SOPRO COMEG 397 User manual

USER MANUAL
MANUEL D’UTILISATION
MANUALE PER UTILIZZATORE
MANUAL DE USUARIO
BETRIEBSANLEITUNG

C1
S10
S11
S12
S1
S14 C2 I
C3 C5
F1 C10
C8 S13
C4 C4
C6 C7
C9 C9
S2
L1 S4
S3 S6 S7 S9
S5 S6 S8
Sopro 397:

USER MANUA P.2
MANUE D’UTI ISATION P.20
MANUA E PER UTI IZZATORE P.38
MANUA DE USUARIO P.56
BETRIEBSAN EITUNG P.74

2011315C - 01/2011
E N G I S H
CONTENTS
INTRO UCTION ............................................3
PRESENTATIONOFTHECAMERA .................................3
PRECAUTIONSFORUSE.......................................4
REGULATORYRECOMMEN ATION ................................5
4.1 CONFORMITY
4.2 ELECTROMAGNETIC INTERFERENCE & ELECTROSTATIC ISCHARGES
4.3 MATERIO-VIGILANCE
4.4 EN OF LIFE
INSTALLATION.............................................6
5.1 CONNEXION OF THE BACK PANEL
5.2 50 / 60HZ
5.3 STARTING
USERA JUSTMENTS.........................................7
6.1 WHITE BALANCE OR AWB [S2]
6.2 FOCUS
6.3 FUNCTIONNING OF THE MENUS
6.4 APPLICATION FIEL MENU [S3]
6.5 VI EO PARAMETERS MENU [S4]
6.6 OPTION MENU [S5]
6.7 TEXT GENERATOR [S9]
ESCRIPTIONOFTHEBACKPANEL ..............................10
7.1 MAINS PLUG
7.2 VI EO OUTPUTS
7.3 PS2-KEYBOAR
7.4 PERIPHERAL OUTPUTS
7.5 I ENTIFICATION AN SYMBOLS ON THE BACK PANEL
RECOMMEN E CLEANING PROCE URE . . . . . . . . . . . . . . . . . . . . . . . . . . . .11
CLEANINGTHEOPTICALSURFACE ...............................12
AFTERSALESSERVICE .......................................13
10.1 THE STAN -BY GREEN LE (L1) OES NOT LIGHT WHEN YOU POWER THE CAMERA
10.2 THE STAN -BY GREEN LE LIGHTS, BUT THERE IS NO IMAGE ON THE MONITOR
10.3 THE IMAGE IS FUZZY, UNIFORMLY WHITE
10.4 THE IMAGE IS TOO CLEAR OR TOO ARK
TECHNICALSPECIFICATIONS...................................15
11.1 CAMERA CONTROL UNIT (CCU)
11.2 CAMERA HEA
ELECTROMAGNETIC COMPATIBILITY . . . . . . . . . . . . . . . . . . . . . . . . . . . . . .17
1
2
3
4
5
6
7
8
9
10
11
12

011315C - 01/2011 3
E N G I S H
1
INTRODUCTION
Thank you for your confidence in us proven by the purchase of this device.
To take full advantage and comply with all necessary precautions, you should carefully read this manual and be
well acquainted with its contents.
Sentences containing the symbol are points requiring special attention.
Sentences containing the symbol are for information.
To facilitate the installation and the use of the camera we wanted to make his handbook more practical. Thus
references in the page of presentation in the back of the cover (in the form of [ 1] for example) are proposed
for you to visualize easily the parts of the product concerned.
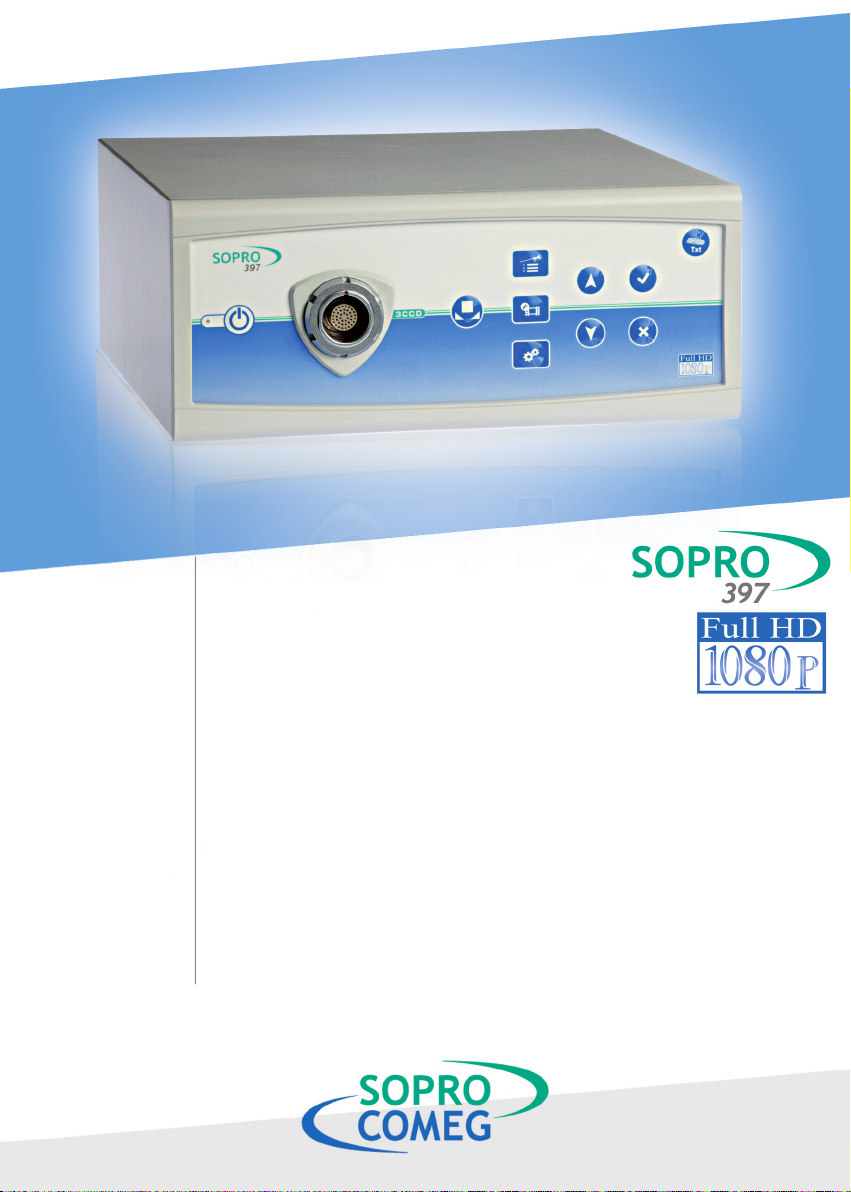
PRESENTATION OF THE CAMERA
This camera is a 3CC Full High definition colour camera, 100% digital, with deported electronic.
Its ergonomics, its automatic shutter, its good sensitivity and excellent resolution as well as its exceptional
fidelity of colours make of it the ideal medical tool, especially for flexible and rigid endoscopies.
It includes:
• Camera Control Unit (CCU)
• Camera Head
• Power cable
• Video cables Peripheral cable
• User manual
For the USA and Canada, you must use the “hospital grade” cable supplied and connect it to an “hospital
grade” mains outlet.
This equipment is delivered in a cardboard box, to be kept for further transport.
Mandatory Accessories:
• 24mm H objective ( S_097_0001)
or
• 16-34 optical Zoom (S_413024)
Recommended Accessories (as an option):
• PS2 keyboard
• A XENON light source 300 W
• A screen with a resolution of 1920 x 1080 pixels and a VI input
2

4011315C - 01/2011
E N G I S H
3
PRECAUTION FOR USE
Respect the use and storage conditions.
Install the CCU in a clean, dry and well ventilated place.
The installation of the equipment must be exclusively done by a competent technician trained by the
manufacturer.
To avoid risk of electrical shocks, fire, short-circuits or dangerous emanations, do not insert any metallic object
in the apparatus.
o not expose the CCU to water and do not store it in damp places (risk of electric shock).
Use only the accessories supplied with the apparatus or proposed as optional by the manufacturer.
o not use this camera near any flammable anesthetics.
This camera must not be used in an ionizing environment.
o not expose this device to LASER rays
This camera is not a sterile device.
Before any use, you should look for any rough surfaces, sharp edges, protrusions that could cause a safety
hazard.

011315C - 01/2011 5
E N G I S H
4
REGU ATORY RECOMMENDATION
4.1 CONFORMITY
This device has been designed and manufactured by a company with a certified quality system.
It complies with the requirements of the European irective 93/42/EEC related to medical devices.
As a result, it complies in particular with the ad hoc electric safety (IEC) and Electromagnetic Compatibility (EMC)
standards.
4.2 E ECTROMAGNETIC INTERFERENCE AND E ECTROSTATIC DISCHARGES
Although this product complies with the EMC standards, it is possible under very special circumstances that it may
disturb other devices or even be disturbed in turn by other devices or by an unfavourable electromagnetic
environment.
To prevent such situations, it is recommended:
• To take care of the quality of the electric network (and particularly the grounding system of all the devices and
carriages) ;
• To keep the device away from ElectroMagnetic sources (e.g., compressor, motor, transformer, HF generator, etc.).
4.3 MATERIO VIGI ANCE
Like for any medical system, this device is subject to the provisions pertaining to a materio vigilance; any serious
dysfunction must therefore be promptly notified to the competent authorities and the manufacturer with the
greatest possible precision.
Address of the manufacturer: see on the last page
Caution: Federal law restricts this device to sale by or on the order of a Physician
This camera is intended to be used by qualified physicians in general and plastic surgery to provide access,
illumination and allow observation or manipulation of body cavities, hollow organs, and canals.
4.4 END OF IFE
This appliance is marked according to the European irective 2002/96/EEC on Waste Electrical and Electronic
Equipment (WEEE).
By ensuring this product is disposed of correctly, you will help prevent potential negative consequences for
environment and human health, which could otherwise be caused by inappropriate waste handling of this
product.
The symbol on the product, or on the documents accompanying the product, indicates that this appliance
may not be treated as household waste. Instead it shall be handed over to the applicable collection point for
recycling of electrical and electronic equipment.
isposal must be carried out in accordance with local environmental regulations for waste disposal.
For more detailed information about treatment, recovery and recycling of this product, please contact your local
city office your household waste disposal service or the dealer to whom you purchased the product from.

6011315C - 01/2011
E N G I S H
5
INSTA ATION
Install the control unit on your video furniture on a table and take the different accessories necessary.
5.1 CONNEXION OF THE BACK PANE
• Connect the power supply cable to the mains plug of the camera [C2] and a video cable to one of the video
outputs: select VI [C3], it gives a better result than the others.
• Plug the other end of this video cable on the video input of your monitor.
5.2 50/60HZ
For S outputs [C6, C7] you need to select according to the country the frequency switch position [S13]. Use
this Switch when the camera is powered off.
5.3 STARTING
To optimize the quality of the images, always connect the sensor prior to power the camera.
• Plug the connector of the sensor on the front panel of the control unit [C1].
• Check that a 24mm objective is correctly screwed on the C-Mount.
• Power the monitor.
• Power the camera thanks to switch located on the rear panel [S14].
The camera is on stand-by, press on the button [S1] to power the camera, the green led [L1] will blink quickly
during few seconds then become stable, the picture appears.
Another press on [S1] will put the camera on Stand-by position.
Before placing your telescope (or fiberscope) in front of the lens of the camera, you must check the
condition of the telescope (clean distal lens, correct focus if necessary).

011315C - 01/2011 7
E N G I S H
6
USER ADJUSTMENTS
6.1 WHITE BA ANCE OR AWB [S2]
It can be performed by two means.
1. From the control unit, select the White Balance icon and validate (S2).
2. From one of buttons on the sensors according to your programming (Long press action).
You must proceed as follows:
• Once the camera is connected to the endoscope and the light source powered, film a white surface;
• Start the white balance, the message WHITE BALANCING appears on the screen.
• Keep filming a white surface until the message WHITE BALANCE OK is displayed.
6.2 FOCUS
Once the endoscope is connected and the light source powered, turn slowly the objective ring to find a position
where objects are clear.
To obtain a satisfying depth of field for the operation, make a distant focus; you will thus avoid making
it too often.
6.3 FUNCTIONNING OF THE MENUS
A MENU is displayed directly on the screen. Press one of these buttons (S3) (S4) (S5) and a first Line appears.
Select the parameter with the two buttons (S6) then validate with (S7) button or cancel with (S8).
Parameters are automatically saved when validated

8011315C - 01/2011
E N G I S H
6.4 APP ICATION FIE D MENU [S3]
Select the specialty amongst the following sub-menu; it will automatically set the video parameters advised for
the application:
LAPAROSCOPY 10mm
LAPAROSCOPY 5mm
ARTHROSCOPY/ENT 4mm
ARTHROSCOPY/ENT 3mm
HYSTERO/CYSTOSCOPY 4mm
HYSTERO/CYSTOSCOPY 3mm
FLEXIBLE
User 1
User2
6.5 VIDEO PARAMETERS MENU [S4]
The user can modify different parameters.
BRIGHTNESS Change the luminosity of the picture
BLUE GAIN Change colorimetry
RE GAIN Changer colorimetry
COLORS Change the saturation of the colors
Noise Reduction Limit the noise in the picture
GAMMA Change the luminosity between dark and bright areas
ETAILS Change the sharpness of the picture to get 3 effect or at the opposite
smooth the picture with the Antimoire filter for flexible scopes.
GAIN Change the level of luminosity in low light condition
WIN OW
Shutter window analysis: surface of the image on which the camera analyses
the quantity of light received, in order to adjust the speed of the shutter to
obtain a right exposure time. To be changed according to the scope size

6.6 OPTION MENU [S5]
6.7 TEXT GENERATOR [S9]
• Connect a keyboard on the rear panel [C8]
• Press on [S9] to make the text appear
• Write the text then it appears on one line
If the text is not displayed on the screen it does not appear on the video signal out-
put.
Languages FR: French; IT: Italian; ES: Spanish; EN: English; E: German
BUTTON TOP
BUTTON LEFT
BUTTON RIGHT
Following functions are available on each button:
Factory Settings Re-setting of the camera with factory parameters
011315C - 01/2011 9
E N G I S H
AWB ZOOM - P1/P2 ET. + GAIN -
MIRROR ZOOM BRI. + ET. - GAIN
FREEZE PER. 1 BRI. - ETAILS INFO
ZOOM + PER. 2 BRIGHT GAIN +

1 0 011315C - 01/2011
E N G I S H
7
DESCRIPTION OF THE BACK PANE
7.1 MAINS P UG
The electric power supply of the camera is done through a plug [C2] which must be linked to the local supply
circuit thanks to the electric cable delivered with the system. This plug includes a fuse-trap [F1] and the general
power switch. The fuses used are of type T2.5A - 250V.
uring a changing of fuse, it is peremptory to disconnect the camera from the mains and to use a fuse of the
same kind. The T of “T2.5A” means “temporised”. Use only fuses marked UR.
7.2 VIDEO OUTPUTS
The following video outputs are available on this camera: VI [C3], H -S I [C4], RGBS [C5], Y/C [C6], and
composite [C7].
DVI output is the connection which ensures the best picture quality with 1080p format on short
distances.
HD-SDI outputs allow carrying the video signal on long distances (deported screen up to 100m....)
7.3 PS2-KEYBOARD
Connect the PS2 certified keyboard (delivered as an option) on the dedicated connector [C8].
7.4 PERIPHERA OUTPUTS
Two peripheral outputs [C9] are available and allow through a jack cable 3,5mm to drive 2 peripherals (ex : a
printer or video recorder) from the buttons located on the sensor [S10,11,12].
These outputs must be configured though the OPTION menu.
The devices which are connected to the “video out” and “peripheral” plugs must comply with the CEI
950 standard.
7.5 IDENTIFICATION AND SYMBO S ON THE BACK PANE
The indications and symbols mentioned on the back panel allow identifying the camera in conformity with the
International standards IEC 60601-1, IEC 60601-2-18, IEC 60417 and ISO 980 (See Annex 1).

011315C - 01/2011 11
E N G I S H
8
RECOMMENDED C EANING PROCEDURE
Whatever the procedure followed for the decontamination is, the use of a sterile sleeve is compulsory
during all the duration of the surgical operation.
The sensor and the objective of the camera are designed for a cold disinfection by immersion of glutaraldehyde
type (Lab. Anios). All other methods of disinfection are prohibited. The damages due to these other methods
could not be taken over by the manufacturer.
The camera connector equipped with its waterproofness cap can be immersed. It is then peremptory to dry
carefully the interior of the cap before re-use. The traces of water that must be dried appear when you remove
the cap from the sensor (trickling and condensation).
We advise you to immerse the sensor with its objective screwed on it, in order to avoid having stains on the glass
before the CC .
It is peremptory to respect the pre disinfection procedure before the disinfection one and, after disinfection, to
rinse carefully with sterile water all the parts which have been in contact with the disinfectant.
Cleaning – pre disinfection
Immersion into a cleaning
solution of enzymatic type
(Aniosyme 1, Hexanios G+R)
or cleaning of the surface
(Anios sweepers).
isinfection
Immersion into a glutaraldehyde
solution (2% or 3.2%)
(Steranios 2%)
Sterilization
by process
STERRA ®100S
Sterilization
You must select one of the two solutions indicated for this type of equipment and use it exclusively during
all the lifetime of the product for the pre-disinfection and disinfection processes.
This camera is not autoclavable
This camera is not compatible with automatic washers-disinfectors.
Existing alkaline solution for the pre-disinfection of some medical devices are FORBIDDEN for the pre-
disinfection of our cameras.
It is peremptory to thoroughly rinse with sterile water the parts which have been in contact with the
disinfectant.
Use unweaved compresses for the drying of the distal lens to avoid scratching it.
The procedures described in this chapter are given to you as advice. They can in no case substitute for
official recommendations or directives.
Decontamination being linked to the products, methods and/or selected tools, it remains under the entire
responsibility of the people in charge.

1 2 011315C - 01/2011
E N G I S H
9
C EANING THE OPTICA SURFACE
Observation can be impeded by a dirty lens surface. There should not be any fingerprints or marks on the surface
of the lens. To avoid scratching the lens surface, never use an abrasive cloth or sponge to clean it.
To remove dust, dirt and other impurities which do not come from the patient, wipe using a soft, lint-free cloth
soaked in ethanol or isopropyl alcohol at 70%. Wear gloves which protect against chemical products during
cleaning.
Always ensure that the equipment is completely dry before using it.
Use unweaved compresses for the drying of the distal lens to avoid scratching it.

011315C - 01/2011 13
E N G I S H
AFTER SA E SERVICE
No special maintenance is necessary on the camera. However, here is a list of common problems which are easy to
troubleshoot. For all other cases, contact your Maintenance Service.
We remind you that the mishandling is not guaranteed.
10.1 THE STAND-BY GREEN ED ( 1) DOES NOT IGHT WHEN YOU POWER THE CAMERA
• Check if the mains plug on the rear panel of the camera is well connected to the mains and the general switch is ON
(“I”).
• Check the good state of the fuses (use only fuse of the kind of those specified on the rear panel).
10.2 THE STAND-BY GREEN ED IGHTS, BUT THERE IS NO IMAGE ON THE MONITOR
• Check if the sensor is well connected to the front panel (in the opposite case, a colour bar will be displayed on the
monitor) and that it films a workable image.
• Check if the camera is well connected to the monitor (good cable, correctly plugged).
• If your video chain holds several elements, try to connect directly the camera to the monitor in order to validate
that the problem is not located at the level of one of your peripherals.
• Check if the monitor is well powered, switched on the good video input and if the images adjustments are in a middle
position (colour, light and contrast).
• Check your light source, your light cable and your telescope.
10.3 THE IMAGE IS FUZZY, UNIFORM Y WHITE
• Check if there is no blur on the lens.
• Check if the sensor does not aim at a too lighted object.
• Check the focus of the lens.
10

1 4 011315C - 01/2011
E N G I S H
10.4 THE IMAGE IS TOO C EAR OR TOO DARK.
• Check if the “BRIGHTNESS” parameter is not at its maximum or minimum.
• Check if the “WIN OW” parameter used is not too small or too big.
• Check if the camera head is correctly connected to the control unit.
• Turn off and power again the camera (no Hot plug of the camera head).
If the problem remains and if you are led to send back the camera, once disinfected, be careful to do it in its original
wrapping.
Likewise, you must send us the whole system (control unit, sensor, lenses, and cables). Be kind enough to join an
explanatory note relative to the observed default to the expedition bill.
The device must be disinfected before being sent back to the manufacturer.
At the reception of your equipment, check its state and enter a reservation on the delivery bill if necessary, then
confirm them by recommended letter addressed to the carrier within 48 hours. In the case where equipment shipped
by us suffers damages during the travel, the amount of the repairing will be charged whether to the carrier if the
reservation were entered in the delays, or to the consignee in the contrary.

011315C - 01/2011 15
E N G I S H
11
TECHNICA SPECIFICATIONS
11.1 CAMERA CONTRO UNIT (CCU)
Main Functions
• Class I product
• 3 Programmable buttons
• IGITAL ZOOM Up to 2.5x
• FREEZE & MIROR
• MENU by Application
• igital processing 3 x 19 bits
• Automatic white balance, Range: 2800K to 6500K
• Two peripherals triggering
• 5 languages (English, French, German, Spanish, Italian)
• Color bar generator
• Automatic and manual adjustment of color
• Color Matrix 12 axes
• Automatic saving of the adjustments parameters
• Electronic shutter : OFF / Manual / ELC (AREA setting, PEAK/AVERAGE setting)
• Automatic (1/50 to 1/100 000)
• Adjustable shutter area
• Adjustments displayed on the monitor
• Text generator with Keyboard connexion
• Gamma adjustment
• Automatic and manual adjustment of light intensity
• Automatic adjustment of sensitivity to low light (auto exposure control)
• Automatic black level adjustment
• etails adjustment
• igital Noise Reduction: OFF / LOW / HIGH
• Automatic compensation function for the blemish pixels
Video outputs
• 1 VBS: 1.0 V [P-P] / 75 ohms Sync Negative,
• 1 Y/C: Y: 1.0 V [P-P] / 75 ohms, C: 0.286 V [P-P] (NTSC), C:300 Vp-p V [P-P] (PAL) / 75 ohms Sync Negative,
• 1 RGB: 3x0.7 V [P-P] & 0.3V [P-P] / 75 ohms
• 2 H -S I: 0.8 V [P-P] / 75 ohms SMPTE292M
• 1 VI- 3x0,7Vcc/& 0,3Vcc/75Ω)

1 6 011315C - 01/2011
E N G I S H
Environment
• Operating Temperature range: +10°C / +40°C
• Operating Relative Humidity range: 30 to 75 %
• Transport and storage Temperature range: -10°C / +45°C
• Transport and storage Relative Humidity range: 20 to 85 %
• Operating, Transport and Storage Atmospheric pressure range: 700hPa to 1060hPa
• Not protected against waterfalls (IPX0)
• Not adapted to a use close to a mixture of inflammable anaesthetic with air or oxygen or nitrous oxide.
• Comply with the European standard 93/42/CEE.
• Comply with the international standards IEC 60601-1; IEC 60601-2-18 ; IEC 60417 and EN 980
• Size of the control unit : W : 300mm; : 311mm; H : 125 mm
• Weight of the control unit : 2500 g
Typical Operating Requirements:
• Input Voltage: 100 - 230 VAC @50/60 Hz
• Power Consumption: 45 VA
• 2 T 2.5A - 250 V fuses (Only fuses marked UR)
• Continuous Service
11.2 CAMERA HEAD
• BF Type applied part
• Sensor : 3 CC 1/3”
• Capturing aspect ratio on the CC : 16 / 9 ( "wide - screen format acquisition")
• Progressive Scan Technology
• 1080p resolution H TV format: Resolution : 1920*1080 pixels
• 14 bits processing
• efinition : 1080 lines
• Sensitivity : 1,5 lux
• Signal / Noise ratio : 70dB
• Cable length : 3 meters
• C-Mount
• imensions of the sensor: 37*50*95 mm
• Weight of the sensor: 250 g

011315C - 01/2011 17
E N G I S H
12
ELECTROMAGNETIC COMPATIBILITY
12.1 GUIDE AND DECLARATION BY MANUFACTURER – ELECTROMAGNETIC EMISSIONS
The reference system, "3 ccd camera" is designed to be used within the electromagnetic environment specified
below. The user should ensure that it is indeed used within this environment
Emissions test Compliance Electromagnetic environment - Guide
RF emissions
CISPR 11 Group 1
The reference system, " 3 ccd camera " only uses radioelectrical
energy for its internal subsystems. Therefore, it emits very low
RF energy and is not likely to interfere with nearby electronic
devices.
RF emissions
CISPR 11 Class A
The reference system, " 3 ccd camera ", must be used in all
premises other than residential premises and premises connected
directly to the public low-voltage power distribution network
used for powering residential buildings.
Harmonic emissions
EN 61000-3-2 Class A
Voltage fluctuations / flicker
EN 61000-3-3 Conform

1 8 011315C - 01/2011
E N G I S H
12.2 GUIDE AND DECLARATION BY THE MANUFACTURER – ELECTROMAGNETIC IMMUNITY
The reference system, " 3 ccd camera " is designed to be used within the electromagnetic environment specified
below. The user should ensure that it is indeed used within this environment
Immunity test CEI 60601
severity level
Compliance
level Electromagnetic environment - Guide
Electrostatic discharges
EN 61000-4-2
±6 kV via contact
± 8 kV via air
±6 kV
± 8 kV
The floor should be in timber, concrete or tiling. If the floor is covered
with a synthetic material, the relative humidity should be at least 30%.
Quick transients in bursts
EN 61000-4-4
± 2 kV for power lines
± 1 kV for
input/output lines
± 2 kV
± 1 kV
Voltage shocks
EN 61000-4-5
ifferential mode ± 1 kV
Common mode ± 2 kV
± 1 kV
± 2 kV
Brown-outs, brief power
failures and voltage
variations
EN 61000-4-11
<5% UT– for 10 ms
40% UT– for 100 ms
70% UT– for 500 ms
<5% UT– for 5 s
<5% UT10 ms
<40% UT100 ms
<70% UT500 ms
<5% UT5 s
Magnetic field at
network frequency
(50/60 Hz)
3 A/m 3 A/m
Conducted RF
EN 61000-4-6
Radiated RF
EN 61000-4-3
3 Vrms
150 kHz to 80 MHz
3 V/m
80 MHz to 2.5 GHz
3V
3V/m
The quality of the main power supply should be that of a typical
commercial or hospital environment.
The quality of the main power supply should be that of a typical
commercial or hospital environment.
The magnetic field at the network frequency should be at a level
characteristic of a location within a typical commercial or hospital
environment.
Portable and mobile RF communication devices must not be used
at a distance from the reference system, " 3 ccd camera " –
including cables – that is less than the recommended separation
distance calculated using applicable formulae according to the
transmitter’s frequency.
Recommended separation distance
d= 1,16 P
d= 1,16 P80 MHz à 800 MHz
d= 2,33 P800 MHz à 2,5 GHz
In which Pis the maximum output power of the transmitter, in
Watts (W), assigned by the manufacturer of the transmitter and
the recommended separation distance (d) in meters (m).
The field levels emitted by immobile RF transmitters – which are
to be established by an electromagnetic measurement at the site –
must be lower than the compliance level in each frequency band.
Interference can occur nearby devices bearing the following
symbol:
NOTE : UT is the nominal value o the power voltage applied during the test.
NOTE 1 : At 80 MHz and 800 MHz, the higher requency band applies.
NOTE 2 : These recommendations may not apply in all situations. The propagation o electromagnetic waves is modi ied by absorption and
re lection due to structures, objects and people.
aThe field level of immobile transmitters, such as radio telephone base stations (cellular and cordless) and mobile terrestrial radio systems, amateur radio systems,
AM/FM radio communication systems, and TV systems cannot be evaluated theoretically with precision. To ascertain the electromagnetic environment due to
immobile RF transmitters, a site measurement must be performed. If a field level measured within the environment in which the reference system, " 3 ccd
camera", is used exceeds the above applicable compliance levels, check that the reference system, " 3 ccd camera ", operates in a satisfactory manner. If abnormal
operation is observed, additional measurements should be taken, such as reorientation or relocation of the reference system.
bOutside the frequency band of 150 kHz to 80 MHz, the field level should be less than 3 V/m
The quality of the main power supply should be that of a typical
commercial or hospital environment.
If the user of the reference system, " 3 ccd camera ", requires to be
able to continue to work during interruptions in the main power
supply, it is recommended that the reference system, " 3 ccd camera
" be powered via a UPS or battery.
Table of contents
Languages:
Other SOPRO COMEG Medical Equipment manuals