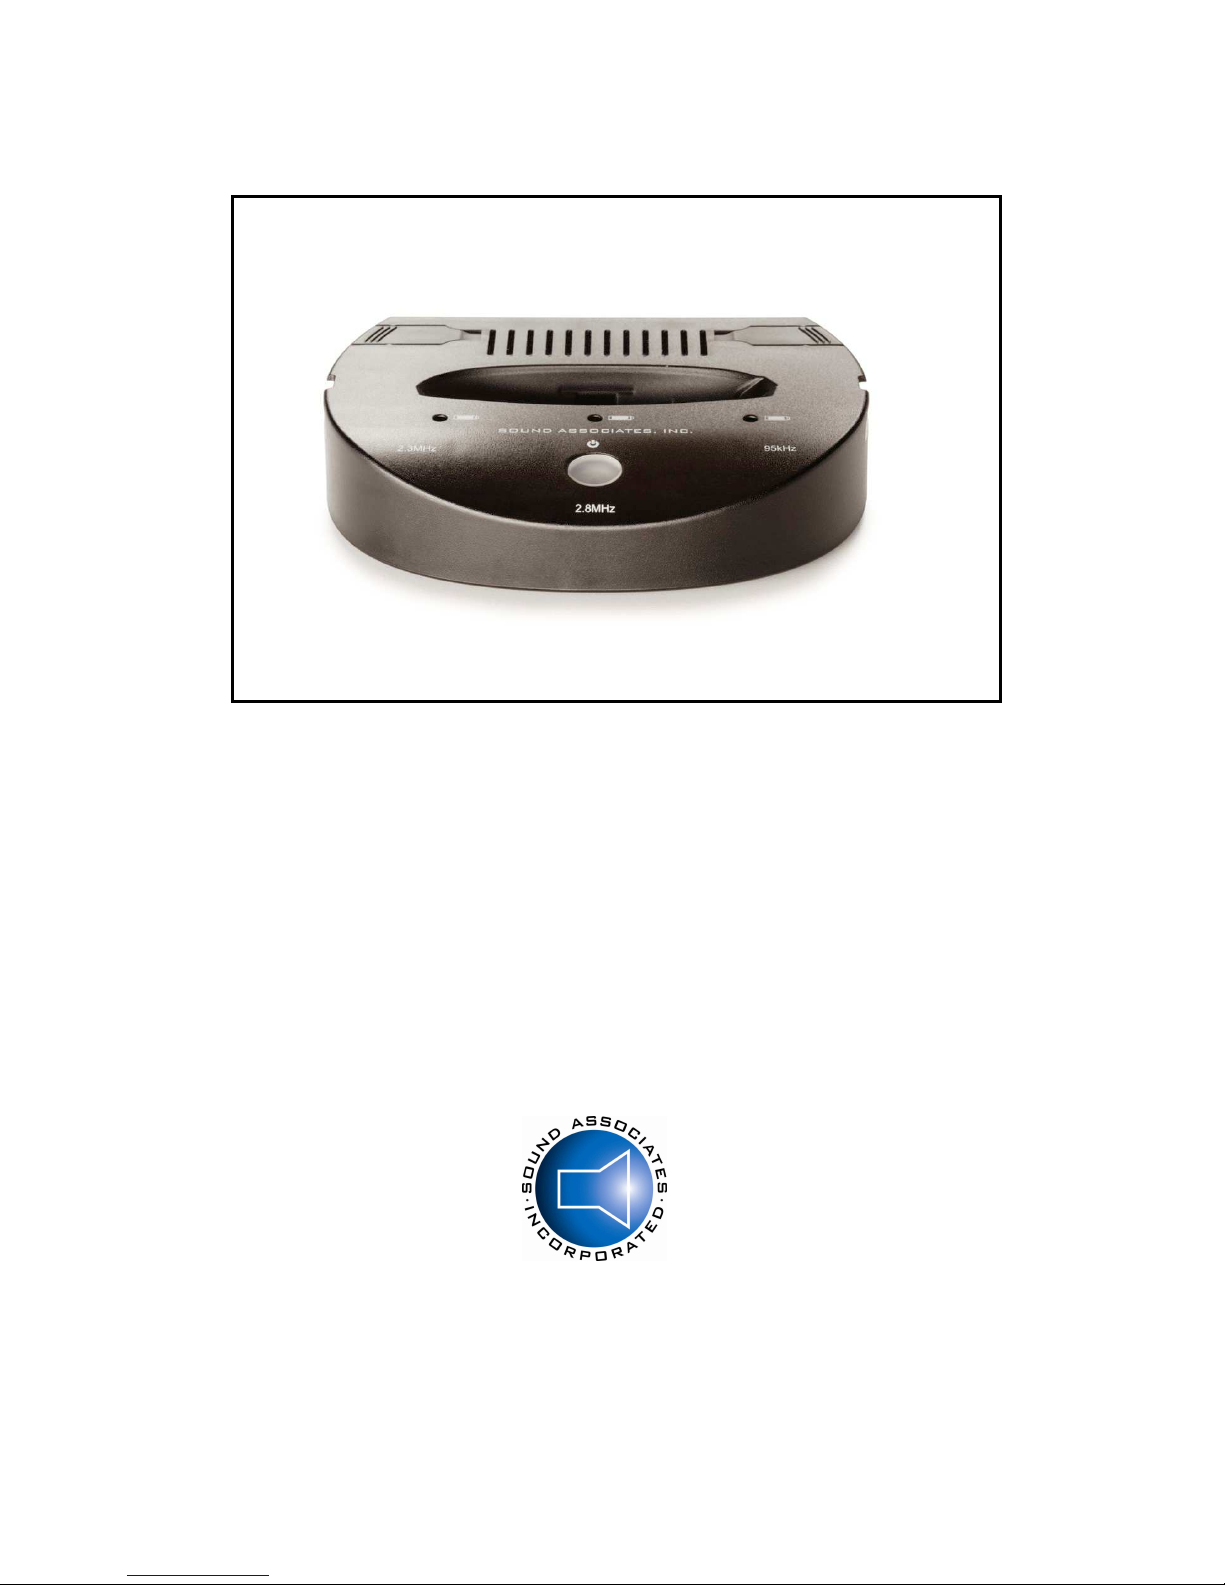
Sound Associates SA1401 User manual

OPERATION MANUAL
SA1401
SMALL AREA INFRARED TRANSMITTER
SOUND ASSOCIATES, INC.
424 West 45th Street, New York, NY 10036
Tel: (212)757-5679 Fa : (212)265-1250
Toll free: 888-772-7686
Homepage: www.soundassociates.com

TABLE OF CONTENTS
IMPORTANT SAFETY INFORMATION..........................................................................................2
INTRODUCTION.............................................................................................................................3
UNPACKING THE UNIT .................................................................................................................3
FEATURES…. ................................................................................................................................3
INSTALLATION
To Connect to Telev s on or Home Enterta nment System ......................................................4
To Use as Recharger Only .......................................................................................................5
OPERATION
Us ng the Transm tter ...............................................................................................................5
Locat on and Use of Controls ...................................................................................................5
TONE ALERTS AND LED INDICATORS FOR RECEIVERS.........................................................7
TROUBLESHOOTING ....................................................................................................................7
SERVICE OR REPAIRS .................................................................................................................8
TECHNICAL SPECIFICATIONS.....................................................................................................8
RELATED ITEMS............................................................................................................................8
WARRANTY....................................................................................................................................8

- 2 -
IMPORTANT SAFETY INFORMATION
CAUTION: TO REDUCE THE RISK OF ELECTRIC SHOCK,
DO NOT REMOVE COVER (OR BACK).
NO USER-SERVICEABLE PARTS INSIDE.
REFER SERVICING TO QUALIFIED SERVICE PERSONNEL.
DO NOT EXPOSE TO RAIN OR MOISTURE.
The lightning flash with arrowhead symbol within an equilateral triangle is intended to alert the user to the presence
of uninsulated "dangerous voltage" within the product's enclosure. It may be of sufficient magnitude to constitute a
risk of electric shock to persons.
The exclamation point within an equilateral triangle is intended to alert the user to the presence of important
operating and maintenance (servicing instructions in the literature accompanying the product
.
Warnings
•
Connect th s un t’s power cord only to an AC outlet of the type stated n th s Owner’s Manual or as
marked on the un t. Fa lure to do so s a f re and electr cal shock hazard.
• Do not allow water to enter th s un t or allow the un t to become wet. F re or electr cal shock may
result.
• Do not place a conta ner w th l qu d or small metal objects on top of th s un t. L qu d or metal objects
ns de th s un t are a f re and electr cal shock hazard.
• Do not remove the un t’s cover. You could rece ve an electr cal shock. If you th nk nternal nspect on,
ma ntenance, or repa r s necessary, contact your dealer.
• Do not mod fy the un t. Do ng so s a f re and electr cal shock hazard.
• If the power cord s damaged ( .e., cut or a bare w re s exposed), ask your dealer for a replacement.
Us ng the un t w th a damaged power cord s a f re and electr cal shock hazard.
• If you not ce any abnormal ty, such as smoke, odor, or no se, or f a fore gn object or l qu d gets ns de
the un t, turn t off mmed ately. Remove the power cord from the AC outlet. Consult your dealer for
repa r. Us ng the un t n th s cond t on s a f re and electr cal shock hazard.
Cautions
• Keep th s un t away from the follow ng locat ons:
Locat ons exposed to o l splashes or steam.
Unstable surfaces, such as a wobbly table or slope.
Do not nstall near any heat sources such as rad ators, heat reg sters, stoves, or other apparatus
( nclud ng ampl f ers) that produce large quant t es of heat.
Locat ons subject to excess ve hum d ty or dust accumulat on.
• Hold the power cord plug when d sconnect ng t from an AC outlet. Never pull the cord. A damaged
power cord s a potent al f re and electr cal shock hazard.
• Do not touch the power plug w th wet hands. Do ng so s a potent al electr cal shock hazard.
• To relocate the un t, turn the power sw tch off, remove the power plug from the AC outlet, and remove
all connect ng cables. Damaged cables may cause f re or electr cal shock.

- 3 -
INTRODUCTION
The SA1401 is designed for professional applications (classrooms, board rooms, small meeting and
conference rooms) as well as for home personal use and is compatible with most infrared receivers
currently in use The drop-in charger is designed only to recharge Sound Associates SA1520 series
receivers
It is designed with a new industrial-strength chassis for added durability in commercial applications
Its advanced mechanical design ensures years of trouble-free use, while making the headset
comfortable to wear
The SA1401 single channel, selectable transmitter is designed to emit a frequency modulation of 2 3
MHz, 2 8 MHz or 95 kHz (via selector switch located on the back of the unit )
The SA1401 uses infrared light to transmit audio to the receiver As it is a “line of sight” technology,
the receiver (headset) must be used in direct line of sight with the transmitter The receiver must be
free of any obstructions that would block the infrared light from the receiver
To ensure proper set up and use of the equipment, the following instructions should be read
completely before attempting to use your receiver If you require further assistance, please call our
Customer Service Department Monday-Friday 10:00 am - 5:30 pm at (888) 772-SOUND (7686)
UNPACKING UNIT
Upon receipt, inspect the unit and all components for possible damage incurred by shipping If the
unit is damaged due to shipping, please keep all packing material and contact the shipping company
as soon as possible Only the consignee may institute a claim against a carrier for damage incurred
in shipping; however, Sound Associates will assist you in such an event
Equipment enclosed:
1 Infrared Transmitter (SA1401)
1 12V DC power supply
1 3 5 mm to RCA phono stereo audio cable
1 3 5 mm to 3 5 mm audio cable
1 3 5 mm to ¼” phono adapter
1 Instruction Manual
FEATURES
• Modulates on one of 3 frequencies (2 3 MHz, 2 8 MHz and 95 kHz, selectable)
• Drop-in charger, plus 2 additional battery charging slots
• Automatic shut off when no audio is present (approximately 5 minutes)
• Weighted base for greater stability
• Full one-year warranty
INSTALLATION
To connect to Television or Home Entertainment System
1 Connect 12 VDC power supply (included) to back of transmitter (where indicated)
2 Plug wall transformer in any working AC outlet (100-240 VAC)

- 4 -
3 Connect audio from desired source
Note: for home use, it is recommended to connect to television to ensure all video
devices including cable, DVD, etc. are available in the headset/receiver.
Option A (recommended)
Note: Audio output can be “variable” (audio level on output jack increases and decreases with
television volume) or “non-variable” (audio level remains constant regardless of television volume) Check
the operation manual of your television for instructions on changing non-variable volume settings
Option B
Note: Choosing Option B may mute external speakers of your audio/video device Earphone jack
volume is typically “variable” (audio level increase and decreases with television volume)

- 5 -
4 Gently depress power switch on Power switch will glow red to show it is on
5 Place receiver (SA1520 series only) in cradle to charge battery in the headset or;
6 Remove battery from receiver and slide into one of two battery charging slots until the tab on
the battery fits into the cut out on the top of the transmitter
7 Corresponding LED light while display red to indicate battery is charging Once LED turns
green, battery is fully charged
There is an approximate 2-second delay to light battery indicator, once connection has been made
To use as Recharger ONLY
1 Connect 12 VDC power supply (included) to back of transmitter (where indicated)
2 Plug wall transformer in any working AC outlet (100-240 VAC)
3 Place receiver (SA1520 series only) in cradle to charge battery in the headset or;
4 Remove battery from receiver and slide into one of two battery charging slots until the tab on
the battery fits into the cut out on the top of the transmitter
5 Corresponding LED light while display red to indicate battery is charging Once LED turns
green, battery can be removed and is ready for use
There is an approximate 2-second delay to light battery indicator, once connection has been made
OPERATION
Using the Transmitter
The infrared transmitter uses line-of-sight transmission to send audio to the infrared receiver It
should be positioned with the sloped side of the device facing in the room at an angle that will give
the maximum coverage It is recommended to place it high enough so that line of sight is clear
between the transmitter and receiver Additionally distance between the two devices should not
exceed 15 ft for maximum reception
Location and Use of ontrols
1 – Drop-In Charger: Charges
SA1505 battery in the headset
Charge indicator light is center, just
below cradle Indicator light will
illuminate red when battery is fully
engaged for charging Light will
change to green when battery is fully
charged Battery (ies) may be charged
outside of headset using additional
battery slots
(
See 3 and 8
)

- 6 -
2 – Battery Extractor: Each transmitter includes a pair of plastic extractors to assist in removing the
battery from SA1520 series receivers To remove the extractor, apply pressure at the ridged area
and slide away from transmitter (To uninstall battery from receiver, insert extractor tip in to slot on
back of receiver and gently twist until battery slides free of receiver )
3 – Additional Battery Charging Slot: Charges SA1505 outside of headset Charge indicator light
indicated by white arrow Indicator light will illuminate red when battery is fully engaged for charging
Light will change to green when battery is fully charged
4 - Channel Indicator ( 5 kHz): When this channel is selected, a red light will appear on the face of
the transmitter (indicated by white arrow) Channel selector is located on the back of the unit
. (See
Note 10).
Caution: When using multi-channel receivers, channel must match the channel of the receiver
.
5 – Power Indicator, On/Off: To turn power on or off, gently depress button Button will glow red
when transmitter is on
6 - Channel Indicator (2.8 kHz): When this channel is selected, a red light will appear on the face
of the transmitter (indicated by white arrow on illustration) Channel selector is located on the back of
the unit
(See Note 10).
Caution: When using multi-channel receivers, channel must match the channel of the receiver
.
7 - Channel Indicator (2.3 MHz): When this channel is selected, a red light will appear on the face
of the transmitter (indicated by white arrow) Channel selector is located on the back of the unit (See
Note 10) Select this channel when using SA1521H receiver
Caution: When using multi-channel receivers, channel must match the channel of the receiver
8 – Additional Battery Charging Slot: Charges SA1505 outside of headset Charge indicator light
indicated by white arrow Indicator light will illuminate red when battery is fully engaged for charging
Light will change to green when battery is fully charged
–Power Connection: Jack to
connect 12V DC power supply to
AC power source
10 – Channel Selector Switch:
Changes infrared modulation
frequency between 95 kHz (left),
2 8 MHz (center) or 2 3 MHz
(right) to match receiver
frequency It is recommended to
use 2 3 MHz for home use
Caution: When using multi-channel receivers, channel must match the channel of the receiver
.
11 – Input Volume Control: Adjusts the volume of audio coming into the transmitter Set to mid-
range level and adjust headset volume according Setting volume too high can cause distortion of
the audio in the headset

- 7 -
12 – Audio Input: Receives audio from selected source (i e television, home entertainment system,
etc ) via one of two audio cables included In most cases, use 3 5mm (black) from audio input to
RCA (red, white) Audio output on audio source The second cable, 3 5mm (black) to 3 5mm (black),
will connect to earphone jack but may cause external speakers to mute Phono adapter can be used
with this cable to connect to audio amplifiers, etc using 1/4” jack
TONE ALERTS AND LED INDICATORS FOR RECEIVERS
The Sound Associate 1520 Series Receivers use a tone alert system and LED indicators to assist in
trouble shooting. LED indicators are ound on the back o the receiver and are recessed. The ollowing is
a list o tones heard on and LED lights displayed on these receivers:
Tone Heard LED Indicator
(located on back of receiver
Indicates
Long Beep
followed by:
1 short beep
2 short beeps (*)
3 short beeps (*)
Susta ned Green LED
followed by:
1 green LED flash
2 green LED flashes
3 green LED flashes
Un t s set to Ch 1 (2.3 MHz)
Un t s set to Ch 2 (2.8 MHz)
Un t s set to Ch 3 (95 kHz)
6 short beeps
6 green LED flashes
Un t s not rece v ng nfrared s gnal
No nfrared s gnal s present
Long Repeat ng Beep
Susta ned Red LED
Low battery
TROUBLESHOOTING
Symptom Cause Remedy
No stat c and no aud o n the rece ver The rece ver s not powered or the nfrared l ght s be ng
rece ved w th no aud o s gnal “on ts back”
Make sure...
...the volume on the rece ver s turned up
...the rece ver battery s charged and secured f rmly n
place
…the aud o nput s plugged nto the transm tter and
funct on ng properly
…the volume on the transm tter s turned up
S gnal s rece ved but w th some stat c n the
rece ver
The nfrared s gnal s too weak or h gh levels of nfrared
l ght are nterfer ng w th the transm ss on
Make sure...
...transm tter s n d rect v ew of the rece ver
…sunl ght or ntense l ght s not sh n ng
nto the rece v ng
d odes

- 8 -
Symptom Cause Remedy
S gnal s nterm ttent or the sound beg ns to
fade
The battery s no longer hold ng an adequate charge
Make sure…
…the battery s charged or use a new battery
SERVICE OR REPAIRS
Contact Sound Associates’ Customer Service Department at 888-772-SOUND (7686) 10:00-5:30
Monday through Friday for any service or repairs
TECHNICAL SPECIFICATIONS
Infrared wave length 880 nm
Modulation FM
Carrier Frequency Ch 1 – 2 3 MHz; Ch 2 – 2 8 MHz; Ch 3 – 95 kHz
Broadcast Distance Approximately 350 sq ft
Frequency Response 30 – 18k Hz
Distortion Typ 1%
S/N Ration Typ > 60 dB(C)
Power Supply 12 VDC
Power Consumption 0 3 A
Battery recharging time Drop-In Charger: Approximately 2 5 hours
Battery Charger Slot: Approximately 2 5 hours
Dimensions 5 4” W x 1 2” H x 3 9” D
137mm W x 31mm H x 99mm D
Weight 12 8 oz (without batteries or headset in chargers)
RELATED ITEMS
SA1521H Headset Receiver (2 3 MHZ)
SA1523H 3-Channel Headset Receiver (2 3 MHz, 2 8 MHz and 95 kHz)
SA1905 Rechargeable battery (for SA1520 series receivers)
WARRANTY
The SA1401 Small Area Transmitter is covered by a full one year warranty from date of original
purchase against defects in workmanship or materials If any component fails due to defects in
craftsmanship or materials within that time, we will repair or replace that component(s) without
charge The factory warranty does not cover malfunction due to abuse or operation other than
specified
Table of contents
Other Sound Associates Transmitter manuals
Popular Transmitter manuals by other brands

Emerson
Emerson Micro Motion 5700 installation manual

Hubbell
Hubbell Full-Size Transmitter 31.310 Spec sheet

SeeEyes
SeeEyes SC-IPT1204P user guide

Williams Sound
Williams Sound Transmitter T1-173 Instructions for use and care

Williams Sound
Williams Sound Transmitter T36 Instructions for use and care

Rose electronics
Rose electronics UltraVista VWL-S122DV Installation and operation manual