Soundcast AudioCast Transmitter User manual

AudioCast Transmitter Owners Manual
○○○○○○○○○○○○○○○○○○○○○○○○○○○○○○○○○○○○○○○○○○○○○○○○○

Thank you for purchasing a Soundcast Systems
wireless product. Soundcast products offer the
highest quality, interference free wireless audio
transmission system available today.
You must have both an AudioCast Transmitter and an
AudioCast Receiver to complete your Soundcast
AudioCast system!
Read these instructions before operating.
Follow all instructions.
Heed all warnings.
Keep these instructions for future reference.
AC/DC Adapter Power Supply
Use only the AC/DC adapter that was supplied by
Soundcast Systems. Do not use a substitute AC/DC
adapter. Using an incorrect AC/DC adapter may cause
damage to the product and will void its warranty.
Caution: Risk of electric shock. Do not tamper with,
modify, open or disassemble.
Do not use near water or in wet environment.
Do not immerse in water or any liquid.
Clean only with dry cloth.
Use only as directed in this user manual.
Do not install or use near any heat sources such as
radiators, heat registers, stoves, or other apparatus
(including amplifiers) that produce heat.
Do not defeat the safety purpose of the polarized plug. A
polarized plug has two blades with one wider than the
other. The wide blade is provided for your safety. If the
provided plug does not fit into your outlet, consult an
electrician for replacement of the obsolete outlet.
Protect the power cord from being walked on or pinched,
particularly at plugs, convenience
receptacles, and the point where they exit from the
power supply.
Use only cables and accessories specified for use with
the power supply.
Unplug the power supply when unused for long periods
of time or during lightning storms.
Servicing is required when the power supply has been
damaged in any way, such as if the power supply cord or
plug is damaged, if liquid has been spilled, if objects
have fallen onto the power supply, if the power supply
has been exposed to rain or moisture, if the power
supply does not operate normally, or if the power supply
has been dropped.
Refer all servicing to qualified service personnel.
AC/ DC Adapter
○○○○○○○○○○○○○○○○○○○○○○○○○○○
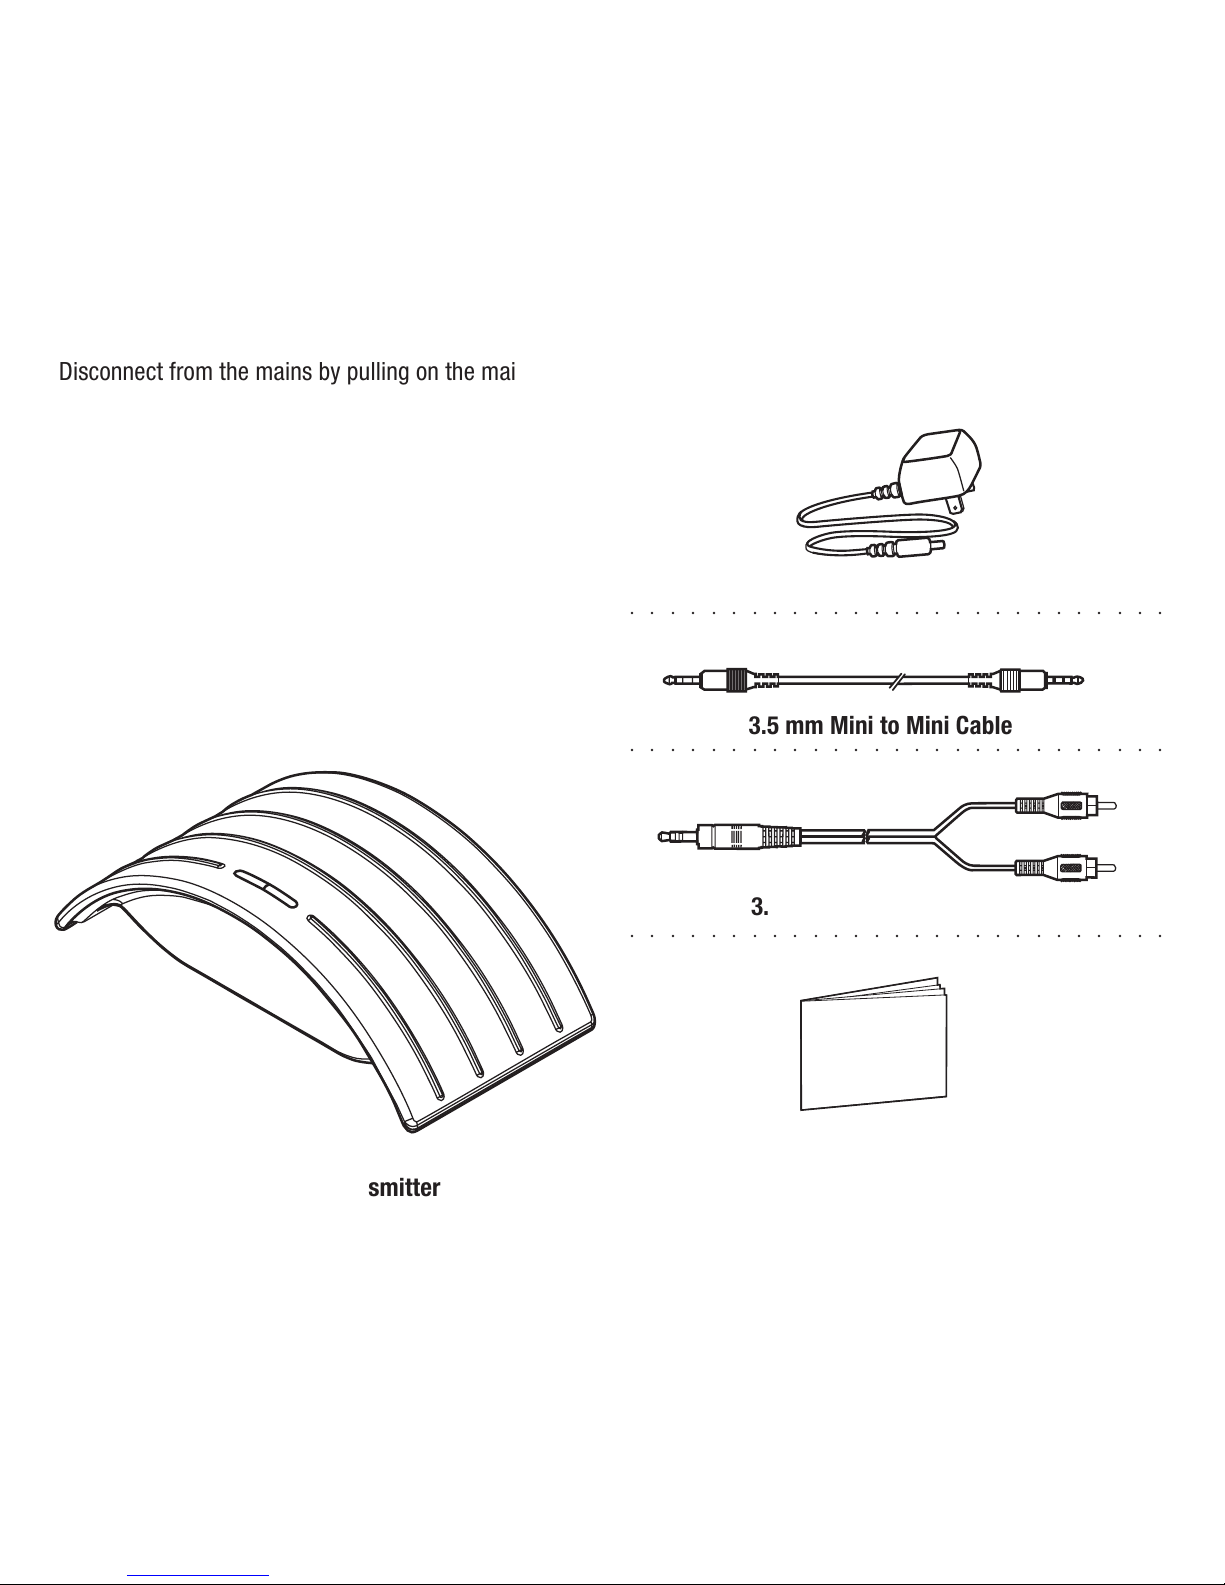
3.5 mm Mini to Mini Cable
3.5 mm Mini to RCA cable
○○○○○○○○○○○○○○○○○○○○○○○○○○○
○○○○○○○○○○○○○○○○○○○○○○○○○○○
Owners Manual
AudioCast Transmitter
Disconnect from the mains by pulling on the mains
power plug, not the cord.
WARNING:
TO REDUCE THE RISK OF ELECTRIC SHOCK, DO NOT
EXPOSE THE POWER SUPPLY TO RAIN OR MOISTURE.
OPERATING INSTRUCTIONS
AudioCast ACT-211/221 Transmitter
The following items are included in this package:
➤
AC/DC socket
➤
Blue light indicator
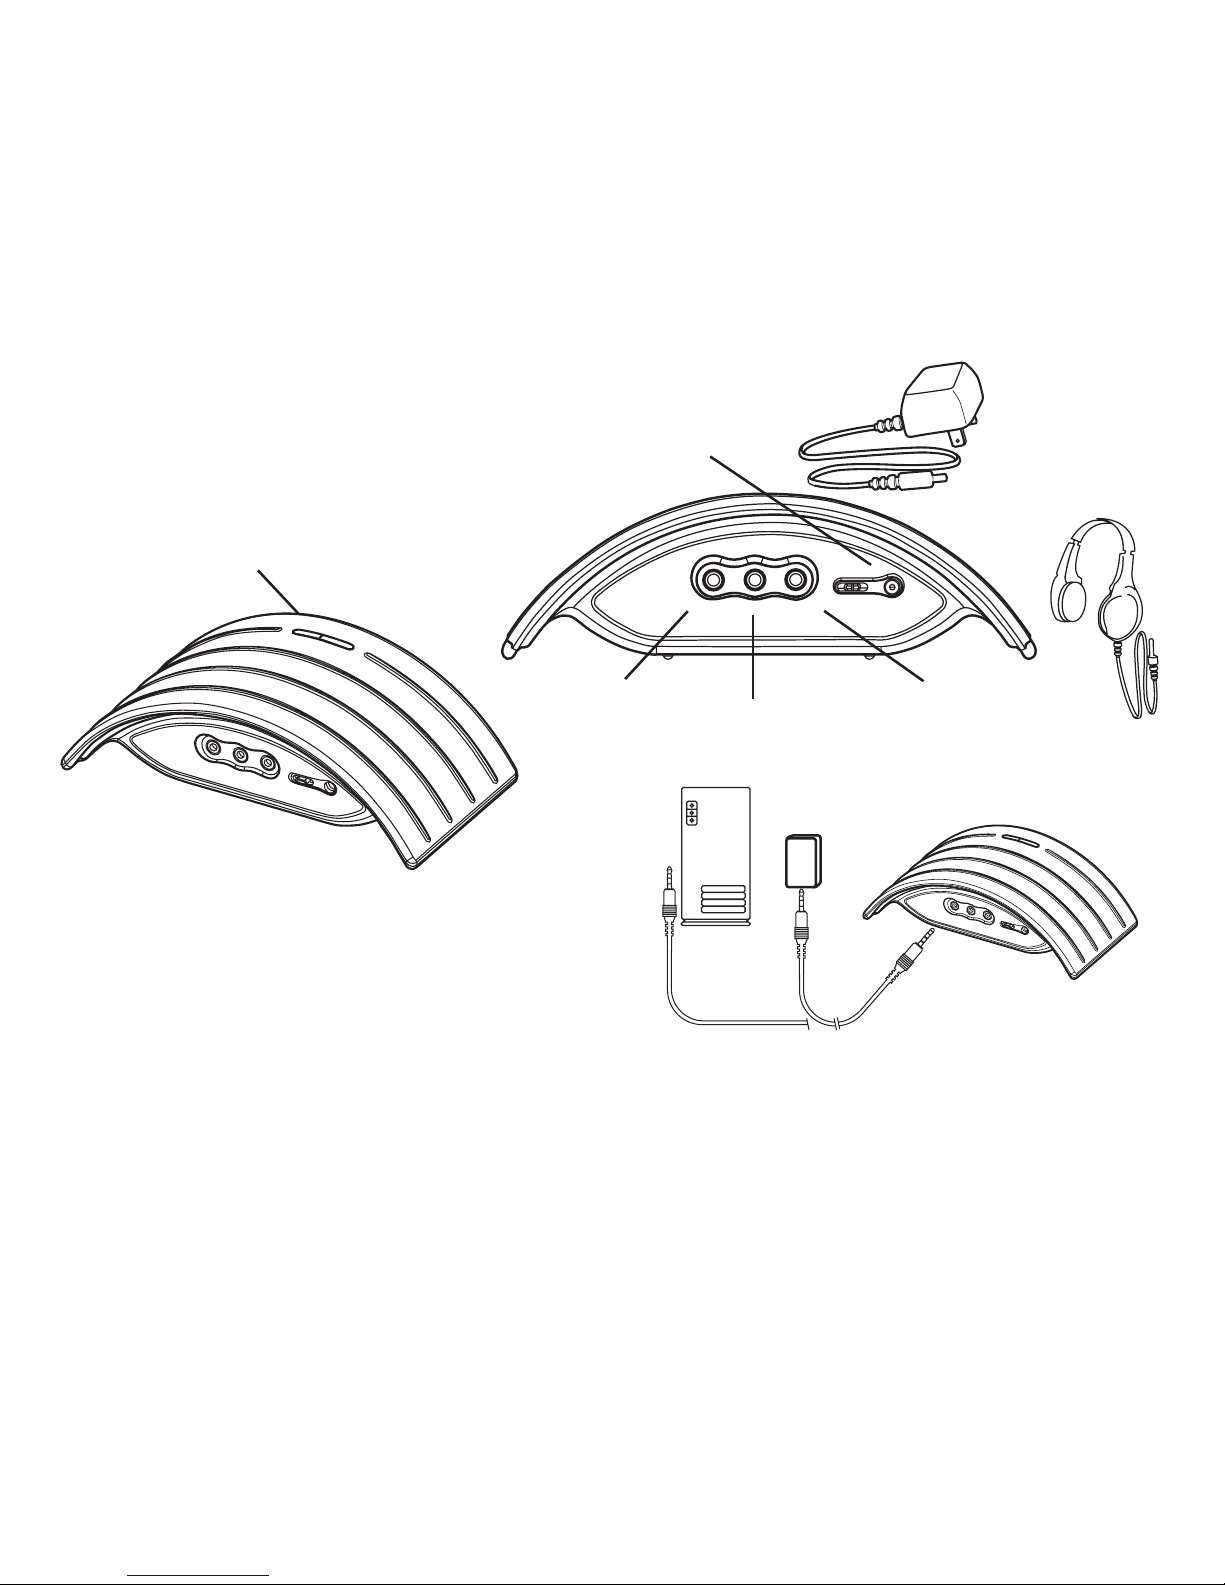
Installation:
Plug the AC adapter into an AC mains wall socket and
attach the power cord to your AudioCast Transmitter by
inserting the plug into the correct socket on the back of
the AudioCast Transmitter.
On the back of your AudioCast Transmitter you will find
four jacks. One is for the AC/DC Adaptor as illustrated
above. You will also see three 3.5 mm mini jacks in a
row on the left side of the back of the transmitter.
The first jack on the left of this row is an input jack
which will be connected to the output of the device you
wish to use as a music source. You can use one of the
cables supplied in the package to make this connection.
➤
CD/MP3 player input
➤
Headphone jack/speakers
➤
Output
A blue light will glow on the top of the transmitter
indicating you have power.
Use the 3.5 mm mini / 3.5 mm mini to connect the
headphone output of an MP3 player or other portable
audio device to the AudioCast Transmitter input jack. This
cable can also be used to connect the transmitter to the
headphone output of a personal computer. Find the audio
output of your computer (usually a 3.5 mm headphone
(PC) MP3
Transmitter
Transmitter

jack) and connect the included 3.5 mm mini-to-mini
cable between the two devices. If your computer has
stereo RCA jacks, then use the other cable. If you are
hooking your AudioCast Transmitter to a component such
as a home audio CD player, you will need to use the
connecting cable with RCA style plugs on one end and
the 3.5 mm mini plug on the other.
Operating Your AudioCast System
To complete your AudioCast system you will need an
AudioCast Receiver. Once you have correctly installed
your AudioCast Receiver, you are ready to transmit your
music. The AudioCast Receiver should be installed at a
distance of no more than 150 feet (45 meters) from your
AudioCast Transmitter when used indoors. Outdoors, the
signal may carry up to 350 feet (100 meters) depending
on conditions. On each Soundcast product there is a
second blue light that will flicker and then glow steadily
once the wireless link is established. Once the link is in
place, you should be able to hear the music from your
MP3 player or other audio source through the device
connected to the AudioCast Receiver.
If you have connected the Transmitter to your computer,
you must select your music and your play lists from the
files stored on your computer. AudioCast only transmits
what your computer or your CD unit is playing. Please
CD player/amplifier
The middle jack in this row is an output jack that you
may use to connect a set of amplified multimedia
speakers to your transmitter. This will allow you to still
use your music source with audio products located in
the same area.
Note: AudioCast units do not have an internal amplifier.
Any speaker systems that are attached to this product
must have internal amplifiers in order to play music.
If you wish to connect your AudioCast Transmitter to a
set of headphones you may do so by inserting the plug
into the headphone jack on the back of the AudioCast
Transmitter.
Amplified
Speakers
Transmitter
Transmitter
remember that your AudioCast system is strictly an
audio device – IT WILL NOT TRANSMIT VIDEO OR ANY
TYPE OF COMPUTER FILE!
You can leave the AudioCast system hooked up 24 hours
per day if you wish to do so – it is designed for
continuous operation. However, if you do not intend to
use the system for an extended period of time, you
should disconnect the power supplies from the wall
outlets to conserve energy.
Additional Features
Reciever upstairs
Reciever downstairs
➤
➤
AudioCast transmitter
You can also connect two AudioCast Transmitters to the
same audio source using the output of one Transmitter
linked to input of another Transmitter. By linking two
transmitters in this manner, and by using two AudioCast
Receivers for each one, you can create a four zone audio
system. Please remember that the same music source
will be heard in all areas and that you can only link a
maximum of two transmitters in this fashion. It is also
possible to operate two entirely different Soundcast
systems in the same household if you wish. Two
transmitters can operate within the same 150 foot (45
meter) radius by using the channel selector switch on
the back of the unit. All Soundcast products come from
the factory with Channel 1 selected. On the back of each
Soundcast unit there is a 3 position selector switch to
allow the user to select different transmission channels.
MP3
Transmitter
(set switch to Channel 1)
Transmitter
(set switch to Channel 2)
In
In
Out
Each AudioCast Transmitter can operate up to two
AudioCast Receivers. This means you can purchase a
second receiver from your retailer and transmit audio to
two different locations in your house.

➤
Channel selector, 1, 2, or 3
When you wish to use two Soundcast systems at the
same time, leave one system on Channel 1 and move
the selector switch to on the second system to Channel
2 or 3. Please remember that both the Transmitter and
Receiver must set on the same Channel. When set this
way, the two systems will not conflict with each other
and you can use two different music sources operating
two different audio systems in the same house.The
Channel selector switch will also allow you to
eliminate the signal from a neighbor’s Soundcast
system. If you live in an apartment building and find
that you receive music from another Soundcast
system, simply move the selector switches on your
Soundcast Transmitter and Receiver to a different
Channel and the unwanted signal will stop being
received.
Should you have any additional questions concerning the
installation or use of your Soundcast products, please
contact Soundcast via E-mail at
Information to User
This device complies with Part 15 of the FCC Rules. Operation is
subject to the following two conditions: (1) This device may not cause
harmful interference, and (2) This device must accept any interference
received, including interference that may cause undesired operation.
This equipment has been tested and found to comply with the limits
for Class B Digital Device, pursuant to Part 15 of the FCC Rules. These
limits are designed to provide reasonable protection against harmful
interference in a residential installation. This equipment generates
and can radiate radio frequency energy and, if not installed and used
in accordance with the instructions, may cause harmful interference
to radio communications. However, there is no guarantee that
interference will not occur in a particular installation. If this equipment
does cause harmful interference to radio or television reception, which
can be determined by turning the equipment off and on, the user is
encouraged to try to correct the interference by one or more of the
following measures.
•Reorient or relocate the receiver or transmitter
•Increase the separation between the equipment and receiver
•Connect the equipment into an outlet on a circuit different from
that to which the receiver is connected
•Consult the dealer or an experienced radio/TV technician for
help
Any changes or modifications not expressly approved by the party
responsible for compliance could void the user’s authority to operate
the equipment.
Soundcast Systems
811 Kuhn Drive, Building 200
Chula Vista, California 91914
1-619-591-0126
In Out

USA & Canada Warranty
Soundcast Systems warrants to the end user (“Customer”) that the
hardware product will be free from defects in workmanship and
materials, under normal use and service, for the following length of
time from the date of purchase from Soundcast or an authorized
retailer: One (1) Year.
Soundcast Systems’ sole obligation under this express warranty shall
be, at its option and expense, to repair the defective product or part,
deliver to Customer an equivalent product or part to replace the
defective item. All products that are replaced will become the property
of Soundcast Systems. Replacement products may be new or
refurbished. Soundcast Systems warrants any replaced or repaired
product or part for a period of ninety (90) days from shipment, or the
remainder of the initial warranty period, whichever is longer.
In no case shall Soundcast be responsible for damage to any
connected audio equipment, including the iPod, resulting from misuse,
abuse, neglect, improper installation or testing, unspecified
application, modification or alteration of or tampering with Soundcast
products.
If you need warranty service on your Soundcast
Products
All warranty returns should be sent to Soundcast’s Warranty Repair
Service Center freight prepaid through the original selling retailer and
must be accompanied by a copy of the original sales receipt. Direct
returns from consumers will also be accepted, but only if
accompanies by a Return Merchandise Authorization number (RMA)
issued by Soundcast in advance of any shipment to the Soundcast
Warranty Repair Service Center. Units returned without an RMA
number to Soundcast may be subject to refusal or significant delays.
Please ship the authorized return to Soundcast within 15 days of the
issuance of the RMA. Repaired or replacement units will be shipped to
you at Soundcast’s expense. Any units with no trouble found will be
returned to you freight collect. Soundcast Systems will give you the
proper return address when the RMA is issued. Do not return the
defective unit directly to Soundcast Systems.
For Warranty Service Please Contact:
Soundcast Systems
Warranty Claim Department
811 Kuhn Drive, Building 200
Chula Vista, California 91914
619-591-0126
Table of contents
Other Soundcast Transmitter manuals


Popular Transmitter manuals by other brands

Advanced Instruments
Advanced Instruments GPR-2500A owner's manual

Honeywell
Honeywell SMV 3000 Specification and model selection guide

CMOSTEK
CMOSTEK CMT2157AW manual

Omega Engineering
Omega Engineering HX92B Series user guide

Novus
Novus TxBlock-USB operating manual

Telecrane
Telecrane F21-60 Installation & operation manual


