Soundcast aptX VGtx User manual

VGtx USER MANUAL
ENGLISH................3
ESPAÑOL...............7
FRANCAIS.............11
DEUTSCHE............15
NEDERLANDS.....19
中文..........................23
9771 Clairemont Mesa Blvd., Suite E, San Diego, CA 92124 USA
Gesworenhoekseweg 4
5047TM Tilburg, the Netherlands

ENGLISH | HOW TO USE VGtx
Congratulations and Thank you for your purchase of the Soundcast VGtx.
Please read the operation instructions carefully before use.
Quick Start Guide:
1. Attach the antenna: On the left side of the VGtx, attach the supplied antenna to
the antenna terminal (turn clockwise until slightly snug). Optimize antenna perfor-
mance by positioning the antenna upright.
2. Connecting to the VGtx: set the audio source slider switch on the back of the
VGtx to either digital or analog. Connect the appropriate included optical Toslink or
3.5mm audio cable and any necessary user supplied adapters to the appropriate
audio input on the back the VGtx.
3. Power on/off: The VGtx can be operated using any USB port or the included
5v/500mA USB power supply. VGtx will automatically turn on when USB power is
applied and can be turned off or back on again by pressing the multi-function button
for 1 second.
4. Paring: Place your Bluetooth® receiving device into pairing mode; follow the
manufacturer specific instructions. Then press and hold the VGtx’s multi-function/
power button for (6) seconds until the indicator light changes from slow flashing
blue to fast flashing red and blue. When pairing is successful, the
Bluetooth indicator will turn solid blue.
For detailed instructions and troubleshooting please continue reading the Soundcast VGtx user
manual or visit www.gosoundcast.com for additional information.
About the Soundcast VGtx
The Soundcast VGtx is a long range wireless stereo transmitter featuring
Bluetooth® 4.2, and the aptX Low Latency codec. Use it to add wireless streaming
technology to all Soundcast VG series speakers. It can also be used for existing
television or stereo equipment, or use it in place of your current transmitting device
to extend your wireless range. The Soundcast VGtx can work with TWS capable
devices which allows two matched Bluetooth® receiving devices to be paired in
stereo (matched devices must support TWS, including other compatible
Soundcast VG series speakers
• VGtx transmitter unit
• (3ft) 3.5mm to 3.5mm
analog audio cable
• (3ft) TosLink Optical audio cable
1. Antenna
2. Bluetooth status indicator
3. Power Indicator/active LLC
connection (yellow)
4. Power/Bluetooth Pairing
multi-function button
5. Analog Indicator
6. Digital Indicator
7. Mounting Tabs
8. Analog Input
9. Input mode (digital or analog)
10. Optical audio input
11. *Optical audio output
12. Power input connector
(Micro USB)
• Micro USB charging cable
• USB power supply
• Antenna
• User Guide
Standby Mode/Not
Connected/Powered On
Analog (Audio Source)
Power on
aptX Low Latency active
Digital (Audio Source)
Re-Connecting Mode
(Searching for last known device)
Connecting Mode
(Connecting to last paired device)
Pairing Mode
Paired
Pairing Memory Cleared
Flashing Blue
Yellow
Green
Yellow/Green both lit
Red
Slow Blinking Blue
Fast Blinking Blue
Alternate Flashing Red and Blue
Solid Blue
Both Blue and Red Fast Flashing
Status
Status
Status
Bluetooth Indicator LED
Analog/Digital Indicator LEDs
Pwr/LL Indicator LED
What’s in the Box?
Feature/Button Layout 1
7
8 9 10 11 12
23456

System Requirements
VGtx transmits high quality stereo audio to all VG series speakers and any compat-
ible A2DP Bluetooth® profile wireless receiving device. Compatible devices include
all VG series speakers, Bluetooth® enabled headphones/speakers or
Bluetooth® adapters.
Bluetooth Codec Support:
The VGtx provides support for three common Bluetooth® codecs: SBC, aptX, and
aptX Low Latency. To pair using a given codec, both the VGtx and the paired receiv-
ing device must support the codec. All Bluetooth® audio devices commonly support
the SBC codec. Unless device specific documentation indicates otherwise; it is likely
the VGtx will pair with your receiving device using the SBC codec.
Note:
• The VGtx is designed to work with all VG series speakers and will utilize the aptX
Low Latency codec automatically. If using other products, aptX Low Latency codec
will only be active when paired with a receiving device that also supports aptX Low
Latency.
• AptX Low Latency codec will not be active in TWS mode. The VGtx will indicate an
active AptX Low Latency connection when the PWR/LLC LED indicator is Yellow.
aptX low latency
aptX
SBC
38ms ± 5ms
70ms ± 10ms
220ms ± 50ms
Bluetooth Device
Supported Codec The audio lag will
be around
Detailed Instructions
Power on/off
The VGtx supports mini USB power. Connect one end of the included USB
power cable to the VGtx USB jack; connect the other end to the included
or a compatible USB power supply unit (5V/500mA), computer, or televi-
sion USB port. Any USB charger that is rated at an output of 5V@500mA
or higher is compatible and may be used with the VGtx.
Connecting Cables
The VGtx ships with the following audio cables:
• (3ft) 3.5mm to 3.5mm analog audio cable
• (3ft) TOSLink optical digital audio cable
Note 1:
The VGtx requires an audio input source like a computer, tablet, smart-
phone, television or stereo system, etc. that can offer the VGtx an audio
signal/music to transmit. The cable being used must be connected to the
appropriate input: either 3.5mm to the “Analog Input”, or optical digital to
the “Digital Input”.
Note 2:
The included USB cable with is for USB power only and does not offer an
audio or data type connection. For optimal performance, always use the
provided USB cable with your VGtx.
Optional Cable – Fiber Optic
A TOSLink digital optical cable can be used with the VGtx. The audio
source, E.g. smartphone, TV, “Digital output”
will be connected to the VGtx “Digital Input”.
* The VGtx digital input will only recognize/decode stereo streams, not
Dolby/DTS encoded, etc. The optical “pass-through” will however pass
through both encoded and stereo type streams.
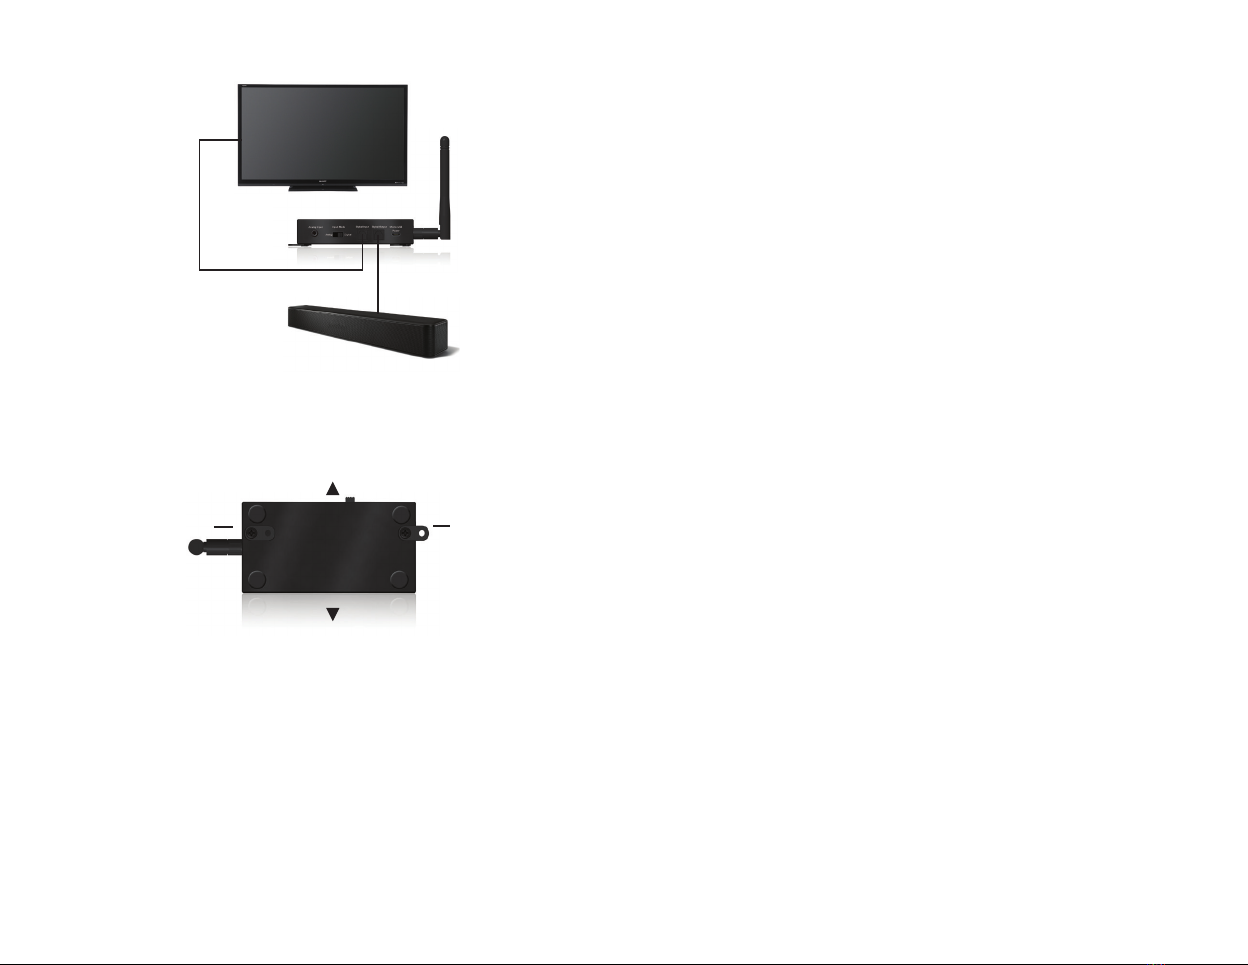
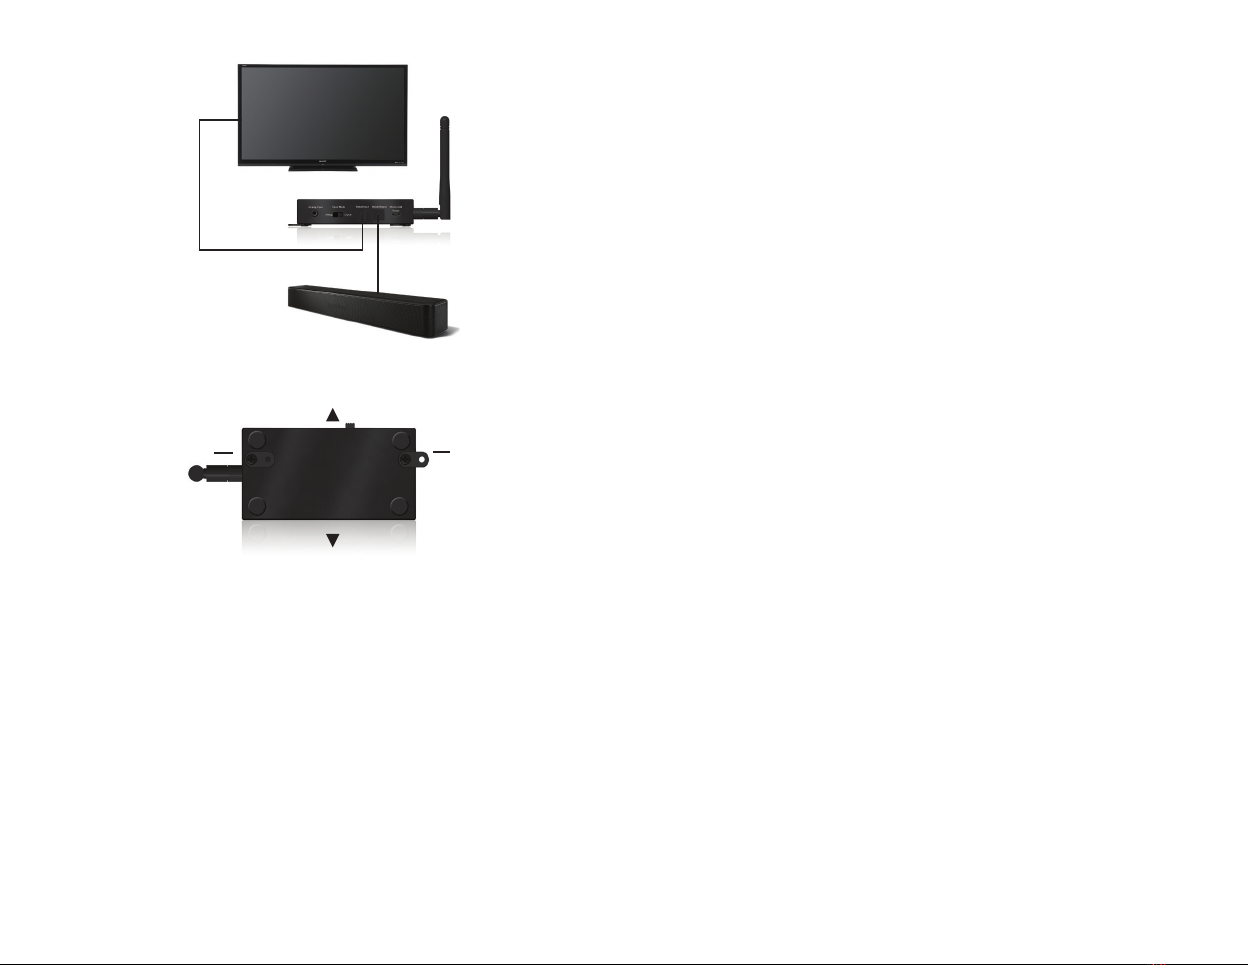
Optical Output – TV Applications - Outdoors
The VGtx Optical output is a “pass-through” circuit. The Optical output
of the VGtx can be used with TV audio via the TV’s Optical output even
though an existing soundbar or home theater amplifier is already con-
nected to the TV’s Optical output (most TV’s only have 1 Optical output).
Please see image A.(Next page) The optical “pass-through” circuit is active
when the unit is turned off, but the VGtx must have power in order for the
“pass-through” to operate.
The VGtx can be installed in an outdoor TV application. The VGtx can be
mounted behind a TV and fastened to a hard surface (mounting bracket,
wall) utilizing the adjustable mounting tabs. The VGtx must be mounted
with the front of the unit facing up to ensure a long-life expectancy.
Please see image B. (Next page)
Pairing
Note: The VGtx and your Bluetooth® device should be no more than one
meter apart when pairing (the closer the better until paired).
1. Power on your headphones, speaker or other compatible A2DP Blue-
tooth® profile device and engage pairing mode.
2. Confirm VGtx is powered-up by connecting USB power cable to power
supply or by turning on with (1 second) mutl- function/power button press
if unit had been previously turned off.
Image A
Image B
Optical out
from TV
To Optical in Optical out to
Soundbar/Amplifier
Power button, LED indicators
facing up
Adjustable
Mounting Tabs Adjustable
Mounting Tabs
Audio inputs/outputs, Power Connector
Facing Down
3. Place the VGtx into pairing mode: press and hold the power button
(6) seconds until the VGtx LED indicators go from slow flashing blue to
alternating red and blue.
4. When pairing is complete the VGtx Bluetooth indicator will light a solid
blue; pairing has been established.
Note: Leave the VGtx continuously connected to USB power, and powered
on to automatically reconnect when the last paired device is within range.
If powered off or disconnected from USB power, the VGtx should automat-
ically reconnect with the last paired receiving device when both devices
are powered on and within range.
*VGtx with TV Audio
The VGtx paired with any VG series speaker will utilize AptX Low Latency
ensuring no delays or lip syncing issues. Other manufacturers speakers
which have AptX Low Latency will also benefit from the AptX Low Latency.
*TWS mode is not recommended for TV audio as the VGtx must default
back to standard aptX when TWS is in use.
Clearing Memory / Factory Reset
The VGtx only has pairing memory for a single device. In order to pair the
VGtx to a new device, you must re-enter pairing mode by pressing the
multi-function/power button for (6) seconds, this will both CLEAR the
previously paired device and put the VGtx into pairing mode where a new
device can be paired following the “Pairing” instructions discussed above.
To factory reset the VGtx and clear pairing memory, press and hold the
multi-function/power button for (10) seconds
until the both the blue and red LED indictors blink rapidly, then release
the multi-function/power button. This indicates that the VGtx has been
successfully reset and pairing memory cleared.
Note: After a factory reset, the internal Bluetooth® pairing memory will
be deleted. You will need to re-pair any previously paired device in order
for the VGtx to properly connect to it again.

Soundcast VGtx does
not turn on.
Audio breaks up or
wireless range is
too short.
No sound/audio output
Can’t control volume
Can’t pair my device with
the soundcast VGtx
Static or noise in
the audio
1. Check the USB power connection.
2. Make sure you press and hold the power button for at
least (1) second if the unit had been previously turned off.
1. Make sure the antenna is attached securely and posi-
tioned correctly (as high off the ground as
possible for maximum range)
2. Move the VGtx away from other 2.4Ghz equpiment
such as Wi-Fi routers and microwaves.
1. Check the cables to make sure they are connected to
the correct jacks.
2. Press play or make sure your audio source device is
active
3. Check to make sure your volume is set to a listenable
level.
1. By design the VGtx is a passive transmitter and has
no volume control. User volum level must be adjusted via
the input and/or output sources
connected to the VGtx.
1. Make sure to use the supplied USB adapter as PC
USB ports cannot always provide adequate/
stable power.
2. Move the VGtx away from any amplifiers
or powered speakers.
3. Make sure the VGtx is cabled to the correct line level
output on your stereo receiver.
4. Make sure that you have the proper input (analog or
digital) selected with slider switch on the
rear of the VGtx.
1. Make sure the VGtx and the device
you’re pairing with are in close proximity to each other.
2. Make sure all other Bluetooth compatible receiving
devices you’re NOT trying to pair with are either powered
off or
Bluetooth disabled.
3. Make sure both devices are in pairing mode. LED
equipped devices will typically flash when in pairing mode
and be solid
when connected.
4. Make sure your device is compatible with the wireless
A2DP Bluetooth stero
audio profile.
Problem Solution
FAQ and Troubleshooting Care and maintenance
Please read the following recommendations before using
your Soundcast VGtx:
• To keep from damaging the VGtx internal circuit, avoid exposure to liquid.
• Extreme temperatures can shorten the life of electronic devices.
• Do not drop: dropping the VGtx can damage the internal circuit.
Specifications
• Bluetooth v4.2
• Supports the A2DP Bluetooth® profile
• Audio Codec Support: SBC, aptX, aptX Low Latency Operating Range:
Up to 150ft (50 meters)
• Operating Frequency: 2.402 GHz to 2.480 GHz
• USB Power: DC 5V @ 500mA or higher
• Size: 20mm(H)x103mm(W)x54mm(D) - 3/4”(H)x4”(W)x2”(D)
Support
Further details and answers to common questions are
found at http://gosoundcast.com/support
If your question is not answered via the support page, feel free
phone at +1 (619) 591-0126, toll free USA (800) 722-1293
FCC Information
This device complies with Part 15 of the FCC rules. Operation is subject to the following two conditions: (1) This
device may not cause harmful interference, and (2) this device must accept any interference received; including
interference that may cause undesired operation.
Federal Communications Commission (FCC) Statement:
This Equipment has been tested and found to comply with the limits for a Class B digital device, pursuant to
Part 15 of the FCC rules. These limits are designed to provide reasonable protection against harmful inter-
ference in a residential installation. This equipment generates uses and can radiate radio frequency energy
and, if not installed and used in accordance with the instructions, may cause harmful interference to radio
communications. However; there is no guarantee that interference will not occur in a particular installation. If
this equipment does cause harmful interference to radio or television reception, which can be determined by
turning the equipment off and on, the user is encouraged to try to correct the interference by one or more of
the following measures:
- Reorient or relocate the receiving antenna.
- Increase the separation between the receiver and equipment.
- Connect the equipment to an outlet on a circuit different from that to which the receiver is connected. - Con-
sult your dealer or an experienced radio / TV technician for help.
Warning:
Changes or modifications to this unit not expressly approved by the party responsible for compliance could void
the user authority to operate the equipment. Tested to comply with FCC standard: FOR HOME OR OFFICE USE.
This equipment complies with FCC RF radiation exposure limits set forth for an uncontrolled environment.
This device and its antenna(s) must not be co-located or in conjunction with any other antenna or transmitter.
© 2017 Soundcast, LLC. All rights reserved. Bluetooth is a trademark of the Bluetooth SIG and used under
license. The term TWS (True Wireless Stereo), aptX® and aptX Low Latency® mark and logo are trademarks
of Qualcomm or one of its group companies and may be registered in one or more jurisdictions.

ESPAÑOL | CÓMO UTILIZAR VGtx
Felicitaciones y gracias por la compra del Soundcast VGtx. Lea detenidamente
las instrucciones de funcionamiento antes de usar.
Guía de inicio rápido:
1. Instalación de la antena: en el lado izquierdo del VGtx.
Instale la antena que se proporciona en el terminal de la antena (gire hacia la dere-
cha para ajustarla sin apretar demasiado). Optimice el desempeño de la antena
colocándola en posición vertical.
2. Conexión al VGtx: ajuste el interruptor deslizante de la fuente de audio ubicado
en la parte posterior del VGtx a digital o analógico. Conecte el correspondiente
cable de audio de 3,5 mm o el cable óptico Toslink que se incluye, y cualquier adap-
tador necesario suministrado por el usuario a la correspondiente entrada de audio
en la parte posterior del VGtx.
3. Encendido/apagado: el VGtx se puede operar usando cualquier puerto USB o
la fuente de alimentación USB de 5 V/500 mA que se incluye. El VGtx se encend-
erá automáticamente cuando se habilite la alimentación USB y se puede apagar o
volver a encender presionando el botón multifunción durante 1 segundo.
4. Emparejamiento: ponga su dispositivo receptor Bluetooth® en modo de em-
parejamiento; siga las instrucciones específicas del fabricante. Luego mantenga
presionado el botón de encendido/multifunción del VGtx durante seis (6) segundos
hasta que la luz indicadora cambie de color azul con parpadeo lento a color rojo y
azul con parpadeo rápido. Cuando el emparejamiento se haya realizado correcta-
mente, el indicador de Bluetooth mostrará una luz azul fija.
Para consultar instrucciones detalladas y procedimientos para solucionar problemas,
continúe leyendo el manual del usuario del Soundcast VGtx o visite www.gosoundcast.com
para obtener información adicional.
Acerca del Soundcast VGtx
El Soundcast VGtx es un transmisor estéreo inalámbrico de largo alcance con
Bluetooth® 4.2, y el códec aptX Low Latency (baja latencia). Utilícelo para añadir
tecnología de transmisión inalámbrica a todos los parlantes de la serie Soundcast
VG. También se puede utilizar para equipos existentes de televisión o de sonido
estéreo, o en lugar de su dispositivo de transmisión actual para ampliar su rango
de alcance inalámbrico. El Soundcast VGtx puede funcionar con dispositivos con
capacidad TWS, lo cual permite que dos dispositivos receptores Bluetooth® vincu-
lados se emparejen en estéreo (los dispositivos vinculados deben ser compatibles
con TWS), incluidos otros parlantes de la serie Soundcast VG compatibles.
• Unidad transmisora VGtx
• Cable de audio analógico de 3.5 mm a 3.5 mm (3 pies [0,91 m])
• Cable de audio óptico TosLink (3 pies [0,91 m])
• Cable de carga micro USB
• Fuente de alimentación USB
• Antena
• Guía del usuario
1. Antena
2. Indicador de estado Bluetooth
3. Indicador de encendido/conexión
LLC activa (amarillo)
4. Botón multifunción de encendido/
emparejamiento de Bluetooth
5. Indicador analógico
6. Indicador digital
7. Pestañas de montaje
8. Entrada analógica
9. Modo de entrada (digital o analógica)
10. *Salida de audio óptica
12. Conector de entrada de alimentación (micro-USB)
Modo de espera/No conecta-
do/Encendido
Analógico (fuente de audio)
Encendido
aptX Low Latency activo
Digital (fuente de audio)
Modo de reconexión
(buscando el último dispositivo conocido)
Modo de conexión
(conectando al último dispositivo emparejado)
Modo de emparejamiento
Emparejado
Borrado de memoria de emparejamiento
Luz azul parpadeante
Amarillo
Verde
Luz amarilla/verde ambas encendidas
Rojo
Luz azul con parpadeo lento
Luz azul con parpadeo rápido
Luz roja y azul con parpadeo alterno
Luz azul fija
Luz azul y roja con parpadeo rápido
Estado
Estado
Estado
Bluetooth Indicator LED
Indicadores LED analógico/digital
Pwr/LL Indicator LED
¿Qué hay en la caja?
Disposición de
funciones/botones
1
7
8 9 10 11 12
23456
Requisitos del sistema
VGtx transmite sonido estéreo de alta calidad a todos los parlantes de la serie
VG y a cualquier dispositivo receptor inalámbrico compatible con perfil A2DP
Bluetooth®. Los dispositivos compatibles incluyen todos los parlantes de la serie
VG, los auriculares/parlantes con funcionalidad Bluetooth® o los adaptadores
Bluetooth®.
Compatibilidad con códec Bluetooth:
El VGtx es compatible con tres códecs Bluetooth® habituales: SBC, aptX y aptX
Low Latency. Para realizar el emparejamiento usando un determinado códec, tanto
el VGtx como el dispositivo receptor que se desea emparejar deben ser compat-
ibles con el códec. Generalmente todos los dispositivos de audio Bluetooth® son
compatibles con el códec SBC. Salvo que la documentación específica del dispos-
itivo indique lo contrario, es probable que el VGtx se empareje con el dispositivo
receptor usando el códec SBC.
Note:
• El VGtx está diseñado para funcionar con todos los parlantes de la serie VG y
utilizará el códec aptX Low Latency automáticamente. Si se usan otros productos,
el códec aptX Low Latency únicamente estará activo cuando se empareje con un
dispositivo receptor que también sea compatible con aptX Low Latency.
• El códec AptX Low Latency no estará activo en modo TWS. El VGtx indicará que
existe una conexión AptX Low Latency activa cuando la luz del indicador LED PWR/
LLC sea amarilla.
aptX low latency
aptX
SBC
38ms ± 5ms
70ms ± 10ms
220ms ± 50ms
Códec compatible con el
dispositivo Bluetooth Desfase de audio
aproximado
Instrucciones detalladas
Encendido/apagado
El VGtx admite alimentación mini USB. Conecte un extremo del cable de ali-
mentación USB que se incluye al conector USB del VGtx; conecte el otro extremo a
una fuente de alimentación USB compatible (5 V/500 mA), o a un puerto USB de
una computadora o televisión. Cualquier cargador USB que tenga una salida con
un valor nominal de 5 V en 500 mA o superior es compatible y se puede usar con
el VGtx.
Cables de conexión
EL VGtx se envía con los siguientes cables de audio:
• Cable de audio analógico de 3,5 mm a 3,5 mm (3 pies [0,91 m])
• Cable de audio digital óptico TosLink (3 pies [0,91 m])
Nota 1:
El VGtx requiere una fuente de entrada de audio (como una computadora, tablet,
smartphone, televisión, sistema de sonido estéreo, etc.) que pueda ofrecer al VGtx
una señal de audio/música para transmitir. El cable utilizado se debe conectar a la
entrada apropiada: 3.5 mm a la “entrada analógica”, o digital óptico a la “entrada
digital”.
Nota 2:
El cable USB que se incluye es únicamente para alimentación USB y no proporcio-
na una conexión de tipo audio o datos. Para un desempeño óptimo, utilice siempre
el cable USB que se proporciona con el VGtx.
Cable opcional – Fibra óptica
Se puede usar un cable óptico digital TOSLink con el VGtx. La “salida digital” de la
fuente de audio (por ejemplo, smartphone, televisión) se conectará a la “entrada
digital” del VGtx
*La entrada digital del VGtx solo reconocerá/descodificará transmisiones de soni-
do estéreo, y no reconocerá transmisiones con codificación Dolby/DTS, etc. Sin
embargo, el “puerto pasante” óptico reconocerá tanto las transmisiones codifica-
das como las de sonido estéreo.
Salida óptica – Aplicaciones de televisión - Exteriores
La salida óptica del VGtx es un circuito con “puerto pasante”. La salida óptica
del VGtx se puede utilizar con audio de televisión mediante la salida óptica de la
televisión, aunque una barra de sonido o un amplificador de sistema de cine en
casa ya se encuentre conectado a la salida óptica de la televisión (la mayoría de las
televisiones solo tienen 1 salida óptica). Consulte la imagen A. El circuito óptico con
“puerto pasante” está activo cuando la unidad se apaga, pero el VGtx debe estar
encendido para que el “puerto pasante” funcione.
El VGtx se puede instalar en una aplicación de televisión en exteriores. El VGtx se
puede montar detrás de una televisión y sujetar a una superficie dura (soporte
de montaje, pared) utilizando las pestañas de montaje ajustables. El VGtx se debe
montar con la parte delantera de la unidad orientada hacia arriba para asegurar
que tenga una vida útil larga. Consulte la imagen B.
Emparejamiento
Nota: El VGtx y su dispositivo Bluetooth® no deberían estar a más de un
metro de distancia cuando se realice el emparejamiento (cuanto más
cerca mejor hasta que estén emparejados).
1. Encienda los auriculares, el parlante u otro dispositivo compatible con
perfil A2DP Bluetooth® y active el modo de emparejamiento.
2. Confirme que el VGtx esté conectado a la alimentación conectando el
cable de alimentación por USB a la fuente de alimentación o proceda a
encenderlo presionando el botón de encendido/multifunción (1 segundo)
si la unidad se había apagado previamente.
3. Ponga el VGtx en modo de emparejamiento: mantenga presionado
el botón de encendido seis (6) segundos hasta que los indicadores LED
del VGtx cambien de color azul con parpadeo lento a color rojo y azul
alternante
Imagen A
Imagen B
Salida óptica de la
televisión
A la entrada óptica Salida óptica a la barra
de sonido/amplificador
Botón de encendido, indicadores LED
orientados hacia arriba
Pestañas de montaje
ajustables Pestañas de montaje
ajustables
Entradas/salidas de audio, conector de
alimentación orientado hacia abajo
4. Cuando el emparejamiento se haya realizado, el indicador de Bluetooth
del VGtx será una luz azul fija; el emparejamiento se ha establecido.
Nota: Deje el VGtx continuamente conectado a la alimentación USB, y
encendido para que se reconecte automáticamente cuando el último
dispositivo emparejado se encuentre dentro del rango de alcance. Si
está apagado o desconectado de la alimentación USB, el VGtx se debería
volver a conectar automáticamente con el último dispositivo receptor
emparejado cuando ambos dispositivos estén encendidos y dentro del
rango de alcance.
*VGtx con audio de televisión
El VGtx emparejado con cualquier parlante de la serie VG utilizará AptX
Low Latency para asegurar que no existan problemas de demoras o de
sincronización de labios. Los parlantes de otros fabricantes que tienen
AptX Low Latency también se beneficiarán del AptX Low Latency.
*El modo TWS no se recomienda para audio de televisión ya que el VGtx
debe usar aptX estándar cuando se está usando TWS.
Borrado de memoria/restablecer la configuración predeterminada
de fábrica
El VGtx solo tiene memoria de emparejamiento para un único dispositivo.
Para emparejar el VGtx a un nuevo dispositivo, es necesario volver a en-
trar en el modo de emparejamiento presionando el botón de encendido/
multifunción durante seis (6) segundos, esto BORRARÁ el dispositivo pre-
viamente emparejado y pondrá al VGtx en modo de emparejamiento en el
que se puede emparejar un nuevo dispositivo siguiendo las instrucciones
de “emparejamiento” indicadas anteriormente.
Para restablecer la configuración predeterminada de fábrica del VGtx y
borrar la memoria de emparejamiento, mantenga presionado el botón de
encendido/multifunción durante diez (10) segundos hasta que los indica-
dores LED azul y rojo parpadeen rápidamente, luego deje de presionar el
botón de encendido/multifunción. Esto indica que el VGtx se ha restableci-
do correctamente y que la memoria de emparejamiento se ha borrado.
Note: Después de restablecer la configuración predeterminada de fábri-
ca, la memoria interna de emparejamiento Bluetooth® se borrará. Será
necesario volver a emparejar cualquier dispositivo previamente empareja-
do para que el VGtx se conecte correctamente a dicho
dispositivo de nuevo.

El Soundcast VGtx no se
enciende
El audio se interrumpe
o el rango de alcance
inalámbrico es
demasiado corto
Sin sonido/salida de audio
No se puede controlar el volumen
No puedo emparejar mi dispos-
itivo con el
Soundcast VGtx
Estática o ruido en el audio
1.Compruebe la conexión de la alimentación USB.
2.Asegúrese de mantener presionado el botón de en-
cendido durante al menos un (1) segundo si la unidad se
había apagado previamente.
1.Asegúrese de que la antena se haya instalado de forma
segura y colocado correctamente (tan lejos del piso como
sea posible para conseguir un rango máximo de alcance).
2. Sitúe el VGtx lejos de otros equipos de 2,4 Ghz como
routers Wi-Fi y microondas
1. Compruebe los cables para asegurarse de que estén
conectados a los conectores correctos.
2. Presione reproducir o asegúrese de que su dispositivo
de fuente de audio este activo.
3. Asegúrese de que el volumen se haya ajustado a un
nivel que se pueda escuchar.
1. Por diseño, el VGtx es un transmisor pasivo y no tiene
control de volumen. El nivel de volumen del usuario se
debe ajustar mediante las fuentes de entrada o salida
conectadas al VGtx.
1. Asegúrese de usar el adaptador USB que se suminis-
tra ya que los puertos USB de computadora no siempre
pueden proporcionar una alimentación adecuada/
estable.
2. Sitúe el VGtx lejos de cualquier amplificador o parlante
encendido.
3. Asegúrese de que el VGtx esté conectado por cable a
la salida de nivel de línea correcta del receptor estéreo.
4. Asegúrese de seleccionar la entrada apropiada
(análoga o digital) con el interruptor deslizante ubicado
en la parte posterior del VGtx.
1. Asegúrese de que el VGtx y el dispositivo que desea
emparejar estén muy próximos.
2. Asegúrese de que todos los demás dispositivos recep-
tores Bluetooth® compatibles que NO desee emparejar
estén apagados o con el Bluetooth® desactivado.
3. Asegúrese de que ambos dispositivos estén en modo
de emparejamiento. En los dispositivos equipados con
luces LED, normalmente las luces parpadearán cuando
estén en modo de emparejamiento y serán luces fijas
cuando estén conectados.
4. Asegúrese de que su dispositivo sea compatible con el
perfil A2DP Bluetooth® de audio estéreo inalámbrico.
Problema Solución
Preguntas frecuentes o solución de problemas Especificaciones
• Bluetooth v4.2
• Compatible con el perfil A2DP Bluetooth®
• Compatible con los códecs de audio: SBC, aptX, aptX Low Latency
• Rango de funcionamiento: hasta 150 pies (50 metros)
• Frecuencia de funcionamiento: 2,402 GHz a 2,480 GHz
• Alimentación USB: CC 5V en 500 mA o superior
• Tamaño: 20 mm (alto) x 103 mm (ancho) x 54 mm (profundidad) - 3/4”
(alto) x 4” (ancho) x 2” (profundidad)
Asistencia
Se proporciona información detallada adicional y respuestas a preguntas
habituales en http://gosoundcast.com/support
Si no obtiene respuesta a su pregunta a través de la página de asistencia,
no dude en ponerse en contacto con nosotros por correo electrónico en
0126, número gratuito en los EE. UU. (800) 722-1293
Información de la FCC
Este dispositivo cumple con la Parte 15 de las normas de la FCC. El funcionamiento está sujeto a las dos
condiciones siguientes: (1) este dispositivo no puede causar interferencias perjudiciales, y (2) este dispositivo
debe aceptar cualquier interferencia recibida, incluidas las interferencias que puedan causar un funcionamien-
to no deseado.
Federal Communications Commission (FCC) Statement:
Se ha comprobado que este equipo cumple los límites para dispositivos digitales de clase B, de acuerdo con
la parte 15 de las normas de la FCC. Estos límites están diseñados para ofrecer una protección razonable
contra las interferencias perjudiciales en una instalación doméstica. Este equipo genera, utiliza y puede irradiar
energía de radiofrecuencia y, si no se instala y se utiliza de acuerdo con las instrucciones suministradas, podría
ocasionar interferencias perjudiciales para las comunicaciones de radio. Sin embargo, no se puede garantizar
que no se vaya a producir este tipo de interferencias en una instalación específica. Si este equipo ocasiona
interferencias perjudiciales en la recepción de radio o televisión, lo cual puede comprobarse encendiendo y
apagando el equipo, se recomienda que el usuario intente corregir la interferencia mediante una o más de las
siguientes medidas:
-Reoriente o reubique la antena receptora.
-Aumente la separación entre el equipo y el receptor.
-Conecte el equipo a un tomacorriente en un circuito diferente al circuito en el cual está conectado el receptor.
-Consulte con el distribuidor o con un técnico de radio y televisión experimentado para conseguir ayuda.
Advertencia:
Los cambios o modificaciones realizados a esta unidad que no hayan sido expresamente aprobados por la par-
te responsable del cumplimiento podrían invalidar la autoridad del usuario para operar el equipo. Probado para
determinar su cumplimiento de la norma de la FCC: PARA USO DOMÉSTICO O EN OFICINAS. Este equipo cum-
ple con los límites de exposición de radiación de radiofrecuencia establecidos para un entorno no controlado.
El dispositivo y su(s) antena(s) no se debe ubicar en el mismo sitio que, ni junto con, ninguna otra antena o
transmisor. © 2017 Soundcast, LLC. Todos los derechos reservados. Bluetooth es una marca registrada de
Bluetooth SIG y se utiliza bajo licencia. El término TWS (True Wireless Stereo [estéreo verdaderamente inalám-
brico], y el logo y las marcas aptX® y aptX Low Latency® son marcas registradas de Qualcomm o de una de
las compañías del grupo y es posible que estén registradas en una o más jurisdicciones.
Cuidado y mantenimiento
Lea las siguientes recomendaciones antes de usar el Soundcast VGtx:
• Para no causar daños al circuito interno del VGtx, evite exponerlo a líquidos.
• Las temperaturas extremas pueden reducir la vida útil de los
dispositivos electrónicos.
• Evite que se caiga: las caídas del VGtx pueden dañar el circuito interno.

FRANÇAIS | COMMENT UTILISER VGtx
Félicitations, nous vous remercions d’avoir acheté un haut-parleur Soundcast VGtx.
Veuillez lire les instructions attentivement avant d’utiliser votre haut-parleur pour la première fois.
Guide de démarrage rapide :
1. Installation de l’antenne : Sur le côté gauche du haut-parleur,
fixez l’antenne sur la prise prévue à cet effet (tourner dans le sens des aiguilles
d’une montre jusqu’à ce que l’antenne soit bien vissée). La performance de l’an-
tenne sera optimale si l’antenne est placée en position verticale.
2. Connexion au haut-parleur VGtx: Réglez la source audio choisie (analogue ou
numérique) grâce au curseur à l’arrière du haut-parleur VGtx. Connectez le câble
optique Toslink fourni ou un câble audio de 3,5 mm et les adaptateurs nécessaires
fournis à l’entrée audio appropriée à l’arrière du haut-parleur VGtx.
3. Allumer/éteindre: : Le haut-parleur VGtx est compatible avec tout port USB ou
alimentation USB 5 V/500 mA fourni(e). Le haut-parleur VGtx s’allume automa-
tiquement quand l’alimentation USB est allumée et peut être éteint ou rallumé en
appuyant sur le bouton multifonctions pendant 1 seconde.
4. Couplage : Lancer le mode couplage sur votre récepteur Bluetooth en mode
couplage en suivant les instructions spécifiques du fabricant. Maintenir une pres-
sion pendant 6 secondes sur le bouton marche/multifonctions, jusqu’à ce que le
voyant lumineux passe du clignotant bleu lent au clignotant rapide rouge et bleu.
Quand le couplage est réussi, le voyant Bluetooth passe au bleu et
cesse de clignoter.
Pour des instructions détaillées et la résolution de problèmes, se référer au manuel du
haut-parleur Soundcast VGtx ou cliquer sur www.gosoundcast.com pour plus de renseignements.
À propos du haut-parleur Soundcast VGtx
Le haut-parleur Soundcast VGtx est un émetteur longue portée sans fil équipé de
la technologie Bluetooth® 4.2 et du codec apt-X Low Latency. Grâce à lui, ajoutez
la technologie de diffusion sans fil à tous vos haut-parleurs Soundcast de la série
VG. Vous pouvez aussi l’utiliser pour votre télévision ou votre équipement stéréo, ou
l’utiliser à la place de votre émetteur existant pour augmenter la portée de votre
connexion sans fil. Le haut-parleur Soundcast VGtx est compatible avec les appa-
reils TWS qui permettent de coupler deux récepteurs Bluetooth® en stéréo (les
appareils doivent supporter la TWS, y compris les autres haut-parleurs Soundcast
de la série VG.
• Émetteur VGtx
• Câble audio 3,5 mm analogue
(91,44 cm)
• Câble optique Toslink (91,44 cm)
1. Antenne
2. Voyant statut Bluetooth
3. Voyant marche/codec apt-X LL
actif (jaune)
4. Marche/Bouton multifonctions
couplage Bluetooth
5. Voyant analogue
6. Voyant numérique
7. Pattes de fixation
8. Entrée analogue
9. Mode entrée (analogue ou
numérique)
10. Entrée audio optique
11. *Sortie audio optique
12. Connecteur d’entrée
d’alimentation (micro-USB)
• Câble de charge micro-USB
• Alimentation USB
• Antenne
• Mode d’emploi
Mode mise en veille/sortie de veille
Connecté/Sous tension
Analogue (source audio)
Sous tension
codec apt-X Low Latency actif
Numérique (source audio)
Mode reconnexion
(Recherche du dernier appareil connu)
Mode connexion
(Connexion en cours avec le dernier appareil couplé)
Mode couplage
Couplé
Mémoire de couplage effacée
Clignotant bleu
Jaune
Vert
Voyants verts et jaunes allumés
Rouge
Clignotant lent bleu
Clignotant bleu rapide
Clignotant rouge et bleu
Voyant bleu
Clignotant bleu et clignotant rouge rapides
Modes
Modes
Modes
Bluetooth Indicator LED
Voyants DEL analogues/numériques
Sous tension/Voyant DEL latence faible
Qu’est qu’on trouve dans la boîte?
Fonctionnalités/Boutons
1
7
8 9 10 11 12
23456

Exigences du système
Le haut-parleur VGtx émet des signaux audio stéréo de haute qualité vers tous les
haut-parleurs de la série VG et tous les récepteurs Bluetooth® A2DP compatibles.
Les appareils compatibles incluent tous les haut-parleurs VG, les casques et haut-
parleurs Bluetooth® ou les adaptateurs Bluetooth®.
Codec Bluetooth
Le haut-parleur VGtx supporte les trois codecs Bluetooth® courants : SBC, apt-X,
et apt-X Low Latency Pour effectuer un couplage avec un codec spécifique, le
haut-parleur VGtx et le récepteur doivent tous les deux supporter le codec. Tous
les appareils audio Bluetooth® supportent en général le codec SBC. Sauf indication
contraire sur une documentation spécifique, le haut-parleur VGtx pourra se coupler
à votre récepteur avec le codec SBC.
Remarque :
• Le haut-parleur VGtx est conçu pour fonctionner avec tous les haut-parleurs VG
et utilisera le codec apt-X Low Latency automatiquement. Si vous utilisez d’autres
produits, le codec apt-X Low Latency s’activera uniquement si le haut-parleur est
couplé avec un récepteur qui supporte le codec apt-X Low Latency.
• Le codec apt-X Low Latency ne s’activera pas en mode TWS. Le haut-parleur
VGtx indiquera une connexion apt-X Low Latency active à l’aide du voyant jaune DEL
Marche/Codec LL.
aptX low latency
aptX
SBC
38ms ± 5ms
70ms ± 10ms
220ms ± 50ms
Codec supporté par les
appareils Bluetooth Retard audio
Instructions détaillées
Marche/Arrêt
Le haut-parleur VGtx supporte une alimentation mini-USB. Connectez une des
extrémités du câble USB fourni à la prise USB du haut-parleur VGtx.
Connectez l’autre extrémité à une alimentation USB compatible (5 V/500 mA), un
ordinateur ou le port USB d’une télévision. Tout chargeur USB dont la sortie est de
5 V @ 500 mA ou plus est compatible et peut être utilisé avec le haut-parleur VGtx.
Câbles de connexion
Le haut-parleur VGtx est expédié avec les câbles audio suivants:
• Câble audio 3,5 mm analogue (91,44 cm)
• Câble optique numérique Toslink (91,44 cm)
Remarque 1:
Le haut-parleur VGtx a besoin d’une source audio comme un ordinateur, une
tablette, un smartphone, une télévision ou un système stéréo, etc. qui émette un
signal audio à transmettre. Le câble à utiliser doit être connecté à la bonne entrée:
soit
3,5 mm à l’« entrée analogue », soit optique numérique à « entrée numérique ».
Remarque 2:
Le câble USB fourni sert uniquement à l’alimentation USB et n’offre pas de connex-
ion de type audio ou données. Pour une performance optique optimale, toujours
utiliser le câble USB fourni avec votre haut-parleur VGtx.
Câbles en option - Fibre optique
Un Câble optique numérique Toslink peut être utilisé avec le haut-parleur VGtx. Les
sources audio, comme un smartphone, une télévision et la « sortie numérique »se
connectent à l’« entrée numérique » du haut-parleur VGtx.
*L’« entrée numérique » du haut-parleur VGtx reconnaît/décode uniquement les
flux stéréo, et non les flux encodés Dolby/DTS, etc. Le « pass-through » optique
fonctionne quand même via les flux encodés et stéréo.
Sortie optique - Applications TV - Extérieur
La sortie optique du haut-parleur VGtx est un circuit « pass-through ».
La sortie optique du haut-parleur VGtx peut être utilisée avec l’audio d’une
télévision via la sortie audio de la télévision même si une barre de son ou un home
cinéma est déjà connecté(e) à la sortie optique de la télévision (la plupart des télévi-
sions ont seulement 1 sortie optique). Voir l’image A. Le circuit « pass-through »
optique est actif quand l’unité est éteinte, mais le haut-parleur VGtx doit être allumé
pour que le « pass-through » puisse fonctionner.
Le haut-parleur VGtx peut être installé dans une application de télévision extérieure.
Le haut-parleur VGtx peut être monté derrière une télévision et attaché à une
surface dure (support de fixation, mur) grâce aux pattes de fixation réglables. Le
haut-parleur VGtx doit être monté avec le devant de l’unité positionné vers le haut
pour une durée de vie optimale. Veuillez voir l’image B.

Couplage
Remarque : Votre haut-parleur VGtx et votre appareil Bluetooth® ne
devrait pas se trouver à une distance de plus d’un mètre pendant le cou-
plage (le plus près possible jusqu’au couplage).
1. Branchez votre casque, haut-parleur, ou tout autre appareil compatible
Bluetooth® A2DP lance le mode couplage.
2. Confirmez que le haut-parleur VGtx est sous tension en connectant le
câble d’alimentation USB à la source d’alimentation ou en le rallumant en
maintenant une pression sur le bouton marche/multifonctions pendant 1
seconde si l’unité a précédemment été éteinte.
Ll’image A
Ll’image B
Sortie
optique TV
Vers entrée optique Sortie optique vers barre
de son/amplificateur
Bouton marche, voyants DEL
vers le haut
Pattes de fixation
réglables Pattes de fixation
réglables
Entrées/Sorties audio, connecteur d’ali-
mentation vers le bas
3. Lancez le mode couplage: appuyer et maintenir la pression sur le
bouton marche pendant 6 secondes jusqu’à ce que le voyant DEL du haut-
parleur VGtx passe du clignotant bleu lent au clignotant rouge et bleu.
4. Quand le couplage est réussi, le voyant Bluetooth du haut-parleur VGtx
passe au bleu fixe.
Remarque :
Ne pas déconnecter le haut-parleur VGtx de l’alimentation USB et ne pas
l’éteindre pour se reconnecter automatiquement avec le dernier appareil
auquel il a été couplé et à portée. S’il est hors tension ou déconnecté de
son alimentation USB, le haut-parleur VGtx devrait toujours se recon-
necter avec le dernier récepteur auquel il a été couplé lorsque les deux
appareils étaient sous tension et à portée.
*VGtx et audio TV
Le haut-parleur VGtx couplé avec tout haut-parleur VG utilisera le codec
apt-X Low Latency pour garantir l’absence de retard ou de problèmes de
synchronisation audio. Les haut-parleurs des autres fabricants disposant
du codec apt-X Low Latency bénéficieront aussi du
codec apt-X Low Latency.
*Le mode TWS n’est pas recommandé pour l’audio d’une télévision car le
haut-parleur VGtx bascule vers l’apt-X standard par défaut en mode TWS.
Effacer la mémoire/réinitialiser
La mémoire du haut-parleur VGtx ne peut enregistrer qu’un appareil à la
fois. Pour coupler le haut-parleur VGtx à un nouvel appareil, il faut relancer
le couplage en appuyant sur le bouton multifonctions/marche pendant
6 secondes, ce qui aura pour effet d’EFFACER l’appareil précédent de
la mémoire et de relancer le couplage avec un nouvel appareil selon les
indications données ci-avant.
Pour réinitialiser le haut-parleur VGtx, réinstaller les paramètres d’usine
et effacer la mémoire de couplage, maintenir le bouton multifonctions/
marche enfoncé pendant 10 secondes,
jusqu’à ce que les voyants bleu et rouge clignotent rapidement, puis ces-
ser d’appuyer sur le bouton. Ceci indique que le haut-parleur VGtx a été
réinitialisé avec succès et que la mémoire de couplage a été effacée.
Reamrque: Après un retour aux réglages initiaux, la mémoire de couplage
Bluetooth® interne sera effacée. Il sera nécessaire de recoupler tout ap-
pareil précédemment couplé pour que le haut-parleur VGtx s’y reconnecte
normalement.

Le haut-parleur Soundcast
VGtx ne s’allume pas
Interruption de son ou
portée trop courte
Pas de son/sortie audio
Impossible de contrôler le
volume
Problème de couplage avec
le haut-parleur VGtx
Bruit statique ou bruit audio
1. Vérifier la connexion à l’alimentation USB.
2. S’assurer de maintenir le bouton marche enfoncé
pendant au moins 1 seconde si l’unité a précédemment
été éteinte.
1. S’assurer que l’antenne est correctement fixée et dans
la bonne position (aussi loin du sol que possible pour une
portée maximale).
2. Éloigner le haut-parleur VGtx des autres appareils 2,4
GHz comme les routeurs Wi-Fi et les fours à micro-ondes.
1. Vérifier les câbles pour s’assurer qu’ils sont connectés
aux bonnes prises.
2. Appuyer sur le bouton marche pour s’assurer que l’ap-
pareil sélectionné comme source audio est sous tension.
3. Vérifier que le volume du son est à un niveau audible
1. Le haut-parleur VGtx est un émetteur passif et n’est
pas équipé de contrôle de volume. Le niveau du volume
s doit être réglé grâce aux sources d’entrée et de sortie
connectées au haut-parleur VGtx.
1. S’assurer de bien utiliser l’adaptateur USB fourni car
les ports USB des ordinateurs ne sont pas toujours des
sources d’alimentation adéquates ou stables.
2. Éloigner le haut-parleur VGtx des amplificateurs ou
des haut-parleurs sous tension.
3. S’assurer que le haut-parleur VGtx est câblé à la
bonne sortie de niveau de ligne sur le récepteur stéréo.
4. S’assurer que la bonne entrée (analogue ou
numérique) est sélectionnée sur le curseur à l’arrière du
haut-parleur VGtx.
1. S’assurer que haut-parleur VGtx et l’appareil avec
lequel vous souhaitez le coupler sont très proches l’un
de l’autre.
2 S’assurer que les autres appareils récepteurs compat-
ibles Bluetooth® que vous ne voulez PAS coupler avec
votre haut-parleur VGtx sont soit hors tension, ou que
leur mode Bluetooth® est désactivé.
3 S’assurer que les deux appareils sont en mode
couplage. Les voyants DEL des appareils clignotent en
général en mode couplage et arrêtent de clignoter quand
ils sont connectés.
4. S’assurer que votre appareil est compatible avec le
profil audio stéréo Bluetooth® A2DP.
Problème Solution
FAQ et dépannage
Entretien
Merci de lire les recommandations suivantes avant d’utiliser le haut-parleur VGtx
pour la première fois.
• Éviter l’exposition aux liquides, qui peuvent endommager le circuit
interne du haut-parleur VGtx.
• Les températures élevées peuvent réduire la durée de vie
des appareils électroniques.
• Ne pas laisser tomber: une chute peut endommager le circuit
interne du haut-parleur VGtx.
Spécifications
• Bluetooth v4.2
• Supporte le profil Bluetooth® A2DP
• Codecs audio supportés: SBC, aptX, aptX Low Latency
• Portée: Jusqu’à 50 m
• Fréquence de fonctionnement: De 2,402 GHz à 2,480 GHz
• Alimentation USB: DC 5 V @ 500 mA ou supérieur
• Dimensions: 20 mm(H) x 103 mm (L) x 54 mm(P) - 3/4 po (H) x 4po (L)
x 2 po (P)
Support
Plus de détails et de réponses aux questions fréquemment posées à : http://go-
soundcast.com/support
Si vous ne trouvez pas la réponse à votre question sur la page de support, n’hésitez
ou par téléphone au +1 (619) 591-0126, appel gratuit au: (800) 722-1293 (É.-U.)
Renseignements concernant la FCC
Cet appareil est conforme à la Partie 15 des règlementations de la FCC. Son fonctionnement est sujet aux
deux conditions suivantes : (1) Cet appareil ne peut pas causer d’interférences nuisibles et (2) cet appareil
doit accepter toute interférence reçue, y compris les interférences qui peuvent causer un fonctionnement
indésirable.
Déclaration de la FCC (Federal Communications Commission):
Cet appareil a été testé et déclaré conforme aux limites d’un dispositif numérique de classe B, conformément
à la partie 15 des règlementations de la FCC. Ces limites sont destinées à fournir une protection raisonnable
contre les interférences nuisibles dans une installation résidentielle. Cet appareil génère, utilise et peut émettre
de l’énergie radiofréquence et, s’il n’est pas installé et utilisé conformément aux instructions, peut provoquer
des interférences nuisibles aux communications radio. Cependant, il n’est pas garanti que des interférences
ne se produiront pas dans une installation spécifique. Si cet appareil cause des interférences nuisibles à la
réception radio ou de télévision, ce qui peut être déterminé en éteignant et rallumant l’appareil, l’utilisateur est
encouragé à essayer de corriger l’interférence par une ou plusieurs des actions suivantes:
- Réorienter ou déplacer l’antenne de réception.
- Augmenter la distance entre l’appareil et le récepteur.
- Brancher l’appareil à un circuit différent de celui auquel le récepteur est connecté.
- Consulter le revendeur ou un technicien radio / TV expérimenté pour obtenir de l’aide.
Avertissement:
Tout changement ou modification apporté(e) à cet appareil et non expressément approuvé(e) par la partie
responsable de la conformité peut annuler l’autorisation de l’utilisateur à utiliser cet appareil. Testé pour répon-
dre aux normes de la FCC. POUR UN USAGE DOMESTIQUE OU DE BUREAU. Cet appareil répond aux limites de
la FCC sur l’exposition aux rayonnements RF établies pour un environnement non-contrôlé.
Cet appareil et son ou ses antenne(s) ne doivent pas être placés à proximité de, ou fonctionner en conjonction
avec tout autre antenne ou émetteur. © 2017 Soundcast, LLC. Tous droits réservés. Bluetooth est une
marque déposée de Bluetooth SIG est utilisée sous licence. Le terme TWS (True Wireless Stereo), les
marques aptX® and aptX Low Latency® et les logos sont la propriété de Qualcomm ou de l’une de ses filiales
et peuvent être enregistrés dans un ou plusieurs territoires.

DEUTSCHE | WIE BENUTZT MAN VGtx
Glückwunsch und vielen Dank für Ihren Kauf des Soundcast VGtx-Senders. Bitte lesen Sie die
Betriebsanleitung vor der Inbetriebnahme sorgfältig durch.
Schnellstartanleitung:
1.Antenne befestigen: An der linken Seite des VGtx,
befestigen Sie die mitgelieferte Antenne am Antennenanschluss (im Uhrzeigersinn
drehen, bis die Antenne leicht fest sitzt). Optimieren Sie die Antennenleistung,
indem Sie die Antenne senkrecht ausrichten.
2. An den VGtx anschließen: Stellen Sie den Schieberregler der Audioquelle auf
der Rückseite des VGtx entweder auf Digital oder auf Analog. Schließen Sie das
entsprechende mitgelieferte, optische Toslink-Kabel oder das 3,5 mm Audiokabel
und alle nötigen, vom Nutzer bereitgestellten Adapter, an den entsprechenden
Audioeingang auf der Rückseite des VGtx an.
3. Strom ein/aus: Der VGtx kann mithilfe aller USB-Anschlüsse oder des mitge-
lieferten 5 V/500 mA USB-Netzteils betrieben werden. Der VGtx schaltet sich
automatisch ein, wenn USB-Strom anliegt, und kann durch Drücken der Multifunk-
tionstaste (eine Sekunde lang) aus- oder wieder eingeschaltet werden.
4. Kopplung: Stellen Sie Ihr Bluetooth®-Empfangsgerät in den Kopplungsmodus
(Pairing-Modus); befolgen Sie hierzu die spezifischen Anweisungen des Herstellers.
Drücken und halten Sie dann die Multifunktions-/Powertaste des VGtx sechs (6)
Sekunden lang, bis die Kontrollleuchte von einem langsamem blauen Blinken zu
einem blauen und roten Blinken wechselt. Wenn die Kopplung erfolgreich war,
leuchtet die Bluetooth-Kontrollleuchte durchgehend blau.
Für detaillierte Anweisungen und die Fehlerbehebung, fahren Sie bitte mit dem Lesen der Betriebsanleitung für
den Soundcast VGtx fort oder besuchen Sie die Webseite www.gosoundcast.com für zusätzliche Informationen.
Über den Soundcast VGtx
Der Soundcast VGtx ist ein drahtloser Stereosender mit großer Reichweite, mit
Bluetooth® 4.2 und dem aptX-Audio-Codec mit geringer Latenz. Verwenden Sie
diesen, um allen Lautsprechern der Soundcast VG-Serie eine drahtlose Stream-
ing-Technologie hinzuzufügen. Der VGtx kann außerdem für bereits vorhandene
Fernseh- oder Stereogeräte verwendet werden oder anstelle Ihres aktuellen
Übertragungsgeräts, um Ihre Funkreichweite zu erweitern. Der Soundcast VGtx
kann mit TWS-fähigen Geräten betrieben werden, welche ermöglichen, dass zwei
abgestimmte Bluetooth®-Empfangsgeräte in Stereo gekoppelt werden können
(abgestimmte Geräte müssen TWS, einschließlich andere,
kompatible Lautsprecher der VG-Serie, unterstützen).
• VGtx-Sendereinheit
• 3,5 mm auf 3,5 mm (90 cm)
analoges Audiokabel
• 3,5 mm (90 cm) TOSLink optisches Audiokabel
1. Antenne
2. Bluetooth-Statusanzeige
3. Stromanzeige /aktive
LLC-Verbindung (gelb)
4. Strom- / Bluetooth-Kop-
plungs-Multifunktionstaste
5. Analoganzeige
6. Digitalanzeige
7. Montagelaschen
8. Analoger Eingang
9. Eingangsmodus (digital
oder analog)
10. Optischer Audioeingang
11.*Optischer Audioeingang
12.Netzanschluss (Mikro-USB)
• Mikro-USB-Ladekabel
• USB-Netzteil
• Antenne
• Benutzerhandbuch
Standby-Modus/nicht anges-
chlossen/nicht eingeschaltet
Analog (Audioquelle)
Strom ein
aptX mit geringer Latenz aktiv
Digital (Audioquelle)
Wiederverbindungsmodus
(es wird nach dem letzten bekannten Gerät gesucht)
Verbindungsmodus
(wird an das zuletzt gekoppelte Gerät angeschlossen)
Kopplungsmodus
Gekoppelt
Kopplungsmodus gelöscht
Blinkt blau
Gelb
Grün
Die gelbe und grüne LED leuchten beide
Rot
Blinkt langsam blau
Blinkt schnell blau
Abwechselndes rotes und blaues Blinken
Durchgehend blau
Schnelles rotes und blaues Blinken
Status
Status
Status
Bluetooth-Kontroll-LED
Analoge/digitale Kontroll-LEDs
PWR/LL Kontroll-LED
Lieferumfang
Funktions-/
Tastenanordnung 1
7
8 9 10 11 12
23456

Systemanforderungen
VGtx überträgt hochwertiges Stereo-Audio an alle Lautsprecher der VG-Serie
und an alle kompatiblen drahtlosen Empfangsgeräte mit A2DP Bluetooth®-Profil.
Kompatible Geräte beinhalten alle Lautsprecher der VG-Serie, Bluetooth®-aktivierte
Kopfhörer/Lautsprecher oder Bluetooth®-Adapter.
Bluetooth-Codec-Unterstützung:
Der VGtx bietet Unterstützung für drei übliche Bluetooth®-Codecs: SBC, aptX, und
aptX mit geringer Latenz. Um mithilfe eines vorgegebenen Codecs zu koppeln,
müssen der VGtx und das gekoppelte Empfangsgerät den Codec unterstützen. Alle
Bluetooth®-Audiogeräte unterstützen üblicherweise den SBC-Codec. Soweit die
gerätespezifischen Dokumentationen nichts anderes angeben, ist es wahrschein-
lich, dass der VGtx über den SBC-Codec mit Ihrem Empfangsgerät gekoppelt
werden kann.
Anmerkung:
•Der VGtx ist so konzipiert, dass er mit allen Lautsprechern der VG-Serie funktion-
iert, und er verwendet automatisch den aptX-Codec mit geringer Latenz. Bei der
Verwendung anderer Produkte wird der aptX-Codec mit geringer Latenz nur dann
aktiv, wenn er mit einem Empfangsgerät gekoppelt wird, das den aptX mit geringer
Latenz auch unterstützt.
•Der aptX-Codec mit geringer Latenz ist im TWS-Modus nicht aktiv. Der VGtx zeigt
eine aktive aptX-Verbindung mit geringer Latenz an, wenn die PWR/LLC LED-An-
zeige gelb leuchtet.
aptX low latency
aptX
SBC
38ms ± 5ms
70ms ± 10ms
220ms ± 50ms
Bluetooth Device
Supported Codec The audio lag will
be around
Detaillierte Anweisungen
Strom ein/aus
Der VGtx unterstützt den Mini-USB-Strom. Verbinden Sie ein Ende des
mitgelieferten USB-Kabels mit der USB-Buchse des VGtx.
Verbinden Sie das andere Ende mit einem kompatiblen USB-Netzteil (5V/500mA),
Computer- oder Fernseh-USB-Anschluss. Jedes USB-Ladegerät, das mit einer
Leistung von 5 V @ 500 mA oder höher bemessen ist, kann mit dem VGtx
verwendet werden.
Anschlusskabel
Der VGtx wird mit folgenden Audiokabeln geliefert:
• 3,5 mm auf 3,5 mm (90 cm) analoges Audiokabel
• 3,5 mm (90 cm) TOSLink optisches, digitales Audiokabel
Anmerkung 1:
Der VGtx erfordert eine Audioeingangsquelle, wie z. B. einen Computer, ein Tablet,
Smartphone, Fernseh- oder Stereosystem etc., das dem VGtx ein Audiosignal/
Musik zum Übermitteln liefern kann. Das verwendete Kabel muss am entsprech-
enden Eingang angeschlossen werden: Entweder am 3,5 mm „analogen Eingang“
oder ein optisches, digitales Audiokabel am „digitalen Eingang“.
Anmerkung 2:
Das mitgelieferte USB-Kabel dient nur dem USB-Strom und bietet keine Audio-oder
Datentypverbindung. Für eine optimale Leistung verwenden Sie bitte immer das
USB-Kabel, das mit Ihrem VGtx mitgeliefert wurde.
Optionales Kabel – Glasfaser
Ein TOSLink digitales, optisches Kabel kann mit dem VGtx verwendet werden. Die
Audioquelle, z. B. Smartphone, TV, „digitaler Ausgang“ wird an den „digitalen Ein-
gang“ des VGtx angeschlossen.
* Der digitale Eingang des VGtx wird nur digitale Stereowiedergaben erkennen/de-
kodieren, keine Dolby-/DTS-kodierten Wiedergaben etc. Der optische „Durchgang“
durchläuft jedoch sowohl kodierte, als auch stereotype Wiedergaben.
Optischer Ausgang – TV-Anwendungen – im Freien
Der optische Ausgang des VGtx ist ein „Durchgangs“-Stromkreis. Der optische
Ausgang des VGtx kann mittels des optischen Ausgangs des Fernsehers mit
dem TV-Audio verwendet werden, selbst wenn ein vorhandener Soundbar- oder
Heimkino-Verstärker bereits am optischen Ausgang des Fernsehers angeschlos-
sen ist (die meisten Fernseher verfügen nur über einen optischen Ausgang). Siehe
Abbildung A. Der optische „Durchgangs“-Stromkreis ist aktiv, wenn die Einheit
ausgeschaltet wird, aber der VGtx muss Strom führen, damit der „Durchgang“
laufen kann.
Der VGtx kann in einer TV-Anwendung im Freien installiert werden. Der VGtx kann
hinter einem Fernseher montiert und an einer harten Fläche (Halterung, Wand)
mithilfe der justierbaren Montagelaschen befestigt werden. Der VGtx muss so
montiert werden, dass die Vorderseite der Einheit nach oben zeigt, um eine lange
Lebenserwartung sicherzustellen. Siehe Abbildung B.

Kopplung
Anmerkung: Der VGtx und Ihr Bluetooth®-Gerät sollten bei der Kopplung nicht
weiter als einen Meter auseinanderstehen (je näher, umso besser, bis beide
gekoppelt sind).
1. Schalten Sie Ihre Kopfhörer, Lautsprecher oder andere kompatible A2DP Blue-
tooth®-Profilgeräte ein und starten Sie den Kopplungsmodus (Pairing-Modus).
2. Bestätigen Sie, dass der VGtx eingeschaltet ist, indem Sie das USB-Netzkabel
an die Stromversorgung anschließen oder indem Sie den VGtx durch Drücken
(1 Sekunde) der Multifunktions-/Stromtaste einschalten, wenn die Einheit zuvor
Abbildung B
Abbildung A
Optischer Ausgang
vom TV
Zum optischen Eingang Optischer Ausgang zu
Soundbar/Verstärker
Power-Taste, LED-Anzeigen
zeigen nach oben
Justierbare
Montagelaschen Justierbare
Montagelaschen
Audioeingänge/-ausgänge, Stroman-
schluss zeigt nach unten
abgeschaltet war.
3. Stellen Sie den VGtx in den Kopplungsmodus (Pairing-Modus): Drücken und
halten Sie die Power-Taste sechs (6) Sekunden lang, bis die LED-Anzeigen des VGtx
von einem langsam blinkenden Blau zu einem abwechselndem Rot
und Blau wechseln.
4. Wenn die Kopplung abgeschlossen ist, leuchtet die Bluetooth-Anzeige des VGtx
durchgehend blau; die Kopplung ist aufgebaut
Anmerkung: : Lassen Sie den VGtx kontinuierlich am USB-Strom angeschlossen
und eingeschaltet, damit er sich automatisch wieder verbinden kann, wenn das
zuletzt gekoppelte Gerät innerhalb der Reichweite ist. Ist der VGtx ausgeschaltet
oder vom USB-Strom getrennt, sollte er sich automatisch wieder mit dem zuletzt
gekoppelten Empfangsgerät verbinden, wenn beide Geräte eingeschaltet und inner-
halb der Reichweite sind.
*VGtx mit TV Audio
Der mit einem Lautsprecher der VG-Serie gekoppelte VGtx verwendet den AptX mit
geringer Latenz und stellt somit sicher, dass es keine Verzögerungen oder Lippen-
synchronisationsprobleme gibt. Lautsprecher anderer Hersteller, die nicht über
AptX mit geringer Latenz verfügen, profitieren auch vom AptX mit geringer Latenz.
*Der TWS-Modus wird bei TV Audio nicht empfohlen, da der VGtx wieder auf Stan-
dard-AptX zurückgesetzt werden muss, wenn der TWS verwendet wird.
Speicher löschen/auf Werkseinstellung zurücksetzen
Der VGtx verfügt nur über einen Kopplungsspeicher für ein einzelnes Gerät. Um
den VGtx mit einem neuen Gerät zu koppeln, müssen Sie erneut in den Kopplung-
smodus (Pairing-Modus) gehen, indem Sie die Multifunktions-/Power-Taste sechs
(6) Sekunden lang drücken und gedrückt halten. Dies LÖSCHT das zuvor gekoppelte
Gerät und versetzt den VGtx in den Kopplungsmodus, in dem dann ein neues Gerät
unter Befolgung der oben erwähnten „Kopplungs“-Anweisungen
gekoppelt werden kann.
Um den VGtx wieder auf Werkseinstellung zurückzusetzen und den Kopplungsspe-
icher zu löschen, drücken und halten Sie die Multifunktions-/Power-Taste zehn (10)
Sekunden lang, bis die blaue und die rote LED-Anzeige schnell blinken, dann lassen
Sie die Multifunktions-/Power-Taste los. Dies zeigt an, dass der VGtx erfolgreich
zurückgesetzt und der Kopplungsspeicher gelöscht wurde.
Anmerkung: Nach einer Rücksetzung auf Werkseinstellung wird der interne
Bluetooth®-Kopplungsspeicher gelöscht. Sie müssen alle zuvor gekoppelten Geräte
erneut koppeln damit sich der VGtx wieder richtig mit ihnen verbindet.
Der Soundcast VGtx
schaltet sich nicht ein.
Der Ton (Audio) bricht
ab oder die Funkreich-
weite ist zu kurz
Keine Ton-/Audioausgabe
Die Lautstärke kann nicht
geregelt werden
Das Gerät lässt sich nicht
mit dem Soundcast
VGtx koppeln
Elektrostatische Störungen
oder Rauschen im
Audio/Ton.
1. Prüfen Sie den USB-Stromanschluss.
2. Stellen Sie sicher, dass Sie die Stromtaste mindestens
eine (1) Sekunde lang drücken und gedrückt halten, wenn
die Einheit zuvor abgeschaltet war.
1. Stellen Sie sicher, dass die Antenne fest angebracht
und korrekt positioniert ist (für maximale Reichweite so
weit wie möglich vom Erdboden entfernt nach oben).
2. Entfernen Sie den VGtx möglichst von anderen Geräten
mit 2,4 Ghz, wie z. B. Wi-Fi-Routern und Mikrowellen.
1. Prüfen Sie die Kabel, um sicherzustellen, dass sie an
den korrekten Buchsen angeschlossen sind.
2. Drücken Sie auf Wiedergabe (Play) oder stellen Sie
sicher, dass Ihr Audioquellgerät aktiv ist
3. Prüfen Sie, dass Ihre Lautstärke auf einer hörbaren
Stufe ist.
1. Der VGtx ist vom Design her ein passiver Sender und
verfügt daher nicht über einen Lautstärkeregler. Der nu-
tzerspezifische Lautstärkepegel muss über die Eingangs-
und/oder Ausgangsquellen justiert werden, die am VGtx
angeschlossen sind.
1. Stellen Sie sicher, dass Sie den mitgelieferten
USB-Adapter verwenden, da die USB-Anschlüsse am PC
nicht immer eine ausreichende/stabile Leistung bieten
können.
2. Stellen Sie den VGtx weit entfernt von Verstärkern
oder Aktivlautsprechern auf.
3. Stellen Sie sicher, dass der VGtx mit dem korrek-
ten Line-Level-Ausgang an Ihrem Stereoempfänger
verbunden ist.
4. Stellen Sie sicher, dass Sie mit dem Schiebeschalter
an der Rückseite des VGtx den richtigen Eingang (analog
oder digital) ausgewählt haben.
1. Stellen Sie sicher, dass der VGtx und das Gerät, mit
dem Sie ihn koppeln, nah beieinander stehen.
2. Stellen Sie sicher, dass alle anderen Bluetooth®-kom-
patiblen Empfangsgeräte, mit denen Sie den VGtx NICHT
koppeln möchten, entweder ausgeschaltet sind, oder
dass die Bluetooth®-Funktion deaktiviert ist.
3. Stellen Sie sicher, dass sich beide Geräte im Kopplung-
smodus (Pairing-Modus) befinden. Mit LED ausgestattete
Geräte blinken üblicherweise im Kopplungsmodus und
leuchten durchgehend, wenn sie verbunden sind.
4. Stellen Sie sicher, dass Ihr Gerät mit dem drahtlosen
A2DP Bluetooth®-Stereo-Audio-Profil kompatibel ist.
Problem Lösung
FAQ und Fehlerbehebung
Pflege und Wartung
Bitte lesen Sie sich die folgenden Empfehlungen durch, bevor Sie Ihren Soundcast
VGtx verwenden:
• Um die interne Schaltung des VGtx nicht zu beschädigen, vermeiden Sie, dass
dieser Flüssigkeiten ausgesetzt ist.
• Extreme Temperaturen können die Lebensdauer elektronischer Geräte verkürzen.
• Nicht fallen lassen: Wenn Sie den VGtx fallen lassen, kann dies die interne Schal-
tung beschädigen
Spezifikationen
• Bluetooth v4.2
• Unterstützt das A2DP Bluetooth®-Profil
• Audio-Codec-Unterstützung: SBC, aptX, aptX mit geringer Latenz
• Betriebsbereich: Bis zu 50 Meter (150 ft)
• Betriebsfrequenz: 2,402 GHz bis 2,480 GHz
• USB-Strom: DC 5 V @ 500 mA oder höher
• Größe: 20 mm (H ) x 103 mm (B) x 54 mm (T) - 3/4” (H) x
4” (W) x 2” (D)
Support
Weitere Einzelheiten und Antworten auf allgemeine Fragen finden Sie
unter http://gosoundcast.com/support
Wenn Ihre Frage auf der Support-Seite nicht beantwortet wird, kontaktieren Sie
unter +1 (619) 591-0126, gebührenfrei USA (800) 722-1293
FCC-Information
Dieses Gerät erfüllt Teil 15 der FCC-Richtlinien. Der Betrieb des Geräts unterliegt den folgenden zwei Bedingun-
gen: (1) Dieses Gerät darf keine schädlichen Störungen verursachen und (2) dieses Gerät muss alle empfan-
genen Störungen akzeptieren; einschließlich Störungen, die einen unerwünschten Betrieb verursachen könnten.
Erklärung der Federal Communications Commission (FCC):
Dieses Gerät wurde getestet und es wurde festgestellt, dass es die Grenzwerte für digitale Geräte der Klasse
B, gemäß Teil 15 der FCC-Richtlinien einhält. Diese Grenzwerte wurden entworfen, um einen vertretbaren
Schutz vor schädlichen Störungen bei Installationen in einem Wohngebiet zu bieten. Das Gerät erzeugt,
verwendet und kann Hochfrequenzwellen ausstrahlen und kann, falls nicht in Übereinstimmung mit den
Anweisungen installiert, schädliche Störungen im Funkverkehr verursachen. Es gibt jedoch keine Garantie,
dass eine Störung bei einer besonderen Installation nicht auftreten wird. Falls dieses Gerät schädliche
Störungen beim Radio- oder Fernsehempfang verursacht, welche durch das Ein- und Ausschalten des Geräts
festgestellt werden können, empfehlen wir dem Bediener, die Störung durch eine oder mehrere der folgenden
Maßnahmen zu beheben:
-Richten Sie die Antenne neu aus oder verändern Sie die Position der Antenne.
-Vergrößern Sie den Abstand zwischen dem Empfänger und dem Gerät.
-Schließen Sie das Gerät an den Ausgang eines vom Empfangsgerät separaten Schaltkreises an.
-Ziehen Sie Ihren Händler oder einen erfahrenen Radio-/Fernsehtechniker zu Rate.
Warnung:
Änderungen oder Modifikationen an dieser Einheit, die nicht ausdrücklich von der Partei, die für die Einhaltung
der Vorschriften verantwortlich ist, genehmigt wurden, können dem Benutzer die Benutzerrechte für das
Gerät entziehen. Dieses Gerät wurde getestet, um die FCC-Norm einzuhalten: FÜR DEN HEIM- UND BÜROGE-
BRAUCH. Dieses Gerät hält die RF-Strahlenbelastungsgrenzen der FCC für eine unkontrollierte Umgebung ein.
Dieses Gerät und seine Antenne(n) dürfen nicht angesiedelt oder in Verbindung mit anderen Antennen oder
einem Sender sein. © 2017 Soundcast, LLC. Alle Rechte vorbehalten. Bluetooth ist eine Handelsmarke der
Bluetooth SIG und wird unter Lizenz verwendet. Der Begriff TWS (True Wireless Stereo), und die Marken und
Logos aptX® und aptX Low Latency® sind Handelsmarken des Unternehmens Qualcomm oder eines seiner
Konzernunternehmen und können in einer oder mehr Gerichtsbarkeiten registriert sein.

NEDERLANDS | HOE TE GEBRUIKEN VGtx
Gefeliciteerd en bedankt voor uw aankoop van de Soundcast VGtx.
Lees de gebruiksaanwijzingen aandachtig alvorens het apparaat te gebruiken.
Snelstartgids:
1. De antenne aansluiten: sluit aan de linkerkant van de VGtx de meegeleverde
antenne op de antenne-aansluiting aan (draai in de richting van de klok totdat het
goed vastzit). Optimaliseer de prestatie van de antenne door de antenne rechtop
te zetten.
2. Verbinden met de VGtx: zet de schuifschakelaar van de audiobron op de achter-
kant van de VGtx op digitaal of analoog. Sluit de correcte, meegeleverde optische
Toslink of de 3,5 mm audiokabel, en elke andere nodige adapter die is meegeleverd
voor de gebruiker, aan op de juiste audio-ingang op de achterkant van de VGtx.
3. In-/uitschakelen: de VGtx kan met elke USB-poort of met de meegeleverde
5V/500mA USB-voeding worden gebruikt. De VGtx gaat automatisch aan wanneer
de USB-voeding wordt gebruikt. Het apparaat kan worden uitgeschakeld en weer
ingeschakeld door de multifunctionele knop gedurende één seconde in te drukken.
4. Koppelen: zet uw Bluetooth®-ontvangstapparaat in de koppelmodus en volg de
instructies van de fabrikant. Druk daarna op de multifunctionele/aan-/uitknop van
de VGtx en houd deze (6) seconden lang vast totdat het licht van de indicator van
langzaam blauw knipperend in snel rood en blauw knipperend verandert. Wanneer
het koppelen geslaagd is, verandert de Bluetooth-indicator in continu blauw.
Raadpleeg de handleiding van de Soundcast VGtx voor gedetailleerde instructies en
probleemoplossingen, of ga naar www.gosoundcast.com voor meer informatie.
Over de Soundcast VGtx
De Soundcast VGtx is een draadloze stereo zender met groot bereik voorzien
van Bluetooth® 4.2, en de aptX lage vertragingscodec. Het wordt gebruikt om
draadloze streamingtechnologie aan alle Soundcast VG series luidsprekers toe te
voegen. U kunt het ook gebruiken voor bestaande televisie of stereo apparatuur, of
in plaats van uw huidige zender voor groter draadloos bereik. De Soundcast VGtx
kan samenwerken met apparaten geschikt voor TWS, waardoor twee afgestemde
Bluetooth® ontvangstapparaten in stereo kunnen worden gekoppeld (gekoppelde
apparaten moeten TWS ondersteunen, met inbegrip van andere compatibele
Soundcast VG series luidsprekers
• De VGtx zendereenheid
• (3ft) 3,5 mm tot 3,5 mm
analoge audiokabel
• (3ft) Toslink optische audiokabel
1. Antenne
2. Bluetooth-statusindicator
3. Aan-/uitindicator / actieve
LLC-aansluiting (geel)
4. Aan-/uitknop / Multifunctionele
knop voor Bluetooth-koppeling
5. Analoge indicator 7
6. Digitale indicator
7. Montagelipjes
8. Analoge ingang
9. Ingangmodus (digitaal
of analoog)
10. Optische audio-ingang
11. *Optische audio-uitgang
12. Ingangsaansluiting voor
voeding (Micro USB)
• Micro USB-oplaadkabel
• USB-voeding
• Antenne
• Gebruikershandleiding
Stand-bymodus/Niet
verbonden/ingeschakeld
Analog (Audio Source)
Power on
aptX Low Latency active
Digital (Audio Source)
Herverbindingsmodus
(Zoeken naar laatst bekende apparaat)
Verbindingsmodus
(Verbinden met laatst gekoppelde apparaat)
Koppelmodus
Gekoppeld
Koppelgeheugen gewist
Blauw knipperend
Geel
Groen
Geel/groen branden allebei
Rood
Langzaam blauw flikkerend
Snel blauw flikkerend
Afwisselend rood en blauw knipperend
Continu blauw
Blauw en rood knipperen allebei snel
Status
Status
Status
Bluetooth-ledindicator
Analoge/digitale ledindicators
PWR/LL-ledindicator
Wat zit er in de doos?
Functies / Knoppen
1
7
8 9 10 11 12
23456

Systeemvereisten
VGtx zendt hoogwaardige stereo audio naar alle VG series luidsprekers en elk com-
patibel draadloos ontvangstapparaat met A2DP Bluetooth®-profiel. Compatibele
apparaten omvatten alle VG series luidsprekers, voor koptelefoons/luidsprekers
die Bluetooth® ondersteunen of Bluetooth®-adapters.
Ondersteuning van Bluetooth-codec:
De VGtx biedt ondersteuning voor drie gangbare Bluetooth®-codecs: SBC, aptX, en
aptX lage vertraging. Om te koppelen met behulp van een bepaalde codec, moeten
zowel de VGtx en het gekoppelde ontvangstapparaat de codec ondersteunen. Alle
Bluetooth®-audioapparaten ondersteunen normaal gesproken de SBC-codec. Ten-
zij anders aangegeven in de apparaatspecifieke informatie, koppelt de VGtx naar
alle waarschijnlijkheid met uw ontvangstapparaat met de behulp van de SBC-codec.
Opmerking:
• De VGtx is ontworpen om met alle VG series luidsprekers en gebruikt automatisch
de aptX lage vertragingscodec. Wanneer u andere producten gebruikt, is de aptX
lage vertragingscodec alleen actief indien gekoppeld met een ontvangstapparaat
dat ook aptX lage vertraging ondersteunt.
• De aptX lage vertragingscodec is in TWS-modus niet actief. Wanneer de PWR/
LLC ledindicator geel is, geeft de VGtx een actieve verbinding met AptX lage
vertraging aan.
aptX lage vertraging
aptX
SBC
38ms ± 5ms
70ms ± 10ms
220ms ± 50ms
Codec ondersteund door
Bluetooth-apparaat De audio vertraging
ligt ongeveer rond
Gedetailleerde instructies
In-/uitschakelen
De VGtx ondersteunt mini USB-voeding. Verbind één uiteinde van de meegeleverde
USB-voedingskabel met de VGtx-USB-aansluiting en de andere uiteinde met een
compatibele USB-voedingseenheid (5 V/500 mA), computer of USB-poort van de
tv. Elke USB-oplader met een uitgang van 5 V@500 mA of hoger is compatibel en
kan worden gebruikt met de VGtx.
Aansluitkabels
De volgende audiokabels worden met de VGtx meegeleverd:
• (3ft) 3,5 mm tot 3,5 mm analoge audiokabel
• (3ft) Toslink optische digitale audiokabel
Opmerking 1: de VGtx heeft een audio-ingangsbron nodig zoals een computer,
tablet, smartphone, televisie of stereosysteem enz., die de VGtx een audiosignaal/
muziek kan bieden om te zenden. De kabel die wordt gebruikt, moet op de juiste
ingang worden aangesloten: of met 3,5 mm op de “Analoge ingang”, of met een
optische digitale kabel op de “Digitale ingang”.
Opmerking 2: de meegeleverde USB-kabel is alleen voor USB-voeding en is niet
geschikt voor het zenden van audio of gegevens. Gebruik voor optimale prestaties
altijd de meegeleverde USB-kabel met uw VGtx.
Optionele kabel - optisch glasvezelkabel
Een Toslink digitale optische kabel kan samen met de VGtx worden gebruikt. De
“digitale uitgang” van de audiobron, bijvoorbeeld een smartphone, tv, wordt aan de
“digitale uitgang” van de VGtx aangesloten.
* De digitale ingang van de VGtx herkent/decodeert alleen stereo streams, geen
Dolby/DTS-gecodeerd streams enz. De optische “doorgang” gaat echter door
zowel gecodeerde als stereo streams heen.
Optische uitgang - tv-toepassingen - buitenshuis
De VGtx optische uitgang is een “doorgang”-circuit. De optische uitgang van de VGtx
kan met tv-audio worden gebruikt via de optische uitgang van de tv, zelfs wanneer
er al een bestaande soundbar of versterker voor thuisbioscoop is aangesloten aan
de optische uitgang van de tv (de meeste tv’s hebben maar één optische uitgang).
Bekijk afbeelding A. Het optische “doorgang”-circuit is actief wanneer de eenheid
is uitgeschakeld, maar de VGtx moet stroom hebben om de “doorgang” te laten
functioneren.
De VGtx kan in een tv-toepassing buitenshuis worden geïnstalleerd. De VGtx kan
achter de tv worden gemonteerd en aan een harde ondergrond worden bevestigd
(montagebeugels, muur) met behulp van de montagelipjes. Monteer de VGtx met
de voorkant van de eenheid omhoog wijzend om een lange levensverwachting te
garanderen. Bekijk afbeelding B.
Table of contents
Languages:
Other Soundcast Transmitter manuals


