SoundGate HONPDSDR User manual

Stillwater Designs & Audio, Inc
3100 N Husband Street
Stillwater, OK 74075
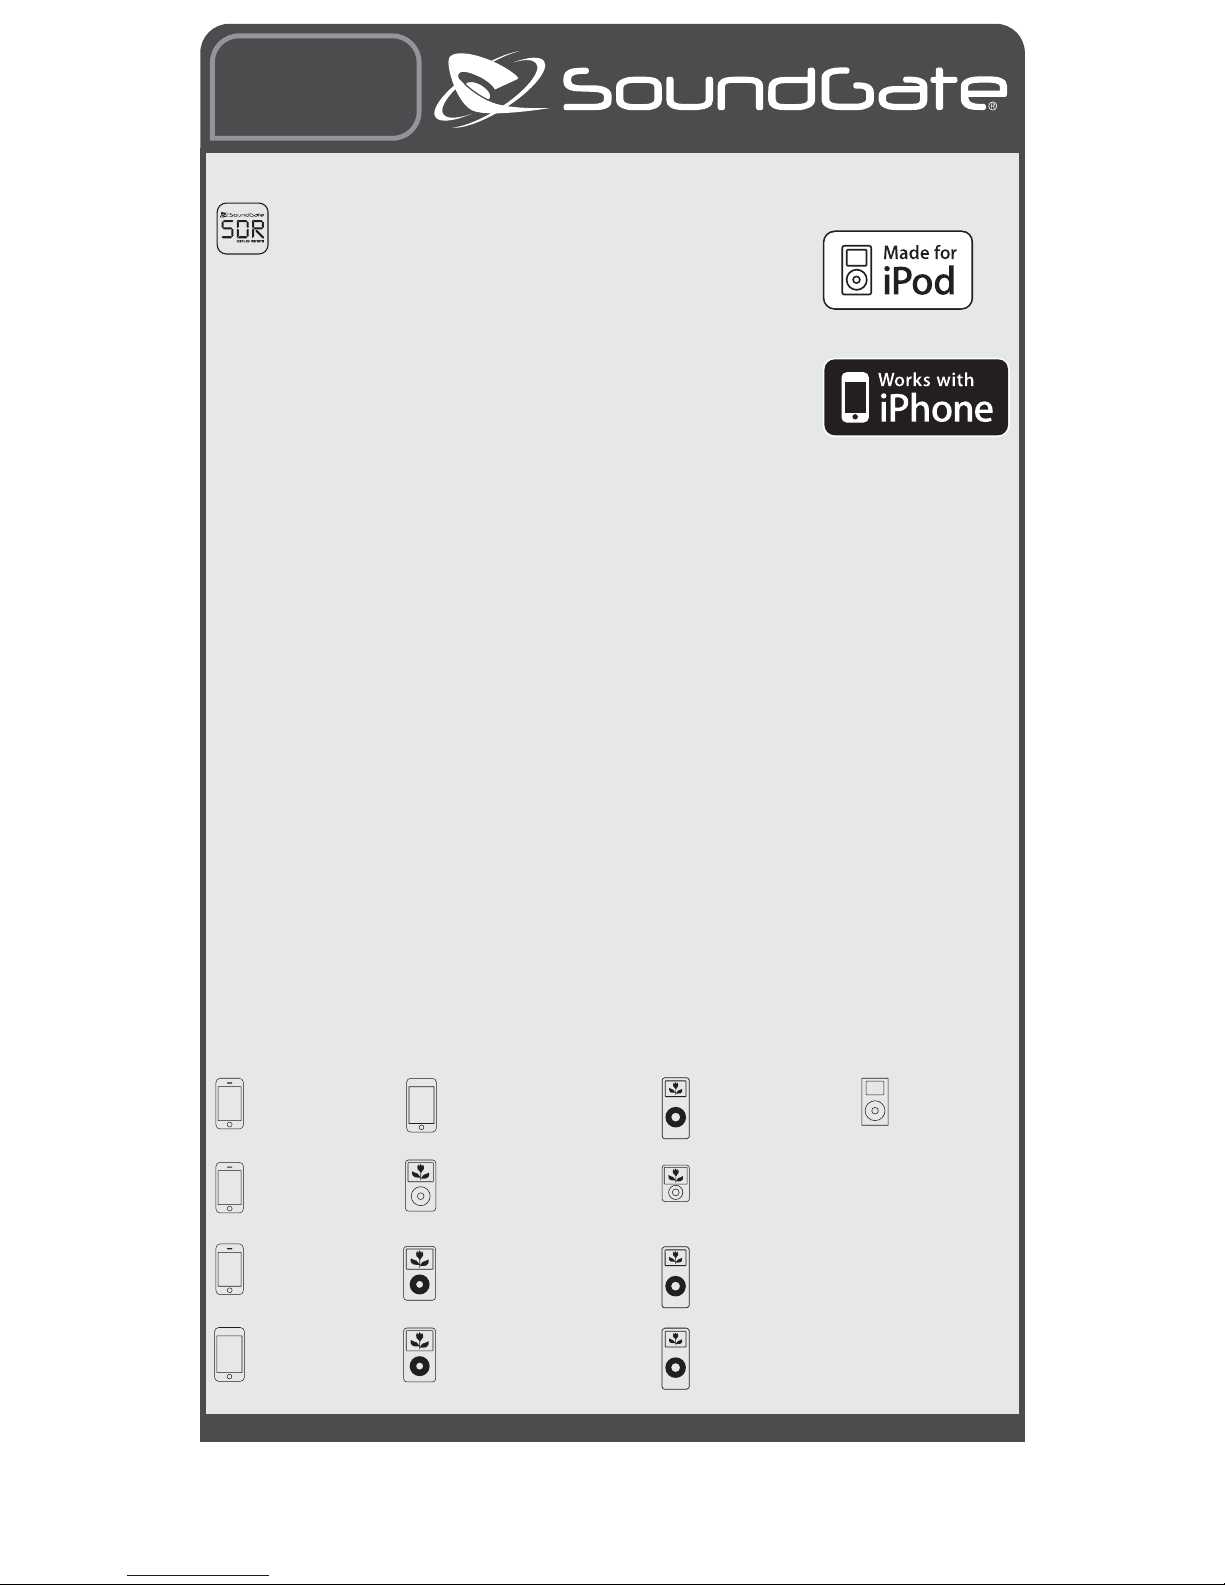
Note: This device can emulate one of three sources
to integrate into your vehicle’s audio system,
replacing that input with your iPod or iPhone.
• CD Changer
• Satellite Radio (XM1/XM2)
• Satellite Radio Source 2 (XM2)
HONPDSDR
Rev 20090724
Purpose/Features
The HONPDSDR with exclusive SoundGate Display Remote
(SDR™) technology directly connects your iPod®or iPhone™
digital mobile device to your vehicle’s factory audio system. It
provides full text and control of your iPod/iPhone through your factory
radio or navigation display in the Honda/Acura vehicles listed below. The
exclusive SDR mode delivers text and simultaneous control directly
from your iPod and from the radio/steering wheel controls for the ultimate
“in-car” iPod experience. The HONPDSDR allows unlimited playlists and
unlimited songs per playlist. It also allows you to search by artist/album/
playlist from your radio, as well as directly from your iPod with SDR Mode
active. It safely charges all current iPod and iPhone devices.
The HONPDSDR works in the following vehicles:
ACURA
MDX32005–2009
TL32004–2008
TSX32004–2008
RDX32007–2009
HONDA
Accord 2004–2009
Accord22003
Civic / Hybrid / Si 2006–2009
CRV 2007–2009
CRV12005–2006
Element12005–2009
Fit 2007–2009
Insight 2010
Odyssey12005–2009
Pilot12006–2010
Ridgeline 2006–2009
S200012004–2009
HONDA GOLD WING
GL180022001–2009
Vehicle must support satellite radio to
display text.
1- Must be satellite radio capable.
2- Radio will only support CD mode (No Text Display)
3- Nav/AcuraLink Vehicles must use CD emulation or
disconnect the XM radio to use satellite emulation.
*- Limited Functionality
Please visit www.soundgate.com for the most
current compatibility information. Contact SoundGate
*
*
iPod touch
iPod touch
iPod classic
iPod
iPod
iPod mini
iPod nano
iPod nano
iPod nano
iPod nano
iPhone 3G
iPhone 3GS
iPhone
2nd generation
8GB 16GB 32GB
80GB 120GB 160GB
5th generation (video)
4th generation (color display)
4GB 6GB
4th generation
3rd generation
2nd generation
1st generation
8GB 16GB
16GB 32GB
4GB 8GB 16GB
8GB 16GB 32GB
30GB 60GB 80GB
20GB 30GB 40GB 60GB
8GB 16GB
4GB 8GB
2GB 4GB 8GB
1GB 2GB 4GB

2
Before You Begin
WARNING
DO NOT DISASSEMBLE OR ALTER
Doing so may result in an accident, fire, or electric shock.
Do not block your view
Do not mount product or any added audio/video equipment where it can block your view through the windshield
or block your view of dashboard indicators and displays.
Do not block safety devices
Do not mount product or any added audio/video equipment where it can obstruct the operation of any safety
device, such as the airbag.
Distraction warning
Do not allow product or any added audio/video equipment to distract you while you are driving.
BEFORE WIRING, DISCONNECT THE CABLE FROM THE NEGATIVE BATTERY TERMINAL
Before starting any installation work , wait 90 seconds after turning the ignition switch to the LOCK position and disconnecting
the negative (-) terminal from the battery. The supplemental restraint system (SRS), or airbag(s) is equipped with a backup power
source. If installation work is started less than 90 seconds after disconnection of the negative (-) battery terminal, the SRS may
deploy. When the negative (-) terminal cable is disconnected from the battery, the clock and audio systems’ memory may be
erased. Before starting installation work, make a record of the clock and audio systems’ memory settings. When installation is
complete, reset the clock and audio systems to their previous settings. Power tilt, power telescopic steering column, power seats,
power mirrors, power shoulder belt anchorage, and other power accessories may or may not be equipped with a memory function;
consider keeping a record of these settings as well.
When installation is complete, readjust the features to their previous settings.
Never use a backup power supply (such as another battery) during installation work in an attempt to avoid losing these memory
settings.
CAUTION
DO NOT ALLOW CABLES TO BECOME ENTANGLED IN SURROUNDING OBJECTS
Cables or wiring that obstruct or get caught on places such as the steering wheel, shift lever, brake pedals, etc.
can be extremely hazardous.
DO NOT INSTALL IN LOCATIONS WITH HIGH MOISTURE OR DUST
Moisture or dust may result in product failure.
HAVE THE WIRING AND INSTALLATION DONE BY EXPERTS
The wiring and installation of this product requires special technical skills and experience.
USE ONLY SPECIFIED ACCESSORY PARTS
Use of other than specified parts may damage product internally.
FOLLOW THE OPERATIONAL AND INSTALLATION MANUALS.
YOU SHOULD READ AND FAMILIARIZE YOURSELF THOROUGHLY WITH THE FOLLOWING INFORMATION
PRIOR TO INSTALLING AND USING THIS UNIT. IN ADDITION, YOU MUST CAREFULLY READ AND FOLLOW THE
INSTALLATION SCHEMATICS AND INSTRUCTIONS FOR THE PRODUCT AND THE VEHICLE IN WHICH IT IS BEING
INSTALLED. FAILURE TO FOLLOW INSTALLATION INSTRUCTIONS MAY DAMAGE THE PRODUCT AND THE
VEHICLE, WILL VOID THE PRODUCT WARRANTY, AND MAY VOID THE VEHICLE WARRANTY.
CHECK YOUR LOCAL LAWS
Some States/Provinces or other governmental jurisdictions (such as cities) may have laws that prohibit the
operation of a video screen within the sight of the driver. If you have purchased such a product, you should use
the product only in locations where it is legal to do so, and if you do use the product, set up the screen so it is
only visible to passengers.
TROUBLESHOOTING
Should this product fail to operate properly, please contact your Dealer or SoundGate Technical Support

3
OR
2
DIP ON
PRODUCT OVERVIEW
HONPDSDR Module
Cable for iPod
HONSAT Harness
HONPDSDR
Harness
HONSAT Cable
For XM2 Emulation, you will need to install the HONSAT
Harness in one of two configurations and establish a
connection between the blue HONSAT cables. See Step
3 for details.
For vehicles with rear
seat entertainment or
an external CD Changer
For vehicles without rear
seat entertainment or an
external CD changer.
Use the DIP switches to choose
your emulation mode (CD, XM1/2 or
Sat source 2 - XM2). See note and
diagram on Pg. 4.
PACKAGE CONTENTS:
(1) Cable for iPod
(1) Blue extension cable
(1) HONPDSDR Module
(1) HONPDSDR Harness
(1) HONSAT Harness

4
INSTALLATION
IMPORTANT
The HONPDSDR module can emulate one of three audio sources at a time: CD, XM1/
XM2 or XM2. Use XM1/XM2 emulation in vehicles without a factory satellite radio. Use
XM2 emulation in vehicles with a factory satellite radio; your factory satellite tuner will be
retained as XM1. For Acura vehicles please see note 3 on the front page. Use CD emulation
mode if your vehicle is not satellite capable. Use of your factory CD changer is retained.
CD Mode does not support text display. Set your emulation mode according to the switch
settings below. If you are installing the HONPDSDR in the Honda Gold Wing you must use
CD emulation mode. Please see page 10 for Gold Wing installation instructions.
BEFORE YOU BEGIN:
1. Turn the ignition off.
2. Remove the negative battery terminal.
3. Have your radio security code, if equipped.
Installation
2
DIP ON
2
DIP ON
2
DIP ON
2
DIP ON
XM1/XM2 Emulation XM2 Emulation CD Emulation
Gain access to the factory radio’s rear panel. The
HONPDSDR connects directly to the rear panel of the factory radio. Full
or partial disassembly of the dash will be necessary. If you are unsure of
this procedure, please consult a factory service manual or have the work performed by a mobile
electronics specialist. Pay special attention to warnings or instructions regarding working near
airbags, other safety devices, or security systems.
11
Connect the appropriate harness to the factory radio.
If there is a factory 14-pin plug present, disconnect it and replace it with
the 14-pin male plug on the HONPDSDR Harness. Take the remaining
14-pin female connection of the HONPDSDR Harness and plug it into the disconnected factory
plug.
22
33To Use XM2 Emulation: With the main connection of the HONPDSDR
Harness in place, you will need to install the HONSAT Harness in one of
two configurations based upon your vehicle and its options.
OR

5
33AA
33BBXM2 Configuration 2 (For vehicles with Rear-Seat
Entertainment or an external CD changer): You MUST
disconnect the 14-pin factory plug at your satellite receiver and replace it with the 14-pin male
plug on the HONSAT Harness. Reconnect the factory plug to the 14-pin female plug on the
HONSAT Harness. Using the included patch cable, connect the HONSAT cable (blue bullet plug)
located on the male plug of the HONSAT Harness to the HONPDSDR Harness. For Acura vehicles
please see note 3 on the front page.
XM2 Configuration 1 (For vehicles without Rear-Seat
Entertainment or an external CD changer): Disconnect the factory
14-pin plug from the HONPDSDR Harness and replace it with the 14-pin male plug of the
HONSAT Harness. Connect the factory plug to the 14-pin female plug of the HONSAT Harness.
Using the included patch cable, connect the HONSAT cable (blue bullet plug) located on the
female plug of the HONSAT Harness to the HONPDSDR Harness.
INSTALLATION
44Mount all components. Mount the HONPDSDR behind or under
the dash (mounting hardware not included). Be careful not to drill into
wiring or vehicle mechanisms. You are solely responsible for securely
fastening the HONPDSDR in your vehicle. Make certain that wires and cables cannot be damaged
by screws, clips or sharp, exposed pieces of metal.
Ensure that the HONPDSDR plug is in a convenient location for connection. Connect the included
cable for your iPod to the HONPDSDR module, then connect the other end to your iPod.
OPERATION
Using your iPod/iPhone. The SoundGate HONPDSDR will allow
you to control the functions of your iPod or iPhone through the controls
of your factory radio or navigation unit. To listen to your iPod, use the
appropriate button on your radio to choose CD, XM1 or XM2 input, selecting the one you’ve
chosen to emulate with the HONPDSDR.
The HONPDSDR may operate in one of two modes: SDR and Radio Interface (RI).
Using SDR mode will leave your iPod unlocked and available to use directly while still
displaying text on the radio. The HONPDSDR also allows you to simultaneously
control your iPod from your device or from the factory radio buttons and/or steering
wheel controls.This is an exclusive SoundGate feature you won’t find anywhere else!
When listening to music in SDR mode, once the end of a playlist is reached, playback will stop.
Press the SCAN button twice to re-initialize SDR mode and start playback from the beginning,
use the radio to select a new track/playlist, or, since your iPod is unlocked in SDR mode, simply
use your iPod to select a new playlist. When choosing a playlist in SDR Mode, use Playlist Down
to move backward alphabetically and Playlist Up to move forward.
55

6
OPERATION
iPod in SDR Mode iPod in RI Mode
Please note that the tables and diagrams on the following pages are a
generic list of controls. Your radio might not support all functions.
SDR MODE/RI MODE
RADIO BUTTON iPod FUNCTION
Skip/Tune/Seek Track
Skip/Tune/Seek Track
Disc/Playback Playlist
Disc/Playback Playlist
Repeat Repeat All
Random Random All
Scan/Disc Repeat Toggle SDR/RI Mode
CD Emulation
Mode: Control
Functions
RI mode will lock your iPod, displaying “OK to Disconnect” on the screen, but will allow artist
and album scrolling. If you are using an iPod Mini or 4th Generation iPod, you will be limited to
RI mode with simple controls. When searching through artists/albums/playlists in RI mode, if the
end of the list is reached when tracking forward or backward, your iPod will move to the next or
previous artist/album/playlist alphabetically.
You may toggle between SDR and RI Mode by pressing the SCAN button on your radio.
Once your iPod is connected, use the tables and diagrams on the following pages to
determine what functions of your iPod device are controlled by the factory radio system.
For more information on the HONPDSDR and other exciting products offered by SoundGate,
please contact your Dealer or SoundGate Technical Support at 800-256-0808 or email

7
OPERATION
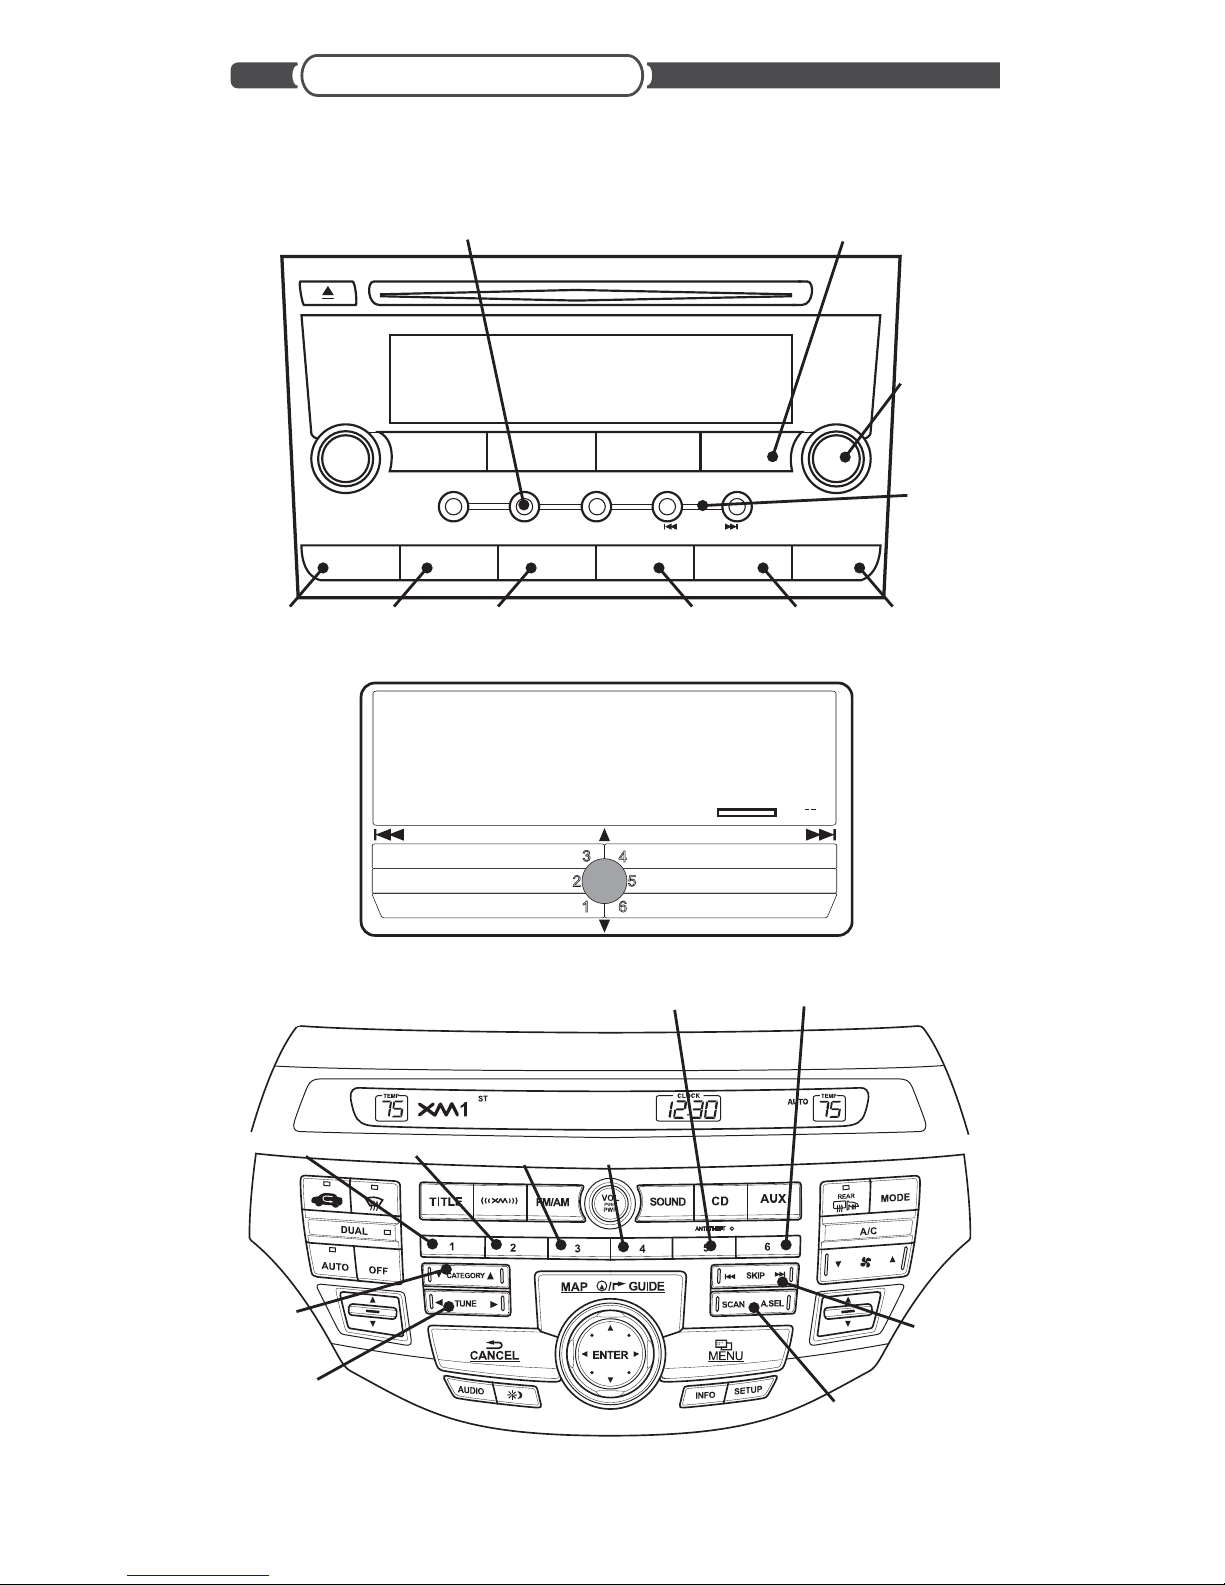
Honda-based radios are capable of two search modes when sourced to satellite. If using
your iPod in SDR mode is favored, we strongly suggest using channel searching. If you
prefer to search by album/ artist, use RI mode with the radio in Category Searching mode.
To switch between searching modes press and hold the TITLE/DISP/MODE button.
CD Emulation Mode: Control Functions
CD 1 1’23 1:23
1
DISC TRACK
Random All
Repeat All
Toggle SDR/RI Mode
Playlist Up/Down
Track Up/Down
Track Up/Down
CHANNEL
SEARCHING
CATEGORY SEARCHING
SDR/RI MODE SDR MODE RI MODE
RADIO
BUTTON
iPod
FUNCTION
RADIO BUTTON iPod FUNCTION iPod FUNCTION
Seek/Tune/Skip Track Seek/Tune/Skip ---------- Artist
Seek/Tune/Skip Track Seek/Tune/Skip ---------- Artist
Category Track Category/Playback Track Track
Category Track Category/Play Track Track
Preset 1 Random All Preset 1 Random All Random All
Preset 2 Repeat All Preset 2 Repeat All Repeat All
Preset 3 Playlist Preset 3 Playlist Playlist
Preset 4 Playlist Preset 4 Playlist Playlist
Preset 5 ---------- Preset 5 ---------- Album
Preset 6 ---------- Preset 6 ---------- Album
Tune Knob Track / Tune Knob ---------- Artist /
Title/DISP/Mode Use quick presses to scroll through text. Press and hold to toggle between Category or
Channel searching.
Scan Toggle SDR/RI Mode
XM1/XM2 & XM2 Emulation Mode: Control Functions
8
OPERATION
XM1/XM2 & XM2 Emulation Mode: Control Functions
1:01 CH
XM1 Never Apart
VOL
PWR
AM/FM
12 34 56
CD/AUX XM DISP
CATEGORY
SEEK/SKIP
RDMSCANRPT
TUNE
SOUND
Random All Repeat All
Toggle SDR/RI Mode Scroll Text or Toggle
Category/Channel search
Playlist Down Playlist Up Album Down
(CAT/RI Mode only)
Album Up
(CAT/RI Mode only)
Track Up/Down
Artist Up/Down
(CAT/RI Mode
only)
Track Up/Down
Artist Up/Down
(CAT/RI Mode
only)
Never apart
Track Up/Down
Artist Up/Down
(CAT/RI Mode only)
Track Up/Down
Artist Up/Down
(CAT/RI Mode
only)
Track Up/Down
Random All Repeat All Playlist Up Playlist Down
Album Up
(CAT/RI Mode only)
Album Down
(CAT/RI Mode only)
Toggle SDR/RI Mode
CHANNEL
CATEGORY
CATEGORY CATEGORY
VOL
AUDIO MENU
NAME
252 Playlist Down
251 Repeat
250 Random
253 Playlist Up
254 Album Down
255 Album Up
TITLE
090 HONPDSDR
Rosie’s Rock
Moses
XM1
Never apart

9
GOLD WING INSTALLATION
BEFORE YOU BEGIN:
1. Turn the ignition off.
Installation
2
DIP ON
2
DIP ON
CD Emulation
11
22
OR
Remove the seat. The HONPDSDR connects directly to the factory
CD changer plug under the seat. Using an Allen wrench, remove the 4
Allen bolts located on the side handles and lift the seat.
Locate the CD changer connection. See figure 1, page 10.
Do NOT connect the HONPDSDR Harness yet. If your Gold Wing is
equipped with a factory CD changer, disconnect the Gold Wing’s CD
changer plug.
NOTE: The HONPDSDR, when used with the Honda Gold Wing, does not
support Satellite Radio Emulation. Please use CD emulation according to the
diagrams below.

10
44Route iPod cable and mount all components. Route the iPod
cable and mount the HONPDSDR (mounting hardware not included).
Be careful not to drill into wiring or vehicle mechanisms. You are solely
responsible for securely fastening the HONPDSDR in your vehicle. Make certain that wires and
cables cannot be damaged by screws, clips or sharp, exposed pieces of metal.
Ensure that the HONPDSDR plug and iPod cable are in convenient locations for connection.
Reassemble the motorcycle.
GOLD WING INSTALLATION
33Complete installation (Please follow these directions or
the HONPDSDR will not work). Turn the ignition on. With the
dipswitches on the HONPDSDR module set to CD mode, connect the HONPDSDR harness to the
HONPDSDR module. Connect the 14-pin male plug of the HONPDSDR to the white 14-pin female
plug of the Gold Wing.
Wait 5 seconds. Cycle the ignition (off/on) and press the CD button. The radio should recognize
the HONPDSDR as the CD source. If this does not happen, repeat this sequence. Leave the
factory 14-pin plug disconnected.
Figure 1
14-Pin White Female Plug
(CD Changer)

11
SDR MODE/RI MODE
RADIO BUTTON iPod FUNCTION
SW Track
SW Track
Hold SW/Preset 4 Playlist
Hold SW/Preset 3 Playlist
Preset 1 Random All
Preset 2 Repeat All
Preset 6 Toggle SDR/RI Mode
CD Emulation
Mode: Control
Functions
GOLD WING OPERATION
Random All Repeat All
Playlist Down
Playlist Up
Set audio source to HONPDSDR
Audio button
Toggle SDR/RI
Mode
Volume Lever
Track/Playlist Lever

12
TROUBLESHOOTING
TROUBLESHOOTING
If the HONPDSDR does not autoplay when selected as the radio’s audio source, press the
SCAN button twice.
If the radio displays “Check iPod”, disconnect and then reconnect the iPod. If the message
remains, reset your iPod using the instructions below.
1. Toggle the Hold switch on, then off.
2. Press and hold the Menu and Center buttons simultaneously until the Apple logo appears.
On older iPod devices, press the Play/Pause and Menu buttons. On the iPod Touch and
iPhone, press the Menu and Sleep buttons.
3. If you’re still having problems, you may need to recharge your iPod with a wall charger
or your computer.
4. If your iPod is not recognized on your computer or will not take a charge, the battery may
need to be completely drained. Put the iPod aside for 24 hours, then try charging again.
www.soundgate.com
iPhone is a trademark of Apple Inc.
iPod is a trademark of Apple Computer, Inc., registered in the U.S. and other countries.
“Made for iPod” means that an electronic accessory has been designed to connect specifically to iPod and has been certified
by the developer to meet Apple performance standards.
“Works with iPhone” means that an electronic accessory has been designed to connect specifically to iPhone and has been
certified by the developer to meet Apple performance standards.
Apple is not responsible for the operation of this device or its compliance with safety and regulatory standards.
Copyright© 2004-2009 SoundGate®. All Rights Reserved. SoundGate® is a registered trademark of Stillwater Designs, Inc.
All other trademarks are the property of their respective owners.
Stillwater Designs & Audio, Inc
3100 N Husband Street
Stillwater, OK 74075
Importante: Este dispositivo puede emular una de
tres fuentes para integrarse al sistema de audio del
vehículo a fin de reemplazar esa entrada con el iPod
o iPhone.
• Cambiador de CD
• Radio satelital (XM1/XM2)
• Fuente de radio satelital 2 (XM2)
HONPDSDR
Rev 20090724
Purpose/Features
El HONPDSDR cuenta con la exclusiva tecnología SoundGate Display
Remote (SDR™) que conecta directamente su dispositivo móvil digital iPod®
o iPhone™ al sistema de audio de fábrica de su vehículo. Podrá visualizar
textos completos y tener un control total de su iPod/iPhone a través de la radio o de
la pantalla de navegación en los vehículos Toyota/Scion que se listan más adelante. El
modo exclusivo SDR proporciona texto y control simultáneo directamente desde el
iPod y desde los controles de radio/volante para ofrecer la experiencia iPod más increíble
en el automóvil. El HONPDSDR permite una cantidad ilimitada de listas de reproducción,
así como una cantidad ilimitada de canciones por lista de reproducción.También permite
realizar búsquedas por artista/álbum/lista de reproducción desde la radio y directamente
desde el iPod con el modo SDR activo. Recarga de forma segura todos los dispositivos
iPod/iPhone actuales.
El HONPDSDR funciona en los siguientes vehículos:
ACURA
MDX32005–2009
TL32004–2008
TSX32004–2008
RDX32007–2009
HONDA
Accord 2004–2009
Accord22003
Civic / Hybrid / Si 2006–2009
CRV 2007–2009
CRV12005–2006
Element12005–2009
Fit 2007–2009
Insight 2010
Odyssey12005–2009
Pilot12006–2010
Ridgeline 2006–2009
S200012004–2009
HONDA GOLD WING
GL180022001–2009
Vehicle must support satellite radio to
display text.
1- Debe tener capacidad para radio satelital.
2- El radio únicamente soportará el modo de CD (no
muestra texto)
3- En los vehículos Nav/AcuraLink se debe usar emulación
de CD o desconectar el radio XM para hacer uso de la
emulación satelital.
*- Funcionalidad limitada
Para obtener información más actualizada sobre
compatibilidad, visite www.soundgate.com.
Comuníquese con SoundGate al (800) 256-0808 o a
*
*
iPod touch
iPod touch
iPod classic
iPod
iPod
iPod mini
iPod nano
iPod nano
iPod nano
iPod nano
iPhone 3G
iPhone 3GS
iPhone
2nd generation
8GB 16GB 32GB
80GB 120GB 160GB
5th generation (video)
4th generation (color display)
4GB 6GB
4th generation
3rd generation
2nd generation
1st generation
8GB 16GB
16GB 32GB
4GB 8GB 16GB
8GB 16GB 32GB
30GB 60GB 80GB
20GB 30GB 40GB 60GB
8GB 16GB
4GB 8GB
2GB 4GB 8GB
1GB 2GB 4GB
14
Antes de comenzar
ADVERTENCIA
NO DESARMAR NI ALTERAR
Si lo hiciera, podría provocar un accidente, un incendio o una descarga eléctrica.
No obstruya su visión
No coloque el producto ni cualquier equipo agregado de audio/video donde pueda obstruir su visión a través del
parabrisas o bloquear la visión de las pantallas o los indicadores del tablero.
No obstruya los dispositivos de seguridad
No coloque el producto ni cualquier equipo agregado de audio/video donde pueda obstruir el funcionamiento de
cualquier dispositivo de seguridad, como el airbag (las bolsas de aire).
Advertencia de distracción
No permita que el producto ni cualquier equipo agregado de audio/video lo distraigan mientras conduce.
ANTES DE REALIZAR LA INSTALACIÓN ELÉCTRICA, DESCONECTE EL CABLE DEL BORNE NEGATIVO DE
LA BATERÍA
Antes de comenzar cualquier tarea de instalación, espere 90 segundos después de girar la llave de encendido a la posición de bloqueo y
desconecte el borne negativo (-) de la batería. El sistema de retención suplementario (SRS) o bolsa(s) de aire está equipado con una fuente
de energía de respaldo. Si las tareas de instalación comienzan antes de que transcurran los 90 segundos después de la desconexión
del borne negativo (-) de la batería, el SRS podría dispararse. Cuando desconecte el cable del borne negativo (-) de la batería, el reloj y
las memorias de los sistemas de audio podrían borrarse. Antes de comenzar las tareas de instalación, tome nota de la configuración del
reloj y de las memorias de los sistemas de audio. Cuando la instalación esté completa, restablezca el reloj y los sistemas de audio a las
configuraciones previas. La inclinación eléctrica, el ajuste telescópico del volante, los asientos eléctricos, los espejos eléctricos, el anclaje
eléctrico de los cinturones de seguridad y demás accesorios eléctricos pueden o no estar equipados con una función de memoria; también
procure tomar nota de estas configuraciones.
Cuando termine con la instalación, restablezca las funciones a las configuraciones previas.
Nunca utilice un suministro de energía de respaldo (como otra batería) durante las tareas de instalación para evitar la pérdida de las
configuraciones de la memoria.
PRECAUCIÓN
NO PERMITA QUE LOS CABLES SE ENREDEN EN LOS OBJETOS QUE LOS RODEAN
Los cables o la instalación eléctrica que representen una obstrucción o se atasquen en lugares tales como el volante,
la palanca de cambios, los pedales de freno, etc. pueden ser extremadamente peligrosos.
NO REALICE LA INSTALACIÓN EN LUGARES CON NIVELES ELEVADOS DE HUMEDAD O POLVO
La humedad o el polvo pueden provocar fallas en el producto.
LA INSTALACIÓN Y EL CABLEADO DEBEN SER REALIZADOS POR EXPERTOS
La instalación y el cableado de este producto requieren experiencia y habilidades técnicas especiales.
UTILICE ÚNICAMENTE PIEZAS Y ACCESORIOS ESPECIFICADOS
El uso de piezas que no sean las especificadas puede dañar el producto internamente.
SIGA LAS INSTRUCCIONES DE LOS MANUALES DE INSTALACIÓN Y OPERACIÓN
DEBE LEER LA SIGUIENTE INFORMACIÓN Y ESTAR COMPLETAMENTE FAMILIARIZADO CON ELLA ANTES DE INSTALAR
Y USAR ESTA UNIDAD. ADEMÁS, DEBE LEER Y SEGUIR CUIDADOSAMENTE LOS ESQUEMAS DE INSTALACIÓN Y LAS
INSTRUCCIONES DEL PRODUCTO Y DEL VEHÍCULO EN EL QUE SE REALICE LA INSTALACIÓN. EL INCUMPLIMIENTO DE
LAS INSTRUCCIONES DE INSTALACIÓN PUEDE DAÑAR EL PRODUCTO Y EL VEHÍCULO, ANULARÁ LA GARANTÍA DEL
PRODUCTO Y PODRÍA ANULAR LA GARANTÍA DEL VEHÍCULO.
CONSULTE LAS LEYES LOCALES
Algunos estados/provincias u otras jurisdicciones gubernamentales (como ciudades) pueden tener leyes que prohíban
la operación de una pantalla de video dentro del alcance de la vista del conductor. Si compró un producto con estas
características, deberá usarlo sólo en lugares donde su operación sea legal y, si usa el producto, ubique la pantalla de
manera que sólo sea visible para los pasajeros.
SOLUCIÓN DE PROBLEMAS
Si el producto no funciona correctamente, comuníquese con su distribuidor o con el Servicio de Asistencia Técnica de

15
O
2
DIP ENCENDIDO
INFORMACIÓN GENERAL DEL PRODUCTO
Módulo HONPDSDR
Cable para iPod
Cable preformado
HONSAT
Cable preformado
HONPDSDR
Cable HONSAT
Para la emulación XM2 deberá instalar el cable
preformado HONSAT en una de dos configuraciones
y establecer una conexión entre los cables azules
HONSAT. Consulte el paso 3 para obtener más detalles.
Para vehículos sin sistema
de entretenimiento para
el asiento trasero o sin un
cambiador de CD externo.
Para vehículos con sistema
de entretenimiento para el
asiento trasero o con un
cambiador de CD externo.
Use los interruptores DIP para
seleccionar el modo de emulación
(CD, XM1/XM2 o XM2). Consulte la
nota y el diagrama de la página 16.
CONTENIDO DEL PAQUETE:
(1) Cable para iPod
(1) Cable de extensión azul
(1) Módulo HONPDSDR
(1) Cable preformado HONPDSDR
(1) Cable preformado HONSAT

16
INSTALACIÓN
El módulo HONPDSDR puede emular una de tres fuentes de audio a la vez: CD,
XM1/XM2 o XM2. Use emulación XM1/XM2 en vehículos que no cuenten con radio
satelital instalado de fábrica. Use emulación XM2 en vehículos que sí cuenten con radio satelital
instalado de fabrica; su sintonizador satelital instalado de fabrica se mantendrá como XM1.
Para los vehículos Acura vea la nota 3 en la portada. Use el modo de emulación de CD si su
vehículo no tiene capacidad satelital. Se mantendrá el uso de su cambiador de CD instalado
de fábrica. El modo de CD no tiene capacidad para mostrar texto en pantalla. Ajuste su modo
de emulación de acuerdo a los ajustes del interruptor que se muestran más adelante. Si está
instalando el HONPDSDR en la Honda Gold Wing, deberá usar el modo de emulación de CD.
Vea la página 20 para instrucciones de instalación en la Gold Wing.
ANTES DE COMENZAR:
1. Apague el vehículo.
2. Desconecte el borne negativo de la batería.
3. Tenga su código de seguridad de radio disponible, si cuenta con esa característica.
Instalación
2
DIP ENCENDIDO
2
DIP ENCENDIDO
2
DIP ENCENDIDO
2
DIP ENCENDIDO
Emulación
XM1/XM2 Emulación XM2 Emulación de CD
Acceda al panel trasero del sistema de audio de fábrica.
El HONPDSDR se conecta directamente al panel trasero del sistema de audio
de fábrica. Será necesario desarmar el tablero total o parcialmente. Si no está
seguro de cómo llevar a cabo este procedimiento, consulte el manual de reparación de fábrica o acuda a
un especialista en electrónica móvil para que realice el trabajo. Preste especial atención a las advertencias
o instrucciones relativas a trabajar cerca de las bolsas de aire, otros dispositivos de seguridad o sistemas
de seguridad.
11
Conecte el cable preformado correspondiente al sistema de
audio de fábrica. Si el sistema de audio de fábrica cuenta con un conector
de 14 pines, desconéctelo y reemplácelo con el conector macho de 14 pines
del cable preformado HONPDSDR. Tome el conector hembra de 14 pines restante del cable preformado
HONPDSDR y conéctelo al conector de fábrica que se encuentra desconectado.
22
33Si está usando emulación XM2: Una vez que la conexión principal del
cable preformado HONPDSDR esté en su lugar, deberá instalar el cable preformado
HONSAT en una de dos configuraciones según las opciones de su vehículo.
O BIEN

17
33AA
33BBConfiguración 2 de XM2 (para vehículos con sistema de
entretenimiento para el asiento trasero): DEBE desconectar el conector
instalado de fábrica de 14 pines de su receptor satelital y reemplazarlo con el conector macho de 14 pines
del cable preformado HONSAT. Reconecte el conector instalado de fábrica al conector hembra de 14 pines
en el cable preformado HONSAT. Usando el cable de conexión incluido, conecte el cable HONSAT (conector
azul en forma de bala) ubicado en el conector macho del cable preformado HONSAT al cable preformado
HONPDSDR. Para vehículos Acura vea la nota 3 en la portada.
Configuración 1 para XM2 (Para vehículos sin sistema de
entretenimiento para el asiento trasero o sin cambiador de CD
externo): Desconecte el conector instalado de fábrica de 14 pines del cable preformado HONPDSDR y
reemplácelo con el conector macho de 14 pines del cable preformado HONSAT. Inserte el conector instalado
de fábrica al conector hembra de 14 pines del cable preformado HONSAT. Usando el cable de conexión
incluido, conecte el cable HONSAT (conector azul en forma de bala) ubicado en el conector hembra del cable
preformado HONSAT al cable preformado HONPDSDR.
INSTALACIÓN
44Instale todos los componentes. Coloque el HONPDSDR detrás o debajo
del tablero (el soporte de fijación no está incluido). Evite perforar el cableado o
algún mecanismo del vehículo. Usted es el único responsable de fijar de forma
segura el HONPDSDR en su vehículo. Asegúrese de evitar que los tornillos, las abrazaderas o las piezas de
metal sobresalientes o filosas puedan dañar el cableado y la instalación eléctrica.
Asegúrese de que el conector HONPDSDR esté en un lugar adecuado para poder conectarlo. Conecte el cable
para iPod incluido al módulo HONPDSDR y después conecte el otro extremo a su iPod.
FUNCIONAMIENTO
Uso del iPod/iPhone. El HONPDSDR de SoundGate le permitirá controlar
las funciones del iPod o del iPhone a través de los comandos de su sistema de
audio de fábrica o de la unidad de navegación. Para escuchar su iPod, utilice
el botón apropiado del sistema de audio con el fin de seleccionar la entrada CD, XM1/XM2 o XM2 que haya
elegido para emular con el HONPDSDR.
El HONPDSDR puede funcionar en uno de dos modos: SDR e interfaz de radio (RI).
Si usa el modo SDR, el iPod quedará desbloqueado y disponible para usarlo directamente mientras el
texto continúa mostrándose en el sistema de audio. El HONPDSDR también le permitirá controlar
simultáneamente el iPod desde el mismo dispositivo o desde los comandos del sistema de audio de
fábrica y/o los controles del volante. ¡Esta es una característica exclusiva de SoundGate que no encontrará
en ningún otro lugar!
Cuando escuche música en el modo SDR, una vez que llegue al final de una lista de reproducción la
reproducción se detendrá. Presione el botón SCAN (Explorar) dos veces para volver a iniciar el modo SDR y
comenzar la reproducción desde el principio. Utilice el sistema de audio para seleccionar una nueva pista/
lista de reproducción o, ya que el iPod esta desbloqueado en modo SDR, simplemente seleccione una nueva
lista de reproducción desde el iPod. Cuando seleccione una lista de reproducción en el modo SDR, utilice
la función descendente de la lista de reproducción para avanzar alfabéticamente hacia atrás o la función
ascendente de la lista de reproducción para avanzar hacia adelante.
55

18
FUNCIONAMIENTO
iPod en modo SDR iPod en modo RI
Tenga en cuenta que las tablas y los diagramas de las páginas siguientes hacen referencia a una
lista de controles genéricos. Su sistema de audio puede no ser compatible con todas las funciones.
Modo de emulación de CD: funciones de control
MODO SDR/RI
BOTÓN DEL SISTEMA DE AUDIO FUNCIÓN DEL IPOD
Buscar/Sintonizar/Saltar Pista
Buscar/Sintonizar/Saltar Pista
Disco Lista de reproducción
Disco Lista de reproducción
Repetir Repetir todo
Modo aleatorio Todo aleatorio
Explorar/Disco Repetir Alternar entre los modos SDR y RI
El modo RI bloqueará el iPod y mostrará “OK to Disconnect” (Desconexión permitida) en la pantalla, pero le
permitirá desplazarse entre artistas y álbumes. Si utiliza un iPod mini o un iPod 4.ª generación, sólo podrá
usar el modo RI. Cuando busque artistas/álbumes/listas de reproducción en el modo RI, si llega al final de la
lista al avanzar hacia adelante o hacia atrás, el iPod pasará al artista/álbum/lista de reproducción siguiente o
anterior alfabéticamente.
Puede alternar entre los modos SDR y RI si presiona el botón SCAN (Explorar) del sistema de audio. Una vez
que el iPod esté conectado, utilice las tablas y los diagramas de las páginas siguientes para determinar qué
funciones de su dispositivo iPod se pueden controlar desde el sistema de audio de fábrica. Para obtener más
información sobre el HONPDSDR y otros increíbles productos de SoundGate, comuníquese con su distribuidor
o con el Servicio de Asistencia Técnica de SoundGate al 800-256-0808 o por correo electrónico: support@
soundgate.com.

19
FUNCIONAMIENTO
BÚSQUEDA DE CANALES BÚSQUEDA POR CATEGORÍAS
MODO SDR/RI MODO SDR MODO RI
BOTÓN DEL
SISTEMA DE
AUDIO
FUNCIÓN
DEL IPOD
BOTÓN DEL
SISTEMA DE AUDIO
FUNCIÓN DEL IPOD FUNCIÓN DEL
IPOD
Buscar/Sintonizar/
Saltar
PistaBuscar/Sintonizar/
Saltar
---------- Artista
Buscar/Sintonizar/
Saltar
Pista Buscar/Sintonizar/
Saltar
---------- Artista
Categoría Pista Categoría/Reproducción
PistaPista
Categoría Pista Categoría/Play Pista Pista
Memoria 1 Todo aleatorio Memoria 1 Todo aleatorio Todo aleatorio
Memoria 2 Repetir todo Memoria 2 Repetir todo Repetir todo
Memoria 3 Lista de
reproducción
Memoria 3 Lista de reproducción Lista de reproducción
Memoria 4 Lista de
reproducción
Memoria 4 Lista de reproducción Lista de reproducción
Memoria 5 ---------- Memoria 5 ---------- Álbum
Memoria 6 ---------- Memoria 6 ---------- Álbum
Perilla de
sintonización
Pista / Perilla de sintonización ---------- Artista /
Titulo/Mostrar/Modo Presione rápidamente para recorrer el texto. Mantenga presionado el botón para cambiar entre las
búsquedas de Categorías o por Canales.
Scan Alternar entre los modos SDR y RI
Los radios de los automóviles Honda tienen dos modos de búsqueda cuando su fuente
es satelital. Si desea utilizar su iPod en modo SDR, es muy recomendable que use la
búsqueda de canales. Si prefiere buscar por álbum/artista, use el modo RI con el radio
puesto en modo Category Searching (Búsqueda por categorías). Para cambiar entre
los modos de búsqueda mantenga presionado el botón TITLE/DISP/MODE (TITULO/
MOSTRAR/MODO).
CD 1 1’23 1:23
1
DISC TRACK
Todo aleatorio
Repetir todo
Alternar entre los
modos SDR y RI
Lista de reproducción Arriba/Abajo Pista Arriba/Abajo
Pista Arriba/Abajo
Modo de emulación XM1/XM2 y XM2: funciones de control

20
FUNCIONAMIENTO
1:01 CH
XM1 Never Apart
VOL
PWR
AM/FM
12 34 56
CD/AUX XM DISP
CATEGORY
SEEK/SKIP
RDMSCANRPT
TUNE
SOUND
Todo aleatorio Repetir todo
Alternar entre los modos SDR y RI Recorrer Texto ó Cambiar entre
búsqueda de Categorías/por Canales
Lista de
reproducción Abajo
Lista de reproducción
Arriba
Álbum Abajo
(Modo CAT/RI
únicamente)
Álbum Arriba
(Modo CAT/RI
únicamente)
Pista Arriba/
Abajo
Artista Arriba/
Abajo (Modo
CAT/RI
únicamente)
Pista Arriba/
Abajo
Artista Arriba/
Abajo (Modo
CAT/RI
únicamente)
Never apart
Pista Arriba/Abajo
Artista Arriba/
Abajo (Modo CAT/
RI únicamente)
Pista Arriba/
Abajo
Artista Arriba/
Abajo (Modo
CAT/RI
únicamente)
Pista Arriba/
Abajo
Todo aleatorio Repetir todo Lista de reproducción Arriba Lista de reproducción Abajo
Álbum Arriba
(Modo CAT/RI únicamente)
Álbum Abajo
(Modo CAT/RI únicamente)
Alternar entre los
modos SDR y RI
CHANNEL
CATEGORY
CATEGORY CATEGORY
VOL
AUDIO MENU
NAME
252 Playlist Down
251 Repeat
250 Random
253 Playlist Up
254 Album Down
255 Album Up
TITLE
090 HONPDSDR
Rosie’s Rock
Moses
XM1
Never apart
Modo de emulación XM1/XM2 y XM2: funciones de control
Table of contents
Languages:


