Spa Sciences CLARO User manual

User Guide
Acne Treatment Light
Therapy System
DERMATOLOGIST RECOMMENDED
Clinically Tested
Wavelengths

CONGRATULATIONS
Congratulations on your new CLARO from Spa Sciences, the next
generation in photo light therapy.
Eective, safe, pain-free and easy to use, the CLARO uses not one
but two types of light therapy that work synergistically to treat your
acne. Blue light eliminates acne causing bacteria and red light calms
the inammation, two of the major causes of acne breakouts. The
combination of blue and red light was clinically found to clear mild to
moderate inammatory acne better and faster than either blue light alone
or 5% benzoyl peroxide cream1. The CLARO will be your best friend in the
ght to eliminate acne and prevent future breakouts.
For important information about safety and how to use the
device, please read the full Instructions for Use booklet before
you use your CLARO for the rst time.
If you have any questions or problems with the CLARO, please contact
customer service at: [email protected]
1Papageorgiou P, Katsambas A, Chu A: Phototherapy with blue (415 nm) and red (660 nm)
light in the treatment of acne vulgaris. Br J Dermatol 2000, 142(5):973-8.

2 | CLARO
TABLE OF CONTENTS
PACKAGE CONTENTS
BEFORE YOU START
WHAT IS THE CLARO USED FOR?
HOW DOES THE CLARO WORK?
IMPORTANT SAFETY INFORMATION
CONTRAINDICATIONS
WARNINGS
PRECAUTIONS
POSSIBLE SIDE EFFECTS
FIRST STEPS
GETTING TO KNOW YOUR CLARO
HOW TO CHANGE TREATMENT HEADS
CHARGING THE BATTERY
CLARO CONTROLS
PRE-TEST BEFORE USE
TREATMENT STEPS
WHAT TO EXPECT
CARE AND MAINTENANCE
TROUBLESHOOTING
TECHNICAL SPECIFICATIONS
WARRANTY INFORMATION
3
4
5
8
8
9
10
11
12
13
15
16
17
19
20
CLARO |3
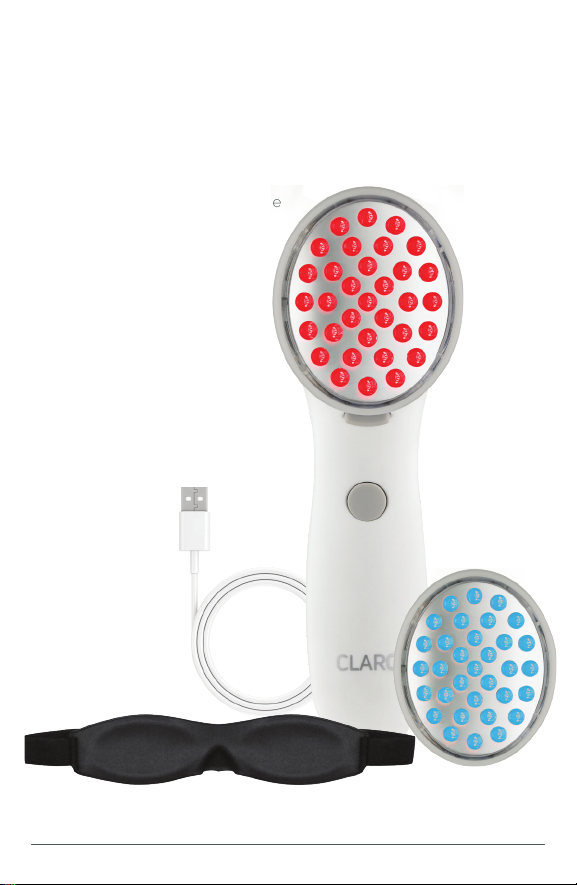
PACKAGES CONTENTS
The CLARO comes with the following components:
• Rechargeable CLARO™ Device
• Blue Light Treatment Head
• Red Light Treatment Head
• USB Charging Cord
• Pair of Safety Goggles
• Operating Manual
• Built-in Timer and Memory

4 | CLARO
BEFORE YOU START
WHAT IS THE CLARO USED FOR?
The CLARO is indicated for the treatment of mild to moderate
inammatory acne.
Mild acne is generally dened as up to approximately 30 spots
which may or may not be inamed including papules (small bumps
with a rough texture) and pustules (inamed bump lled with white
or yellow pus, i.e., pimple).
Moderate acne is generally dened as more numerous spots
and pimples (up to approximately 100) with greater inammation
(redness/tenderness).
If you have nodules (solid mass under the skin) or cysts (liquid-lled
bag-like structure under the skin), then your acne is more severe.
Consult your doctor for the appropriate treatment.
HOW DOES THE CLARO WORK?
Using the CLARO according to instructions has been proven to
result in the destruction of the bacteria causing acne, healing of
existing pimples, and the reduction in the appearance of new
pimples. Best results can be expected after 2-4 weeks of daily
3-minute treatments.

CLARO |5
IMPORTANT SAFETY INFORMATION
CONTRAINDICATIONS
Never use this device over any suspicious lesion. Using the device
over a lesion can result in delaying the best medical treatment.
According to the AAD (American Academy of Dermatology) typical
characteristics of potentially auspicious lesions include:
• Asymmetry: one half of the abnormal skin area is dierent
than the other half
• Borders: irregular borders
• Color: varies from one area to another with shades of tan,
brown, or black (sometimes white, red, blue)
• Diameter: usually (but not always) larger than 6 mm in size
(diameter of a pencil eraser)
• Bleeding: Any skin growth that bleeds or will not heal
Do not use if you have a history of light triggered seizures or
migraine headaches.
WARNINGS
• DO NOT use the CLARO on your eyes or eyelids or stare
directly into the lights.
• DO NOT use the CLARO to treat (i) severe nodular or cystic
acne or (ii) moles, warts, open sores, cancerous lesions or
skin conditions other than mild or moderate acne. See your
healthcare professional.
• DO NOT treat any one aected area of the skin more than
6 minutes per day (3 minutes blue light and 3 minutes red
light).
• DO NOT share the CLARO with other people as this may
result in transferring germs that could cause infection.

6 | CLARO
• DO NOT allow children to use the CLARO unless under adult
supervision.
• DO NOT use the CLARO if it is wet or where the handpiece or
power cord while plugged in can come in contact with water.
• Keep the CLARO away from open ame or ammable
aerosol products. The CLARO is not suitable for use in the
presence of a ammable anesthetic mixture with air or
Oxygen or Nitrous Oxide.
• DO NOT use the CLARO if your skin is sensitive to light or you
are taking medications that may make you sensitive to light.
• DO NOT USE if you are pregnant.
• Stop using if you feel pain or your skin gets uncomfortably
hot. See a healthcare professional if you have skin redness
that persists more than 24 hours after treatment.
• DO NOT use the CLARO in the presence of debrillation as
the device is not protected against the high electrical output
from debrillators.
• DO NOT use the CLARO if it is visibly damaged or not
functioning properly or attempt to open or repair the CLARO
yourself. There are no user serviceable parts. Contact
customer service at [email protected].
PRECAUTIONS
• The CLARO is designed so that the light is only activated
when the treatment head is in contact with the skin. However,
take additional precautions to protect your eyes by wearing
the goggles provided with the device and never shine the
light into your eyes or those around you.

CLARO |7
• Do not operate the CLARO in the presence of other
devices that intentionally emit electromagnetic energy
in an unshielded manner, as such devices may aect the
CLARO operation (for example, mobile radio frequency
communication equipment).
• Do not scratch, mark or otherwise damage the light emitting
surface.
• The CLARO is intended for short term operation only.
• Use only the components that come with your CLARO. Use
of any other components, particularly any other USB Cord,
could cause injury to the user or damage to the equipment.
• The CLARO does not have any user serviceable or
replaceable parts. If you should encounter problems with
your device, do not attempt any repairs or replacements.
Please contact customer service at: customerservice@
spasciences.com.
POTENTIAL SIDE EFFECTS
When used according to the instructions, side eects and
complications associated with use of the CLARO are rare. However,
every cosmetic procedure, including those designed for home
use, involve some degree of risk. Therefore, it is important that you
understand and accept the risks and complications that can occur
with energy-based systems designed for home use. Blue and red
light treatments are generally very well-tolerated. Most users sense
the moderate heat applied by the device during use, with no further
discomfort.
Minor Skin Discomfort / Skin Redness: Your skin may become
slightly irritated and/or red after using the device. This is a typical
and transient phenomenon. If the irritation or redness does not
disappear within a few days, please consult a physician or a
dermatologist.
8 | CLARO
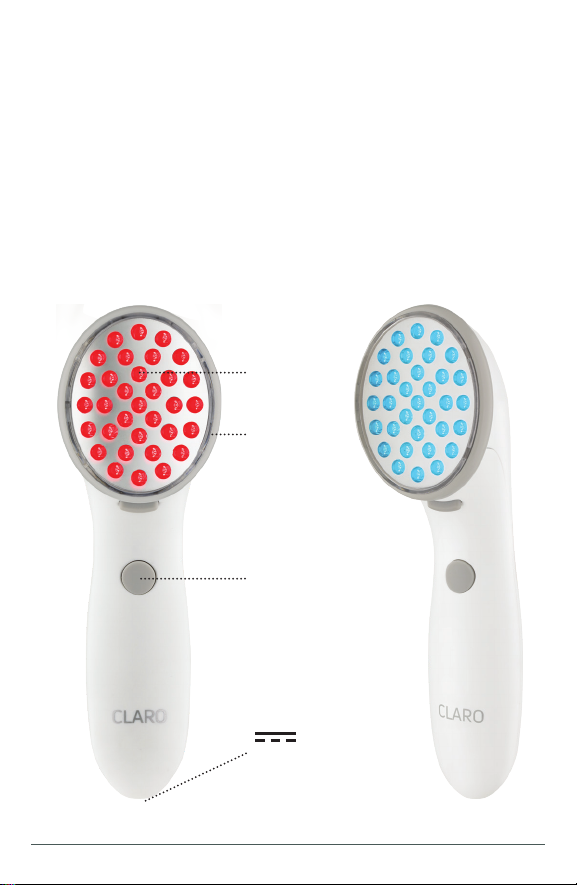
FIRST STEPS
On / O
Button
LED
Light
Treatment
Head
DC Input
Getting started
• Unpack the device and all the accessories
• Review the information below, which will tell you how to use
your device safely and eectively
GETTING TO KNOW YOUR CLARO

CLARO |9
HOW TO CHANGE TREATMENT HEADS
The CLARO Comes With 1 Blue and 1 Red LED Light Treatment Head:
Blue and Red Light
Treatment Heads
To change Treatment Heads:
1. Press the Treatment Head Release Lever at the back of the
device and slide out existing Treatment Head.
2. Slide your desired Treatment Head into the slot until it is
securely installed with a clicking sound.
1.
2.
Release
Lever
Slide
Treatment
Head
10 | CLARO
CHARGING THE BATTERY
Your CLARO comes with a partial initial charge from the manufacturer
but it is recommended to fully charge the unit before full treatment.
Initial Charging. Before your rst use, charge CLARO for 12 hours. If you
do not use your CLARO for 3+ months, periodically charge for 6 Hours
to maintain the battery life. When battery is low, the light will ash red 3
times then auto shut o. Do not use CLARO while charging.
Turn on the Power Button and check the Indicator (green) light. The light
will be blinking if the battery needs to be charged. A steady green light
means the battery is charged and the device is ready to use.
If the battery needs charging, plug the CLARO into that USB Cord and
insert the opposite end of the cord into a wall adapter or computer USB
port. The Power Indicator Light will remain lit while charging is in process
and will turn o when the battery is fully charged. Unplug the device and
USB Cord when nished.
CAUTIONS:
• Always attach the USB Cord to the CLARO rst before
inserting into an outlet.
• Charge the battery only when needed (when the Power
Indicator Light starts blinking). Premature charging of the
battery can cause the Power sensor to malfunction.
• The CLARO cannot be used while charging.
CLARO |11
CONTROLS
The CLARO is simple to use.
• The ON/OFF button turns on the device.
• The power light over the ON/OFF button indicates when the
device is ON (steady green light) or when the battery needs
charging, the light will ash red 3 times.
• The device will only emit light when the treatment head is
in contact with your skin. This is a safety feature to reduce
the likelihood of light shining in the eyes and also prolongs
the life of the CLARO because the light is only on when
delivering treatment.
• When the device is on, but not in contact with the skin, it is
in STANDBY mode. The device automatically turns o if not
used after 3 minutes in STANDBY mode.
• CLARO comes with a buit-in reminder that will beep once
every 3 minutes so you move to another treatment area.
• After 3 minutes of treatment use (in contact with skin), 1
beep will sound. Move the treatment head to a new area
for another 3 minute treatment cycle. The device will
automatically shut o after 12 minutes (4 treatment cycles of
3 minutes).

12 | CLARO
PRE-TEST BEFORE USING
Before beginning treatments with the CLARO, test the device on your
forearm. This is important to determine whether your skin may be
sensitive to the light from the device.
Treat a patch of skin on your forearm or other location not on your face
following the step-by-step instructions in the “TREATMENT STEPS”
section of this manual. It is normal for your skin to feel warm when using
the CLARO, but if you feel pain or your skin gets uncomfortably hot during
treatment, stop using the Device.
Following the test, wait 24 hours and look at the treated skin. If you
don’t see any dierence between the treated and untreated skin, you
may begin treatments. If you see redness, discoloration or experience
discomfort, the CLARO is not for you. Follow the instructions below to
obtain a refund.
30 DAY MONEY BACK GUARANTY. The CLARO comes with a 30-Day
Money Back Guarantee to give you the opportunity to obtain a refund
if you are not satised with your purchase. If for any reason you are not
satised with your purchase, you may send your device back within
30 days of delivery date for a full refund or exchange if you made your
purchase directly through spasciences.com, less a $40 restocking and
outbound shipping charge. Contact our Customer Service department at
[email protected] within 30 days of receipt of purchase
for instructions on how to safely return your Device. Once we receive
it and inspect it for damage and missing parts, we will issue you a full
refund. If you made your purchase through another website or retailer,
please contact them directly to inquire if they have a return policy on this
device.
CLARO |13
TREATMENT STEPS
Start by gently washing and drying your skin before starting your
treatment. Then begin with the blue light treatment to kill acne causing
bacteria followed by the red light treatment to reduce inammation and
facilitate healing.
EYE SAFETY WARNING:
The CLARO has been designed so that the lights only go on when the
Treatment Head is in contact with skin or other surface. DO NOT use the
CLARO on your eyes or attempt to look directly at the Head. Goggles are
provided with the CLARO your safety and comfort.
• Position the goggles over your eyes.
• Tie the elastic band so that the goggles t comfortably
around your head.
BLUE LIGHT TREATMENT:
1. Install the Blue Treatment Head into the CLARO.
2. With the treatment head facing away from you, turn the
CLARO only pressing the ON/OFF button. The device will
beep once an the green light will come on. The light will
activate once you have put device to your skin..
3. The Treatment Heads contain contact sensors that turn the
treatment lights on when you touch the Device to your skin and
o when you take the Device away. With the Device in standby
mode. Begin your Blue light treatment by gently touching the
Treatment Head of the CLARO to your skin, which will turn the
treatment lights on.
(Continue next page)

14 | CLARO
For best results, it is recommended that you treat one aected area for the
full 3-minute treatment cycle. The device will beep 2 times after 3 minutes
have gone by. Then, move the device to another area and start treatment
by touching the Treatment Head face to the new area of skin. Repeat this
process until all aected areas have been treated with the blue light.
4. Turn the Device OFF by pressing the ON/OFF button. The
Power Indicator Light will go o.
NOTE: It is recommended that you keep the Device in contact with the
skin during the entire 3 minutes of treatment. Should the Device be
removed from the skin before completion of the 3 minute treatment
cycle, the treatment lights will turn o and the Device will return to
Standby mode. To continue with treatment, simply touch the Treatment
Head to your skin again and the lights will turn on for another three (3)
minute treatment cycle.
RED LIGHT TREATMENT
1. Make sure that the Device power is OFF.
2. Remove the Blue Treatment Head and install the Red
Treatment Head following the instructions in “How to Change
the Treatment Heads” (page 9).
3. Repeat Steps 2 and 3 above (under Blue Light Treatment) to
treat each of the skin areas with up to 3 minutes of Red Light.
WARNING: Each aected skin area (for example, on your face) should
be treated with a maximum of 3 minutes blue light and 3 minutes red light per
day. DO NOT exceed 6 minutes total blue and red light treatment per aected
skin area per day.

CLARO |15
WHAT TO EXPECT
During treatment of your acne with the CLARO, it is normal to experience
and feel a sensation of warmth in your skin and possibly slight reddening
of the skin (mild erythema) in the treatment areas. These are both normal
and should disappear within approximately an hour after the treatment is
completed.
WARNING: Although it is normal for your skin to feel warm when
using the CLARO, do not hold the Device in one place long enough for
your skin to get hot which could cause injury.
The blue light treatments act to kill the acne causing bacteria in your
skin. The red light treatments act to reduce the inammation that
accompanies the acne. It will take some time for the blemishes on your
skin to go away, but you should start to notice improvements after 1
to 2 weeks of daily use, and best results are most often achieved after
2.5-4 weeks of daily use. Depending upon the severity of your acne you
may choose to use this device for 3-7 days per week. Your results may
dier because of dierences in the how you use the device, or how your
particular acne responds.
16 | CLARO
CARE AND MAINTENANCE
Cleaning: The CLARO is intended for surface contact with skin
and does not require sterilization.
Follow the steps below to clean the treatment head surface after each
use:
1. Unplug the USB Cord from the CLARO.
2. Gently rub the treatment head surface using a soft, lint-
free cloth that has been moistened with water and a mild,
alcohol-free cleaner such as dishwashing liquid. Remove the
cleaner by rubbing with a soft, lint-free cloth moistened by
water only. Your device is not waterproof. DO NOT submerge
the device in water, put the device in the dishwasher or
otherwise allow water to enter the device. Should the unit
accidentally become submerged, do not attempt to use it.
Contact Spa Sciences Customer Service.
Storage: When not in use for prolonged periods, store your CLARO in a
dry place at a temperature between 32°F and 140°F (0°C to 60°C).
The CLARO does not require any other regular maintenance. If the Device
is not working properly, discontinue use and contact Customer Service at
CLARO |17
TROUBLESHOOTING
If you have diculty in operating the CLARO, the Troubleshooting Tips
below may help to solve the problem. If you are still having diculty after
following these instructions, please contact Spa Sciences Customer
Service at [email protected]om.
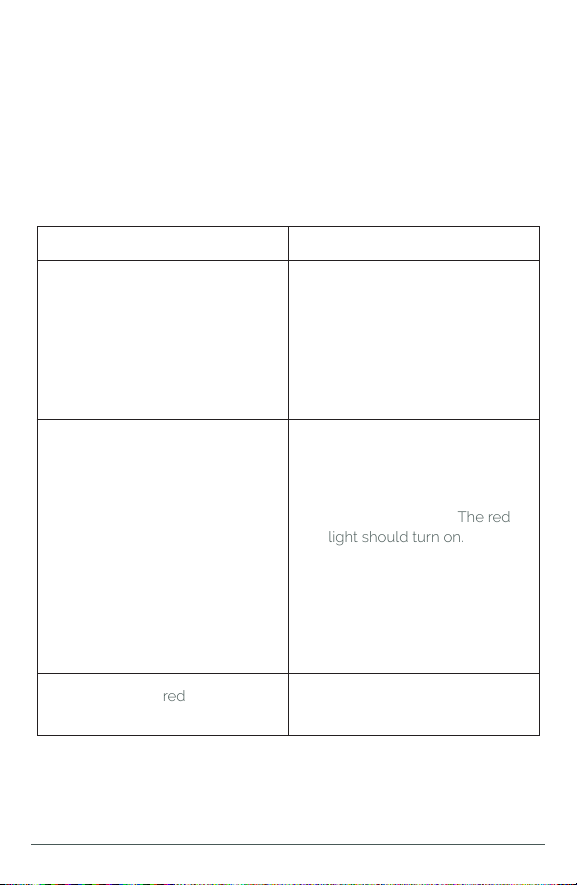
PROBLEM
CLARO does not work
The Light Indicator is o when
the CLARO is plugged into the
USB Cord and plugged into a
power source
Indicator Light is red but treatment
lights are not illuminated
Make sure Treatment Head face is
in contact with skin.
• Make sure you have pressed
the ON/OFF button for at
least 3 seconds.
• Make sure the Treatment
Head is securely connected
to the handpiece.
• Charge the battery.
• The battery is fully charged
and ready to use. Unplug
CLARO from USB Cord and
press the ON/OFF button for
at least 3 seconds. The red
light should turn on.
• Make sure the CLARO is
securely connected to USB
Cord.
• Connect another appliance
to the AC outlet to make sure
the outlet is “live.”
TRY THIS SOLUTIONS

18 | CLARO
PROBLEM
CLARO power turns o on its own
CLARO light turns o on their
own after 3 minutes
CLARO lights turn on when
Treatment Head is not in contact
with skin
DO NOT look directly into
lights. Press ON/OFF button
immediately to turn device o
and contact Customer Service.
• Press the ON/OFF button
to reactivate power and put
Device in Standby mode..
• If the device turns o
before 3 minutes, make
sure the battery is charged.
If the battery does not
need charging, wait 5 to
10 minutes for the device
to cool and try turning the
device back on.
• Device is working properly
if the lights go o after 3
minutes of use (in contact
with skin). Press Treatment
Head to another location
on your skin to re- activate
lights for another 3 minutes.
• If the lights turn o before
3 minutes, make sure the
Treatment Head face is in
contact with skin (pressing
gently).
TRY THIS SOLUTIONS
Treatment Head temperature
rises during treatment
It is normal for the Treatment
Head to get warm during
treatment. If the Treatment Head
gets hot too the touch, turn the
device o and contact Customer
Service.
Table of contents
Other Spa Sciences Personal Care Product manuals


Popular Personal Care Product manuals by other brands


Otto Bock
Otto Bock TLSO 50R152 Series instructions

Saxby Lighting
Saxby Lighting 13937 instructions

Dannyco
Dannyco BabylissRRO BAB821C operating instructions

Enpuly
Enpuly W1 Plus instruction manual

Remington
Remington WPG4031AU Use & care manual

Philips AVENT
Philips AVENT AVENT SCF145/06 Specification sheet