manuals.online logo
Brands
  1. Home
  2. •
  3. Brands
  4. •
  5. Speakman
  6. •
  7. Plumbing Product
  8. •
  9. Speakman Speakman SFS-8000 User manual

Speakman Speakman SFS-8000 User manual

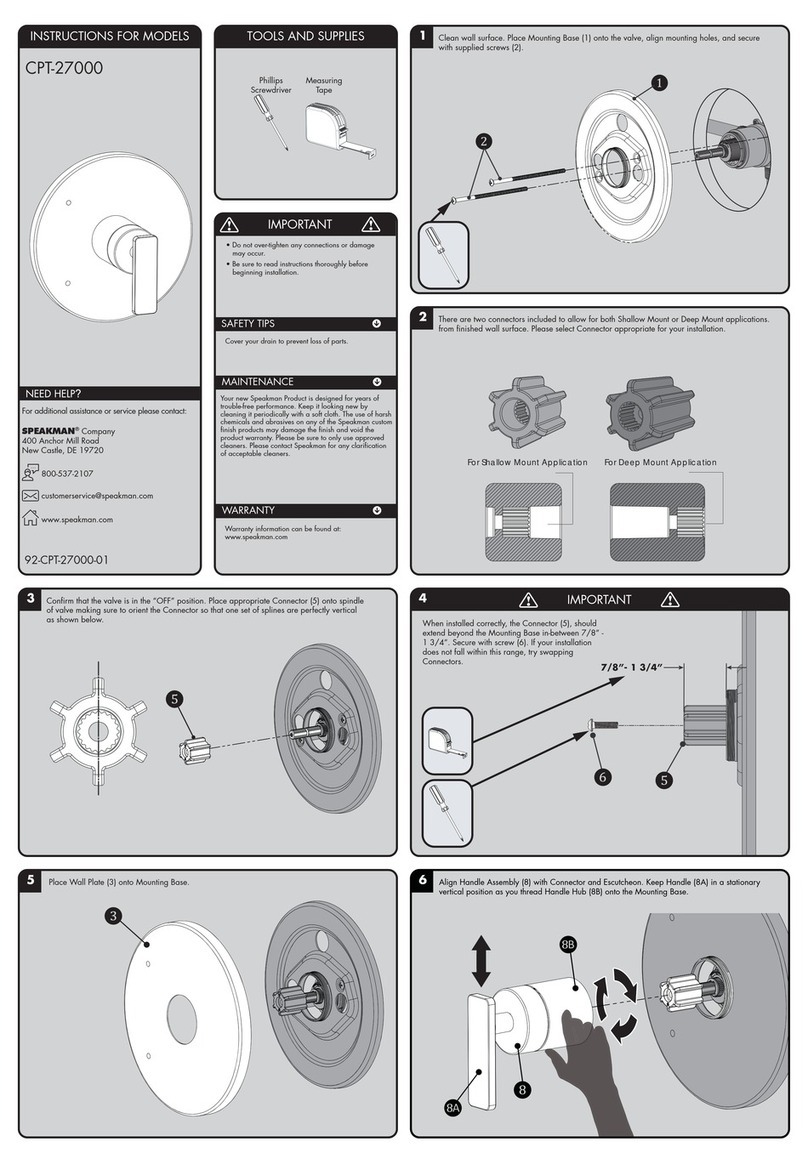
INSTRUCTIONS FOR MODELS
92-SFS-8000-01
For additional assistance or service please contact:
SPEAKMAN®
800-537-2107
customerser[email protected]
www.speakman.com
SFS-8000
Classic Sensor Soap Dispenser
SFS-9000
Designer Sensor Soap Dispenser
HELPFUL TOOLS & SUPPLIES:
TOOLS AND SUPPLIES
Adjustable
Wrench
Safety
Glasses
Liquid
Soap
Foam
Soap
PencilExtended Phillips
Screwdriver
DrillScissors
Warranty information can be found at:
www.speakman.com
WARRANTY
Cover your drain to prevent loss of parts. Be sure to
wear eye protection while cutting pipe.
SAFETY TIPS
IMPORTANT
• Be sure to read instructions thoroughly before
beginning installation.
• Do not over-tighten any connections or damage
may occur.
FINISH MAINTENANCE
Your new Speakman Product is designed for years of
trouble-free performance. Keep it looking new by
cleaning it periodically with a soft cloth. Pay special
attention to the nozzle area. Periodically clean the
nozzle area to avoid soap residue build up. The use of
harsh chemicals and abrasives may damage the finish
and void the product warranty. Please be sure to only
use approved cleaners. Please contact Speakman for any
clarification of acceptable cleaners.
• This installation manual covers several models.
While the appearance of your model may vary, the
installation steps required are the same as shown in
this manual.
1Remove the Rubber Washer (1), Metal Washer
(2) and Mounting Nut (3) from the threaded
Shank.
2Verify that the Rubber Gasket is in position and
aligned to the base of the Faucet.
3Place all hoses, sensor wire and threaded shank
through the mounting hole one at a time. Take
extra precautions to avoid pinching any wires.
Lower Sensor Soap Dispenser into position.
4
OR
From beneath, reinstall the Rubber Washer (1),
Metal Washer (2) and Mounting Nut (3) to
secure the Sensor Soap Dispenser. Align the
Sensor Soap Dispenser to desired position and
wrench tighten Mounting Nut (3). Verify that the
wires are not pinched.
5Place the Control Box (1) against the desired mounting surface while ensuring adequate
clearance for servicing of all connections. If using the optional A/C Adapter, consider the
distance to the nearest electrical outlet. Control Box should be mounted so the Soap and Air
Outlet Ports are facing up.
14" MAX
IN ALL DIRECTIONS
OPTIONAL AC ADAPTER
6Mark Screw Hole mounting locations (X4) using a Mounting Screw
(included) and an extended Phillips Screw Driver. Mount the Control
Box onto the previously marked locations. If mounting on drywall and
not to stud, use the appropriate anchors and fasteners for
application. Recommend screw in EZ anchor or equal for drywall.
XX
XX
7Align the SOAP and AIR tubes to the Control
Box. Cut to length and press tubing over barbed
fittings on Control Box.
AIR
SOAP
WARNING: Running excessive tubing may lead to decrease
in performance. Always keep tube length to minimum.
8Open the Soap Bottle Lid by pulling the
C Clip away.
9Lift the Cap to access soap bottle.
10 Pour Soap into the Soap Container. This Soap
Dispenser will work with both Liquid Hand Soap
and Foaming Hand Soap with a viscosity
of < 2000cP.
LIQUID
OR
FOAM
11 • After filling the soap bottle, align the cutout of
the cap and close the bottle cap. Make sure the
feed tube reaches all the way to the bottom of the
bottle.
• Secure the Cap with the C Clip.
FILL/REFILLING SOAP
12 Align the UNLOCK Symbol of the Soap Bottle to
the Vertical Line on the Control Box. Press
upwards for engagement and rotate clockwise
until the LOCK symbol of the Soap Bottle is
aligned to the vertical line on the Control Box.
13 Select the proper Mode of the Sensor Soap
Dispenser based on the soap filled. The Mode
Switch button is located on the left side of the
Control Box.
FOAMFOAM
SOAPSOAP
LIQUIDLIQUID
SOAPSOAP
FILL/REFILLING SOAP
14 Make electrical connections from the Sensor Eye to the Control Box. Connect the Blue Male Ended Wire to the
Blue Female Connection. Connect the Green Male Ended Wire to the Green Female Connection. To further aid
proper alignment, there are white alignment lines on the connector ends. These alignment lines should face
forward when properly installed.
GREEN
BLUE
15 FOR BATTERY POWER
• Access the interior Battery Enclosure by unscrewing the two (X2) Screws using a Phillips Screwdriver (1).
• Insert or replace the batteries with four (X4) new standard 1.5v D size batteries. Ensure the position of the
new batteries are aligned to the plus (+) and minus (-) symbols within the battery holder (2).
BATTERIES NOT INCLUDED
16 FOR BATTERY POWER
• Close the Battery Box by tightening the two (X2) Philips screws. Determine the desired location of the Battery
Box, make sure the Connecting Wire is long enough to reach the Control Box. Mount the Control Box onto the
previously marked location using a Phillips Screwdriver and two (X2) Mounting screws (included) (1). If
mounting on drywall and not to stud, use the appropriate anchors and fasteners for application. Recommend
screw in EZ anchor or equal for drywall.
• Connect the Blue Battery Connector to the Blue Male Connector on the side of the Control Box (2).
45" MAX
WIRE LENGTH
BLUE
17 FOR A/C POWER
Disconnect and remove the Battery Box. Connect the A/C Adapter (included) to the Black Female Port on the
Control Box. Plug the A/C Adapter into the wall outlet.
BLACK
18 For first time use, or after soap refill, activate the Sensor Soap Dispenser repeatedly to prime the pump. It may
take approximately 10-30 activations (depending on tube length) to get the pump primed. Check to make sure
that there are no leaks.
10-30
ACTIVATIONS
VIEW FROM UNDERNEATH
SENSOR EYE
SFS-8000 / SFS-9000 TROUBLESHOOTING
If your sensor soap dispenser has reduced performance:
1) Check to see if the soap bottle need refill.
2) Check to see if the soap feed tube in the soap bottle is pulling from the bottom of the
bottle.
3) Check to see if any tube is clogged or bent. If it is clogged, clean all tubes with water.
4) If the bottle is refilled and issue continues, check the viscosity of the soap. This soap
dispenser is only compatible with soap that has less than 2000cP viscosity.
5) If high viscosity soap use is desired, mix the soap with warm water to reduce viscosity.
If your sensor soap dispenser has completely stopped working:
1) Check to see if the soap bottle need refill.
2) Check to see if the soap bottle is correctly installed.
3) If battery power is used, replace batteries with new ones and try to reactivate the
sensor soap dispenser.
4) Check to see if there is anything blocking the sensor. If there is then remove the subject
and reactivate the sensor soap dispenser after 15s.
5) If nothing works, replace the control box with a new one.
SFS-8000 / SFS-9000 QUESTIONS & ANSWERS
Q. How does the Sensorflo®Soap dispenser work?
A. It uses laser technology. The Sensor emits a non-visible beam of light. When an object
enters the detection area, the Sensor signals the pump(s) to operate for 1second.
Q. Is the Sensorflo®sensor beam adjustable?
A. No, the Sensorflo®sensor beam is not adjustable. It has been factory set to factory
specifications for these soap dispensers.
Q. What kind of soap can I use on the Sensor Soap Dispenser?
A. The Sensorflo®Soap Dispenser is designed to work with any hand soap that has a
viscosity of < 2000cP.
Q. Do I have to use the foaming hand soap?
A. No. You can use either foaming hand soap or liquid hand soap. Just make sure you
select the right mode on the control box.
Q. Does Sensorflo®reduce maintenance?
A. By elimination of on/off handles, control components are reduced and fittings stay
cleaner longer. Only a light rinsing and wiping is required to restore the beauty of the
Sensorflo®Soap Dispenser. Drip stains are eliminated. Fingerprints and soap spots on
sinks and fittings are avoided. Finishes last longer and wash areas stay cleaner. Germs
and bacteria are not transferred as easily making for a healthier environment.
Q. The chrome finish on my Faucet seems to be deteriorating. What can I
do to prevent this from happening?
A. Many commercial cleaning products contain harsh chemicals and abrasives. These
products should not be used on any chrome-plated plumbing products. Please use only
mild soap and water to clean the Faucet. Dry immediately with a soft cloth.
Q. Is my Sensor Soap Dispenser protected from power surges?
A. Yes, Sensorflo®has been designed to have built-in power surge protection.
Q. If we lose power, do I have to do something to get the soap dispenser
to operate again?
A. After a power outage, the soap dispenser is automatically ready for operation as soon
as the power comes back on.
Q. If I call a plumber to come and install this Faucet, will they know
enough to hook it up?
A. Our installation diagrams are very easy to follow.

2"
MAX DECK
THICKNESS
14" MAX
IN ALL DIRECTIONS
45" MAX
WIRE LENGTH
2"
MIN. TO LEDGE
51mm
2"
MIN. TO WALL
51mm
LAVATORY ROUGH-IN
32mm
11
4
"
MIN
32mm
11
4
"
MIN
SFS-8000 / SFS-9000 BELOW COUNTER ROUGH-IN DIAGRAM SPEAKMAN®
ALL DIMENSIONS ARE IN INCHES (MILLIMETERS) UNLESS
OTHERWISE SPECIFIED. DIMENSIONS SUBJECT TO
CHANGE WITHOUT NOTICE.
2"
MIN. TO LEDGE
51mm
2"
MIN. TO WALL
51mm
LAVATORY ROUGH-IN
32mm
11
4
"
MIN
32mm
11
4
"
MIN
21
4
"
57mm
11
16
"
27mm
41
2
"
115mm
AIR TUBE
30"
SOAP TUBE
12"
55
8
"
143mm
15.00°
313
16
"
97mm
SFS-8000 ROUGH-IN DIAGRAM SPEAKMAN®
ALL DIMENSIONS ARE IN INCHES (MILLIMETERS) UNLESS
OTHERWISE SPECIFIED. DIMENSIONS SUBJECT TO
CHANGE WITHOUT NOTICE.
2"
MIN. TO LEDGE
51mm
2"
MIN. TO WALL
51mm
LAVATORY ROUGH-IN
32mm
11
4
"
MIN
32mm
11
4
"
MIN
65
16
"
161mm
37
16
"
88mm
43
8
"
112mm
2"
MAX
2"
51mm
SFS-9000 ROUGH-IN DIAGRAM SPEAKMAN®
ALL DIMENSIONS ARE IN INCHES (MILLIMETERS) UNLESS
OTHERWISE SPECIFIED. DIMENSIONS SUBJECT TO
CHANGE WITHOUT NOTICE.

This manual suits for next models

1

Other Speakman Plumbing Product manuals

Speakman Kubos CPT-24000 User manual

Speakman

Speakman Kubos CPT-24000 User manual

Speakman SENTINELPRO COMBINATION SLV-5420 Guide

Speakman

Speakman SENTINELPRO COMBINATION SLV-5420 Guide

Speakman CPT-27400 User manual

Speakman

Speakman CPT-27400 User manual

Speakman SB-2401 User manual

Speakman

Speakman SB-2401 User manual

Speakman SBS-1042 User manual

Speakman

Speakman SBS-1042 User manual

Speakman SENTINELPRO SLV-5450 Guide

Speakman

Speakman SENTINELPRO SLV-5450 Guide

Speakman S-9020 Guide

Speakman

Speakman S-9020 Guide

Speakman SF-9102 User manual

Speakman

Speakman SF-9102 User manual

Speakman SB-1004 User manual

Speakman

Speakman SB-1004 User manual

Speakman SEF-9200-ILR User manual

Speakman

Speakman SEF-9200-ILR User manual

Speakman S-1496-AF User manual

Speakman

Speakman S-1496-AF User manual

Speakman SB-2401 User manual

Speakman

Speakman SB-2401 User manual

Speakman SEF-1800 EYESAVER User manual

Speakman

Speakman SEF-1800 EYESAVER User manual

Speakman SB-1042 User manual

Speakman

Speakman SB-1042 User manual

Speakman RPG05-109305 User manual

Speakman

Speakman RPG05-109305 User manual

Speakman GRAVITYFLO SE-4320 User manual

Speakman

Speakman GRAVITYFLO SE-4320 User manual

Speakman EYESAVER SE-570 Guide

Speakman

Speakman EYESAVER SE-570 Guide

Speakman SB-2141 User manual

Speakman

Speakman SB-2141 User manual

Speakman SEF-9200 User manual

Speakman

Speakman SEF-9200 User manual

Speakman S-5141-LD User manual

Speakman

Speakman S-5141-LD User manual

Speakman NEO SM-1010 Guide

Speakman

Speakman NEO SM-1010 Guide

Speakman CPT-27000 User manual

Speakman

Speakman CPT-27000 User manual

Speakman CPT-16000 User manual

Speakman

Speakman CPT-16000 User manual

Speakman SB-2701 User manual

Speakman

Speakman SB-2701 User manual

Popular Plumbing Product manuals by other brands

IKEA RÄNNILEN manual

IKEA

IKEA RÄNNILEN manual

DURAVIT 791247 00 0 00 1000 Mounting instructions

DURAVIT

DURAVIT 791247 00 0 00 1000 Mounting instructions

American Standard Pekoe 4332.350 Specification sheet

American Standard

American Standard Pekoe 4332.350 Specification sheet

Fortis GATTINARA installation instructions

Fortis

Fortis GATTINARA installation instructions

Omnires PM7433GR Installation and Maintenance

Omnires

Omnires PM7433GR Installation and Maintenance

BELLOSTA Microfono 6903/2/1/E installation instructions

BELLOSTA

BELLOSTA Microfono 6903/2/1/E installation instructions

Geberit Sigma10 Maintenance manual

Geberit

Geberit Sigma10 Maintenance manual

Tapwell EVM 168 instructions

Tapwell

Tapwell EVM 168 instructions

Pfister Arlington F-049-AR Quick installation guide

Pfister

Pfister Arlington F-049-AR Quick installation guide

Emerson Fisher 655R instruction manual

Emerson

Emerson Fisher 655R instruction manual

Belanger 44DT PRODUCT CARE

Belanger

Belanger 44DT PRODUCT CARE

Elkay Lustertone ELU2118 Specifications

Elkay

Elkay Lustertone ELU2118 Specifications

American Standard Williamsburg 0554.700 Specification sheet

American Standard

American Standard Williamsburg 0554.700 Specification sheet

HSK Lavida 1900019 manual

HSK

HSK Lavida 1900019 manual

miseno KIDO- 2510 installation manual

miseno

miseno KIDO- 2510 installation manual

Hans Grohe Aquno Select M81 170 3jet 73837 Series manual

Hans Grohe

Hans Grohe Aquno Select M81 170 3jet 73837 Series manual

Luxart Selah SH341 installation manual

Luxart

Luxart Selah SH341 installation manual

Grohe ATRIO 29216001 owner's manual

Grohe

Grohe ATRIO 29216001 owner's manual

manuals.online logo
manuals.online logoBrands
  • About & Mission
  • Contact us
  • Privacy Policy
  • Terms and Conditions

Copyright 2025 Manuals.Online. All Rights Reserved.