SPEC MIX LOAD N GO SILO User guide

SILO
SAFETY MANUAL
MANUAL DE SEGURIDAD
MANUEL DE SÉCURITÉ
ENGLISH, SPANISH AND FRENCH EDITION
EDUCIÓN EN ESPAÑOL, INGLÉS Y FRANCÉS
ÉDITION EN ANGLAIS, ESPAGNOL ET FRANÇAIS
OVERVIEW · SPECIFICATIONS · SAFETY INFORMATION · OPERATION · MAINTENANCE
OPERATING AND SAFETY INSTRUCTIONS
1
2
3
4
5
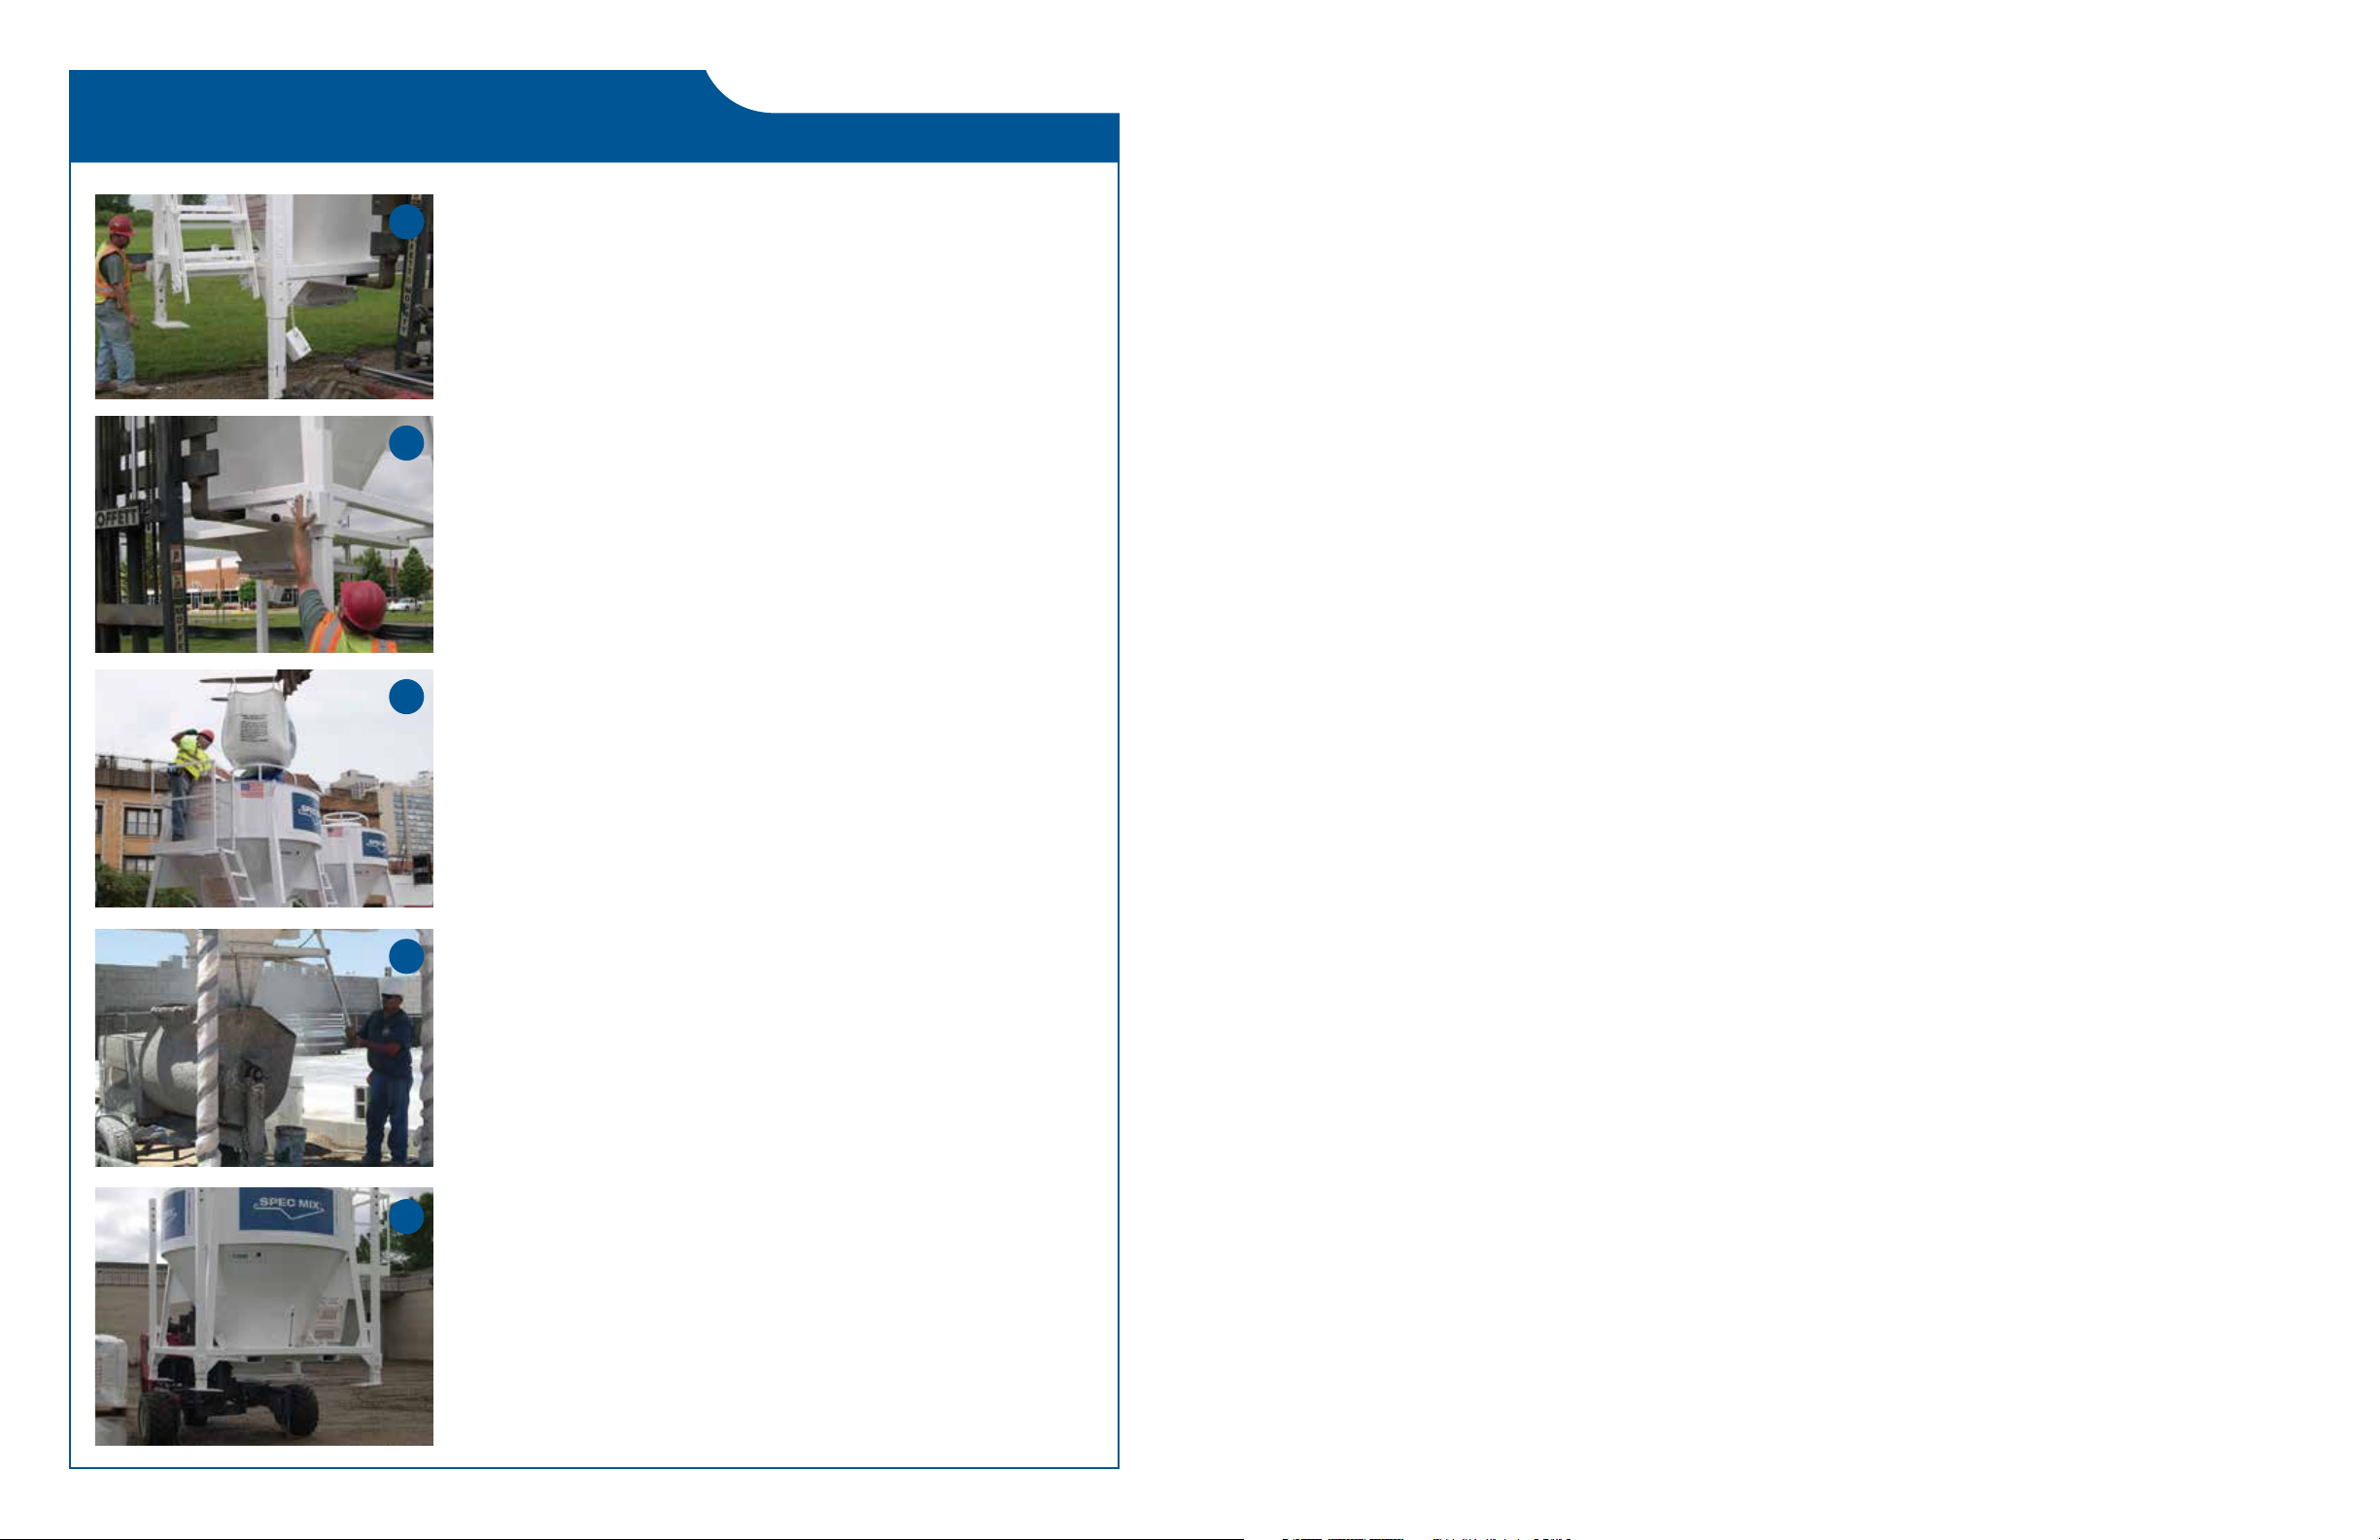
A double batch of material is made in 5 minutes or less
without straining the laborer’s or compromising the
integrity of the mix. No electricity or pressurized water
source is needed, just a standard mechanical batch
mixer. The silo is transportable. As the job progresses,
the crew and silo mixing station follows.
This is how it works:
Step 1: To erect the silo on site, make sure the ground is
dry, level and compacted. With a 26-foot, 4,500 lb capacity
standard forklift, insert the forks of the lift into the silo’s
fork pockets and raise the unit to the desired height. Four
heights are available.
Step 2: Using the double leg pins attached to the frame,
secure the upper silo assembly by sliding the leg pins into
position. Then secure the pins with the safety locking pins.
Next, attach the valve gate handle in its place and get ready
to load your SPEC MIX product into the silo.
Step 3: The bulk bags are easily loaded into the silo by
inserting the forks through the bag’s reinforced loops. Once
the bag is above the silo and in position over the upper dust
shroud, the laborer standing on the safety platform can
release the bag’s double discharge chutes.
Step 4: After the silo is loaded with four to five 3,000 lb bulk
bags, place the batch mixer beneath the cone under the
silo’s boot. If needed, trim the length of the boot to the top
of the mixer. To make product, add the desired amount of
water to the mixer and pull back the silo handle to dispense
the amount of material needed to achieve the preferred
consistency. Any size batch can be made. Let the product
mix four to five minutes to ensure complete hydration of all
materials for optimal workability and board life.
Step 5: The silo is easily relocated on site to position your
mixing station as close as possible to the work, maximizing
job site efficiency. With the silo legs pinned in the up or
down position, insert the forks of the lift into the silo’s fork
pockets. Then, raise the silo and place it in the preferred
location. Make sure the forklift is equipped to safely
transport the silo and that the new terrain is dry, level and
stable. Always secure all leg pins and safety pins!
TABLE OF CONTENTS
Pages
Introduction ................................................................................................. 2
Silo Specifications ....................................................................................... 3
SafetyInformation.....................................................................................4-5
Transporting Silos ....................................................................................... 6
Assembling Silos ...................................................................................... 7-9
Loading Silos ....................................................................................... 10-12
BulkBagHandlingProcedures ..............................................................13-15
Operating Silos ..................................................................................... 16-17
Relocating Silos ........................................................................................ 18
Maintenance ........................................................................................ 19-20
Best Practices for SPEC MIX Silos ........................................................ 21-23
TABLA DE MATERIAS
Paginás
Introducción .............................................................................................. 25
Especificaciones del silo .......................................................................... 26
Información de seguridad para silos .................................................... 27-28
Transporte de los silos .............................................................................. 29
Montaje de los silos ............................................................................. 30-32
Carga de los silos ................................................................................. 33-35
Manipulacióndebolsasagranelyprocedimientosdeelevación............36-38
Funcionamiento de los silos ................................................................. 39-40
Reubicación de los silos ........................................................................... 41
Mantenimiento de los silos .................................................................. 42-43
Guía de las Mejores Prácticas de SPEC MIX ........................................ 44-46
TABLE DES MATIÈRES
Pages
Introduction................................................................................................48
Spécifications du silo ................................................................................. 49
Information de sécurité ......................................................................... 50-51
Le Transporter des silos ............................................................................. 52
L’assemblage des silos ...................................................................... 53-55
Chargerlessilos....................................................................................56-58
Procédures de levage & manipulation des conteneurs souples ............ 59-61
Fonctionnementdes silos ..................................................................... 62-63
Déplacerlessilos........................................................................................64
Entretiendessilos.................................................................................65-66
Guide des meilleures pratiques SPEC MIX .......................................... 67-69
© SPEC MIX®Inc. 2016
2 3
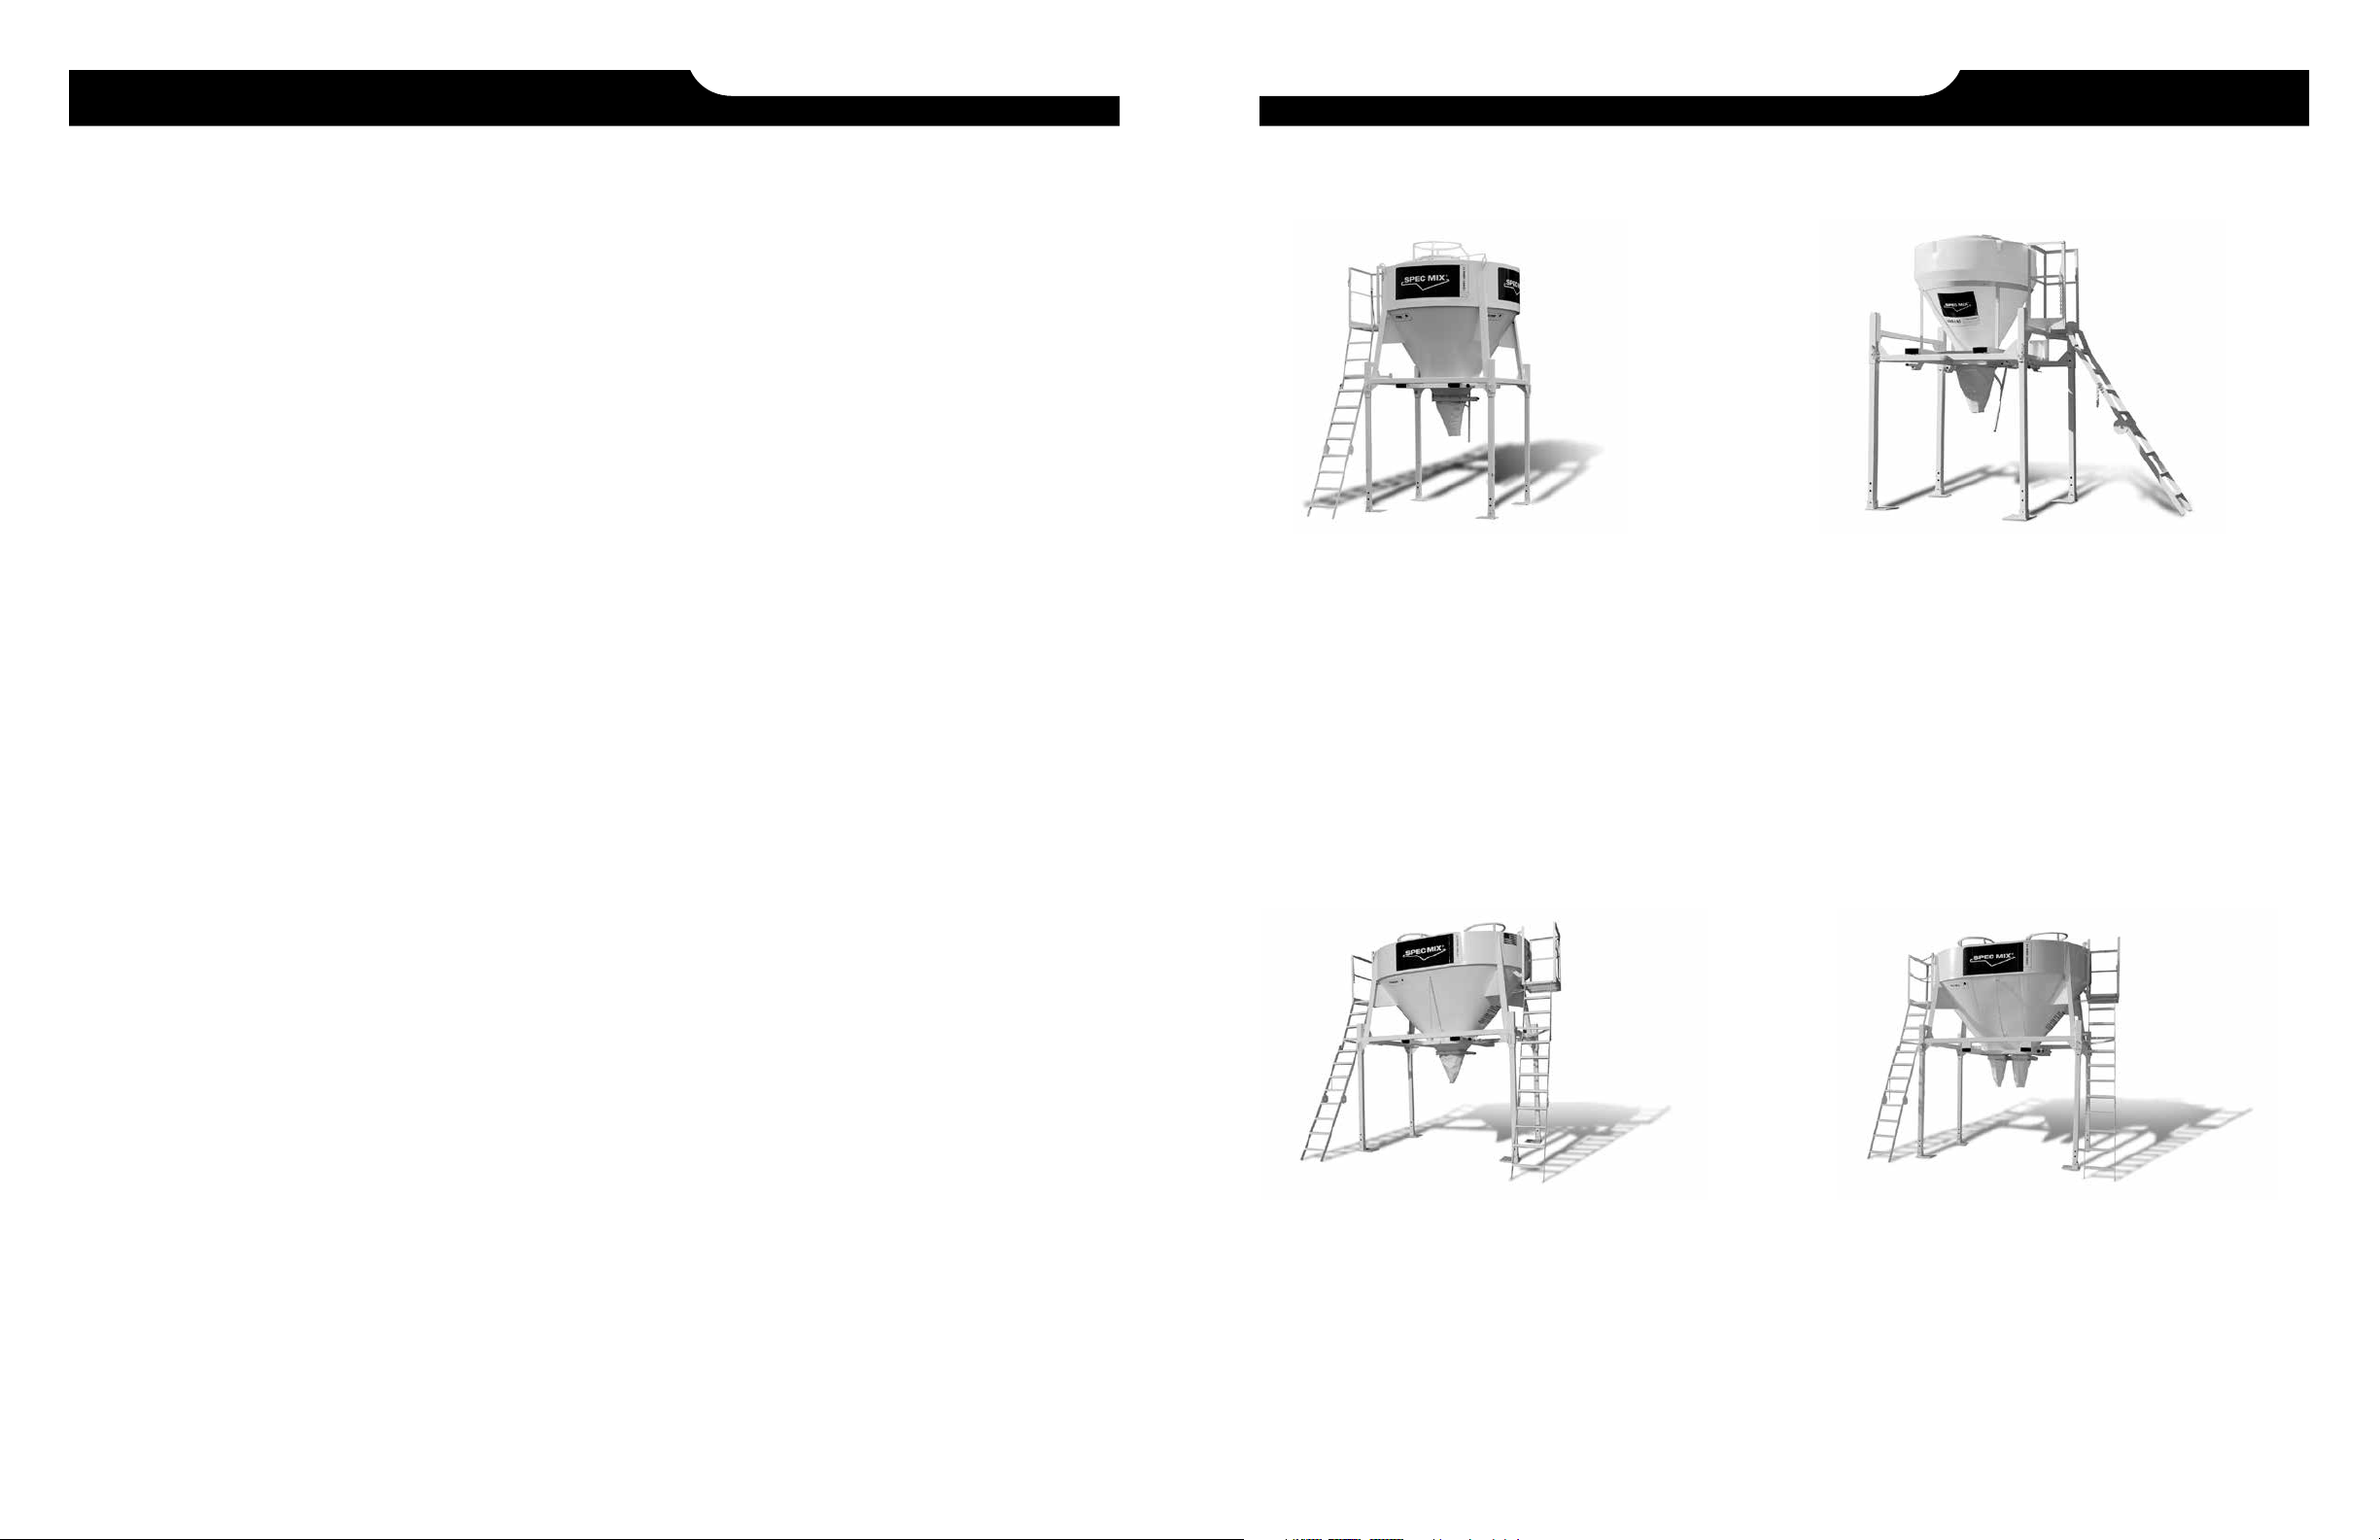
KEEP MOVING. KEEP WORKING. KEEP SAFE. SILO SPECIFICATIONS
G7000 SILO
TEN BAGGER SILO
LOAD N GO®SILO
SPLIT SILO
To ensure that a safe working environment is provided to all individuals who are operating or have
contact with SPEC MIX equipment and products, the following procedures for working with the
SPEC MIX silos and bulk bags have been formulated.
Since safety is everyone’s responsibility, we ask that you become familiar with these procedures
yourself, and make sure that everyone operating or having any contact with SPEC MIX silos and bulk
bags be familiar with and implement, the following procedures as well.
It is everyone’s responsibility to be aware of the necessary precautions that must be taken to ensure
that laborers are provided with a safe working environment; that they implement safe handling and
operating procedures for their own safety as well as others.
NOTE: These warnings do not constitute all possible safety hazards encountered in the use of
such products on a construction site. All applicable OHSA regulations must be followed in the
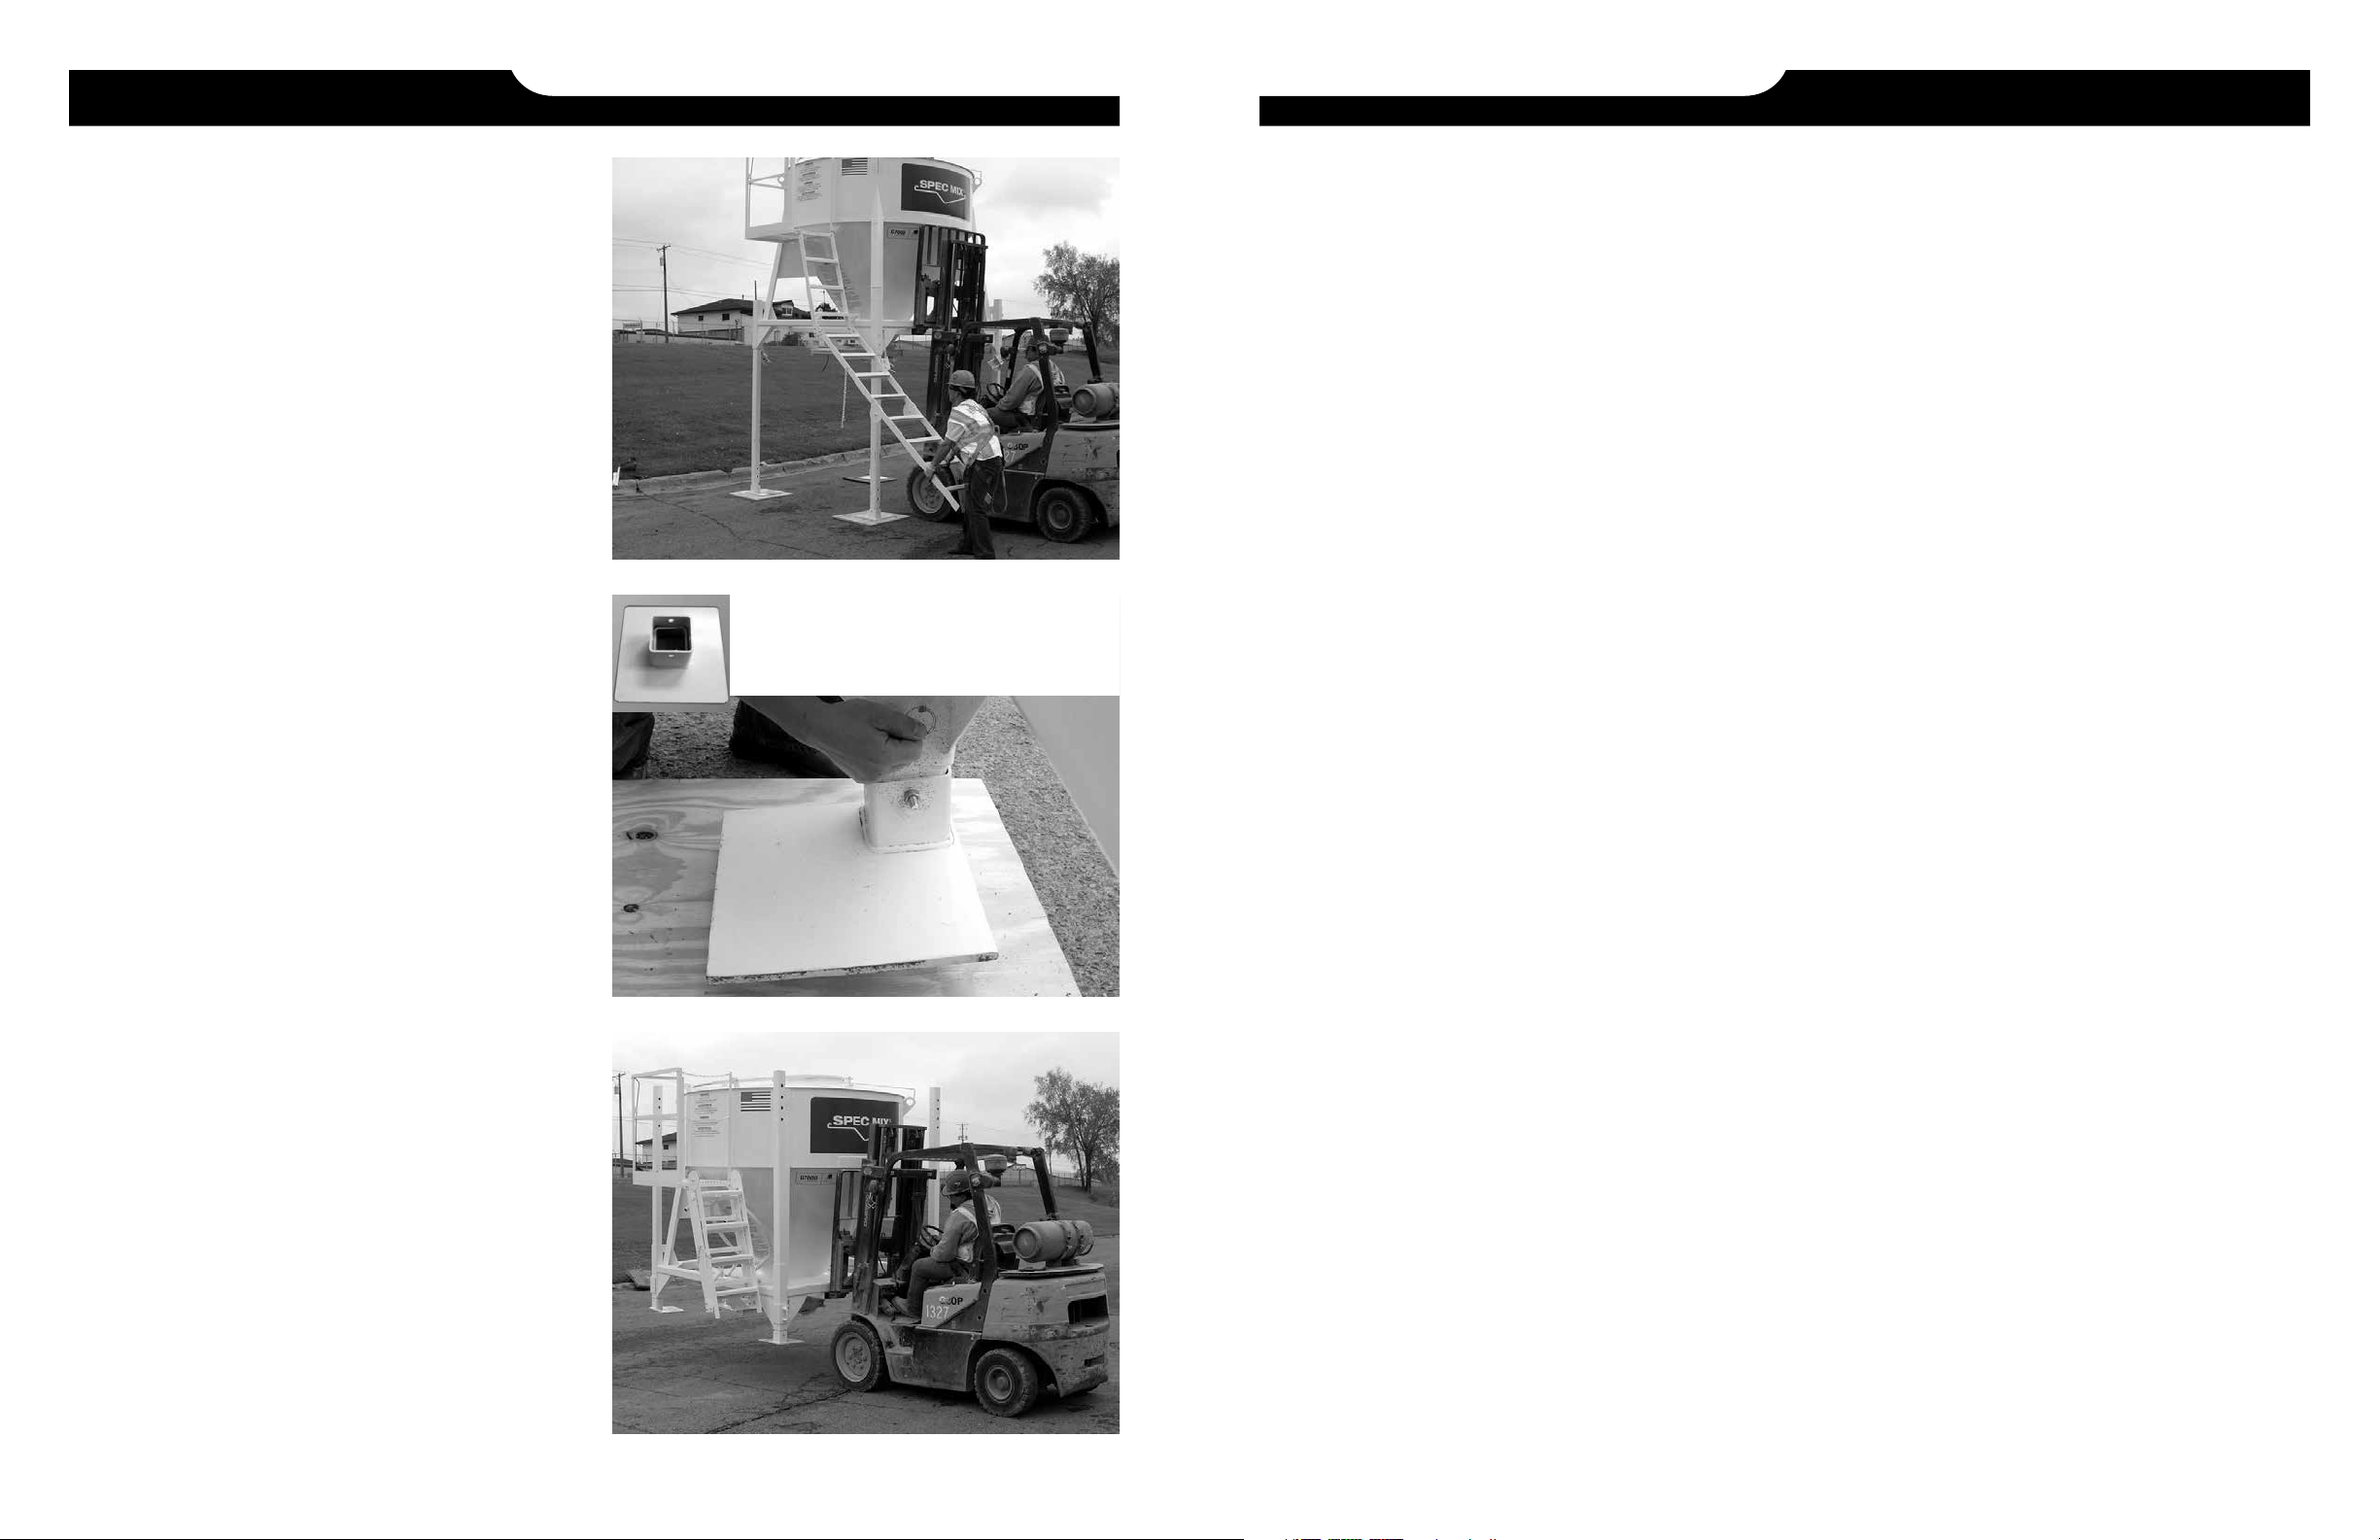
setup, relocation, cleaning, or use of the silo and product. FOOTPRINT 8 ft 2 in x 8 ft 2 in
CAPACITY Up to 5 - 3,000 lb (1,360.7 kg) bulk bags
WEIGHT EMPTY 2,900 lb (1,315.4 kg)
WEIGHT FULL Up to 18,000 lb (8,164.6 kg)
SHIPPING HEIGHT 8 ft 6 in collapsed
SHIPPING MEASUREMENT 8 ft 6 in x 10 ft
JOB SITE HEIGHTS Low Setting: 15 ft 6 in
High Setting: 16 ft 6 in
FORKLIFT REQUIREMENTS 4,500 lb (2,041.1 kg)
26 ft double stage lift
(or) telescopic lift
FOOTPRINT 8 ft x 11 ft
CAPACITY Up to 10 - 3,000 lb (1,360.7 kg) bulk bags
WEIGHT EMPTY 3,210 lb (1,456 kg)
WEIGHT FULL UP TO 30,000 lb (13,607.7 kg)
SHIPPING HEIGHT 8 ft 4 in collapsed
JOB SITE HEIGHTS Low Setting: 15 ft 6 in
High Setting: 16 ft 6 in
FORKLIFT REQUIREMENTS 5,000 lb (2,267.9 kg)
26 ft double stage lift
(or) telescopic lift
2 COMPONENT SYSTEM
DURABLE POLYETHYLENE CONE
FOOTPRINT 6 ft 6 in x 7 ft 1 in
TOP COMPONENT 400 lb (181.4 kg)
BOTTOM COMPONENT 740 lb (335.6 kg)
WEIGHT EMPTY 1,100 lb (498.9 kg)
WEIGHT FULL 4,200 lb (1,905 kg)
SHIPPING HEIGHT 8 ft 3 in collapsed
SHIPPING MEASUREMENT 8 ft x 6 ft 5 in
JOB SITE HEIGHTS Low Setting: 10 ft 10 in
High Setting: 13 ft 3 in
FORKLIFT REQUIREMENTS 4,000 lb (1,814.3 kg) lift capacity
10 ft in the air
FOOTPRINT 8 ft x 11 ft
CAPACITY Up to 10 - 3,000 lb (1,360.7 kg) bulk bags
in 2 compartments (5 each)
WEIGHT EMPTY 3,610 lb (1,637.4 kg)
WEIGHT FULL UP TO 30,000 lb (13,607.7 kg)
SHIPPING HEIGHT 8 ft 4 in collapsed
JOB SITE HEIGHTS Low Setting: 15 ft 6 in
High Setting: 16 ft 6 in
FORKLIFT REQUIREMENTS 5,000 lb (2,267.9 kg)
26 ft double stage lift
(or) telescopic lift

4 5
SAFETY INFORMATION FOR SPEC MIX®SILOS SAFETY INFORMATION FOR SPEC MIX®SILOS
SPEC MIX®silo systems are engineered and fabricated to increase all aspects of job site safety. Providing a safe
working environment for personnel utilizing the silo systems is our number one objective, and SPEC MIX, Inc.
continually strives to find new ways to exceed this goal.
The most common daily practice when operating a SPEC MIX silo is loading the unit with bulk bags. During this
process, to ensure the safety of the laborer that is opening the discharge chute(s) of the bulk bag being dispensed,
we strongly recommend individuals only work from the silo’s safety platform. Moreover, the individual should use
the metal bag hook (gaff) shipped with each new silo to open the B-lock closure.
The SPEC MIX silo safety platform is engineered based on the OSHA safety standards specified for scaffolding
listed below—our silos meet these requirements.
1. Guard rails are required on welded frame scaffolds (or silos) that are 10 feet high or more.
2. Top rail height shall be at least 36 inches to a maximum of 45 inches.
3. Top rail strength must be at least 200 pounds for welded frame scaffolds.
4. Mid-rails must be positioned below the top rail and the work platform and the strength on a welded
frame scaffold must be at least 150 pounds.
5. Scaffold (or silo) legs must bear on base plates and these shall rest on either firm foundation or mud
sills.
In the event a person needs to climb on top of the silo, an OSHA fall protection lanyard is required and should
be used. OSHA states the following regarding scaffolding (or silo safety) work platforms: “If a scaffold (or work
platform) is more than 10 feet above a level (or ground), workers must have fall protection.”
Fall Arrest Systems: A fall arrest system consists of a full body harness, a lanyard short enough to limit a fall to
six feet, and an anchorage. Welded on the top of silo to the left side of the slide-hatch top of each SPEC MIX silo
is a D-shaped anchorage point. This is where an individual’s lanyard should be attached. The entire Fall Arrest
System must be capable of resisting the shock load caused by a fall. Both OSHA and ANSI rules require that these
anchorages be capable of supporting at least 5,000 pounds per worker attached—the SPEC MIX anchorage point
meets this specification.
Below are some suggestions for individuals using a fall protection lanyard to ensure job site safety.
1. Fall-arresting devices should be periodically inspected for damage by a qualified person, and faulty equipment
should be immediately removed from service. Additionally, employees required to wear fall protection should
inspect their own equipment before the start of each job.
Additionally, employers should train workers in inspection techniques that would allow them to identify faulty
equipment. Workers should inspect their equipment before the start of work each day. Faulty equipment should
be immediately removed from service to ensure worker safety.
2. Personal protective equipment should be able to withstand the harshest conditions to which it may be
subjected on any given job. Many materials, including nylon, can be easily damaged in the presence of extreme
heat. For this reason, nylon lanyards should not be used where they might be exposed to conditions that
could include extreme heat; rather, steel mesh or wire core lanyards would have been more suitable. Personal
protective equipment should be evaluated before being used on any job to ensure that it can withstand the
harshest conditions to which it may be subjected without sustaining damage that would jeopardize the safety
of a worker.
3. OSHA requires that workers working from float or ship scaffolds (scaffolds suspended from overhead supports)
be protected by an approved safety lifebelt, lanyard, and lifeline secured above the point of operation to an
anchor point or structural member.
The SPEC MIX silo ladder is engineered based on the OSHA safety standards specified for fixed ladders listed
below. Our silos meet these key requirements.
1. If the total length of the climb on a fixed ladder equals or exceeds 24 feet (7.3 m), the ladder must be equipped
with ladder safety devices.
2. Fixed ladders must be provided with cages where the length of climb is less than 24 ft (7.3 m) but the top of the
ladder is greater than 24 ft (7.3 m) above lower levels.
3. Fixed ladders must support two loads of 250 lb (114 kg) each.
4. Individual rung/step ladders must extend at least 42 in (1.1 m) above a landing platform, or by providing vertical
grab bars that must have the same lateral spacing as the vertical legs of the ladder rails.
5. Each step or rung of a fixed ladder must be able to support a load of at least 250 lb (114 kg) applied in the
middle of the step.
6. Rungs of individual rung/step ladders must be shaped to prevent slipping off the end of the rungs.
7. Rungs and steps of fixed metal ladders must be corrugated, knurled, dimpled, coated with skid-resistant mate-
rial or treated to minimize slipping.
8. Minimum perpendicular clearance between fixed ladder rungs and any obstruction behind the ladder must be 7
in.
9. Minimum perpendicular clearance between the centerline of fixed ladder rungs and any obstruction on the
climbing side of the ladder must be 30 in (76 cm).
10. Fixed ladders must be used at a pitch no greater than 90 degrees from the horizontal, measured from the back
side of the ladder.

6 7
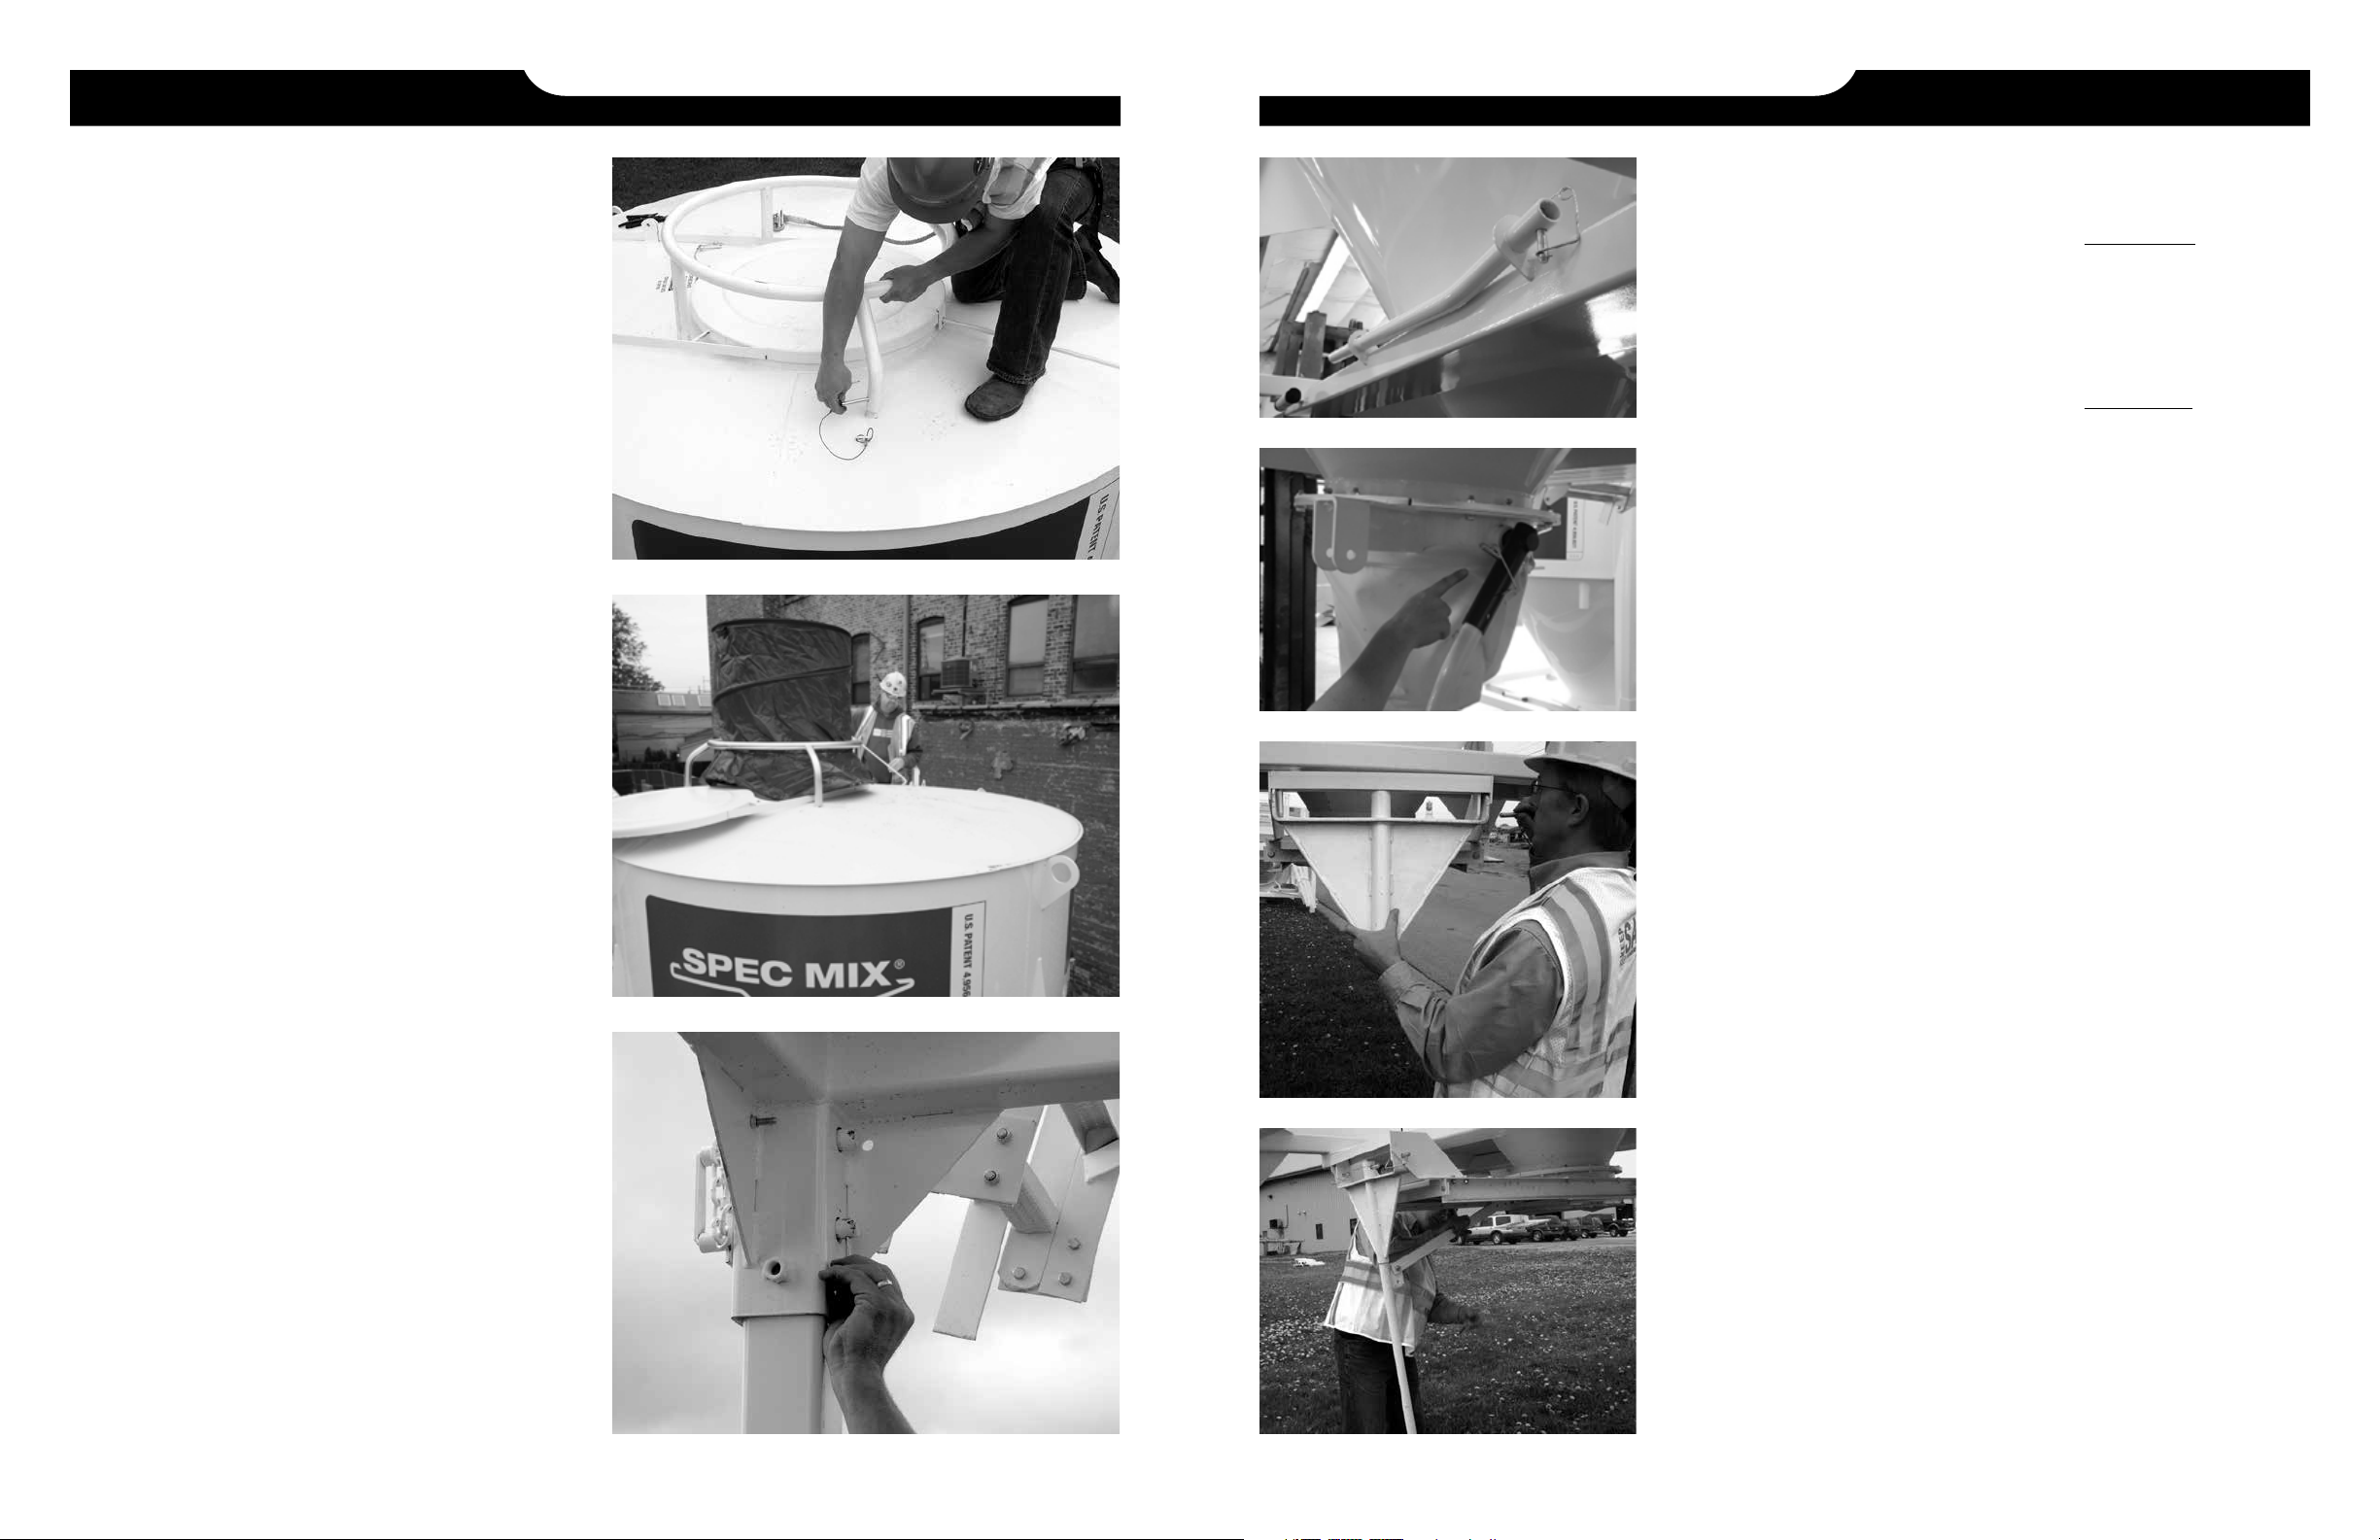
TRANSPORTING SPEC MIX®SILOS ASSEMBLING SPEC MIX®SILOS
1. Inspect SPEC MIX silo to make sure that it has
been emptied.
WARNING: Do not enter the interior of the silo cone
for any inspection or maintenance. If absolutely
necessary, personnel must follow confined space
entry procedures (OSHA).
2. Lower or remove and secure safety ring to silo
cone.
WARNING: Connect safety line and fall arrestor device
to tie off hook before climbing onto silo top. This
device must comply with the 5,400 pound tensile
strength as required by OSHA 1926.104 (b).
3. Secure top hatch handle with bolt and nut or lock-
pin
4. Remove valve gate handle assembly and pin in
holding ring.
5. To lift silo, insert forklift forks into fork pockets at
full depth.
6. To lower silo, slightly raise silo and remove leg pins
and lynch pins from legs. Lower silo while manually
raising ladder to avoid damage. Secure ladder with
chains.
7. Once lowered to the transportation mode, re-install
leg pins and lynch pins to their original position.
8. Fold ladder to collapsed position and secure with
chain
9. Secure third contact point between silo and forklift
using chain or strap with minimum tensile strength
of 5,000 pounds live working load, i.e., from lifting
eye or tie down ring to fork mast or backstop.
10. Slowly and carefully load silo onto the trailer
following accepted U.S. DOT procedures.
11. Secure silo to trailer using DOT-approved chains
and binders or strap and ratchets with a minimum
of 5,000 pounds tensile strength.
12. Remove any debris or material from silo or trailer
bed before traveling.
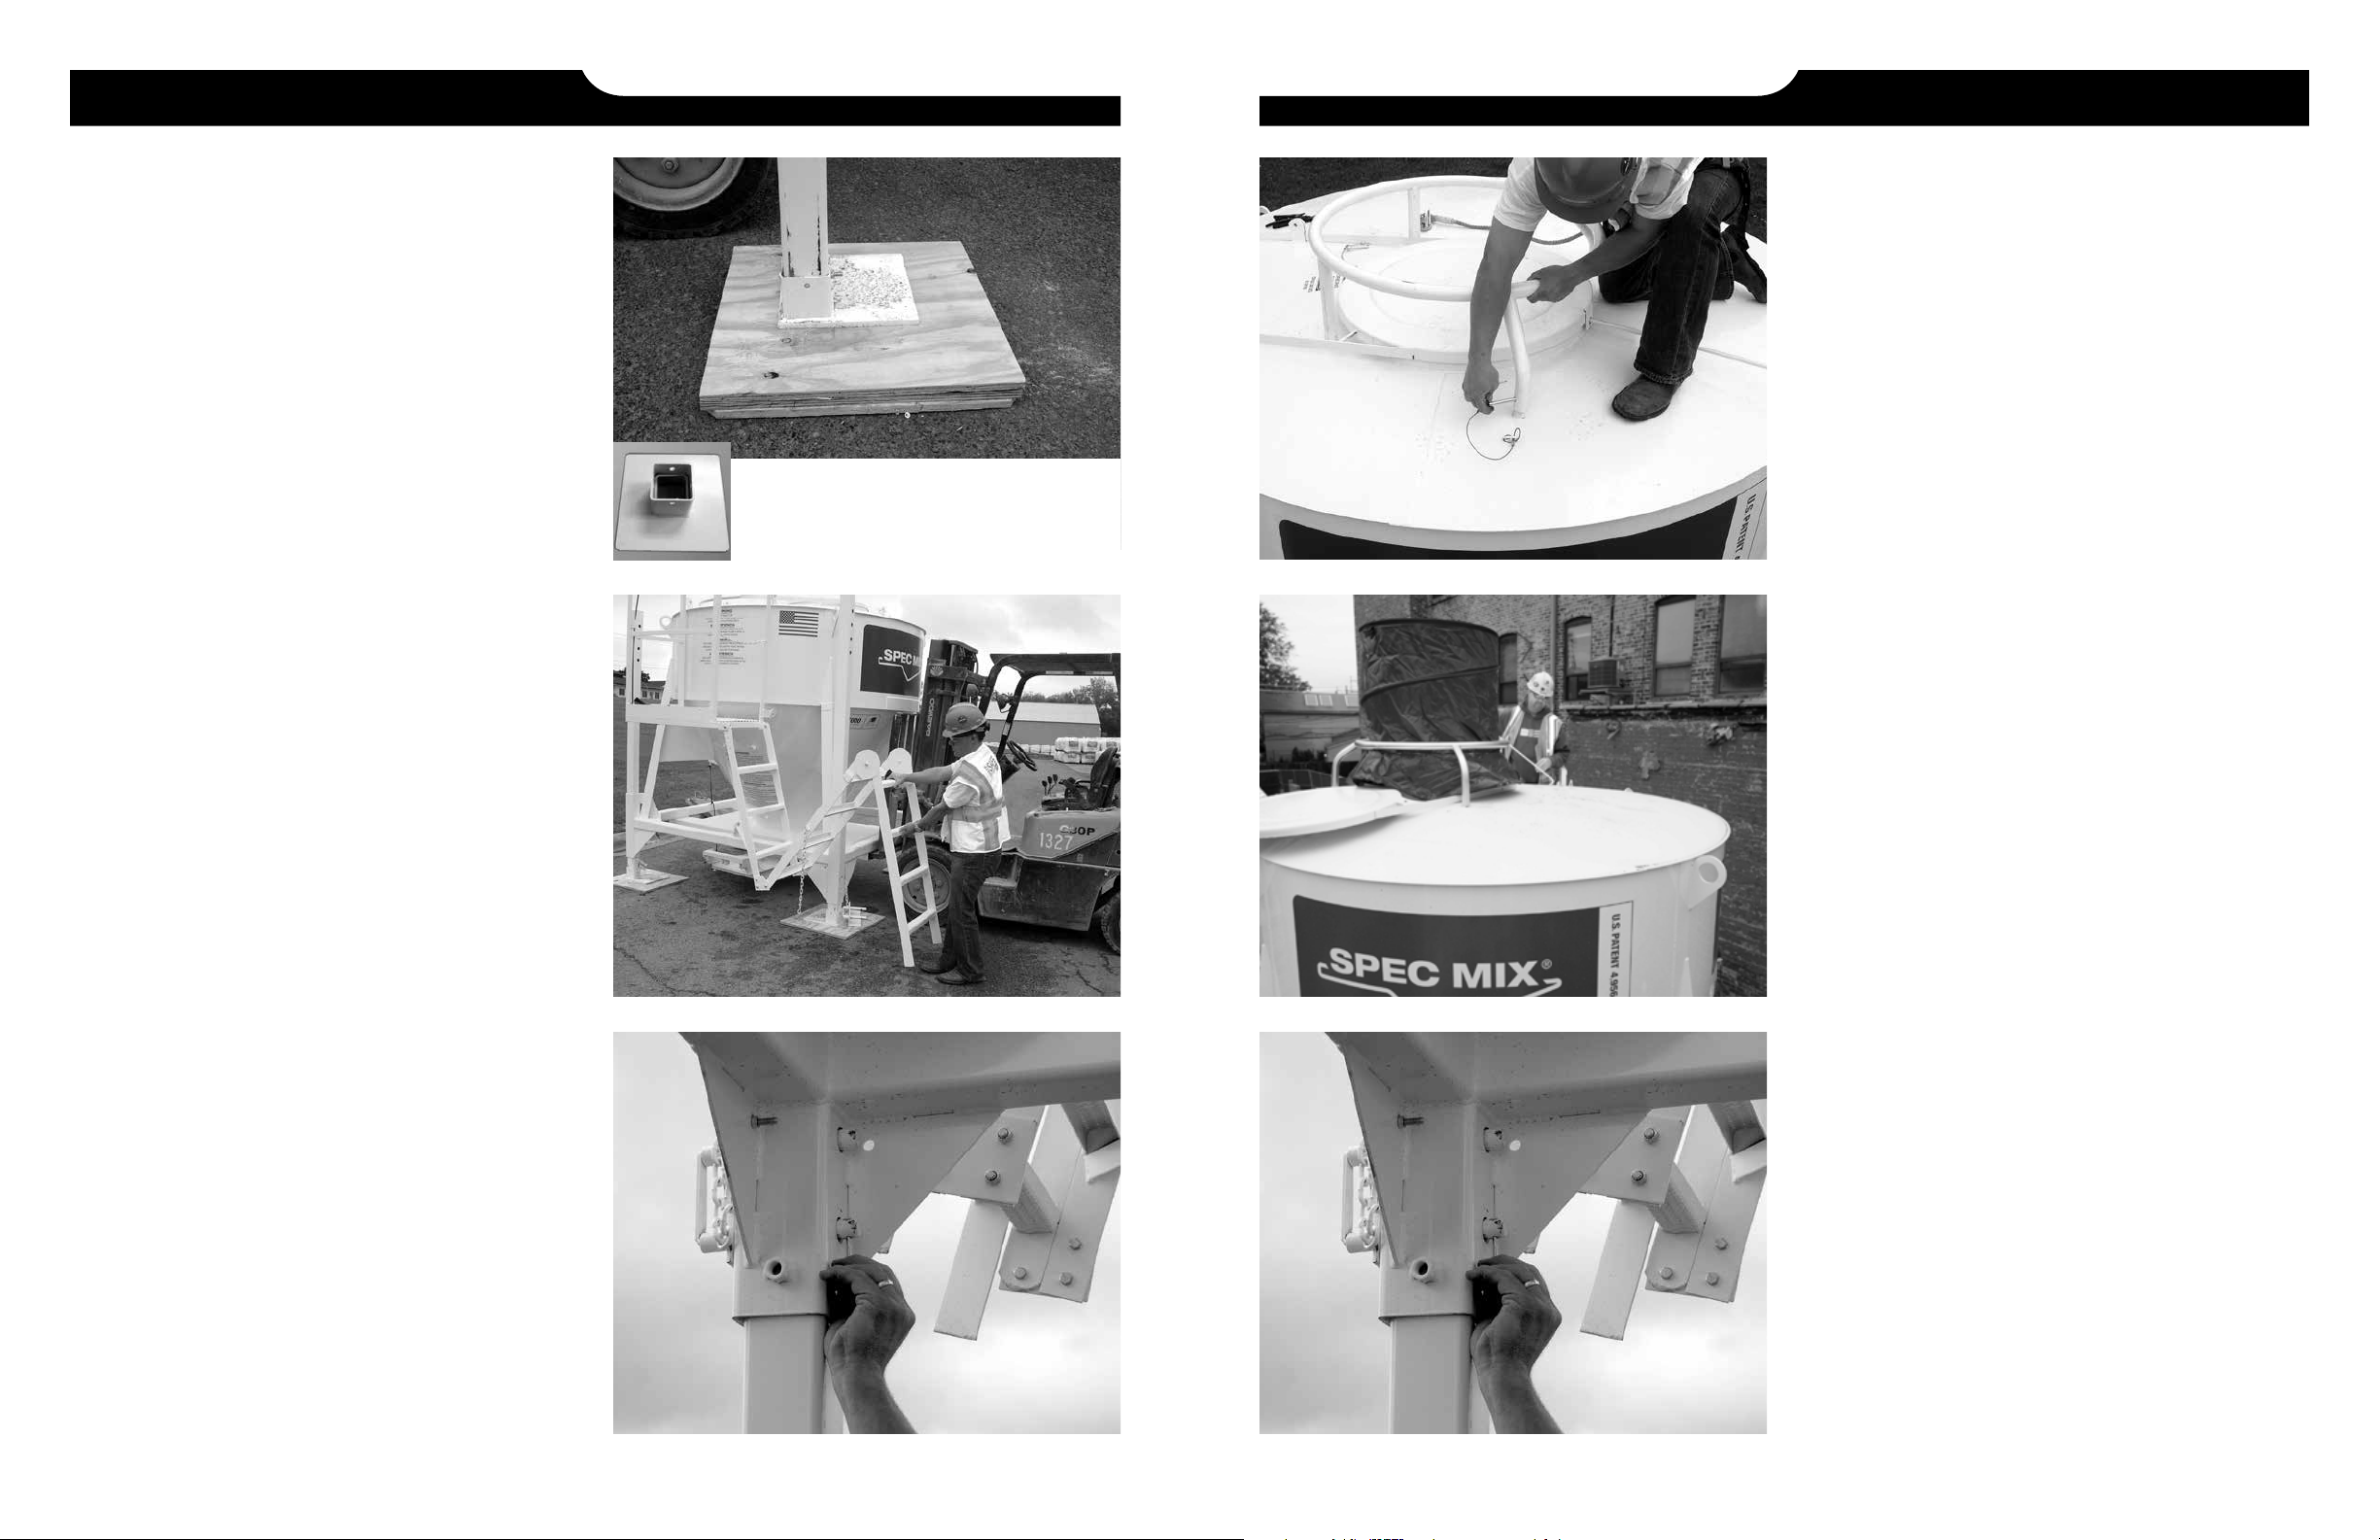
1. Select a position on the job site where the ground is
dry, compacted, level and stable. The site should be
in an area of open wind. Avoid enclosed or confined
areas.
NOTE: To ensure the stability of the erected silo, dry,
compacted, level ground MUST be available for set
up, or the silo should NOT be erected. Also, when
using the older style foot pads, turn foot outward
(turned inward for shipping purposes only).
2. Softer soil will require the use of either footings or
concrete pads of 24 x 24 x 6 inches of reinforced
concrete with a minimum compressive strength of
3,500 psi.
3. Foot pads should be constructed of 24 x 24 x 1 inch
steel pads or of three separate pieces of 24 x 24 inch
treated plywood that are ¾ inch thick and laminated
together with screws. Discard foot pad when
punctured. Each silo requires four foot pads.
4. To lift silo, insert forks completely into fork tubes.
NOTE: A proper capacity forklift must be utilized to
lift the standard weights of the silo and material being
used. (See silo specifications on Page 3).
5. Secure third contact point between silo and forklift
using chain or strap with minimum tensile strength of
5,000 pounds live working load, from lifting eye or tie
down ring to fork mast or backstop.
NOTE: The third contact point is necessary for
preventing the silo from sliding off the forklift forks
during any job site transportation.
6. Slowly lift and recline forklift position while clearing
silo from trailer.
7. Place the tower on the best approved location.
8. Position the silo so the mason tender can be
positioned with a crosswind over the mixer or
downwind to keep dust from blowing into the face of
the worker while mixing.
9. Before you raise the silo, remove leg pins and release
the ladder chain. Reinsert leg pins at the desired
height and lower ladder allowing admittance to the
safety railed platform when accessed.
WARNING: Both safety chains must be securely
attached across the entry point when on the safety
railed platform.
Note: Newer Style Foot Pads are centered.
*When using the Older Style Foot Pads (above)
turn Foot outward (turned inward for shipping
purposes only).
8 9
ASSEMBLING SPEC MIX®SILOS ASSEMBLING SPEC MIX®SILOS
WARNING: Connect safety line and fall arrestor
device to tie off hook before climbing onto silo top.
(This device must comply with the 5,400 pound tensile
strength as required by OSHA 1926.104(b).)
10. Check material flow basket for positioning,
obstructions, valve gate handle assembly and/or
assorted hardware.
WARNING: Do not enter interior of the silo cone
for any inspection or maintenance. If absolutely
necessary, personnel must follow confined space
entry procedures (OSHA).
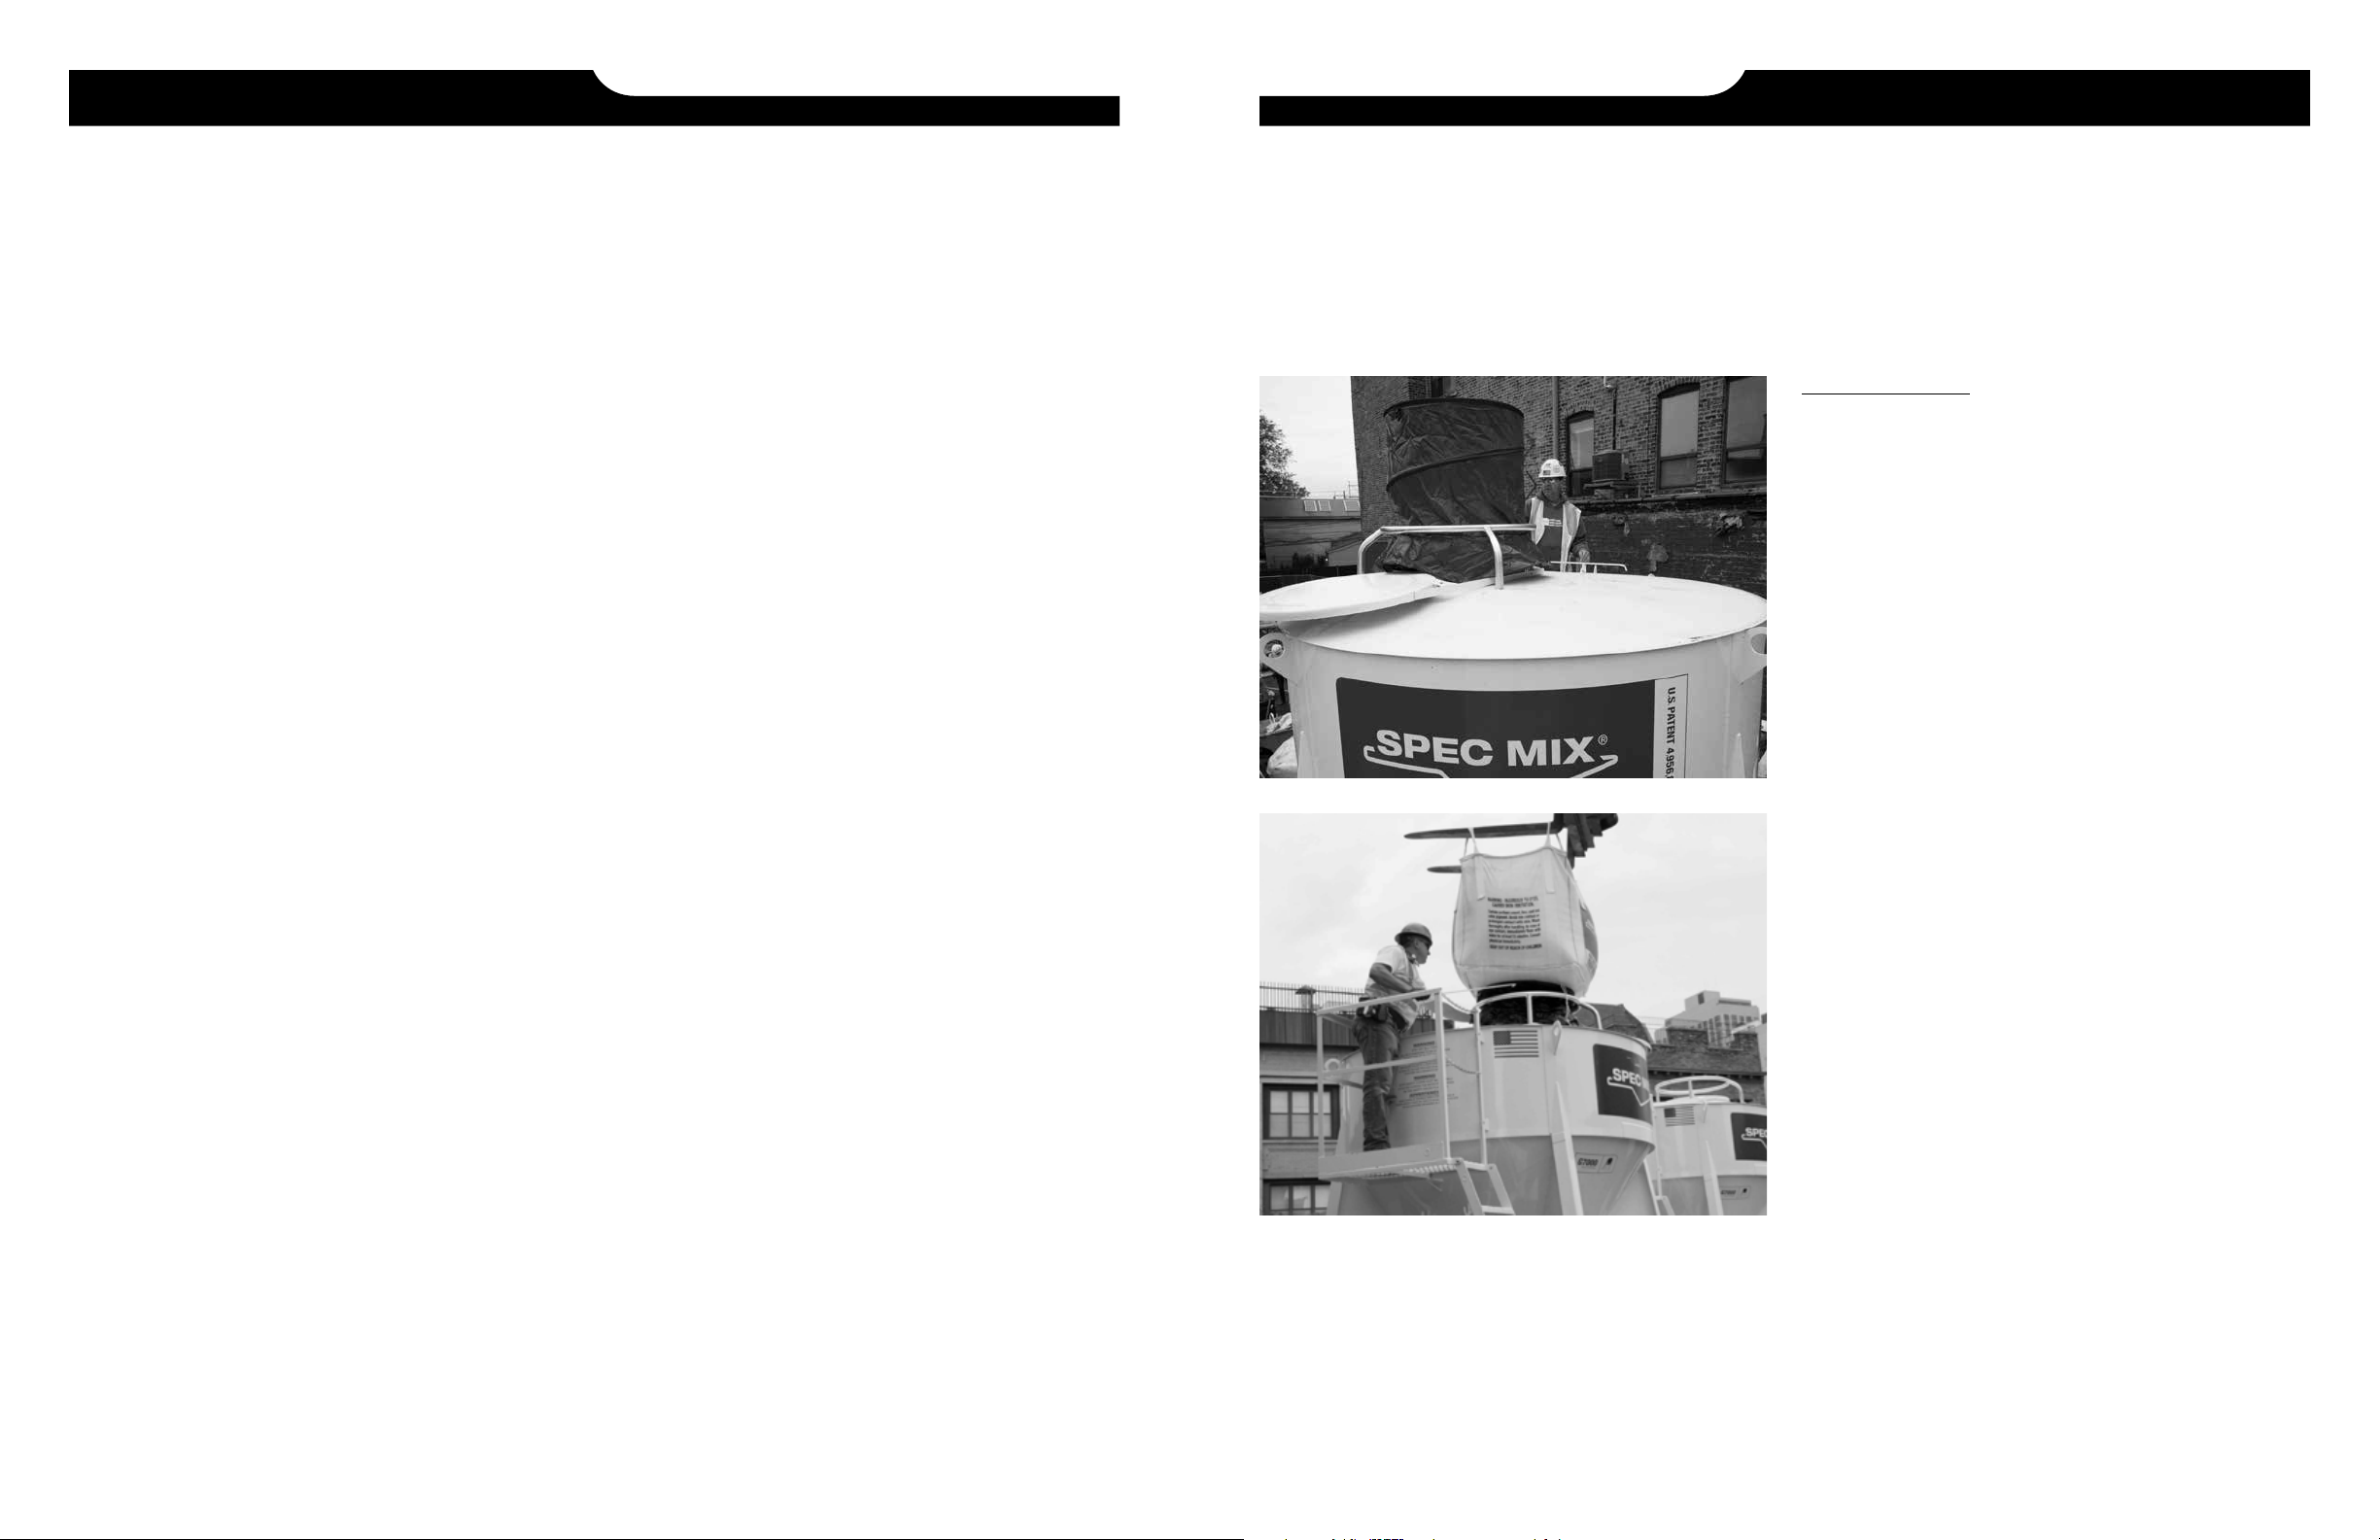
11. Place and securely fasten safety ring to top of silo
using safety locking pins
12. Slide open the silo hatch and install the SPEC MIX
Upper Dust Shroud into the fill port of the silo. The
end of the tube with the skirt should be positioned just
above the top of the silo and draped down to close
any air gaps between the upper dust shroud and the
silo.
13. By slightly raising the silo, you can remove all four leg
pins allowing silo legs to telescope to full adjustment.
WARNING: Keep legs, feet and hands clear of silo
legs as they are lowered.
14. Raise tower to desired height until holes in silo leg
match holes in receiver tube assembly.
15. Secure silo by inserting all four leg pins at the desired
height, then insert the safety locking pins in the holes
of the four leg pins to lock the leg pins in place.
16. Hand tighten stabilizer bolts then fully tighten with a
wrench.
17. If the silo is equipped with a VALVE GATE: Attach
handle and handle supports to valve gate assembly.
18. Check valve gate for easy operation and complete
closure allowing access for padlock. For swivel gates,
check rotation and grease zerts.
19. If the silo is equipped with a SLIDE GATE: Attach
handle and handle supports to slide gate assembly
matching the short handle to gate door and the
long handle to pivot point located on cross brace.
20. Check slide gate for easy operation and complete
closure allowing access for padlock. For swivel
gates, check rotation and grease zerts.
NOTE: It is advisable, under windy conditions, to also
utilize a wind tarp that attaches to the legs on two
sides of the silo.
VALVE GATE
VALVE GATE
SLIDE GATE
SLIDE GATE
10 11
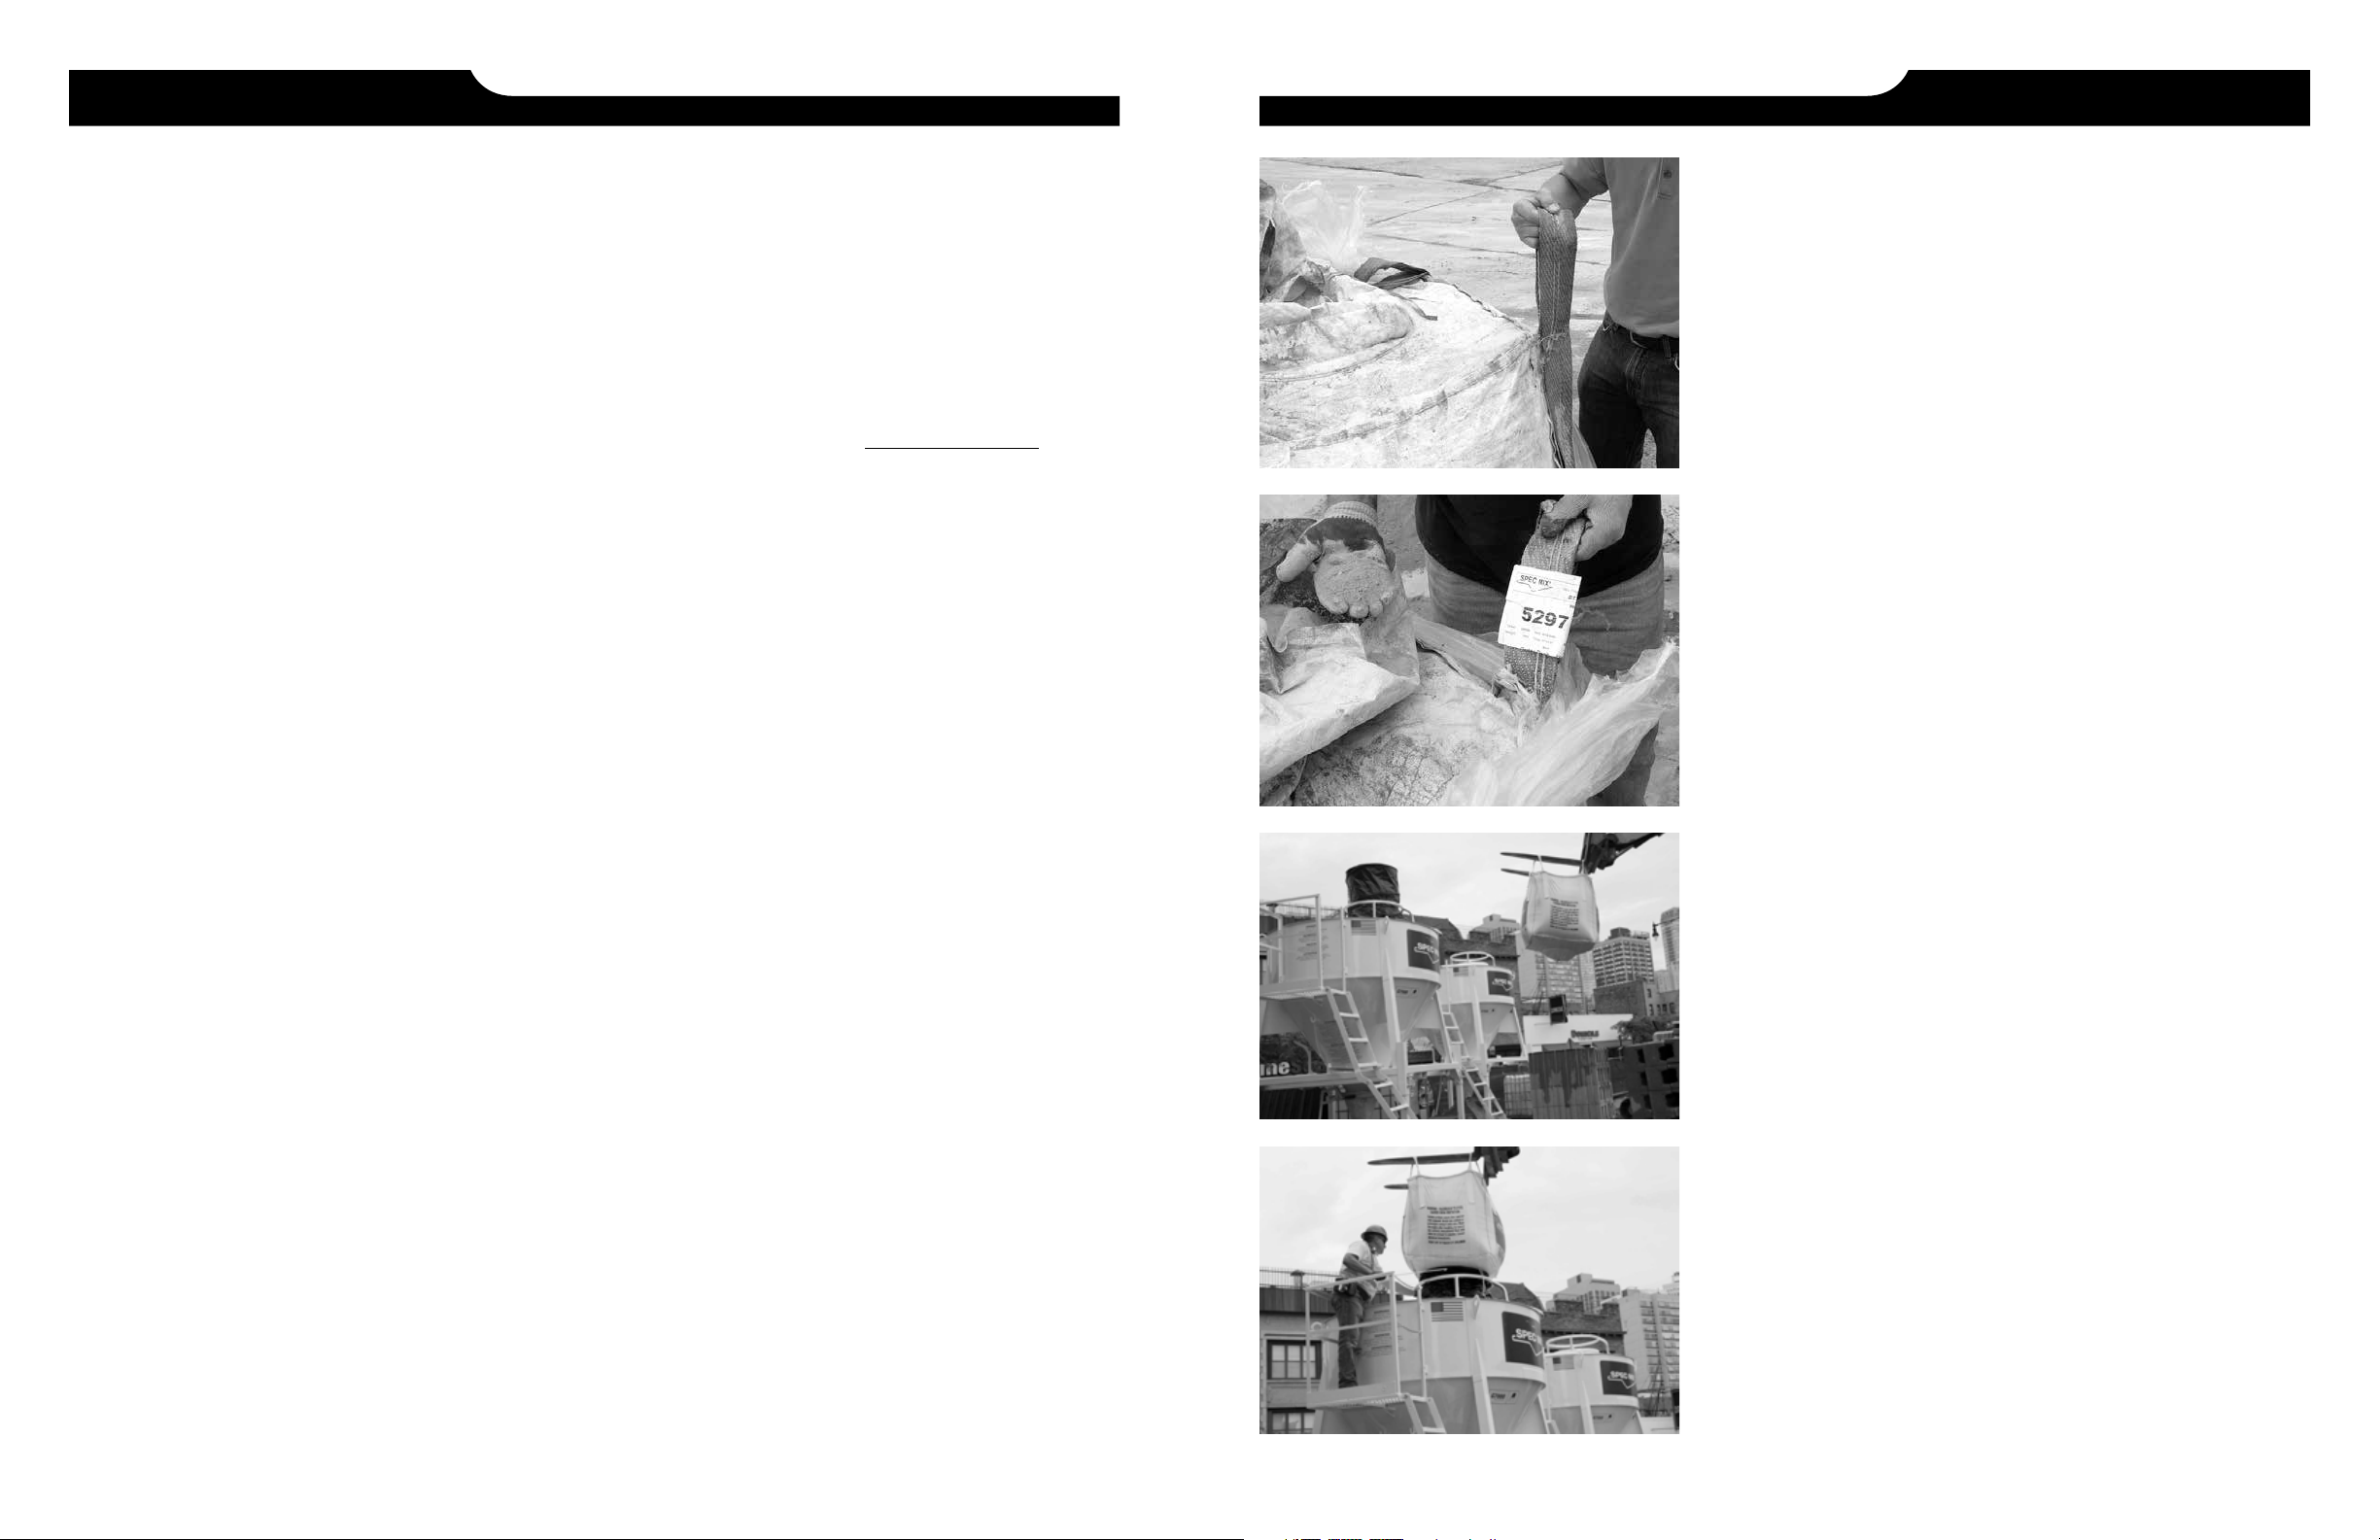
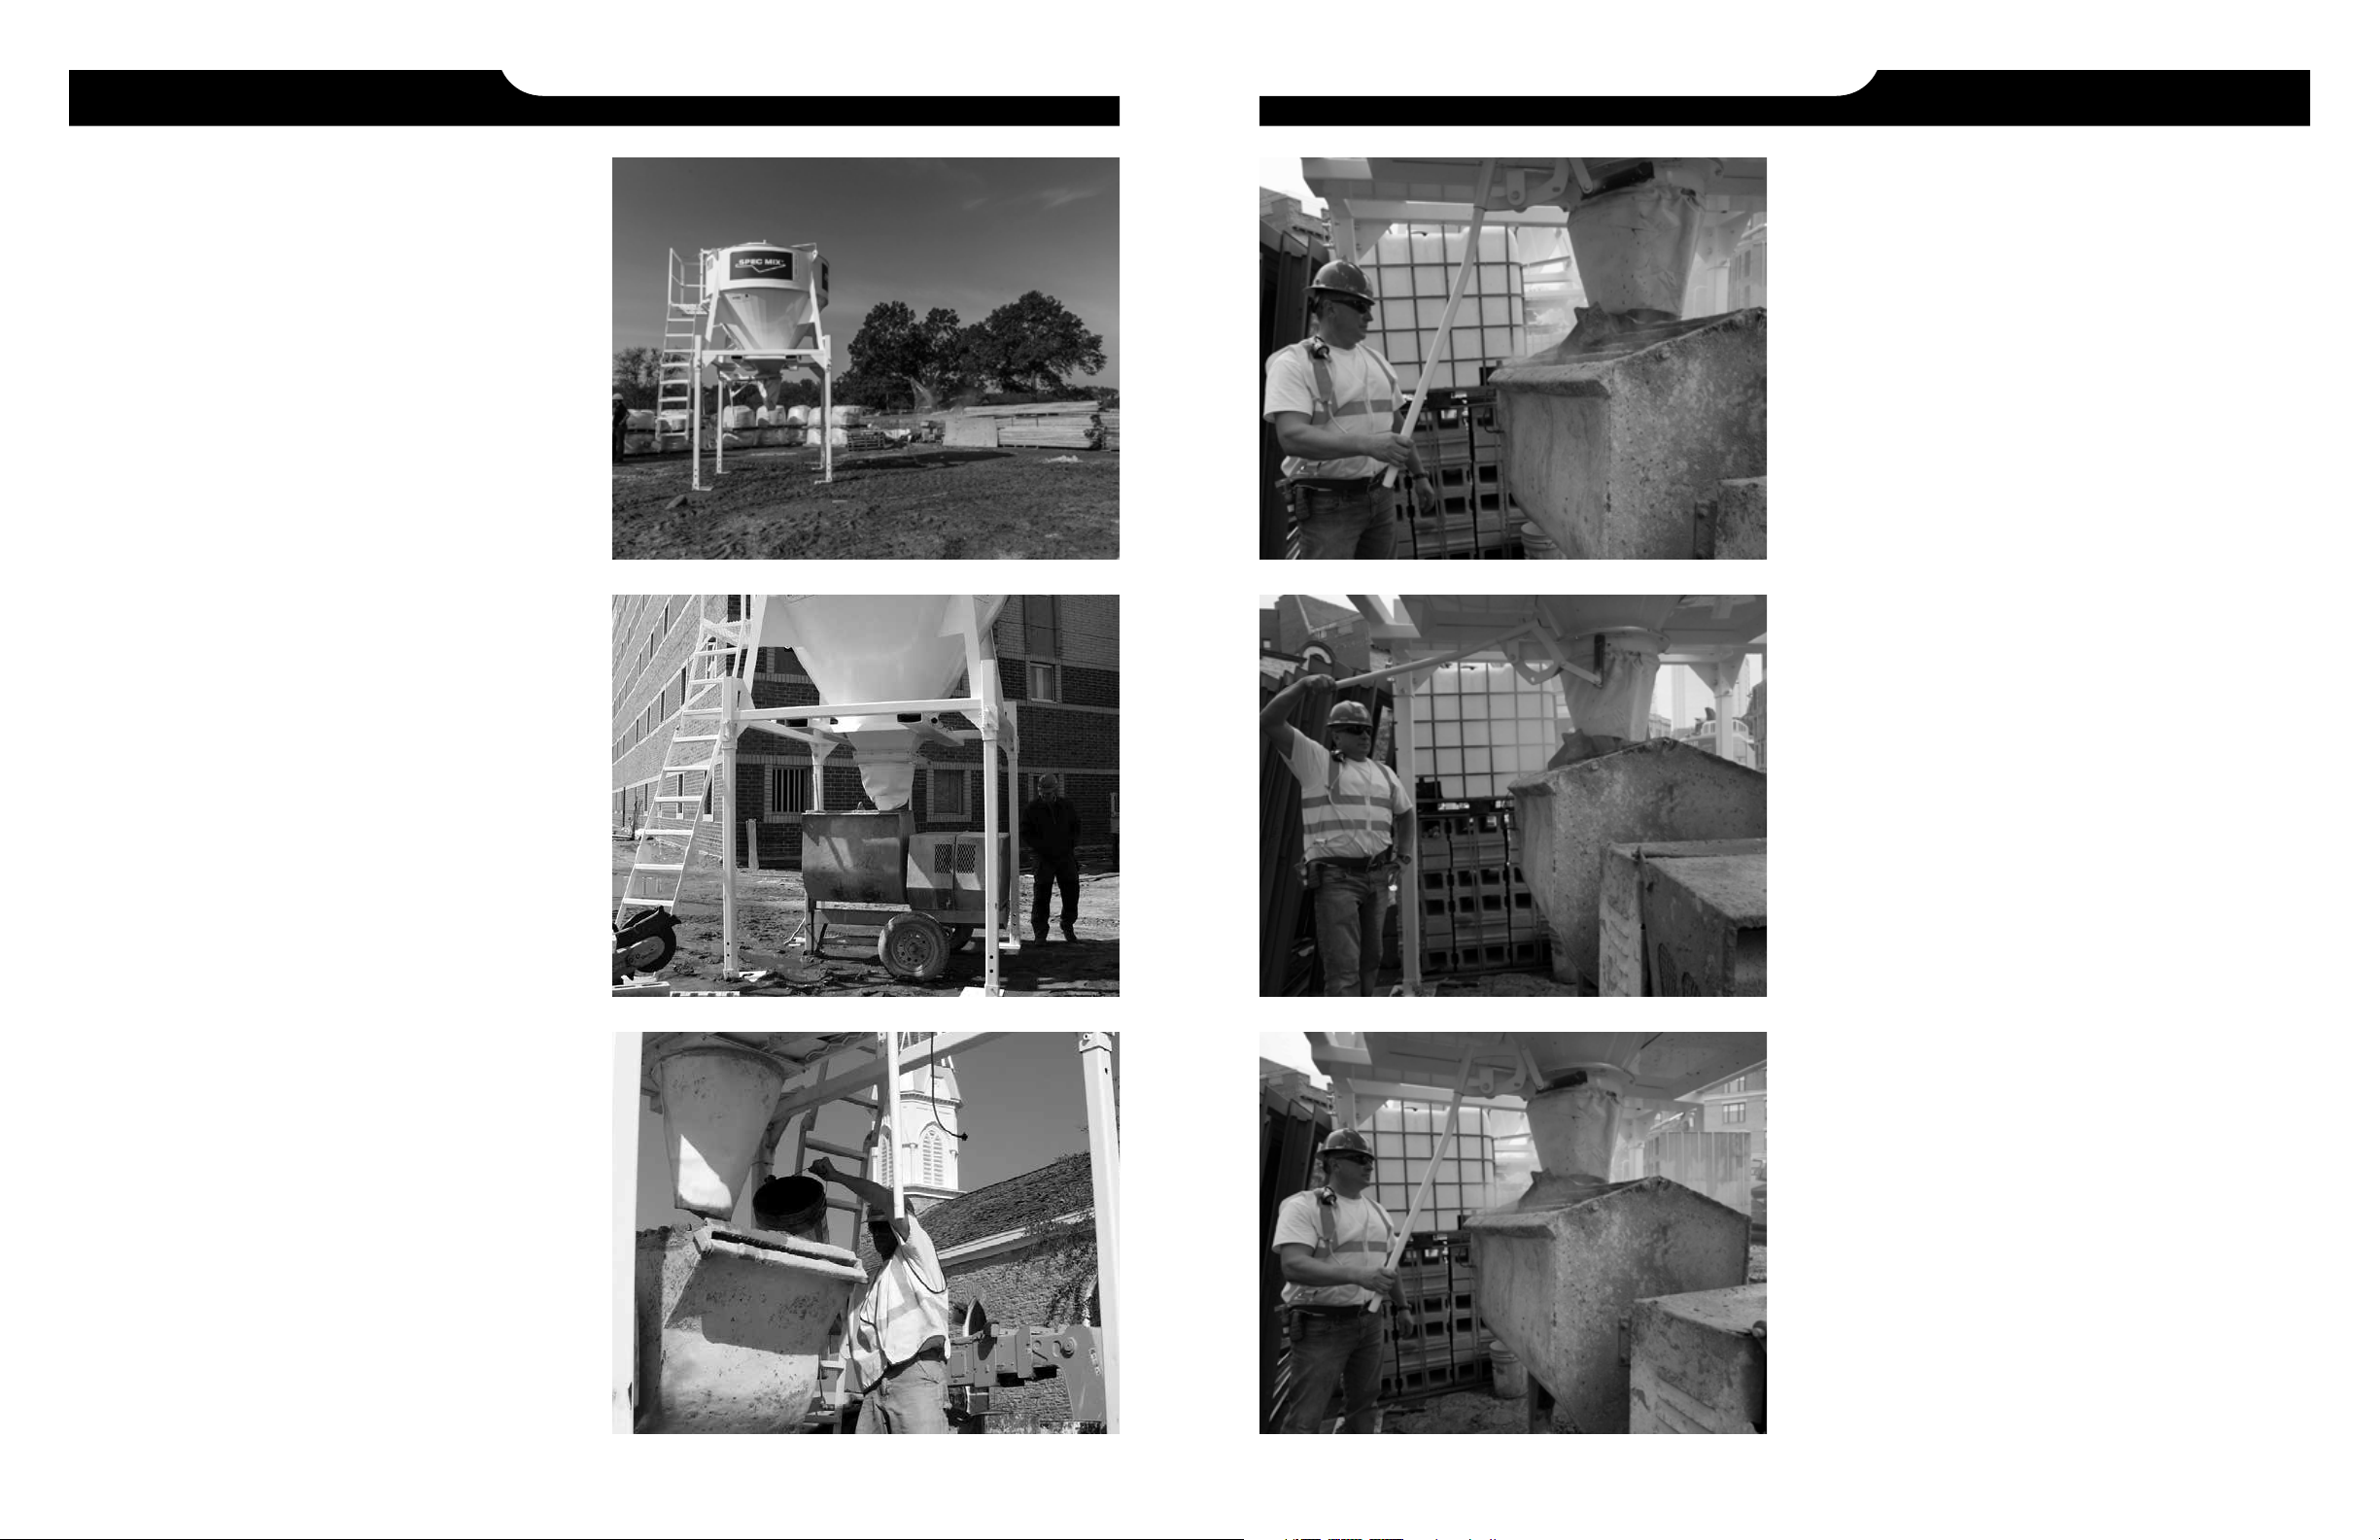
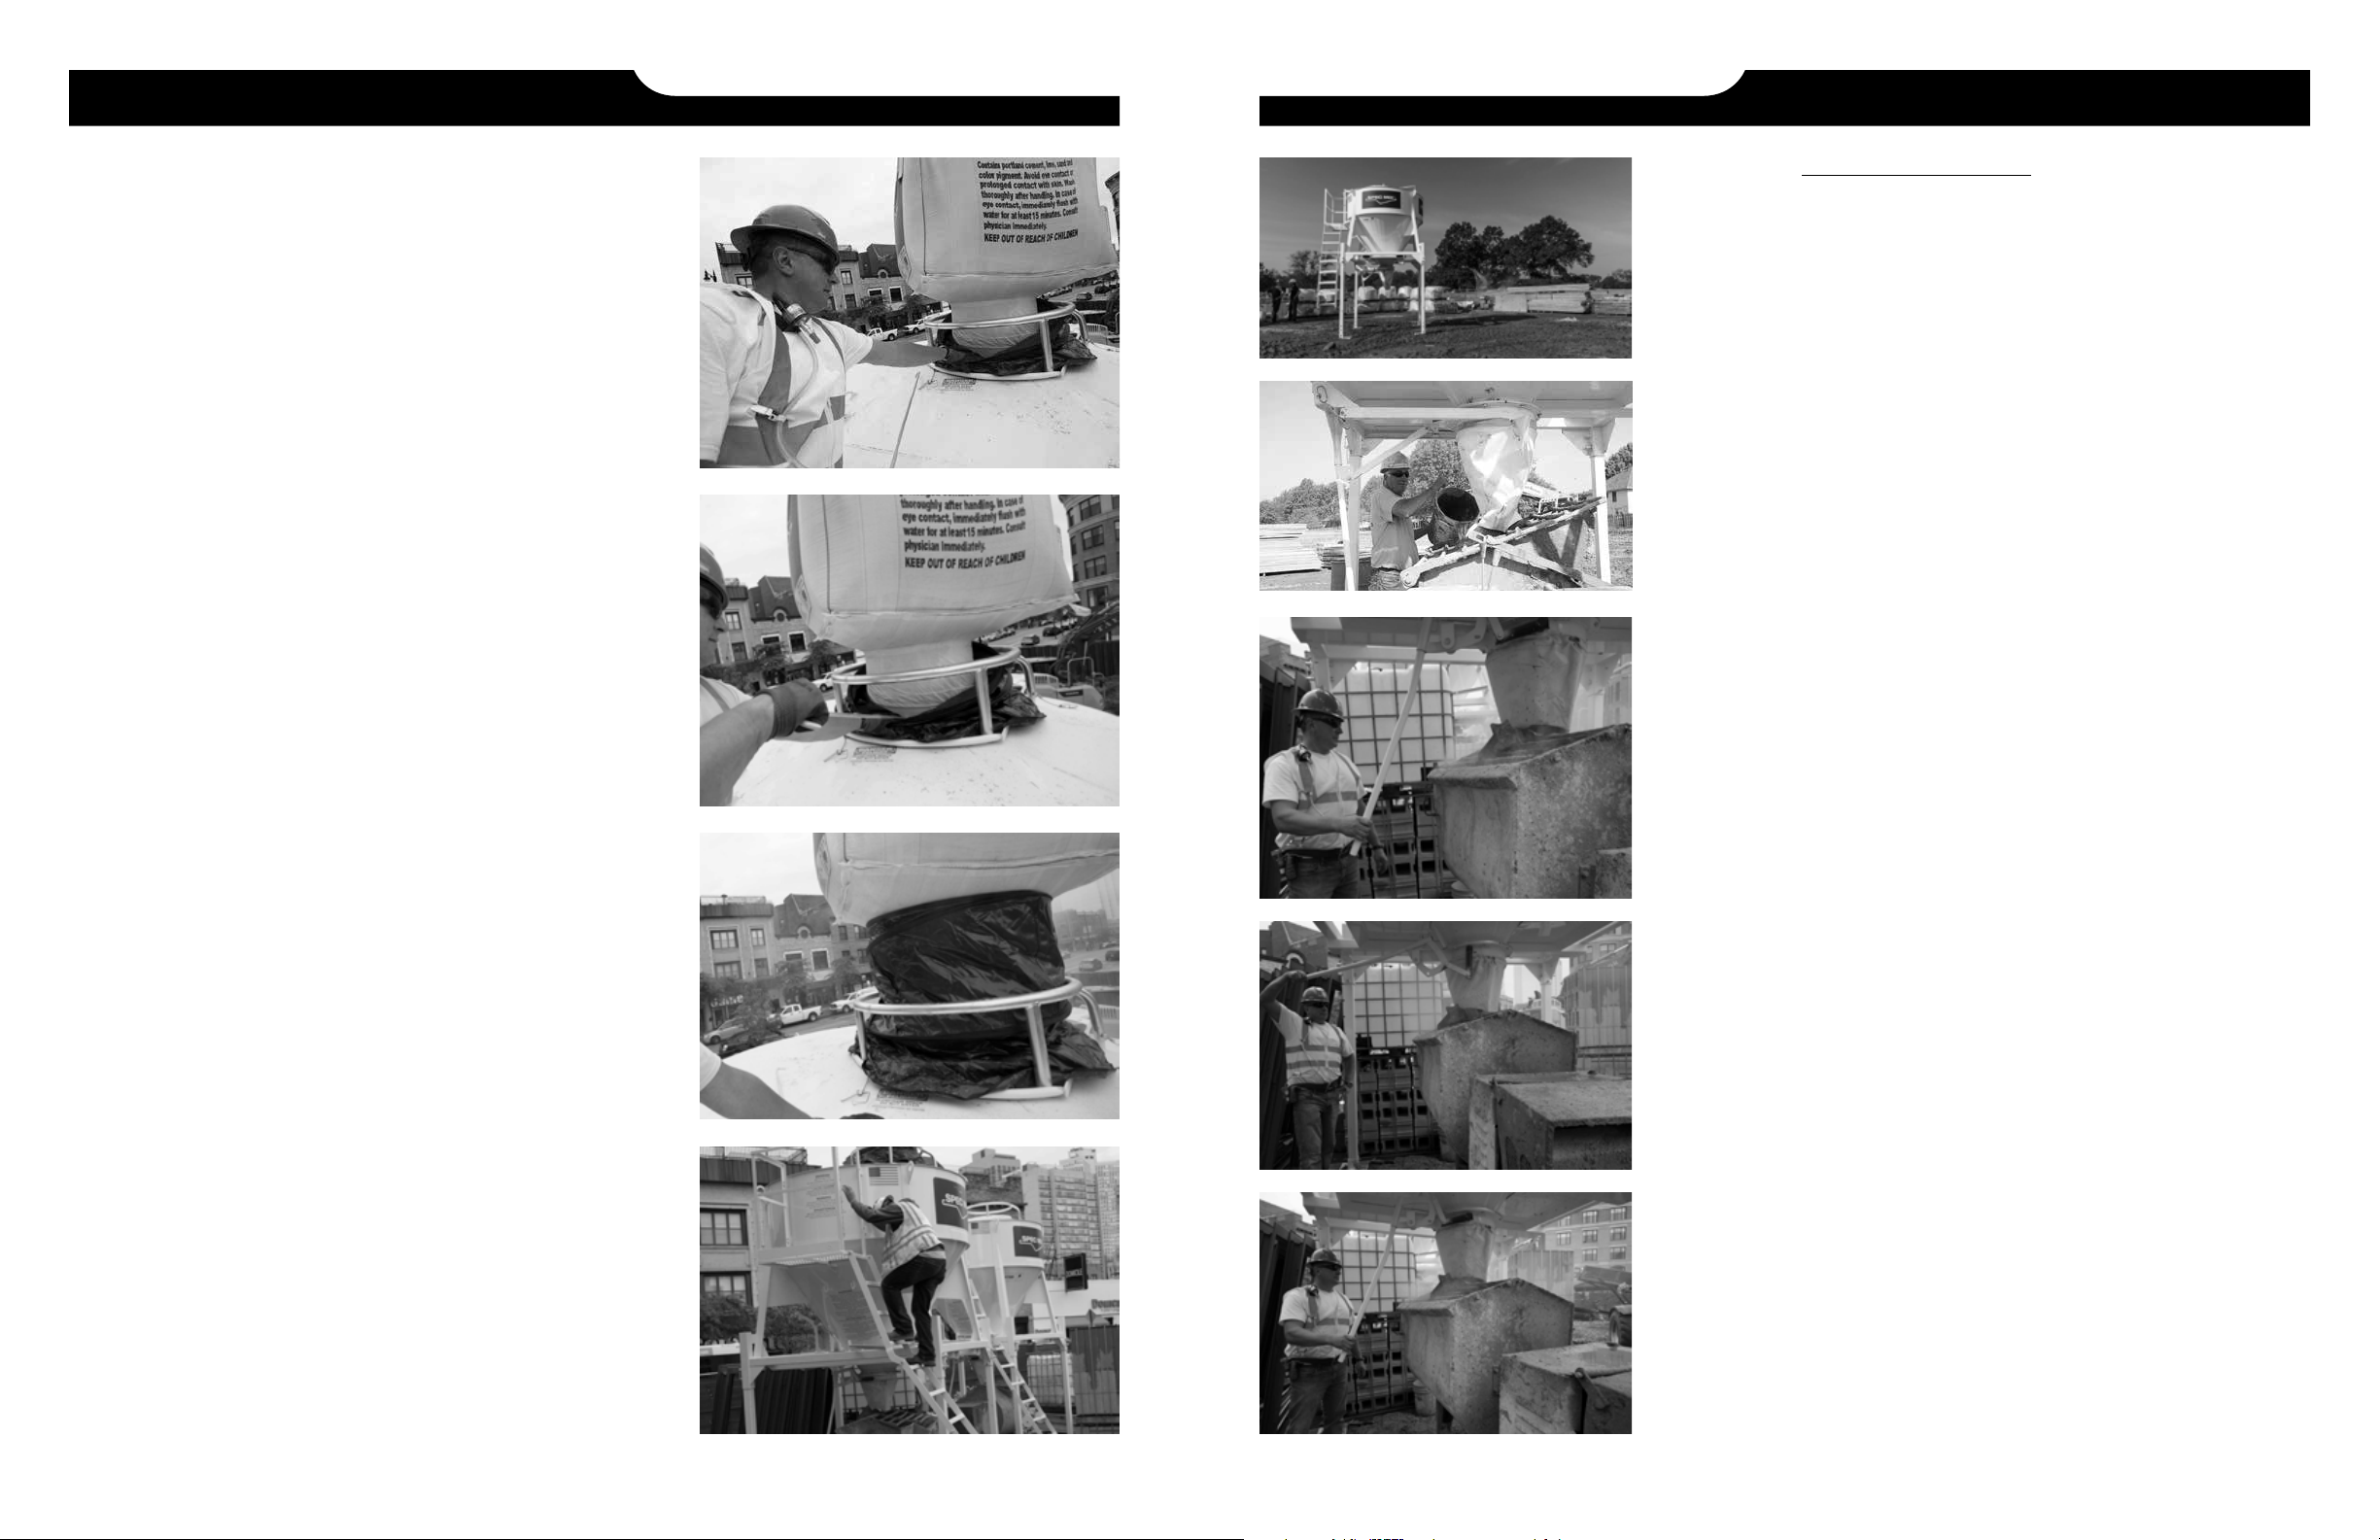
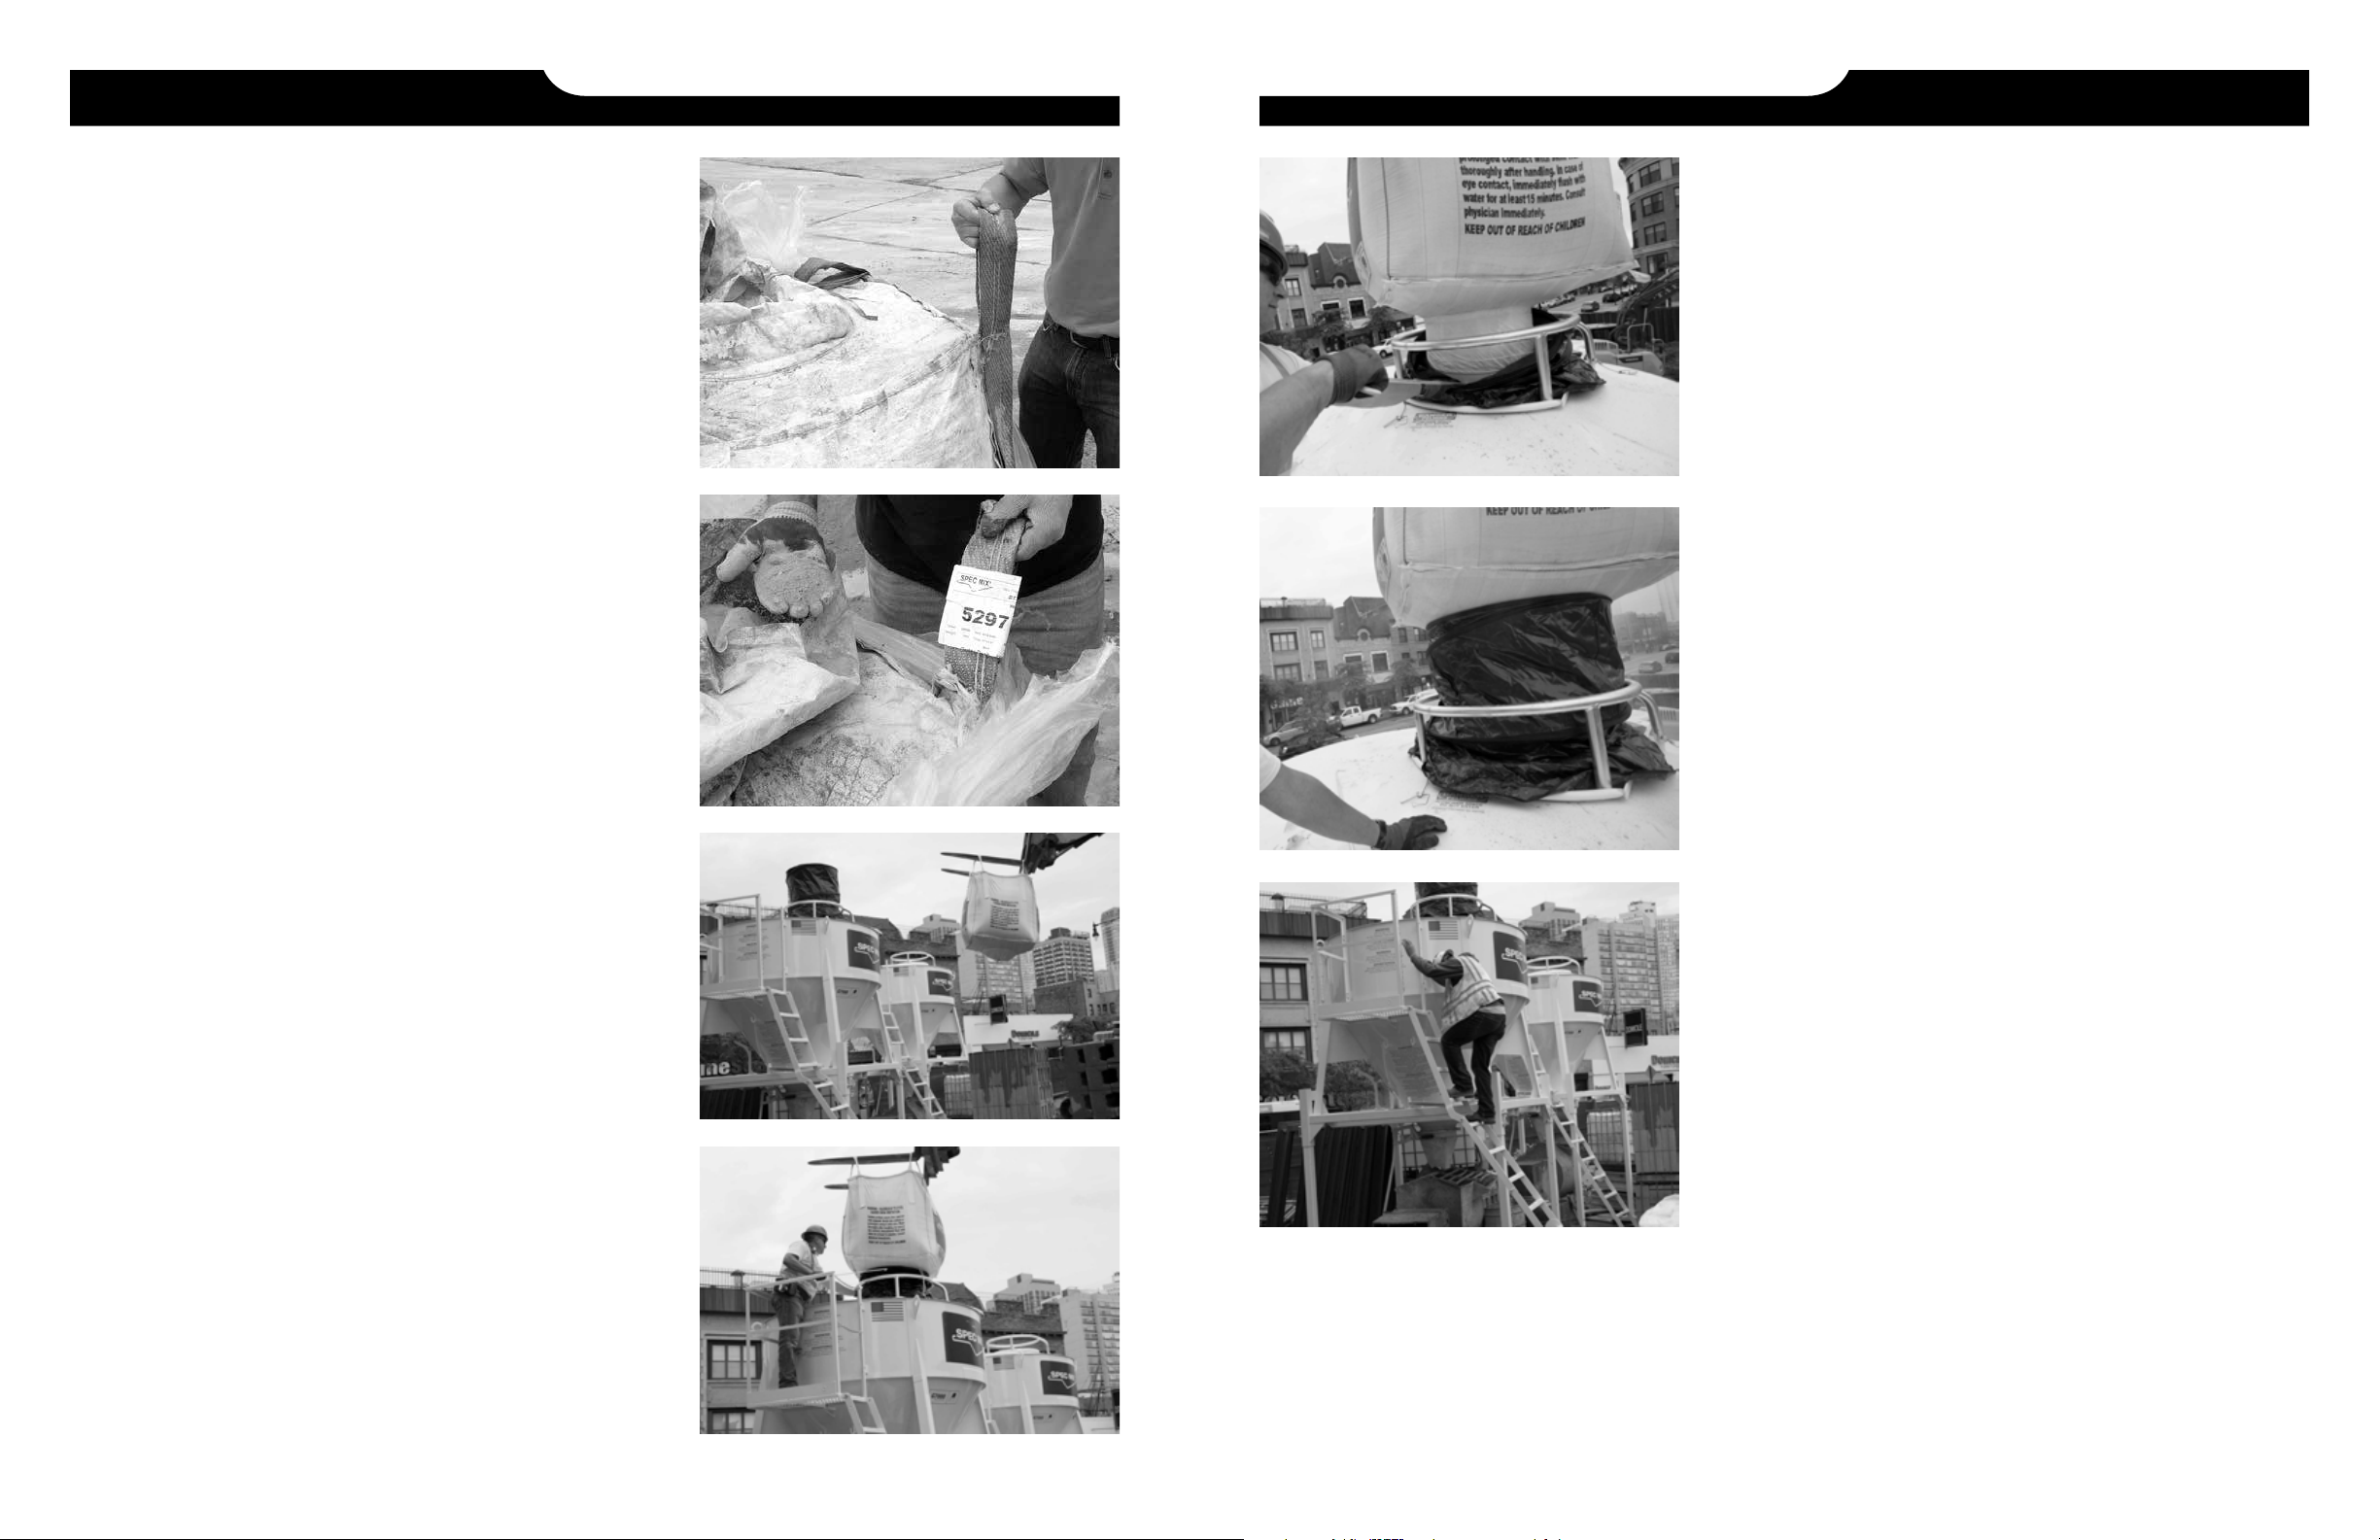
LOADING SPEC MIX®SILOS LOADING SPEC MIX®SILOS
1. While standing on the ground, slide the outer plastic cover
down to the pallet level of the material bulk bag. At this
time, inspect the overall condition of the bulk bag giving
special attention to the bag’s lifting loops. Check for fraying
on both sides. If the strap appears stressed, set the bag
and pallet aside for replacement and recover to protect the
material inside.
2. Save the product identification card or batch ticket
located inside the plastic cover. This will verify the product
delivered matches the product ordered, which may be
useful during the construction process.
3. Once the bag has passed the visual inspection, insert the
forklift forks through the four lifting loops. The forks should
easily slide to a position where all four loops are on the
forks as far as possible. It is important the loops do not
leave this position before lift tension is applied.
4. To improve flow, open the top spout of bag.
5. From an area opposite the side of the silo safety rail
platform, carefully raise the bag to the silo hatch. At no
time should personnel be under the bulk bag. The forks
should be at a reclined position while raising the bag to a
distance of 3-4 feet above safety ring.
6. Position the bulk bag over the top of the silo centered
over the fill port and safety ring so that the upper dust
shroud meets up with the bottom of the bulk bag. Bag can
now be slowly lowered to within 2-3 inches of safety ring,
compressing the upper dust shroud. Hand communication
signals should be used to indicate when the bag has been
lowered the appropriate distance.
WARNING: Do not allow the bag to rest on safety ring or
silo top.
7. The laborer/operator can now climb the ladder to the safety
railed platform once the bag is in this position.
WARNING: The person on the platform must securely
attach both safety chains across the entry point when on
the safety railed platform.
8. The design of the silo and bags is such that the material
charging of the silo can be done without accessing the silo
top.
SPEC MIX silo delivery systems are designed to increase productivity on site while adding to job site safety by
reducing physical injury with their ergonomically correct design. The standard gravity silos can also limit workers
exposure to construction site mixing dust when the following best practices are incorporated into every day use.
DANGER Causes severe skin burns and serious eye damage. May cause an allergic skin reaction. May cause
respiratory irritation. May cause cancer through chronic inhalation. Causes damage to lungs through prolonged or
repeated inhalation. Harmful if swallowed.
WEAR IMPERVIOUS GLOVES, such as nitrile. Wear eye protection & protective clothing. Do not breathe
dust. A NIOSH approved dust mask, such as N95, is recommended, especially in poorly ventilated areas or when
permissible exposure limits may be exceeded. Wash thoroughly after handling. Do not eat, drink, or smoke when
using this product. Before handling, read Safety Data Sheet which is available online at www.specmix.com, 800-
282-5828.
FIRST AID: If on skin or hair rinse with water. If in eyes: rinse cautiously with water for several minutes; remove
contact lenses if easy to do; continue rinsing. If inhaled: remove person to fresh air and keep comfortable for
breathing. If swallowed: rinse mouth; do NOT induce vomiting. Immediately take off all contaminated clothing and
wash before reuse. You cannot rely on pain to alert you to cement burns. Portland cement can cause dermatitis
or sensitization. If skin irritation or rash occurs get medical advice or attention. Immediately seek medical advice
or attention if symptoms are significant or persist. Contains Portland cement, silica sand and may contain fly ash.
Dispose of contents & container in accordance with all regulations.
KEEP OUT OF REACH OF CHILDREN
REQUIRED EQUIPMENT
Hard Hat
Impervious Gloves such as Nitrile
Safety Harness
Safety Goggles
Dust Mask: N-95 Recommended
SPEC MIX Safety Hook
SPEC MIX Upper Dust Shroud

12 13
LOADING SPEC MIX®SILOS
WARNING: Stay off the silo top. All silo charging to be
done from the safety railed platform only.
9. Using the SPEC MIX Safety Hook, pull the dust
containment chute down and grasp and pull the B-LOK or
plastic closure pin located on the outer tie on the bottom of
the bulk bag. Pull the b-lock to open the outer chute. This
will open the protective outer flap encompassing the bag’s
discharge chute.
10. With the same SPEC MIX hook, pull the upper dust shroud
down and hook the b-lock on the inner chute at the bottom
of the bulk bag. Pull the b-lock on the inner chute to begin
dispensing material into the silo.
11. Immediately remove the bulk bag hook to allow the upper
dust shroud to compress up into the bottom of the bulk
bag, containing any dust as the material dispenses into the
silo.
12. Climb down the ladder as the material dispenses into the
silo to minimize exposure to dust while filling the silo.
13. Repeat these exact procedures for each bag emptied into
the silo for charging.
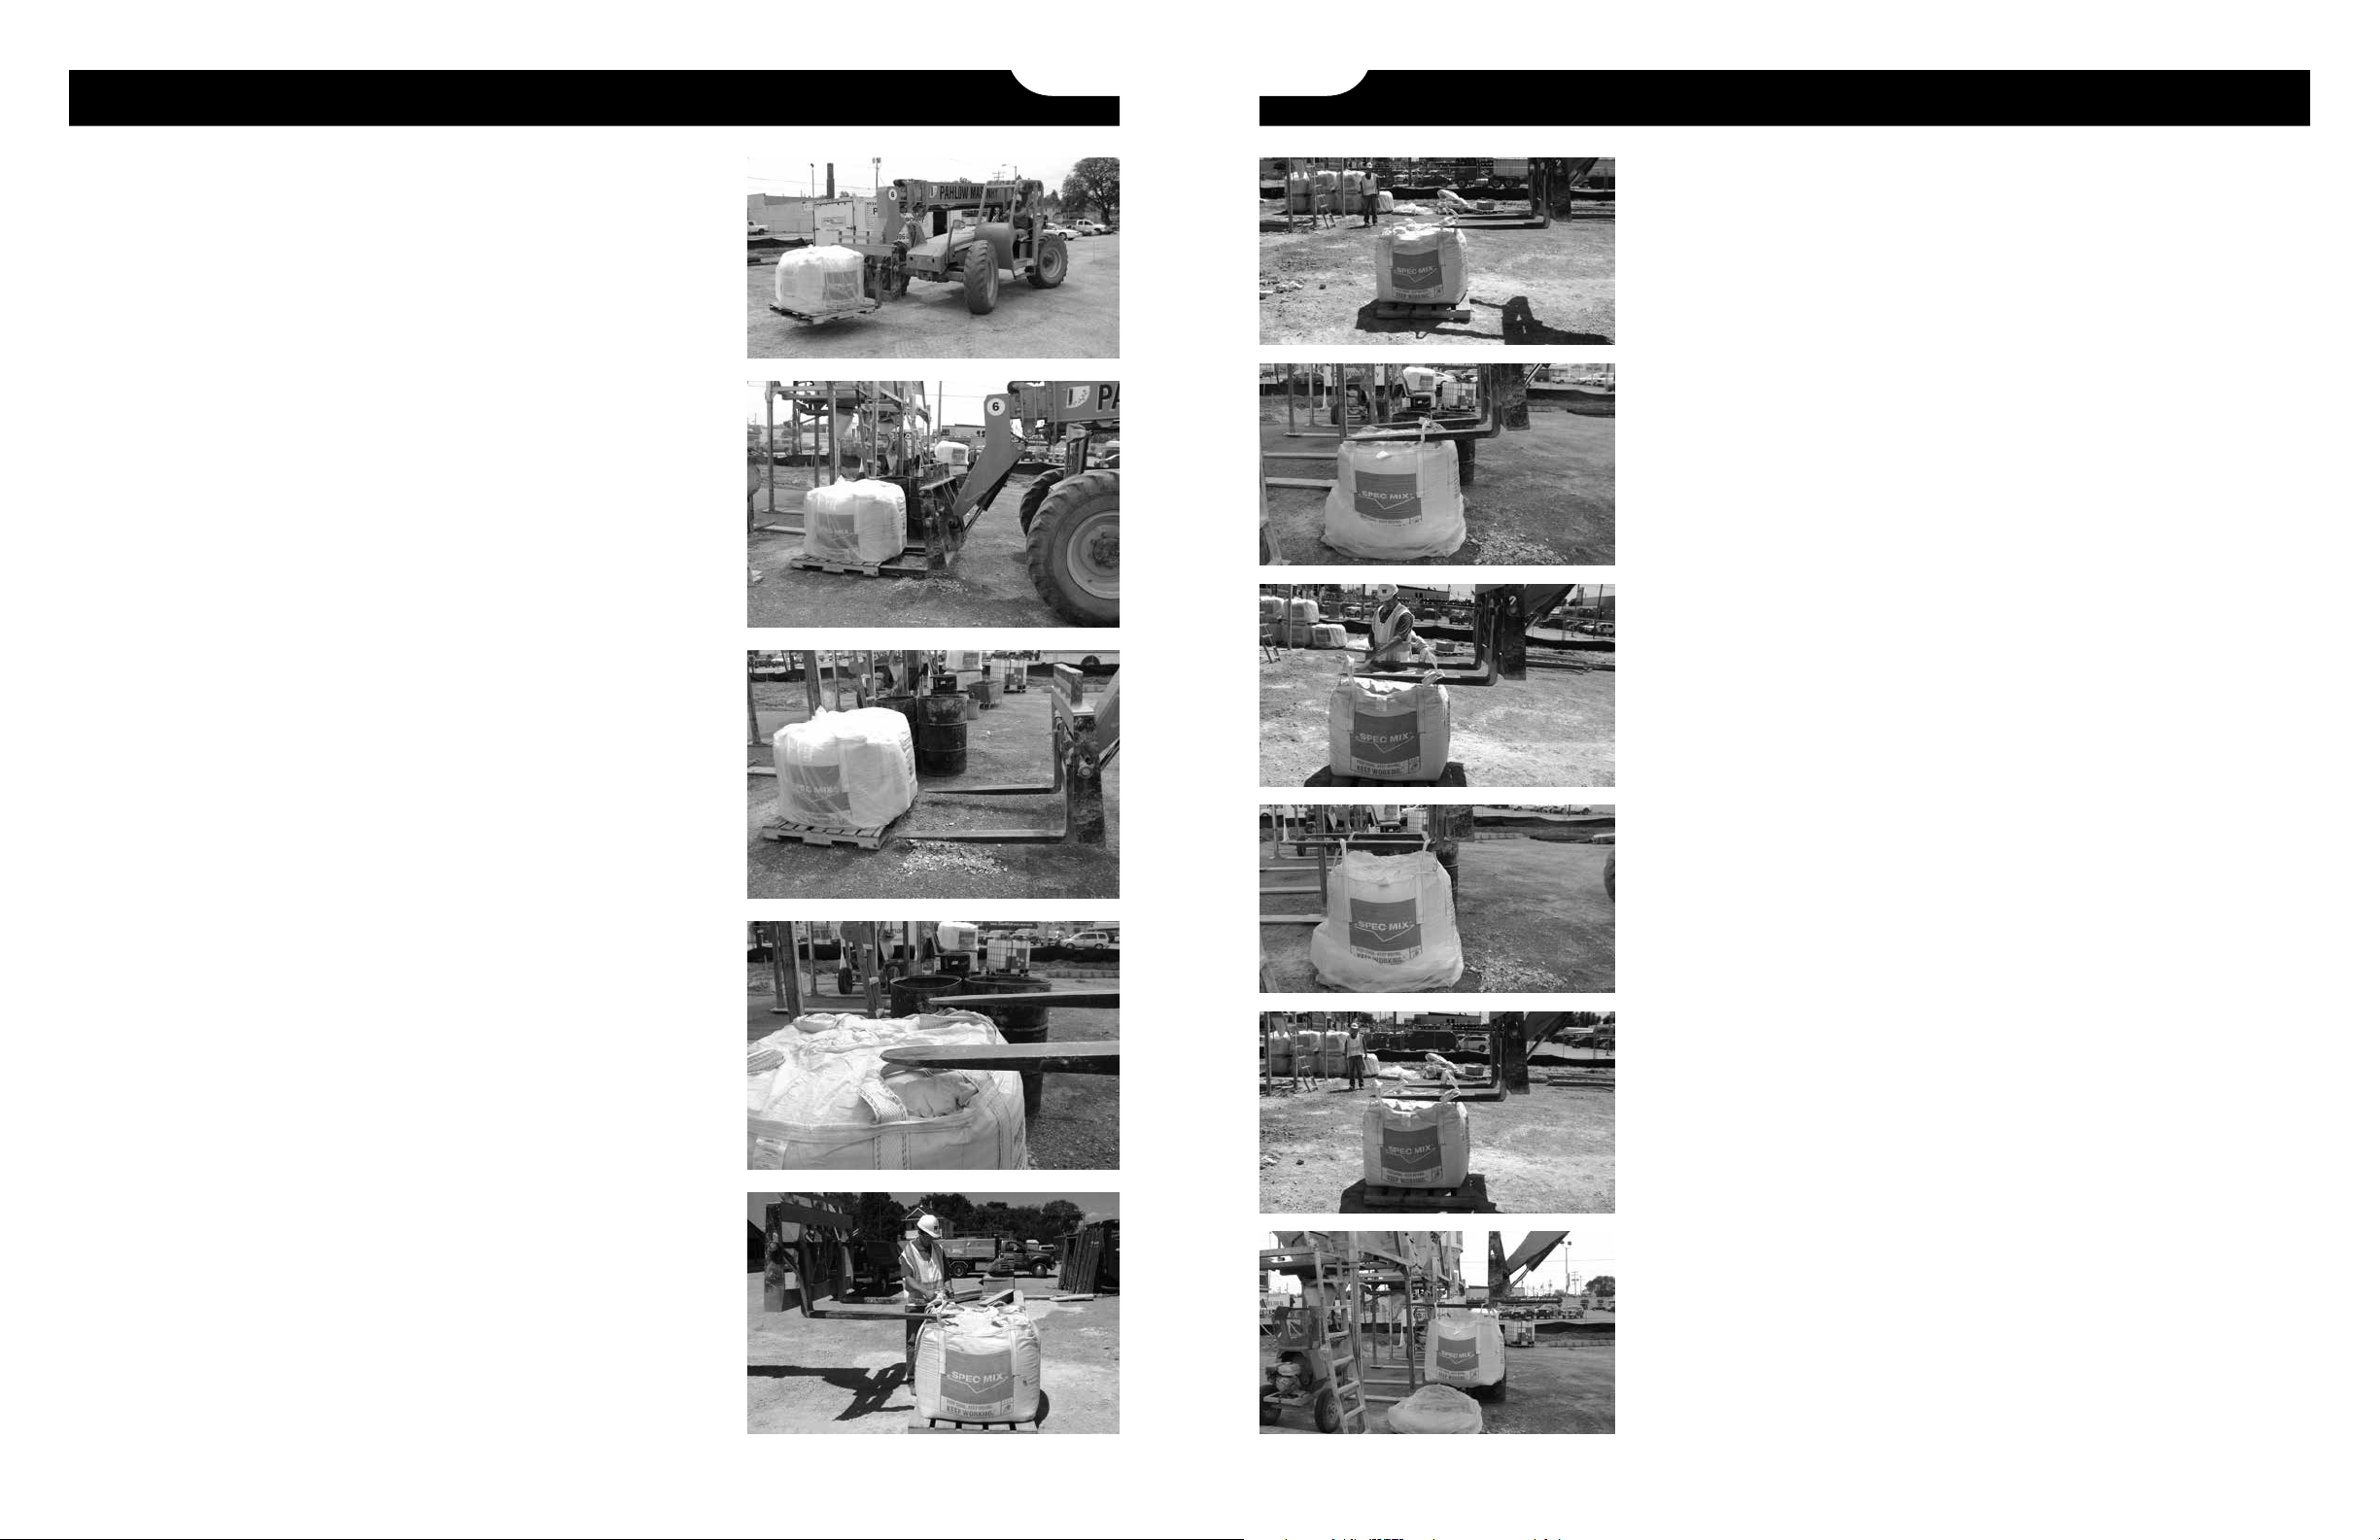
BULK BAG HANDLING & LIFTING PROCEDURES
The following flexible intermediate bulk container (bulk bag)
lifting and handling procedures are specifically stated for
safe use and operation when utilizing SPEC MIX Silo Delivery
Systems. SPEC MIX bulk bags are specifically designed
for use with construction job site fork trucks. SPEC MIX
bulk bags are manufactured and tested to exceed industry
safety specifications. To ensure the safety of all construction
site personnel, please read and follow these practices and
procedures when handling SPEC MIX bulk bags. Work smart,
work safe!
1. When transporting bulk bags, only move the bag while
seated on a pallet. The boom of the fork truck should be
fully retracted. Do not transport bulk bags around the
jobsite suspended from its lifting straps.
2. To load the SPEC MIX silo, first position the bulk bag on
the pallet directly in front of the SPEC MIX silo so it is
lined up with the fill port on the top of the silo. At this point
the fork truck’s front tires should be no more than 12 feet
from the silo’s front legs. Always adhere to the fork truck
manufacturers load chart when lifting bulk bags. A SPEC
MIX bulk bag weighs 3000 pounds.
3. To lift the bulk bag, back up the fork truck slowly removing
the fork tines from the pallet supporting the bulk bag.
Before inserting the forks into the lifting loops, inspect the
tines of the fork truck to ensure there are no rough edges.
If a rough edge is found, file or grind the rough edge to
remove any burs. Make sure to shut down the fork truck
before working on fork tines.
4. Place the fork truck in neutral and engage the parking
break. Then slowly lift the fork tines of the fork truck to a
position where the tines are in line with the bag’s front two
lifting straps, yet just over the top of the bulk bag. Remove
the protective outer plastic cover from the bulk bag to
inspect the integrity all four lifting straps of the bag.
NOTE: To increase the flow and discharge speed of the
bag’s content while filling the silo, untie and open the bag’s
top fill spout.
5. Once the fork tines are in position, turn off the fork truck. It
is now safe for the assistant to approach the fork truck and
manually slide the bag’s lifting straps over the fork tines.
Always approach the side of the fork tine, do not stand in
front of the fork tines.

14 15
BULK BAG HANDLING & LIFTING PROCEDURESBULK BAG HANDLING & LIFTING PROCEDURES
12. To lift the bulk bag over the SPEC MIX Silo, the fork truck
operator must place the fork truck in neutral, apply the
parking brake and level the machine. The operator can then
slowly raise the fork truck boom until the bottom of the
bulk bag is slightly above the top of the silo. Next, extend
the boom until the bag’s discharge chute is directly above
the silo’s fill port and safety ring located atop the silo. Once
the bag is in position, the operator should verify that the
fork truck is in neutral and the parking brake is applied,
then turn off the fork truck so the assistant can safely climb
the silo ladder to dispense the bulk bag’s contents into the
silo from the silo’s safety platform. While standing on the
platform, the assistant must attach and secure both safety
chains on the loading platform before opening the fill port
lid on the silo.
13. To open and discharge the bulk bag into the silo, use the
bulk bag hook to pull and open the first B-lock closure
on the bag’s outer chute. CAUTION: The bulk bag
hook should only be inserted under the silo safety
ring mounted above the fill port, not above. Always
keep hands and arms clear of the area below the bulk
bag. Follow the same procedure to open the bag’s inner
discharge chute to allow material flow.
14. When all the contents of the bag have been emptied,
the assistant can close the silo fill port and the fork truck
operator can safely return the empty bag back to its
original pallet for jobsite removal. Once the fork truck boom
is safely in a lowered position over the original pallet, the
assistant can safely climb down the ladder from the loading
platform.
To load the silo with additional bulk bags of material,
closely follow the same procedures above.
6. Once the lift straps are securely positioned on the fork
tines the assistant should step safely away from the bulk
bag and fork tines before the fork truck is started and any
movement of the fork truck begins.
7. Before the next set of lifting straps can be slid over the
fork tines, while the tines are still in the proper position, the
forklift operator should extend the boom forward so the
tips of the fork tines are directly above the bag’s second
set of lifting straps.
8. Once the forks are in position, turn off the forklift. It is now
safe for the assistant to manually slide the bag’s lifting
straps over the fork tines. Always approach the side of the
fork tine, do not stand in front of the fork tines.
9. The assistant should ensure the bag’s front lifting straps
are slid back to the vertical rise at the rear of the fork tines
and position the lifting straps so each is directly above the
point at which it connects to the bulk bag.
10. When the lifting straps are properly positioned on the fork
tines, the assistant should step safely away from the bulk
bag and fork truck before it is started and any movement of
the fork truck begins.
11. The bulk bag should be slowly lifted off the pallet. If
the plastic outer cover is still around the bulk bag, the
operator should place the fork truck in neutral, then apply
the parking brake and turn off the fork truck to allow the
assistant to safely remove the outer cover from the bulk
bag.
NOTE: For product quality control measures the attached
manufacturer batch ticket can be kept as a permanent
record of the material in the bulk bag.
16 17
OPERATING SPEC MIX®SILOS
WARNING: Injurious to eyes, lungs & skin SPEC
MIX products contain portland cement and lime,
masonry cement, mortar cement, additives, sand
and/or color pigment.
Avoid eye contact, prolonged breathing of dust or
contact with skin
Recommended wearing of NIOSH approved
dust mask or respirator that meets minimum
performance of N-95, appropriate eye protection,
gloves and the proper clothing to protect from
prolonged exposure.
Wash hands thoroughly after handling. In case of
eye contact, immediately flush with plenty of water
for at least 15 minutes and consult a physician.
1. Position the silo so the mason tender can be
positioned with a crosswind over the mixer or
downwind to keep dust from blowing into the face
of the worker while mixing. Many SPEC MIX silos
are equipped with a rotating gate that allow for
the handle to be moved without moving the silo
itself. To keep rotating gates working properly, keep
grease in zerts and make sure to open the gate
before attempting to rotate it to remove downward
force from the weight of the material on the gate
when rotating.
2. Position mixer under silo to facilitate dumping of
mixed product into mud box or tub.
3. Place discharge chute as close as possible to mixer
protective grate or orifice.
4. Start the mechanical mixer.
5. Fill the mixer with sufficient water to receive
the material. It is beneficial to keep the initial
batch wetter than required for final use to ensure
complete hydration of the aggregate, reducing dust
when charging the mixer and increasing board life
of the final product.
OPERATING SPEC MIX®SILOS
6. Next, locate the handle that controls the flow of
SPEC MIX preblended material into the mixer. This
handle extends down and away from the silo just
above the chute. Pull the handle away from the
mixer to open and push to close.
7. When opening the gate, take a stance that is away
from the discharge of material to limit exposure to
nuisance dust.
8. Open the gate with even force and only as wide as
needed to allow for a good steady flow of material
into the silo. Opening at too great of a distance can
cause product surges that have the potential to
increase nuisance dust on site.
9. When the desired amount of material has been
dispensed into the mixer, shut the gate with even
force, maintaining distance from the mixer.
10. Adjust mix as needed by adding either more water
or SPEC MIX product in order to obtain the desired
consistency.
11. As the wind shifts, make sure to position with
a cross wind or downwind to continue to avoid
nuisance dust.
12. Mix each batch to the full five minutes as required
by ASTM.
18 19
RELOCATING SPEC MIX®SILOS
1. One of the many advantages of the SPEC MIX
system is the easy relocation of the silo. The
ability to move the silo around the job site enables
the forklift operator to deliver mortar quickly and
efficiently.
2. Select a position on the job site where ground is
dry, compacted, level and stable. (See additional
requirements in “ASSEMBLING SPEC MIX SILOS.”)
3. Empty silo as much as feasible or possible.
(Material may be re-loaded into an empty bag if
necessary.)
NOTE: Silos can weigh between 1,100 to 3,700
pounds. (See silo specifications on Page 3.)
4. Remove mixer and any obstructions that may
hinder the freedom of movement, including any
hardened material around base of silo legs and foot
pads.
5. Run forklift forks into fork tubes full depth.
NOTE: A proper capacity forklift must be utilized
to lift the standard weights of the silo and material
being used. See silo specifications on Page 3.
6. Slightly raise silo and remove lynch pins and leg
pins from legs. Lower silo while manually raising
ladder to avoid damage.
7. Once lowered to the transportation mode re-install
leg pins and lynch pins to their original position.
8. Connect third contact point to forklift using either
chain or strap with minimal tensile strength of 5,000
pounds.
NOTE: The third contact point is necessary for
preventing the silo from sliding off the forklift forks
during any job site transportation.
9. Slowly transport silo to new location.
10. Follow same guidelines for initial erection of silo
paying note to soil conditions as before.
11. Re-charge silo following the loading instructions.
Note: Newer Style Foot Pads are centered.
*When using the Older Style Foot Pads (below)
turn Foot outward (turned inward for shipping
purposes only).
MAINTENANCE OF SPEC MIX®SILOS
1. Maintenance begins on the day the silo is delivered.
a. Silo should be coated with release agent as supplied by Arrow/Mag-Nolin, ZEP, or other
manufacturer.
b. Install all warning signs and decals in appropriate locations on silo and work platform.
c. Check valve/swivel gate for all parts, alignment, and ease of operation.
d. Check all leg pins, lynch pins, cables, stabilizer nuts and bolts, valve/swivel gate, hatches,
and safety chains for ease of operation and proper locations.
e. Upon silo erection at job site, cover legs with poly, form release agent or utilize another
method to protect leg assemblies, and foot pads from material collection.
2. Daily maintenance to be performed by contractor:
a. Keep top hatch free of excess material in order to facilitate ease of opening and closing.
b. Check safety chains for stress.
c. Check discharge chute for proper height rips or tears. Replace as needed.
d. Check to make sure all warning signs are visible and in their proper location.
e. Check to ensure that all non-skid tapes are in place.
f. Check to make sure that all handles, chains, leg pins, lynch pins, and cables are in place and
not bent, cut or damaged. If so, replace immediately.
g. Inspect silo legs for alignment, dents or bending. Replace silo immediately if necessary.
h. Check silo for plumb and level.
i. Check position of all four 24 x 24 inch foot pads.
3. Upon return to Distributor or SPEC MIX Manufacturer, check the following and correct or replace
as needed.
a. All signs are clean and visible.
b. All safety chains and clasps are operational.
c. Upper Dust Shroud is intact.
20 21
MAINTENANCE OF SPEC MIX®SILOS BEST PRACTICES FOR SPEC MIX®SILOS
d. Valve gate is clean and operates easily.
e. Discharge chute is not cut, torn or weathered.
f. Material flow basket is intact, clean and operational.
g. Legs are free of mortar build-up.
h. Top of silo is free of excessive mortar build-up.
i. Top hatch integrity is sound and free of defects, broken welds or supports and free of mortar
build up.
j. Safety ring connections are clean and free of hardened mortar or grout.
NOTE: Damaged silo legs affecting the integrity of the silo must be replaced immediately before
silo set up or any continued use.
NOTE: There is no replacement schedule for the silo lynch pins, unless a manufacture defect is
evident.
WARNING: Do not enter the interior of the silo cone for any inspection or maintenance. If
absolutely necessary, personnel must follow confined space entry procedures (OSHA).
Reducing Unnecessary Exposure to Dust at the Mixing Station
SPEC MIX silo delivery systems are designed to increase productivity on site while adding to job site
safety by reducing physical injury with their ergonomically correct design. The standard gravity silos
can also limit workers exposure to construction site mixing dust when the following best practices
are incorporated into every day use.
Loading the Silo :
1. Install the SPEC MIX Dust Containment Chute into
the fill port of the silo. The end of the tube with
the skirt should be positioned just above the top
of the silo and draped down to close any air gaps
between the dust containment chute and the silo.
2. Position the bulk bag over the top of the silo
centered over the fill port and safety ring so that the
dust containment chute meets up with the bottom
of the bulk bag.
3. Lower the bulk bag to a position just above the
safety ring, compressing the dust containment
chute.
22 23
BEST PRACTICES FOR SPEC MIX®SILOSBEST PRACTICES FOR SPEC MIX®SILOS
4. Using the bulk bag hook, pull the dust containment
chute down and hook the b-lock on the outer chute
at the bottom of the bulk bag. Pull the b-lock to
open the outer chute
5. Using the bulk bag hook, pull the dust containment
chute down and hook the b-lock on the inner chute
at the bottom of the bulk bag. Pull the b-lock on the
inner chute to begin dispensing material into the
silo.
6. Immediately remove the bulk bag hook to allow the
dust containment chute to compress up into the
bottom of the bulk bag, contianing any dust as the
material dispenses into the silo.
7. Climb down the ladder as the material dispenses
into the silo to minimize exposure to dust while
filling the silo.
Silo Mixing Procedures:
1. Position silo in an area of open wind, avoiding
enclosed or confined areas.
2. Position the silo so the mason tender can be
positioned with a crosswind over the mixer or
downwind to keep dust from blowing into the face
of the worker while mixing. Many SPEC MIX silos
are equipped with rotating gate that allow for the
handle to be moved without moving the silo itself.
To keep rotating gates working properly, keep
grease in zerts and make sure to open the gate
before attempting to rotate it to remove downward
force from the weight of the material on the gate
when rotating.
3. Fill the mixer with sufficient water to receive
the material. It is beneficial to keep the initial
batch wetter than required for final use to ensure
complete hydration of the aggregate, reducing dust
when charging the mixer and increasing board life
of the final product.
4. When opening the gate, take a stance that is away
from the discharge of material to limit exposure to
nuisance dust.
5. Open the gate with even force and only as wide as
needed to allow for a good steady flow of material
into the silo. Opening at too great of a distance can
cause product surges that have the potential to
increase nuisance dust on site.
6. When the desired amount of material has been
dispensed into the mixer, shut the gate with even
force, maintaining distance from the mixer.
7. As the wind shifts, make sure to position with
a cross wind or downwind to continue to avoid
nuisance dust

25
SIGA ADELANTE. SIGA EN MOVIMIENTO. MANTÉNGASE SEGURO.
Para garantizar que se brinda un ambiente de trabajo seguro a todas las personas que operan o
entran en contacto con los productos y equipos de SPEC MIX, se han formulado los siguientes
procedimientos para trabajar con los silos de SPEC MIX y las bolsas a granel.
Ya que la seguridad es responsabilidad de todos, le pedimos que se familiarice con estos
procedimientos y se asegure de que también todos aquellos que operen o entren en contacto con
los silos de SPEC MIX y las bolsas a granel estén familiarizados con estos procedimientos y los
implementen.
Es responsabilidad de todos estar conscientes de las precauciones que deben tomarse para
garantizar que los trabajadores cuentan con un ambiente de trabajo seguro; que implementan
procedimientos de operación y manipulación seguros tanto para su propia seguridad como para la
de los demás.
NOTA: Estas advertencias no representan todos los peligros contra la seguridad que pueden
ocurrir durante el uso de dichos productos en una obra de construcción. Se deben cumplir
con todas las regulaciones de OHSA aplicables en la instalación, reubicación, limpieza o uso
del silo y del producto.
INSTRUCCIONES DE FUNCIONAMIENTO Y SEGURIDAD
1
2
3
4
5
Se prepara una cantidad doble de material en 5 minutos o
menos sin sobrecargar al trabajador o poner en peligro la
integridad de la mezcla. No se necesita electricidad ni agua
a presión, solamente una mezcladora mecánica. El silo
puede transportarse. A medida que avanza el trabajo, los
trabajadores y la estación de mezclado con silo lo siguen.
Así es cómo funciona:
Paso 1: Para levantar el silo, asegurarse de que el terreno esté
seco, nivelado y compactado. Con una carretilla elevadora de 26
pies y una capacidad de 4500 libras, inserte las horquillas de la
carretilla en los huecos para horquilla del silo y levante la unidad
a la altura deseada. Se dispone de cuatro alturas.
Paso 2: Usando los pasadores dobles de las patas que están
acoplados al chasis, asegurar el conjunto superior del silo
deslizando los pasadores de las patas a su posición. Después,
asegure los pasadores con los pasadores de enganche de
seguridad. A continuación, coloque la manilla de la compuerta
deslizante en su lugar y prepárese para cargar el producto SPEC
MIX en el silo.
Paso 3: Las bolsas a granel se cargan fácilmente en el silo
insertando las horquillas a través de los lazos reforzados de
la bolsa. Una vez que la bolsa está ubicada sobre el silo y en
posición sobre la cubierta de polvo superior, el trabajador que
está en la plataforma de seguridad puede liberar los canales de
descarga doble de la bolsa.
Paso 4: Después de haber cargado el silo con cuatro o cinco
bolsas a granel de 3000 libras, coloque la mezcladora debajo
del cono que está debajo de la bota del silo. Si es necesario,
corte el largo de la bota hasta la parte superior de la mezcladora.
Para preparar el producto, añada la cantidad deseada de
agua a la mezcladora y tire hacia atrás de la manilla del silo
para dispensar la cantidad de material necesario para lograr la
consistencia deseada. Se puede preparara cualquier cantidad.
Deje que el producto se mezcle durante cuatro o cinco minutos
para asegurar que todos los materiales se hidraten bien para
conseguir una docilidad y duración óptimas.
Paso 5: El silo se reubica fácilmente en el lugar de trabajo para
colocar la estación de mezclado tan cerca como sea posible del
trabajo, maximizando así la eficiencia en el trabajo. Con las patas
del silo sujetas con pasadores en la posición superior o inferior
inserte las horquillas de la carretilla en los huecos para horquilla
del silo. Después, súbalo y colóquelo en la ubicación deseada.
Asegúrese de que la carretilla esté equipada para transportar el
silo de manera segura y de que el terreno esté seco, nivelado y
estable. Asegure siempre todos los pasadores de las patas y los
de seguridad.

26 27
ESPECIFICACIONES DEL SILO
G7000 SILO
TEN BAGGER SILO
LOAD N GO®SILO
SPLIT SILO
SUPERFICIE 8 pies 2 pulg. x 8 pies 2 pulg.
CAPACIDAD HASTA 5 BOLSAS A GRANEL
PESO VACÍO 2,900 lb
PESO LLENO HASTA 18,000 lb
ALTURA DE ENVÍO 8 PIES 6 PULG. COLAPSADO
ALTURAS EN EL LUGAR DE TRABAJO
POSICIÓN BAJA: 15 pies 6 pulg.
POSICIÓN ALTA: 16 pies 6 pulg.
REQUISITOS DE LA HORQUILLA ELEVADORA
4,500 lb
ELEVACIÓN EN DOS ETAPAS DE 26 pies
(o) ELEVACIÓN TELESCÓPICA
SUPERFICIE 8 pies X 11 pies
CAPACIDAD HASTA 10 BOLSAS A GRANEL
PESO VACÍO 3,210 Lb
PESO LLENO HASTA 30,000 lb
ALTURA DE ENVÍO 8 pies 4 pulg. COLAPSADO
ALTURAS EN EL LUGAR DE TRABAJO
POSICIÓN BAJA: 15 pies 6 pulg.
POSICIÓN ALTA: 16 pies 6 pulg.
REQUISITOS DE LA HORQUILLA ELEVADORA
4,500 lb
ELEVACIÓN EN DOS ETAPAS DE 26 pies
(o) ELEVACIÓN TELESCÓPICA
SISTEMA DE 2 COMPONENTES
CONO DURADERO DE POLIETILENO
SUPERFICIE 6 pies 5 pulg. x 7 pies 1 pulg.
CAPACIDAD HASTA 1,5 BOLSAS A GRANEL
PESO VACÍO 1,100 lb
PESO LLENO HASTA 4,200 lb
ALTURA DE ENVÍO 8 pies 3 pulg. COLAPSADO
ALTURAS EN EL LUGAR DE TRABAJO
POSICIÓN BAJA: 10 pies 10 pulg.
POSICIÓN ALTA: 113 pies 3 pulg.
REQUISITOS DE LA HORQUILLA ELEVADORA
4,000 Lb CAPACIDAD DE ELEVACIÓN
10 pies EN EL AIRE
SUPERFICIE 8 pies X 11 pies
CAPACIDAD HASTA 5 BOLSAS A GRANEL
EN CADA COMPARTIMENTO
PESO VACÍO 3,610 lb
PESO LLENO HASTA 30,000 lb
ALTURA DE ENVÍO 8 pies 4 pulg. COLAPSADO
ALTURAS EN EL LUGAR DE TRABAJO
POSICIÓN BAJA: 15 pies 6 pulg.
POSICIÓN ALTA: 16 pies 6 pulg.
REQUISITOS DE LA HORQUILLA ELEVADORA
4,500 Lb
ELEVACIÓN EN DOS ETAPAS DE 26 pies
(o) ELEVACIÓN TELESCÓPICA
INFORMACIÓN DE SEGURIDAD PARA DE LOS SILOS SPEC MIX®
Los sistemas de silos de SPEC MIX® han sido diseñados y fabricados para incrementar todos los aspectos de
seguridad en el lugar de trabajo. Proporcionar un ambiente de trabajo seguro para el personal que utiliza los
sistemas de silos es nuestro principal objetivo, y SPEC MIX, Inc. se esfuerza continuamente por encontrar nuevas
formas de superar esta meta.
La práctica diaria más común al utilizar un silo de SPEC MIX es cargar la unidad con bolsas a granel. Durante este
proceso, y para garantizar la seguridad del trabajador que abre el (los) canal(es) de descarga de la bolsa a granel
que se dispensa, recomendamos que se trabaje únicamente desde la plataforma de seguridad del silo. Además,
la persona debe usar el gancho de metal para bolsas (garfio) que se envía con cada nuevo silo para abrir la
abrazadera B-lock.
La plataforma de seguridad del silo de SPEC MIX está diseñada según los estándares de seguridad de OSHA para
andamios que se enumeran a continuación. Asimismo, nuestros silos cumplen con estos requisitos.
1. Las barandillas son requeridas en andamios de armazón soldado (o silos) que tengan 10 pies o más de
altura.
2. La altura de la baranda superior será de, por lo menos, 36 pulgadas hasta un máximo de 45 pulgadas.
3. La resistencia de la baranda debe ser de al menos 200 libras para andamios de armazón soldado.
4. Las barandas de mediana altura deben colocarse debajo de la baranda superior y de la plataforma de
trabajo; además, la resistencia del andamio de armazón soldado debe ser de, como mínimo, 150 libras.
5. Las patas del andamio (o silo) deben estar ubicadas sobre placas base, las cuales reposarán ya sea en
cimientos firmes o soleras (durmientes).
En caso de que una persona tenga que subir a la parte superior del silo, deberá utilizar una cuerda de seguridad
de OSHA para caídas. OSHA establece lo siguiente con respecto a las plataformas de trabajo para andamios (o
seguridad de silos): “Si un andamio (o plataforma de trabajo) está a más de 10 pies sobre el nivel (o suelo), los
trabajadores deben contar con protección contra caídas.”
Sistemas de protección anticaídas: Un sistema anticaídas consta de un arnés de cuerpo entero, una eslinga lo
suficientemente corta para limitar la caída a seis pies y un anclaje. Soldado en la parte superior del silo, al lado
izquierdo de la escotilla deslizante en la parte superior de cada silo de SPEC MIX, se encuentra un punto de
anclaje en forma de D. Es aquí donde la persona debe fijar el elemento de amarre. Todo el sistema anticaídas debe
ser capaz de resistir la carga de choque causada por una caída. Las normas de OSHA y ANSI exigen que estos
anclajes sean capaces de soportar por lo menos 5000 libras por trabajador; y el punto de anclaje de SPEC MIX
cumple con esta especificación.
A continuación se presentan algunas sugerencias para las personas que utilizan una cuerda de seguridad ante
caídas para garantizar la seguridad del sitio de trabajo.
1. Los dispositivos anticaídas deben ser revisados periódicamente por personal calificado para comprobar
que no existan daños y cualquier equipo defectuoso debe retirarse del servicio inmediatamente. Además,
los empleados obligados a llevar protección contra caídas deben inspeccionar sus equipos antes de
comenzar a trabajar.
2. Asimismo, los empleadores deben capacitar a los trabajadores sobre las técnicas de inspección que les
permitan identificar equipo defectuoso. Cada día, los trabajadores deben inspeccionar sus equipos antes
empezar el trabajo. El equipo defectuoso debe retirarse del servicio inmediatamente para garantizar la
seguridad del trabajador.

28 29
INFORMACIÓN DE SEGURIDAD PARA DE LOS SILOS SPEC MIX®
3. El equipo de protección personal debe ser capaz de soportar las condiciones más severas a las que pueda
someterse en cualquier trabajo determinado. Muchos materiales, incluyendo el nylon (nailon), se pueden
dañar fácilmente en presencia de calor extremo. Por esta razón, no se deben usar cuerdas de nylon que
pueden estar expuestas a condiciones que podrían incluir calor extremo; en tal caso, las mallas de acero
o cordones con núcleo de alambre son más apropiadas. Se debe evaluar el equipo de protección personal
antes de ser utilizado en cualquier tipo de trabajo para garantizar que este puede resistir las condiciones
más severas a las que puede someterse sin sufrir daños que podrían poner en peligro la seguridad del
trabajador.
4. OSHA exige que los trabajadores que trabajen en andamios flotantes o de embarcación (andamios
suspendidos de soportes aéreos) estén protegidos por un salvavidas de seguridad, cordones y líneas de
vida aprobados sobre el punto de operación que estén fijados a un punto de anclaje o piezas estructurales.
La escalera del silo de SPEC MIX ha sido diseñada conforme a los estándares de seguridad de OSHA para
escaleras fijas que se enumeran a continuación. Nuestros silos cumplen con estos requisitos esenciales.
1. Si la longitud total del ascenso en una escalera fija es igual o superior a 24 pies (7.3 m), la escalera debe
estar equipada con dispositivos de seguridad para escaleras.
2. Las escaleras fijas deben contar con jaulas cuando la longitud del ascenso sea menor a 24 pies (7.3 m)
pero la parte superior de la escalera sea superior a 24 pies (7.3 m) sobre niveles más bajos.
3. Las escaleras fijas deben soportar dos cargas de 250 libras (114 kg) cada una.
4. Los escalones/peldaños individuales deben extenderse, por lo menos, 42 pulgadas (107 cm) por encima
de una plataforma de descanso, o proporcionar barras de sujeción vertical que deben tener el mismo
espaciamiento lateral que el de las patas verticales de la escalera.
5. Cada escalón o peldaño de una escalera fija debe ser capaz de soportar una carga de al menos 250 libras
(114 kg) aplicada sobre el centro del escalón.
6. Los peldaños de las escaleras de peldaño/escalón individual deben estar moldeados de forma que se
eviten los resbalones en la parte final del peldaño.
7. Los escalones de escaleras fijas de metal deben ser acanalados, con estrías, con hoyuelos, recubiertas de
material antideslizante o tratadas para minimizar el deslizamiento.
8. La distancia mínima perpendicular entre los peldaños de la escalera fija y cualquier obstrucción detrás de
la escalera debe ser de 7 pulgadas.
9. La distancia mínima perpendicular entre la línea central de una escalera fija y cualquier obstrucción en el
lado de ascenso de la escalera debe ser de 30 pulgadas (76 cm).
10. Las escaleras fijas se deben utilizar con una pendiente que no exceda los 90 grados de la horizontal,
medida desde la parte posterior de la escalera.
TRANSPORTE DE LOS SILOS SPEC MIX®
1. Inspeccione el silo de SPEC MIX para asegurarse de
que ha sido vaciado.
ADVERTENCIA: Nunca ingrese en el interior del cono
del silo para realizar inspecciones o mantenimiento. De
ser absolutamente necesario, el personal debe seguir
los procedimientos de ingreso en espacios confinados
(OSHA).
2. Baje o quite y asegure el anillo de seguridad al cono
del silo.
ADVERTENCIA: Conecte la línea de seguridad y el
dispositivo de paracaídas al gancho de amarre antes
de subir a la parte superior del silo. Este dispositivo
debe cumplir con la resistencia a la tracción de 5,400
libras, según OSHA 1926.104 (b).
3. Asegure la manija superior de la escotilla con tornillo y
tuerca o perno de cerradura
4. Quite el montaje de la manija de la válvula de
compuerta y asegure el anillo de retención.
5. Para levantar el silo, introduzca completamente las
horquillas del montacargas en las aberturas para las
horquillas.
6. Para bajar el silo, levante ligeramente el silo y retire
los pasadores y clavijas articuladas de las patas. Baje
el silo mientras eleva la escalera manualmente para
evitar daños. Asegure la escalera con cadenas.
7. Después de haberlo bajado al nivel del transporte,
vuelva a instalar los pasadores y clavijas articuladas en
su posición original.
8. Doble la escalera en posición contraída y asegúrela
con una cadena
9. Asegure el tercer punto de contacto entre el silo
y montacargas con una cadena o correa cuya
resistencia mínima sea de 5,000 libras de carga útil,
es decir, desde la argolla de elevación o el anillo de
amarre al mástil de la horquilla o tope.
10. Cargue el silo lentamente y con cuidado en un
remolque que cumpla con los procedimientos del U.S.
DOT.
11. Asegure el silo al remolque utilizando cadenas o
broches aprobados por el DOT o correas y trinquetes
con una resistencia mínima de 5,000 libras a la
tensión.
12. Retire cualquier residuo o material del silo o remolque
antes de viajar.
30 31
MONTAJE DE LOS SILOS SPEC MIX®MONTAJE DE LOS SILOS SPEC MIX®
1. Seleccione un sitio en el área de trabajo donde el suelo
esté seco, compacto, nivelado y estable. El sitio debe
estar en una zona al aire libre. Evite las áreas cerradas
o confinadas.
NOTA: Para asegurar la estabilidad del silo erguido, el
nivel del suelo DEBE estar seco y ser compacto para
proceder a la instalación del silo, de lo contrario NO
debe instalarse. Además, cuando se utilice las antiguas
almohadillas para las patas, deberá girar la pata hacia
afuera (colocada hacia adentro durante el envío).
2. En un suelo más suave se requerirá el uso de zapatas
(cimientos) o plataformas de hormigón de 24 x 24 x 6
pulgadas de concreto reforzado con una resistencia a
la compresión mínima de 3500 psi.
3. Las almohadillas para las patas deben ser fabricadas
de 24 x 24 x 1 pulgada de placas de acero o tres
piezas separadas de 24 x 24 pulgadas de madera
contrachapada tratada cuyo grosor sea de ¾ de
pulgada y laminadas con tornillos. Descarte la
almohadilla si está perforada. Cada silo requiere cuatro
almohadillas para las patas.
4. Para levantar el silo, inserte completamente las
horquillas en los tubos para horquillas.
NOTA: Se debe utilizar un montacargas de capacidad
apropiada para levantar el peso estándar del silo y el
material en uso. (Vea las especificaciones del silo en la
página 3).
5. Asegure el tercer punto de contacto entre el silo y
montacargas con una cadena o correa cuya resistencia
mínima sea de 5,000 libras de carga útil, desde la
argolla de elevación o el anillo de amarre al mástil de la
horquilla o tope.
NOTA: El tercer punto de contacto es necesario
para evitar que el silo se resbale de las horquillas del
montacargas durante cualquier transporte en el área de
trabajo.
6. Levante lentamente y coloque el montacargas en
posición reclinada mientras retira el silo del remolque.
7. Coloque la torre en la mejor ubicación aprobada.
8. Posicione el silo de modo que el albañil pueda
colocarse teniendo el viento de costado sobre la
mezcladora o a favor del viento para evitar que el
polvo sople en la cara del trabajador mientras esté
mezclando.
9. Antes de subir el silo, retire los pasadores y libere la
cadena de la escalera. Vuelva a colocar los pernos a
la altura deseada y baje la escalera para permitir el
acceso a la plataforma con rieles de seguridad durante
su acceso.
Note: Newer Style Foot Pads are centered.
*When using the Older Style Foot Pads (above)
turn Foot outward (turned inward for shipping
purposes only).
ADVERTENCIA: Se deben colocar firmemente ambas
cadenas de seguridad en el punto de entrada cuando
se encuentre en la plataforma con rieles de seguridad.
ADVERTENCIA: Conecte la línea de seguridad y el
dispositivo de pararrayos al gancho de amarre antes de
subir a la parte superior del silo. (Este dispositivo debe
cumplir con la resistencia a la tracción de 5,400 libras
conforme a OSHA 1926.104(b).)
10. Verifique la ubicación de la cesta de flujo de material así
como las obstrucciones, el montaje de la manija de la
válvula de compuerta y los diversos equipos.
ADVERTENCIA: Nunca ingrese en el interior del cono
de silo para realizar cualquier tipo de inspección o
mantenimiento. De ser absolutamente necesario, el
personal debe seguir los procedimientos de ingreso en
espacios confinados (OSHA).
11. Coloque el anillo de seguridad en la parte superior del
silo y ajústelo firmemente usando pernos de fijación de
seguridad
12. Abra la escotilla del silo e instale la cubierta de polvo
superior SPEC MIX en el puerto de llenado del silo. La
parte final del tubo con faldón debe colocarse justo por
encima de la parte superior del silo y debe ser cubierto
para eliminar el aire entre la cubierta de polvo superior
y el silo.
13. Al levantar ligeramente el silo, puede quitar los cuatro
pasadores permitiendo que las patas del silo se puedan
plegar para un ajuste completo.
ADVERTENCIA: Mantenga las piernas, pies y manos
alejadas de las patas del silo a medida que este se
baje.
14. Eleve la torre a la altura deseada hasta que los orificios
en la pata del silo coincidan con los orificios del
ensamblaje del tubo receptor.
15. Asegure el silo insertando todos los pasadores de las
cuatro patas a la altura deseada y luego insertando los
pernos de seguridad en los orificios de los pasadores
de las cuatro patas para asegurar los cuatro pasadores
en su lugar.

32 33
16. Apriete con la mano los pernos de estabilización y
luego apriételos con una llave.
17. Si el silo está equipado con una VÁLVULA DE
COMPUERTA: Instale la manija y soportes de la manija
al montaje de la válvula de compuerta.
18. Compruebe la válvula de compuerta para asegurar una
operación fácil y el cierre total para permitir acceso al
candado. En el caso de puertas giratorias, compruebe
la rotación y lubrique las conexiones de engrase
(alamites).
19. Si el silo está equipado con una PUERTA CORREDIZA:
Instale la manija y soportes de la manija al montaje de
la puerta corrediza, haciendo coincidir la manija corta
con la puerta y la manija larga con el eje de giro situado
en la cruceta.
20. Compruebe la puerta corrediza para asegurar una
operación fácil y el cierre total para permitir acceso al
candado. En el caso de puertas giratorias, compruebe
la rotación y lubrique las conexiones de engrase
(alamites).
NOTA: En condiciones de viento, es aconsejable utilizar
una lona que se adhiera a las patas de ambos lados del
silo.
VÁLVULA DE
COMPUERTA
VÁLVULA DE
COMPUERTA
PUERTA
CORREDIZA
PUERTA
CORREDIZA
CARGA DE LOS SILOS SPEC MIX®
Los sistemas de suministro de los silos de SPEC MIX han sido diseñados para incrementar la productividad
in situ añadiendo seguridad al sitio de trabajo mediante la reducción de daños físicos a través de su diseño
ergonómicamente correcto. Los silos de gravedad estándar también pueden limitar la exposición de los
trabajadores de la obra al mezclado de polvo cuando se incluyen las siguientes mejores prácticas en el uso diario.
PELIGRO Causa quemaduras graves de la piel y lesiones oculares graves. Puede provocar una reacción alérgica
en la piel. Puede irritar las vías respiratorias. Puede causar cáncer por inhalación crónica. Causa daño a los
pulmones por inhalación prolongada o repetida. Nocivo si se ingiere.
USE GUANTES IMPERMEABLES, tales como de nitrilo. Use protección ocular y ropa de protección. No respire
el polvo. Se recomienda utilizar una máscara antipolvo aprobada por NIOSH, como la N95, especialmente en áreas
mal ventiladas o cuando se puedan superar los límites de exposición permisible. Lávese meticulosamente después
de la manipulación. No coma, beba o fume durante la utilización de este producto. Antes de su manipulación, lea
la Hoja de Seguridad que está disponible en www.specmix.com, 800-282-5828.
PRIMEROS AUXILIOS: En caso de contacto con la piel o cabello, enjuague con agua. En caso de contacto con
los ojos: Enjuague cuidadosamente con agua durante varios minutos; si usa lentes de contacto y es fácil hacerlos,
retírelos; siga enjuagando. En caso de inhalación: Traslade a la persona al aire libre y manténgala cómoda para
respirar. En caso de ingestión: NO induzca el vómito. Quítese inmediatamente toda la ropa contaminada y lávela
antes de volverla a usar. No debe esperar a que aparezca dolor para advertir quemaduras de cemento. El
cemento Portland puede causar dermatitis o sensibilidad. Si aparece irritación o enrojecimiento, busque consejo
o atención médica. Busque asistencia o atención médica inmediatamente si los síntomas son considerables o
persisten. Contiene cemento Portland, arena de sílice y podría contener cenizas volátiles. Elimine el contenido y el
recipiente de conformidad con todos los reglamentos.
MANTÉNGASE FUERA DEL ALCANCE DE LOS NIÑOS
EQUIPO NECESARIO
Casco protector
Guantes impermeables, tales como de nitrilo
Arnés de seguridad
Gafas de seguridad
Mascarilla antipolvo: N-95 recomendada
Gancho de seguridad SPEC MIX
Cubierta de polvo superior SPEC MIX
MONTAJE DE LOS SILOS SPEC MIX®
34 35
CARGA DE LOS SILOS SPEC MIX®
CARGA DE LOS SILOS SPEC MIX®
1. Al estar de pie sobre el suelo, deslice la cubierta de
plástico externa hasta el nivel del palé de la bolsa de
material a granel. En este momento, inspeccione el
estado general de la bolsa a granel prestando especial
atención a los lazos de elevación de la bolsa. Verifique si
existe desgaste en ambos lados. Si la correa parece estar
tensada, aparte la bolsa y el palé para su reemplazo y
vuelva a cubrir para proteger el material en el interior.
2. Guardar la tarjeta de identificación del producto o etiqueta
de lote ubicado dentro de la tapa plástica. Con esto
se verifica que el producto entregado coincide con el
producto pedido, lo cual puede ser útil durante el proceso
de construcción.
3. Después de que la bolsa haya pasado la inspección visual,
introduzca las horquillas del montacargas a través de los
cuatro lazos de elevación. Las horquillas deben deslizarse
fácilmente hacia una posición donde los cuatro lazos se
introduzcan lo más posible en las horquillas. Es importante
que los lazos no dejen esta posición antes de aplicar la
tensión de elevación.
4. Para mejorar el flujo, abra la boquilla superior de la bolsa.
5. En un área opuesta al lado de la plataforma con rieles
de seguridad del silo, levante cuidadosamente la bolsa
hacia la escotilla del silo. Nunca debe haber personal
debajo de la bolsa a granel. Las horquillas deben estar en
una posición reclinada mientras se levanta la bolsa a una
distancia de 3 a 4 pies por encima del anillo de seguridad.
6. Coloque la bolsa a granel sobre la parte superior del
silo centrándola sobre el puerto de llenado y el anillo de
seguridad para que la cubierta de polvo superior coincida
con la parte inferior de la bolsa a granel. La bolsa se puede
ahora bajar lentamente dentro de las 2 a 3 pulgadas del
anillo de seguridad, comprimiendo la cubierta de polvo
superior. Se deben usar señales de comunicación con las
manos para indicar cuando la bolsa ya se ha bajado hasta
la distancia adecuada.
ADVERTENCIA: No permita que la bolsa descanse sobre
el anillo de seguridad o la parte superior del silo.
7. El operador o el trabajador puede ahora subir la escalera
que conduce a la plataforma con rieles de seguridad una
vez que la bolsa está en esta posición.
8. ADVERTENCIA: La persona ubicada en la plataforma debe
colocar firmemente ambas cadenas de seguridad en el
punto de entrada cuando se encuentre en la plataforma
con rieles de seguridad.
9. El silo y las bosas se han diseñado de modo que la carga
de material en el silo se pueda realizar sin tener acceso a la
parte superior del silo.
ADVERTENCIA: Permanezca fuera de la parte superior del
silo. Toda la carga del silo se debe llevar a cabo desde la
plataforma con rieles de seguridad únicamente.
10. Utilice el gancho de seguridad SPEC MIX, jale el conducto
de contención de polvo hacia abajo y sujete y tire el perno
B-LOK o perno de cierre de plástico situado en el amarre
externo en la parte inferior de la bolsa a granel. Para abrir
el conducto externo, jale la abrazadera del B-LOCK. Se
abrirá la solapa exterior protectora que abarca el canal de
descarga de la bolsa.
11. Con el mismo gancho SPEC MIX, jale la cubierta de polvo
superior hacia abajo y enganche la abrazadera B-LOCK en
el conducto interno en la parte inferior de la bolsa a granel.
Jale la B-LOCK en el conducto interno para comenzar a
dispensar el material en el silo.
12. Quite inmediatamente el gancho de la bolsa a granel para
permitir que la cubierta de polvo superior se comprima
hasta la parte inferior de la bolsa a granel, para contener
cualquier polvo que se haya generado a medida que se
dispensa el material en el silo.
13. Suba por la escalera a medida que se distribuye el material
en el silo para minimizar la exposición al polvo durante el
llenado del silo.
14. Repita estos procedimientos exactos para cada bolsa que
vaya a ser vaciada en el silo durante la carga.
36 37
MANIPULACIÓN DE BOLSAS A GRANEL Y PROCEDIMIENTOS DE ELEVACIÓNMANIPULACIÓN DE BOLSAS A GRANEL Y PROCEDIMIENTOS DE ELEVACIÓN
Los siguientes procedimientos de elevación y manipulación de
envases a granel (bolsas a granel) de flexibilidad intermedia se
señalan específicamente para el uso y el funcionamiento seguro
cuando se utilizan los sistemas de suministro de los silos SPEC
MIX. Las bolsas a granel de SPEC MIX están específicamente
diseñadas para su uso con camiones montacargas (carretillas
elevadoras) en obras de construcción. Las bolsas a granel de
SPEC MIX han sido fabricadas y probadas para exceder las
especificaciones de seguridad del sector. Para garantizar la
seguridad de todo el personal en las obras de construcción, lea
y siga estas prácticas y procedimientos al manipular las bolsas a
granel de SPEC MIX. ¡Trabaje de manera inteligente y trabaje con
seguridad!
1. Al transportar las bolsas a granel, mueva la bolsa únicamente
mientras se esté ubicada en un palé. La grúa del montacargas
debe estar completamente retraída. No transporte las bolsas a
granel colgadas de sus correas de elevación.
2. Para cargar el silo SPEC MIX, posicione primero la bolsa a
granel en el palé directamente en frente del silo SPEC MIX de
modo que esté alineada con el puerto de llenado en la parte
superior del silo. En este momento, los neumáticos delanteros
del montacargas no deben estar a más de 12 pies de las patas
delanteras del silo. Siempre cumpla con el diagrama de carga
provisto por el fabricante del montacargas al momento de
levantar las bolsas a granel. Una bolsa a granel de SPEC MIX
pesa 3 000 libras.
3. Para levantar la bolsa a granel, retroceda el montacargas,
extrayendo lentamente las horquillas del palé en el que se
apoya la bolsa a granel. Antes de introducir las horquillas del
montacargas en los lazos de elevación, inspecciónelas para
asegurarse de que no haya bordes ásperos. Si encuentra un
borde áspero, lime o pula (muela) el borde áspero para eliminar
cualquier rebaba. Asegúrese de apagar el montacargas antes de
trabajar en las horquillas.
4. Coloque el cambio del montacargas en neutro y ponga el
freno de estacionamiento. A continuación, levante lentamente
las horquillas del montacargas a una posición en la que estén
alineadas con las dos correas de elevación frontales de la bolsa,
pero ligeramente por encima de la parte superior de la bolsa
a granel. Retire la cubierta de plástico externa de la bolsa a
granel para inspeccionar la integridad de sus cuatro correas de
elevación.
NOTA: Para incrementar el flujo y la velocidad de descarga del
contenido de la bolsa durante el llenado del silo, desate y abra la
boquilla de relleno en la parte superior de la bolsa.
5. Una vez que las horquillas estén en posición, apague el
montacargas. Ahora, el asistente puede abordar el montacargas
de forma segura y deslizar manualmente las correas de elevación
de la bolsa sobre las horquillas. Siempre acérquese por el
costado de la horquilla; no permanezca frente a las horquillas.
6. Una vez que las correas de elevación estén bien posicionadas en
las horquillas, el asistente debe alejarse de la bolsa a granel y las
horquillas antes de que el montacargas se arranque y comience
a moverse.
7. Antes de deslizar el siguiente conjunto de correas de elevación
sobre las horquillas, mientras estas están todavía en la posición
correcta, el operador del montacargas debe extender la grúa
hacia adelante de modo que las puntas de las horquillas estén
directamente por encima del segundo conjunto de correas de
elevación de la bolsa.
8. Una vez que las horquillas estén en posición, apague el
montacargas. Ahora es seguro para el asistente deslizar
manualmente las correas de elevación de la bolsa sobre las
horquillas. Siempre acérquese por el costado de la horquilla; no
permanezca frente a las horquillas.
9. El asistente debe asegurarse de que las correas de elevación
frontales de la bolsa se hayan deslizado hasta la elevación
vertical en la parte posterior de las horquillas y colocar las
correas de elevación de modo que cada una esté directamente
encima del punto en el que se conecta a la bolsa a granel.
10. Una vez que las correas de elevación se hayan colocado
correctamente en las horquillas, el asistente debe alejarse de la
bolsa a granel y del montacargas antes de que se arranque y
comience a moverse.
11. La bolsa a granel debe retirarse lentamente del palé. Si la
cubierta de plástico externa aún está posicionada alrededor
de la bolsa a granel, el operador debe colocar el cambio del
montacargas en neutro, poner el freno de estacionamiento y
apagar el montacargas para permitir que el asistente retire de
forma segura la cubierta exterior de la bolsa a granel.
NOTA: Para efectos de las medidas de control de calidad del
producto, la etiqueta adjunta del lote del fabricante puede
conservarse en forma permanente como parte del registro del
material en la bolsa a granel.
This manual suits for next models
3
Table of contents
Languages:


