Spedal CL586 User manual

004C1A09-EN
CL586
USER MANUAL
Multifunctional Dashcam

CONTENT
If you have any problems reading this manual or using the product, feel free to contact us
at suppor[email protected]
1. DISCLAIMER AND SAFETY GUIDELINES 1
1.1 Disclaimer 1
1.2 Safety Guidelines 2
2. ACCESSORIES AND INTERFACES 3
2.1 In the box 3
2.2 Product Diagram 4
2.3 Installation Guideline 5
2.4 Interfaces Introduction 8
3. FUNCTIONS AND SETTINGS 9
3.1 General Settings 9
3.2 Carlink and its settings 11
3.3 Recorder and its settings 12
3.4 FM and its settings 13
3.5 Playback and its settings 14
4. APPENDIX 15
4.1 Specifications 15
4.2 Warranty 15

1. DISCLAIMER AND SAFETY GUIDELINES
1.1 Disclaimer
This product is a multifunctional dashcam, which will bring you safe and pleasant driving
experience when the power supply is working normally and the components are not
damaged. Please pay special attention to the cautions and warnings in this User Manual.
You can visit our homepage http://www.spedal.cc to get relevant files of this product,
including this User Manual and other files. Shenzhen Xinzhuang Gude Technology Co. Ltd.
(Spedal) reserves the right to update this User Manual.
The information in this document affects your safety, legal rights and responsibilities. Read
this entire document carefully to ensure proper configuration before use. Failure to follow
the instructions and warnings in this document may result in product damage or other
possible injury or loss. You must strictly follow Spedal's guidelines to install and use the
product, and never use non-standard parts. Before assembling, setting up and using, be
sure to carefully read all the instructions and warnings in this document. This product is not
a toy. Please do not allow children to touch this product or its parts and wires. Please be
careful when operating in scenes where children are present.
By using this product, you hereby signify that you have read this disclaimer carefully and
that you understand and agree to abide by the terms and conditions herein. The user
promises to be responsible for his actions and all consequences arising therefrom. The
user promises to use this product only for legitimate purposes, and agrees to all the terms
and contents of this document and any related policies or guidelines that Spedal may
formulate. You understand and agree that in the absence of videos or photos, Spedal may
not be able to analyze the cause of your product damage or accident, and cannot provide
you with after-sales service such as warranty.
Spedal is not responsible for all losses caused by the user's failure to use the product
in accordance with this User Manual.
In compliance with laws and regulations, Spedal reserves the right of final interpretation of
this document and all related documents of this product. If the manual is updated, revised
or terminated, we will not notify you separately. Please visit the official website of Spedal
for the latest product information. Spedal is a trademark of Shenzhen Xinzhuang Goodo
Technology Co. Ltd. and its affiliates. The product names, brands, etc. appearing in this
article are all trademarks or registered trademarks of their respective companies.
1

1.2 Safety Guidelines
Warnings
●Please use the original cable and power cords only; .
●Do not exceed the rated voltage when using the device; .
●Do not install or operate the device with wet hands; .
●Do not install the device in places of high temperature, humidity; .
●Do not install the device in places of flammable or explosive gases or liquids; .
●Do not install the device in an area interfering with the driver's sight or driving safety; .
●Do not install the device on the airbag cover or within the airbag’s working range; .
●Do not leave the device in a closed vehicle under high temperature for a long time; .
●Do not poke the device and its accessories using sharp objects such as awl or scissor; .
●Do not disassemble, repair or modify the device and its accessories by yourself; .
●Do not install, use or place the device within the reach of any children under 16; .
●Do not cut the charging cable.
Notice: Damage caused to the dashcam as result of not obeying the warnings above is not covered
by the warranty!
Cautions
●Do not press the lens forcefully to avoid lens breakage or lens misalignment; .
●Do not directly touch the lens surface to avoid stains that affect the recording effect; .
●Do not remove the memory card to avoid file damage during the shutdown process;
●When using the memory card for the first time, please format it on the device to ensure
stable reading and writing; .
●When not using the device for a long time, please pull out the memory card to ensure
the memory card’s performance.
2

2. ACCESSORIES AND INTERFACES
2.1 In the box
Before using this product, please check whether the product package contains all of the
following items. If anything is missing, please contact Spedal or your local agent.
Notice: Please use the SPEDAL original cable and accessories only. Gifts and accessories are not
covered by the warranty. The content of this product package is subject to change without notice,
the actual package shall prevail!
3
●Multifunctional Radar Detector
●In-Car charger
●Magnetic Chuck Bracket
●Quick Guide
●32GB TF Card
(Gift)

2.2 Product Diagram
Warning: When the function Carlink is activated, the projection chip and the drive recording chip
will work at the same time. The surface temperature of the heat-dissipating metal sheet can reach
as high as 60℃, which is within normal range of working temperature. Please do not touch the
sheet surface for a long while to prevent being scalded.
4
GPS
TF
AV-IN
USB /

2.3 Installation Guideline
The device is in the storage state when it leaves the factory. Please follow the steps below
to prepare for installation:
1. Take the device and its accessories out of the box or plastic bag; .
2. Tear off the protective film on the screen and lens of the device; .
3. Remove the wire tie that binds the wire.
Installation Position
●Do not install the device in a position blocking the view of the driver or in an unsafe area
●Install the device near the rearview mirror but not in a place blocking the driver vision. .
●Install the device within the wiper blade area to ensure clear capture on rainy days. .
●Do not install the device on the airbag cover or near the airbag operating range. .
●Do not install the device on the protection film to prevent damage to the film. .
●Install the device in a position not affecting any other electronic devices in your vehicle.
Note: Please follow the instruction or warnings above strictly. Our company assumes no
responsibility for any injury or death caused by car impact or airbag problems.
5

TF Card Installation
Install the TF card in the TF socket with the pins facing upwards. Push the Micro SD card
forward, and the card can be removed after it pops out.
Please use the 32GB TF card that comes with the product. A third-party TF card should
meet these requirements: Class 8 or above, maximal 128GB.
Note: Installing and removing the TF card in the recording mode may result in failure of recording
videos and causing damage to the SD card. Please turn off the device before inserting or
unplugging the TF card.
Note: When recording or snapping, if the SD card is not inserted or the SD card is abnormal, the
device will broadcast an alarm sound of "dididi" and show a pop-up window to remind the user
that the TF card is not inserted.
6

Installation Method
1. Aim the magnetic transfer slide buckle at the mount buckle on the device. .
2. Hold the device and chuck bracket with your hands, and aim the mount at the chuck
bracket on the device. .
3. Select a proper position (such as the center of the rearview mirror), attach the suction
mound to the windshield and rotate the mount clockwise to lock. .
4. Adjust the recording angle (it is the best angle that the car front shows in the middle of
the display).
Note: The first and second steps have been completed when the product leaves the factory. You
only need to perform the third and fourth steps.
7

2.4 Interfaces Introduction
Main Interface
When you connect the device to the vehicle via the in-vehicle charging cable, the device
powers on after the vehicle starts. If you want to connect the device to the power in any
other way, press and hold the power button to turn it on. The screen after turning on the
device is as follows.
Note: For more detailed introduction of the device functions and settings, please refer to 3.
FUNCTIONS AND SETTINGS.
No.
Area
Function
①
Time & Date
The time and date can be set in the settings.
②
Settings
General settings of the device.
③
Carlink
Mobile phone projection onto the device.
④
Recorder
Photo and video shooting during drive process.
⑤
FM
Mobile phone FM connection to the car loudspeaker.
⑥
Playback
View the photos and the videos.
8
12:00
08-08 Sun.
Settings
Carlink
Recorder
FM
Playback
①
②
③
④
⑤
⑥

3. FUNCTIONS AND SETTINGS
3.1 General Settings
Click “Settings” on the main interface to enter “General Settings”.
No.
Subcategory
Option
Introduction
①
Screen Saver
Off / 1 min. / 3
min.
Default is Off. Choose time length to start the screen saver
program during drive recording.
②
Clock Settings
/
Date and time settings.
③
Resolution
1080P / 720P
Default is 1080P.
④
Video
Duration
1min. / 2 min. / 3
min.
Default is 1 minute. Video duration when drive recording.
⑤
Protect Level
Off / High / Low
Default is Off. Sensitivity of the Gravity sensor (G-Sensor).
Emergency videos activated by collision will be locked and
can not be overwritten.
⑥
Park
Monitoring
Off / High / Low
Default is Off. Auto video recording for 1 minute when car is
parked and sensed collision. Emergency videos activated by
collision will be locked and can not be overwritten.
No.
9
12:00
Screen Saver
Clock Settings
Resolution
Video Duration
Protect Level
08-08 Sun.
Click to return to the main interface. Scroll to see all subcategories.

1
Keyboard
clicks
Off / On
Default is On. Feedback sound of clicking.
Volume
0-10
Default is 5. Volume of the device.
2
Language
English,
Deutsch, 简体中
⽂,繁体中⽂,⽇
本語
System language.
3
Firmware
Version
/
View the firmware version.
4
Flicker
50Hz / 60Hz
Default is 50Hz.
5
Reset settings
Yes / No
Reset all settings back to factory settings, without deleting
data from TF card.
6
Format TF-
Card
Yes / No
Format the TF card and delete all data.
Subcategory
Option
Introduction
No.
10

3.2 Carlink and its settings
Carlink technology will allow you to project your mobile phone screen onto the dashcam
screen. Please make sure your mobile phone has projection or screen mirroring function.
Click “Carlink” on the main interface to enter the Carlink interface and follow the following
instructions or follow the guideline on screen (as shown in the picture below) to connect
your mobile phone to the dashcam.
Click “Carlink” on the main interface to enter the Carlink interface.
Carlink Introduction:
1 Disconnect your mobile phone to any other WIFI;
2 Keep the WIFI option on your mobile phone “ON”;
3 Find the device WIFI “Spedal-XXXX” on your mobile;
4 Enter the WIFI password to connect to the wifi;
5 Open the “Projection” or “Screen Mirroring” on your mobile phone;
6 Select the device name “Spedal-XXXX” on your mobile;
7 Screen and sound synchronization begin.
Note: Some mobile brands allow the projection/screen mirroring programs running in the
background. While some brands allows only simultaneous projection. Please consult your mobile
phone supplier to confirm if you need to keep your mobile phone screen always on during
projection. If you have any problems when using this function, please feel free to contact us:
support@spedaltech.com
11
1. Select DEVICE NAME in the WIFI-Settings in your mobile;
2. Enter WIFI PASSWORD in your mobile to connect device;
3. Select DEVICE NAME in projection settings in your mobile;
4. The device will allow simultaneous projection / screen mirroring.
Carlink
Contact [email protected] for consultation
DEVICE NAME WIFI PASSWORD IP ADDRESS VERSION

3.3 Recorder and its settings
Click “Recorder” on the main interface to enter the dashcam interface.
Note:
1. You can change resolution and time in Settings.
2. The audio recording status has two status: ON/OFF. You can switch the status by clicking on the
“Audio recording” icon at the bottom of the screen. .
3. The lock file status has two status: Locked/Unlocked. You can switch the status by clicking on
the “Lock File” icon at the bottom of the screen. .
4. The video length sign will appear only when a video is being recorded. You can change the video
duration in settings. 。
5. The function “Switch Front and Rear Camera” can only be used when an additional rear camera
is connected to the device.
12
1080P 2020-05-16 07:03:21 00:00:00
-
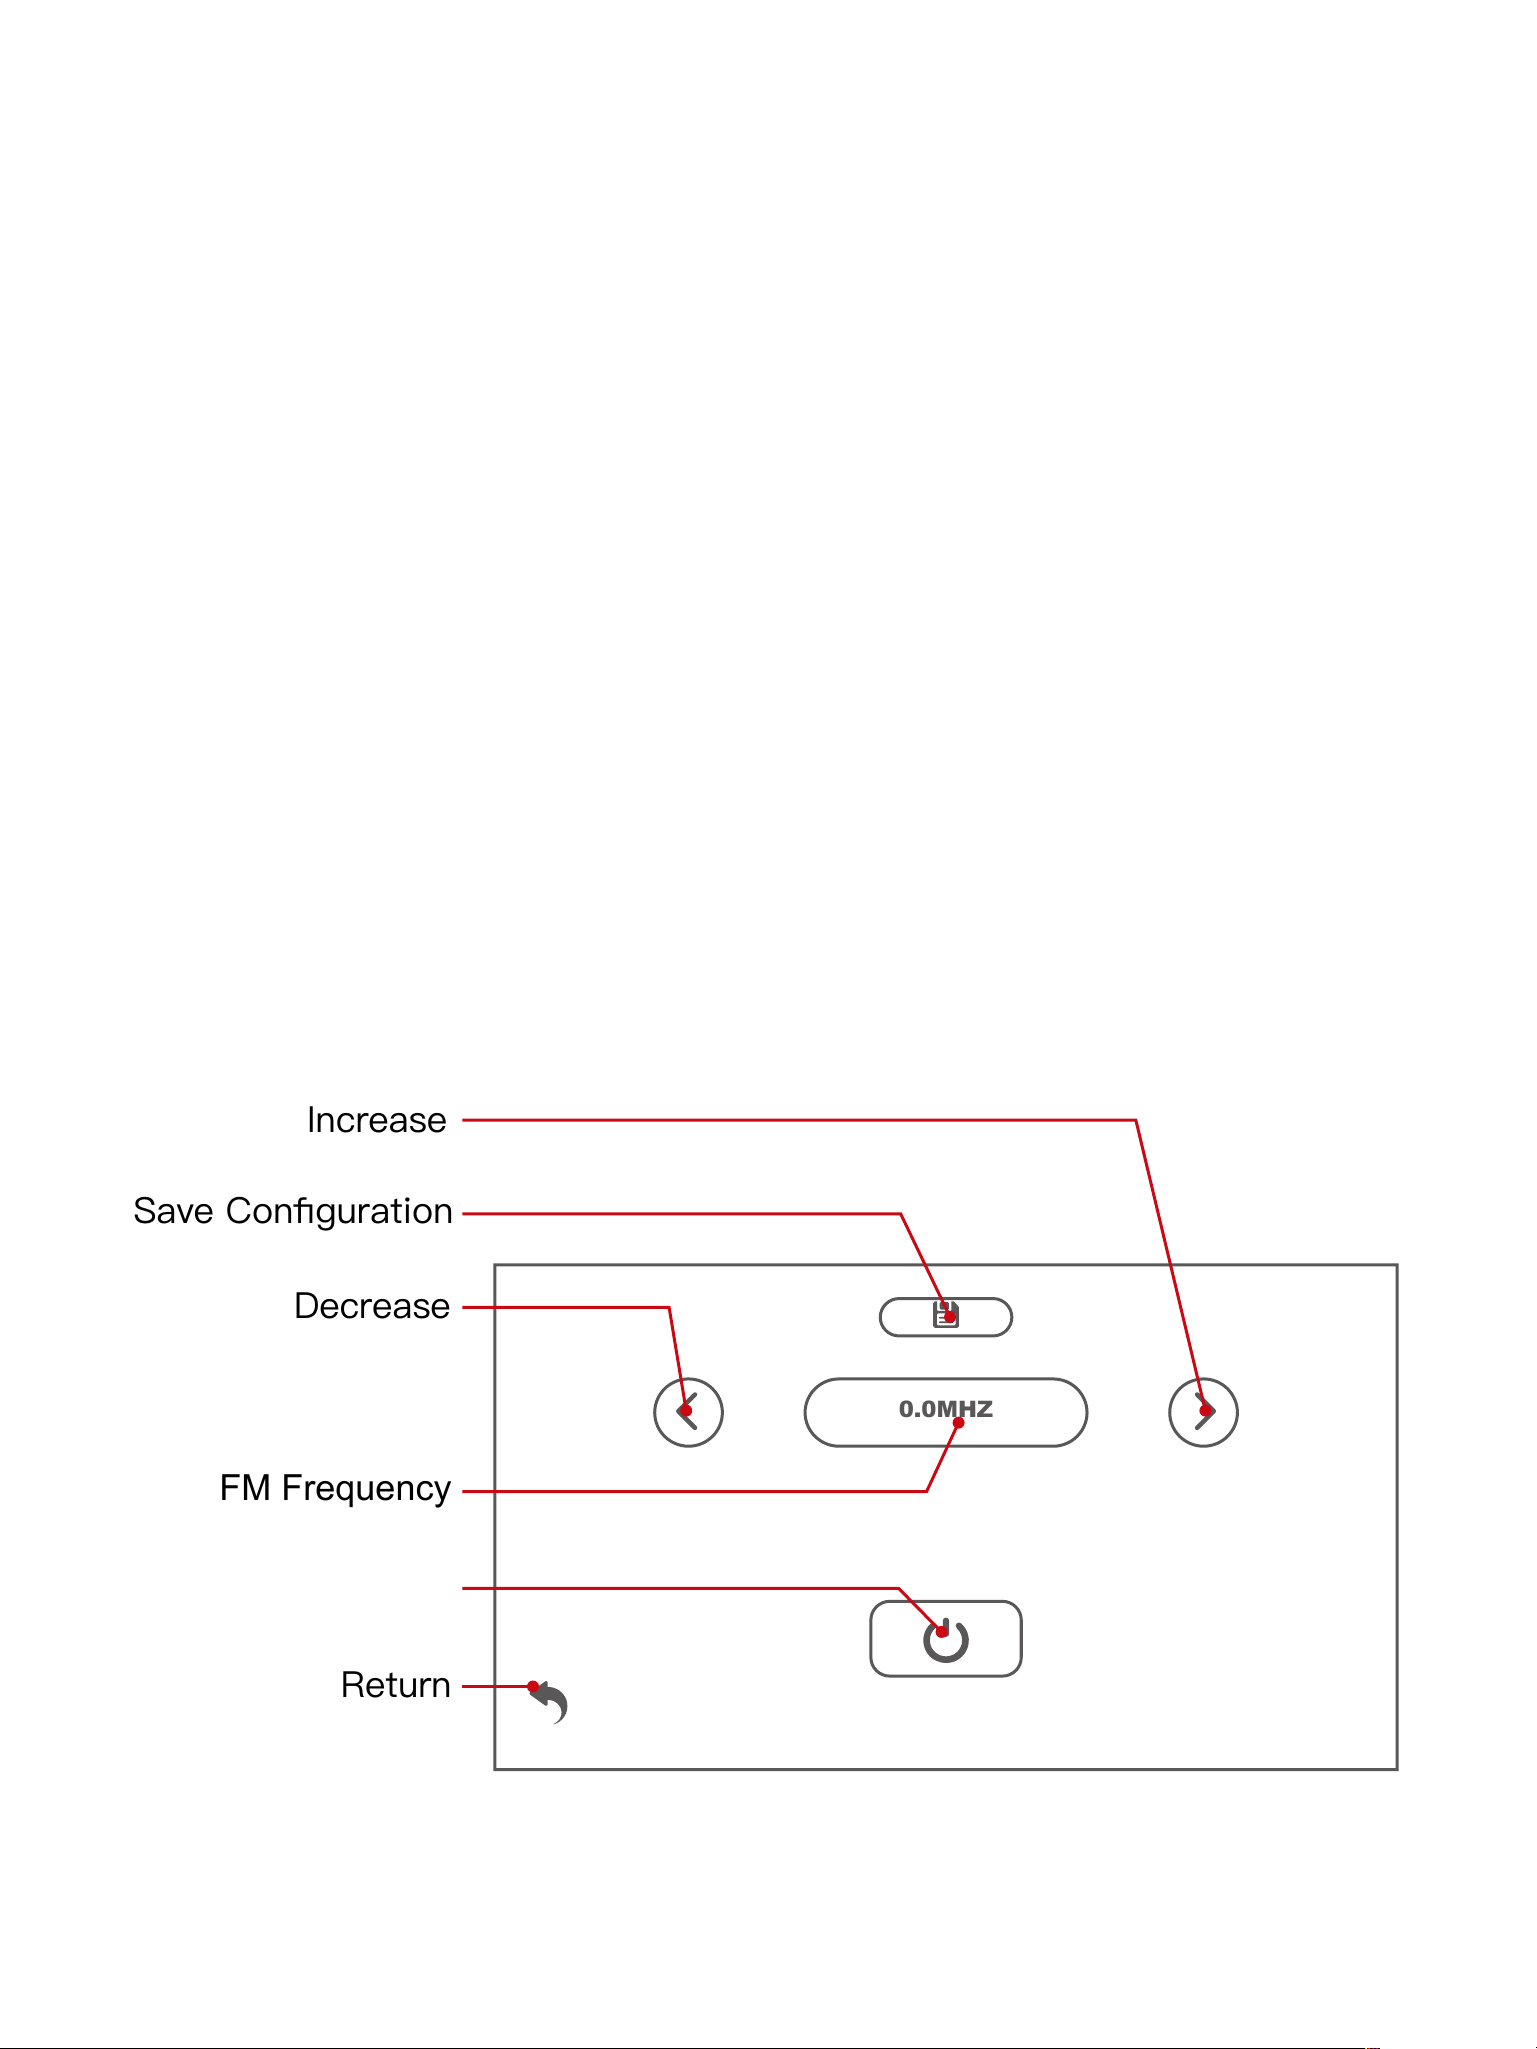
3.4 FM and its settings
Before using this function, please ensure at first that your mobile phone has been
connected to the dashcam through Carlink(refer to 3.2 Carlink and its settings) and screen
and sound synchronization have begun properly.
FM transmitter technology allows you to launch specific FM frequency (please make sure
that this frequency is not occupied by any radio or broadcast) from the dashcam. Once you
adjust the FM frequency on your car to the same level. The car’s loudspeaker will
synchronize the sound from the dashcam which originate from your mobile phone. In
other word, the users can play music or use navigation sound or any audio files on their
mobile phones and the sound will come out from their car’s loudspeakers through the FM
transmitter technology.
Click “FM” on the main interface to enter the FM interface. Adjust the FM frequency of your
car to an available frequency that is not occupied by any radio or broadcast, for example
to 91.0MHz if it is available. Then adjust the FM frequency of your dashcam to the same
level of 91.0MHz to connect.
13
0.0MHZ
FM Frequency
Turn ON/OFF

3.5 Playback and its settings
Playback Interface
14
FILE200516-083422-000103F.TS
FILE200516-083321-000102F.TS
FILE200516-083221-000101F.TS
FILE200516-083121-000100F.TS
FILE200516-083021-000099F.TS
FILE200516-082920-000098F.TS
FILE200516-082820-000097F.TS
FILE200516-082720-000096F.TS
01/13
FILE200516-075517-000059F.TS
00:00:00 / 00:01:00
2021/05/16 07:56:13
21/25
Expanded File
4. APPENDIX
4.1 Specifications
4.2 Warranty
Thank you for purchasing the Spedal multifunctional dashcam. This product can provide
you with the opportunity to project your mobile phone onto the dashcam.
Customers enjoy a one-year warranty and after-sales service from the date of purchase.
During this period, our company will actively respond to customers' questions or problems
and provide maintenance services for product failures under normal use. Delivery fee of
the product sent to and back from the factory for repair or replacement shall be paid by
the product owner or the person asking for repair.
The company reserves the right to reject maintenance requirements caused by the
following conditions, including but not limited to:
1. Failure to follow instructions and improper use causing device failure or damage; .
2. Failure due to unauthorized disassembly, modification or maintenance of equipment; .
3. Accidental damages caused by any natural disasters or other force majeure factors; .
4. Warranty period of the device has expired; .
5. Purchases from unreliable sources such as second-hand products.
Please strictly follow the instructions in this manual to use this product to
avoid unnecessary losses. If you have any questions or problems while
reading the product manual or using the product, please contact us by
Screen
5.0" Full View IPS LCD Screen
Aperture
F#1.8
Resolution
1080P
Field of View
120°
USB
Mini USB 2.0
Video Format
TS
Photo Format
JPEG
Storage Device
TF Card(Max. support 28GB)
Operating temperature
-20℃~65℃
Storage temperature
-30℃~75℃
15
Other manuals for CL586
1
Table of contents
Other Spedal Dashcam manuals


