manuals.online logo
Brands
  1. Home
  2. •
  3. Brands
  4. •
  5. Spike
  6. •
  7. Automobile Accessories
  8. •
  9. Spike 78-2600-R User manual

Spike 78-2600-R User manual

78-2600-R - Instructions MAVERICK TRAIL-SPORT-COMMANDER Vent Rear Windshield - rev00 www.spikepowersports.com / 888-769-2295
1
INSTALLATION INSTRUCTIONS
CANAM MAVERICK TRAIL/SPORT & 2021 COMMANDER
REAR WINDSHIELD - VENT
PART # 78-2600-R
IMPORTANT NOTICES
READ AND UNDERSTAND THESE INSTRUCTIONS COMPLETELY BEFORE INSTALLATION TO
AVOID INJURY TO YOURSELF, DAMAGE TO THE VEHICLE OR ACCESSORY.
•For proper installation, TWO people are required.
•Torque specifications must be followed when tightening bolts. Over-tightening any and/or all screws will cause
cracks around mounting holes which is not covered by any warranty.
•As specified on carton label, once protective film on shields is removed, product cannot be returned.
•As specified on carton label, damage caused by packaging staples is not covered by warranty. All staples must be
removed prior to removing product from carton.
•ANY cutting, trimming, drilling or altering of this product as delivered is not covered under warranty.
•Failure to follow these installation instructions completely may void any warrantable components and result in
product damage or personal injury.
•Do not use Loctite/Super Glue or any other similar fastener adhesive. These types of products react to plastics
and cause cracking. Not covered by any warranty.
•Our windshields are made from the highest quality material providing optimum transparency and clarity.
Blurriness and/or extrusion marks may or may not appear when looking through windshield from a wide, side-
angle. This is normal for all extruded clear plastic materials.
•The application of improper cleaners, abrasive and/or dirty cleaning towels can severely damage the product.
Failure to follow cleaning recommendation (provided herewith) may void any warrantable components.
DEALER
These instructions contain important information for future reference and must be given to the customer at time of
purchase or upon completion of installation.
Parts List (parts available with kit only and not available separately)
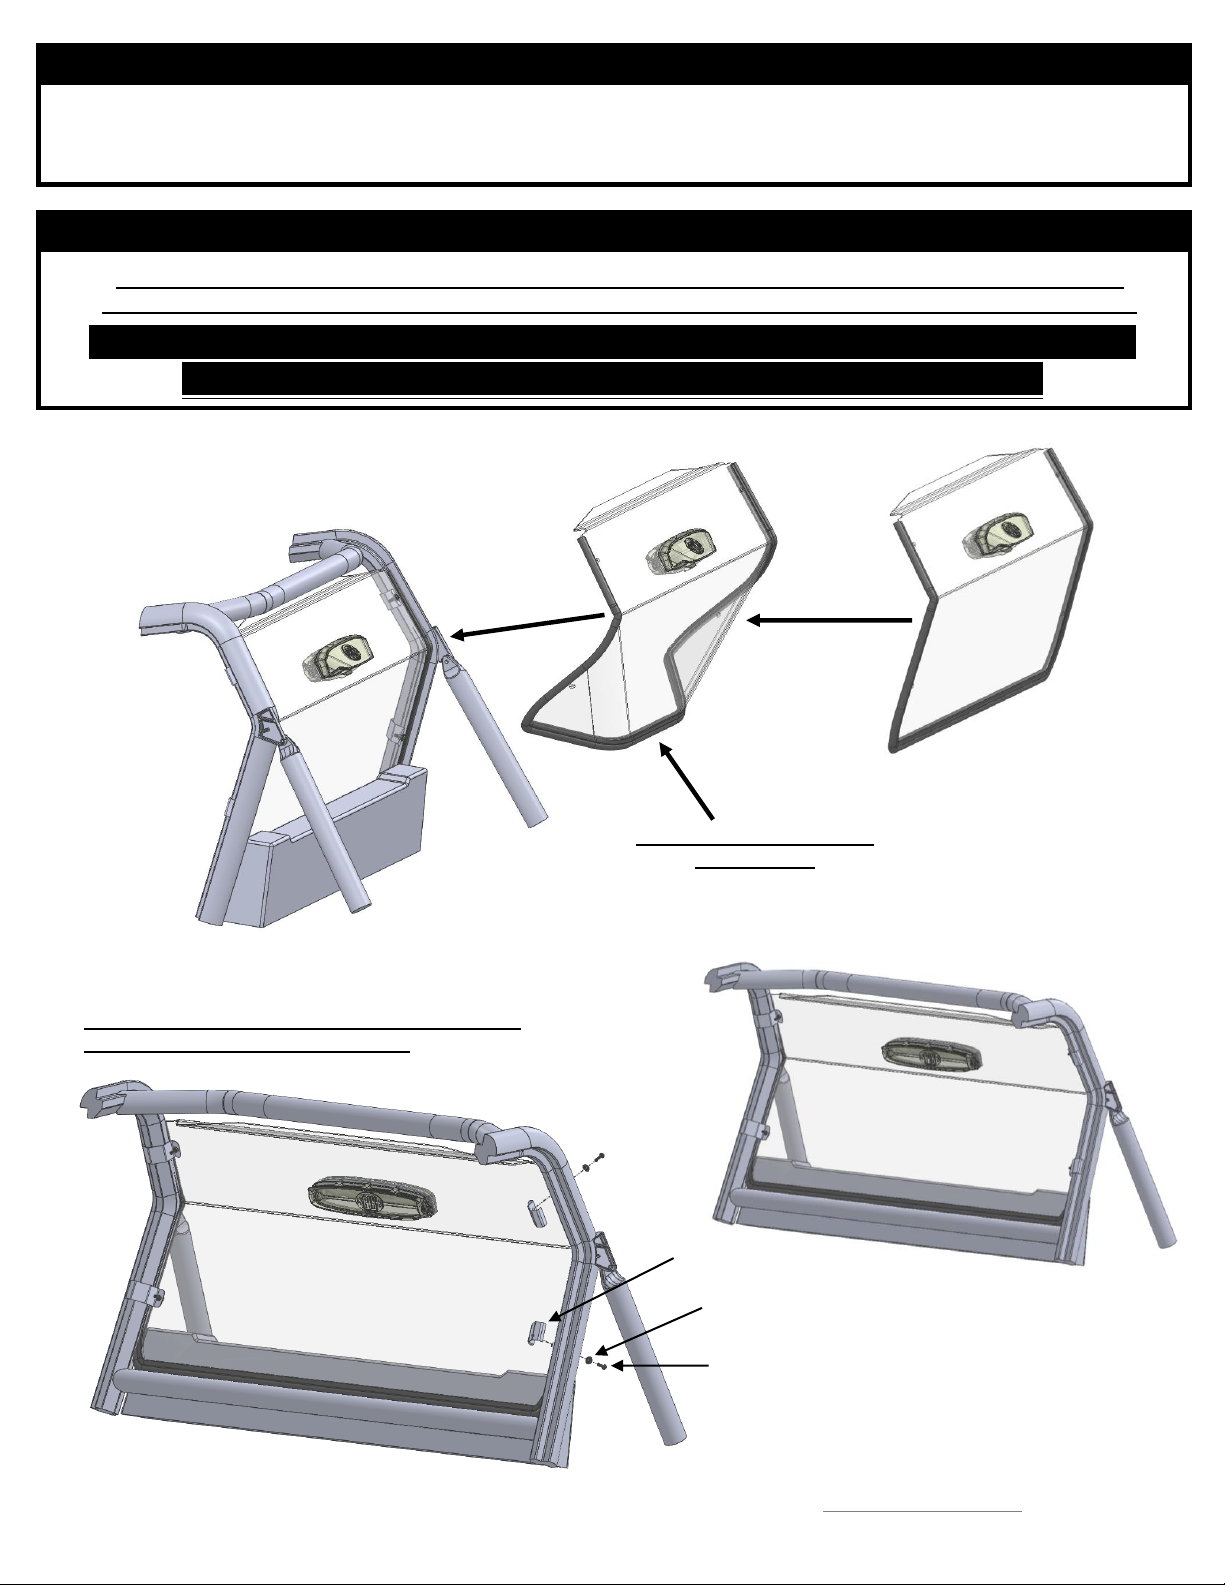
1. Installation
a) Find a clean flat area where you can safely lay down the
windshield (Item A). Partially remove the protective film
on both sides and apply the co-extruded bulb seal (Item C)
using manual pressure to ensure good adhesion and cut
any excess.
ITEM
PART NAME
DESCRIPTION
QTY
A
Windshield
CNC windshield cut-out made of ⅛" thick GE polycarbonate or equivalent
1
B
Vent assembly
Includes: 1 vent cover, 1 vent flap assembly, 1 rubber vent seal and 7 vent mounting screws
1
C
Co-extruded bulb seal (¼")
Includes: 84" Co-extruded bulb seal (¼") / #77-95BS [end user to cut to exact length]
1
INSTRUCTION
BAG
D
Windshield Hardware
Includes: 4 metal plate hooks, 4 phillips truss head screws M6 x 20 and 4 plastic shoulder
washers M6
1
Co-extruded bulb seal ¼"
(+/- 83")
78-2600-R - Instructions MAVERICK TRAIL-SPORT-COMMANDER Vent Rear Windshield - rev00 www.spikepowersports.com / 888-769-2295
2
IMPORTANT NOTICES
Torque specifications must be followed when tightening bolts.
Over-tightening any and/or all screws will cause cracks around mounting holes which is not covered by any
warranty.
b) Vent assembly (Item B) installation: Partially remove the protective film on
both sides of the windshield around the vent cutouts and follow instructions
below.
a. From the front side (cab side) of the windshield, slide the vent flap
assembly (Item B) in the vent cut out as shown in image b1. Ensure the
lower tab nests into the front of the windshield as shown in image b2 & b3.
b. Install the remaining vent components (Item B) using supplied hardware
as shown below in image b4 & b5.
Caution: over tightening any hardware could cause irreversible
damage to the windshield.
DO NOT USE POWER TOOLS FOR THE INSTALLATION
OF THE 7 MOUNTING SCREWS.
Vent flap
assembly
b1
b2
Windshield
vent cut out
Back
side
Vent cover
Rubber vent
seal
Vent mounting screws (7x)
(2.0 ± 0.2 N•m / 18 ± 2 lbf•in)
Back
side
Front side
(cab side)
b4
SIDE VIEW
SIDE
VIEW
As shown on the front-view image, the lever is installed
by default on the right side of the vent.
Lever can be installed/relocated on left or right side of
the vent. End user can decide.
Tightening/Loosening of the screw in the lever
determines the force required for the baffle adjustment.
BACK VIEW
Front side
(cab side)
FRONT VIEW
(CAB SIDE)
b5
BACK VIEW
Lower tab
b3
SIDE
VIEW
Back
side
Front side
(cab side)
REAR VIEW
78-2600-R - Instructions MAVERICK TRAIL-SPORT-COMMANDER Vent Rear Windshield - rev00 www.spikepowersports.com / 888-769-2295
3
IMPORTANT NOTICES
Torque specifications must be followed when tightening bolts.
Over-tightening any and/or all screws will cause cracks around mounting holes which is not covered by any
warranty.
IMPORTANT NOTICES
TWO people are required to install the windshield to the roll cage. Since windshield is wider at the bottom, gentle
manipulation and/or slight bending by each person will be required for windshield to slide all the way down into position.
Warning: Exercise extreme care during the next step in order to ensure that
you do not damage the windshield or vehicle. This is a tight fit.
c) Install the windshield to the vehicle as shown below.
d) Install the supplied hardware (Item D) as shown below.
Adjust the position of the windshield and tighten.
Caution: over tightening any hardware could cause
irreversible damage to the windshield.
Gentle manipulation and/or
slight bending
Philips truss screw M6 x 20 (4x)
(5.0 ± 0.5 N•m / 44 ± 4 lbf•in)
Shoulder washer
M6 (4x)
Metal plate
hook (4x)
78-2600-R - Instructions MAVERICK TRAIL-SPORT-COMMANDER Vent Rear Windshield - rev00 www.spikepowersports.com / 888-769-2295
4
IMPORTANT NOTICES
Trailerable ONLY with a FULL Front windshield AND Roof - or damage can occur!
Due to extreme wind turbulence, towing on an open trailer pulled by a motor home, bus or
other large size vehicle at highway speeds is NOT recommended.
CAUTION
Limited Towing at lower speeds (60mph or less) for shorter distances is acceptable with a
FULL Front Windshield AND Roof ONLY. Prolonged towing at highway speeds on an
Open trailer is NOT recommended and can cause damage that is NOT covered under
Warranty. Whenever towing anytime, it is mandatory to check all windshield hardware
BEFORE towing and at frequent intervals afterwards!
SPIKE suggests removal of Rear Windshields if towed in any conditions that are NOT
recommended - removal will also create less drag on the tow vehicle
2. Maintenance and Care
Tighten all hardware after first use and periodically thereafter.
CLEANING:
▪Rinse with lukewarm water; wash gently with mild soap or detergent and lukewarm water, using a soft cloth or sponge. DO NOT SCRUB
or use brushes or squeegees.
▪Rinse again. Dry with soft cloth or moist cellulose sponge to prevent water spotting.
▪To remove wet paint, glazing compound or grease, rub lightly with a good grade of VM&P naphtha or isopropyl alcohol, then wash and
rinse. DO NOT USE GASOLINE.
NOTICE: Abusive cleaning procedures by hand washing or automated washing equipment will eventually result in visual hazing, loss of
light transmission and coating delamination.
Compatible Cleaning Agents
▪Aqueous Solution of Soaps and Detergents
Joy
Freon T.F.
Palmolive liquid
Top Job
VM&P grade Naphtha
Windex (with ammonia D)
MINIMIZING HAIRLINE SCRATCHES
For minimizing scratches and minor abrasions, mild automobile polish can be used.
Recommended products: Johnson Paste Wax, Novus Plastic Polish #1 and #2, Mirror Glaze plastic polish and Plexux1.
Testing polish on a separate Lexan sample is recommended. Be sure to follow product instructions carefully.

Other Spike Automobile Accessories manuals

Spike 77-2800-R-T User manual

Spike

Spike 77-2800-R-T User manual

Spike 58-4250 User manual

Spike

Spike 58-4250 User manual

Popular Automobile Accessories manuals by other brands

APLIC 301483 user manual

APLIC

APLIC 301483 user manual

Cruz Alu-Rack L37-160 Assembly instructions

Cruz

Cruz Alu-Rack L37-160 Assembly instructions

Airxcel RVP INFRARED REMOTE CONTROL SYSTEM operating instructions

Airxcel

Airxcel RVP INFRARED REMOTE CONTROL SYSTEM operating instructions

AMP Research BedStep 75315-01A quick start guide

AMP Research

AMP Research BedStep 75315-01A quick start guide

Hamron 335-018 installation instructions

Hamron

Hamron 335-018 installation instructions

Ecoological AeroBox installation manual

Ecoological

Ecoological AeroBox installation manual

IMS XST11A installation manual

IMS

IMS XST11A installation manual

Rear view safety RVS-920619 Product manual installation & instructions

Rear view safety

Rear view safety RVS-920619 Product manual installation & instructions

travall TDG 1637 Fitting instructions

travall

travall TDG 1637 Fitting instructions

RITE-HITE Genisys GRH-700 Dok-Lok owner's manual

RITE-HITE

RITE-HITE Genisys GRH-700 Dok-Lok owner's manual

Prorack PR3097 Fitting instructions

Prorack

Prorack PR3097 Fitting instructions

AUTOTECH 10.109.423 installation instructions

AUTOTECH

AUTOTECH 10.109.423 installation instructions

BSR Optiflow Assembly instruction

BSR

BSR Optiflow Assembly instruction

Quadratec QuadraTop 11113.1135 installation manual

Quadratec

Quadratec QuadraTop 11113.1135 installation manual

Warn 108000 installation instructions

Warn

Warn 108000 installation instructions

Mister EV MAXICHARGER User manual and safety instruction

Mister EV

Mister EV MAXICHARGER User manual and safety instruction

Volvo 31339704 Installation instructions, accessories

Volvo

Volvo 31339704 Installation instructions, accessories

Opel KARL Infotainment manual

Opel

Opel KARL Infotainment manual

manuals.online logo
manuals.online logoBrands
  • About & Mission
  • Contact us
  • Privacy Policy
  • Terms and Conditions

Copyright 2025 Manuals.Online. All Rights Reserved.