Splash MESH & SOLID SAFETY COVER User manual

Page
1
of 5
MESH & SOLID SAFETY COVER
INSTALLATION GUIDE
Congratulations on your purchase of a
Safety Cover from Splash Super Center.
Before you Start
Please fully read these instructions before and during the installation,
to ensure a smooth, quick & proper installation.
The Pool Site
Carefully examine the immediate pool area. The deck width around
the pool needs to be a minimum of 3 feet. The cover itself will over-
lap the pool from waters edge approximately 9”- 18” onto the deck
surface. The spring and strapping will extend another 17” from covers
edge.
Examine the deck surface. Are there any extrusions (obstacles) on the
deck surface that would prevent the cover from laying fl at? Rough cop-
ing ladder sockets, waterspouts, and other items that are not fl ush with
the deck. These surfaces should be padded with carpet, foam or other
similar material which will help to protect the cover from chafi ng.
Tools
You will need the following tools to complete installation.
• Rotary Hammer Drill
• 3/4” Concrete drill bit w/long shaft (diamond tip)
• Lubricant (silicone spray)
• Hammer
• Tape measure
• Chalk and chalk line
Included Safety Cover Hardware
Please examine the following list, and
make sure your safety cover includes
all the needed hardware.
Standard Hardware
Brass anchors
Stainless steel springs
Stainless steel buckles
Steel installation rods
Allen wrench
Spring covers
Tamper
Optional Hardware
Wood deck anchors
Anchor tubes
Short springs
Anchor fl anges
Lawn stakes
Automatic cover pump
Raised Wall Hardware
Eyebolts
Cable
Lag shields
PLEASE READ ALL DIRECTIONS CAREFULLY BEFORE DRILLING ANY HOLES
ACURATE MEASURING WILL ENSURE A PROPERLY INSTALLED COVER
60 Campanelli Dr., Braintree, MA 02184 www.splashsupercenter.com
Questions?
Phone us at 1-877-527-4881 (toll free Monday-Friday 9am-5pm EST)
FAX 1-781-297-2083
or email us at customercare@splashsupercenter.com

MESH AND SOLID SAFETY COVER INSTALLATION GUIDE
Installing a Safety Cover
Pool
Edge
Cover
overlaps
pool edge
evenly
Center
Strap
Center
Strap
STEP 1
Remove the safety cover from the box and
carefully unfold.
Be sure cover is right side up, and protective strips
are on bottom.
Drape cover over the pool, it is easier to leave the
water at normal height, as cover will fl oat on water.
Stretch cover evenly over pool as tightly as pos-
sible. Water bags or 5 gallon buckets placed on
the straps can be used to temporarily secure cover
in place.
Adjust cover so that overlap is equal on all sides.
Attach the springs to the straps, leaving about 4”
of strap between the covers edge and the buckle,
and about 3” between the buckle and the spring.
This will allow for adjustment.
STEP 2
Find the center straps along the length and width.
Using a piece of chalk , mark a point 3” beyond the
uncompressed spring, or about 18” from covers
edge.
Using this mark as a guide, snap a chalk line along
the whole length of the pool. This will ensure that
the anchor’s will be parallel to pool.
Snapped
chalk line
Anchor
drill hole
location
Anchor
drill hole
location
3” 3”
3”
3”
15”
18”
Page
2
of 5
60 Campanelli Dr., Braintree, MA 02184 www.splashsupercenter.com
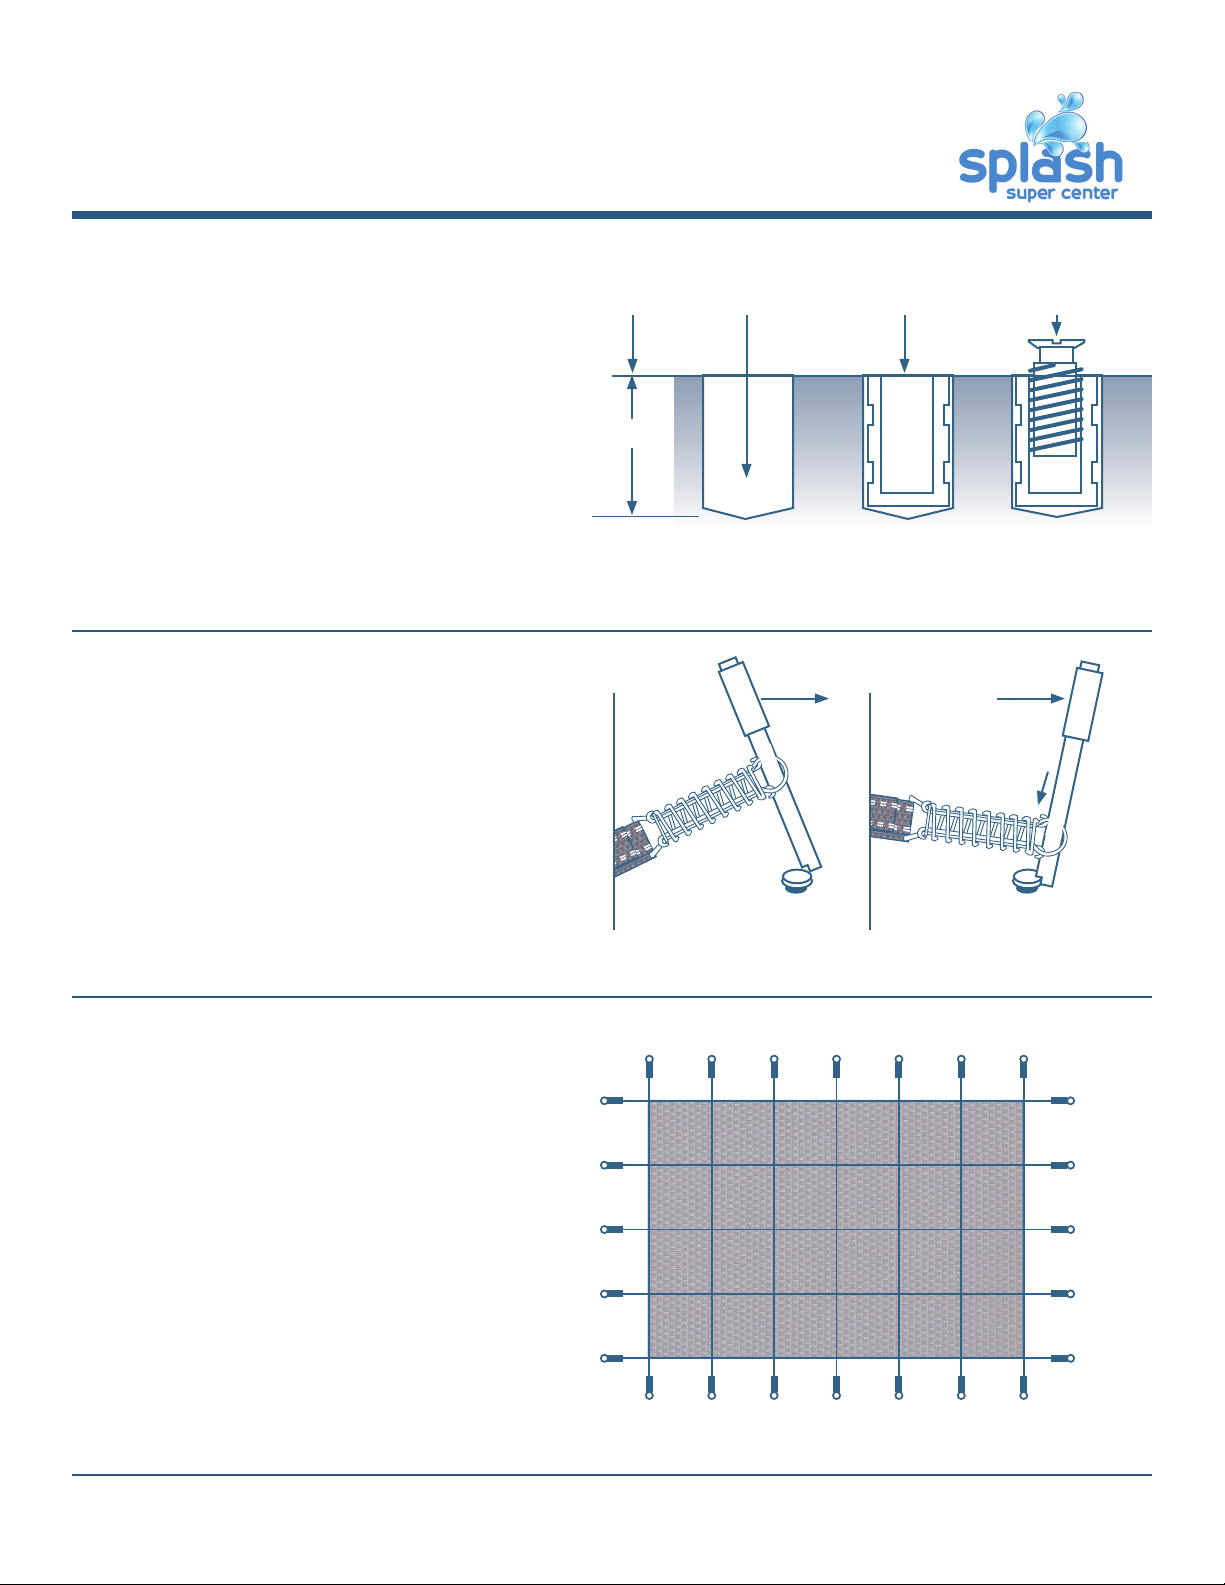
STEP 3
Using a hammer drill and a 3/4” drill bit, set the
drill over the marked anchor holes. Keeping
the drill perpendicular to the deck surface, drill
down 1 7/8” into deck. This allows the anchor to
lie fl ush with deck surface. Drilling dust should
be removed from hole. Remove anchor screw
from casing and spray casing and tamp tool
with silicon.
Insert tamping tool in casing and tamp anchor
in place.
STEP 4
Once the anchor is in place, it’s time to attach
spring to anchor. Using the included installation
rod. slip the notched end of the rod through
the round section of the spring. Place the notch
over the anchor, and using leverage, pull the
installation rod away from the pool so that the
spring slides down the rod.
STEP 5
To fi nish the installation, proceed to the oppo-
site side of the pool, and install the anchor for
the same strap. Next install the anchors for the
center straps along the width. After installing the
center straps along the length and width, install
those straps nearest the center along the length.
Use the numbered chart (right) for the proper
order of attaching straps.
1
18
6
7
8
20
19
17
5
2
4
9
11
13
15
3 10
12
14
16
22
24
21
23
1 7/8”
Deck
Surface
Tamp in
Casing
Drill
Hole
Screw in
Anchor
Page
3
of 5
MESH AND SOLID SAFETY COVER INSTALLATION GUIDE
Installing a Safety Cover
60 Campanelli Dr., Braintree, MA 02184 www.splashsupercenter.com

FREEFORM COVERS
Freeform safety covers are installed the same as
standard rectangular covers, freeform covers have
an 18” overlap. When initially aligning the cover
make sure the overlap is equal on all sides.
It can be diffi cult to follow anchor installation
sequence, remember to install center straps along
length and width fi rst. then work your way around
pool alternating sides and securing cover to anchor
as installed.
WOOD DECK ANCHORS
Install wood deck anchors by drilling a 1 1/2” hole
to a depth of 1/8” with a paddle bit.
Then drill a 3/4” hole in the center of the fi rst
hole to a depth of 1”.
Insert the wood deck anchor into the hole so that
the wide part is fl ush with deck. Lastly, screw brass
screw into the four holes to secure anchor.
RAISED WALLS
Raised walls require hardware that keeps the cover
fl ush against the wall. To accomplish this a steel
cable is used along the wall inside foam along the
edge of the cover and is secured by springs on
either end of the raised wall.
First drill 5/8” hole into the raised wall where the
snap hooks on underside of cover line up to eye-
bolt
(always check with builder of raised wall to assure
that drilling will not damage surface of wall).
Snap hooks to eyebolts and attach cable at ends
where it meets deck.
CUSTOM DECK SURFACES
Brick, stone, pavers or lawn surfaces require
additional support for the anchors to maintain
tension.
Locate your anchor holes as usual, then drill a
7/8” hole through the brick, stone or pavers 18”.
Insert brass anchor into tube, and hammer the
tube into the hole until anchor is fl ush with
the surface.
Attach spring to anchor to install cover.
Cover
Foam Cable
WALL
Eye Bolt
Snap Hook
Page
4
of 5
MESH AND SOLID SAFETY COVER INSTALLATION GUIDE
Installing a Safety Cover
60 Campanelli Dr., Braintree, MA 02184 www.splashsupercenter.com

MESH AND SOLID SAFETY COVER INSTALLATION GUIDE
Care and Maintenance
Cover must always stretch taut across the pool.
After the initial installation, some stretching
may occur.
Each spring should be compressed 50%, if needed
readjust straps.
Water level in pool can not go below 18” from top,
as cover is designed to set down on water with the
weight of snow and ice. Without proper water level,
the cover will stretch too far, placing undue strain
on cover and voiding the warranty.
Mesh covers are designed to screen out leaves and
large debris. Dust, dirt and other small debris will
fi lter through cover into pool. Algae will also form
under mesh cover without proper chlorinization
and winterization. Solid covers with mesh panel
keep most debris out of pool. Solid covers without
mesh drain must have automatic pump on cover
and pluged in at all times.
Store the cover in supplied mesh bag when not in
use and store off ground to keep mice and other
animals from getting to the cover.
Page
5
of 5
60 Campanelli Dr., Braintree, MA 02184 www.splashsupercenter.com
Popular Lighting Equipment manuals by other brands

EuroLite
EuroLite LED CC-18 Lighting effect user manual

Avolites
Avolites DIAMOND II Operation manual

B-K lighting
B-K lighting ArtiStar Remote ES16 Metal Halide installation instructions

Sensio
Sensio Ark TrioTone SE11192T0 quick start guide

HERA
HERA Leoline S12 Series installation guide

Manfrotto
Manfrotto 635 instructions


