splashtop SIRONA REMOTE User manual

SIRONA REMOTE
MANUAL
EN/DE/FR/ES/IT

INSTALLATION
nStreamer and Windows Client should not be installed on the same PC.
nEnsure that the monitor of your practice PC (on which you mirror e.g. the AC) is
of good quality and has good resolution – especially if you create, for example,
the preparation margin or design on this monitor.
nDo not use Sirona Remote if you are using the MCXLnet/WLAN grinding network
to grind the restorations.
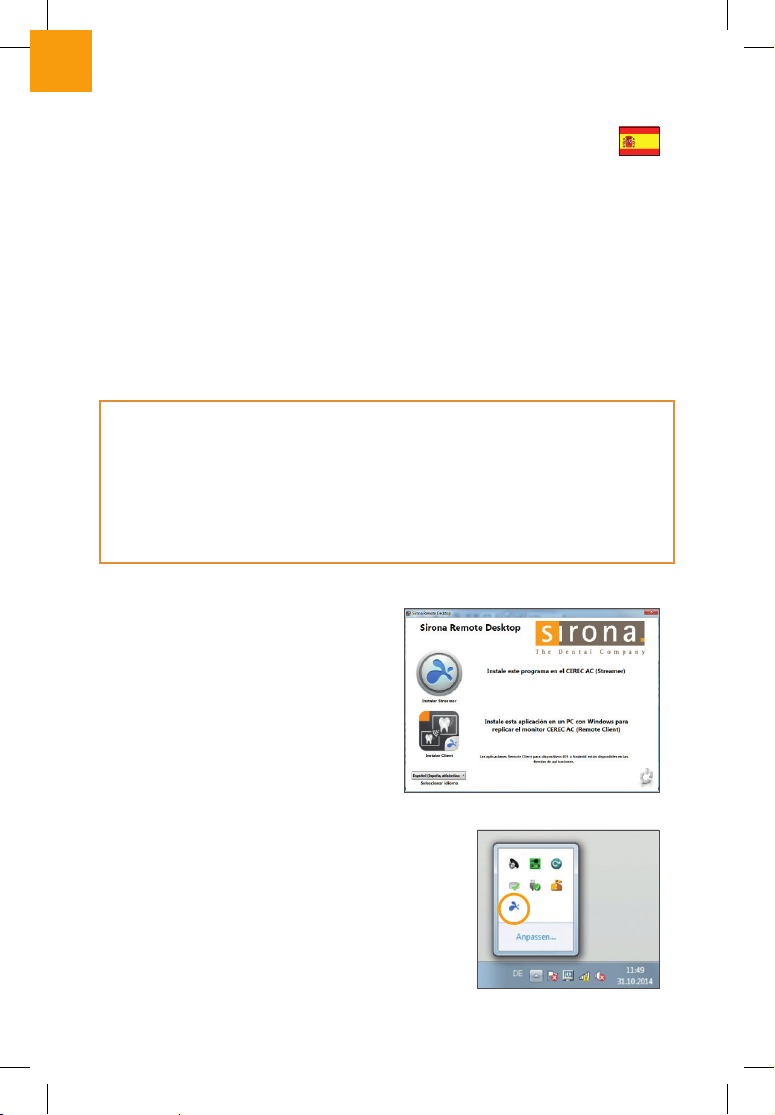
STREAMER INSTALLATION
1. Put the DVD in the CD drive of the PC
on which you intend to run the
streamer. This can be the CEREC AC,
CEREC AF / AI or another Sirona PC.
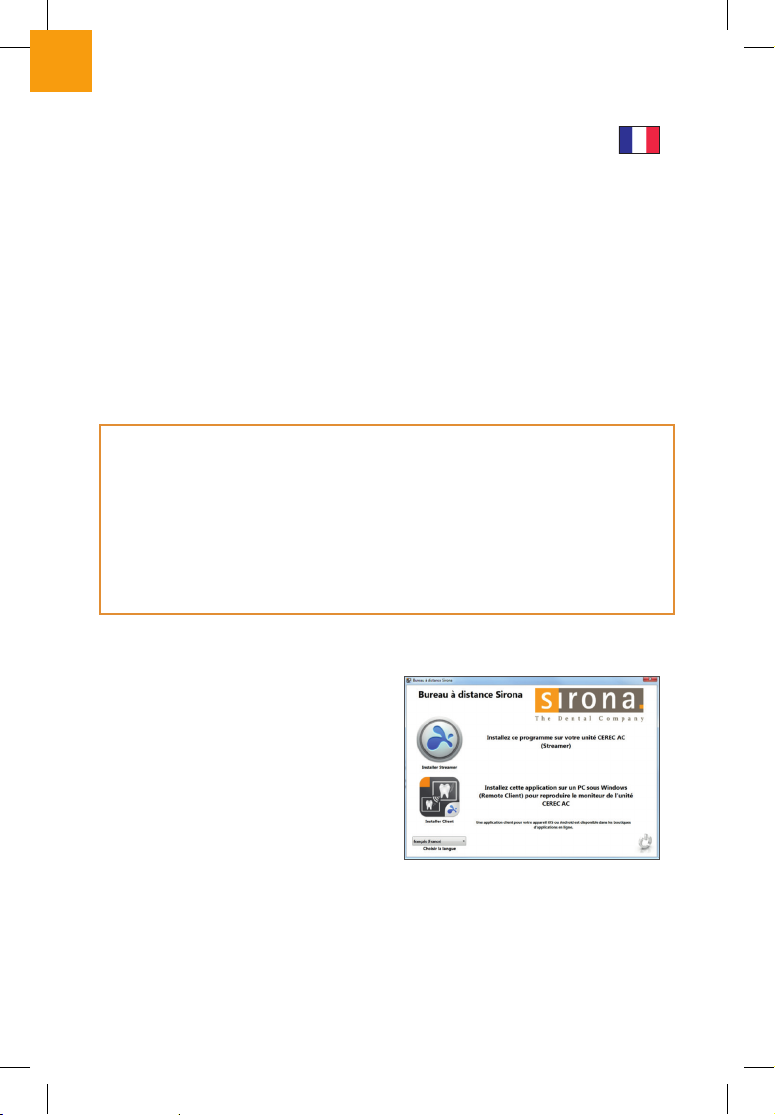
The auto installation process starts
and you will see the following window
on your screen. If it does not begin
automatically, start the installation
program by clicking the Autorun.exe
file.
2. Click the top button “Install Streamer” and follow the Splashtop installation
process. After installation the Windows streamer will run automatically in
Sirona Remote software is both fast and easy to install. Successful
software installation connects the streamer (SENDER) and client
(RECIPIENT) quickly. To do so, both must be in the same local network.
Please consult your IT service provider for support if you should face
any issues.

ENGLISHDEUTSCHFRANÇAISESPAÑOLITALIANO
02 I 03
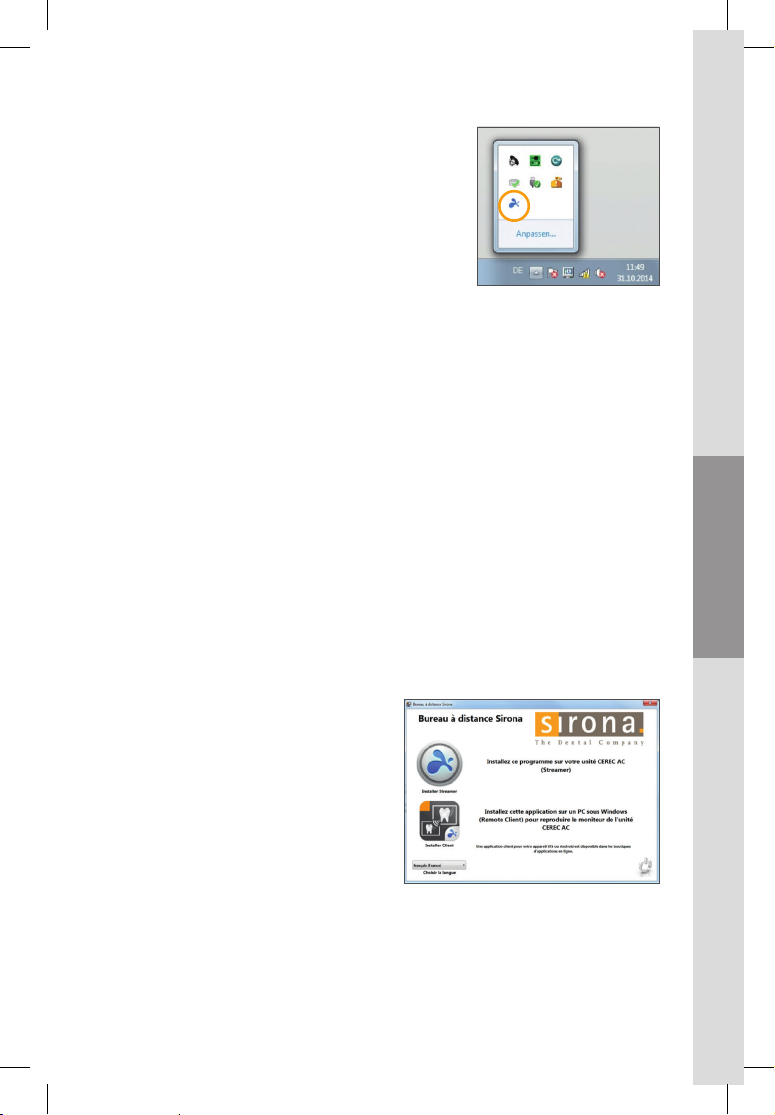
the start process, i.e. it will start through a
shortcut in the Windows auto start folder
each time you boot up your PC. The back-
ground running streamer will show its
status (running/oine/client connected)
as a Windows tray icon. See the circled icon
in the following screenshot.
3. Open the streamer (either it is open after installation or you click on the
Splashtop Streamer icon in the START menu) and go to the Security folder. If
you do not want to work with a Windows password then un-check the top
check box.
4. Go to the Security folder. In order to later connect your client with the
streamer you have to key in an alphanumerical security code e.g. aaaa1111.
Take CD out of the drive where you just installed the streamer.
SIRONA REMOTE WINDOWS CLIENT INSTALLATION
1. If you wish to mirror the screen of
your PC based system (CEREC AC
etc.) onto the screen of another
PC (RECIPIENTS: chair PC, Desktop
PCs, Notebooks) then insert the
CD in the corresponding drive. The
auto installation process starts
and you will see the following win-
dow on your screen. If it does not
begin automatically, start the in-
stallation program by clicking the
Autorun.exe file.

2. Click the bottom button “Install Client”. A Sirona Remote icon will show on your
desktop.
3. Double click the Sirona Remote icon on your desktop and follow the install-
ation process. The Sirona Remote Window for the streamer search will show.
4. Whenever you want to open Sirona Remote you will double click the Sirona
Remote icon on your desktop or click the Sirona Remote icon in your START
menu.
SIRONA REMOTE IOS CLIENT INSTALLATION FOR IPAD
If you wish to install the Remote Client on your iPad go to the Apple store and
search for Sirona Remote (using the search term Sirona). You will find the Sirona
Remote icon on the Apple app store as a free download. Download the Sirona
Remote client and install on your iPad. A Sirona Remote icon will show on your iPad.
SIRONA REMOTE ANDROID CLIENT INSTALLATION FOR ANDROID TABLETS
If you wish to install the Remote Client on your Android Tablet go to Google play and
look for Sirona Remote (using the search term Sirona). You will find the Sirona
Remote icon on Google play as a free download. Download the Sirona Remote client
and install on your Android tablet. A Sirona Remote icon will show on your Android
tablet.
nStreamer and Windows Client check for available updates if the PCs are online.
niOS and Android check for available updates in the corresponding App Stores.
ENGLISHDEUTSCHFRANÇAISESPAÑOLITALIANO
04 I 05
1. Ensure that the client and streamer PC are in the same network (in most cases
WLAN).
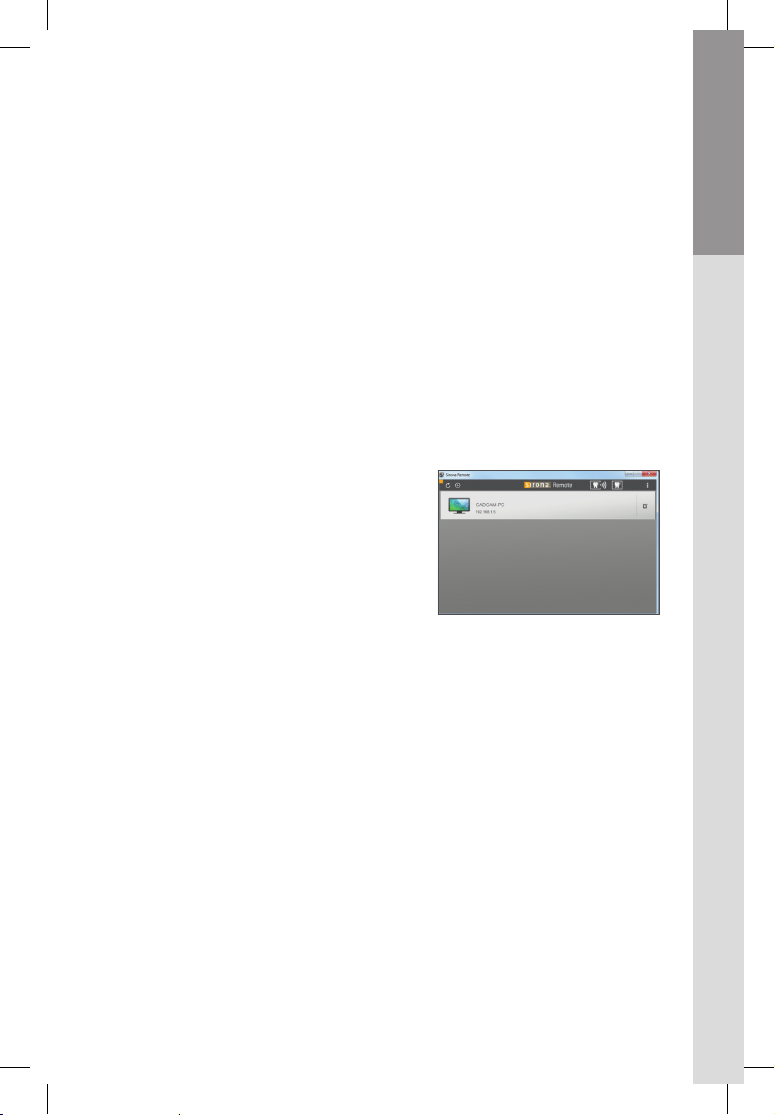
2. Open Sirona Remote on your client. Once
you open the application, the streamer list
is displayed. Streamer recognition should
not take longer than 60 seconds. The client
automatically recognizes the accessible
streamers in the same local network. If
you only have one streamer installed, only
one streamer PC should be displayed on
your client PC, iPad or Android.
3. To establish the connection, you must enter the security code, which you
defined in your streamer. Click on the streamer, with which you wish to
establish a connection.
For the Windows version, click on “Connect” and enter the security code into the
field that opens.
For iOS and Android, a field opens immediately in which the security code is to
be entered.
4. The streamer PC is displayed on your client PC/tablet.
CONNECTION OF CLIENT
WITH STREAMER
Following a restart, the client is displayed as a program icon on
the desktop PC or your iPad or Android Tablet. To connect the client
with your streamer PC, you must perform the following steps.

The stability of the connection between Client (receiver) and Streamer (sender PC)
fully depends on the equipment available (WLAN) in the IT infrastructure. Should
you experience interruptions to connections, please contact your IT service.
AUDIO PARAMETER SETTINGS
Audio can be transmitted to the client from the streamer or stay with the streamer.
This is a streamer setting and can be configured manually by the user. The default
is that audio is with the client. That can be changed if you
nopen the streamer on your streamer PC by clicking on the Splashtop icon of the
tray,
ngo on settings,
ncheck mark your sound preference.
Audio stays with streamer or client upon restart if set so at a previous session.
RESOLUTION PARAMETER SETTINGS
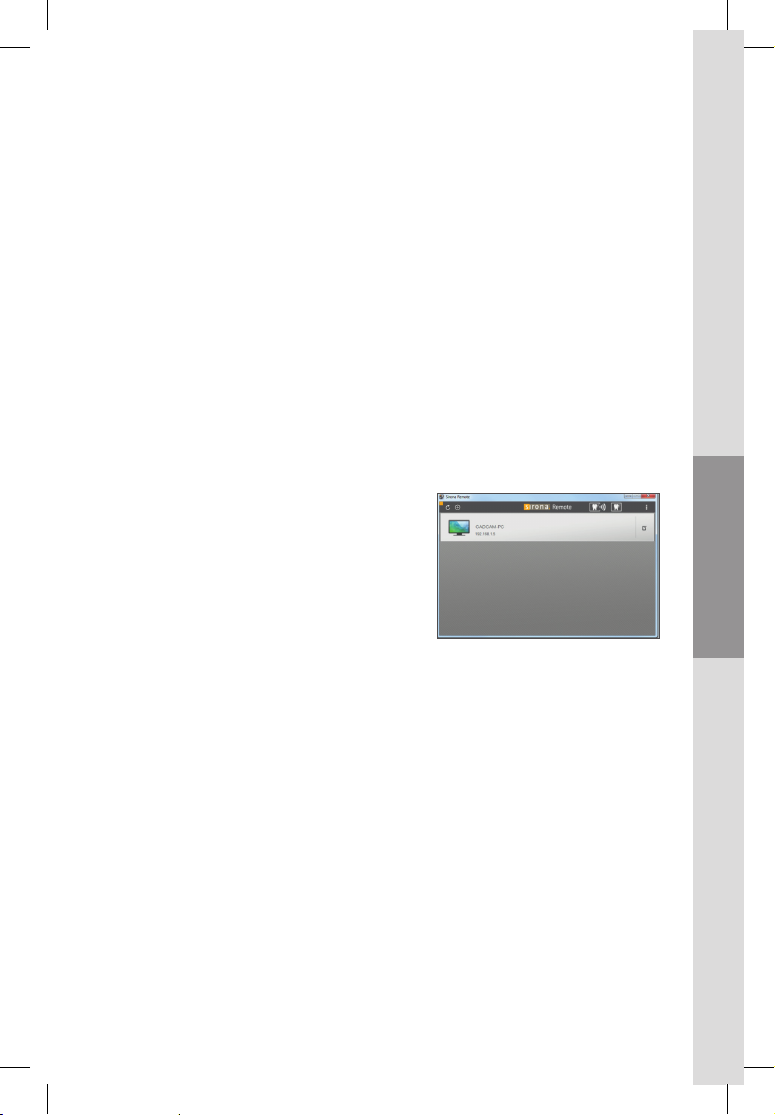
Client screen resolution does not interfere with streamer resolution; by
default the native streamer resolution will stay on the streamer PC when you
connect the client with the streamer. For full screen support go on the symbol bar
and click on the full screen icon you see circled in the following image:
If you decide to optimize the client resolution then you can do that by the
following steps:
1. You open Sirona Remote on your client.
2. Look for the streamer that you would like to adjust the client resolution.
Go on the computer details thumbnail on the right of the streamer banner.
A window opens with a drop down menu at the bottom for resolution
selections.
3. Choose the resolution that you want the client to be supported.
One solution is the best fit solution for your computer.

ENGLISHDEUTSCHFRANÇAISESPAÑOLITALIANO
06 I 07
MOVE APPLICATION TO SECOND CLIENT PC SCREEN
You might have two screens e.g. at your practice PC workstation – one on your
practice PC sideboard and one at the chair.
You can mirror your streamer PC screen to your second screen of your practice
PC workstation at the chair. The Windows Client Application saves its last window
position on close. So if you move the Sirona Remote Windows client window to the
2nd (extended) screen of the client PC it will automatically reboot there.
You can do this by dragging the Sirona Remote application window from one screen
to the other where you would like to mirror your streamer PC screen.
AUTOMATIC CONNECTION
If a security code is defined on the streamer, the user will have to enter it for the
connection. There will be an option to save/remember the security code so that
upon second start the client will automatically connect without asking again the
unchanged security code. If the code on the server is changed later on, the code
will have to be reentered by the user.
SWITCHING CLIENTS
If a second client tries to connect to the same server only the first will be
connected. If you wish for example to move the AC from one operatory to
another and wish to connect a dierent client with the AC you have to first
disconnect the client from the streamer before moving the AC into a dierent
operatory. Move the AC into a dierent operatory and start the client that looks for
streamers. Connect client with streamer.
For the latest version of the Sirona Remote Manual, visit sirona.com

INSTALLATION
nStreamer und Windows Client sollten nicht auf dem gleichen PC installiert werden.
nStellen Sie sicher, dass der Monitor Ihres Praxis PCs (auf den Sie spiegeln) von
guter Qualität und Auflösung ist – insbesondere dann, wenn Sie z.B. Präparati-
onsrand oder Design an diesem Monitor gestalten.
nVerwenden Sie Sirona Remote nicht, wenn Sie das Schleifnetzwerk MCXLnet/
WLAN-Netz zum Ausschleifen Ihrer Restaurationen verwenden.
REMOTE-STREAMER INSTALLATION
1. Legen Sie die DVD in das CD-Laufwerk
des PCs ein, auf dem Sie den Strea-
mer ausführen möchten. Dies kann
der CEREC AC-, CEREC AF/AI- oder ein
anderer Sirona-PC ein. Der automati-
sche Installationsprozess wird ge-
startet und auf Ihrem Bildschirm wird
das folgende Fenster angezeigt. Soll-
te dies nicht der Fall sein, dann füh-
ren Sie bitte die Datei Autorun.exe
aus.
Die Sirona Remote-Software lässt sich schnell und einfach
installieren. Nach erfolgreicher Installation der Software können
Sie schnell eine Verbindung zwischen Streamer (SENDER) und
Client (EMPFÄNGER) herstellen. Dazu müssen beide in demselben
lokalen Netzwerk sein. Bitte wenden Sie sich bei Problemen wegen
Unterstützung an Ihren IT-Dienstanbieter.

ENGLISHFRANÇAISESPAÑOLITALIANO DEUTSCH
08 I 09
2. Klicken Sie auf die obere Schaltfläche „Streamer
installieren“ und befolgen Sie den Installationspro-
zess von Splashtop. Ein Installationsschritt heißt
“Choose Installation Option”. Wählen Sie hier „All
users“.NachderInstallationwirdderWindows-Stre-
amer als Autostart-Programm ausgeführt, d. h. er
wird beim Hochfahren Ihres PCs über eine Ver-
knüpfung im Autostart-Ordner von Windows auto-
matisch gestartet. Der Status des im Hintergrund ausgeführten Streamers
(Betrieb/oine/mit Client verbunden) wird mit einem Windows-Taskleistensymbol
angezeigt. Siehe das eingekreiste Symbol im vorhergehenden Screenshot.
3. Önen Sie den Streamer (falls dieser nach der Installation nicht automatisch
geönet wird, klicken Sie auf das Splashtop Streamer-Symbol im Startmenü)
und gehen Sie zum Ordner „Sicherheit“. Wenn Sie kein Windows-Kennwort ver-
wenden möchten, deaktivieren Sie das oberste Kontrollkästchen.
4. Gehen Sie zum Ordner „Sicherheit“. Um später Ihren Client mit demStreamer zu
verbinden, müssen Sie einen alphanumerischen Sicherheitscode eingeben, z.
B. aaaa1111. Entnehmen Sie die DVD, mit der Sie gerade den Streamer instal-
liert haben, aus dem Laufwerk.
INSTALLATION DES WINDOWS-CLIENTS FÜR SIRONA REMOTE
1. Wenn Sie den Bildschirm Ihres PC-
basierten Systems (z.B. CEREC AC,
inLab-PC oder CEREC AF/AI) auf dem
Bildschirm eines anderen PCs (EMP-
FÄNGER: Behandlungsstuhl-PC, Desk-
top-PCs, Notebooks) spiegeln wollen,
legen Sie die DVD in das entsprechende
Laufwerk ein. Der automatische Ins-
tallationsprozess wird gestartet und
auf Ihrem Bildschirm wird das folgende Fenster angezeigt. Sollte dies nicht der
Fall sein, dann führen Sie bitte die Datei Autorun.exe aus.

2. Klicken Sie auf die untere Schaltfläche „Client installieren“. Ein Sirona
Remote-Symbol wird auf Ihrem Desktop angezeigt.
3. Doppelklicken Sie auf das Sirona Remote-Symbol auf Ihrem Desktop und befol-
gen Sie den Installationsprozess. Das Fenster für die Streamersuche von Sirona
Remote wird angezeigt.
4. Immer wenn Sie Sirona Remote önen möchten, klicken Sie doppelt auf das
Sirona Remote-Symbol auf Ihrem Desktop oder einfach auf das Sirona Remo-
te-Symbol in Ihrem Startmenü.
INSTALLATION DES SIRONA REMOTE IOS-CLIENTS FÜR IPAD
Wenn Sie den Remote-Client auf Ihrem iPad installieren möchten, wechseln Sie
zum Apple Store und suchen Sie nach Sirona Remote (unter Suchbegri Sirona).
Sirona Remote steht im Apple App Store kostenlos zum Download zur Verfügung.
Laden Sie den Sirona Remote-Client herunter und installieren Sie ihn auf Ihrem
iPad. Danach wird ein Sirona Remote-Symbol auf Ihrem iPad angezeigt.
INSTALLATION DES SIRONA REMOTE ANDROID-CLIENTS FÜR ANDROID-TABLETS
Wenn Sie den Remote-Client auf Ihrem Android-Tablet installieren möchten, wech-
seln Sie zu Google Play und suchen Sie nach Sirona Remote (unter Suchbegri
Sirona). Sirona Remote steht in Google Play kostenlos zum Download zur Verfü-
gung. Laden Sie den Sirona Remote-Client herunter und installieren Sie ihn auf
Ihrem Android-Tablet. Danach wird ein Sirona Remote-Symbol auf Ihrem Android-
Tablet angezeigt.
nStreamer und Windows Client prüfen die Verfügbarkeit von Updates wenn die
PCs im Internet sind.
niOS und Android prüfen die Verfügbarkeit von Updates in den entsprechenden
App Stores.

ENGLISHFRANÇAISESPAÑOLITALIANO DEUTSCH
1. Stellen Sie sicher, dass Client und Streamer PC in demselben lokalen Netzwerk
sind (in den meisten Fällen WLAN).
2. Önen Sie Sirona Remote auf Ihrem Client.
Wenn Sie die Anwendung önen, wird die
Streamer-Liste angezeigt. Die Erkennung
der Streamer sollte nicht länger als 60
Sekunden dauern. Der Client erkennt die
erreichbaren Streamer im selben lokalen
Netzwerk automatisch. Wenn Sie nur
einen Streamer installiert haben, sollte auf
Ihrem Client-PC, iPad oder Android auch
nur ein Streamer-PC angezeigt werden.
3. Um die Verbindung herzustellen, müssen Sie den Sicherheitscode ein-
geben, den Sie in Ihrem Streamer definiert haben. Klicken Sie auf den
Streamer, mit dem Sie eine Verbindung herstellen möchten.
Für die Windows-Version klicken Sie auf „Verbinden“ und geben den Sicherheits-
code in das sich önende Feld ein.
Für iOS und Android önet sich unmittelbar ein Feld, in das der Sicherheitscode
einzugeben ist.
4. Der Streamer-PC wird auf Ihrem Client-PC / Tablet gespiegelt.
VERBINDUNG DES
CLIENTS MIT DEM
STREAMER
Der Client wird nach dem Neustart als Programmsymbol auf dem
Desktop-PC bzw. Ihrem iPad oder Android-Tablet angezeigt. Um den
Client mit Ihrem Streamer-PC zu verbinden, müssen Sie die folgen-
den Schritte ausführen.
10 I 11

Die Stabilität der Verbindung zwischen Client (Empfänger) und Streamer (Send-
er-PC) ist ganz maßgeblich von der Ausstattung (WLAN) der IT-Infrastruktur
abhängig. Wenden Sie sich z.B. bei Verbindungsabbrüchen an Ihren IT-Service.
EINSTELLUNGEN FÜR AUDIO-PARAMETER
Der Streamer kann das Audio-Signal optional an den Client übertragen. Dies ist eine
Streamer-Einstellung, die vom Anwender manuell konfiguriert werden kann. Stan-
dardmäßig wird das Audio-Signal an den Client übertragen. Um die Einstellung zu
ändern, gehen Sie folgendermaßen vor:
nÖnen Sie den Streamer auf Ihrem Streamer-PC (AC, CEREC AF usw.).
Klicken Sie dazu auf das Splashtop-Symbol in der Taskleiste,
ngehen Sie zu „Einstellungen“
nund wählen Sie Ihre Audio-Voreinstellung aus.
Die Einstellung aus der Sitzung bleibt bis zum Neustart erhalten.
EINSTELLUNGEN FÜR AUFLÖSUNGSPARAMETER
Die Auflösung des Client-Bildschirms beeinflusst die Streamer-Auflösung nicht.
Standardmäßig wird die native Streamer-Auflösung auf dem Streamer-PC übernom-
men, wenn Sie den Client mit dem Streamer verbinden. Für Vollbildunterstützung
klicken Sie auf die Symbolleiste und dann auf das Vollbild-Symbol (im folgenden
Bild eingekreist):
Wenn Sie die Client-Auflösung anpassen möchten, gehen Sie folgendermaßen vor:
1. Önen Sie Sirona Remote auf Ihrem Client.
2. Suchen Sie nach dem Streamer, für den Sie die Client-Auflösung anpassen
möchten. Gehen Sie zum Computerdetails-Symbol auf der rechten Seite des
Streamer-Banners. Ein Fenster mit einem Dropdown-Menü am unteren Rand
wird geönet, indem Sie die Auflösung auswählen können.
3. Wählen Sie die Auflösung, die sich für Ihren Client am besten eignet.

ENGLISHFRANÇAISESPAÑOLITALIANO DEUTSCH
SPIEGELN DER ANWENDUNG AUF EINEN ZWEITEN CLIENT-PC-BILDSCHIRM
Sie verfügen möglicherweise über zwei Bildschirme, z. B. für die PC-Work-
station in Ihrer Praxis – einen am PC-Tisch und einen am Behandlungsstuhl.
Sie können Ihren Streamer-PC-Bildschirm auf dem zweiten Bildschirm Ihrer
PC-Workstation am Behandlungsstuhl spiegeln. Die Windows-Clientanwendung
speichert beim Schließen die letzte Fensterposition. Wenn Sie das Fenster des
Sirona Remote Windows-Clients auf den 2. (zusätzlichen) Bildschirm des
Client-PCs verschieben, wird er automatisch dort neu gestartet.
Ziehen Sie einfach das Sirona Remote-Anwendungsfenster auf den Bildschirm, auf
dem Sie den Bildschirm Ihres Streamer-PCs spiegeln möchten.
AUTOMATISCHE VERBINDUNG
Wenn auf dem Streamer ein Sicherheitscode definiert ist, muss der Anwender die-
sen auf dem Client eingeben, um die Verbindung herzustellen. Der Sicherheitscode
kann gespeichert werden, sodass der Client ab dem zweiten Start die Verbindung
automatisch herstellt, ohne den Sicherheitscode abzufragen. Wenn der Code auf
dem Server zu einem späteren Zeitpunkt geändert wird, muss er vom Anwender
wieder eingegeben werden.
WECHSELN VON CLIENTS
Wenn ein zweiter Client versucht, eine Verbindung mit demselben Server
herzustellen, schlägt dies fehl. Wenn Sie z. B. die CEREC AC in einem anderen OP
aufstellen und einen anderen Client mit der CEREC AC verbinden möchten, müssen
Sie zuerst den Streamer trennen, bevor Sie die CEREC AC in den anderen OP fahren.
Wenn die CEREC AC sich in dem anderen OP befindet, starten Sie den Client, der
daraufhin mit der Suche nach Streamern beginnt. Verbinden Sie dann den Client mit
dem Streamer.
Für die aktuellste Version des Sirona Remote Manual gehen Sie bitte auf sirona.com
12 I 13
INSTALLATION
nLe streamer et Windows Client ne devraient pas être installés sur le même PC.
nAssurez-vous que le moniteur du PC de votre cabinet (pour la mise en miroir)
est de bonne qualité et présente une bonne résolution – en particulier si vous
utilisez ce moniteur pour créer p. ex. le bord de la préparation ou pour une fon-
ction Design.
nN’employez pas Sirona Remote si vous utilisez le réseau d’usinage MCXLnet/
réseau WIFI pour usiner les restaurations.
INSTALLATION DU STREAMER SIRONA REMOTE
1. Placez le DVD dans le lecteur de CDduPC
surlequel voussouhaitez faire fonctionner
le streamer.Il peut s’agir du PC de l’unité
de prise d’empreinte CEREC AC, CEREC
AF/AI ou d’un autre PC Sirona. Le proces-
sus d’installation automatique est lancé
et vous verrez apparaître la fenêtre sui-
vante sur votre écran.
Si ce n´est pas le
cas, veuillez activer le programme
Autorun.exe.
2. Cliquez sur le bouton du haut “Install Streamer” et suivez le processus d’instal-
lation Splashtop. L’une des étapes d’installation s’appelle «Choose Installation
Le logiciel Sirona Remote est à la fois rapide et facile à installer.
Une installation logicielle réussie permet de connecter rapidement le
streamer (EXPÉDITEUR) et le client (DESTINATAIRE). À cet effet,
expéditeur et destinataire doivent faire partie du même réseau
local. Veuillez consulter votre fournisseur de services IT pour
bénéficier d‘une assistance si vous rencontrez des problèmes.
ENGLISHDEUTSCHFRANÇAISESPAÑOLITALIANO
Option». Dans cette étape, sélectionnez «All
users». Une fois l’installation terminée, le
streamer Windows va lancer automatiquement
le processus de démarrage, c’est à dire qu’il va
démarrer via un raccourci dans le répertoire de
démarrage automatique de Windows à chaque
fois que vous démarrez votre PC.
Le streamer qui fonctionne en arrière-plan a-
chera son état (running/oine/client connected) sous la forme d’une icône de
zone de notification Windows. Voir l’icône entourée dans la capture d’écran
suivante.
3. Ouvrez le streamer (soit il s’ouvre après l’installation, soit vous cliquez sur
l’icône Splashtop Streamer dans le menu DÉMARRER) et rendez-vous dans le
dossier Sécurité. Si vous ne souhaitez pas travailler avec un mot de passe Win-
dows, décochez la case du haut.
4. Rendez-vous dans le dossier Sécurité. Afin de pouvoir connecter ultérieurement
votre client au streamer, il vous faut saisir un code de sécurité
alphanumérique, par exemple aaaa1111. Retirez le DVD du lecteur ayant servi à
installer le streamer.
INSTALLATION DE SIRONA REMOTE SUR SYSTÈME CLIENT WINDOWS
1. Si vous souhaitez reproduire l’écran de
votre système basé sur PC (unité
CEREC AC, PC inLab ou CEREC AF /AI)
sur l’écran d’un autre PC (DESTINA-
TAIRES : PC de fauteuil, PC de bureau,
Notebooks), insérez le DVD dans le
lecteur correspondant. Le processus
d’installation automatique est lancé
et vous verrez apparaître la fenêtre
suivante sur votre écran. Si ce n´est
pas le cas, veuillez activer le
programme Autorun.exe.
14 I 15

2. Cliquez sur le bouton du bas “Install Client”. Une icône Sirona Remote va s’a-
cher sur votre bureau.
3. Double cliquez sur l’icône Sirona Remote de votre bureau et suivez le
processus d’installation. La fenêtre Sirona Remote pour la recherche du
streamer va s’acher.
4. Lorsque vous souhaitez ouvrir le logiciel Sirona Remote, eectuez un double-clic
sur l’icône Sirona Remote de votre bureau ou cliquez sur l’icône Sirona Remote
de votre menu DÉMARRER.
INSTALLATION DE SIRONA REMOTE SUR SYSTÈME CLIENT IOS POUR IPAD
Si vous souhaitez installer le logiciel Remote Client sur votre iPad, rendez-vous
dans la boutique en ligne Apple et recherchez Sirona Remote (sous le terme de re-
cherche Sirona). Vous allez trouver dans l’Apple store l’icône Sirona Remote pour
télécharger l’application gratuitement. Téléchargez l’application Sirona Remote
client et installez-la sur votre iPad. Une icône Sirona Remote va s’acher sur votre
iPad.
INSTALLATION DE SIRONA REMOTE SUR SYSTÈME CLIENT ANDROID POUR
TABLETTES TACTILES ANDROID
Si vous souhaitez installer le logiciel Remote Client sur votre Tablette Android, ren-
dez-vous dans la boutique en ligne Google play et recherchez Sirona
Remote (sous le terme de recherche Sirona).. Vous allez trouver dans la
boutique en ligne Google play l’icône Sirona Remote pour télécharger
l’application gratuitement. Téléchargez l’application Sirona Remote client et instal-
lez-la sur votre tablette Android. Une icône Sirona Remote va s’acher sur votre
tablette Android.
nLe streamer et Windows Client contrôlent la disponibilité de mises à jour
lorsque les PC sont sur Internet.
niOS et Android contrôlent la disponibilité de mises à jour dans les App Stores
respectifs.
ENGLISHDEUTSCHFRANÇAISESPAÑOLITALIANO
1. Assurez-vous que le client et le PC streamer se trouvent dans le même réseau
local (un réseau WLAN dans la plupart des cas).
2. Ouvrez Sirona Remote sur votre client.
Lorsque vous ouvrez l’application, la liste
des streamers s’ache. La détection des
streamers ne devrait pas durer plus de 60
secondes. Le client reconnaît automati-
quement les streamers accessibles dans
le même réseau local. Si vous n’avez instal-
lé qu’un seul streamer, il ne devrait appa-
raître qu’un seul PC de streaming sur votre
PC client, iPad ou tablette Android.
3. Pour établir la connexion, vous devez entrer le code de sécurité que vous avez
défini dans votre streamer.Cliquez sur le streamer avec lequel vous souhaitez
établir une connexion.
Pour la version Windows, cliquez sur «Connecter» et tapez le code de
sécurité dans le champ qui s’ouvre.
Pour les appareils iOS et Android, il apparaît immédiatement un champ dans
lequel vous devez taper le code de sécurité.
4. L’image du PC de streaming se retrouve sur votre PC client / tablette.
CONNEXION DU CLIENT
AU STREAMER
Après le redémarrage, le client apparaît sous forme d‘icône de
programme sur l‘ordinateur de bureau, sur votre iPad ou votre
tablette Android. Pour connecter le client à votre PC de streaming,
vous devez exécuter les étapes suivantes.
16 I 17

La stabilité de la liaison entre le client (destinataire) et le streamer (PC expéditeur)
dépend fortement de l’équipement (WIFI) de l’infrastructure informatique. En cas
d’interruption de la liaison, par exemple, adressez-vous à votre service informatique.
RÉGLAGES DES PARAMÈTRES AUDIO
Les paramètres audio peuvent être transmis au système client depuis le streamer ou
se limiter au seul streamer. Il s’agit d’un réglage du streamer pouvant être configuré
manuellement par l’utilisateur. La transmission des paramètres audio au système
client représente la configuration par défaut. Il est possible de modifier ce paramètre
nsi vous ouvrez le streamer sur votre streamer PC (AC, CEREC AF etc.) en
cliquant sur l’icône Splashtop de la zone de notification,
nallez dans paramètres,
ncochez l’option de votre choix en matière de préférence audio.
Les paramètres audio vont être aectés au streamer ou au client lors du
redémarrage, suivant ce qui a été défini lors de la session précédente.
RÉGLAGES DES PARAMÈTRES DE RÉSOLUTION
La résolution de l’écran du système client n’a pas d’influence sur la résolution du
streamer, la résolution d’origine du streamer va être conservée par défaut sur le
streamer PC lorsque vous vous connectez au client avec le streamer. Pour une
prise en charge du mode plein écran, rendez-vous sur la barre de symboles et
cliquez sur l’icône plein écran que vous voyez entourée dans l’image suivante :
Si vous décidez d’optimiser la résolution du système client, vous pouvez le faire en
adoptant les étapes suivantes :
1. Vous ouvrez Sirona Remote sur votre système client.
2. Recherchez à partir de quel streamer vous souhaitez ajuster la résolution
client. Rendez-vous dans l’imagette propriétés de l’ordinateur, située à la droite
de la banderole du streamer. Une fenêtre va s’ouvrir avec un menu déroulant
situé en bas pour les sélections de résolution.
3. Choisissez la résolution qui doit être prise en charge par le client. Le choix d’une
solution unique représente la meilleure solution pour votre ordinateur local.

ENGLISHDEUTSCHFRANÇAISESPAÑOLITALIANO
DÉPLACER L’APPLICATION VERS L’ÉCRAN D’UN SECOND PC CLIENT
Vous êtes susceptible de disposer de deux écrans au niveau de la station de travail
de votre cabinet, un écran au niveau du PC de votre poste de travail et un écran au
niveau du fauteuil.
Vous pouvez reproduire l’écran de votre streamer PC sur le deuxième écran de la
station de travail de votre PC, situé au niveau du fauteuil. L’application Windows Client
eectue une sauvegarde de la dernière position de sa fenêtre lors de la fermeture.
Ainsi, si vous déplacez la fenêtre Windows client du logiciel Sirona Remote vers le 2ème
écran (étendu) du PC client, le redémarrage dans cet écran sera automatique.
Pour ce faire, vous pouvez déplacer la fenêtre de l’application Sirona Remote d’un
écran à l’autre, à l’endroit où vous souhaitez reproduire votre écran streamer PC.
CONNEXION AUTOMATIQUE
Si un code de sécurité est défini sur le streamer, l’utilisateur devra le saisir sur le
système client pour permettre la connexion. Il existe une option permettant de
sauvegarder/rappeler le code de sécurité de façon à ce qu’au deuxième démarrage,
le client se connecte automatiquement sans nouveau rappel du code de sécurité
inchangé. Si le code sur le serveur est modifié ultérieurement, le code devra de
nouveau être saisi par l’utilisateur.
CHANGER DE SYSTÈME CLIENT
Si un deuxième système client essaye de se connecter au même serveur, seul le
premier sera connecté. Si vous souhaitez par exemple déplacer l’unité de prise
d’empreinte CEREC AC d’une salle d’opération à l’autre et souhaitez connecter un
système client diérent avec l’unité CEREC AC, il vous faut d’abord déconnecter le
client du streamer avant de déplacer l’unité de prise d’empreinte CEREC AC dans
une salle d’opération diérente. Déplacez l’unité CEREC AC dans une salle d’opéra-
tion diérente et lancez le système client qui va rechercher les streamers. Connec-
tez le client avec le streamer.
Pour la version la plus récente du Sirona Remote Manual, allez sur sirona.com
18 I 19
INSTALACIÓN
nStreamer y Windows Client no deben instalarse en el mismo PC.
nAsegúrese de que el monitor del PC de su consulta (en el que “refleja”) tiene
una calidad y resolución buenas, especialmente si, p. ej., configura el margen
de la preparación o un diseño en ese monitor.
nNo use Sirona Remote si talla las restauraciones con la red de tallado Mcxlnet/WLAN.
INSTALACIÓN DEL STREAMER DE SIRONA REMOTE
1. Inserte el DVD en la unidad de CD del PC
en el que desea ejecutar el streamer.
Puede ser el CEREC AC, el CEREC AF/AI
u otro PC Sirona. Se inicia el proceso de
instalación automática y se mostrará la
siguiente ventana en la pantalla. Si
este no es el caso, por favor, ejecute el
archivo Autorun.exe.
2. Haga clic en el botón “Instalar Streamer” y siga
el proceso de instalación de Splashtop. Un paso
de la instalación se llama “Choose Installation
Option”. Seleccione aquí “All users”. Una vez fi-
nalizada la instalación, el streamer de
Windows se ejecutará automáticamente en el
proceso de inicio, es decir, se iniciará a través
El software Sirona Remote se instala de forma muy rápida y sencilla.
Con la instalación correcta del software, el streamer (SENDER) se
conecta rápidamente con el client (RECIPIENT). Para ello, ambos
deben encontrarse en la misma red local. Si tiene algún problema,
póngase en contacto con el proveedor de servicios de TI para solicitar
ayuda.
Table of contents
Languages:
Popular Dental Equipment manuals by other brands


Durr Dental
Durr Dental CA 4 Installation and operating instructions

B.A. International
B.A. International Ultimate BA-102 Operation manual

GLO
GLO PRO WHITE PLATINUM user manual

Durr Dental
Durr Dental VistaRay 5 Installation and operating instructions

Heka Dental
Heka Dental UnicLine 5D OPERATING AND TECHNICAL INSTRUCTIONS

Renfert
Renfert SYMPRO Operating and safety instructions


