Spokey FIT Line ARLINGTON User manual

PL
EN
CZ
SK
LT
LV
RU
1
…7
12
18
................................................ 23
ELIPSINIS TRENIRUOKLIS .......................................... 28
ERIS.................. 33
SCHEMAT / DIAGRAM / / SCHEMA / .. A-B
ARLINGTON
Model / / Modelis: 84650

1
PL
PL
1.
2.
zasadne jest
3.
4.
5.
m wolnej przestrzeni z
6.
7. i kontrolom.
8.
zenia.
9.
10. 150 kg.
11. Podczas podnoszenia lub
12.
rehabilitacyjny.
13.
zestawie.
14. jakikolwiek ich element.
PONOSIMY ODPOWIEDZIALN
DANE TECHNICZNE
Waga netto 51 kg
9 kg
149 x 62 x 157 cm
- 150 kg
(schemat –str. A-B)
NR
NR
NR
A
Licznik
1
E-3
1
I-18
4
A-1
4
E-4
1
I-19
2
B
Kolumna kierownicy
1
E-5
1
I-20
2
B-1
1
E-6
1
I-21
2
B-2
kierownicy
1
E-7
ornik
1
I-22
2
B-3
Tuleja
1
E-8
1
I-23
4
B-4
4
E-9
1
I-24
4
B-5
2
E-
10
1
I-25
4
B-6
2
E-
11
3
I-26
Tuleja
2
B-7
1
F
1
J
1
B-8
3
F-1
1
J-1
2
C
Kierownica
2
F-2
Tuleja
1
J-2
Uchwyt piankowy
2
C-1
2
F-3
1
J-3
2
C-2
Czujnik pulsu
2
F-4
2
J-4
2
C-3
1
F-5
1
J-5
Tuleja
4
C-4
1
F-6
2
J-6
1
C-5
Uchwyt piankowy
2
F-7
2
J-7
2
D
1
F-8
2
J-8
2
D-1
kierownicy
1
G
Przedni stabilizator
1
J-9
2
D-2
1
G-1
4
J-10
4
D-3
8
G-2
Regulowane podstawki
4
K
1
D-4
7
G-3
4
L
1

2
PL
D-5
1
G-4
2
L-1
2
D-6
1
G-5
2
L-2
2
D-7
1
G-6
Tuleja
2
L-3
1
D-8
1
G-7
Rolki transportowe
2
L-4
Tuleja
2
D-9
2
H
Tylni stabilizator
1
L-5
2
D-10
1
I
1
M
1
D-11
Wspornik
1
I-1
2
M-1
1
D-12
Magnes
1
I-2
2
N
1
D-13
1
I-3
2
N-1
5
D-14
1
I-4
8
N-2
Regulator
2
D-15
3
I-6
2
N-3
Tuleja
1
D-16
Pasek
1
I-7
2
N-4
1
D-17
1
I-8
2
N-5
1
D-18
1
I-9
2
N-6
1
D-19
Zasilacz
1
I-12
4
N-7
Tuleja
1
D-20
1
I-13
2
O
1
2
D-21
2
I-14
2
O-1
8
E
1
I-15
4
O-2
8
E-1
2
I-16
4
O-3
2
E-2
1
I-17
4
O-4
2
O-5
2
(rysunki: str. C-D)
:
KROK 1 ---
stabilizatorem (H).
Przedni stabilizator posiada rolki transportowe.
KROK 2 -7, D--5),
--4).
--2).
KROK 3 --
---6).
-3, J--4, J-10).
KROK 4 Kolejny etap to p-7).
----5).
KROK 5 -3, M----
(I-17).
KROK 6 --
-3).
-2, B--8, I-4).
KROK 7 Kolejnym kro kolumny kierownicy (C-4, B-
-1).
asilania
wybrane miejsce.
INSTRUKCJA TRENINGU
kondycja fizyczna,
FAZA ROZGRZEWKI
ania
ud i kolan

3
PL
FAZA TRENINGU
wyznaczonej strefy.
-20 minut.
ODPOCZYNEK
przynajmniej trzy razy w tygodniu.
BDZENIA
POZYCJA
wyprostowane plecy
R
odpoczynku, ale pod koniec fazy treningu n
poziomie.
UTRATA WAGI
REGULACJAOPORU
niski zmniejsza go.
PIA
SSJI TRENINGOWEJ ORAZ HAMOWANIA
a) Zasilacz
b) Wybór programu UP i DOWN w celu wybrania odpowiedniego programu i ENTER w celu potwierdzenia swojego wyboru.
c) Przyciski
DOWN
-
-wyboru programu treningowego
RECOVERY
START/STOP
UP
-
-wyboru programu treningowego
RESET
MODE/ENTER
- potwierdzenia wybranej funkcji lub programu
-
BODY FAT
-
-
PULS
TARGET ZONE
MAXIMUM
MINIMUM
WIEK

4
PL
d) Program MANUAL (użytkownika) przed
TIME (czas), DISTANCE (dystans), CALORIES (kalorie), PULSE (puls).
FUNKCJE LICZNIKA (Rysunki str. E-G)
AE/(ON/OFF)
2-
(Rys. 1)
zasilania.
FUNKCJE
1. -
2. DISTANCE (dystans) -
3. TIME (czas) - (0:00~99:59)
4. CALORIES (kalorie) -
5. PULSE (puls) - uchwytach kierownicy. (P~30~230)
6. RPM
7. WATT -
8. RECOVERY -
9. BODY FAT
10. czterech (U1~U4)
11. H.R.C.
PROGRAM MANUAL
1.
2.
3.
P(U1~U4) (SELECT USER)
1.
2.
3.
4. przycisku MODE/ENTER.
5. h. (Rys. 3)
6. - TIME (czas), DISTANCE (dystans), CALORIES (kalorie),
W celu wyzerowania wprowadzo
7. MANUAL PROGRAM USER PROGRAM H.R.CWATT (Rys. 4)
PROGRAMY YTKOWANIA (Rys. 5)
1.
2.
3. Gdy wybrany
4.
5.
6.
7.
▲USER speed >PC RPM
●USER speed = PC RPM
▼USER speed <PC RPM
8. Gdy TIME (czas)
INDYWIDUALNY PROGRAM U (Rys. 6)
1.
2.
3.
MODE/ENTER.
4.
5.

5
PL
6.
7.
▲USER speed >PC RPM
●USER speed = PC RPM
▼USER speed <PC RPM
8.
licznik)
PROGRAM H.R.C. CZYLI (Rys. 7)
W
procentach: 55%, 75%, 90%, TARGET (cel). Poprzez
Po
PROGRAM BODY FAT (Rys. 8)
1.
2. "- - - - - - - - " przez 8 sekund.
3.
4.
5.
6. - na czujnikach pulsu.
PROGRAM RECOVERY (Rys. 9)
na -F6 (najgorszy).
Uwaga:
Zasilacz przeznaczony do zasilania licznika:
230V/50Hz or 60Hz Output: 6V AC/0.5A.
KONSERWACJA
1.
2.
. Licznik nale
3.
4.
5. dolnym przewodem.
UWAGA:
za kabel. W przypadku uszkodzenia,
SYMBOL
NISKI
WYSOKI
<13%
13%-25.8%
26%-30%
>30%
KOBIETA
<23%
23%-35.8%
36%-40%
>40%

6
DOKUMENT GWARANCYJNY:
1. Producent (Gwarant) :
ul.
tel. 32 317 20 00
NIP 731 11 59 686
REGON 471323630
2.
3. ARLINGTON (84650)
1. aniczne
2. elementach
3. najmniej
4.
5.
Gwaranta, po uzgodnieniu z Gwarantem, telefonicznie pod numerem serwisu 32 317 20 34 lub 32 317 20 33 trybu i terminu odbioru towaru.
6.
7.
8. ce
z niniejszej gwarancji w terminie kolejnych 7 dni. W przypadku uznania reklamacji, naprawiony przedmiot gwarancji zostanie dostarczony
t
w
9.
mechanicz
10. sza

7
EN
EN
INSTRUCTION MANUAL
Please keep this instruction manual for future reference.
This product is exclusively intended for home use.
SAFETY REMARKS
1. Prior to the assembly of the device and training, read carefully this instruction manual. Safe and effective use of the device can be guaranteed only if it is assembled,
maintained, and used appropriately, in a manner described in the manual. If you are not the user, please provide all the users with this instruction and inform them about
all possible hazards and precautions.
2. Prior to starting with any exercises, please consult a doctor in order to make sure that there are no mental or physical conditions that could be harmful to your health and
safety. The consultancy with a doctor may also protect you against an inappropriate use of the device. A doctor will specify whether taking drugs that would have an
effect on pulse, pressure or cholesterol level is justified.
3. Pay attention to your body signals. Inappropriate or excessive training may have a negative influence on your health. Immediately stop exercising if any of the following
symptoms occurs: pain, chest constriction, irregular pulse, exceptional shortness of breath, faints, vertigo, nausea. If any of the above symptoms occurs, contact your
doctor immediately and give up training until then.
4. Children and animals should be kept away from the device. The device is intended only and exclusively for adults.
5. The device should be placed on a straight, stable and tough surface, protected with a mat or a carpet. For the sake of safety, 2 m of free space, needed for a safe usage,
should be left to each side around the device. Prior to starting any exercises, make sure that all the bolts and nuts are tightly fitted. Please, pay special attention to the
parts that are prone to wearing out the most.
6. An appropriate safety level of this device may by guaranteed only if it is subject to regular service and inspection.
7. The device should be always used in accordance with its purpose. Should during the assembly or use any of the parts appear to be faulty or make alarming sounds, stop
using the exerciser and have it serviced . You must not use a damaged device.
8. During training, wear appropriate clothes. Avoid loose clothes that could get caught in the device or such that could restrict or even make movement impossible. It is also
advised to exercise in appropriate sport shoes. At the beginning, set a slow pace. During exercises, hold handgrips and do not leave the saddle.
9. mounts to 150 kg.
10. Take special precautions while lifting and moving the device. The device should be always moved by two persons. While lifting or moving the equipment, maintain an
appropriate posture so as to avoid backbone damage.
11. The equipment was counted among class H and A and is intended for home use exclusively. It cannot be used as a therapeutic or rehabilitation equipment.
12. While assembling the device, strictly follow the enclosed instruction and use only the parts included in the set. Prior to the assembly, check whether the set contains all
the parts that the enclosed list includes.
13. It is advised against leaving control devices, which could restrict movement, in such a position that any of the elements sticks out.
WARNING: PRIOR TO STARTING A TRAINING ON THIS DEVICE, READ THE INSTRUCTION MANUAL CAREFULLY.WE DO NOT HOLD RESPONSIBILITY FOR
INJURIES OR DAMAGES TO OBJECTS CAUSED BY AN INAPPROPRIATE USE OF THIS PRODUCT. BODY INJURIES MAY HAPPEN DUE TO AN INAPPROPRIATE OR
TOO INTENSIVE TRAINING.
TECHNICAL SPECIFICATIONS
Net weight 51 kg
Flywheel 9 kg
Dimensions of the assembled exercise machine 149 x 62 x 157 cm
Maximum weight of the user 150 kg
LIST OF PARTS (Diagram p. A-B)
ITEM
DESCRIPTION
QUANTIT
Y
ITE
M
DESCRIPTION
QUANTIT
Y
ITEM
DESCRIPTION
QUANTIT
Y
A
Counter
1
E-3
Flat washer
1
I-18
Bolt
4
A-1
Screw
4
E-4
Spring washer
1
I-19
Bolt
2
B
Steering column
1
E-5
Screw
1
I-20
Spring washer
2
B-1
Rear cover of the
handlebar
1
E-6
Screw
1
I-21
Flat washer
2
B-2
Front cover of the
handlebar
1
E-7
Spring bracket
1
I-22
Roller
2
B-3
Sleeve
1
E-8
Spring
1
I-23
Bolt
4
B-4
Screw
4
E-9
Screw
1
I-24
Flat washer
4
B-5
Flat washer
2
E-10
Flat washer
1
I-25
Bearing
4
B-6
Washer
2
E-11
Nut
3
I-26
Sleeve
2
B-7
Top sensor cable
1
F
Set of magnets
1
J
Left side arm
1
B-8
Screw
3
F-1
Flat washer
1
J-1
Hole plug
2
C
Handlebar
2
F-2
Sleeve
1
J-2
Foam grip
2
C-1
Hole plug
2
F-3
Flywheel controller
1
J-3
Front cover of the side arm
2
C-2
Pulse sensor
2
F-4
Screw
2
J-4
Rear cover of the side arm
2
C-3
Screw
1
F-5
Screw
1
J-5
Sleeve
4
C-4
Bottom sensor cable
1
F-6
Flat washer
2
J-6
Handlebar axle
1
C-5
Foam grip
2
F-7
Spring
2
J-7
Handwheel
2
D
Main frame
1
F-8
Screw
2
J-8
Hole plug
2
D-1
Steering column cover
1
G
Front stabilizer
1
J-9
Washer
2
D-2
Bottom sensor cable
1
G-1
Front stabilizer ends
4
J-10
Screw
4
D-3
Screw
8
G-2
Adjustable stands
4
K
Right side arm
1
D-4
Screw
7
G-3
Hole plug
4
L
Left base of the pedal
1
D-5
Left cover
1
G-4
Nut
2
L-1
Cover of the pedal left base
2
D-6
Roller
1
G-5
Roller
2
L-2
Cover of the pedal right base
2
D-7
Flat washer
1
G-6
Sleeve
2
L-3
Left pedal
1

8
ENEN
D-8
Curved washer
1
G-7
Castors
2
L-4
Sleeve
2
D-9
Bearing
2
H
Rear stabilizer
1
L-5
Cover
2
D-10
Screw
1
I
Metal cover
1
M
Right cover of the pedal
1
D-11
Bracket
1
I-1
Flat washer
2
M-1
Right pedal
1
D-12
Magnet
1
I-2
Spring washer
2
N
Flywheel
1
D-13
Roller
1
I-3
Bolt
2
N-1
Nut
5
D-14
Axle
1
I-4
Screw
8
N-2
Controller
2
D-15
Screw
3
I-6
Bolt
2
N-3
Sleeve
1
D-16
Belt
1
I-7
Flat washer
2
N-4
Bearing
1
D-17
Right cover
1
I-8
Washer
2
N-5
Flywheel axle
1
D-18
Wire
1
I-9
Curved washer
2
N-6
Bearing
1
D-19
Power supply
1
I-12
Nut
4
N-7
Sleeve
1
D-20
Sensor box
1
I-13
Flat washer
2
O
Middle part of the cover 1
2
D-21
Screw
2
I-14
Screw
2
O-1
Screw
8
E
Belt pulley set
1
I-15
Flat washer
4
O-2
Flat washer
8
E-1
Curved washer
2
I-16
Spring washer
4
O-3
Middle part of the cover 2
2
E-2
Belt pulley
1
I-17
Knob
4
O-4
Nut
2
O-5
Middle part of the cover 3
2
INSTALLATION INSTRUCTIONS (Pictures p. C-D)
For installation, use the following tools:
STEP 1 Connect the front stabilizer (G) with the main frame (D) by using two bolts (I-23), a washer (I-24) and a nut (I-12). Then repeat this procedure for the rear stabilizer
(H). The front stabilizer has castors.
STEP 2 Please install the handlebar column cover (B-7, D-2). Then connect the front column (B) with the main frame by using two flat washers (B-5), two semicircular
washers (B-6), and four bolts (B-4).
Note: Please remember about connecting the protruding wires carefully: the bottom wire (B-7) and the top wire (D-2).
Please exercise extreme caution when installing the handlebar column to prevent accidental damage to cables.
STEP 3 The next step of installation is to join side arms (C, J) with the steering column (B) using an axle (J-6), two curved washers (I-9), two washers (I-8), two flat washers
(I-7) and two bolts (I-6).
Then please install the side arm covers (J-3, J-4) using the bolts (I-4, J-10).
STEP 4 The next step is to connect side arms (K, J) with their bases (L, M) using the knobs (J-7). Then screw the pedal bases (L, M) to the pins with two flat washers (I-21),
two spring washers (I-20) and two bolts (I-19). Please remember to add guards (L-5).
STEP 5 The next step is to screw the pedals (L-3, M-1) to their bases (L, M) using 4 bolts (I-18), flat (I-15) and spring (I-16) washers, as well as knobs (I-17).
STEP 6 Please install the handlebar (C) on the front column using a metal cover (I), two flat washers (I-1), two spring washers (I-2) washers and two bolts (I-3).
The next step is to install the handlebar column cover (B-2, B-1) using screws (B-8, I-4).
STEP 7 otruding wires from the handlebar column (C-4, B-7). Then please install the counter (A) at the top of the
handlebar column using four bolts (A-1).To start your exercises, connect the power supply to a power source.
MOVING THE DEVICE
Lift the bicycle carefully onto the front transport wheels and holding it on both sides, move it to a chosen place.
TRAINING INSTRUCTION
Following a TRAINING CYCLE brings many benefits to your health such as: physical fitness, muscles firming and combined with calorie absorption control weight loss.
WARM-UP PHASE
This stage guarantees an appropriate blood flow through the body and ensures an appropriate muscles work. The warm-up phase reduces the risk of contractions and
muscle damages. It is recommended to do a few stretching exercises, according to the drawings presented below. Each position should be hold for approximately 30 seconds
and muscles should not be strained or pulled during the exercises. As soon as you feel any pain, stop exercising immediately.
Stretching the thigh
and butt muscles
Stretching the thigh
and knee muscles
Stretching the calf
muscles
Stretching the
thigh muscles
Stretching your
upper body
Stretching leg muscles
TRAINING PHASE
This stage requires effort. After some time of regular training, your leg muscles will become
more flexible. You should exercise at your own pace, but it is important to keep the same pace
constantly. During exercises, pulse rate should fall within the determined zone.
This stage should last at least 12 minutes, however, in case of the majority of people, it may last
between 15-20 minutes.
RESTING PHASE
This stage allows to re-establish the normal pulse rate and cool down the muscles. This stage is
PULSE
TARGET ZONE
MAXIMUM
MINIMUM
AGE

9
EN
a repetition of the warm-up phase and should last for about 5 minutes. Stretching exercises should be redone and you must remember not to strain muscle.
It is recommended to have a training at least three times a week.
DEVICE ERROR
If on the display screen no readout appears, make sure that all the cables are connected appropriately.
BODY POSITION
Place your feet on the pedals and grasp the handles with your hands. Exercise by moving your feet and hands alternately. You should have your back straight
while exercising.Exercising on a fitness trainer is a great alternative to exercises performed on a traditional trainer.
MUSCLES FIRMING
In order to firm your muscles during a training, resistance needs to be considerably increased. It results in a greater muscle tension, but, as a consequence, you may not be
able to train as long as you would like to. If you also want to train your physical fitness, change your training programme. As usual, training should comprise warm-up phase,
training phase, and resting phase, however, at the end of the training phase, resistance should be increased so as to increasork. Speed should be reduced so that
the pulse rate can be kept on the determined level.
WEIGHT LOSS
Effort that needs to be put into exercises constitutes an important factor at this point. The longer and harder you train, the more calories you burn. Achieving the same
effectiveness as in case of cardiovascular training is the success.
USAGE
RESISTANCE ADJUSTMENT
The function of intensity regulation allows you to change pedal resistance. High resistance requires a greater effort during pedalling while a low one reduces the needed
effort. Resistive force can be regulated by means of the computer. To achieve a satisfying result, intensity should be adjusted during workout, by means of knob UP (+) and
DOWN (-).
LEVELLING
Prior to a training, it is advisable to check whether the position of the device is appropriate. Please, level the device by means of
the rear stabilizer end caps. Braking system is independent of speed.
MANNER OF FINISHING TRAINING SESSION AND BRAKING
In order to stop the exerciser, stop pedalling. The bicycle is not equipped with a blocking system and a safety brake
HOW TO OPERATE THE BIKE METER
a. Power supply in order to use the computer functions, before starting a workout session, plug the power supply into an
electrical outlet. After the above mentioned action has been completed, the display screen will switch on and make a specific
sound immediately after being switched on.
b. Programme choice Please, use UP and DOWN buttons to choose an appropriate programme and press ENTER to confirm
your choice.
c. Buttons
DOWN
This button allows you to:
- reduce the entered value
-choose a workout programme
RECOVERY
Press the RECOVERY button in order to check the status of heart beat rate
START/STOP
Press the START/STOP button in order to start or end a workout session.After pressing the button, exercises can be started. All the
UP
This button allows you to:
- increase the entered value
-choose a workout programme
RESET
Press the RESET button to reset values
MODE/ENTER
Press the MODE / ENTER button to::
- confirm selected function or programme
- confirm the entered value
BODY FAT
Press BODY FAT button in order to:
- calculate the indicator of fat
- change the output data of the user
d. MANUAL (user’s) programme before starting any exercises, by means of the UP and DOWN buttons, values that you want to achieve in case of the following functions:
TIME, DISTANCE, CALORIES, PULSE can be set.
Each time, after reaching the particular value of a function, the computer will make a specific sound and stop counting.
In the case when one of the values of the above mentioned functions has been reached and the other have not been reached yet, press the START/ STOP button in order to
continue exercising.

10
EN
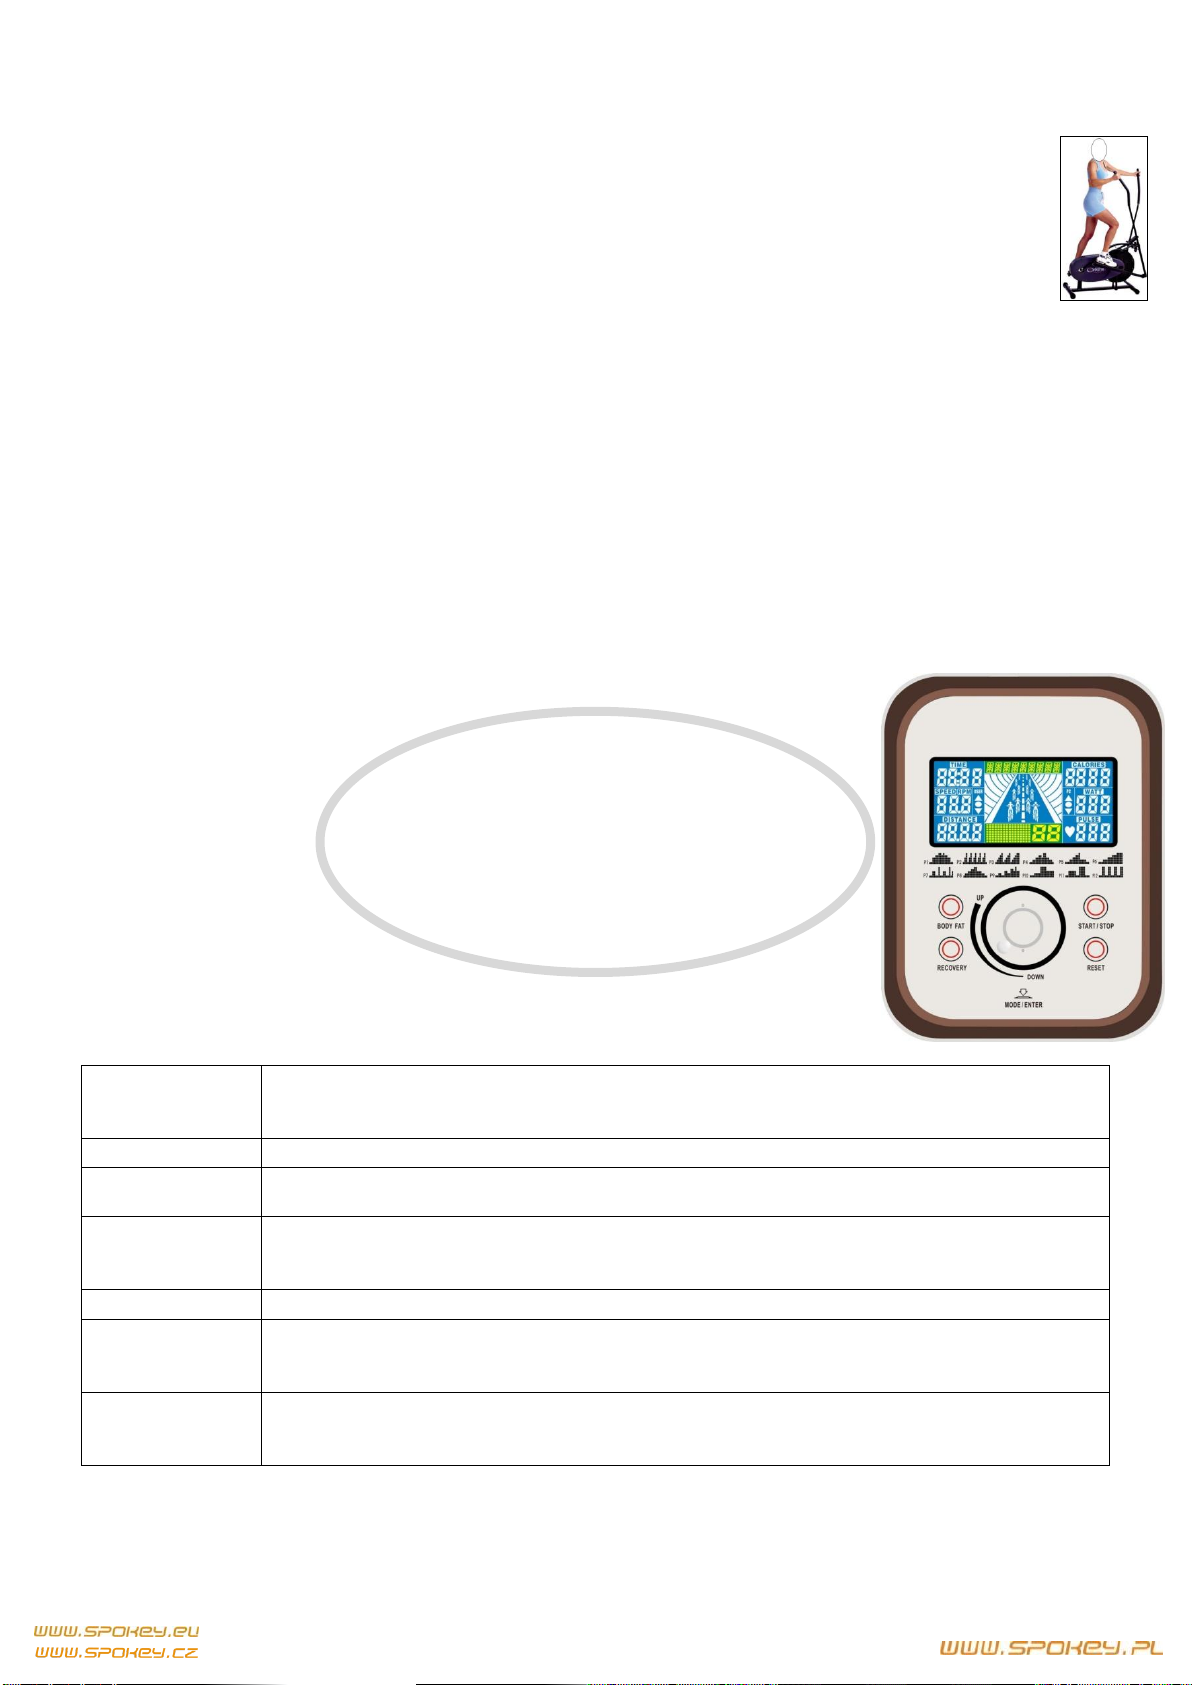
COUNTER FUNCTIONS (PICTURES P. E-G)
AUTOMATIC ON /OFF
The display turns on automatically when you: connect the power supply to a power source, begin to move the pedals, or press any key. After having switched the counter
on, it will emit 2-second signal and all the indicators will come on.
You can start your exercises after you click the START button. All values will be counted from zero. (Pict. 1)
The display turns off automatically when you discontinue your training for longer than 4 minutes or when you disconnect the power supply from the power source.
FEATURES
1. SPEED - Displays the current speed at which your exercises are being performed (0,0~99,9 km/h)
2. DISTANCE - Displays the distance run during your training (0,00~99,99 km)
3. TIME - Displays your workout time (0:00~99:59)
4. CALORIES - Displays calories burned during an exercise (0~999)
5. PULSE - Displays your current pulse. The pulse is measured by sensors placed in the grips of the handlebar. (P~30~230)
6. RPM Displays the current number of revolutions per minute (0~15~999)
7. WATT - energy consumption including time, distance and calories burnt (10~350)
8. RECOVERY - i.e. the measurement of your heart rate at rest with the evaluation of the physical performance
9. BODY FAT level of fat
10. NUMBER OF USERS four (U1~U4)
11. H.R.C. the measurement of your heart rate at rest with the evaluation of the physical performance
MANUAL PROGRAMME
1. During the exercises, you can change the resistance level by pressing the UP or DOWN buttons.
2. Before starting your exercises, you can set the desired value for the following functions to achieve:
TIME, DISTANCE, CALORIES, PULSE by using the UP and DOWN knob. Confirm the chosen value with ENTER button.
3. After entering all the values, please press the START button to begin the exercise. During your exercise training, all the values will be counted down.
THE USERS PROGRAMMES (U1~U4) (SELECT USER)
1. selection of the user. (Pict. 2)
2. Choosing the right number can be done by using the UP and DOWN buttons; confirm it with the MODE/ENTER button.
3. Before starting your exercises, enter the following data: sex, age, height, and weight.
4. Confirm the selected programme and values entered by pressing the MODE/ENTER buttons.
5. Then the display will show "Select workout". The user can press the MODE button to enter the selected data. (Pict. 3)
6. Before starting your exercises, you can freely set the values you want to achieve - TIME, DISTANCE, CALORIES, PULSE, RESISTANCE using the UP and DOWN knob.
The chosen value is confirmed by pressing the MODE/ENTER button. The entered values will be counted down to zero. In order to reset the entered values, press the
RESET button.
7. To start the exercise, you should select the following by using the UP and DOWN buttons: MANUAL PROGRAM USER PROGRAM H.R.CWATT (Pict. 4)
.
PROGRAMMES basic rules of the operation (Pict. 5)
1. Select the right programme (from P1 to P12) by using the UP, DOWN knob.
2. The selected programme is confirmed by pressing the MODE/ENTER button.
3. When the selected profile will flash, the user can adjust the level of resistance.
4. The time of exercise is determined, i.e. 20 minutes.
5. After having started the session, its duration will be counted down.
6. After having started the session, its duration will be counted down.
7. The user should keep track of two values: USER Speed and PC RPM (revolutions per minute).
▲USER speed >PC RPM the user must slow down
●USER speed = PC RPM
▼USER speed <PC RPM the user must speed up
8. When TIME intended for the exercise ends, i.e. it amounts to zero, the counter will be beeping for 8 seconds. The display will show one of the following results:
PC WIN USER WIN
INDIVIDUAL USERS PROGRAMME (Pict. 6)
1. Select the right USER PRO programme by using the UP, DOWN knob.
2. The selected programme is confirmed by pressing the MODE/ENTER button.
3. Before starting any exercises, the user can set the desired level of resistance by using the UP and DOWN knob. The chosen value is confirmed by pressing the
MODE/ENTER button.
4. The time of exercise is determined, i.e. 20 minutes.
5. After having started the session, its duration will be counted down.
6. After having started the session, its duration will be counted down.
7. The user should keep track of two values: USER Speed and PC RPM (revolutions per minute).
▲USER speed >PC RPM the user must slow down
●USER speed = PC RPM
▼USER speed <PC RPM the user must speed up

11
EN
8. When TIME intended for the exercise ends, i.e. it amounts to zero, the counter will be beeping for 8 seconds. The display will show one of the following results:
PC WIN USER WIN
H.R.C. PROGRAMME,I.E.THE MEASUREMENT OF THE HEART RATE AT REST AND THE EVALUATION OF THE PHYSICAL PERFORMANCE (Pict. 7)
To select a programme called H.R.C. you should choose an appropriate programme and confirm your choice by pressing the MODE button. In order to use this feature, you
must enter your age. Starting value for age is 20 years old. To set a correct value, use the UP/DOWN knob and confirm the selected value by pressing the MODE button.As a
result, the previously entered data is displayed as a percentage value: 55%, 75%, 90%, TARGET. By turning the UP/DOWN knob, the value can be increased, e.g. up to 75%
or 90%.
After having entered the H.R.C. value, which you would like to achieve during your training session, you should exercise at an appropriate pace in order to achieve this value.
Note: If the previously selected programme requires some verification of the HRC level, the display will show NEED H.R.
BODY FAT PROGRAMME (Pict. 8)
1. Please press the BODY FAT button. Then put your both hands on the pulse sensors.
2. The display will show "- - - - - - - - " for 8 seconds.
3. The BODY FAT result will be calculated as a percentage value and BMI.
4. The display will show one of the following results:
5. To return to the main menu, press the BODY FAT button again.
6. Note: The "E-1" means an error, please re-try the BODY FAT function being sure to carefully place your hands on the pulse sensors.
RECOVERY PROGRAMME (Pict. 9)
In order to use this feature, you should press the RECOVERY after finishing a training session, and immediately put both hands on the so-called pulse sensors. All the values
will disappear from the display, apart from the time. Then the counting down of 1 minute (00:60) to 0:00 will start. After this step, the current status of the RECOVERY (i.e.
pulse measurement at rest with the assessment of physical performance) will be displayed. Available levels: F1 (the best) - F6 (the worst).
To return to the main menu, press the RECOVERY button again.
Note: if the display will show the letter "P" or "ERR", this means that the counter has not received a signal from the pulse sensors. In this case, please repeat the procedure
from the beginning and ensure that both of your hands are placed on the pulse sensors.
Computer power supply:
230V/50Hz or 60Hz Output: 6V AC/0.5A In the event when the display screen fails to switch on, unplug the power supply from the electrical outlet and wait 15 seconds.
MAINTENANCE
1. Prior to each use of the bicycle, make sure that all the bolts, nuts and knobs are tightly fitting.
2. Aggressive cleaning products must not be used to clean the device. Use a soft, damp cloth to remove dirt and dust. Clean sweat traces since acidic pH may damage the
upholstery.
3. The device should be kept in a dry place in order to protect it against dampness and corrosion.
4. Should the computer work incorrectly, make sure that all the cables are connected appropriately, especially the upper cable with the computer. If the computer still does
not work, make sure that batteries have been put in appropriately and that they are not worn-out. If the readout on the display screen is not legible or some elements are
invisible, replace batteries immediately.
5. In case of no resistance adjustment, make sure that the upper sensor cable is well connected with the lower cable.
CAUTION: The device is equipped with a power adapter. Due to the protection of the natural environment, worn-out batteries, power adapters, motors etc. should not be
disposed with household wastes. Worn-out batteries, power adapters, motors etc. should be taken to a point that will utilise them in agreement with the enforceable law on
environmental protection. It is recommended to check the power cord and the plug periodically. Never pull the cord. In case of damage, the device should not be used. Never
SYMBOL
sex LEVEL OF FAT %
LOW
LOW/MEDIUM
MEDIUM
HIGH
MALE
<13%
13%-25.8%
26%-30%
>30%
FEMALE
<23%
23%-35.8%
36%-40%
>40%

12
RU
RURU
o.
1.
2.
3.
4.
5.
2 a
6.
7.
8. -
9.
10. 150
11.
12. H A
.
13. , .
14.
51
9
149 x 62 x 157
- 150
A-B)
-
-
-
A
1
E-3
1
I-18
4
A-1
4
E-4
1
I-19
2
B
1
E-5
1
I-20
2
B-1
1
E-6
1
I-21
2
B-2
1
E-7
1
I-22
2
B-3
1
E-8
1
I-23
4
B-4
4
E-9
1
I-24
4
B-5
2
E-10
1
I-25
4
B-6
2
E-11
3
I-26
2
B-7
1
F
1
J
1
B-8
3
F-1
1
J-1
2
C
2
F-2
1
J-2
2
C-1
2
F-3
1
J-3
2
C-2
2
F-4
2
J-4
2
C-3
1
F-5
1
J-5
4
C-4
1
F-6
2
J-6
1
C-5
2
F-7
2
J-7
2

13
D
1
F-8
2
J-8
2
D-1
1
G
1
J-9
2
D-2
1
G-1
4
J-10
4
D-3
8
G-2
4
K
1
D-4
7
G-3
4
L
1
D-5
1
G-4
2
L-1
2
D-6
1
G-5
2
L-2
2
D-7
1
G-6
2
L-3
1
D-8
1
G-7
2
L-4
2
D-9
2
H
1
L-5
2
D-10
1
I
1
M
1
D-11
1
I-1
2
M-1
1
D-12
1
I-2
2
N
1
D-13
1
I-3
2
N-1
5
D-14
1
I-4
8
N-2
2
D-15
3
I-6
2
N-3
1
D-16
1
I-7
2
N-4
1
D-17
1
I-8
2
N-5
1
D-18
1
I-9
2
N-6
1
D-19
1
I-12
4
N-7
1
D-20
1
I-13
2
2
D-21
2
I-14
2
-1
8
E
1
I-15
4
-2
8
E-1
2
I-16
4
-3
2
E-2
1
I-17
4
-4
2
-5
2
(. C-D)
GDI-I-I-
H).
B-7, D-BB-
B-4).
B-D-2).
K, JBJ-I-I-
I-I-6).
J-3, J-I-4, J-10).
K, JLJ-
LI-I-I-
L-5)
L--LI-I-I-
I-17).
6 CII-I-I-
3).
B-2, B--8, I-4).
C-4, B-7).
AA-1).
-

14
-
.
UP DOWN.
a. Питатель
b. Выбор программы UP DOWN ENTER, .
c. Кнопки
DOWN
-
-
RECOVERY
RECOVERY
START/STOP
START/STOP
TARGET ZONE

15
RU
UP
-
-
RESET
RESET
MODE/ENTER
-
BODY FAT
BODY FAT :
d. Программа MANUAL (пользователя) UP DOWN
TIME DISTANCE CALORIES PULSE
START/STOP
( E-G)
on/off)
-.
START ( 1)
SPEED
DISTANCE -
TIME
CALORIES
ATLANTA
PULSE () . , . (P~30~230)
RPM - (0~15~999)
WATT , (10~350)
RECOVERY ..
BODY FAT -
- (U1~U4)
H.R.C.
Manual
1. , UP DOWN.
2. : TIME (), DISTANCE (), CALORIES
(), PULSE (), UP DOWN.
3. .
U1~U4) (SELECT USER)
1. select user ( 2)
2. UP, DOWNMODE/ENTER.
3. sexageheightweight).
4. MODE/ENTER.
5. select workutMODE ( 3)
6. - TIME DISTANCE
CALORIES PULSERESISTANCE UP DOWN
MODE/ENTER
RESET.
7. UP DOWNMANUAL -> PROGRAM -> USER PROGRAM -> H.R.C-> WATT
( 5)
1. PPUP, DOWN.
2. MODE/ENTER.
3.
4. time
5. START/STOP.
6.
7. USER Speed PC RPM
USER speed > PC RPM
USER speed = PC RPM
USER speed < PC RPM

16
RU
8. TIME (), , .. , 8 .
PC WIN
USER WIN
( 6)
1. USER PRO UP, DOWN.
2. MODE/ENTER.
3. UP DOWN
MODE/ENTER.
4. time
5. START/STOP.
6.
7. USER Speed PC RPM
USER speed > PC RPM
USER speed = PC RPM
USER speed < PC RPM
8. TIME (), , .. , 8 .
PC WIN
USER WIN
H.R.C ( 7)
H.R.Ca MODE
UP/DOWN, a MODE
TARGET UP/DOWN
H.R.C
H.R.CNEED H.R.
BODY FAT ( 8)
1. BODY FAT
2. ------
3. BODY FAT BMI.
4.
<13%
13%-25.8%
26%-30%
>30%
<23%
23%-35.8%
36%-40%
>40%
5. BODY FAT.
6. E-- BODY FAT
RECOVERY ( 9)
RECOVERY
time
RECOVERY F1
-F
RECOVERY.
PERR
230V/50Hz 60Hz Output: 6V AC/0.5A.
1.
2.
3.
4. -
5.

17

18
CZ
CZ
OBSLUZE
1.
2.
3.
4.
5.
2 m z
6.
7. -
8. souladu s
9.
10. Lavice j150 kg.
11. .
12.
13.
14.
Hmotnost netto: 51 kg
:9 kg
: 149 x 62 x 157 cm
: 150 kg
A-B)
A
1
E-3
1
I-18
4
A-1
4
E-4
1
I-19
2
B
Sloup volantu
1
E-5
1
I-20
2
B-1
1
E-6
1
I-21
2
B-2
1
E-7
1
I-22
Kladka
2
B-3
Pouzdro
1
E-8
1
I-23
4
B-4
4
E-9
1
I-24
4
B-5
2
E-
10
1
I-25
4
B-6
2
E-
11
3
I-26
Pouzdro
2
B-7
1
F
1
J
1
B-8
3
F-1
1
J-1
2
C
Volant
2
F-2
Pouzdro
1
J-2
2
C-1
2
F-3
1
J-3
2
C-2
2
F-4
2
J-4
2
C-3
1
F-5
1
J-5
Pouzdro
4
C-4
1
F-6
2
J-6
Osa volantu
1
C-5
2
F-7
2
J-7
2
D
1
F-8
2
J-8
2
D-1
Kryt sloupu volantu
1
G
1
J-9
2
D-2
1
G-1
4
J-10
4
D-3
8
G-2
4
K
1
D-4
7
G-3
4
L
1
D-5
1
G-4
2
L-1
2
D-6
Kladka
1
G-5
Kladka
2
L-2
2
D-7
1
G-6
Pouzdro
2
L-3
1

19
CZCZ
D-8
1
G-7
2
L-4
Pouzdro
2
D-9
2
H
1
L-5
Kryt
2
D-10
1
I
1
M
1
D-11
Konzola
1
I-1
2
M-1
1
D-12
Magnet
1
I-2
2
N
1
D-13
Kladka
1
I-3
2
N-1
5
D-14
Osa
1
I-4
8
N-2
2
D-15
3
I-6
2
N-3
Pouzdro
1
D-16
1
I-7
2
N-4
1
D-17
1
I-8
2
N-5
1
D-18
1
I-9
2
N-6
1
D-19
1
I-12
4
N-7
Pouzdro
1
D-20
1
I-13
2
O
2
D-21
2
I-14
2
O-1
8
E
1
I-15
4
O-2
8
E-1
2
I-16
4
O-3
2
E-2
1
I-17
4
O-4
2
O-5
2
(-D)
KROK 1 (I- -
KROK 2 -7, D--
--4).
-7) a -2).
KROK 3 - - -8), dvou
--6).
-3, J--4, J-10).
KROK 4 -7).
----5).
KROK 5 D-3, M----
-17).
KROK 6 ---3).
-2, B--8, I-4).
KROK 7 -4, B-7).
-
.
svalstva a ve
na
stehen a kolen
stehen
STEHEN
This manual suits for next models
1
Table of contents
Other Spokey Elliptical Trainer manuals

Spokey
Spokey ZOTMAR User manual

Spokey
Spokey LOTUS User manual

Spokey
Spokey LOTUS+ Mounting instructions

Spokey
Spokey Lunar User manual

Spokey
Spokey LEGANES II User manual

Spokey
Spokey DEMI User manual

Spokey
Spokey VIGO User manual

Spokey
Spokey ALEAR+ Mounting instructions

Spokey
Spokey LOKI User manual

Spokey
Spokey TENGUS User manual

Spokey
Spokey STEREO User manual

Spokey
Spokey ALEAR 928651 User manual

Spokey
Spokey PLANET User manual

Spokey
Spokey GRINGO User manual

Spokey
Spokey VIGO II User manual

Spokey
Spokey JONI User manual

Spokey
Spokey KREKKA User manual

Spokey
Spokey MANTIS User manual

Spokey
Spokey ARC User manual

Spokey
Spokey HADAR User manual