Sport-thieme TTMaxima Operator's manual

Art.-Nr.: 1489301
Instrucciones de montaje y utilización
Instructions for assembly and use
Montage- und Gebrauchsanweisung
Instructions de montage et utilisation
Instruções de montagem e utilizaçã

2
Fig.1

3
Fig.2
Fig.3 Fig.4

4
Fig.5
Fig.6

5
Fig.7
Fig.8

6
Fig.9
Fig.10

7
Español
INSTRUCCIONES DE
SEGURIDAD.-
Antes de comenzar cualquier
programa de ejercicio, consulte a su
médico. Se recomienda la realización
de un examen físico completo.
Trabaje en el nivel de ejercicio
recomendado, no llegue al
agotamiento. Si siente dolor o
molestias de cualquier tipo, pare el
ejercicio inmediatamente y acuda a su
médico.
Utilice el aparato sobre una superficie
sólida y nivelada, con algún tipo de
protección para el suelo o alfombra.
Por razones de seguridad, el equipo
deberá disponer a su alrededor de un
espacio libre no inferior a 1 m.
No permita a los niños jugar con este
aparato o a su alrededor. Mantenga
las manos alejadas de las partes en
movimiento.
Compruebe el equipo antes de
comenzar el ejercicio, para
asegurarse de que se han montado
todas las piezas y que las tuercas,
tornillos, y brazos se han apretado
correctamente antes del uso.
Ningún dispositivo de ajuste que
pueda interferir con el movimiento del
usuario debe sobresalir de la
máquina.
Utilice prendas y calzado apropiados
para el ejercicio físico. No utilice
prendas sueltas. No utilice calzado
con suela de cuero o tacones altos.
Este aparato ha sido probado y
cumple con la norma EN957
adecuado sólo para uso doméstico
IMPORTANTE.-
Lea las instrucciones detenidamente
antes de proceder con el montaje.
Retire todas las partes del cartón de
embalaje e identifíquelas con
respecto al listado, para asegurarse
de que no falta ninguna.
No elimine el cartón hasta haber
montado el equipo completamente.
Utilice el aparato siempre de acuerdo
con las instrucciones. Si encuentra
algún componente defectuoso
durante el montaje o comprobación
del aparato, o si oye algún ruido
extraño durante la utilización, pare.
No utilice este aparato hasta que se
haya solucionado el problema.
INSTRUCCIONES PARA EL
EJERCICIO.-
El uso del equipo le reportará
diferentes beneficios, mejorará su
condición física, tono muscular y,
junto con una dieta baja en calorías.
1. La fase de calenamiento
Esta fase acelera la circulación
sanguínea en el cuerpo y pone a tono
los músculos para el ejercicio.
También reduce el riesgo de
calambres y lesiones musculares. Es
aconsejable realizar algunos
ejercicios de estiramiento, según se
muestra más adelante.

8
Realice cada estiramiento
aproximadamente durante 30
segundos, no fuerce los músculos. Si
siente dolor, PARE.
2. La fase de ejercicio.
En esta fase se realiza el esfuerzo
más importante. Tras el ejercicio
regular, los músculos aumentarán su
flexibilidad. Es muy importante
mantener un ritmo constante. El ritmo
de ejercicio será lo bastante alto para
aumentar las pulsaciones hasta la
zona objetivo que se muestra en el
gráfico siguiente.
Esta fase debería durar un mínimo de
12 minutos aunque se recomienda a
la mayoría de la gente comenzar con
períodos de 10-15 minutos.
3. La fase de relajación
Esta fase permite la relajación del
sistema cardiovascular y muscular.
Se trata de una repetición de los
ejercicios de calentamiento, por
ejemplo, reduciendo el ritmo, y
continuando aproximadamente 5
minutos. Repita los ejercicios de
estiramiento, y recuerde no forzar los
músculos.
Según transcurran los días,
necesitará entrenamiento más
prolongados y de mayor intensidad.
Es recomendable ejercitarse un
mínimo de tres días por semana, en
días alternos.
Tonificación muscular.
Para tonificar los músculos durante el
ejercicio deberá seleccionar una
resistencia alta. Esto implicará una
mayor tensión sobre la musculatura
de las piernas y quizás deba reducir
el tiempo del ejercicio. Si también
desea mejorar su forma física
general, deberá cambiar su programa
de entrenamiento. Realice los
ejercicios de calentamiento y
relajación de costumbre, pero cuando
esté llegando al final de la fase de
ejercicio, aumente la resistencia para
someter sus piernas a un mayor
esfuerzo. Deberá reducir la velocidad
para mantener el ritmo cardíaco en la
zona objetivo.
INDICACIONES GENERALES.-
Lea atentamente las instrucciones de
este manual. Este le da indicaciones
importantes sobre el montaje,
seguridad y uso de la máquina.
1 Esta unidad esta diseñada para uso
en casa. El peso de usuario no debe
exceder de 130Kg.
2 Mantenga las manos alejadas de
cualquiera de las partes móviles de la
unidad.
3 Los padres y otras personas
responsables de los niños deben de
tener en cuenta la naturaleza curiosa
de estos y que puede llevarles a
situaciones y conductas que pueden
resultar peligrosas. Esta unidad no ha
de utilizarse en ningún caso como
juguete.
4 Es responsabilidad del propietario
asegurarse que todos los usuarios de
la máquina estén adecuados e
informados sobre todas las
precauciones necesarias.
5 Su unidad sólo puede ser usada por
una persona al mismo tiempo.

9
6 Utilice prendas de vestir y calzado
adecuado. Átese los cordones
correctamente.
INSTRUCCIONES DE MONTAJE.-
Saque la unidad de la caja y
compruebe que tiene todas las
piezas.
Para el montaje de esta maqa, se
recomienda la ayuda de una
segunda persona.
Retire los componentes de la caja y
compruebe que tenga todas las
piezas
Fig.1.-
(1) Chasis inferior.
(2) Tubo guía de pesas.
(3) Tubos de guía de pesas posterior.
(7) Tope superior de pesas.
(10) Selector de pesas.
(11) Pesas 6kgs.
(12) Pesas 8 Kgs.
(13) Selector.
(15) cuerpo superior.
(17) Chapa lateral.
(18) Soporte.
(23) Pomo.
(24) Pomo.
(25) Cuerpo principal.
(26) Soporte de asiento.
(27) Soporte de piernas.
(28) Chapa decorativa izquierda.
(29) Chapa decorativa derecha.
(30) Casquillo separador.
(33) Tubo base asiento.
(34) Brazo Butterfly izquierdo.
(35) Brazo Butterfly derecho.
(36) Leva
(37) Eje de leva.
(39) Brazo posterior pecho.
(40) Eje brazo posterior.
(41) Placa arqueada.
(42) Soporte polea.
(45) Pletina brazo polea
(46) Apoyapies.
(48) Chapa de polea doble.
(49) Polea
(50) Casquillo.
(51) Placa doble guiada de polea.
(54) Guía.
(55) Guía.
(58) Casquillo D22.
(59) Cable lateral.
(60) Cadena.
(61) Barra de tiro grande.
(64) Cable elevación pierna.
(65) Barra de tiro pequeña.
(66) Placa de polea doble.
(68) Cable intermedio.
(69) Cable brazo butterfly.
(70) Cadena
(71) Asa.
(72) Soporte respaldo
(73) Respaldo.
(75) Asiento.
(76) Eje esponja respaldo.
(77) Tapón de cierre interior.
(78) Tapón de cierre exterior.
(80) Espuma.
(81) Carcasa.
(82) Pomo.
Tornilleria
(4) Tornillo hexagonal M10x65.
(5) Arandela D10.
(6) Tornillo M10x20.
(8) Tornillo hexagonal M8x70.
(9) Tuerca autobloq M8.
(14) Arandela D8.
(16) Tuerca autobloq M10.
(19) Tornillo hexagonal M12x70.
(20) Arandela D12.
(21) Tuerca autobloq M12.
(22) Tornillo hexagonal M10x130.
(31) Tornillo hexagonal M12x75.
(32) Tornillo hexagonal M12x130.
(38) Tornillo hexagonal M8x16.
(43) Arandela D25.
(44) Tornillo M10x16.

10
(47) Tornillo hexagonal M10x70.
(53) Tornillo hexagonal M10x115.
(56) Tornillo hexagonal M10x45.
(57) Tornillo hexagonal M10x60.
(62) Esparrago M8x48.
(63) Tornillo M10x45.
(67) Tornillo hexagonal M10x55.
(74) Tornillo M8x40.
(79) Tornillo M8x25.
(83) Tornillo hexagonal M10x25.
(84) Arandela muelle D10.
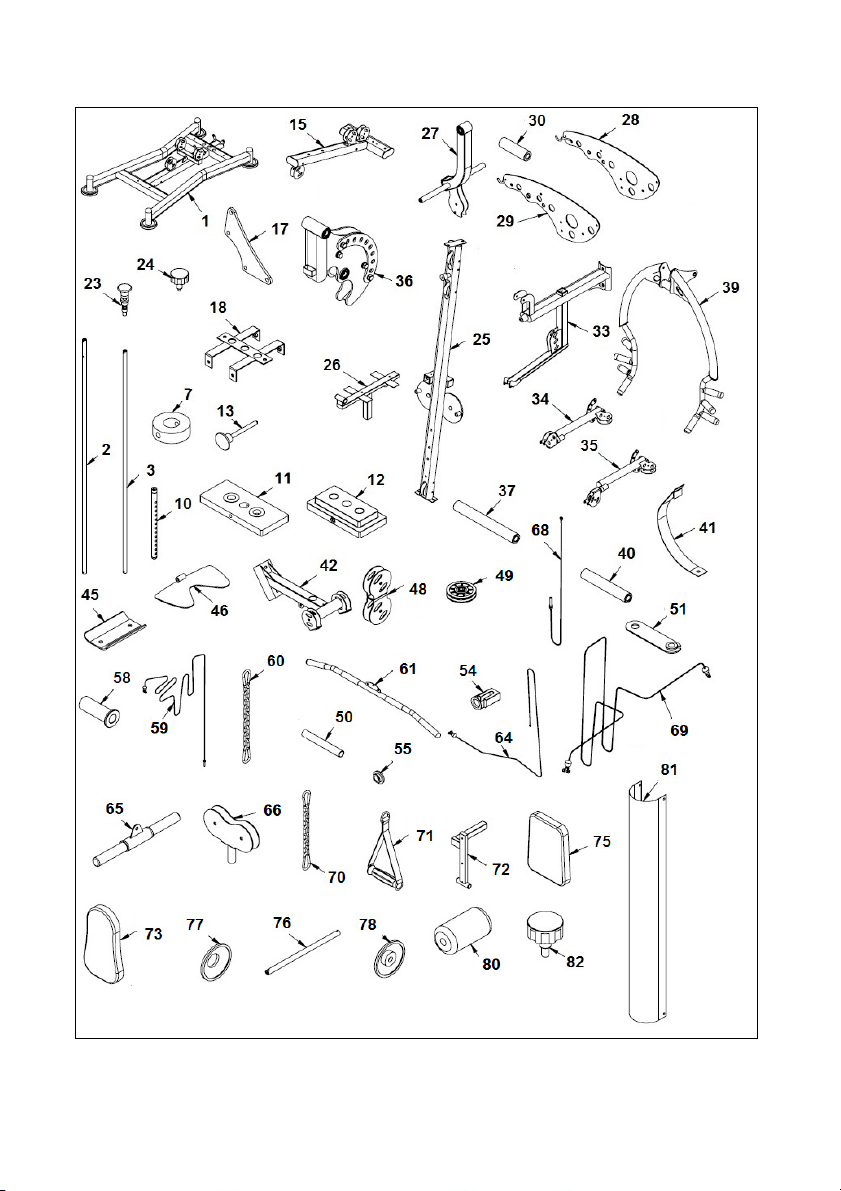
Coloque los tubos de guía de pesas
(2) y (3) en el bastidor inferior (1) Fig.3,
coloque los tornillos (4) y (6), junto con
las arandelas (5) y apriete
fuertemente. Fig 3.
Introduzca las pesas (11) en los tubos
de guía pesas tal como indica la Fig.3.
Seguido coja el tubo selector de pesas
(10) junto con las pesas (12) Fig.3 e
introdúzcalo sobre la última pesa,
coloque el selector (13) en el tubo
selector de pesas, como le indica la
Fig.3.
Por último coloque el tope superior de
pesas (7) Fig.3 coloque los tornillos
(8), junto con las arandelas (14) y las
tuercas (9) y apriete fuertemente.
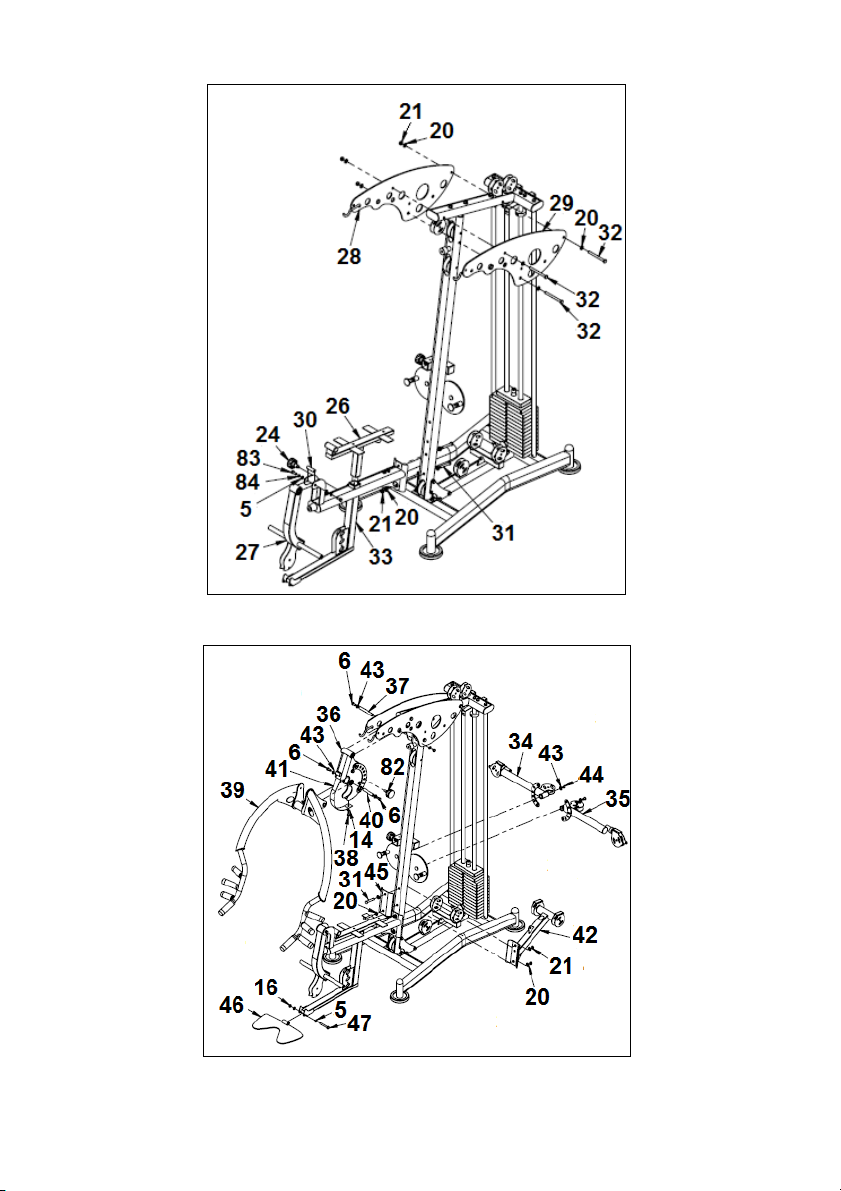
Posicione el cuerpo principal (25) en el
chasis (1) como le indica la Fig.4.
Inserte los tornillos (19), junto con las
arandelas (20) y las tuercas (21)
apriete fuertemente.
Coloque el soporte (18) en las barras
(2) como le indica la Fig.4.
Posicione el cuerpo superior (15) en
el cuerpo (25) y el soporte (18) como
le indica la Fig.4.
Inserte los tornillos (19), junto con las
arandelas (20) y las tuercas (21) y
apriete fuertemente.
Coloque los tornillos (6), apretando
fuertemente junto con las arandelas
(5) y las tuercas (16). Por otra parte
coloque el tornillo (4) junto con la
arandela (5) y apriete fuertemente
como le indica en la fig 4.
Por ultimo coloque las chapas
laterales (17) al cuerpo (15) y (1) junto
con los tornillos (22) las arandelas (5)
y las tuercas (16).
Coloque los pomos (23) y (24) en los
ejes del soporte (15) fig 4.
A continuación coloque la chapa
decoración izquierda (28) y atorníllelo
al soporte (15) junto con Fig.5, el
tornillo (32) junto con las arandelas
(20) y las tuercas (21) y apriete.
Realice el mismo montaje para el lado
derecho.
NOTA:
Una vez realizado este paso del
presente montaje, se tienen que
reapretar fuertemente los tornillos y
tuercas montados en los pasos
anteriores.
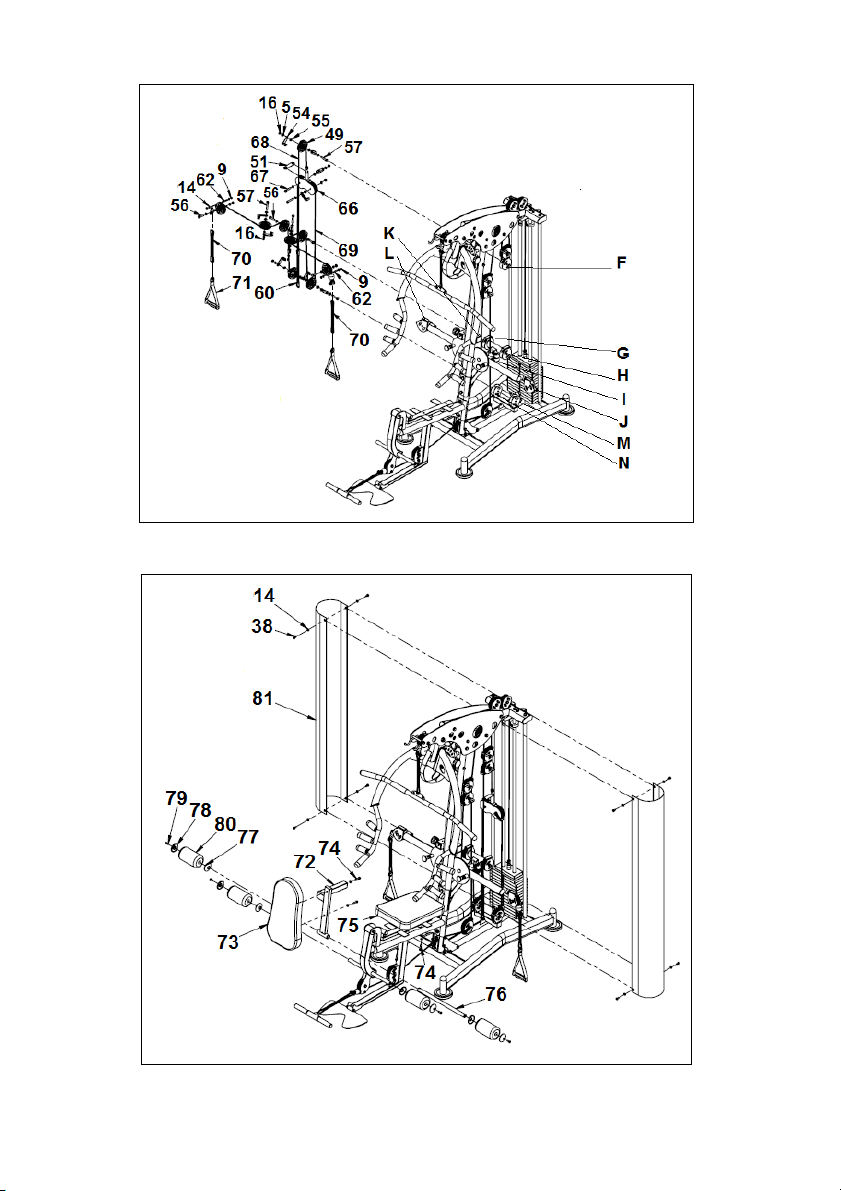
Introduzca el soporte de asiento (26)
en el tubo saliente del tubo base (33)
Fig.5.
Posicione en uno de los agujeros de
altura Fig.5 del soporte asiento,
Introduzca el pomo y apriételo en el
sentido de las agujas del reloj el
pomo (24).
Posicione el soporte del asiento (33)
en el cuerpo principal (25) Fig.5.
Introduzca el tornillo (31) junto con las
arandelas (20) y apriete la tuerca de
bloqueo (17).
Coja el soporte de piernas (27),
coloque el casquillo separador (30) en
el interior del casquillo soporte
piernas (27) Fig.5.

11
Colóquelo en los agujeros del soporte
asiento (33) y alineando los agujeros
coloque los tornillos (83) junto con las
arandelas (84) y (5) y atornille.
A continuación coloque el soporte de
polea (42) y atorníllelo al soporte
principal (25) junto con la pletina (45)
Fig.6, coloque el tornillo (31) junto con
las arandelas (20) y las tuercas (21) y
apriete.
Posicione los brazos del butterfly (34)
y (35) en los ejes del soporte principal
(25) Fig.6.coloque el tornillo (44) junto
con las arandelas (43) y apriete.
Posicione el apoyapiés (46) en el tubo
base del soporte (27) Fig.6.
Introduzca el tornillo (47) junto con las
arandelas (5) y apriete la tuerca (16).
Introduzca la leva (36) en las chapas
decoración (28) y (29) el eje (37)
Fig.6 atorníllelo con los tornillos (6)
junto con las arandelas (43).
A continuación introduzca los brazos
(39) y la chapa arqueada (41) en la
leva (36) con el casquillo (40) y
atorníllelo con los tornillos (6) y (38)
junto con las arandelas (43) y (14) fig
6.
Atornille la punta del cable (59) en la
pesa (12) Fig.7, seguido con la otra
punta del cable (59), y páselo por las
poleas superiores (49), la polea
intermedia (48) como le muestra la
Fig.7. Monte las poleas (49) en el
soporte superior (15), como le
muestra la Fig.7 ayudándose del
tornillo (53), (56), (57), (50), (63) y
(22) junto con la arandela (5), el
casquillo (58) y la guía (54) y las
chapas (48), apriete con la tuerca
(16) según la fig 7.
Coloque la cadena (60) en el cable
con el mosquetón y la barra de tiro
(61) Fig.7.
A continuación enebre el cable (64)
con las poleas en los soportes (A);
(B); (C); (D) y (E) ayudándose del
tornillo (57), (22), (62) y (56) junto con
la arandela (5), y (14), la guía (54) y
(55) y apriete con la tuerca (16) y (9)
según la fig 8.
Coja el enganche de cadenas (60) y
una el extremo del cable (64) que
acaba de enebrar, con la barra (65)
Fig.8. Una el otro extremo del cable
(64) al soporte polea (42) ayudándose
del tornillo (83) junto con la arandela
(5), y apriete con la tuerca (16) fig 8.
Enebre el cable (68) y (69) con las
poleas en los soportes (F); (G); (H);
(I); (J); (K); (L); (M) y (N) ayudándose
del tornillo (57), (67), (62) y (56) junto
con la arandela (5), y (14), la guía
(51), (54) y (55) y apriete con la
tuerca (16) y (9) según la fig 9.
Una el otro extremo del cable (68) al
soporte (1) ayudándose de la cadena
(60) en el cable con el mosquetón.
Coloque la cadena (70) en el cable
con el mosquetón y el asa (71) Fig.9.
Coja el asiento (75), y acérquelo al
Soporte piernas (26), como muestra
la Fig.10. A continuación coja los
tornillos (74) las arandelas (14).
Coloque los tapones de cierre (77)
en el tubo redondo del soporte de
piernas. Coloque las espumas
inferiores (80) del soporte de piernas
(27).
Coloque los tapones de cierre (78) en
los extremos de las espumas (80)
Fig.10. junto con los tornillos (79).
Coja el respaldo (73), y acérquelo al
soporte respaldo (72), como muestra
la Fig.10.

12
A continuación coja los tornillos (74)
las arandelas (14) y atornille el
respaldo Fig.10.
Introduzca el eje (76) en la guía del
soporte respaldo (72). Coloque los
tapones de cierre (77) en el eje (76).
Coloque las las espumas (80) en el
eje (76).
Coloque los tapones de cierre (78) en
los extremos de las espumas (80)
Fig.10. junto con los tornillos (79).
Coloque el soporte respaldo en el
soporte principal y sujételo con el
pomo (24).
Coloque las carcasas de protección
izquierda y derecha (81) en el soporte
(18) Fig.10, apretando ligeramente los
tornillos (38) junto con las arandelas
(14), en la parte superior Fig.10. Fije
también las carcasas en el bastidor
inferior (1) Fig.10, con los tornillos
(38) junto con las arandelas (14).
Para cualquier consulta, no dude en
ponerse en contacto con el
(S.A.T).Servicio de Asistencia
Técnica, llamando al teléfono de
atención al cliente (ver página final
del presente manual).
SPORT-THIEME SE RESERVA EL
DERECHO A MODIFICAR LAS
ESPECIFICA-CIONES DE SUS
PRODUCTOS SIN PREVIO AVISO.

13
English
SAFETY INSTRUCTIONS.-
Consult your doctor before starting
any exercise program. It is advisable
to undergo a complete physical
examination.
Work at the recommended exercise
level, do not overexert yourself. If you
feel any pain or discomfort, stop
exercising immediately and consult
your doctor.
Use the appliance on a solid, flat
surface, with some type of protection
for the floor or carpet. In the interest of
safety, the equipment must have at
least 1 metre of free space around it.
Do not allow children to play with the
equipment or in the immediate vicinity.
Keep your hands well away from any
of the moving parts.
Check the equipment before starting
the exercise; to make sure that all of
the parts are attached and that the
nuts, bolts, and focus bars have been
tightened correctly prior to use.
Any adjustment device that could
interfere with the user’s movement
should not be left projecting.
Wear appropriate clothing and
footwear for the exercise. Do not use
loose clothing. Do not wear leather
soled shoes or footwear with high
heels.
This appliance has been tested and it
complies with standard EN957,
suitable for domestic use only.
IMPORTANT.-
Read the instructions carefully before
proceeding to assemble the
equipment.
Remove all the parts from the
cardboard packaging and check them
against the parts list to ensure that
there is nothing missing.
Do not throw the cardboard away until
the equipment is fully assembled.
Always use the appliance in
accordance with the instructions. If
you discover any defective component
while assembling or checking the
equipment, or if you hear any strange
noise during exercise then stop. Do
not use the appliance until the
problem has been resolved.
EXERCISE INSTRUCTIONS.-
Use of the equipment offers various
benefits; it will improve fitness, muscle
tone and when used in conjunction
with a calorie controlled.
1,Warm-up phase
This phase speeds up the body’s
blood circulation and gets the muscles
ready for exercise. It also reduces the
risk of cramp and sprains. It is
advisable to do some stretching
exercises, as shown below. Each
stretch should last approximately 30
seconds, do not overexert the
muscles. If you feel pain, STOP.
2. Exercise phase
This phase requires the greatest
physical exertion. After regular
exercise the muscles will become
more flexible.

14
It is important to keep the rhythm
constant. The rhythm of the exercise
should be fast enough to bring the
heart rate into the target area, as
shown on the following graph:
This phase should last at least 12
minutes, although it is advisable for
most people to start off with
sessions of 10-15 minutes.
3. Cool-down phase
This phase allows the cardiovascular
and muscle system to relax. It
consists of repeating the warm-up
exercises, i.e. reducing the rhythm
and continuing for approximately 5
minutes. Repeat the stretching
exercises but remember not to
overexert the muscles.
Eventually your training sessions will
have to become longer and more
intensive. It is advisable to exercise
at least three days per week, on
alternate days.
Muscle toning
You should select a high exertion
level in order to tone muscles during
exercise. This entails greater stress
on the leg muscles, so it may be
wise to reduce exercise times. If you
also wish to improve your overall fi
tness then you should change your
training program. Do the warm-up
and cooldown exercises as normal
but when you are reaching the end
of the exercise phase, increase the
exertion level in order to make your
legs work harder. You should reduce
speed in order to keep your heart
rate within the target area.
GENERAL INSTRUCTIONS.-
Carefully read through the
instructions contained in this
manual. It provides you with
important information about
assembly, safety and use of the
machine.
1 This unit has been designed for
home use. The user weight does not
have to exceed 130kg.
2 Keep your hands well away from
any of the moving parts.
3 Parents and/or those responsible
for children should always take their
curious nature into account and how
this can often lead to hazardous
situations and be haviour resulting in
accidents. This unit does not have to
be used in any case like toy.
4 The owner is responsible for
ensuring that anyone who uses the
machine is duly informed about the
necessary precautions.
5 Your unit can only be used by one
person at a time.
6 Use suitable clothing and
footwear. Tie up your shoelace
correctly.
ASSEMBLY INSTRUCTIONS.-
The assistance of a second person
is required for assembling this
machine.
Take the unit out of its box and
make sure that all of the pieces are
there:
Fig.1.-
(1) Bottom frame.
(2) Weight guide bars.

15
(3) Forward weight guide bars.
(7) Top cap.
(10) Selector post.
(11) Weight. 6kgs.
(12) Weight. 8 Kgs.
(13) Selector.
(15) Upper body.
(17) Lateral plate.
(18) Support.
(23) Knob.
(24) Knob.
(25) Main body.
(26) Seat support.
(27) Leg support.
(28) Left decorative cover.
(29) Right decorative cover.
(30) Spacer.
(33) Seat support tube.
(34) Left Butterfly arm.
(35) Right Butterfly arm.
(36) Leva
(37) Eje de leva.
(39) Front Push Arm.
(40) Front Push axle.
(41) Arc plate.
(42) Pulley support.
(45) Pulley support plate.
(46) Footrest.
(48) Double pulley frame.
(49) Pulley.
(50) Sleeve.
(51) Double guide pulley frame.
(54) Plastic guide.
(55) Plastic guide.
(58) Spacer D22.
(59) Lateral cable.
(60) Chain.
(61) Big tensioner.
(64) Lift Leg cable.
(65) Small tensioner.
(66) Double pulley plate.
(68) Middle cable.
(69) Butterfly arm cable.
(70) Chain.
(71) Handle.
(72) Backrest support.
(73) Backrest.
(75) Seat.
(76) Backrest foam axle.
(77) Inside cap.
(78) Exterior cap.
(80) Foam.
(81) Security cover.
(82) Knob.
NUTS & BOLTS
(4) Hex screw M10x65.
(5) Washer D10.
(6) Screw M10x20.
(8) Hex screw M8x70.
(9) Locked nut M8.
(14) Washer D8.
(16) Locked nut M10.
(19) Hex screw M12x70.
(20) Washer D12.
(21) Locked nut M12.
(22) Hex screw M10x130.
(31) Hex screw M12x75.
(32) Hex screw M12x130.
(38) Hex screw M8x16.
(43) Washer D25.
(44) Screw M10x16.
(47) Hex screw M10x70.
(50) Cap D22xD10,5
(53) Hex screw M10x115.
(56) Hex screw M10x45.
(57) Hex screw M10x60.
(63) Screw M10x45.
(67) Hex screw M10x55.
(74) Screw M8x40.
(79) Screw M8x25.
(83) Hex screw M10x25.
(84) Spring washer D10.
Fit the weight guide bars (29 and (3)
on the main support (1), Fig.3, fit
screws (4) and (6), along with the
washers (5) and tighten securely.
Now fit the bottom washer for the
weights (6) Fig.3.

16
Place the weights (11) onto the
guide bars as shown in Fig.3.
Now take the weight selector post
(10), Fig.3 with the weights (12) and
insert it onto the last weight, fit the
selector ring (13) onto the central
boss on the weight selector post, as
shown in Fig.3.
Finally place the top cap for the
weights (7), Fig.3, fit screws (8)
along with the washers (14) and nuts
(9) and tighten securely.
Place the main body (25), onto the
frame (1), Fig.4. Fit screws (19)
along with the washers (20) and nuts
(21) and tighten securely.
Place the bracket (18) on the bars
(2) as shown in Fig.4.
Place the upper body (15), Fig.4,
onto the main body (25) and the
support (18), Fig.4. Insert the screws
(19) along with the washers (20) and
nuts (21) and tighten securely.
Now fit screws (6) along with the
washers (5) and nuts (16) and
tighten securely.
By other side place the screws (4)
along with the washers (5) and
tighten securely as shown in fig 4
Finally place the lateral plates (17) to
the body (15) and (1) along with
screws (22) washers (5) and nuts
(16).
Place the knobs (23) and (24) onto
the shafts for the support (15) fig 4.
Then place the left decorative cover
(28) and fix to the the bracket (15)
with Fig.5, along the the screw (32)
with washers (20) and nuts (21) and
tighten.
Now go through the same procedure
for the right side.
NOTE: Once this stage of the
assembly has been completed, all of
the bolts fitted previously should be
retightened securely.
Insert the seat support (26) onto the
post sticking out of the tube (33) Fig.5.
Line up one of the height setting
holes, Fig.5, on the seat support and
release the knob then tighten the knob
(24) by turning it clockwise.
Position the backrest support (33) on
the main body (25), Fig.5. Insert screw
(31), along with washers (20) and
locknut (17), and tighten securely.
Take the leg support (27), fit the
spacer (30) on the inside of the
bushing for the leg support (27), Fig.5.
Fit it into the holes on the seat support
(33) by lining up the holes insert
screws (83) along with the washers
(84) and (5) and secure them.
Then place the pulley bracket (42)
and screw to the main body (25) with
the plate (45) Fig.6, place the screw
(31) with washers (20) and nuts (21)
and tighten.
Place the butterfly arms (34) and
(35) on the support shafts (25) fig 6.
Secure using the screws (44) along
with the washers (43) and tighten.
First insert the caps (41) in the top
leg tube- Place the bottoms foams
(40) of the leg support (36).
Finally, fit the caps (42) onto the
ends of the foam covers (40), Fig.6
along with the screws (43).
Place the footrest (46) on the
support tube (27) fig 6. Introduce the
screw (47) along the washers (5)
and tighten with the nut (16).

17
Enter the cam (36) between the
decorative cover (28) and (29) and the
shaft (37) Fig.6 attach using screws
(6) along with the washers (43).
Then enter the arms (39) and the arc
plate (41) on the cam (36) with cap
(40) and tighten with screws (6) and
(38) along the washers (43) and (14)
Figure 6.
Screw the tip of the cable (59) onto
the weight guide (12), Fig.7, then
take the other end of the cable (59)
and pass it through the top pulleys
(49) and the middle pulley (48) as
shown in Fig.7.
Then mount pulleys (49) onto the
upper support (15) Fig.7 using
screws (53), (56), (57), (50), (63)
and (22) along with the washer (5),
the spacer (58), the guide (54) and
the plates (48) and tighten using
nuts (16) shown in fig 7.
Attach the chain (60) onto the cable
using the carabiner and the pull bar
(61), Fig.7.
Next thread cable (64), with the
pulleys in the supports (A); (B); (C);
(D); and (E) using (57), (22), (62)
and (56) along with the washers (5),
and (14), the guide (54) and (55)
and tighten using nuts (16) and (9)
shown in fig 8.
Take the chain hook (60) and join
the end of cable (64), which you
have just threaded through, with the
cable tensioner (65), Fig.8. Attach
the end of the cable (64) to the
pulley bracket (42) along with the
screw (83) with washer (5) and
tighten the nut (16) fig 8.
Thread cables (68) and (69), with
the pulleys in the supports (G); (H);
(I); (J); (K); (L); (M) and (N) using
screws (57), (67), (62) and (56)
along with the washers (5), and
(14), the guides (51), (54) and (55)
and tighten using nuts (16) and (9)
shown in fig 9.
Attach the end of the cable (68) to
the chassis (1) along with the chain
(60) onto the cable using the
carabiner.
Attach the chain (70) onto the cable
using the carabiner and the handle
(71), Fig.9.
Take the seat (75) and position it on
the leg support (26), Fig.10. Attach
using screws (74) and washers (14).
Insert the caps (77) in the leg tube.
Place the bottoms foams (80) of the
leg support (27).
Finally, fit the caps (78) onto the
ends of the foam covers (80), Fig.10
along with the screws (79).
Take the backrest (73) and position
it to the backrest support (72), as
shown in Fig.10.
Now use screws (74) and washers
(14) to secure the backrest, Fig.10.
Insert the shaft (76) in the backrest
support guide (72). Insert the caps
(77) into the axle (76). Fit the caps
(78) onto the ends of the foam
covers (80), Fig.10 along with the
screws (79).
Place the backrest to the main body
(25) and secure it with the knob (24)
Fit the left and right safety covers
(81) onto the top bracket (18),
Fig.10, hand tightening screws (38)
along with the washers (14) on the
top section, Fig.10.
Also fit covers on the the bottom
bracket (1) Fig.10, using screws (38)
with washers (14), on the bottom
section, Fig.10.

18
Do not hesitate to get touch with the
Technical Assistance Service if you
have any queries by phoning
customer services (see last page in
manual)
SPORT-THIEME RESERVES THE
RIGHT TO MODIFY THE
SPECIFICATIONS OF ITS
PRODUCTS WITHOUT PRIOR
NOTICE.

19
Deutsch
SICHERHEITSHINWEISE.-
Konsultieren Sie unbedingt Ihren Arzt,
bevor Sie mit dem Training beginnen.
Es ist ratsam, den Körper einem
kompletten Check-Up zu unterziehen.
Trainieren Sie gemäß dem empfohlenen
Intensitätslevel, überanstrengen Sie sich
nicht. Wenn Sie Schmerzen haben oder
sich unwohl fühlen, brechen Sie das
Training sofort ab uns suchen Sie Ihren
Arzt auf. Stellen Sie die Station auf
einen soliden, flachen Untergrund und
benutzen Sie eine Schutzmatte o.Ä., um
den Boden zu schützen. Aus
Sicherheitsgründen muss um das Gerät
herum 1 Meter freier Platz zur
Verfügung stehen.
Achten Sie darauf, dass Kinder nicht mit
dem Gerät oder in unmittelbarer Nähe
spielen. Halten Sie Ihre Hände weg von
den beweglichen Teilen des Geräts.
Überprüfen Sie das Gerät vor jedem
Training. Stellen Sie sicher, dass alle
Muttern, Bolzen und Griffstangen
korrekt befestigt sind, bevor Sie das
Gerät nutzen.
Nehmen Sie keinerlei Veränderungen
am Aufbau des Geräts vor, die Ihre
Bewegungsfreiheit einschränken
könnten.
Tragen Sie geeignete Kleidung und
Schuhwerk zum Training. Tragen Sie
keine weite Kleidung. Tragen Sie keine
Schuhe mit Ledersole oder mit
Absätzen, um zu trainieren.
Dieses Trainingsgerät wurde ausgiebig
getestet und entspricht dem Standard
EN957 für den Heimgebrauch.
WICHTIG.-
Lesen Sie diese Hinweise sorgfältig,
bevor Sie mit dem Aufbau des Geräts
beginnen. Holen Sie zunächst alle Teile
aus der Verpackung und prüfen Sie
anhand der Teileliste, ob alles
vollständig ist. Bewahren Sie die
Verpackung zunächst noch auf, bis das
Gerät vollständig aufgebaut und
einsatzbereit ist. Verfahren Sie immer
gemäß der Montageanleitung. Wenn
Sie während des Aufbaus oder des
Trainings ein defektes Bauteil
entdecken oder ein seltsames Geräusch
hören, stoppen Sie sofort. Trainieren Sie
nicht mit dem Gerät, bis alle
Unklarheiten beseitigt sind und alles in
einem einwandfreien Zustand ist.
ÜBUNGSHINWEISE.-
Das Training mit dem Gerät bietet
verschiedene Vorzüge; es verbessert
Ihre allgemeine Fitness und baut, in
Verbindung mit einer ausgewogenen
Ernährung, Ihre Muskulatur auf.
1. Aufwärmphase
In der Aufwärmphase wird die
Blutzirkulation im Körper angeregt und
die Muskeln auf das Training
vorbereitet. Das Risiko von Krämpfen
und Zerrungen wird deutlich verringert.
Es ist ratsam, Dehnübungen zu machen
(siehe Abbildung). Jede Dehnung sollte
dabei ca. 30 Sekunden andauern.
Überbeanspruchen Sie die Muskeln
nicht. Wenn Sie Schmerzen verspüren,
hören Sie sofort auf.

20
2. Trainingsphase
In dieser Phase ist die körperliche
Anstrengung am größten. Bei
regelmäßigem Training werden die
Muskeln flexibler. Es ist entscheidend,
einen gleichmäßigen
Trainingsrhythmus beizubehalten. Die
Intensität sollte dabei hoch genug
sein, um die Herzfrequenz in die
Zielregion zu bringen, siehe Grafik:
Diese Phase sollte mindestens 12
Minuten andauern, wobei für die
meisten Nutzer empfohlen wird,
zunächst 10-15 Minuten lang zu
trainieren.
3. Cool-Down Phase
In dieser Phase können die Muskeln
und das kardiovaskuläre System
wieder entspannen. Wiederholen Sie
hierbei die Übungen der
Aufwärmphase für ca. 5 Minuten, aber
mit deutlich reduzierten Rhythmus und
Intensität. Wiederholen Sie auch die
Dehnübungen, aber
überbeanspruchen Sie die Muskeln
nicht.
Mit der Zeit werden Ihre
Trainingseinheiten länger und
intensive werden. Es wird empfohlen,
an mindestens 3 Tagen in der Woche
zu trainieren, oder an abwechselnden
Tagen.
Muskelaufbau
Sie sollten eine hohe Intensität
wählen, um die Muskeln während des
Trainings zu definieren. Dadurch steigt
die Belastung der Beine, daher ist es
zu empfehlen, die Trainingsdauer zu
reduzieren. Wenn Sie Ihre allgemeine
Fitness verbessern möchten, dann
müssen Sie das Training anpassen.
Führen Sie Aufwärm- und Cool-Down
Phase normal durch, doch erhöhen
Sie gegen Ende der Trainingsphase
die Intensität deutlich, damit Ihre
Beine stärker beansprucht werden.
Verlangsamen Sie das Training, um
die Herzfrequenz im Zielbereich zu
halten.
GENERELLE HINWEISE.-
Lesen Sie die Hinweise in der
Anleitung sorgfältig durch. So erhalten
Sie wichtige Instruktionen zu Aufbau,
Sicherheit und Benutzung des Geräts.
1 Dieses Gerät wurde ausschließlich
für den Heimgebrauch entwickelt. Das
maximale Nutzergewicht beträgt 130
Kg.
2 Halten Sie Ihre Hände weg von den
beweglichen Teilen, um Verletzungen
zu vermeiden.
3 Eltern bzw. Aufsichtspersonen
sollten immer mit der natürlichen
Neugier von Kindern rechnen, was
häufig zu gefährlichen Situationen und
Verletzungen führen kann. Dieses
Trainingsgerät ist kein Spielzeug.
Table of contents
Languages:
Other Sport-thieme Home Gym manuals