SportEar Micro Blast open ear User manual

YOUR SPORTEAR®KIT INCLUDES:
Your state-of-the-art SportEAR(s)®
Cleaning brush and cleaning wire for the tubes
SportEAR carrying case
Instructions / Warranty / Service Information
Size 10 Batteries
3 sets of tips
(Flare Tips, Foam Tips, Clear Acoustics™Tips)
Welcome!
Thank you for choosing SportEAR®and congratulations
on purchasing the finest premium hearing
enhancement and protection product available.
It is important to us that you are thrilled with your new
SportEAR products. Please read these instructions
thoroughly.
If you have any questions about your new SportEAR,
call us directly at 866.422.5502. We take pride in
offering the best customer service possible and look
forward to hearing from you.
Thanks Again,
The SportEAR Team
IMPORTANT!
Please take a few moments and read this
instruction manual before using this product.
Please call us directly at 1-866-422-5502
to help you get started.
INSTRUCTION MANUAL
INSTALL HEARING AID BATTERY (SIZE 10)
1. Remove protective tab from battery.
2. Open the battery compartment by placing your
fingernail under the edge of the battery door and
gently pulling outward. Figure 1
3. Insert the battery into the battery door so the + side of
the battery is up, then close the door. Figure 2
CAUTION: Never force the door shut. To remove
the battery, gently lift it out using your thumb and
forefinger.
Most hearing aid batteries last 140 hours (7-10 days)
when the unit is used from morning to night on a daily
basis. If you are not actively using your SportEAR, you
should remove the battery and place the yellow tab on
the back side of the battery to preserve battery life.
figure 1
WEARING YOUR SportEAR
1. To insert SportEAR into your ear, identify the right
and left sides by the marking on the SportEAR
tubes. Figure 5
Red lettering for right ear
Blue lettering for left ear
2. Start by gently inserting the tip into your ear canal.
Figure 6. Never push so far that it becomes painful
as this can severely damage your ear.
figure 5
3. Once into place, then wrap the tail inside of the
outer part of your ear. Figure 7
Then tuck the device itself comfortably behind your
ear. To get the Comfort Foam™tip deeply seated, it
may be easier if you use your other hand to gently
pull the back of your ear (toward the back of your
head) while inserting the SportEAR.
4. After you have the SportEAR correctly situated, ad-
just the volume by gently pushing the button. Figure
8. When it beeps 1x that is for setting one and so on
up to 3 for the 30 model and up to 4 for the 210, 412,
and 812 models. Volume will adjust accordingly.
30 MODELS
1 Moderate volume increase
2 Louder volume increase
3 Maximum volume increase
210, 412, 812, 812D MODELS
1 Moderate volume increase
2 Moderate volume increase with automatic
background noise reduction
3 Louder volume increase
4 Maximum compression/hearing protection for more
aggressive recreational and industrial environments.
You may have your MB 210, 412, & 812 models
programmed and reprogrammed however
you prefer. Just mail your SportEAR devices
to us with a note or a phone call of how you
want them programmed for your best use and
satisfaction. There are literally thousands of
options with the SportEAR revolutionary new
100% digital technology for your listening
enjoyment.
figure 2
Keep batteries and SportEAR devices out of the reach
of children and pets. Animals are particularly attracted
to hearing devices and may chew or destroy your
instruments.
TESTING YOUR SportEAR
Before wearing the SportEAR, test it doing the
following:
1. Adjust the volume to the loudest setting.
2. Place the SportEAR in the cup of your hand and
close your hand around it.
3. If you hear a whistling feedback sound, your
SportEAR is working correctly. If you do not hear a
whistling sound, check that the SportEAR volume is
set to maximum, that the battery is fresh, or that the
battery is installed properly.
figure 4
figure 6
figure 8
Volume
Push Button
figure 7
Tail
5. If you hear a feedback or whistling sound, make
sure your SportEAR is seated properly and your tip
is inserted correctly. If the feedback or whistling
continues, call us for help. Make sure your battery
is good and then adjust between programs to find
the right setting for you.
6. To remove your SportEAR, simply pull on the tube to
get the tip to come out of your ear canal and then pull
the device from behind your ear.
7. After removing the SportEAR from your ear, remem-
ber to turn it off to conserve battery power. You can
do this by opening the battery door.
Micro Blast
Models
OPEN EAR
BEHIND-THE-EAR
Using Your SportEAR for
the First Time:
Install Battery
Select a Tip
Wearing Your SportEAR
SELECT YOUR TIP
Clear Acoustics™or Flare™Tips are for hearing
enhancement purposes only and provide no hearing
protection. The Comfort Foam Tip is for hearing
enhancement with protection, Make sure it seals your
ear canal off well. If there are any gaps, the SportEAR
will not give you maximum hearing protection. Larger
and smaller tips and tubes are available directly through
SportEAR. Call us for additional help if needed.
ATTACH THE TIPS TO YOUR SportEAR
1. Place the open end of the tip over the sound
opening of the SportEAR tube. Gently push until
the tip is seated securely on the SportEAR tube.
Figures 3 and 4.
Make sure that the tip is installed correctly
before putting the tube into your ear.
2. To remove the tip, gently pull off with one finger on
each side of the tip.
• Neveruseatipthathasbeenwornby
someone else or if it becomes dirty, torn, or
damaged.
• Use only SportEAR Authorized Tips.
• ReplacementClearAcoustics™and Comfort
Foam™tips can be purchased directly from
SportEAR.
CAUTION:
Never insert your SportEAR into your ear
without a proper tip installed first.
1
2
3
figure 3
Clear Acoustics™ Tip
Comfort Foam™ Tip
WARNING:
HEARING AID BATTERIES ARE DANGEROUS IF SWALLOWED!
If hearing aid batteries are swallowed, seek immediate
attention and call the National Button Battery Hotline collect
at (202) 625-3333.
NOTE:
If you cannot eliminate feedback (squealing noise)
from the unit, call us toll free at 866.422.5502.
CAUTION:
If you do not have a snug fit, the unit may not provide
the necessary protection from damaging sounds!
Flare™ Tip
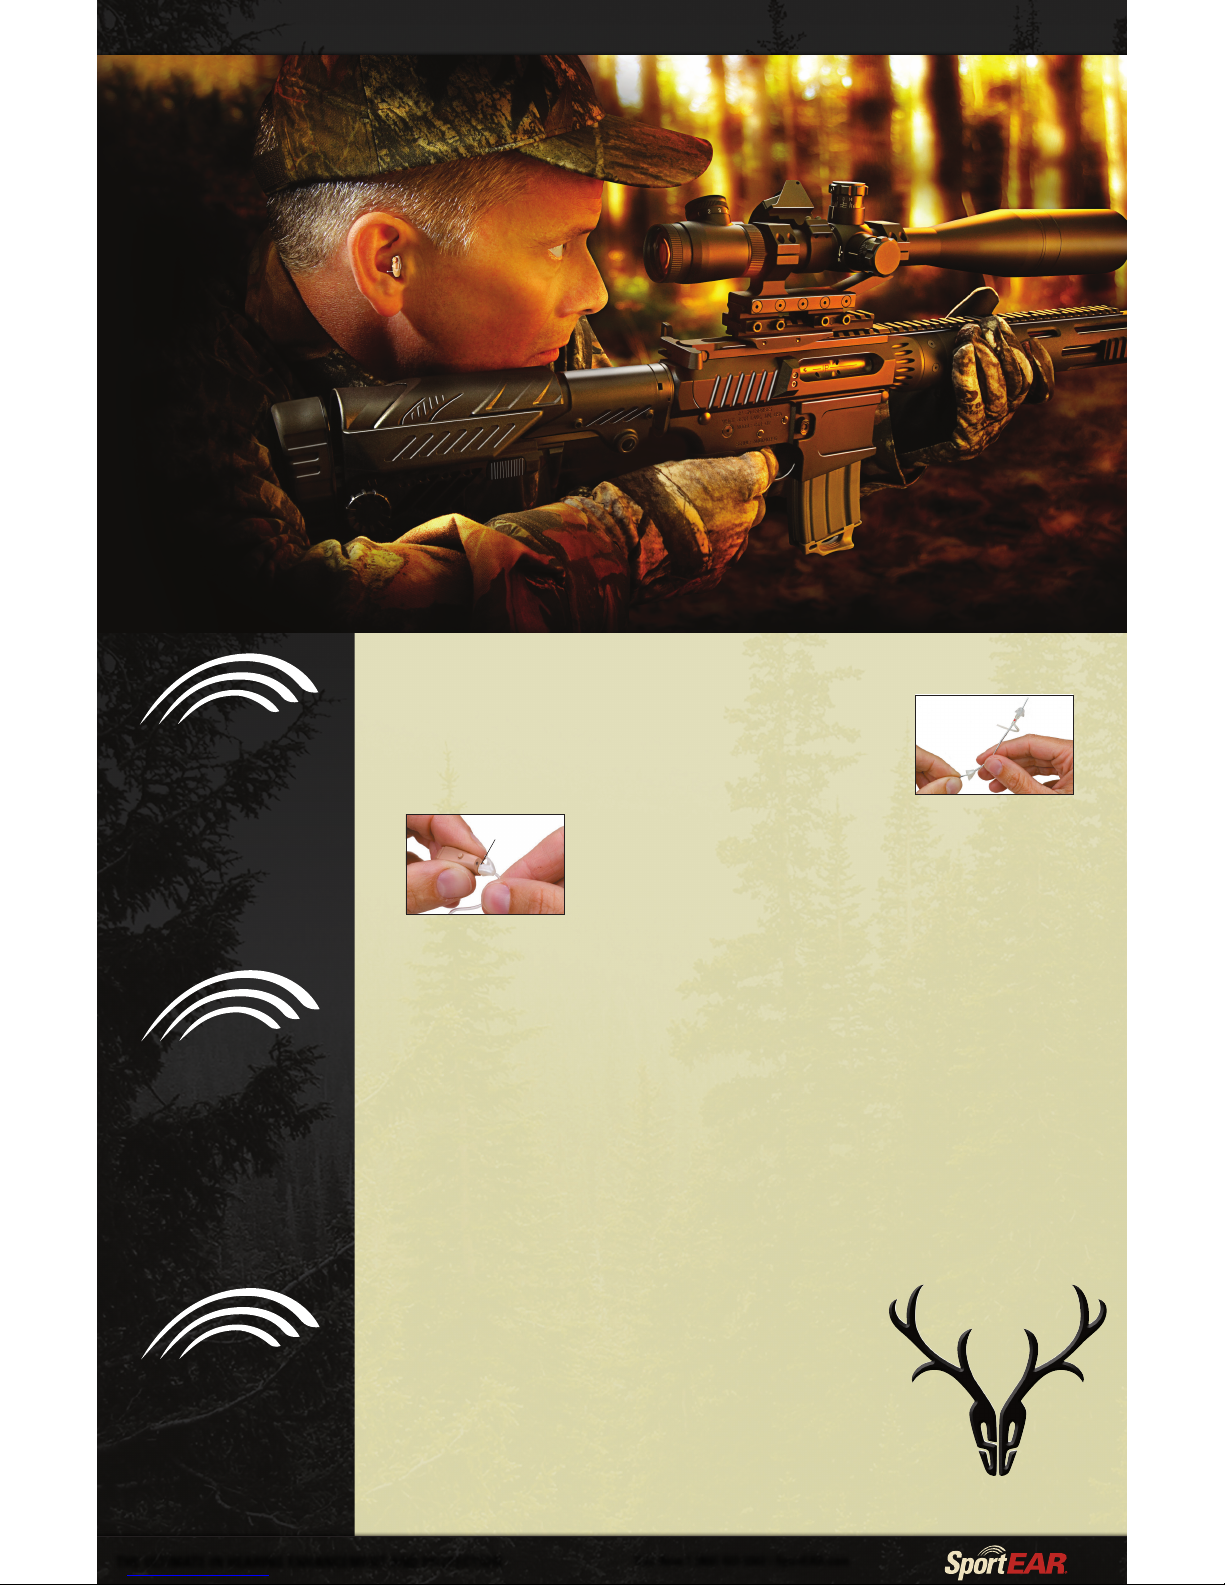
CLEANING YOUR SportEAR
To keep your SportEAR operating correctly, you should
clean it regularly when you see wax, moisture, dirt or
anything else building up on it.
1. Remove the tips. Using the cleaning brush, use the
brush to remove any accumulated wax from the
exposed sound outlet. Figure 9. If wax is located
inside the sound outlet, use the brush to dislodge it.
Be careful not to push any wax into the opening of
the sound outlet.
figure 9
Sound Outlet
2. Using a clean, soft cloth or tissue paper, gently
wipe the shell unit until clean. Use the brush to
remove any wax from the faceplate.
3. Remove the tubing by securing the sides with
your fingers (so you don’t twist the device apart
& break it, as this would not be covered under
the warranty). Turn the tube a quarter turn and
pull away from the device. Once removed insert
the cleaning wire through to push out any wax,
etc., that is plugging up the tube. Figure 10
CARE & MAINTENANCE
• DO NOT immerse your SportEAR in water. DO NOT
use in the shower or other wet environments.
• Alltipsanddeviceshouldbecleanedregularly.
• Gentlysoakthesofttipsinwarmsoapywaterand
then wipe off with a dry cloth. Do not REATTACH
to the SportEAR until tip is completely dry.
• Thetubingshouldbekeptfreeofearwaxorother
obstructions.
• KeepyourSportEARasdryaspossibleanddo
not expose to excessive heat, such as on the
dashboard of a car or in direct sunlight for long
periods of time.
• CAUTION: Remove your SportEAR during any
electromagnetic procedures, such as a MRI or
CAT scan.
THE ULTIMATE IN HEARING ENHANCEMENT AND PROTECTION Call Now 1 (866) 422-5502 | SportEAR.com
figure 10
TROUBLESHOOTING
If you are having problems with your SportEAR,
check the following:
• Makesurebatteryisinsertedcorrectly,the
battery door is closed tightly, and the unit is
switched on and the volume turned up.
• Tipsandtheunitarecleanandclearofearwaxor
any obstruction.
• Exposedsoundoutletmustbeclearof
obstruction. (DO NOT put any object other than
cleaning brush into the sound outlet)
• ExposingyourSportEARtodampnesscanshorten
battery life and eventually damage the instrument.
WARRANTY
Your SportEAR is covered by a one year unlimited
parts and labor warranty against defects in material
and workmanship. The warranty period begins at the
date of original purchase, confirmed by your sales
receipt. This warranty is non-transferable from the
original purchaser.
All work while under warranty carries a shipping and
handling charge of $19.95.
Please include a description of the problem.
Clear Acoustics™, Select-A-Fit Soft Tips™, Comfort
Foam™Tips, cleaning brushes, and batteries are
not covered under this warranty and are regarded
as consumables. This warranty does not cover
malfunctions caused by abuse of the unit, and is void
if the unit has been tampered with or opened.
Specific exclusions from the warranty include, but are
not limited to the following:
water damage, physical damage, damage caused by
neglect or improper handling, or damage caused by
wearing the unit without the appropriate SportEAR tips.
In the event of a malfunction within the warranty
period or beyond, contact the manufacturer. Any
problems or questions concerning this product or the
instruction manual, call SportEAR directly.
IMPORTANT: This warranty gives you specific
rights. You may have other rights which vary
from state to state or country to country.
Cleaning Your SportEAR
Care & Maintenance
of Your SportEAR
Troubleshooting
Repair & Service
SportEAR®•866.422.5502 toll free •SportEAR.com
© SportEAR 2010. All rights reserved.
Warranty
4
5
6
REPAIR AND SERVICE
Repair and service of your SportEAR can be obtained
directly through the manufacturer. Any repair work
performed by someone other than the manufacturer
may void the warranty.
This manual suits for next models
1
Table of contents
Other SportEar Hearing Aid manuals


