BHM contact forte User manual

Instruction for Use
Digital bone conduction hearing system

Instruction for Use
2

Instruction for Use
3
Congratulations on acquiring your digital
bone conduction hearing system contact
forte – a quality product from BHM. Your
state-of-the-art hearing system is manuf-
actured in Austria in accordance with pro-
visions set by the European Medical Device
Regulation (EU) 2017/745, and is in line with
the latest audiological ndings and techno-
logical innovations. It bears the CE mark,
signalling its adherence to the latest quality
and safety requirements.
Use of the hearing aid is only permit-
ted after detailed instruction by your
hearing care professional.
The bone conductiond hearing system
is suitable for the home healthcare en-
vironment and due to their portability it
may happen that it is used in professional
healthcare facility environment like physi-
cian ofces, dental ofces etc.
Your bone conduction hearing system, which
is characterised by its high-quality signal pro-
cessing, can be worn on a number of dif-
ferent wearing options. Please be aware of
the different sizes of these when choosing
your wearing option, to make sure that you
will be comfortable wearing your device.This
Instruction for Use contains many hints and
tips on how to get the best from your new
contact forte and how to care for it properly.
Please read these carefully, and always keep
this Instruction for Use handy in order to get
the best out of your hearing system.
Intended Use:The bone conduction hearing
system contact forte has been designed
to compensate hearing loss by processing
sound and transmitting it to the inner ear.
User group(s):The hearing system is suita-
ble for people of any age with hearing loss.
Indications: For conductive hearing loss,
mixed hearing loss and single sided deaf-
ness.

Instruction for Use
4
Contraindications: Do not use in case of
irritated and injured skin or pressure marks.
Warning! Potential side effects: Possible
pressure points, irritation of the skin or
pain in case of wrong size selection of the
wearing option.
For additional, current information, please
visit www.bhm-tech.at
The contact forte is designed for a lifetime
of 5 years.
Your contact forte has been specially cho-
sen for you by your hearing care professio-
nal based on your personal hearing impair-
ment, and has been adapted to meet your
hearing needs.Your hearing care professio-
nal will provide you with comprehensive in-
struction on rst-time use, proper handling,
how to wear it, and regular maintenance.
You may of course contact your hearing
care professional to discuss any questions
or issues concerning your hearing or use
of the hearing system. Various individual
settings, such as the sounding of warning
tones or their volume is the responsibility
of your hearing care professional. Please
t these settings together.
Your contact forte uses radio techno-
logy with Bluetooth Low Energy and
operates in a frequency range of 2.4 GHz
to 2.48 GHz (not valid for contact forte “AT ”
version). Always pay attention to the envi-
ronment in which you use it. Any restricti-
ons must be observed. When ying please
check if ight operator requires devices to
be switched into ight mode, see chapter
“Wireless”.
The couplings to the contact forte
contain a magnet. Magnets generate
a far-reaching, strong magnetic field.
Among other things, they can damage tele-
visions, laptops, computer hard disks, credit
Instruction for Use
5
Before using the device, please make sure
that it is functioning correctly and in good
working condition. Never use the device
if you suspect that it is not working aw-
lessly or is in any way damaged, especial-
ly the battery compartment or the battery
compartment safety lock! Do not put your
device under any excessive mechanical
strain. If it has fallen onto the ground or is
damaged in any other way, please send it
to your hearing care professional to be che-
cked and repaired. Never pass your bone
conduction hearing system to other people
i.e. please prevent any unauthorised use.
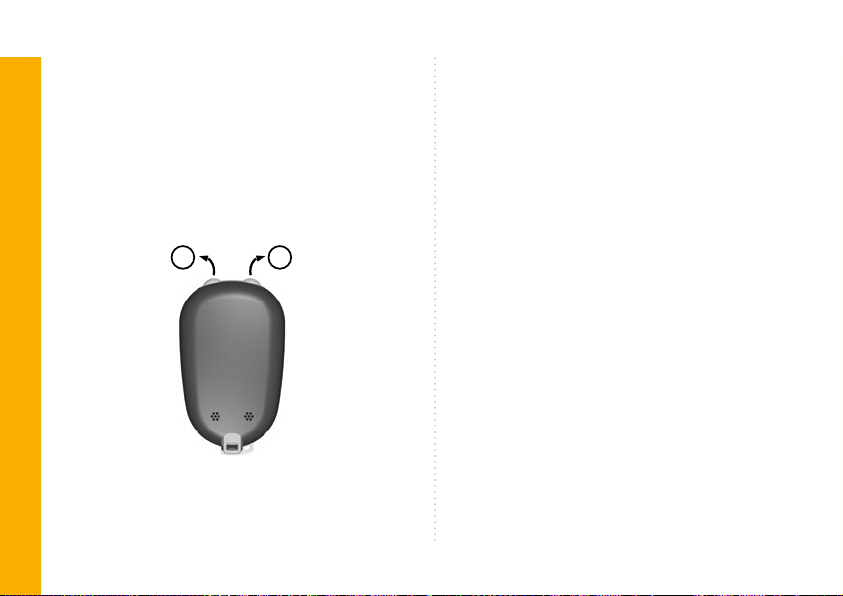
Each hearing system is intended for use
on the left-hand side when shipped. Your
hearing care professional will adjust the
device for the right-hand side if necessary.
For a binaural system, your hearing care
professional will mark one device with a
blue sticker and one device with a red sti-
cker (Symbolic image 1).The blue marked
and debit cards, data carriers, mechanical
watches, loudspeakers, etc. Keep magnets
away from any equipment or objects that may
be damaged by strong magnetic elds.
Magnets can also affect medical devices
(pacemakers, debrillators,…) or electronic
systems and cause malfunctions.
Use the contact forte only if there are no
doubts about the safety. Manufacturers
of equipment that may be susceptible or
sensitive to magnets (such as pacemakers)
must provide reasonable safety advice.
The safety margin of coupling and magne-
tically sensitive devices (e.g. pacemaker)
must be at least 30 cm.
Please read this Instruction for Use
fully and carefully before using the
device. If you are not the person using the
hearing system, please bear in mind the
following information on behalf of the per-
son concerned.

Instruction for Use
6
device must then be worn on the left-hand
side and the red marked device on the
right-hand side.
In order to ensure that your hearing
system is safe and functional, please
only use BHM accessories which you can
obtain from your hearing care professional.
Content
Key ............................................................. 7
Technical data............................................ 8
The hearing system contact forte ......... 10
Inserting/replacing battery......................11
Switching on/off...................................... 12
Safety line................................................ 13
Key functions .......................................... 14
Programme "Automatic" .................... 16
Wearing options...................................... 16
Making phone calls................................. 22
Wireless................................................... 22
Fitting & programming .......................... 25
Troubleshooting...................................... 29
Cleaning................................................... 30
Warnings ................................................. 32
Important information............................ 33
Warranty, maintenance & repairs.......... 35
Disposal................................................... 36
Required information ............................. 36
Declaration of Conformity
for the hearing system ........................... 39
ø 3 mm Symbolic image 1
Instruction for Use
7
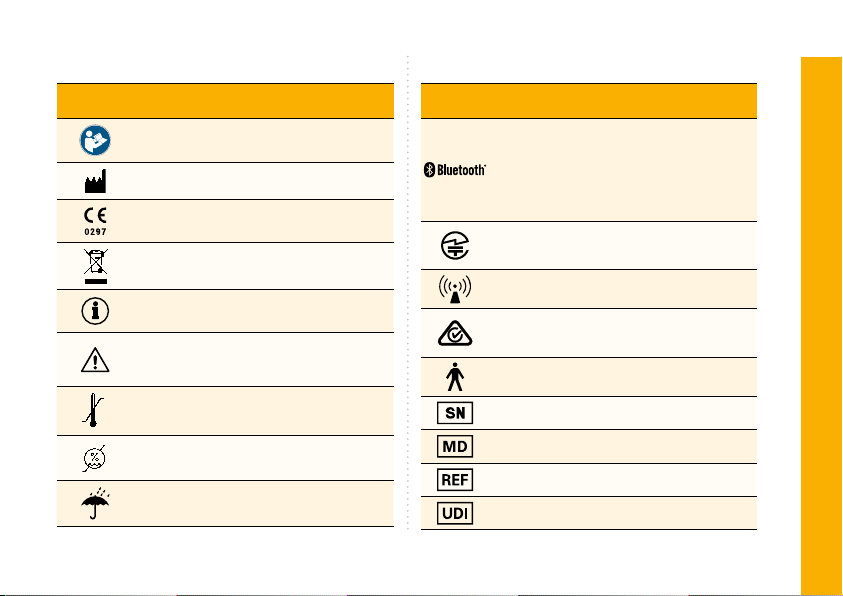
Key
Symbols
Follow instructions for use!
Manufacturer
CE marking and Notied Body
number
Do not dispose of in household
waste
Important information for usage and
product safety
Warning! Pay attention to the war-
nings notices in these instruction
for use
-20°C
+60°C Temperature during transport and
storage
10%
95% Humidity during transport and sto-
rage
Protect from moisture
Symbols
The Bluetooth®word mark and logos
are registered trademarks owned by
Bluetooth SIG, Inc. and any use of
such marks by BHM-Tech Produktions-
gesellschaft m.b.H. is under license.
Other trademarks and trade names are
those of their respective owners.
Japanese Radio Law and Japanese
Telecommunications Business Law
Compliance
Equipment includes radio transmitter
RCM - Regulatory compliance mark for
ACMA (Australian Communications
and Media Authority)
Type B Applied part
Serial number
Medical Device
Article Number
Unique device identier
Due to the limited size available on the device, relevant approval markings are found in this document.
Instruction for Use
8
Technical data
Dimension / Environment
Weight, incl. battery
< 15 g
Dimensions Height: < 15 mm; Length: < 35 mm; Width: < 22
mm
Operating temperature range +5° C to +40° C
Operating Rel. Humidity / atm. pressure 10 - 90% / 700 - 1060 hPa
According to DIN IEC 60118-9:2019 Measured on Articial
Mastoid with Headband adapter
Measured on Skull
Simulator
Frequency Range 300 Hz – >8000 Hz 350 Hz – >8000 Hz
Max. Output Vibratory Force Level
(@ 90 dB SPL, FOG) 119 dB rel. 1 µN 127 dB rel. 1 µN
Max. Acousto-Mechanical Sensitivity
Level (@ 50 dB SPL, FOG) 43 dB rel. 1 µN / 20 µPa 49 dB rel. 1 µN / 20 µPa

Instruction for Use
9
Battery
Battery size 13 (PR 48, Zinc–Air)
Battery current 1.6 mA (@ 65 dB SPL Input, 1 kHz)
Battery rating up to 13 mA

Instruction for Use
10
6
7
3
2
1
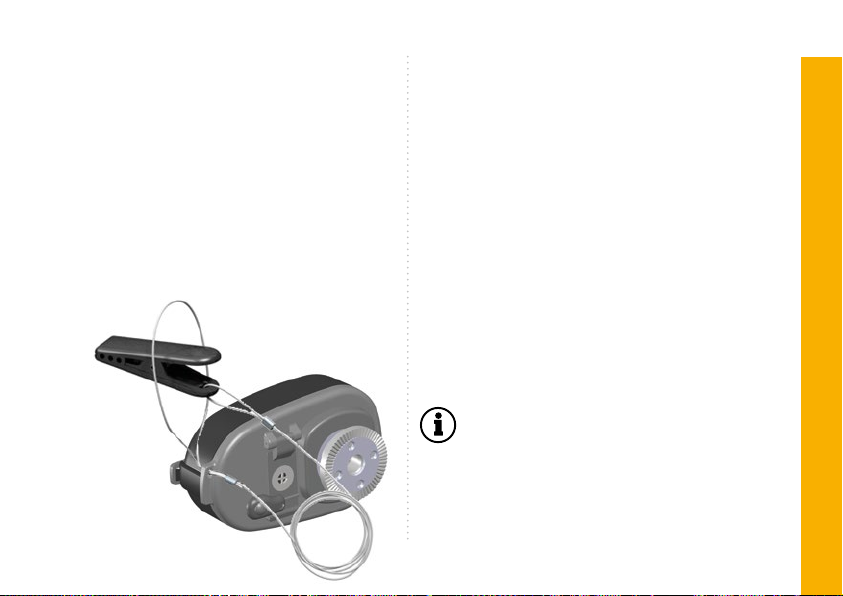
The hearing system contact forte
5
4
1Microphones
2Control buttons
(programme and volume)
3Coupling for wearing options
4
Battery compartment
5Battery compartment safety lock
6
Programming socket (under the cover)
7
Attachment for the safety line
Symbolic image 2

Instruction for Use
11
battery into the battery compartment,
never directly into the hearing system
(Symbolic image 3d)!
6. Close the battery compartment carefully
with your ngers and then seal the batte-
ry compartment safety lock in a clockwise
direction using the BHM screwdriver sup-
plied until it clicks into place (Symbolic
image 3c, 3b, 3a).
Battery warning sound
The contact forte is equipped with a battery
warning as standard. When the battery is
weak, the device will emit a warning tone and
the signal gain will automatically be redu-
ced. Please replace the battery immediately!
Swallowing a battery is harmful to
health and may cause severe damage
or even death! Therefore: never store bat-
teries alongside, for example, medicines!
If you have swallowed a battery, please seek
Inserting/replacing battery
1. To open the battery compartment and to
insert or replace the battery, turn the bat-
tery compartment safety lock anti-clock-
wise with the BHM screwdriver supplied
(Symbolic image 3a & 3b).
2. Carefully open the battery compartment
until it is fully open (Symbolic image 3c).
3. When replacing the battery, please remo-
ve the old battery and dispose of this in
accordance with local regulations.
4. Take a new battery, size 13, from the
package and remove the adhesive strip
from the positive terminal.Then wait the
amount of time stipulated by the manuf-
acturer before inserting the battery into
the hearing system.
5. Please ensure that the battery has been
inserted correctly, in alignment with the
correct terminal (please check the + mar-
king on the battery). Always insert the

Instruction for Use
12
medical attention immediately. Always store
batteries out of reach of children! Pay at-
tention to an intact battery compartment
and an intact battery compartment safety
lock!
The use of the BHM screwdriver by
children and persons with cognitive
impairment is prohibited. In this case, the
battery must be changed by the supervisor
or the person in charge. Improper handling
may result in injuries.
Switching on/off
The hearing system contact forte does not
have an ON/OFF switch.The device switches
on when the battery compartment is closed
and switches off when it is opened. After
Symbolic image 3d
Symbolic image 3c
Symbolic image 3a
Images: Opening and
closing the battery
compartment with the
BHM screwdriver
supplied.
Symbolic image 3b
Instruction for Use
13
Safety line
The safety line is designed to reduce the
risk of dropping or losing your hearing
system.
You can attach a safety line that clips onto
your clothing (Symbolic image 3e):
1. Pinch the loop on the end of the safety
line between your finger and thumb.
2. Pass the loop through the attachment
hole in the hearing system from front to
back.
3. Pass the clip through the loop and pull
the line tight. Attach the clip to your
clothing.
It is recommended to use the safety
line when engaging in physical acti-
vities. Children should use the safety line
at all times.
your day's use and/or when the device is
not being used, the battery must be remo-
ved. The hearing system must be stored
with the battery compartment open, in a
safe place, out of reach of anyone. Opening
the battery compartment also enables you
to dry any moisture that has accumulated.
Use only non rechargable size 13 zinc-air
hearing aid batteries.
A stand-by function can be programmed
by your hearing care professional for you.
Symbolic image 3e
Instruction for Use
14
decreased. The device will beep three times
to signal that the maximum or minimum
volume has been reached.
Key functions
Adjusting the volume
Press the control buttons (Symbolic image
4) briefly to increase (+) or reduce (-) the
volume of the device. A signal confirms
whether the volume has been increased or
Volume / Programme
– +
Symbolic image 4
Selecting a programme
In your hearing system, up to four program-
mes for various hearing situations can be sto-
red. Use the control buttons to switch between
the programmes that your hearing care pro-
fessional has set for you with your approval.
Pressing one of the two control buttons
(approx. 1 second) will – depending on the
button selected – switch to the next pro-
gramme or switch it back. When the battery
compartment is closed and the hearing
system switches on, it will automatically
start with programme 1. If you switch to a
different programme by pressing one of the
control buttons, you will hear a confirmation
signal. For a better overview, please com-
plete the following table:
Key lock
Key lock prevents you from accidentally
adjusting the sound processor settings (such
as programme selection or volume). Your

Instruction for Use
15
Programme Conrmation signal Description of hearing situation
1
1 beep
22 beeps
33 beeps
44 beeps

Instruction for Use
16
hearing care professional can activate or
deactivate this function. We recommend
activating the key lock if the hearing system
is used by a child or a person with a mental
impairment.
Programme “Automatic“
In the programme setting “Automatic“, the
signal received via the microphone is anal-
ysed and classied as one of several diffe-
rent hearing situations.These are:
• Quiet environment
• Speech in quiet environment
• Loud environment
• Speech in loud environment
• Musical environment
• Windy environment
Depending on the classication, the pa-
rameters of the hearing system are con-
gured in such a way as to achieve opti-
mum hearing comfort and optimum speech
intelligibility.
Wearing options
The decision as to which wearing op-
tion is most suitable for contact forte
will be made by your hearing care profes-
sional. Your hearing care professional will
then instruct you in detail on how to use
contact forte and the accessories.
When selecting a suitable option for
wearing the device, please consider
the various sizes! Incorrect use and selection
of the sizes of the wearing options can lead
to skin irritation, pressure points and pain.
The use of accessories from other ma-
nufacturers or products not approved
by BHM can endanger your health and cau-
se irreparable damage to your health. Only
accessories from BHM may be used.
Your hearing care professional will advise
you in this regard.
Instruction for Use
17
a standing position (Symbolic image 6).
The device must not touch the pinna! To
adjust the tilt, the hearing device can be in-
dividually aligned in 6-degree increments.
The device or its parts must not be
touched or covered by headgear or
other things during usage!
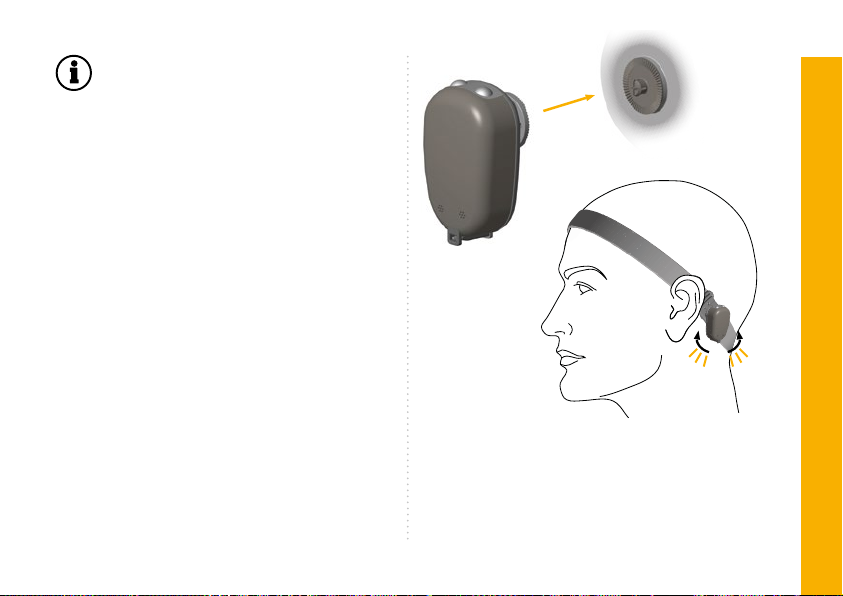
Attaching to wearing options
The contact forte can only be used with a
variety of wearing options. BHM offers a
range of options to get the most out of your
hearing system. After the selected wearing
option has been positioned correctly on the
wearer's head (options listed on the follow-
ing pages), simply attach the magnetics-
nap coupling of the hearing system to the
mechanism (conductor plate) integrated
into the wearing option (Symbolic image 5).
The hearing system must be positioned be-
hind the ear on the head (mastoid) or – if
recommended by your hearing care profes-
sional – elsewhere on the head.The micro-
phones must be pointing downward and
positioned level with one another when in
Symbolic image 5
6°
Symbolic
image 6
Instruction for Use
18
For babies and children, care must be
taken to ensure that, due to the soft
cranial bones, the wearing option is repo-
sitioned at regular intervals to avoid defor-
mation.Your hearing care professional will
show you how to proceed.
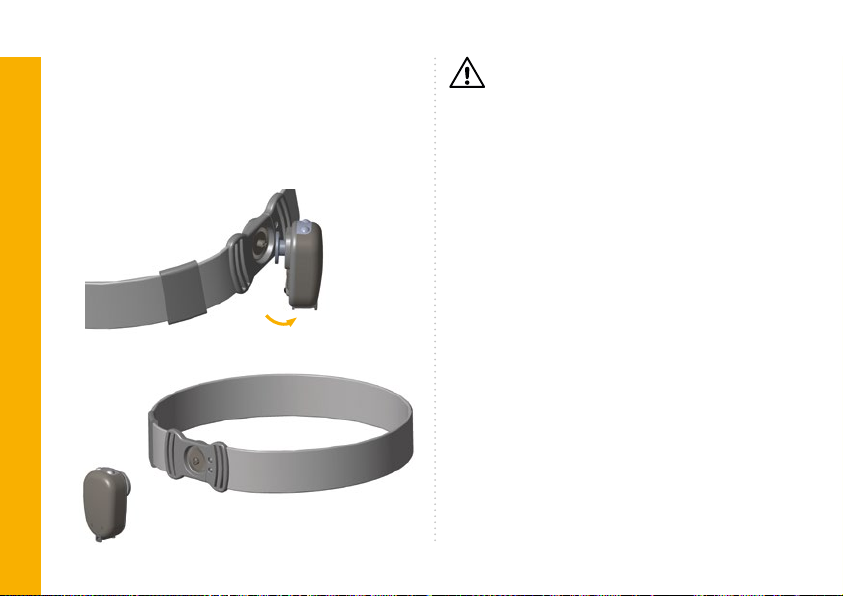
Adapter for individual headbands or
softbands
The BHM contact forte adapters can be
used to make custom-made headbands
or softbands. The adapters are already
tted with the necessary conductor plate.
The contact forte is simply attached to the
coupling on the back of the conductor plate
(Symbolic image 8).
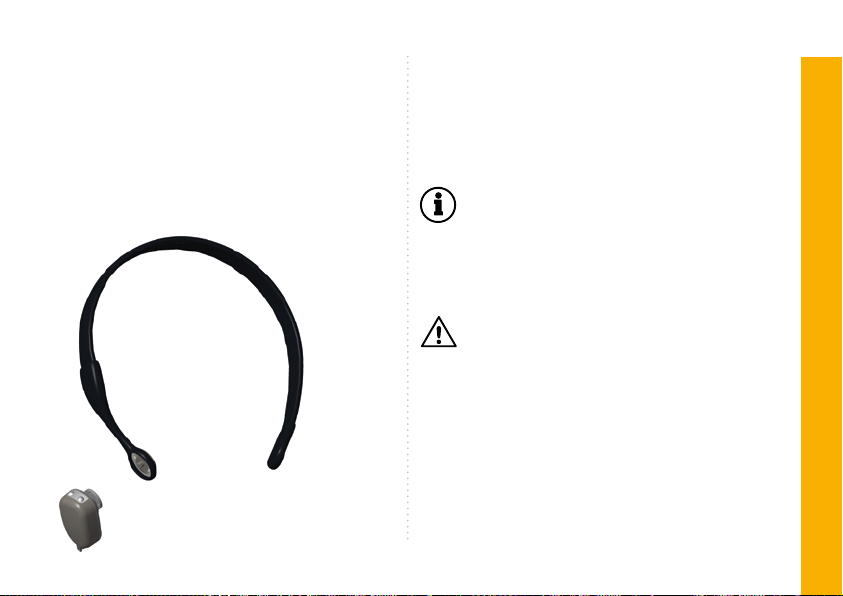
Plastic headband
BHM plastic headbands also come already
tted with the conductor plate.The contact
forte is simply placed onto the back of the
conductor plate using the coupling (Sym-
Symbolic
image 7
Image shows a softband in unilateral
(monaural) use (Symbolic image 8).
To remove the hearing system from the
wearing options, do not simply pull the
hearing system from the conductor plate.
The coupling will detach more easily by
tilting it to the side (Symbolic image 7).
Instruction for Use
19
bolic image 9). Plastic headbands are
available in both monaural and binaural
models, and in the sizes small, medium,
standard and large.Your hearing care pro-
fessional will advise you on the correct size.
Adhesive adapter
The contact forte can be worn virtually in-
visibly by using an adhesive adapter. We
kindly point out that using the adhesive
adapter results in a lower signal gain!
Adhesive adapters (consisting of adhe-
sive pad and sticker) are available for
both the right-hand and left-hand side.
You can obtain the sticker from your hea-
ring care professional.
Usage limitation:The sticker is inten-
ded for single use. If the sticker is used
several times, it will no longer stick to the
skin. There is a risk of inade-quate supply
of the hearing system and loss of the de-
vice. Only stickers from BHM may be used.
Image shows plastic headband
in unilateral (monaural) use
(Symbolic image 9).

Instruction for Use
20
2. Peel the large protective liner from the
sticker and make sure that the exposed
adhesive surface remains clean (Sym-
bolic image 11).
3. Place the adhesive surface onto the
adhesive pad and rmly stroke down
(Symbolic image 12).
The following images depicts use on the
left-hand side.
1. Find a suitable point behind the ear on
the mastoid bone and clean this tho-
roughly (Symbolic image 10). This area
must be clean and hair-free; if necessary,
please shave this area.
left-hand
side
right-hand
side
Symbolic
image
Symbolic image 10
Symbolic image 11
Symbolic image 12
Other manuals for contact forte
2
Table of contents
Other BHM Hearing Aid manuals

BHM
BHM pan eco User manual

BHM
BHM Apollon Installation instructions

BHM
BHM pan duo User manual

BHM
BHM Viper 170P User manual

BHM
BHM contact star evo1 User manual

BHM
BHM contact forte User manual

BHM
BHM Pan Series User manual

BHM
BHM contact star evo1 Installation instructions

BHM
BHM contact forte User manual

BHM
BHM AN-Evo1 Installation instructions


