Sportop U80 Operation manual
U80
MODEL :
Owner’s Operating Manual ENGLISH
Main frame
A
Adaptor
I
Central supporting
tube
BRear stabilizer
C
DFront stabilizer
Handle bar
E
Console
G
HSaddle
Saddle tube &
Saddle basement
F
KLeft pedal (K1) &
Right pedal (K2)
Tool
Water bottle
L
4m/m 6m/m
KnobA46
1
J7
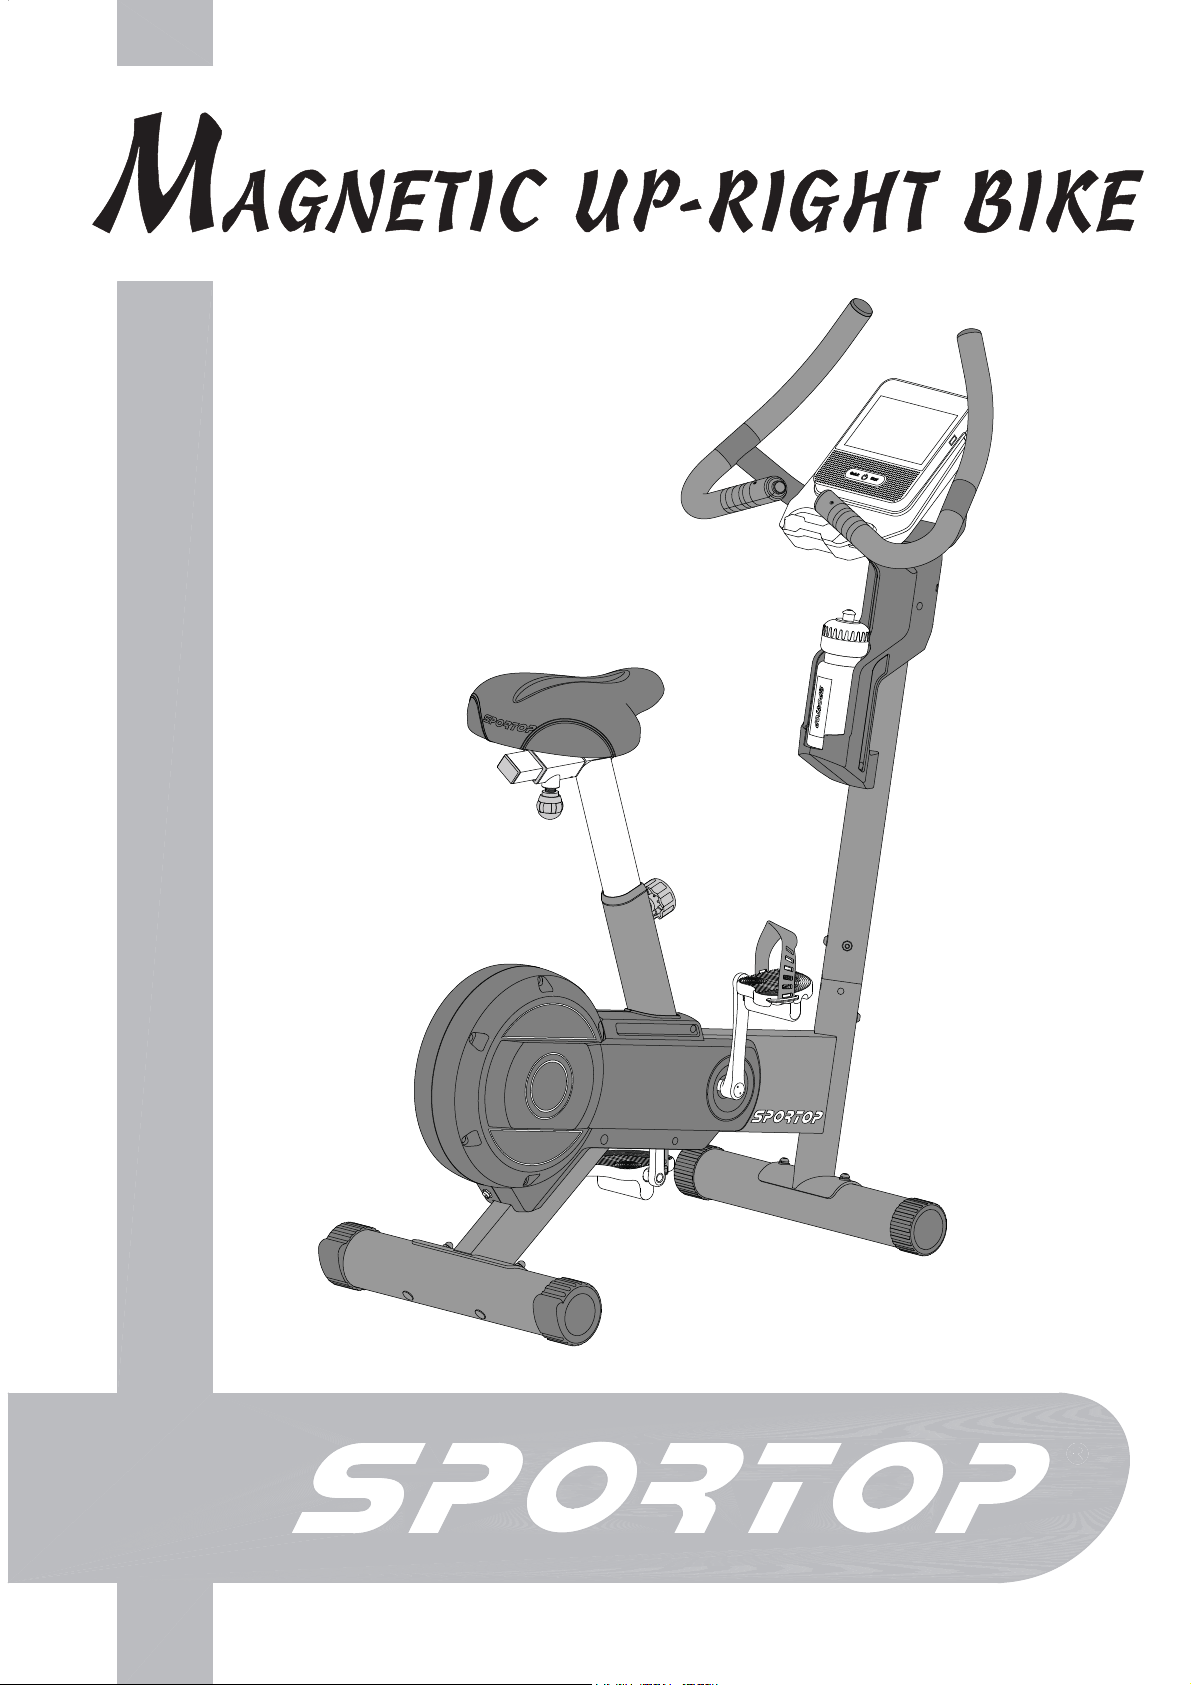
Step 1. Remove the preassembled nut (J1), spring washers (J2), and washers (J3) from
the rear stabilizer (C).
Step 2. Attach the rear stabilizer (C) to the main frame (A) with nut (J1), spring washers (J2),
and washers (J3).
FIGURE 1 : Rear Stabilizer Assembly
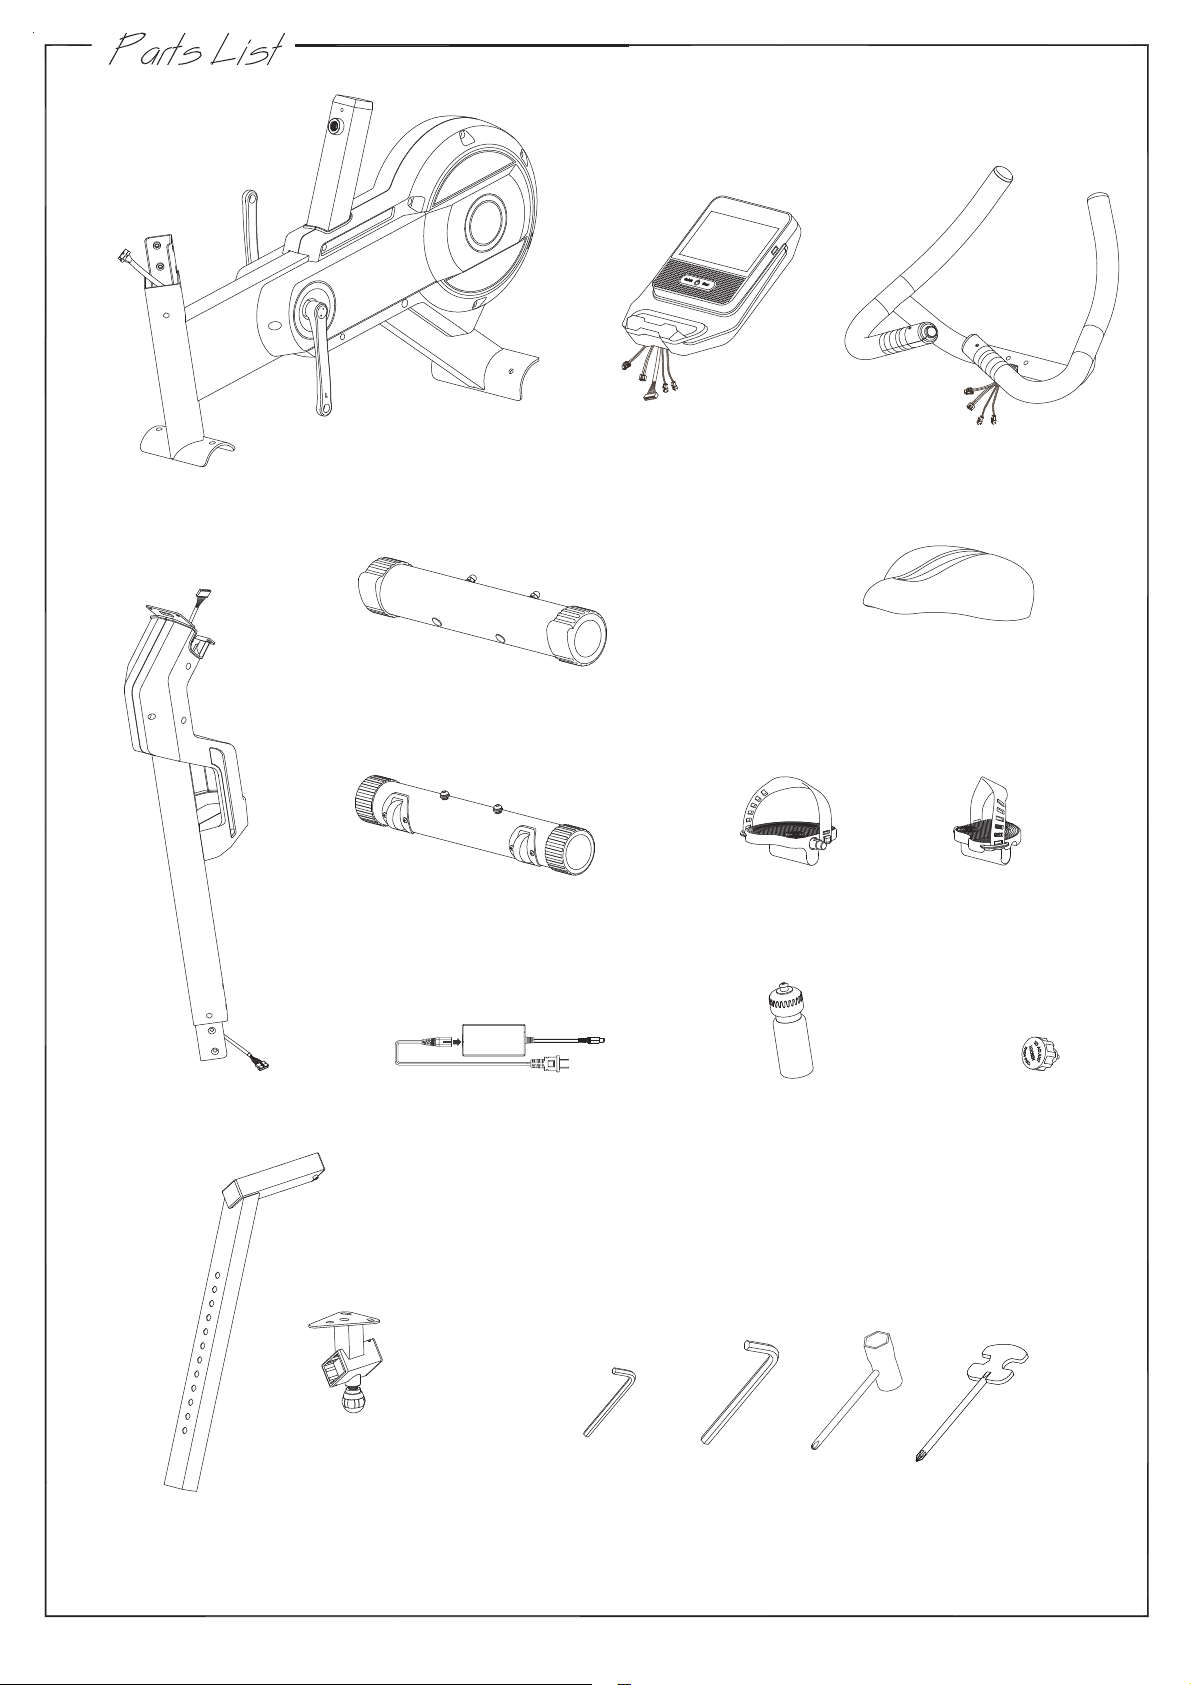
Step 1. Remove the preassembled screws (J6), spring washers (J2) and washers (J3) from
the front stabilizer (D).
Step 2. Attach the front stabilizer (D) to the main frame (A) with screws (J6), spring washers (J2)
and washers (J3).
FIGURE 2 : Front Stabilizer Assembly
J3
J2
J1
C
A
A
J3
J2
J6
D
Use tool :
Use tool : 6m/m
2
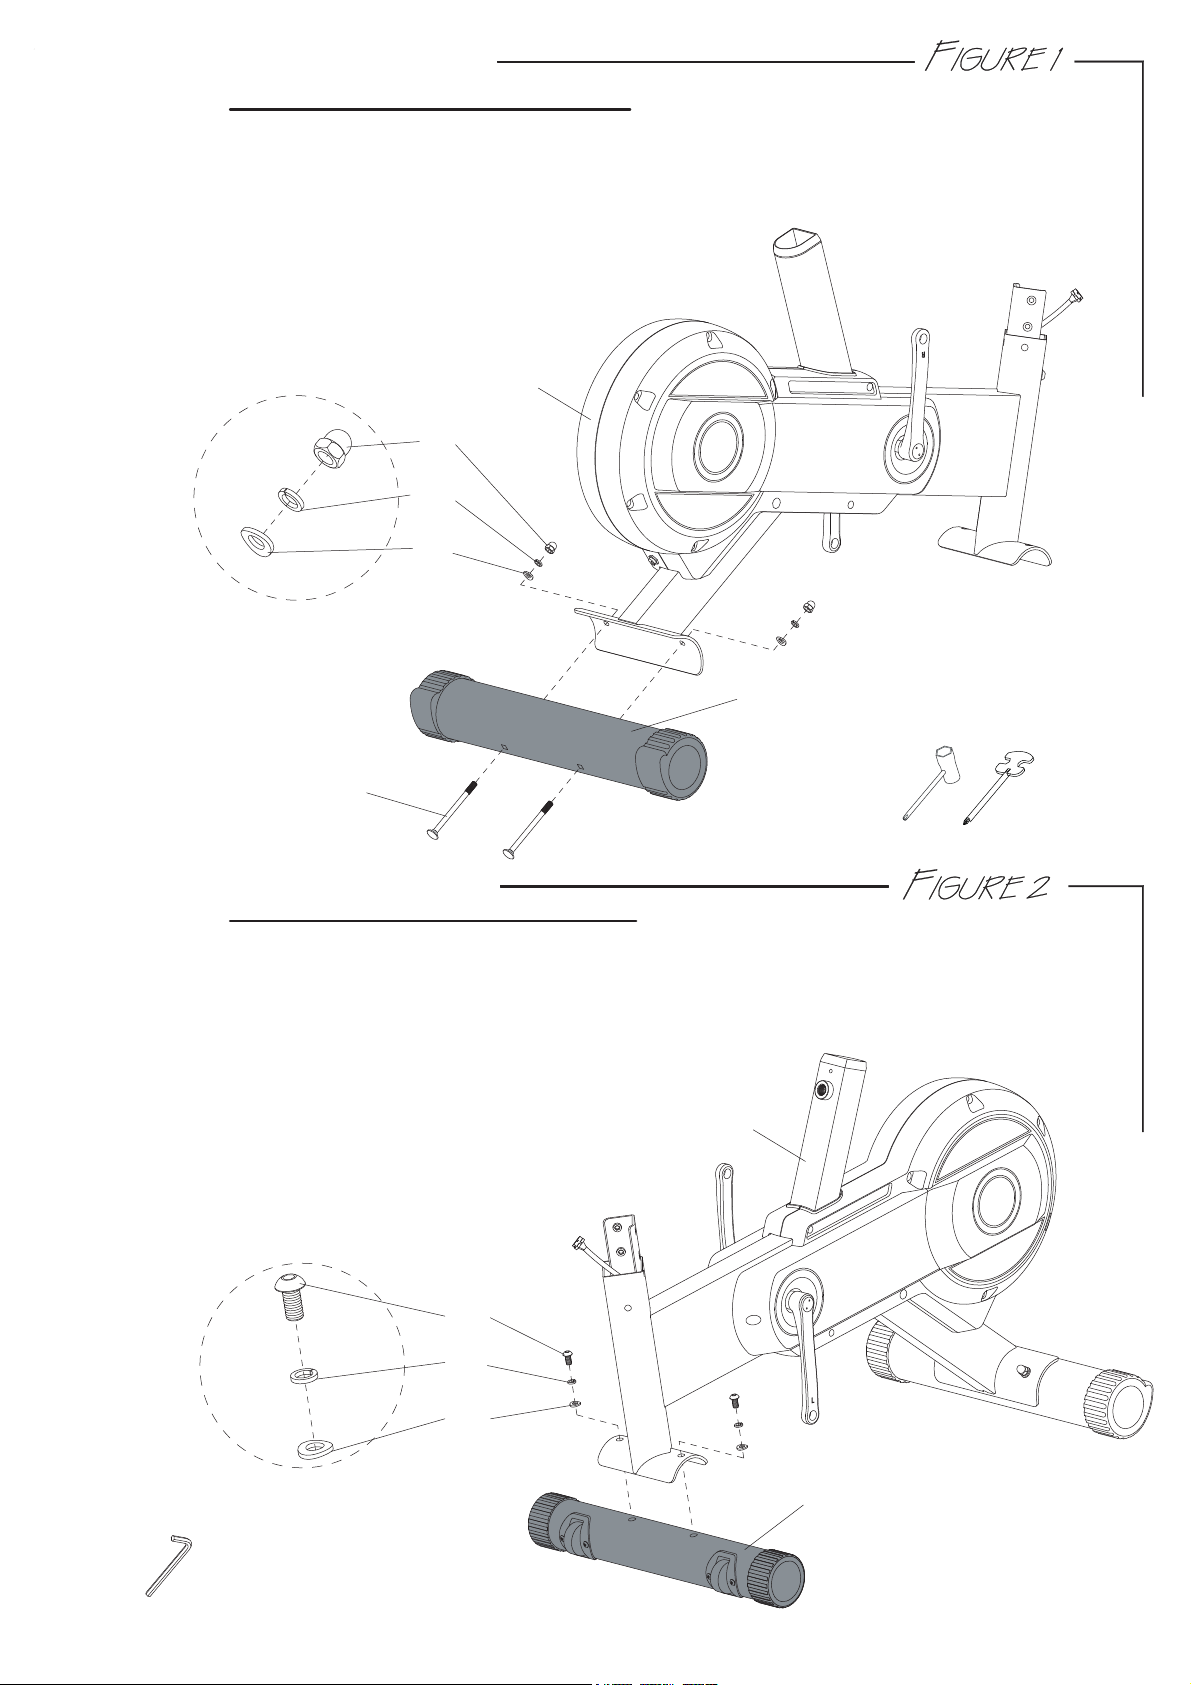
Note: Additional assistance may be needed to help connect sensor wire
and to stabilize central supporting tube (B).
Step 2. Locate and connect sensor wire (M1) with sensor wire (M2),
.ylreporpdeniojerasnoitcennocerusekam
Note: Be careful not to pinch wires while joining the central
supporting tube (B) to the main frame (A).
Step 3. Place the central supporting tube (B) into the main frame (A)
, spring washers (J12) and)4J(swercshtiwmehtniojdn
a
Step 4. Use a 6m/m Allen wrench to tighten screws (J4) firm.
FIGURE 3 : Central SupportingTube Assembly
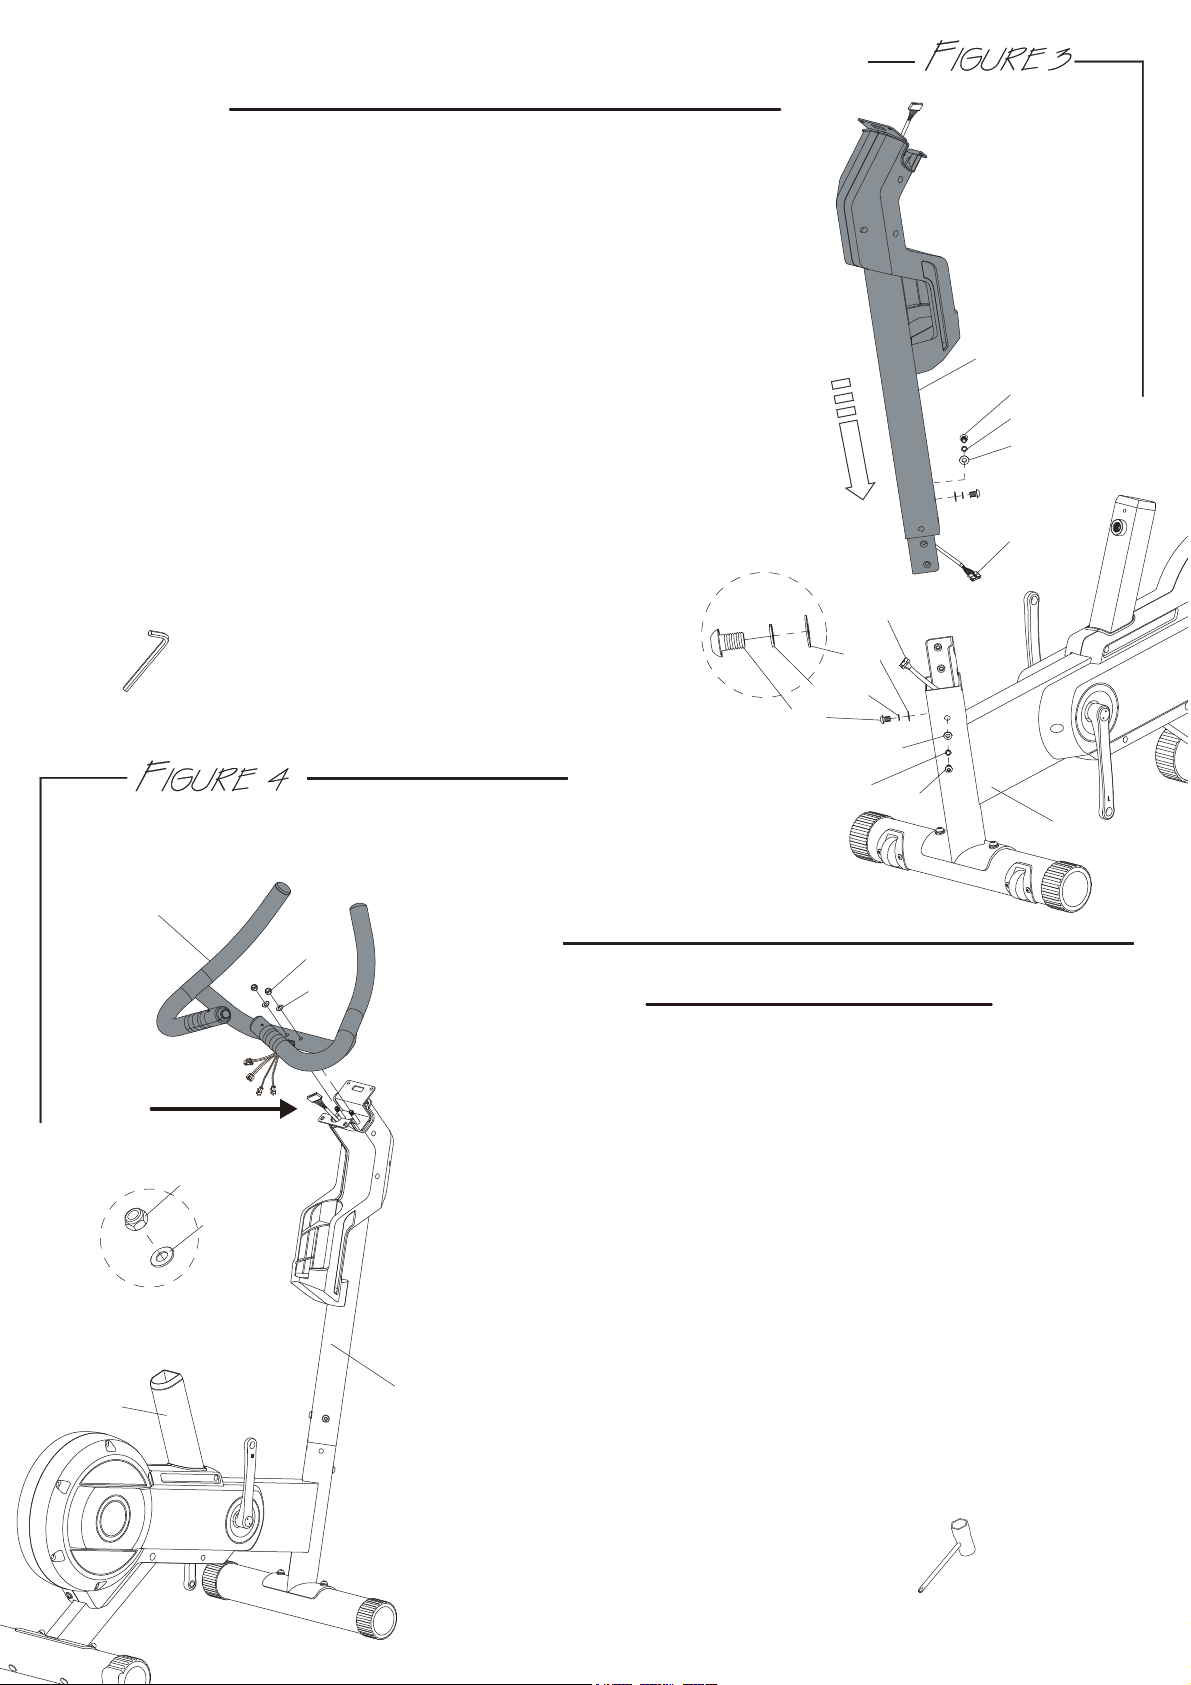
Step 1. Remove nuts (J8) and washers (J9) from the
central supporting tube (B).
Step 2. Join the handle bar (E) assembly to the central supporting
tube (B) using the same washer (J9) and nut (J8).
Step 3. Using a 13mm wrench to tighten nut (J8) firm.
FIGURE 4 : Handle Bar Assembly
A
J4
J5
M1
J5
J4
Note!
Note : Do not pinch the sensor wire when assembling
EJ8
J9
J8
J9
J12
J12
Use tool : 6m/m
Use tool :
Step 1. First, remove the screws(J4), spring washers (J12) and
washers(J5) from the main frame (A).
washers(J5).
B
A
M2
J4
J5
J12
B
3

Step 1. Remove four screws (G1) on the back of the console (G).
Step 2. Connect cable (M2, M4, M5) and the handle pulse sensor wires (M3)
to the console (G). The handle pulse sensor wires (M3) can be interchangeable.
Step 3. Mount the console (G) onto the central supporting tube (B). Be aware of
the wire location at all times to prevent any pinched wires.
Push any extra wires back into the mounting hole of the handle
bar (E). Side the console down until it cannot be pushed any further.
Step 4. Using a screw driver, tighten the console (G) using the same
screws (G1).
FIGURE 5 : Console Assembly
FIGURE 6 : Install Bottle Holder
G1
B
E
G
Put water bottle (L) on bottle holder cover.
M2
M3
M4
M5
L
Use tool :
4
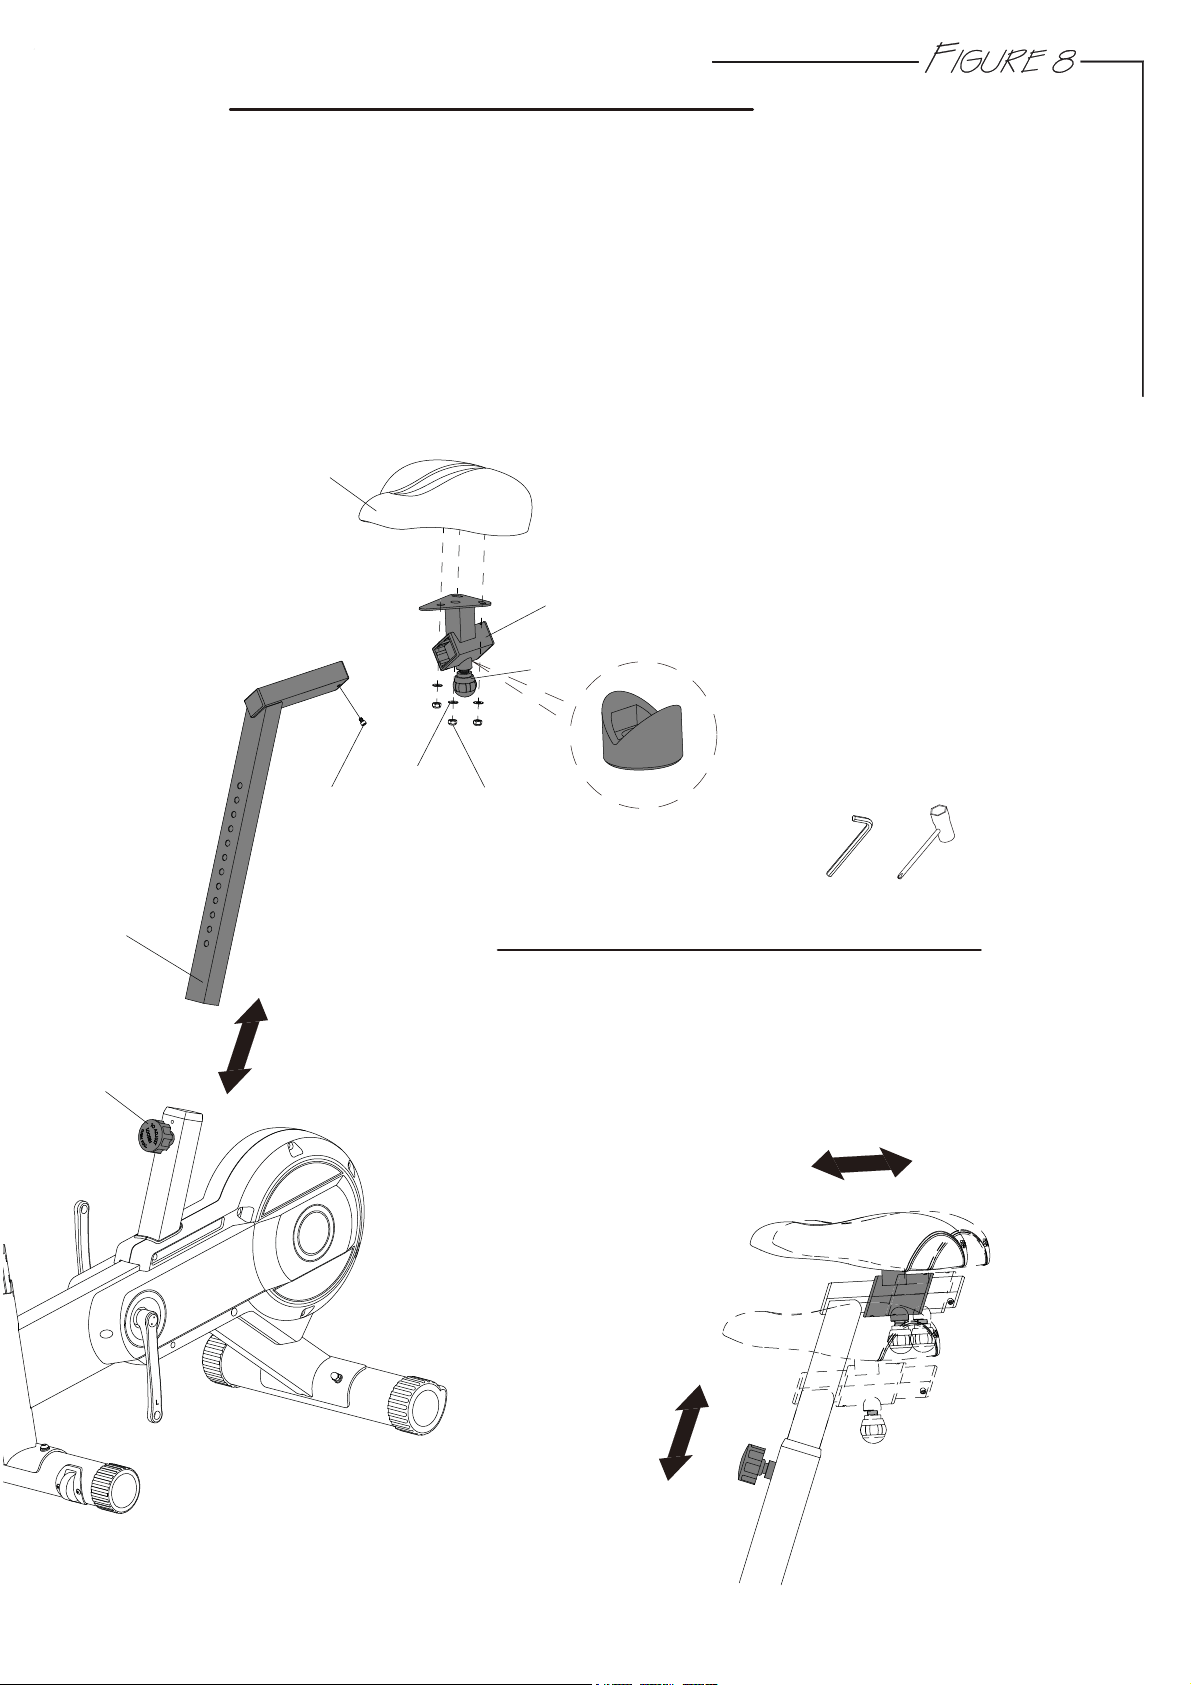
FIGURE 8 : Saddle & Seat Tube Assembly
Adjust the saddle position and height of the bike by loosening
knobs (A46) and (F4).
Adjust both adjustments according to
placement and then firmly tighten each
each rider’s desired
saddle from moving. knob to prevent the
How to Adjust Saddle Position
A46
H
F
H1
H2
F4
F2
Step 1. Remove nuts (H1) and washes (H2) on the back of the saddle (H).
Step 2. Position seat (H) onto the seat basement (F2) and tighten it using nuts (H1) and
washes (H2).
Step 3. Loosen the knob (F4) on the seat tube receiver and pull on the knob (A46) to allow the seat
Once the seat tube (F) is positioned in the desired location, release the knob (A46) and
.erucesotbonkehtnethgit
Step 4. Remove screw (J11) on the seat tube (F).
Step 5. Loosen the knob (F4) and gently slide the seat basement (F2) onto the seat tube (F).
Let the inside styrofoam slide out at the same time. Then screw back the same screw (J11)
onto the seat tube (F). Note: Do not take out the inside styrofoam
until “FIGURE 8 - Step 5.” to let the
stopper (F5) inside the seat noitisopthgirehttatestnemesab
.reviecernwo
dedilsot)F(ebut
J11
Use tool :
4m/m
F5
5
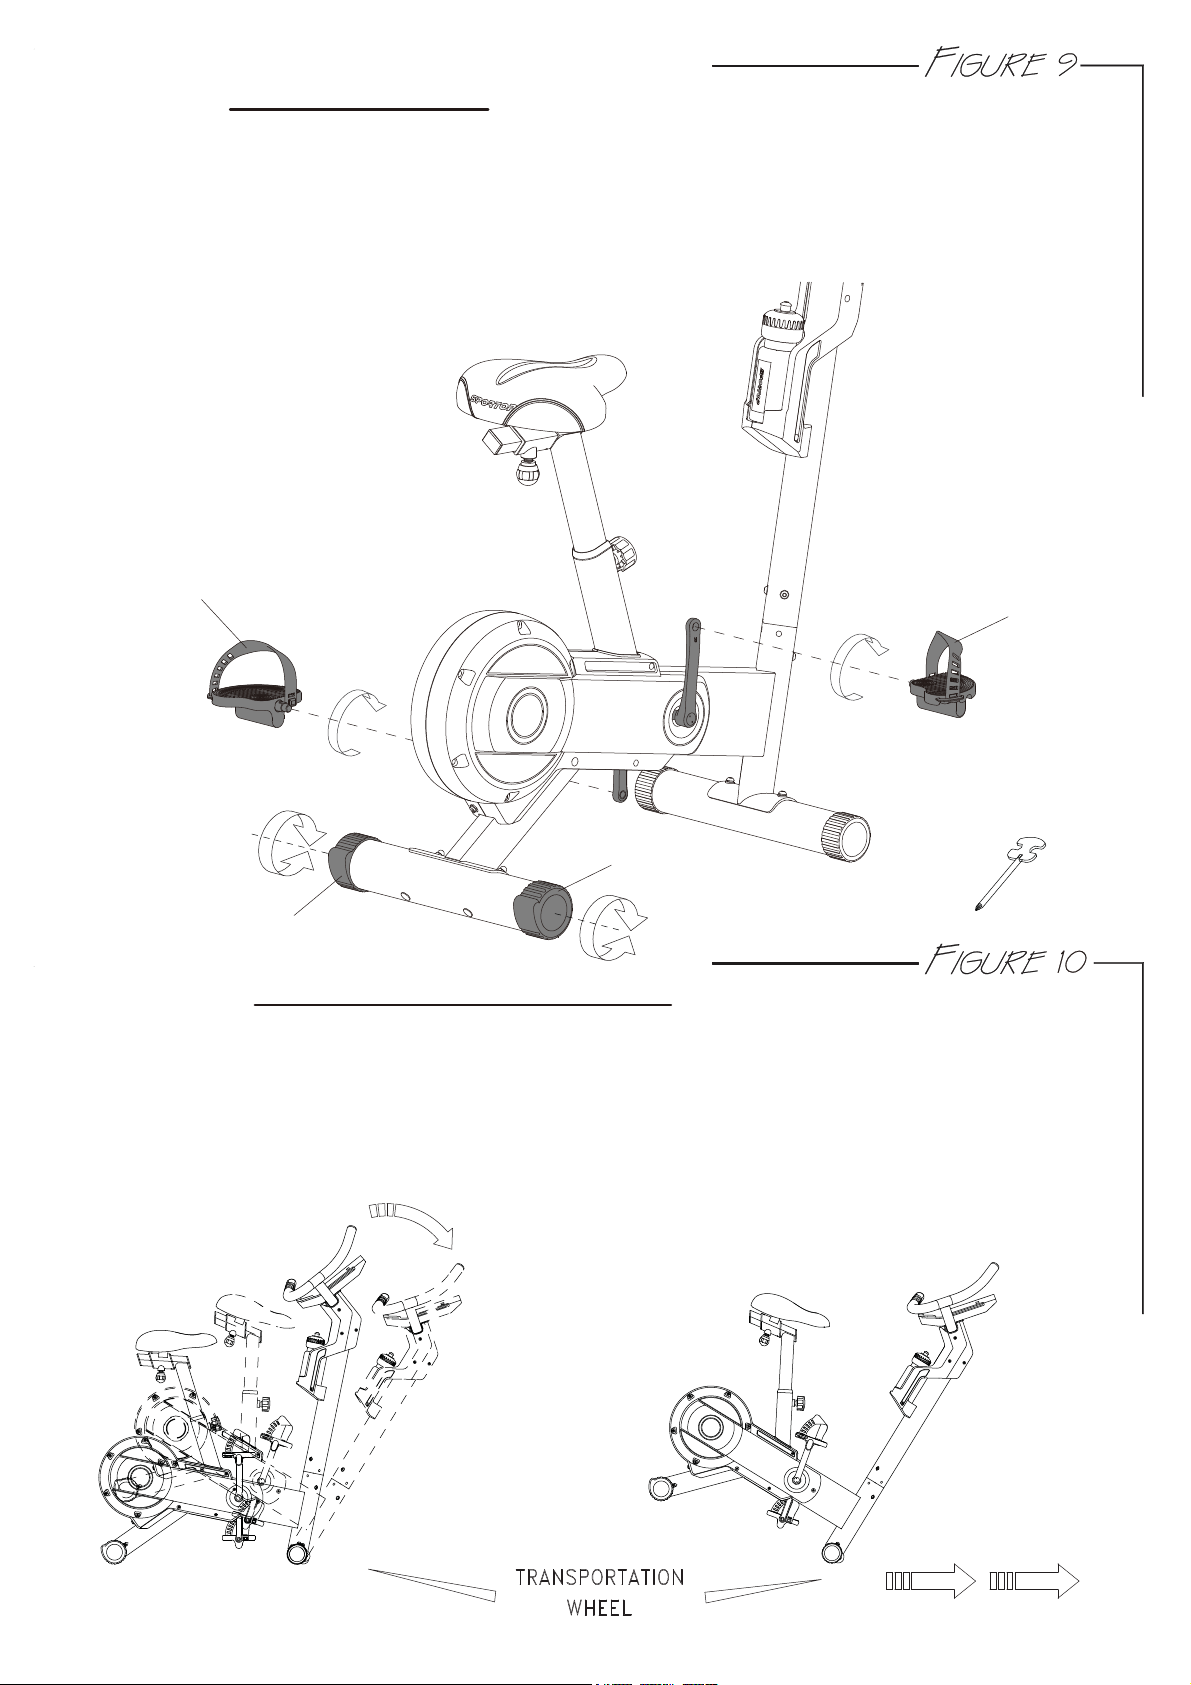
Note: Locate the left & right pedals. There is a Left and Right mark on each pedal and each pedal strap
to distinguishing them.
Step 1. Tighten the left pedal (K1) counter-clockwise to left crank arm and the right pedal (K2)
clockwise to right crank arm. Use a 15mm wrench to tighten each pedal as tight as possible.
Step 2. Insert the pedal straps into each pedal. Adjust the straps according to the user’s shoe size while
on the bike.
FIGURE 9 : Pedal Assembly
FIGURE 10 : How to Transport the Bike
K1
If the machine needs to be transported to a different location, lift up the rear stabilizer until the front
transport wheels are touching the ground. You may now move to the desired location. After the move,
gently set the machine down at its new location and adjust the stabilizers’ end caps to stabilize the
machine if needed.
WARNING: Never attempt to lift the bike by yourself, ask for additional help if needed and never attempt
to lift the machine if you have any medical issues.
K2
NOTE:
if the machine dose not sit level, you
can use the two adjustable end
caps(C2&C3) to compensate for uneven
floors.
C2
C3
Use tool :
6

7” TFT
BUTTON FUNCTIONS
QUICK START BUTTON烉
AˣWhen the console is in SLEEP mode, the quick start button can wake it up.
BˣWhen the console is in STAND BY mode, the button can quick start the console.
TFT Panel operation烉
All operations are performed on the TFT display.
FUNCTION DESCRIPTION
1. Console Function烉
(1) MANUAL烉Average manual setting exercise
(2) PROGRAM烉Program exercise
(3) WATT CONTROL: WATT adjusting program exercise
(4) H.R.C.烉You can set 55%ˣ75%ˣ90%ˣTarget炻Heartbeat value control Level auto-adjustment
(5) RECOVERY烉Heartbeat recovery function test (F1~F6)ˤ
(6) USER DATA烉Profile setting (U0~U4)烉U0 (data not stored) U1~U4(data stored)
(Name, age, height, weight, gender)
(7) COMMUNITY: Multimedia function selection
(8) SETTING MODE烉
WIFI, BRIGHTNESS, VOLUME, LANGUAGE, UNIT SWITCH, ABOUT
CONSOLE DISPLAY
7

DISPLAY FUNCTIONS
1.TIME:
(1) Display range: 0:00~99:59
(2) Setting range:0~99(minutes) (Enter the value directly by using the numeric keypad)
(3) Screen display BAR: Number of cells-10 cells (MAX=60 minutes, display full cells)
(4) When there’s no setting value, the default setting is counting upward (after 99:59 it returns to 0:00)
(5) When there’s setting value, the default setting is counting downward, to 0:00 the console pause, all
the operational values are saved.
2.SPEED:
(1) Display range :0.0~99.9(km/ml)
(2) Screen display BAR: Number of cells-10 cells (MAX=60KM displays full cells, each cell is 60/10=6KM)
(3) After signal input for 3~4 seconds it will display the value.
(4) No signal input for 4~6 seconds the value returns to 0.
3.RPM:
(1) Display range :0~999
(2) Screen display BAR: Number of cells-10 cells (MAX=120RPM displays full cells, each cell is
120/10=12RPM)
(3) After signal input for 3~4 seconds it will display the value.
(4) No signal input for 4~6 seconds the value returns to 0.
4.DISTANCE:
(1) Display range:0.0~60(km/ml)
(2) Setting range:0~99 (Enter the value directly by using the numeric keypad)
(3) Screen display BAR: Number of cells-10 cells (MAX=10.0KM displays full cells)
When there’s no setting, 10.0KM/10 cells=1.0KM/cell
When there’s setting, the setting value/10 cells.
(4) When there’s no setting value, the default setting is counting upward (99.9 turns 0.0)
(5) When there’s setting value, the default setting is counting downward, to 0:00 the console pause, all
the operational values are saved.
5.CALORIES:
(1) Display range:0~999
(2) Setting range:0~990 (Enter the value directly by using the numeric keypad)
(3) Screen display BAR: Number of cells-10 cells (MAX=150 CAL displays full cells)
When there’s no setting, 150 CAL/10 cells=15 CAL/cell
When there’s setting, the setting value/10 cells.
(4) When there’s no setting value, the default setting is counting upward(999 turns 0)
(5) When there’s setting value, the default setting is counting downward, to 0:00 the console pause, all
the operational values are saved.
6.PULSE:
(1) Display range:0~230
(2) Setting range:0~230 (Enter the value directly by using the numeric keypad)
(3) Screen display BAR: Number of cells-10 cells (MAX=120 displays full cells, each cell is
120/10=12/cell)
(4) Field display detection value when no value is set
(5) When there is a set value, the field displays the detected value. When the heartbeat value exceeds
the set value, the console will beep.
(6) The sound is 1 second 2 short beeps.
8

7.WATT:
(1) Display range:0~999
(2) Setting range: not settable.
(3) Screen display: Number of cells-10 cells (MAX=350 displays full cells炻each 350/10=35/cell)
(4) According to RPM&LOAD cells display (WATT console)
8.LOAD:
(1) Display range:1~16
(2) Setting range:1~16
(3) Screen display: Number of cells-16 cells (MAX=16 displays full cells)
9.USER:
(1) Users: U0~U4
(2) U0 not saved after setting
(3) U1~U4 after setting can store profile.
(4) Can set and store AGEˣHEIGHTˣWEIGHT炻USER NAME炻GENDER
AGE: Setting range:1~99 (Default 25)
HEIGHT: Setting range:100~250 CM (Default 160 CM)
40~99 INCH (Default 60 INCH)
WEIGHT: Setting range:20~150KG (Default 50 KG)
40~350 LB (Default 100 LB)
USER NAME SETTING: XXXXXXXXXX
GENDER: MALE / FEMALE
9
INSTRUCTIONS
Power up烉
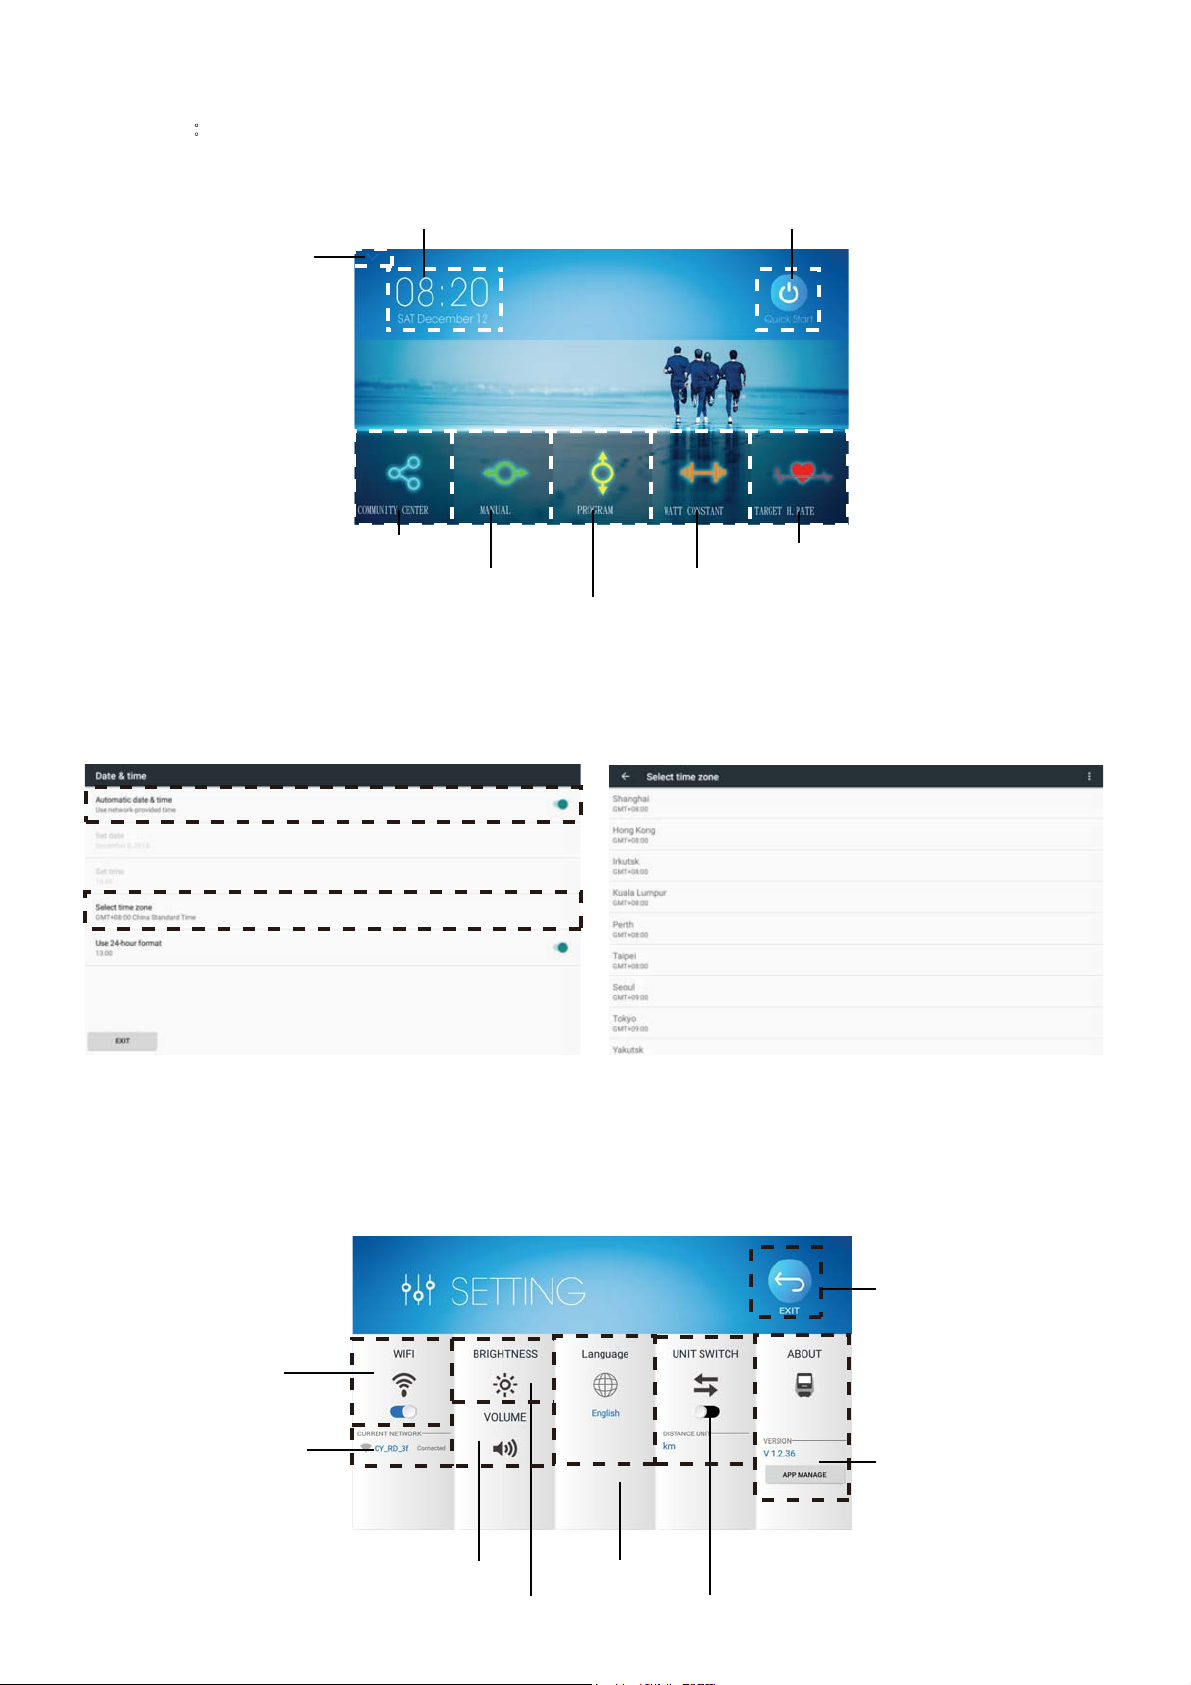
1. Console power up image , after about 30 seconds, enter STAND BY mode (image1), the function key
panel will raise.
2. Under STAND BY mode, press "Time / Perpetual Calendar Box" to set time and perpetual calendar.
Default value 2018/01/01.
*** After pressing "Time / Perpetual Calendar Box", please turn on “Automatic date & time” and select
your time zone from “Select time zone”
image 2 image 3
3. Under STAND BY mode, press QUICK START key to enter QUICK START function.
4. Under STAND BY mode, press the drop-down arrow to enter SETTING mode.
WIFI, BRIGHTNESS, VOLUME, LANGUAGE, UNIT SWITCH, ABOUT.
image 1
"Time / Perpetual Calendar Box" QUICK START function
factory mode
COMMUNITY CENTER
MAUNAL
PROGRAM
WATT CONSTANT
TARGET H.RATE
screen brightness metric switching
exit
WIFI select
WIFI ON / OFF
volume
image 4
updates
LANGUAGE
10
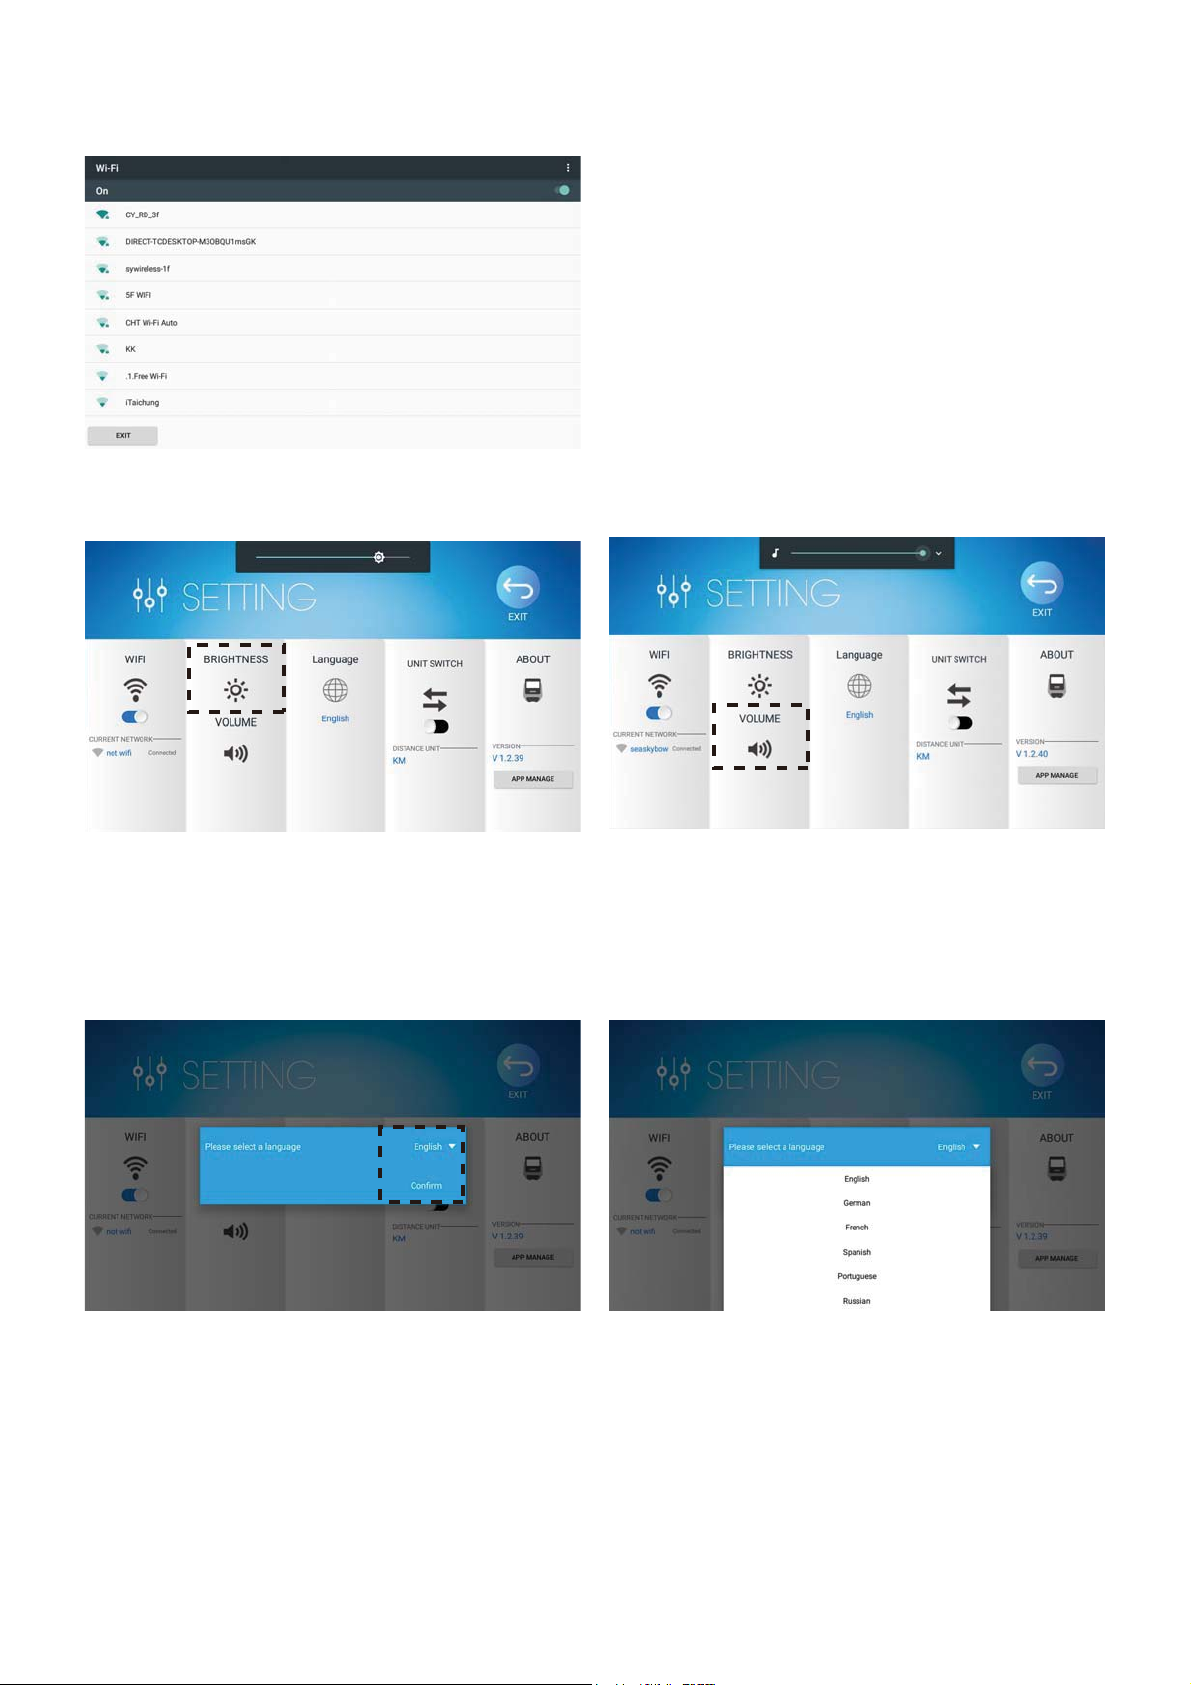
(1)WIFI
Turn on the WIFI, and select the available network to connect.
image 5
(2) BRIGHTNESS
Slide the bar to adjust the brightness.
image 6
(3) VOLUME
Slide the bar to adjust the volume.
image 7
(4) LANGUAGE
Select the language you want from the list.
image 8 image 9
Languages are available in English, German, French, Spanish, Portuguese, Russian, Traditional Chinese,
Chinese, Czech, Slovak, Polish, and Hungarian.
11
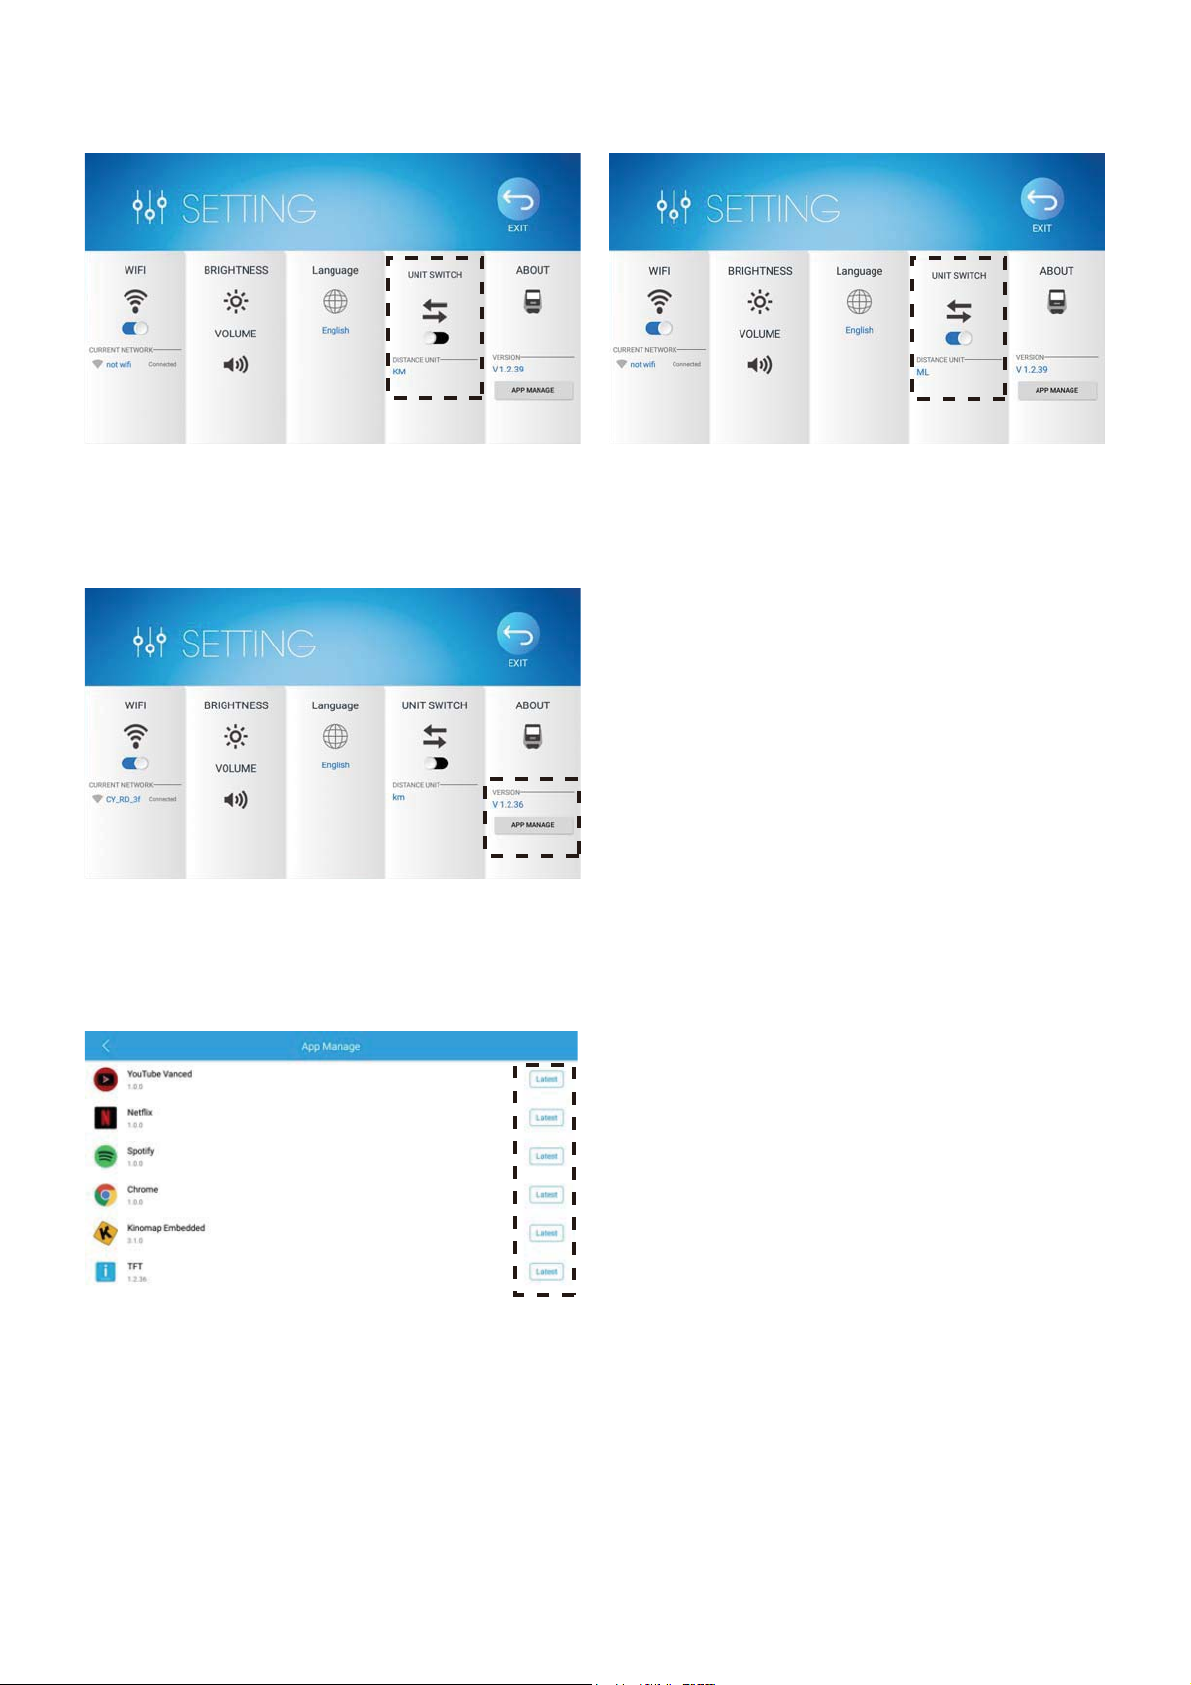
(5) UNIT SWITCH
Switch KM or ML.
image 10 image 11
(6) ABOUT
Console version will be showed on About area.
When user presses APP MANAGE, it will automatically detect if there is the latest version.
image 12
After console detecting, if APP is the latest version, the right side will show “Latest”;
if APP is not the latest version, the right side will show“Update”, the user can click the button and
follow the direction to update.
image 13
5. Select COMMUNITY CENTERˣMAUNALˣPROGRAM炻WATT CONSTANTˣTARGET H.RATE enter function
12

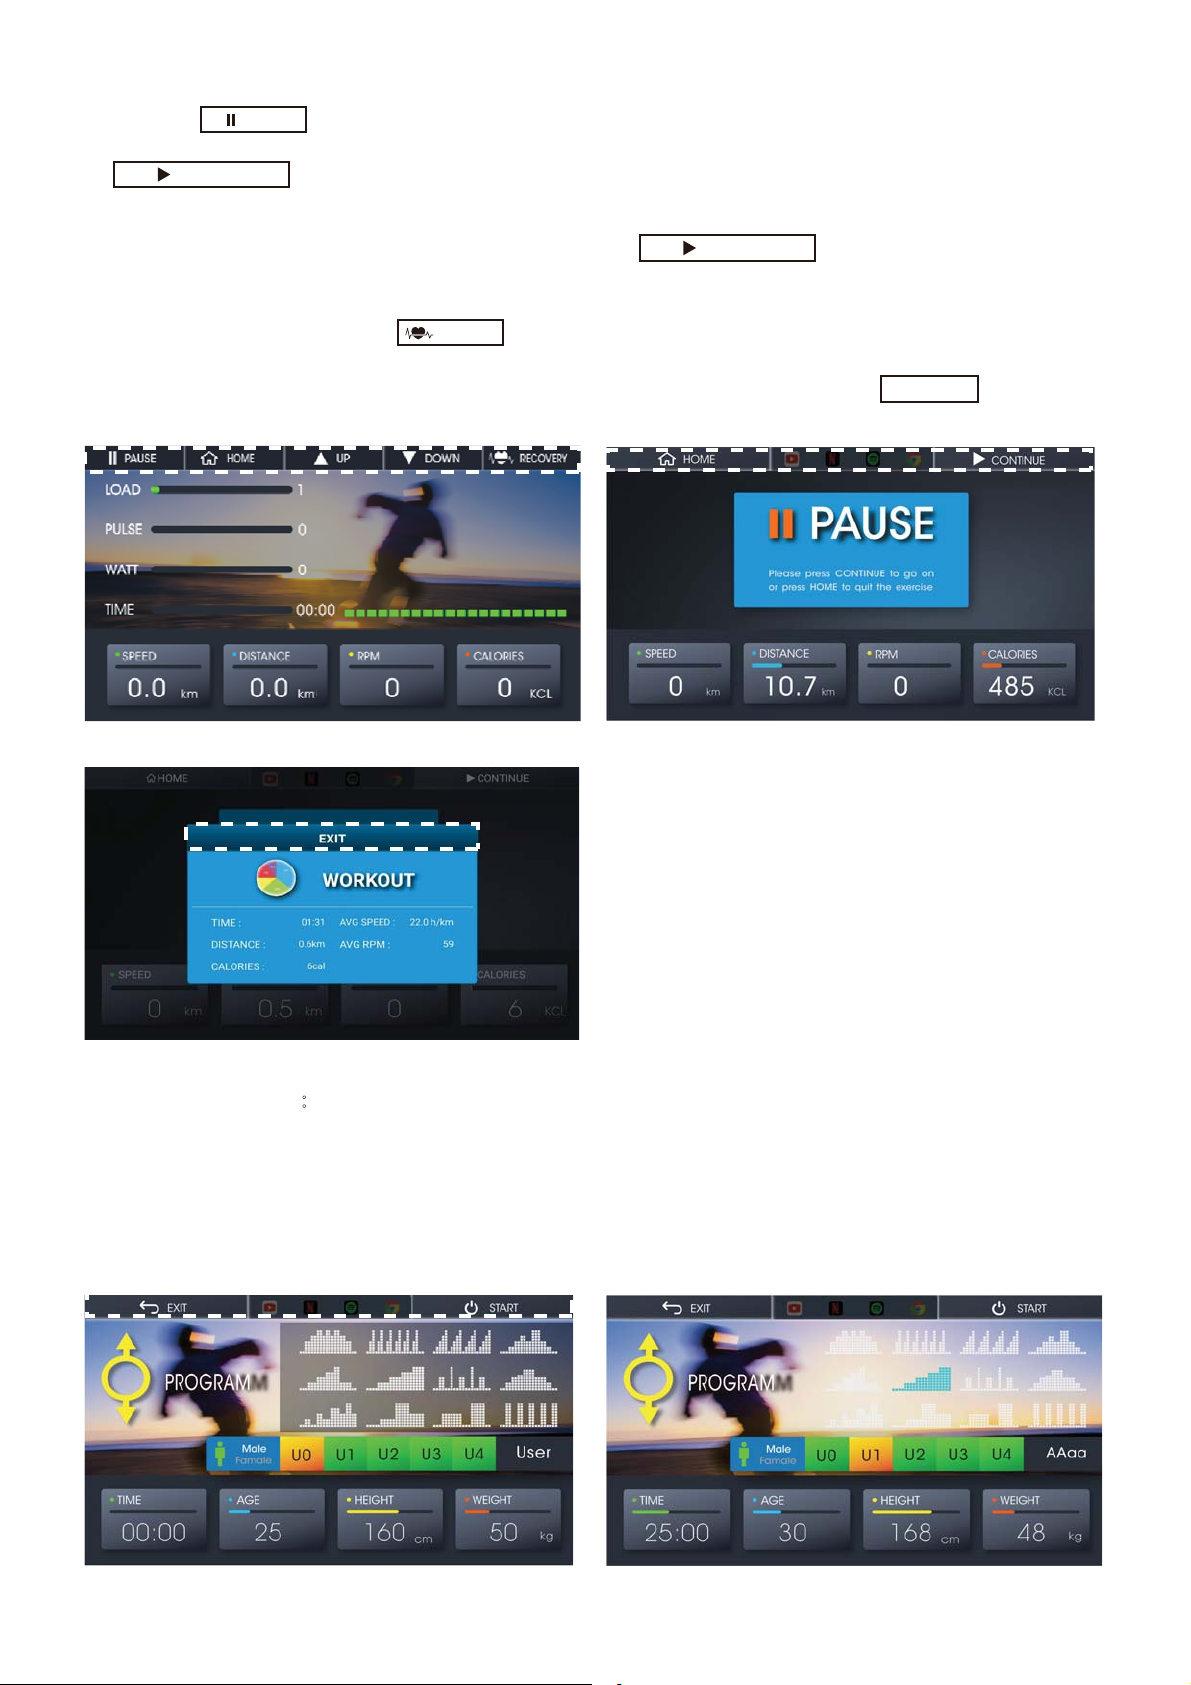
Quick start function烉
Under STAND BY mode, press to enter QUICK START function, the console will enter the motion
picture (image 14).
image 14
1.When the RPM input is >15, SPEEDˣDISTANˣRPMˣCALORIES and every value will start loop counting.
2.Press or to adjust LOAD, the matrix image will rise or decline, the matrix will
switch a field every 0.1km/ml.
image 15 image 16
image 17
4.During the work out, press to enter RECOVERY function. When counting down to 0, it
will show the result and press any position on the screen to return to homepage.
PAUSE
UP DOWN
RECOVERY
CONTINUE
CONTINUE
5. Press HOME, the WORKOUT data will display and press EXIT to return to homepage.
( Training time is less than 30 seconds and WORKOUT data will not be displayed)
3. Press to enter pause mode, the word PAUSE will be shown on the LCD display, the
console will pause, and the SPEED&RPM returns to 0.
The other values will keep, the motor returns to LOAD1,
Under Pause mode, user can choose multimedia (YouTube炻Netfilx炻Spotity炻Chrome), press the
multimedia that you want it will light up, and press to start the multimedia.
Without choose multimedia, press to resume the console execution display.
Press HOME, the WORKOUT data will display and press EXIT to return to homepage. ( Training time is
less than 30 seconds and WORKOUT data will not be displayed)
13

2.Select any multimedia below to activate the multimedia function(image ).
3.After activating the multimedia, slide the left arrow from left to right and it will display the HOME /
QUICK START key (image ).
4.If there is no movement within 3 seconds, the lightness will fade to 50%, you can press “烋” key to
hide the function panel.
image image
5.After activating the multimedia, slide the right arrow from right to left, the SPEEDˣLOADˣġ
DISTANCEˣTIMEˣRPMˣWATTˣCALORIESˣPULSE will be displayed according to the current
status(image 2), if there is no movement within 3 seconds, the lightness will fade to 50%.
6.Press ”烍“ key to hide the function panel.
image 2image 2
7. Press QUICK START, every calculating value will start counting. During the work out process press
UP or DOWN to adjust the resistance, press PAUSE and the console will
pause. SPEED & RPM & WATT value returns to 0, other value will be kept
(image 2).
COMMUNITY CENTER function烉
1.Under STAND BY mode, press COMMUNITY CENTER to enter said function (image 1), the
multimedia function below will rise (image 1).
image 1image 1
14
8. Press HOME, the WORKOUT data will display and press EXIT to return to homepage, or press
CONTINUE to keep training.
( Training time is less than 30 seconds and WORKOUT data will not be displayed)
image 2
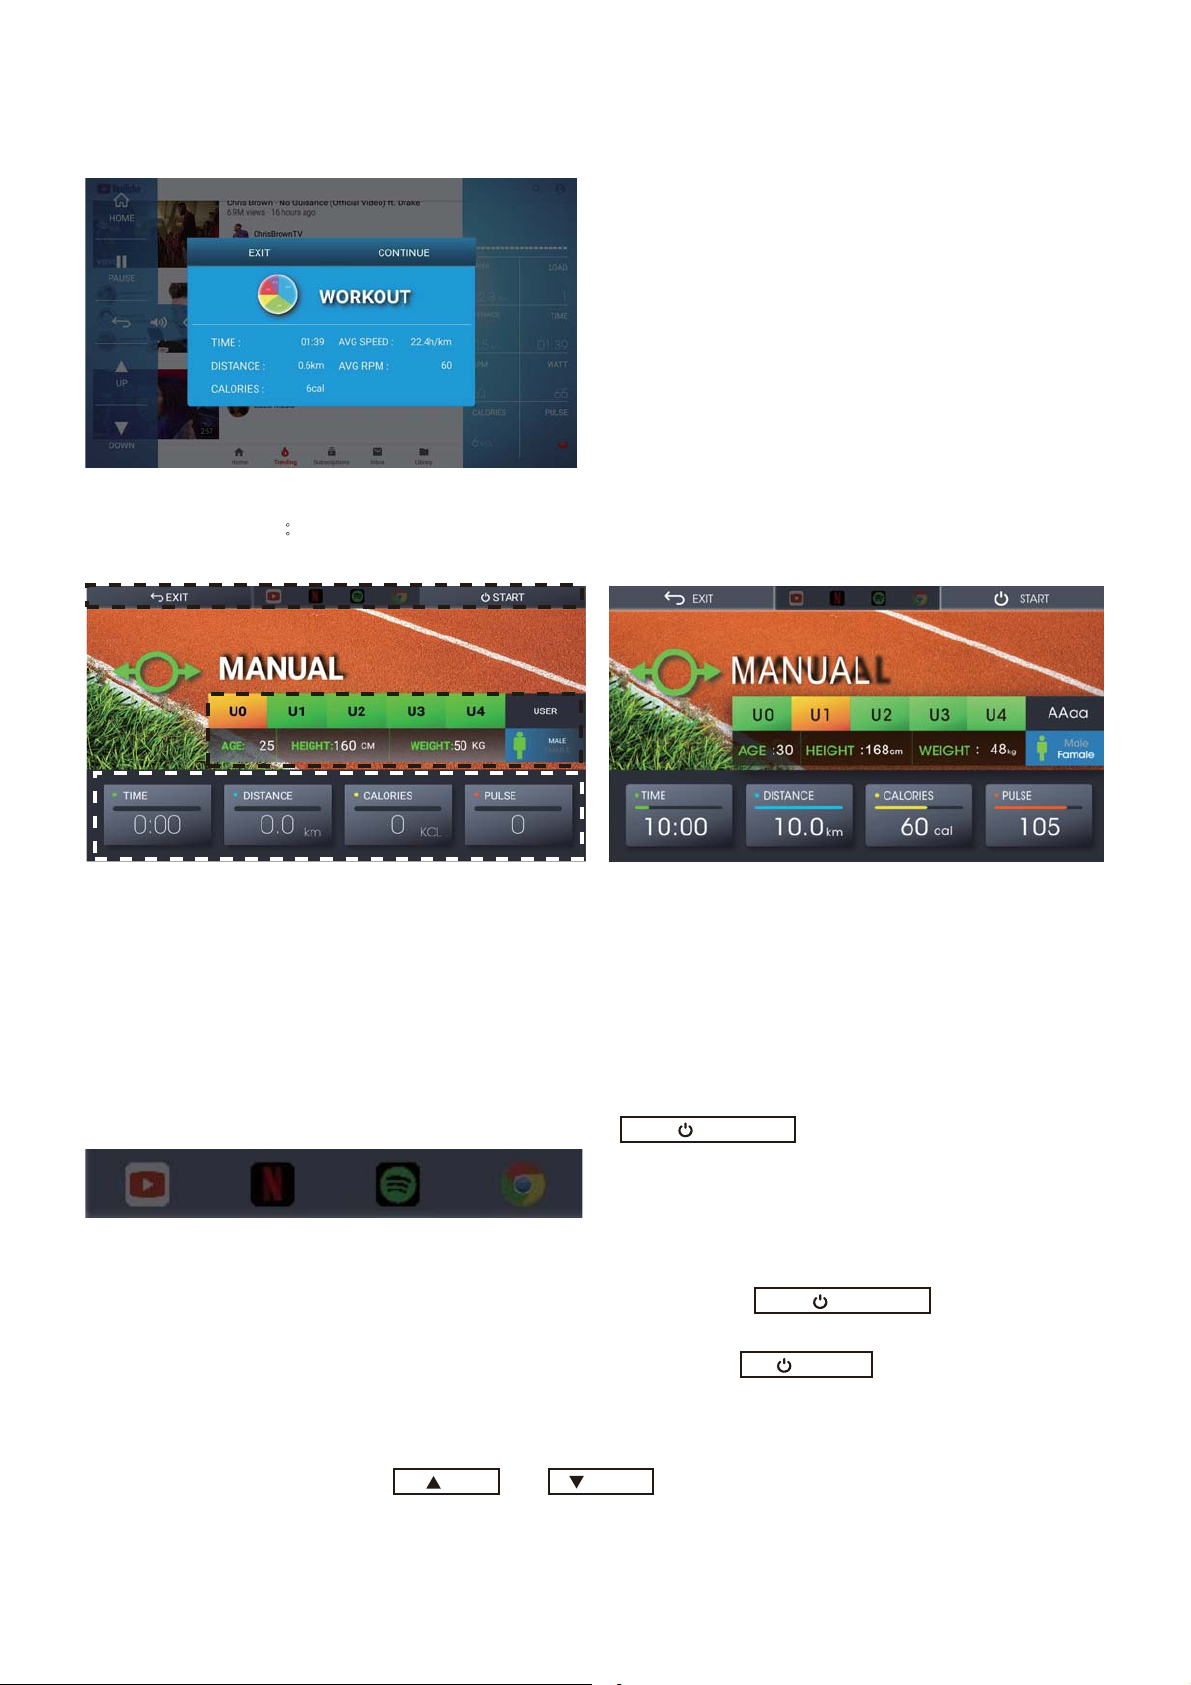
MANUAL function烉
1.Under STAND BY mode, press MANUAL to enter said function (image 2).
image 2image 2
2.You can press U0~U4 to switch between different users, and the user information will also be
displayed accordingly. (U0 is for guest use, data will not be saved.)
3.You can select AGEˣHEIGHTˣWEIGHT to set the user’s age, height, weight, select Male/Female, and
press User to set NAME.
4.Select the below TIMEˣDISTANˣCALORIESˣPULSE to set target time, distance, calorie,
heartrate(image 2).
7. and the consoleWhen there’s no setting TIMEˣDISTANˣCALORIESˣPULSE,
press
count upward (image 2).
9. During the work out, press or to adjust LOAD, the matrix image will rise or
decline, the matrix will switch a field every 0.1km/ml. When TIME is set the matrix will switch field
every /20.
UP DOWN
START
START
START
image 2
6.During the setting, press EXIT, the console returns to the home page.
8.When there’s setting TIMEˣDISTANCEˣCALORIESˣPULSE, press and the console count
downward, the function that has setting value will start counting downward according to the
calculated value. When one of the function values count down to 0 the system will stop, the
WORKOUT data will display and press EXIT to return to homepage.
5.Under STANDBY mode, user can choose multimedia (YouTube炻Netfilx炻Spotity炻Chrome), press the
multimedia that you want it will light up, and press to start the multimedia.
15
11.During the work out, press to enter RECOVERY function. When counting down to 0, it
will show the result and press any position on the screen to return to homepage.
'
image 28 image 29
'
'
'
'
'
'
'
'
'
'
'
PAUSE
RECOVERY
CONTINUE
CONTINUE
EXIT
10.Press to enter pause mode, the word PAUSE will be shown on the LCD display, the
console will pause, and the SPEED&RPM returns to 0. The motor returns to LOAD1(image 29), press
to resume console activating motion picture.
Under PAUSE mode, user can choose multimedia (YouTube炻Netfilx炻Spotity炻Chrome), press the
.aidemitlumehttratsotsserpdna,puthgillliwtitnawuoytahtaidemitlum
Press HOME, the WORKOUT data will display and press EXIT to return to homepage. ( Training time
is less than 30 seconds and WORKOUT data will not be displayed)
12.During the work out, press HOME, the WORKOUT data will display and press to return to
homepage. ( Training time is less than 30 seconds and WORKOUT data will not be displayed)
image 30
PROGRAM function烉
1.Under STAND BY mode, press PROGRAM to enter said function(image ).
2.You can press image (12 PROGRAM images) and select work out mode (image ).
3.You can press U0~U4 to switch between different users, and set user profile, and the user
information will also be displayed accordingly.
4.You can press TIME to set time, select AGEˣHEIGHTˣWEIGHT to set the user’s age, height, weight,
select Male/Female, and press User to set NAME.
image image
16
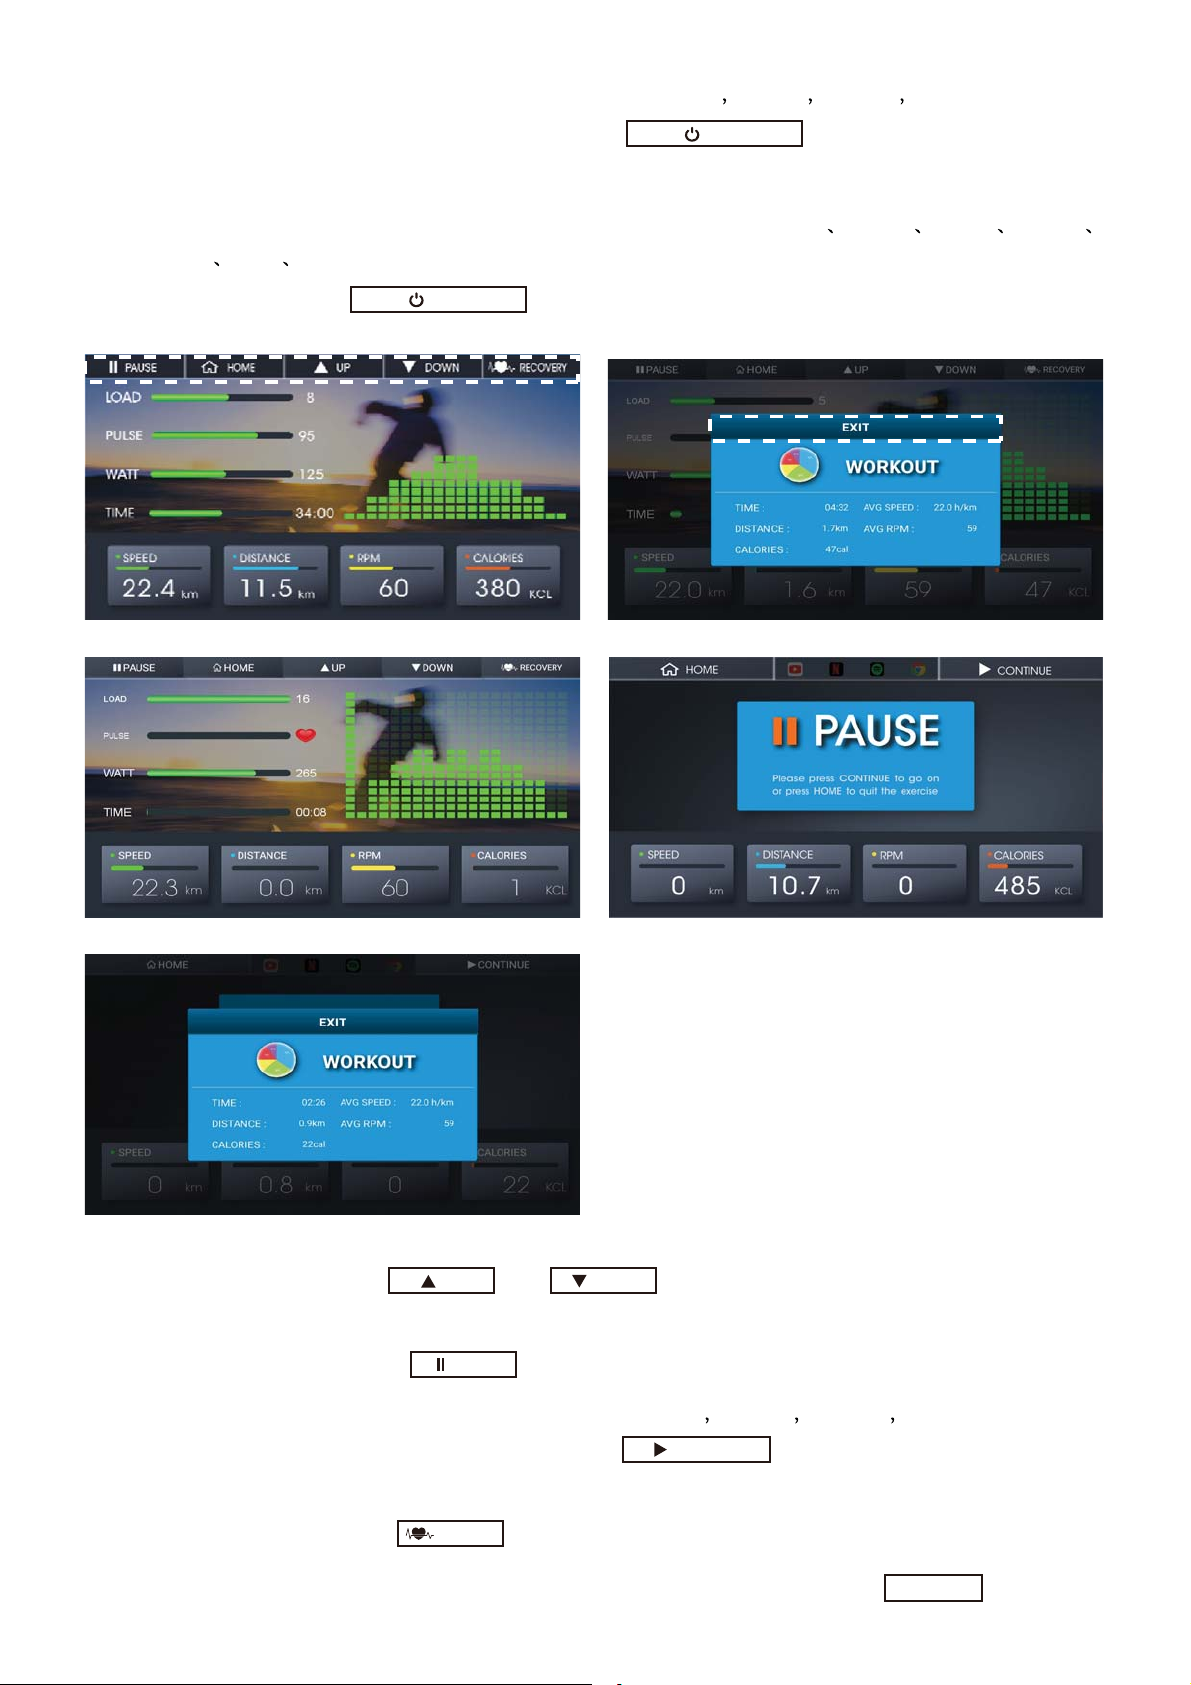
image 33 image 34
image 35
image 37
image 36
PAUSE
UP DOWN
RECOVERY
START
5.
Under STANDBY mode, user can choose multimedia (YouTube Netfilx Spotity Chrome), press the
multimedia that you want it will light up, and press
START
to start the multimedia
6.During the setting, press EXIT, the console returns to the home page.
7.Press START to start the work out, the console will enter the motion picture, the console value will
count upward, the matrix will display the chosen work out image, LOAD PULSE WATT SPEED
DISTANCE RPM CALORIES displays work out value. (image 33)
8. If the time is set, press and start counting down, counting down to 0 and the
console will stop, and the WORKOUT data will display and press EXIT to return to homepage.(image 34)
9.During the work out, press or toadjustLOAD.Theloadofprofilecanbe
adjusted to MAX load to 16, or to MIN load to 1(image 35). The matrix will switch a field every
0.1km/ml. If the time is set, the matrix will switch a field every /20.
10.During the work out, press to stop the work out screen display, every value will be
saved, the motor returns to LOAD 1.
Under PAUSE mode, user can choose multimedia (YouTube Netfilx Spotity Chrome), press the
multimedia that you want it will light up, and press
to start the multimedia.(image 19)
Press HOME, the WORKOUT data will display (image 37) and press EXIT to return to homepage.
( Training time is less than 30 seconds and WORKOUT data will not be displayed)
otnwodgnitnuocnehW.noitcnufYREVOCERretneotsserp,tuokrowehtgniruD.11
0, it will show the result and press any position on the screen to return to homepage.
12.
During the work out, press HOME, the WORKOUT data will display and press
to return to
homepage. ( Training time is less than 30 seconds and WORKOUT data will not be displayed)
CONTINUE
EXIT
17

WATT CONSTANT function
1.Under STAND BY mode, press WATT CONSTANT to enter said function (image 38).
2.You can press WATT to set WATT value (Default value :125W).
3.You can press U0~U4 to switch between users, the user information below will also be displayed
accordingly.
4.You can press TIME to set time, select AGE HEIGHT WEIGHT to set the user’s age, height, weight,
select Male/Female, and press User to set NAME (image 39).
5.During the setting, press EXIT, the console returns to the home page.
6.Press START to start the work out, the console will enter the motion picture, SPEED RPM TIME
DISTAN CALORIES WATT displays work out value (image 40).
image 38 image 39
image 40 image 41
image 42 image 43
8.TARGET WATT CONSTANT DATA: The value will be displayed according to WATT setting.
REAL WATT CONSTANT DATA: Displays actual work out WATT value.
LOAD CONTROL DATA LOAD shows target WATT value that pair with the LOAD value.
9. During the work out, press to stop the work out screen display, every value will be
saved, the motor returns to LOAD 1. (image 42)
PAUSE
START
7. If the time is set, after
, it will start the count down. Counting down to 0, the console
will stop and WORKOUT data will display(image 41), press to return to homepage.
EXIT
18
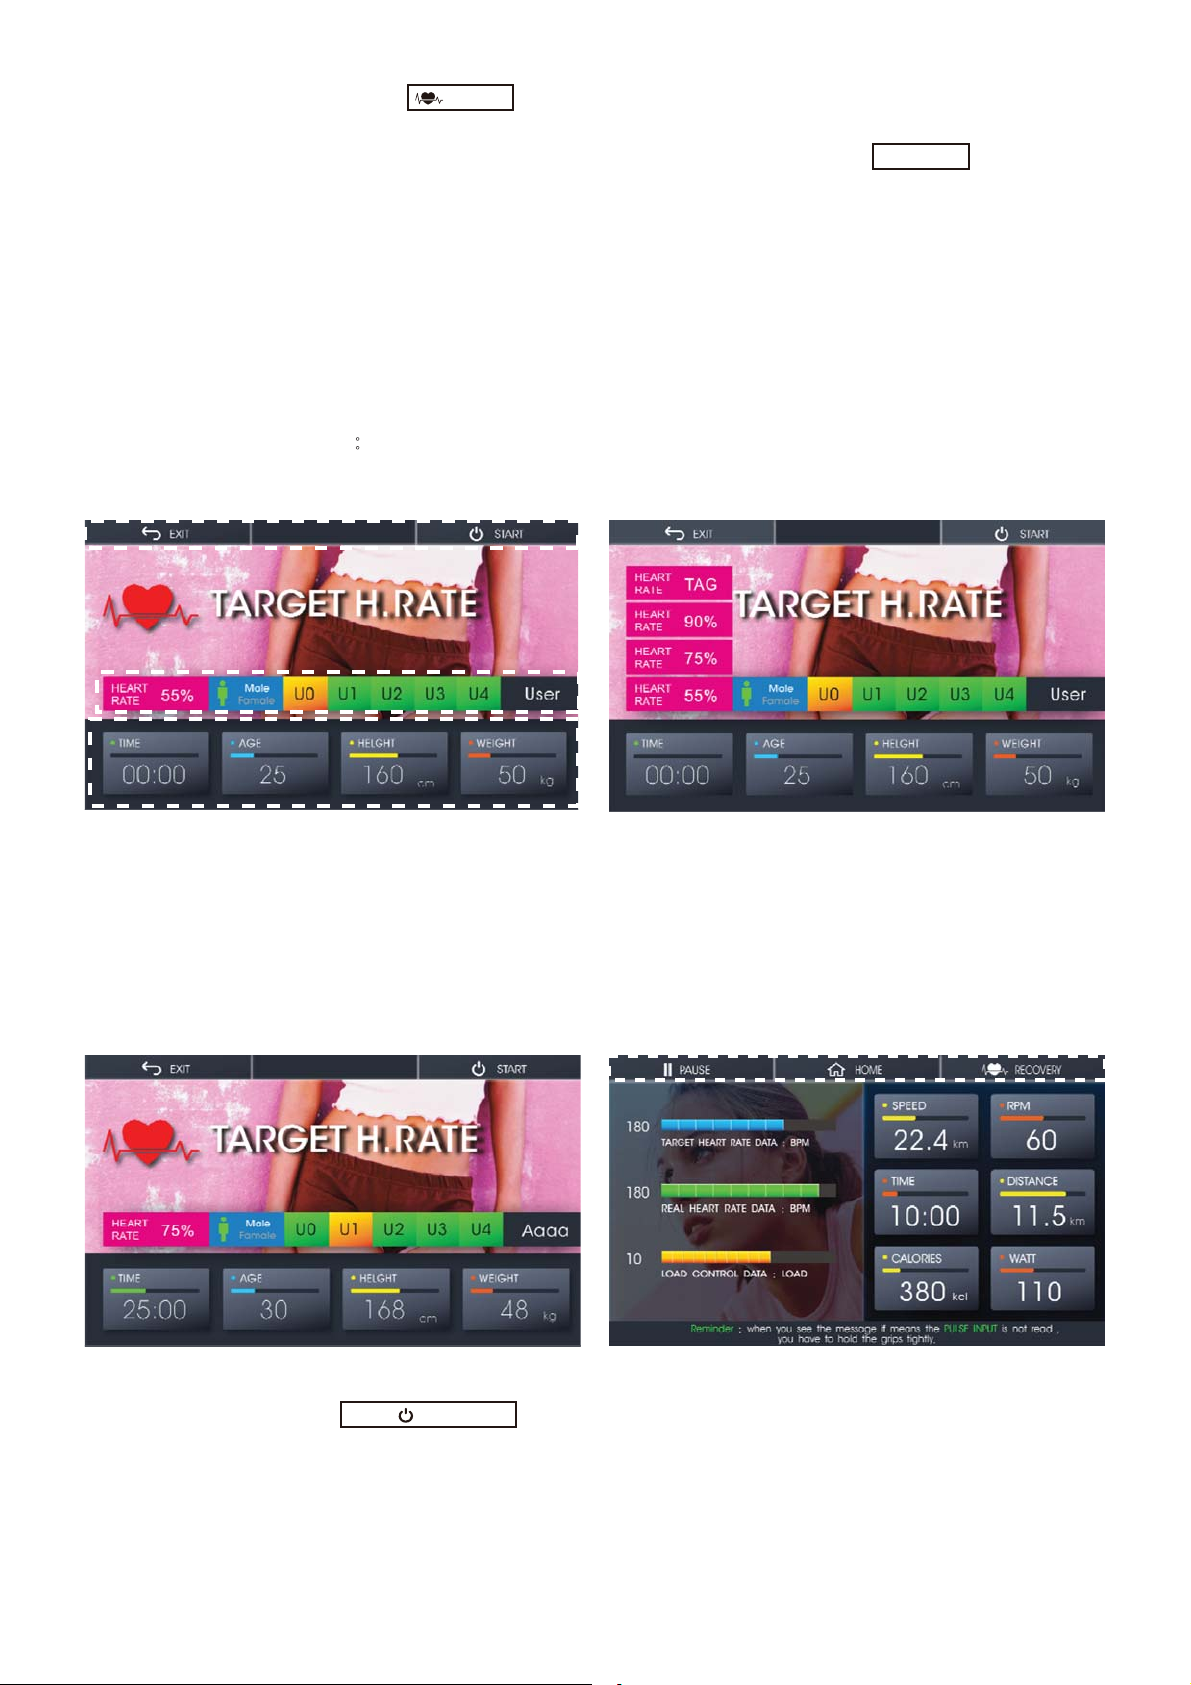
TARGET H.RATE function烉
1.Under STAND BY mode, press TARGET H.RATE to enter that function(image 44).
2.You can select TAGˣ90%ˣ75%ˣ55% to set heartbeat target value (image 45).
image 44 image 45
3.You can press U0~U4 to switch between users, the user information below will also be displayed
accordingly.
4.You can press TIME to set time, select AGEˣHEIGHTˣWEIGHT to set the user’s age, height, weight,
select Male/Female, and press User to set NAME (image 46).
5.During the setting, press EXIT, the console returns to the home page.
6.Press START to start the work out, the console will enter the motion picture炻SPEEDˣRPMˣTIMEˣ
DISTANˣCALORIESˣWATT displays work out value (image 47).
image 46 image 47
7. If the time is set, after , it will start the count down. Counting down to 0, the
consple will stop
8.TARGET HEART RATE DATA烉BPM displays set values based on age.
REAL HEART RATE DATA烉BPM display actual heartbeat value.
LOAD CONTROL DATA烉LOAD display current LOAD value.
START
10.During the work out, press to enter RECOVERY function. When counting down to 0,
it will show the result and press any position on the screen to return to homepage.
12.WATT will be displayed according to the current speed.
Too slow: Please accelerate your speed. Actual watt value < Set watt value (1-25%)
Moderate: Please keep current speed. Set watt value (1+25%)> Actual watt value > Set watt value
(1-25%)
Too fast: Please slow down your speed. Actual value >Set value (1+25%)
13.LOAD will be adjusted according to the RPM&WATT form and respective LOAD value(the principle
is not exceeding the LOAD of the target) to show the closest LOAD value.
RECOVERY
11.
During the work out, press HOME, the WORKOUT data will display and press
to return to
homepage.(image 43) ( Training time is less than 30 seconds and WORKOUT data will not be displayed)
and WORKOUT data will display, press EXIT to return to homepage.
EXIT
19
Other manuals for U80
1
Table of contents
Other Sportop Exercise Bike manuals


Popular Exercise Bike manuals by other brands

BODY BIKE
BODY BIKE Basic Instructions for mechanics

Christopeit Sport
Christopeit Sport AL 1 Assembly and exercise instructions

Yamaha
Yamaha bikespeed-RS Instructions for the installation and description of the functions

Precor
Precor RBK 615 Product owners manual

Monark
Monark EVO manual

True Fitness
True Fitness Z7 Series owner's guide


