Spotlight miniPAR N100 User manual

MI PAR N100 / MI PAR T75 / MI PAR BS35
User's Manual
miniPAR

ATTENZIONE:
Prima di usare questi apparecchi, leggere attentamente le istruzioni che seguono.
Spotlight srl non potrà essere ritenuta responsabile di danni derivanti dalla
non osservanza di dette istruzioni.
SAFETY WARNING:
Before using this products, read the present instructions carefully.
Spotlight srl will not be responsible for damage resulting from instructions
not being followed.
INDICE
Descrizione dei proiettori pag. 2
Indicazioni generali pag. 2
Installazione pag. 2
Connessioni elettriche pag. 2
Accensione e puntamento pag. 2
Cambio delle lampade pag. 3
Pulizia pag. 3
Manutenzione pag. 3
Accessori pag. 3
Dimensioni e pesi
(Appendice A)
pag. 8
Lampade utilizzabili
(Appendice A)
pag. 8
INDEX
Projectors description pag. 4
Introduction pag. 4
Installation pag. 4
Electrical connections pag. 4
Focus and regulation pag. 4
Changing the lamps pag. 5
Cleaning pag. 5
Maintenance pag. 5
Accessories pag. 5
Sizes and weights
(Appendix A)
pag. 8
Lamps
(Appendix A)
pag. 8
miniPAR
ACHTUNG:
Vor Inbetriebnahme zuerst die folgenden Anweisungen sorgfältig lesen.
Bei nicht Beachtung übernimmt Spotlight srl keinerlei Haftung.
ÜBERSICHT:
Produkt Beschreibung pag. 6
Einführung pag. 6
Installation pag. 6
Elektrische Verkabelung pag. 6
Anschalten und Einrichten pag. 6
Leuchtmittel Wechsel pag. 7
Reinigung pag. 7
Instandhaltung pag. 7
Zubehör pag. 7
Masse und Gewicht
(Anhang A)
pag. 8
Leuchtmitteltypen
(Anhang A)
pag. 8

miniPAR
miniPAR
miniPAR T 75W
miniPAR N 100W
miniPAR (all products)
User's Manual
8
6
1
3
2
5
4
miniPAR BS 35W
7

miniPAR
miniPAR
ACCENSIONE E PUNTAMENTO
I proiettori devono essere collocati rispettando la
distanza minima dall’oggetto che si deve illuminare,
indicata sulle etichette dei fari.
Tramite la maniglia laterale ⑤ si può allentare il
bloccaggio del faro in una certa posizione e modicare
la sua inclinazione.
Lo stesso si può fare riguardo alla rotazione dell’asse
verticale , facendolo ruotare sul perno di aggancio.
ATTENZIONE: se visibilmente danneggiate
sostituire immediatamente le lampade
DESCRIZIONE DEI PROIETTORI
Riferendosi ai disegni nella pagina a anco:
① Staffa di sospensione
② Anello fermalampada
③ Gola per anello fermalampada
④ 2 pomelli per bloccaggio accessori
⑤ Maniglia per regolazione inclinazione faro
⑥ Portalampada (per MI PAR N100)
⑦ Portalampada (per MI PAR BS35)
⑧ Faston alimentazione lampada (per MI PAR T75)
INDICAZIONI GENERALI
I proiettori ora in Vs possesso rispondono alle
direttive 73/23 CEE in quanto conformi alle norme EN
60598-1 e EN 60598-2-1.
Le targhette sistemate sui anchi dei proiettori,
contengono le seguenti informazioni:
• Modello
• Tensione di alimentazione in V
• Potenza della lampada in W
• Indice di protezione IP
• Massima temperatura ambiente ammissibile in °C
• Massima temperatura del corpo del proiettore in °C
• Distanza minima da ogni supercie inammabile
INSTALLAZIONE
• I proiettori sono progettati esclusivamente per
impiego professionale.
• Non installare i proiettori a contatto o vicino ad una
supercie inammabile.
• Si prega di prestare la dovuta attenzione alle note
riportate sulle etichette degli apparecchi.
• Ricordarsi di collegare la fune di sicurezza, se
previsto dalle norme di sicurezza locali.
• l proiettori possono essere usati sia sospesi, sia
montati su cavalletto o su basetta, ribaltando la
forcella; tramite adattatore possono essere usati su
binario elettricato.
ACCESSORI: gli accessori previsti per questi tipi di faro
sono elencati nella tabella di pag. 5 e possono essere
ssati tramite i 2 pomelli ④.
CONNESSIONI ELETTRICHE
I vostri fari sono stati progettati per una tensione di
alimentazione da 220V a 240V, 50-60 Hz. Il cavo di
alimentazione risponde alle norme CEI 20-35.
Prima e durante l’installazione osservare le seguenti
norme:
• Vericare sempre l’efcienza del collegamento a
terra della linea in uso.
• Gli apparecchi sono previsti per uso all’interno:
pertanto devono essere protetti dall’umidità e dalla
pioggia se usati in condizioni diverse
• Non impiegare lampade diverse da quelle indicate
nella tabella in Appendice B.
• Vericare che il voltaggio degli apparecchi
corrisponda al voltaggio di rete
• Sugli apparecchi non sono montati fusibili che se necessari
potranno essere installati sulla linea
• Il modello MI PAR BS35 non può essere collegato
a un dimmer.
ATTENZIONE: Gli apparecchi devono essere
collegati a terra
2

miniPAR
miniPAR
ATTENZIONE: L’apparecchio deve essere collegato alla messa a terra
CAMBIO DELLA LAMPADA
Tramite gli appositi terminali stringere e slare l’anello
fermalampada ②.
Estrarre delicatamente la lampada dalla sua sede
evitando di strappare i cavi di alimentazione.
- MI PAR N100 e MI PAR BS35: ruotare la lampada
sul portalampada ⑥-⑦ in senso antiorario per
rimuoverla, e in senso orario per inserirla;
- MI PAR T75: scollegare i due faston ⑧ dalla
lampada da sostituire e collegarli alla nuova
lampada.
Reinserire la nuova lampada nella sua sede e bloccarla
con l’anello fermalampada ② controllando che
questo sia inserito nella apposita gola ③ e blocchi
correttamente la lampada.
ATTENZIONE: per motivi di sicurezza, scol-
legare sempre gli apparecchi dalla rete di
alimentazione prima di aprirli per cambiare
le lampade.
IMPORTANTE: per MI PAR BS35
• ATTENZIONE: accensione della lampada con innesco
ad alta tensione: non cercare mai di inserire o
disinserire la lampada con l’apparecchio alimentato.
Pericolo alta tensione.
• ATTENZIONE: spegnere e sostituire immediatamente
la lampada in caso di rottura del vetro frontale
di protezione anche se la lampada risulta ancora
funzionante.
• La lampada, all’accensione a freddo, impiega alcuni
minuti per raggiungere la piena luce.
• Dopo lo spegnimento della lampada occorrerà
attendere circa 5 minuti prima di poterla
riaccendere.
• Attendere il completo raffreddamento della lampada
prima di aprire il proiettore.
PULIZIA
Per una maggiore resa dei fari, occorre tener pulita la
supercie delle lampade.
MANUTENZIONE
Sottoporre i fari a revisione almeno una volta all’anno
per controllare l’integrità delle parti elettriche e
meccaniche. A tal ne utilizzare solo rivenditori
qualicati, a garanzia di un corretto e completo
intervento.
ACCESSORI PER miniPAR
Telaio porta gelatina per miniPAR TC MINI PAR
Paraluce 4 alette per miniPAR PL 4 MINI PAR
Basetta per montaggio in appoggio BASE-QI22 AS
Gancio di sospensione in alluminio per tubi ø 30 mm T58830
Gancio di sospensione in alluminio per tubi ø 50 mm HC/075
Filtri dicroici dicrospot
Adattatore per binario elettricato a richiesta
3

miniPAR
miniPAR
DESCRIPTION OF THE PROJECTORS
Refer to gures on page 2:
① Suspension clamp
② Lamp retaining ring
③ Slot for lamp retaining ring
④ 2 accessory retaining knobs
⑤ Lever handle for tilt regulation
⑥ Lamp holder (for MI PAR N100)
⑦ Lamp holder (for MI PAR BS35)
⑧ Lamp supply faston (for MI PAR T75)
INTRODUCTION
The projectors you have bought satisfy directives
73/23/EEC as they comply with standards EN 60598-1
and EN 60598-2-17.
The label located on the side of the projectors contain
the following information:
• model
• Supply voltage in V
• Power of the projector in W
• the level of protection IP
• maximum allowed ambient temperature in °C
• maximum temperature of the body in °C
• minimum distance from any inammable surface
INSTALLATION
• The luminaires are intended for professional use only
• Do not mount the luminaire on or near a ammable
surface
• Please note carefully the notes written on the labels
of the luminaires
• Do not forget to connect a safety rope, if required by
local country safety regulations
• The projectors can be either suspended, or mounted
on a stand or base plate, positioning the yoke
upside-down; they can also be mounted on an
electried track using an adapter.
ACCESSORIES: The accessories foreseen for these
projectors are listed in the accessory list and can be
xed with the 2 knobs ④.
ELECTRICAL CONNECTIONS
Your projectors have been designed for 220V - 240V
supply voltage, 50-60Hz.
The power cables comply with standards CEI 20-35.
Before and during the installation, follow the
instructions below:
• Always check the efciency of the ground
connection of the electrical line you are using.
• The products are intended for indoor use:
consequently they have to be protected from
humidity and rain, if used in different conditions
• Do not use lamps other than indicated on the table
(Appendix B) on the back cover
• Verify that the luminaire voltage is correct for the
main voltage
• Fuse is not foreseen on the luminaires and they have
to be installed on the line, if necessary
• Model MI PAR BS35 cannot be connected to a
dimmer.
FOCUS AND REGULATION
The luminaires should be at the minimum distance
from the object it is illuminating, as indicated on the
label.
Using the side handle ⑤ it is possible to loosen the
projectors when they are locked in a certain position
and thus change their inclination.
In the same way, the projectors can be rotated with
respect to their vertical axis by rotating on their
hooking hinge.
WARNING: replace immediately the lamps
if visibly damaged.
WARNING: The luminaires must be grounded
4

miniPAR
miniPAR
CHANGING THE LAMP
Using the appropriate ends, tighten and take off the
lamp retaining ring ②.
Extract carefully the lamp from its lodging paying
attention not to tear off the supply cables.
- MI PAR N100 and MI PAR BS35: rotate the lamp
on its holder ⑥-⑦ counter clockwise to remove it,
and clockwise to insert it;
- MI PAR T75: disconnect the two faston ⑧ of the
lamp to be replaced and connect them to the new lamp.
Place the new lamp in its loding an block with the
retaining ring ② checking that it is duly inserted in
the appropriate slot ③ and that it is blocking the
lamp correctly.
Use only lamps listed in the table on the back cover
(Appendix B).
WARNING: For safety reasons always
disconnect the projectors from the mains
before opening them to change the lamps
IMPORTANT NOTICE for MI PAR BS35
WARNING: Start off of high voltage lamp: never
insert or remove the lamp when xture is powered on.
WARNING: Immediately switch off and replace the
lamp when the front safety glass breaks, even though
the lamp is still working.
On cold start, the lamp will take a few minutes to
attain full brighness.
Once switched off, wait approximately 5 minutes
before relamping.
Let the lamp cool down completely before opening the
projector.
CLEANING
For utmost projector performance, the reectors must
be kept as clean as possible.
MAINTENANCE
The projectors must be serviced at least once a year to
check the integrity of their electrical and mechanical
parts. For this purpose, you should conctact only a
qualied dealer, to ensure proper service.
ACCESSORIES FOR miniPAR
Colour lter frame for miniPAR TC MINI PAR
4 leaf barndoor for miniPAR PL 4 MINI PAR
Base mounting plate BASE-QI22 AS
Aluminium hook clamp for 30 mm diameter tubes T58830
Aluminium hook clamp for 50 mm diameter tubes HC/075
Dichroic lter dicrospot
Adaptor for electrical track on request
5

miniPAR
miniPAR
ACHTUNG: Bei sichtbarer Beschädigung des
Leuchtmittel-Glaskolbens sofort das Leucht-
mittel austauschen (Explosionsgefahr)
PRODUKT BESCHREIBUNG
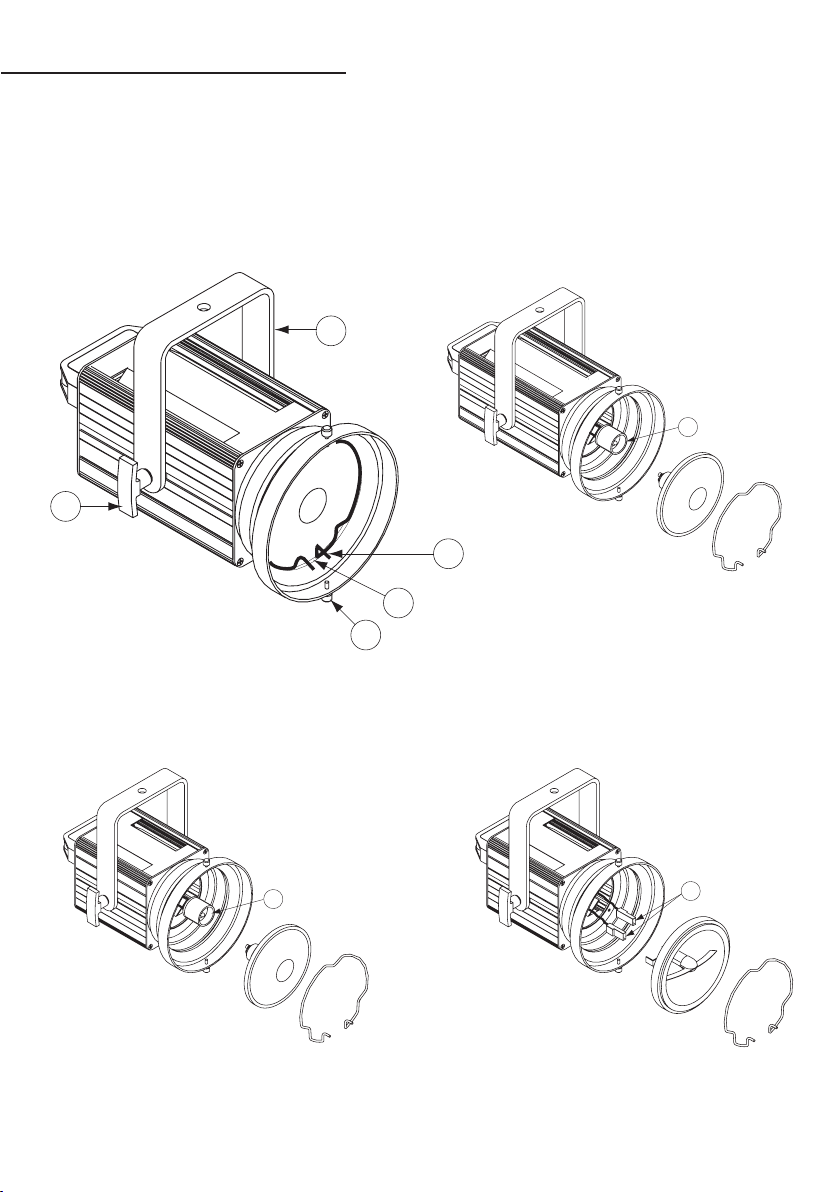
Vorhergehende Zeichnungen wie folgt beachten:
① Montage Bügel
② Leuchtmittel Halteklammer
③ Sitz der Halteklammer
④ 2 Zubehör Feststellschrauben
⑤ Einjustierungsschrauben des Projektors
⑥ Leuchtmittel Halterspange (für MI PAR N 100)
⑦ Leuchtmittel Halterspange (für MI PAR BS 35)
⑧ Elektrische Steckschuhe für Leuchtmittel (für MI
PAR T75)
EINFÜHRUNG
Die Projektoren entsprechen den Richtlinien CEE 73/23
gemäß der europäischen Normen EN 60598-1 und EN
60598-2-1.
Die seitliche Etikettierung enthält folgende
Informationen:
• Model Typ
• Spannungszuführung in V
• Leistung des Leuchtmittels in W
• Schutzgrad IP
• Höchst Zulässige Umgebungstemperatur in °C
• Maximaltemperatur des Gehäuses in °C
• Mindest Abstand zu entammbaren Materialien
INSTALLATION
• Die Projektoren sind speziell für professionellen
Einsatz gebaut.
• Nicht in Berührung oder in der Nähe von
entammbaren Materialen installieren.
• Die seitliche Etikettierung am Projektor beachten.
• Örtliche Sicherheitsvorschriften für
Sicherheitsfangseil beachten.
• Die Projektoren können sowohl hängend als auch
auf Ständer stehend sehr einfach zum Einsatz
gebracht werden, indem der Befestigungshalter nach
unten verstellt wird. Mittels speziellen Verbindern
können die Projektoren an elektrische Stromschienen
angeschlossen werden.
ZUBEHÖR: Das entsprechende separate Zubehör der
Projektoren ist in Tabelle 5 aufgeführt und kann durch
die 2 Feststellschrauben einfach montiert werden ④.
ELEKTRISCHE VERBINDUNGEN
Die Projektoren sind für die Spannungsversorgung von
220V – 240V, 50-60Hz gebaut. Das elektrische Kabel
entspricht der EU Normen CEI 20-35.
Bevor und während der Installation der Projektoren
sind folgende Normen zu beachten:
• Die Masse- Schutzleiter- Verbindung der
Spannungszuführung überprüfen und garantieren.
• Die Projektoren sind für Hausbetrieb gebaut und
müssen gegen Feuchtigkeit und Regen geschützt
werden, wenn sie außerhalb zum Einsatz kommen.
• Keine anderen Leuchtmittel verwenden als in der
Tabelle im Anhang B angegeben ist.
• Die Spannungszuführung gemäß der am Projektor
angegebenen Spannung unbedingt überprüfen und
einhalten.
• Im Projektor sind keine Sicherungen eingebaut
und müssen daher bei der Spannungszuführung
entsprechend berücksichtigt werden.
• Der Model Typ MI PAR BS35 kann in keinem
Falle mit einem Dimmer betrieben werden
(Gasentladungslampe mit Ballast).
ANSCHALTEN UND EINRICHTEN
Die Projektoren gemäß der seitlichen Etikettierung
mit der entsprechenden Distanzangabe zum
Beleuchtungsobjekt installieren.
Die Einjustierungsschrauben ⑤ erlauben das genaue
vertikale Ausrichten und Blockieren des Projektors zum
Beleuchtungsobjekt hin.
Die Horizontale Ausrichtung wird durch das Drehen des
Montage Bügels um die Befestigungsschraube erreicht.
Achtung: Die Projektoren müssen entspre-
chend geerdet werden.
6

miniPAR
miniPAR
LEUCHTMITTEL WECHSEL
Die Leuchtmittel Halterspange zusammendrücken und
aus dem Sitz nehmen ②.
Vorsichtig das Leuchtmittel herausziehen ohne die
Verbindungsleiter auszureißen.
- MI PAR N100 und MI PAR BS35: aus dem
Leuchtmittelhalter ⑥-⑦ gegen den Uhrzeigersinn
vorsichtig ausdrehen; neues Leuchtmittel mit dem
Uhrzeigersinn wieder vorsichtig eindrehen;
- MI PAR T75: die zwei Kabelschuhe ⑧ vorsichtig
abziehen und mit neuem Leuchtmittel verbinden.
Leuchtmittel wie vorher in den Sitz bringen und die
Halterspange ② einsetzen. Die Halterspange muss
dabei fest in ihrem Sitz ③ verankert sein und das
Leuchtmittel fest blockieren.
ACHTUNG: Bevor Öffnen des Projektors
unbedingt Sicherheitsvorschriften einhalten
und zuerst die Spannungszuführung
abschalten!
WICHTIGE HINWEISE für MI PAR BS35
• ACHTUNG: Die Gasentladungslampe wird
mit Hochspannung gezündet. Niemals das
Leuchtmittel bei Spannungszuführung einsetzen.
Hochspannungsgefahr!
• ACHTUNG: Bei sichtbarer Beschädigung des
Leuchtmittel-Glaskolbens sofort das Leuchtmittel
austauschen, auch wenn der Projektor noch
funktioniert (Explosionsgefahr).
• Das Leuchtmittel braucht einige Minuten um nach
dem Einschalten die normale Helligkeit zu erreichen.
• Nach dem Ausschalten muss das Leuchtmittel erst ca.
5 min. Abkühlen bevor es wieder neu Zünden kann
• Zum Austauschen erst Leuchtmittel komplett
abkühlen lassen.
REINIGUNG
Um die maximale Helligkeit gewährleisten zu können,
muss der Glaskolben des Leuchtmittels sauber
gehalten werden.
INSTANDHALTUNG
Jährlich die elektrische und mechanische Funktion
überprüfen. Dazu nur qualiziertes Fachpersonal
einsetzen um eine rundum Garantie gewaehrleisten
zu können.
ZUBEHÖR für miniPAR
Folien Filterhalter für miniPAR TC MINI PAR
4 Fach Torblende für miniPAR PL 4 MINI PAR
Tischständer BASE-QI22 AS
Aluminium Rohrschelle für 30mm Rohre T58830
Aluminium Rohrschelle für 50mm Rohre HC/075
Dicroitische Glasslter dicrospot
Spannungsabnehmer für Stromschienen auf Anfrage
7

Type/Code W t(h) V
miniPAR T 75W
(3000 °K)
HASP/75 75 G53 8° - 24° - 45° 3000 12
miniPAR N 100W
(2900 °K)
ESD111 H 100/10
ESD111 H 100/24
100 GZ10 10° - 24° 2000 230
miniPAR BS 35W
(3000 °K)
ES-111 BS 35/8
ES-111 BS 35/24
39 GX10 8° - 24° 6000 95
Spotlight s.r.l.
Via Sardegna 3
20098 S. Giuliano Milanese
Milano - Italy
Tel. +39.02.98830.1
Fax +39.02.98830.22
E-mai: info@spotlight.it
www.spotlight.it
Lampade - Lamps - Leuchtmitteltypen
MI PAR T75W (HASP75 - 75W)
MI PAR BS35 (BriteSpotTM - 35W)
sizes in mm sizes in mm
199
207 175
199
260 175
199
207 175
MI PAR N100 (ESD111 - 100W)
weight Kg 2,1 weight Kg 1,2
weight Kg 1,5
sizes in mm
Appendice A / Appendix A / Anhang A
This manual suits for next models
2
Table of contents
Languages:
Other Spotlight Spotlight manuals

Spotlight
Spotlight Sintesi AR 05 User manual

Spotlight
Spotlight Black Gun W 400 User manual

Spotlight
Spotlight piccolo HS User manual

Spotlight
Spotlight FresneLED 200 UD User manual

Spotlight
Spotlight Mini PC NO User manual

Spotlight
Spotlight Beam Light RP 1280 User manual

Spotlight
Spotlight MIDI 250 Profile User manual

Spotlight
Spotlight mini PC Series User manual

Spotlight
Spotlight Evolution Series User manual

Spotlight
Spotlight Fresnel LED Hyperion 300 6C User manual