Spracht ZuM DECT 6.0 HEADSET User manual
ZūM DECT 6.0 HEADSET™
Digital Enhanced Cordless Telecommunications
Wireless Headset with 500’ Range
USER GUIDE
English & Français

Zum DECT 6.0 Headset

TABLE OF CONTENTS
Introduction ... .. ... .. ... .. ... .. ... .. ... .. ... .. ... .. ... .. ... .. ... .. ... .. ... .. ... .. ... .. ... 1
Package Contents .. ... .. ... .. ... .. ... .. ... .. ... .. ... .. ... .. ... .. ... .. ... .. ... .. ... .. ... 1
Zum DECT 6.0 Headset™ Design . .. ... .. ... .. ... .. ... .. ... .. ... .. ... .. ... .. ... .. .. 2
Safety Precautions . ... .. ... .. ... .. ... .. ... .. ... .. ... .. ... .. ... .. ... .. ... .. ... .. ... .. .. 3
Zum DECT 6.0 Headset™ Set Up .. .. ... .. ... .. ... .. ... .. ... .. ... .. ... .. ... .. ... .. .. 4
Installing the Optional Handset Lifter .. ... .. ... .. ... .. ... .. ... .. ... .. ... .. ... .. .. 5
Installing the Over-the-head Headband & Cushion on Headset... .... .... ....6
Charging the Zum DECT 6.0 Headset™ . ... .. ... .. ... .. ... .. ... .. ... .. ... .. ... . 6, 7
Pairing Zum DECT 6.0 Headset™ with Base Unit: Registering.. .... .... .... .... 7
Basic Operation ... .. ... .. ... .. ... .. ... .. ... .. ... .. ... .. ... .. ... .. ... .. ... .. ... .. ... .. .. 7
Switch the Headset on/o . .. ... .. ... .. ... .. ... .. ... .. ... .. ... .. ... .. ... .. ... .. ... .. ... .. ... . 7
Make a Call (No optional handset lifter installed) .. ... .. ... .. ... .. ... .. ... .. ... .. .. 7
Making a Call with a handset lifter installed.. .. ... .. ... .. ... .. ... .. ... .. ... .. ... .. .. 8
Adjusting the Volumes .. ... .. ... .. ... .. ... .. ... .. ... .. ... .. ... .. ... .. ... .. ... .. ... .. .. 8
Muting the Microphone . ... .. ... .. ... .. ... .. ... .. ... .. ... .. ... .. ... .. ... .. ... .. ... .. .. 8
LED Status Indicators .. ... .. ... .. ... .. ... .. ... .. ... .. ... .. ... .. ... .. ... .. ... .. ... .. .. 9
Specifications .. ... .. ... .. ... .. ... .. ... .. ... .. ... .. ... .. ... .. ... .. ... .. ... .. ... .. ... .. 10
Replacing the Battery . .. ... .. ... .. ... .. ... .. ... .. ... .. ... .. ... .. ... .. ... .. ... .. ... .. 10
Troubleshooting Guide.. ... .. ... .. ... .. ... .. ... .. ... .. ... .. ... .. ... .. ... .. ... .. .. 11, 12
Limited warranty policy . ... .. ... .. ... .. ... .. ... .. ... .. ... .. ... .. ... .. ... .. ... .. . 12, 13
FCC statements ... .. ... .. ... .. ... .. ... .. ... .. ... .. ... .. ... .. ... .. ... .. ... .. ... .. . 13, 14
IC statements . .. ... .. ... .. ... .. ... .. ... .. ... .. ... .. ... .. ... .. ... .. ... .. ... .. ... .. ... .. 14
EN

Introduction
Thank you for purchasing Spracht’s Zum DECT6.0 Headset™. You can use
your headset up to 492 feet away from the Base Unit. You recharge the
headset simply by placing it in the cradle and it recharges in less than 3
hours. You will have up to 7 hours of talk time. For comfort, you can choose
either the over-the-head or over-the-ear configuration of the Headset and
switching over from one to the other is easy.
For a list of technical specifications, see page 10 of this manual.
Package Contents
1. Zum DECT 6.0 Headset™
2. Over-the-head headband
3. Over-the-ear earloop
4. Spare ear cover
5. AC power cable
6. RJ-9 cable
7. User Guide
8. Warranty/registration
Zum DECT 6.0 Headset
1
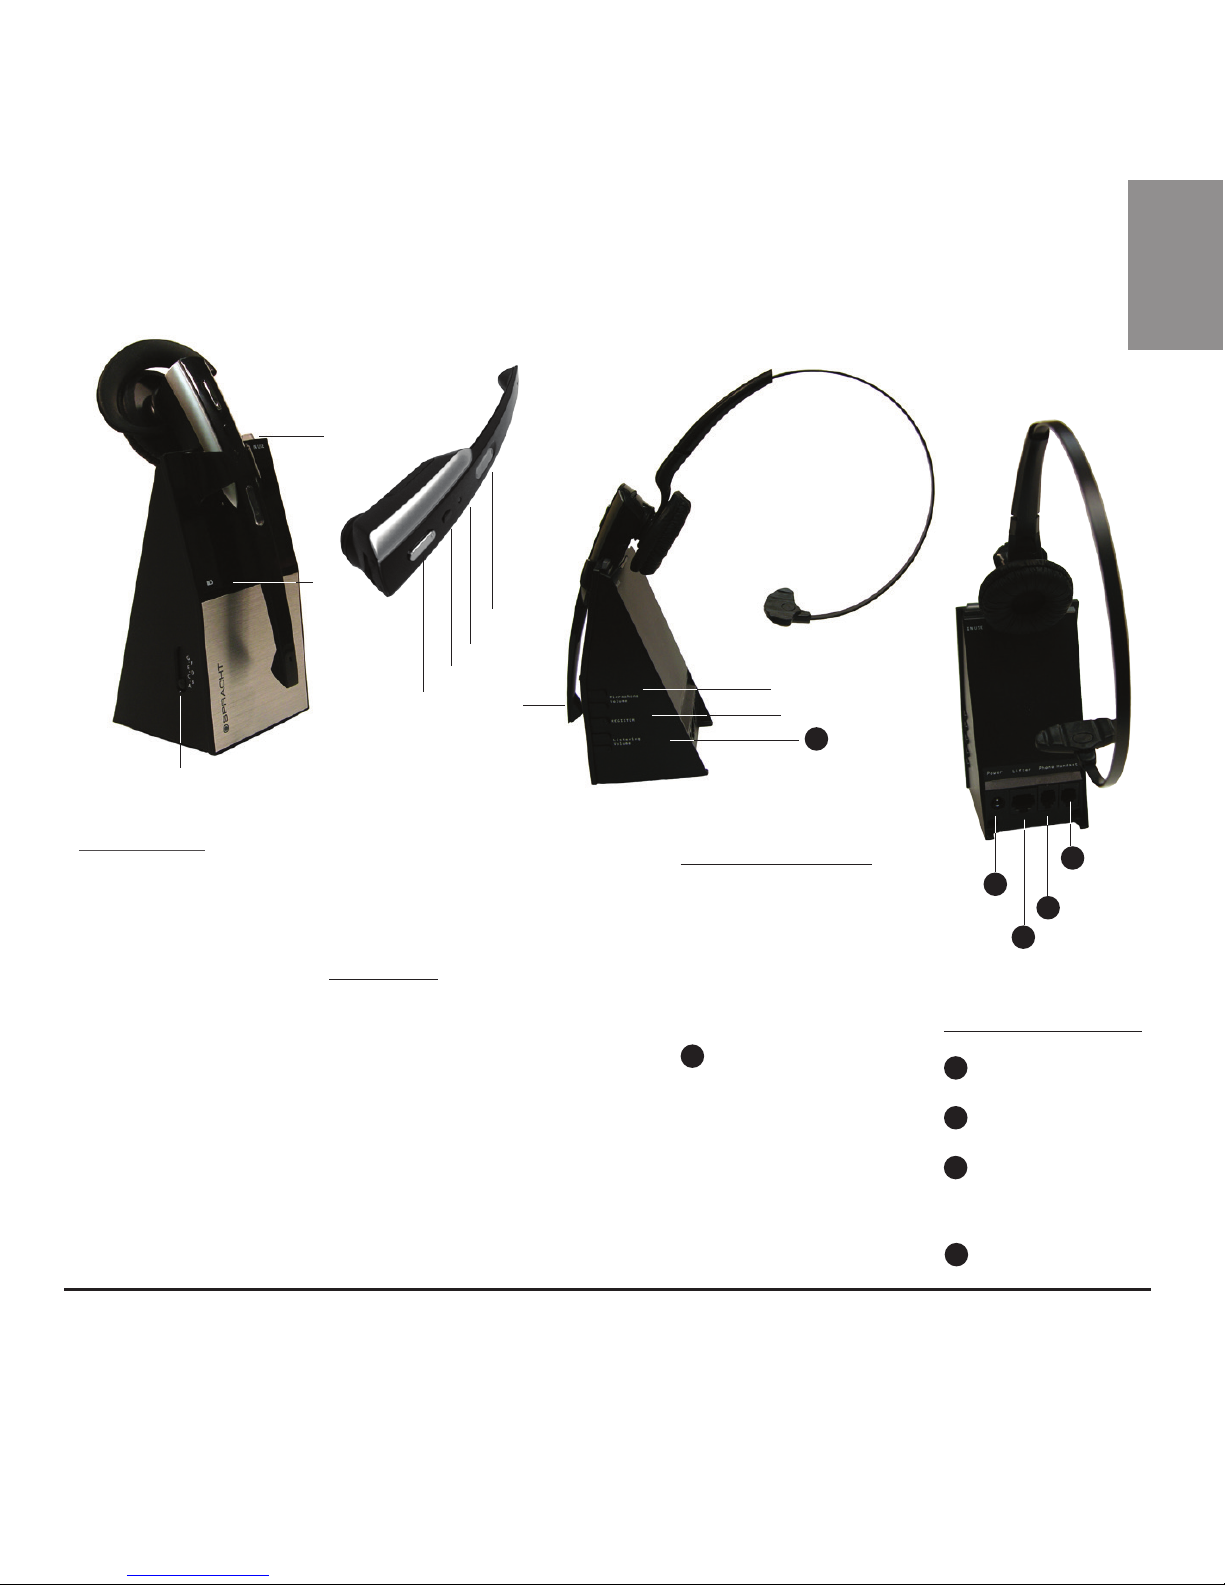
Base Unit
➊Slide Switch
➋In Use LED on
Base Unit
➌Battery Status
LEDs
Headset
➍Talk/End Call Button
➎Mute Button
➏In Use LED on Headset
➐Name Card
➑Microphone location on Headset
Base Unit Side
➒Microphone
+/- key
➓Register key
11 Headset
Volume +/- key
Zum DECT 6.0 Headset™ Design
Base Unit Back
12 Power jack
13 Lifter jack
14 Phone RJ-9
jack
15 Handset jack
➊
➍
➋
➌
➎
➏
➐
➑
11
11
12
➓
➒
13
14
15
2
EN

Precautions
Safety Precautions
For safe operation of your Zum DECT 6.0 Headset™, please follow the guidelines below.
•Readthismanualthoroughly.Followtheoperatinginstructionsandinformationprovided.
• Place the Base Unit on a non-slip surface and lay the connection cables in such a
way as they cannot be the source of an accident.
• Do not expose the equipment to extreme temperatures or high relative humidity
and protect it from direct sunlight and dusty conditions.
• Clean the equipment with a soft, damp cloth. Do not use any solvents or harsh cleansers.
• Connect only approved accessories.
• Use only the supplied AC power adapter.
• Never open the unit. Opening the unit voids the guarantee, but more importantly,
exposes you to the risk of an electric shock.
• If your unit needs repair, contact the retailer you bought it from, or contact
Spracht directly.
• We recommend removing the Headset battery if the equipment is not going to be
used for 30 days or more.
• Replace the Headset battery only with ones supplied by the retailer you bought
the Zum DECT 6.0 Headset™ from, or directly from Spracht. Dispose of defective
batteries according to the applicable local laws (not in household waste). We assume
no liability for damage caused by using the equipment for unintended purposes.
Battery Safety Precautions
• Do not burn, disassemble, mutilate, or puncture. Like other batteries of this type, toxic
materials could be released which can cause injury.
• To reduce the risk of fire or personal injury, use only the battery listed in the User’s Guide.
• Keep batteries out of the reach of children.
Zum DECT 6.0 Headset
3
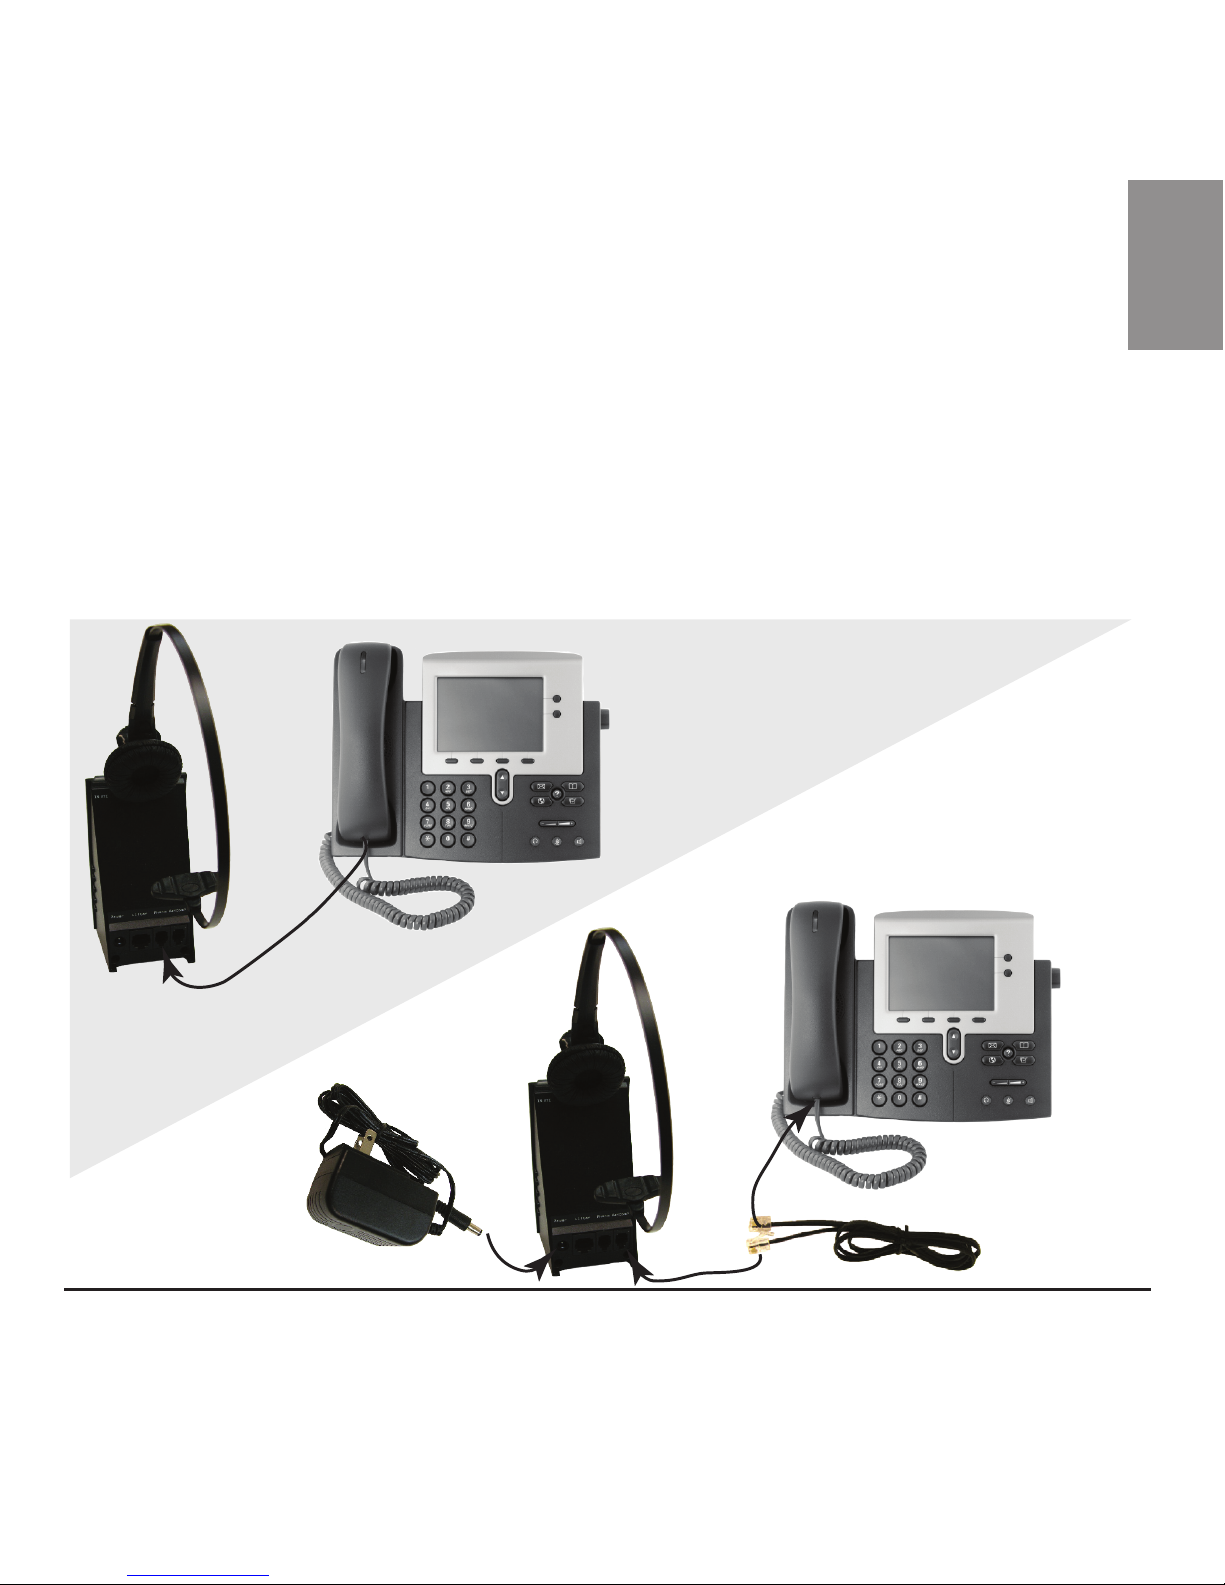
Zum DECT 6.0 Headset™ Set Up
Setting up the Zum DECT 6.0 Headset™
1. You will be plugging cords from your phone into the jacks on the back of your
Base Unit. First, unplug the coiled handset cord from the handset of your phone.
2. Plug that cord into the jack on the Base Unit that is labeled “Phone”.
3. Using the provided RJ-9 Phone Cord, plug one end into the jack in the Base Unit
labeled “Handset” and the other end into the jack on the handset of your phone.
4. Plug the AC charger into an outlet and into the AC charging jack on the Base Unit.
HINT: Place the Base Unit about 6” (15cm) away from your desktop phone and about
12” (30cm) from your computer to avoid interference.
1
2
3
3
4
4
EN
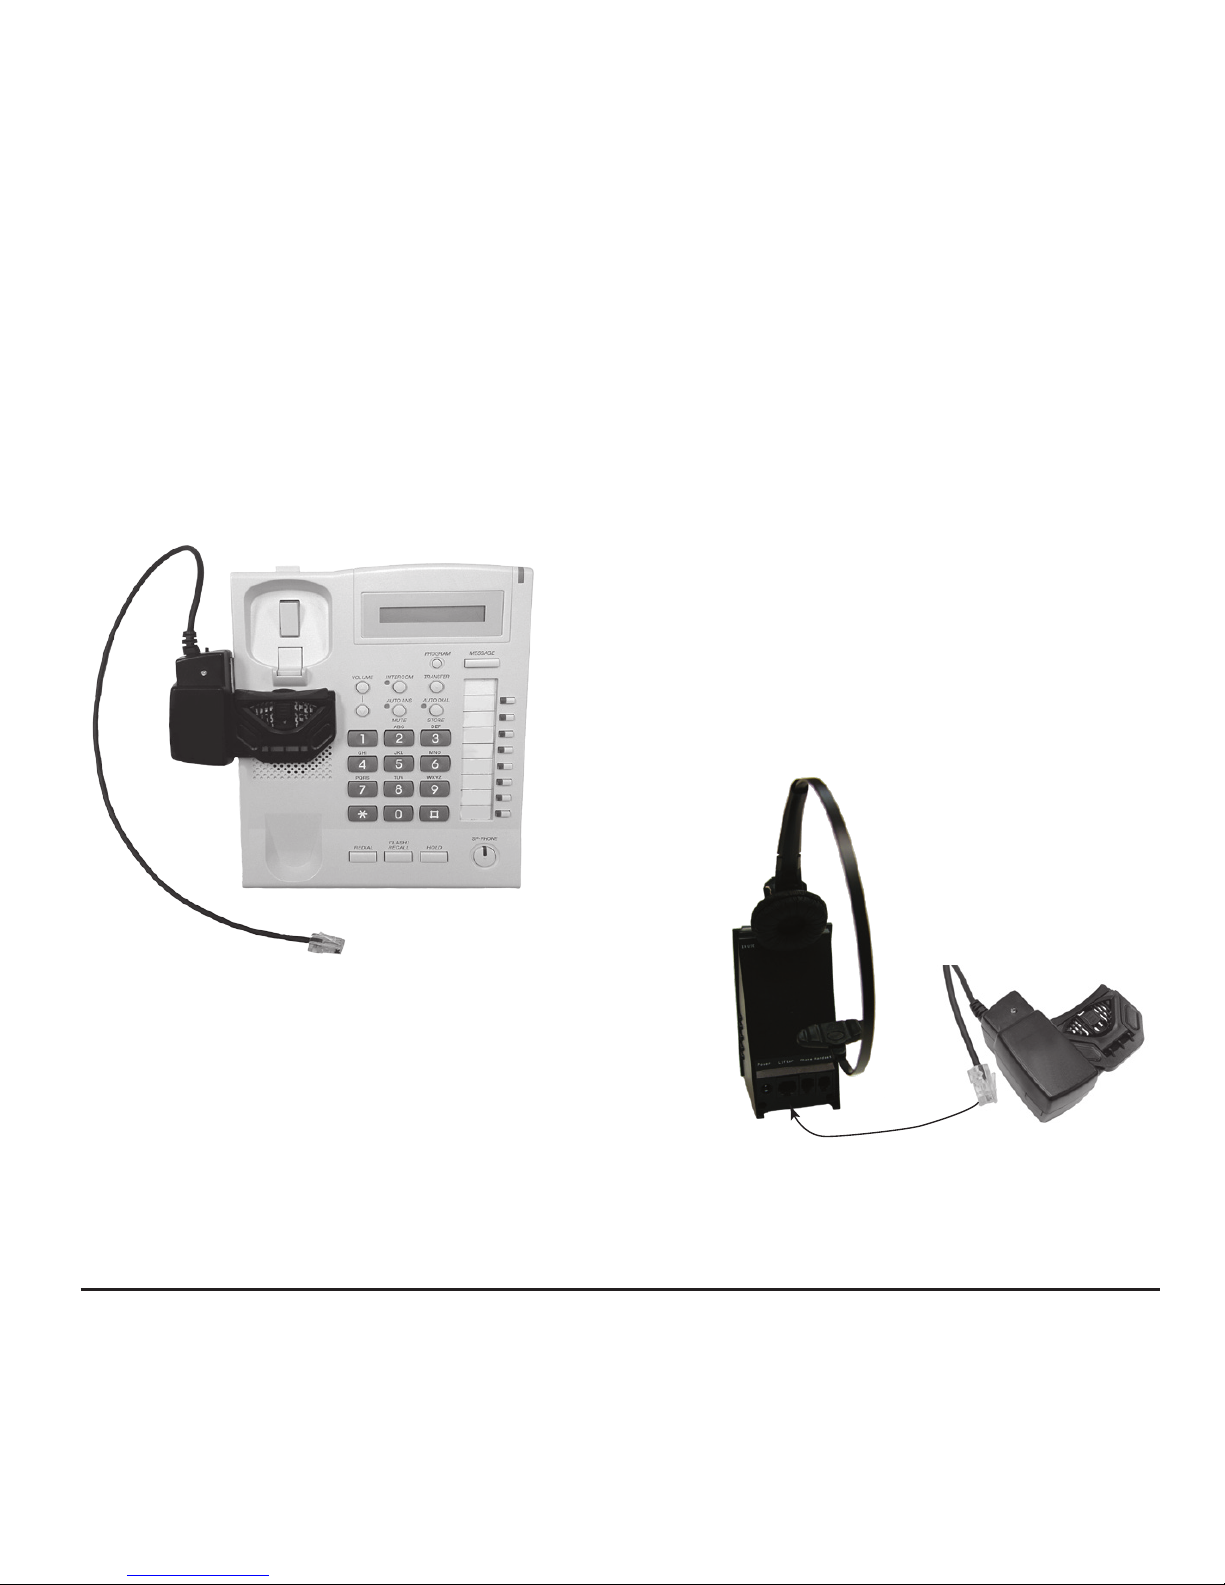
Installing the Optional Handset Lifter
If you will be using the Handset Lifter with your Zum DECT 6.0 Headset™, the
directions are below. If not, please go on to the next section.
The exact position of the lifter will vary phone to phone. You’ll have to experiment
to find the best place on your phone to physically lift the phone’s handset so that
you can take the call on your Zum DECT 6.0 Headset™. The picture below shows
the lifter in place. Once you have found the best location, you’ll have to attach the
lifter to your phone with the provided adhesive
strips.
If the Handset Lifter is not directly over the
speaker of your phone you may have to plug in
the optional extra microphone, provided. If it is
needed, plug it into the jack on the lifter.
Plug the Connector from the Handset
Lifter into the jack in the back of the
Base Unit labeled “Lifter”.
Installing the Over-the-head Headband and Cushion on the Headset
Place the Over-the-head headband ring over the round area on the Headset.
There are 2 Cushion Earcovers: one with a retaining ring, and one spare. Place
the Cushion Earcover with the retaining ring over the ring area on the Headset.
Once attached, you can rotate the Headset until it’s in the correct place for use.
Don’t force the plastic parts; they should snap on fairly easily.
Charging the Zum DECT 6.0 Headset
Before using the wireless Headset, you must charge the battery. Place the Headset in
the Base Unit charging cradle. Gently press down on the Headset to confirm that it is
making contact in the charging position. The Base Unit has a Battery Status indicator
on the front face of the unit, which will flash from green to red until the Headset
Zum DECT 6.0 Headset
5

Installing the Over-the-head Headband and Cushion on the Headset
Place the Over-the-head headband ring over the round area on the Headset.
There are 2 Cushion Earcovers: one with a retaining ring, and one spare. Place
the Cushion Earcover with the retaining ring over the ring area on the Headset.
Once attached, you can rotate the Headset until it’s in the correct place for use.
Don’t force the plastic parts; they should snap on fairly easily.
Charging the Zum DECT 6.0 Headset
Before using the wireless Headset, you must charge the battery. Place the Headset in
the Base Unit charging cradle. Gently press down on the Headset to confirm that it is
making contact in the charging position. The Base Unit has a Battery Status indicator
on the front face of the unit, which will flash from green to red until the Headset
6
EN

battery is fully charged. The battery will be fully charged when all 4 LED lights are
on. 3 LEDs indicate about 3/4 full, 2 LEDs indicate about 1/2 full, and 1 LED shows the
battery is low. The Battery Indicator will display your battery level while the Headset is
“o cradle, as long as you’re within the operating range of the Base Unit.
Note: The green LED on the Base Unit indicates the Headset fully charged. As soon
as you remove the Headset from the Base Unit, it’s normal for the LED to change from
green to amber.
Pairing the Zum DECT 6.0 Headset™ with the Base Unit: Registering
Once your Headset has a charged battery, you must pair the Headset with the Base
Unit. This is only done when the unit is new, or if you change/replace the Base Unit
or Headset. With the Headset in the Base Unit cradle, press and hold the “Register”
button on the Base Unit for 5 seconds until the “In Use” Status LED flashes. Press
and hold the “Mute” button on the Headset for 3 seconds until the blue and red
color LEDs flash. When the registration is complete, all the LEDs will shut o.
Base Unit Switch Settings
The Base Unit has a sliding switch on one side labeled from A to G. It is set on A
in the factory. You will have to test which setting is best with your phone for
headset and speaking volumes. In some settings, you may experience no volume,
so you will have to experiment using each setting until you find the best one.
Basic Operation
Switch the Headset on/o
1. To turn the Headset on, press and hold the “Talk” button until the Headset LED
goes on.
2. To switch o the Headset, press and hold the “Talk” button until the Headset LED
turns o.
Make a Call (No optional handset lifter installed)
1. Take your telephone handset o-hook. The dial tone should sound through your
phone’s handset.
2. Press the “Talk” button on the Headset. The talk indicator will light up on both
the Base Unit and the Headset, indicating a successful link. You will now hear the
dial tone through the Headset.
3. Dial using your telephone’s keypad.
4. To end the call, press the “Talk” button again or place the Headset into the charger
to disconnect.
Making a Call with the handset lifter installed
1. Press the “Talk” button on the Headset to connect to the Base Unit. The “In Use”
LED on the Base Unit will flash.
2. Dial using the telephone keypad.
3. To end a call, press the “Talk” button again, or place the headset into the charger
to disconnect the call.
Note: The Headset automatically enters o hook status when it’s o the cradle, you
just need to enter the number to dial out.
Adjusting the Volumes
You must be in talk mode, in other words, on a call, to adjust any of the following
levels. You may want to make some test calls to set the volumes.
Adjusting the microphone volume
Press the “Microphone Volume +/-” button to increase / decrease the speaking volume.
Adjusting the Base Unit listening volume
Press the “Listening Volume +/-” button to increase / decrease the listening volume.
Adjusting Headset listening volume
Press the volume control switch + or – (on the top of the Headset) to adjust the
listening volume.
Muting the Headset microphone
1. Press the “Mute” button on the Headset; the microphone will be switched off.
The “In Use” LED on the Base Unit will flash rapidly while you’re in Mute Mode.
2. Press the “Mute” button again; the microphone will be back on.
Zum DECT 6.0 Headset
7

2. Press the “Talk” button on the Headset. The talk indicator will light up on both
the Base Unit and the Headset, indicating a successful link. You will now hear the
dial tone through the Headset.
3. Dial using your telephone’s keypad.
4. To end the call, press the “Talk” button again or place the Headset into the charger
to disconnect.
Making a Call with the handset lifter installed
1. Press the “Talk” button on the Headset to connect to the Base Unit. The “In Use”
LED on the Base Unit will flash.
2. Dial using the telephone keypad.
3. To end a call, press the “Talk” button again, or place the headset into the charger
to disconnect the call.
Note: The Headset automatically enters o hook status when it’s o the cradle, you
just need to enter the number to dial out.
Adjusting the Volumes
You must be in talk mode, in other words, on a call, to adjust any of the following
levels. You may want to make some test calls to set the volumes.
Adjusting the microphone volume
Press the “Microphone Volume +/-” button to increase / decrease the speaking volume.
Adjusting the Base Unit listening volume
Press the “Listening Volume +/-” button to increase / decrease the listening volume.
Adjusting Headset listening volume
Press the volume control switch + or – (on the top of the Headset) to adjust the
listening volume.
Muting the Headset microphone
1. Press the “Mute” button on the Headset; the microphone will be switched off.
The “In Use” LED on the Base Unit will flash rapidly while you’re in Mute Mode.
2. Press the “Mute” button again; the microphone will be back on.
8
EN

LED Status Indicators
Base Unit
Event “In Use” LED indicator on top of Base Unit
Headset on cradle Off
Registration Moderate Flashing
In Use Normal Flashing
Muting in use Fast Flashing
Headset LEDs
Event Red LED indicator Blue LED indicator
Standby Slow Flashing
Charging Steady On
Charged Steady On
Pairing/ Alternating Red/Blue Alternating Red/Blue
Registration
In Use Normal Flashing
Out of Range Normal Flashing
Ringing Signal Fast Flashing
Low Battery Very Slow Flashing
Flashing speed definitions
Pattern LED On/Off Sequence
Normal Flashing ON (1 sec), OFF (1 sec)
Fast Flashing ON (250 milisec), OFF (250 milisec)
Moderate Flashing ON (500 ms), OFF (500 ms)
Slow Flashing ON (2 sec), OFF (2 sec)
Very Slow Flashing OFF (8 sec), ON (2 sec), OFF (2 sec), ON (2 sec)
All information is believed to be reliable, however specifications are subject to change without notice.
Zum DECT 6.0 Headset
9

Technical Specifications
Headset Operating Time: Approx. 7 hours talk time, 120 hrs. Standby
AC / DC Adapter (For Base Unit) Input 100-240V, Output 7.5 VDC 800mA
Telephone connection Designed for connection to an analog phone line, class
TNV3 (telecommunications network voltage) as defined
by the EN60950 Standard
Rechargeable Battery 3.7VDC/ 320mAh
Replacing the Battery
• Lift up the battery door on the Headset. Gently slide out the battery. You may
have to remove the Ear Cushion from the Headset to have complete access to the
battery door.
• Pull the white connector on the battery gently apart from the white connector in
the Headset.
• Place the new battery in the compartment, with the leads exposed.
• Connect the white connectors. Gently tuck in the wires into the battery compartment.
• Slide the battery door back in place and close the door.
IMPORTANT: Use only replacement batteries from Spracht. The Headset will not work
and may be damaged if the wrong battery is used. There is even a risk of explosion if
the battery is replaced by an incorrect one.
Dispose of all used batteries correctly. Used equipment and used headset batteries must
be disposed of in compliance with current environmental protection regulations. You
should return them to your reseller or dispose of them at an approved recycling location.
10
EN

Do not attempt to open the batteries, as they contain chemical substance. In the
event of leakage, avoid contact with the skin, eyes and mouth. In the event of contact,
rinse the aected area for several minutes with running water. Clean the product
with absorbent paper or a dry cloth and contact your reseller or Spracht directly for
replacement batteries.
Troubleshooting Guide
The Base Unit does not work
• Check that the AC adapter jack is connected to the Base Unit.
• Check that the AC adapter is securely connected to a working outlet.
• Check that the AC adapter is the one that came with the Zum DECT 6.0 Headset™.
Note: The battery indicator LED on the Base Unit will flash once when it powers on.
Your Headset does not work
• Check that the phone is connected to the Base Unit’s phone jack and it is pushed
in firmly.
• Check that the phone handset is connected to the Base Unit’s phone handset jack
and it is pushed in firmly.
• The Headset may be out of range of the Base Unit. Move closer to the Base Unit
until the Headset is within range. The range varies in each office environment.
• Check the Headset battery; it may need recharging. Place the Headset in the Base
Unit’s charging cradle to recharge the battery.
• The listening volume may be too low. Increase the volume on the Headset using the
volume button.
• You may have to re-pair/register your Headset with the Base Unit.
Your callers can’t hear you
• Check if the Headset is muted. Press the Mute button on the Headset to unmute
the microphone.
• The microphone volume may be too low. Increase the volume by pressing the
Microphone + button on the Base Unit.
Zum DECT 6.0 Headset
11

Do not attempt to open the batteries, as they contain chemical substance. In the
event of leakage, avoid contact with the skin, eyes and mouth. In the event of contact,
rinse the aected area for several minutes with running water. Clean the product
with absorbent paper or a dry cloth and contact your reseller or Spracht directly for
replacement batteries.
Troubleshooting Guide
The Base Unit does not work
• Check that the AC adapter jack is connected to the Base Unit.
• Check that the AC adapter is securely connected to a working outlet.
• Check that the AC adapter is the one that came with the Zum DECT 6.0 Headset™.
Note: The battery indicator LED on the Base Unit will flash once when it powers on.
Your Headset does not work
• Check that the phone is connected to the Base Unit’s phone jack and it is pushed
in firmly.
• Check that the phone handset is connected to the Base Unit’s phone handset jack
and it is pushed in firmly.
• The Headset may be out of range of the Base Unit. Move closer to the Base Unit
until the Headset is within range. The range varies in each office environment.
• Check the Headset battery; it may need recharging. Place the Headset in the Base
Unit’s charging cradle to recharge the battery.
• The listening volume may be too low. Increase the volume on the Headset using the
volume button.
• You may have to re-pair/register your Headset with the Base Unit.
Your callers can’t hear you
• Check if the Headset is muted. Press the Mute button on the Headset to unmute
the microphone.
• The microphone volume may be too low. Increase the volume by pressing the
Microphone + button on the Base Unit.
• Incorrect configuration dial setting for your phone. Try other configuration dial
settings on the side of the Base Unit, labelled A through G.
The sound in the Headset is distorted or there is an echo in the Headset
• Reduce the Microphone volume on the Base Unit.
• The listening volume may be too high on the phone. If your phone has a handset
volume control, lower it until the distortion disappears.
• If the distortion is still present, lower the listening volume by adjusting the volume
on the Headset.
• The Base Unit may be too close to the phone or your computer. Move the Base
Unit 6” (15cm) away from the phone and 12” (30cm) away from your computer.
You can hear too much background noise or conversation
• The speaking volume is too high. Lower the Microphone volume on the Base Unit.
The talk time is significantly less than it used to be even after a full charge
• The battery needs replacement. Replace the rechargeable battery with a new one.
Important: Replace the battery only with the approved battery, from the seller you
bought the Zum DECT 6.0 Headset™ from, or directly from Spracht.
Spracht Limited Warranty Policy
Spracht warrants its products against defects or malfunctions in material and workmanship under
normal use and service, with the exceptions stated below. This warranty lasts for one year from
the original date of purchase. Coverage terminates if you sell or otherwise transfer the product.
In order to keep this warranty in effect, the product must have been handled and used as
prescribed in the instructions accompanying the product.
Spracht shall (at its option) repair or replace a defective unit covered by this warranty, or shall
refund the product purchase price. Repair, replacement with a new or reconditioned unit, or
refund, as provided under this warranty, is your exclusive remedy. This warranty does not
cover any damages due to accident, misuse, abuse, or negligence. Spracht shall not be liable
for any incidental or consequential damages. Some states do not allow limitation or exclusion
of incidental or consequential damages, so the above limitation or exclusion may not apply to
12
EN

you. Implied warranties of merchantability and fitness for a particular purpose are limited in
duration to the duration of this warranty. Some states do not allow limitations on how long an
implied warranty lasts, so the above limitation may not apply to you. To make a warranty claim,
the purchaser must obtain a return authorization number (RA) from Spracht (serial number and
purchase date required), and then return the product to Spracht at purchaser’s expense. A copy
of the original dated receipt or shipping document must accompany the product. To obtain a
return authorization, see “Warranty” on our website at www.spracht.com, send an e-mail to
[email protected], or contact us at:
Spracht, 974 Commercial Street, Suite 108, Palo Alto, CA 94303 USA
Tel: 650-215-7500
For repair or replacement of a failed product, allow 4 to 6 weeks for processing and shipment.
This warranty gives you specific legal rights, and you may also have other rights which vary from
state to state.
FEDERAL COMMUNICATIONS COMMISSION STATEMENT
Interference Statement
This device complies with Part 15 of the FCC Rules. Operation of this device is
subject to the following two conditions:
(1) This device may not cause harmful interference, and
(2) this device must accept any interference received, including interference that
may cause undesired operation.
NOTE: This device has been tested and found to comply with the limits for a Class B digital
device pursuant to Part 15 of the Federal Communications Commissions Rules and Regulations.
These limits are designed to provide reasonable protection against harmful interference when
the equipment is operated in a commercial environment. This equipment generates, uses,
and can radiate radio frequency energy and, if not installed and used in accordance with the
instruction manual, may cause harmful interference to radio communications. However, there is
no guarantee that interference will not occur in a particular installation. If this equipment does
cause harmful interference to radio or television reception (which can be determined by turning
the equipment off and on), the user is encouraged to try to correct the interference by one or
more of the following measures:
• Reorient or relocate the receiving antenna.
• Increase the separation between the device and the receiver.
Zum DECT 6.0 Headset
13

• Connect the device into an outlet on a circuit different from that to which the receiver is
connected.
• Consult the dealer or an experienced radio/TV technician for help.
NOTE: This DECT radio device must be installed and used in strict accordance with the instructions
as described in the ZumDECT 6.0 Headset™ User Guide that accompanies the product. Any other
installation or use will violate FCC Part 15 regulations. Modifications not expressly approved by
Spracht could void the user’s authority to operate the equipment.
Radio Approvals
It is important to ensure that you only use your radio device in countries where the device is
approved for use. To determine whether you are allowed to use your wireless network device in a
specific country, please check to see if the radio type number that is printed on the identification
label of your device is listed as approved for that country on the radio approval list posted on the
vendor’s support website.
IC RSS warning
This device complies with Industry Canada licence-exempt RSS standard(s). Operation is subject
to the following two conditions: (1) this device may not cause interference, and (2) this device must
accept any interference,including interference that may cause undesired operation of the device.
Under Industry Canada regulations, this radio transmitter may only operate using an antenna of
a type and maximum (or lesser) gain approved for the transmitter by Industry Canada. To reduce
potential radio interference to other users, the antenna type and its gain should be so chosen
that, the equivalent isotropically radiated power (e.i.r.p.) is not more than that necessary for
successful communication.
IC Radiation Exposure Statement:
For the Headset portion, this equipment complies with IC RF radiation exposure limits set
forth for an uncontrolled environment. This transmitter must not be co-located or operating in
conjunction with any other antenna or transmitter.
But for the Base unit, this equipment should be installed and operated with a minimum distance
of 8” (20cm) between the base unit and your body. This equipment complies with IC RF radiation
exposure limits set forth for an uncontrolled environment. This transmitter must not be co-
located or operating in conjunction with any other antenna or transmitter.
Any changes or modifications not expressly approved by the party responsible for compliance
could void the user’s authority to operate the equipment.
FEDERAL COMMUNICATIONS COMMISSION STATEMENT 14
EN

© 2017 Spracht®. All rights reserved. Spracht®, the Spracht logo, and Zum DECT 6.0 Headset are trademarks
and registered trademarks of Spracht®. All other trademarks are property of their respective owners.
Visit our website at www.spracht.com Rev 3.1

ZūM DECT 6.0 HEADSET™
Télécommunications Numériques Sans Fil Améliorées
GUIDE DE L'UTILISATEUR
Version française
© 2017 Spracht®. Tous droits réservés. Spracht®, le logo Spracht et Zum DECT 6.0 Headset sont des marques
commerciales et des marques déposées de Spracht. Toutes les autres marques sont la propriété de leurs
propriétaires respectifs.
Visitez notre site Web à www.spracht.com.
Zum DECT 6.0 Headset

TABLE DES MATIÈRES
Introduction ... .... .... .... .... .... .... .... .... .... .... .... .... .... .... .... .... .... .... .... .... .... 1
Contenu de l'emballage . .... .... .... .... .... .... .... .... .... .... .... .... .... .... .... .... .... 1
Conception du Zum DECT 6.0 Headset™ . .... .... .... .... .... .... .... .... .... .... .... 2
Précautions de sécurité .. .... .... .... .... .... .... .... .... .... .... .... .... .... .... .... .... .... 3
Installation du Zum DECT 6.0 Headset™ ... .... .... .... .... .... .... .... .... .... .... .... 4
Installation du décrocheur de combiné en option .... .... .... .... .... .... .... .... 5
Installation du serre-tête et du coussinet sur le casque... . . .... .... ... .... .... .6
Charge du Zum DECT 6.0 Headset™ .... .... .... .... .... .... .... .... .... .... .... .... .6, 7
Appairage du Zum DECT Headset™ avec la base : Enregistrement.. ... .. ... . 7
Fonctionnement de base .... .... .... .... .... .... .... .... .... .... .... .... .... .... .... .... .... 7
Marche/arrêt du casque . .... .... .... .... .... .... .... .... .... .... .... .... .... .... .... .... .... .... .... . 7
Pour placer un appel (décrocheur de combiné en option non installé) ... .... .. 7
Pour placer un appel avec un décrocheur de combiné installé. .... .... .... .... .... 8
Réglage des volumes.. .... .... .... .... .... .... .... .... .... .... .... .... .... .... .... .... .... .... 8
Pour désactiver le microphone.. .... .... .... .... .... .... .... .... .... .... .... .... .... .... .... 8
Voyants d'état DEL .... .... .... .... .... .... .... .... .... .... .... .... .... .... .... .... .... .... .... 9
Caractéristiques techniques .... .... .... .... .... .... .... .... .... .... .... .... .... .... .... .. 10
Remplacement de la batterie ... .... .... .... .... .... .... .... .... .... .... .... .... .... .... .. 10
Guide de dépannage .. .... .... .... .... .... .... .... .... .... .... .... .... .... .... .... .... .... .... 11
Politique de garantie limitée .... .... .... .... .... .... .... .... .... .... .... .... .... .... .. 12, 13
Déclarations de la FCC.... .... .... .... .... .... .... .... .... .... .... .... .... .... .... .... .. 13, 14
Déclarations de la IC ... .... .... .... .... .... .... .... .... .... .... .... .... .... .... .... .... .... ... 14
© 2017 Spracht®. Tous droits réservés. Spracht®, le logo Spracht et Zum DECT 6.0 Headset sont des marques
commerciales et des marques déposées de Spracht. Toutes les autres marques sont la propriété de leurs
propriétaires respectifs.
Visitez notre site Web à www.spracht.com.
FR
Table of contents
Languages:
Other Spracht Headset manuals

Spracht
Spracht ZuM Maestro DECT User manual

Spracht
Spracht ZuM UC1 User manual

Spracht
Spracht ZuM eco-Set User manual

Spracht
Spracht ZuM Maestro Combo USB/DECT User manual

Spracht
Spracht ZuM BT User manual

Spracht
Spracht ZuM Maestro BT User manual

Spracht
Spracht ZuM Maestro HS-2050 User manual

Spracht
Spracht ZuM Maestro USB/BT Combo User manual

Spracht
Spracht ZuM Maestro USB User manual

Spracht
Spracht ZuM BT Prestige User manual


