Avaya SupraElite User manual

USER GUIDE
SupraElite™ Wireless
PROFESSIONAL HEADSET SYSTEM
©2006 Plantronics, Inc. All rights reserved. Avaya and the Avaya Logo are trademarks of Avaya, Inc.
and may be registered in certain jurisdictions.
IntelliStand, SupraElite, and the voice tube clear color trade dress and shape trade dress are trade-
marks or registered trademarks of Plantronics, Inc.
Patents U.S. 5,210,791; 6,735,453; D469,756; D505,413; Australia 147229; France 651,857-651,865;
Germany 40108524.4; GB Regd.Des.No. 2104923 and Patents Pending
Printed in China 72412-01 (04.06)

3
2
Components
Telephone Short Cord
Base
Headset (
One model included in each package—all available models shown)
AC Charger
Binaural
Noise-canceling
Alternative
Ear Cushions
Removable
Comfort Pad
24/46 Hookswitch
Control Cord
Ring Detector
27
25 24
28
D + M Filter Cord
29 31
8400 Hookswitch
Control Cord
30
18V 18N
21
22
19
9600 Hookswitch
Control Cord
Monaural
Voice Tube
Headset Band
Table of Contents
Setup 1–5
Positioning
Adjusting Fit
Charging
Checking Compatibility
Components 3
6
11
11
10
13
Making/Answering/Ending Calls
12
Multi-shift Pairing 12
Headset Controls
Volume
18
IntelliStand
16
15
Troubleshooting 20
Base Indicator Lights 19
Subscription 22
22
System Reset
22
Maintenance
VoiceTube Replacement 22
Technical Assistance 25
Battery Replacement 23
24Accessing UCC
Regulatory Notices 25

5
4
Charging Cradle
Indicator Lights
Talk (Green)
Power (Red)
Charge (Amber)
Telephone
Configuration Dial
Listening Volume
Major Adjust
Telephone Short Cord
IntelliStand
On/Off Switch
(to automate
call control button)
Speaking Volume
Minor Adjust
Front
Back
2
3
9
1
4
13
10
11
25
Listening Volume
Minor Adjust
Mute
Headset Talk
Indicator Light
Call Control Button
Noise-Canceling
Microphone
Headset
Base - Underside View
Listening Volume
Minor Adjust
Mute
Headset Talk
Indicator Light
Call Control Button
VoiceTube
Headset
Speak Volume
Major Adjust
Handset Jack
Accessory Jack
Ring Detector Jack
AC Power
Adapter Jack
Telephone Base Jack
EV24/ADJ
18N
15M
18V
15M
12
32
26
17
17
15
15
14
14
8
7
6
5
Components Components

7
6
Setup 2Setup 1
with AVAYA 2420, 4610SW, 4620, 4620SW,
4621SW, 4622SW, 4625SW 4630SW, 5420,
5610 and 5620 telephones*
with AVAYA 2410, 4630, 5410, 6416 D+M
and 6424 D+M telephones
7
24
24
28
28
26 5
25
25
4
1
24
27
425
7
2427
29
29
1
*24xx and 54xx phones require 4.0 firmware or greater.
46xx and 56xx phones require 1.8 firmware or greater.
Configuration
dial set to 3 Configuration
dial set to 1
See pages 3, 4,
and 5 for callout
of components

9
24
27
430
7
2427
1
8
Setup 3
with AVAYA 7403D, 7405D, 7407D, 7406,
8403, 8405, 8410D, 8411D, 8434, 8510ISDN
and 7506ISDN telephones
24
27
425
7
2427
31
31
1
Setup 4
with AVAYA 9600 series telephones
Configuration
dial set to 1

11
6“
12”
The minimum recommended separation distance is shown above.
IMPORTANT: Incorrect positioning can cause noise and interference problems.
Charging
1
2
Positioning
1. Slide the headset into the charging
cradle. The earpiece with the micro-
phone goes into the cradle.
2. Gently press down on the the head-
set to ensure that the headset is in
the correct position. The amber
charge indicator light on the base
will flash while charging and will
change to solid amber when fully
charged.
•20 minutes = minimum charge
to continue setup
• 3 hours = full charge
Set the IntelliStand
switch to IntelliStand off
(
–
)if you want to control
the handset lifter with
the call control button
on your headset.
Set the IntelliStand
switch to IntelliStand on
(
=
)if you want the
handset to automatically
pick up when you take
the headset off the
charging cradle.
Setup 5 with other AVAYA telephones
P
L
A
N
T
R
O
N
I
C
S
24
25
7
24
6
P
L
A
N
T
R
O
N
I
C
S
Optional
Lifter
Optional
Lifter
Optional
Lifter
4
Configuration
Dial
{see page 15}
Be sure to connect
this plug into the
jack wherethe
handset was
connected.
1
Caution: It is important for correct and safe operation that the base cord
is installed into the proper jack of your telephone. Follow these instructions
carefully, especially if your telephone has two jacks where the handset was
attached. Be sure to note or mark which jack was used for the handset.
3
IntelliStand
off
IntelliStand
on
IntelliStand™
10

13
12
1
2
Adjusting Fit
1. Adjust headband to fit.
2. Rotate noise-canceling microphone until it is pointed towards your chin.
Making/Answering/Ending Calls
Setup 1, 2, 3 & 4
To make a call, press call control button. Dial tone should sound through handset
(If not, check compatibility—see Setup 1, 2, 3 & 4). Dial using the telephone keypad.
To answer a call, press the call control button on the headset.
To end a call, press the call control button on the headset. If either you or the recipient
have trouble hearing, please check compatibility (Setup 1, 2, 3 & 4).
NOTE: Depending on your preference,
you can replace the pre-installed
leatherette ear cushions with the
included alternative foam cushions.
Multi-shift Pairing
2
1
OROROR
Enable
Disable
1. To pair another headset to the same base, you must first enable the multi-shift
pairing feature. Long press (5 sec.) the speaking volume minor adjust up button on
back of base until the power indicator flashes.
2. Place a charged headset in charging cradle. The red indicator light on base will
flash for 2 seconds if the multi-shift pairing feature is enabled. Within 10 seconds of
doing so, press either the "+"or "-"listening volume button for 3 seconds until the
green talk indicator lights to indicate pairing mode, and goes out after successful
pairing. Repeat steps 1 and 2 if headset and base do not link when call control but-
ton is pressed.
NOTE: Only the last paired headset will work with the base. You must NOT be in talk mode
(on a call) to enable or disable this feature.
To disable the multi-shift pairing feature, long press (5 sec.) the speaking volume
minor adjust down button until the power indicator light flashes.

15
14
Checking Compatibility
1
2
3
4
1
2
3
4
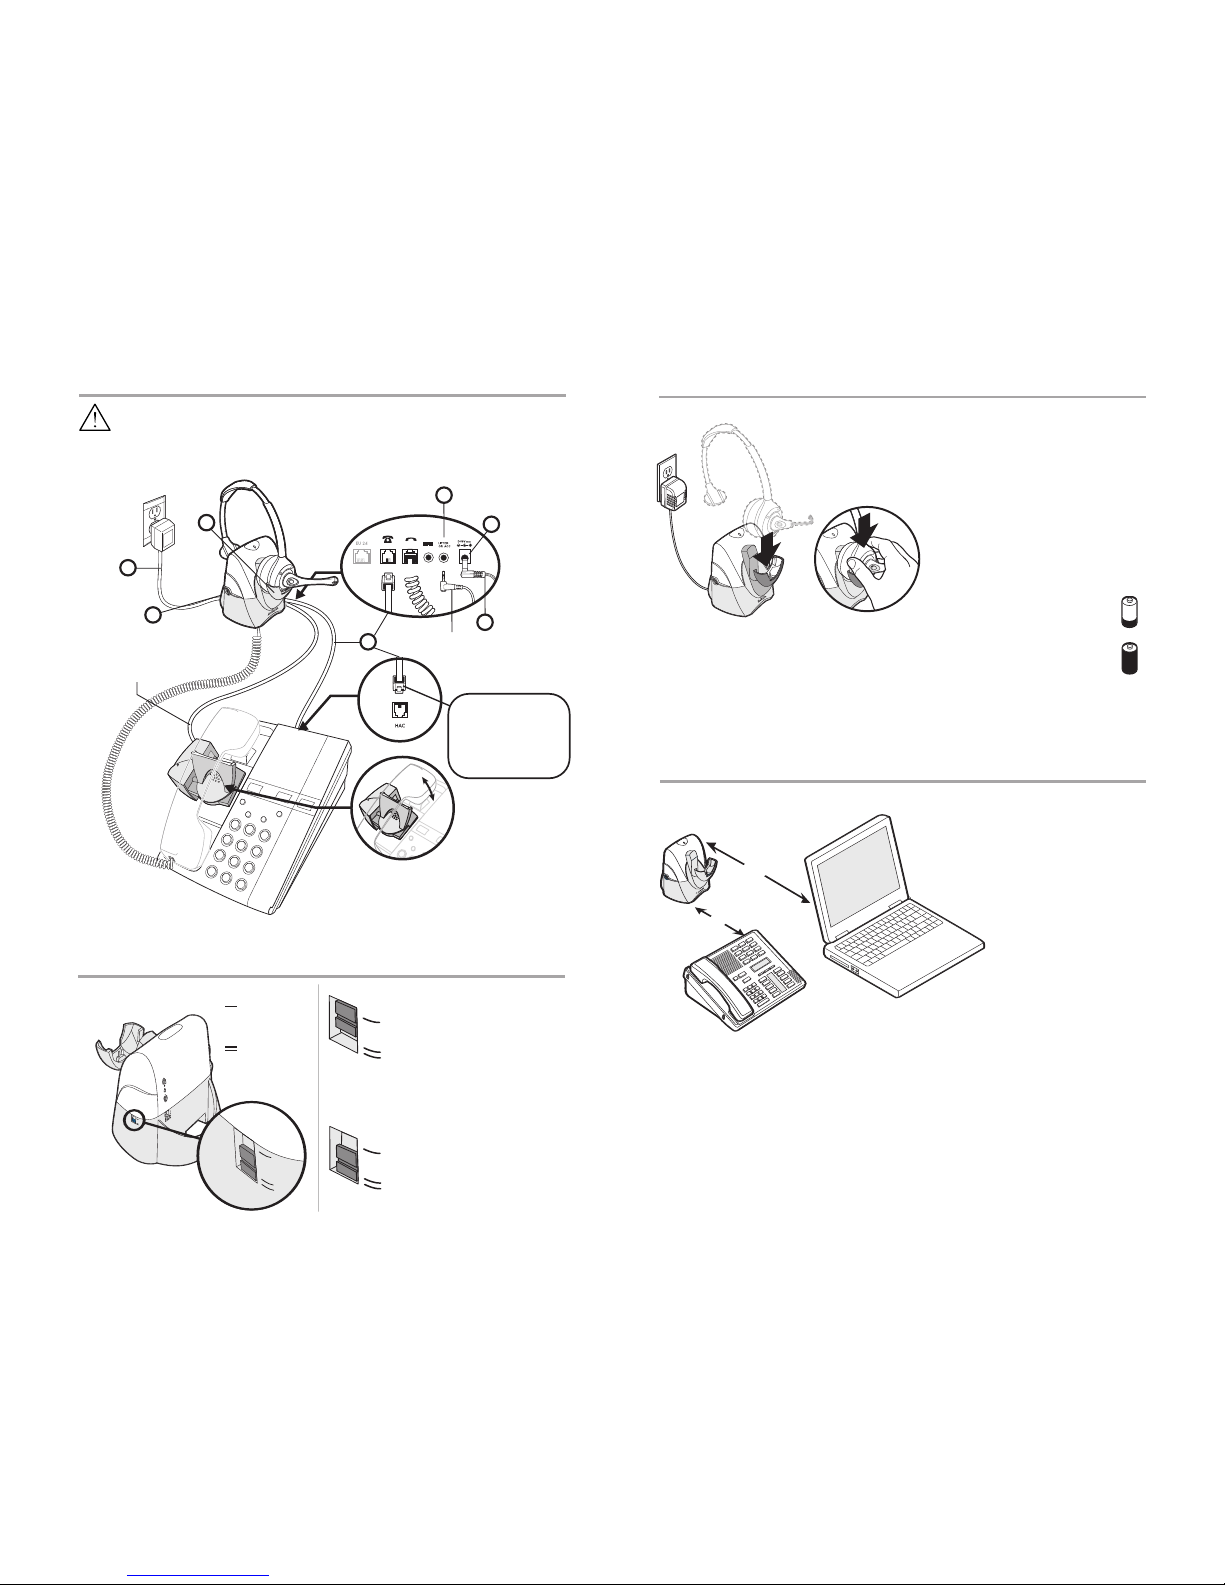
Adjust your telephone configuration dial on the base to position 3 for the following tele-
phones: 2420, 4610SW, 4620, 4620SW, 4621SW, 4622SW, 4625SW, 4630SW, 5420, 5610,
5620, 7403D, 7405D, 7407D, 7406, 8403, 8405, 8410D, 8411D, 8434, 8510ISDN, and
7506ISDN.
Adjust the configuration dial to position 1 for the following telephones:
2410, 4630, 5410, 6416D+M, 6424D+M, and 9600 series.
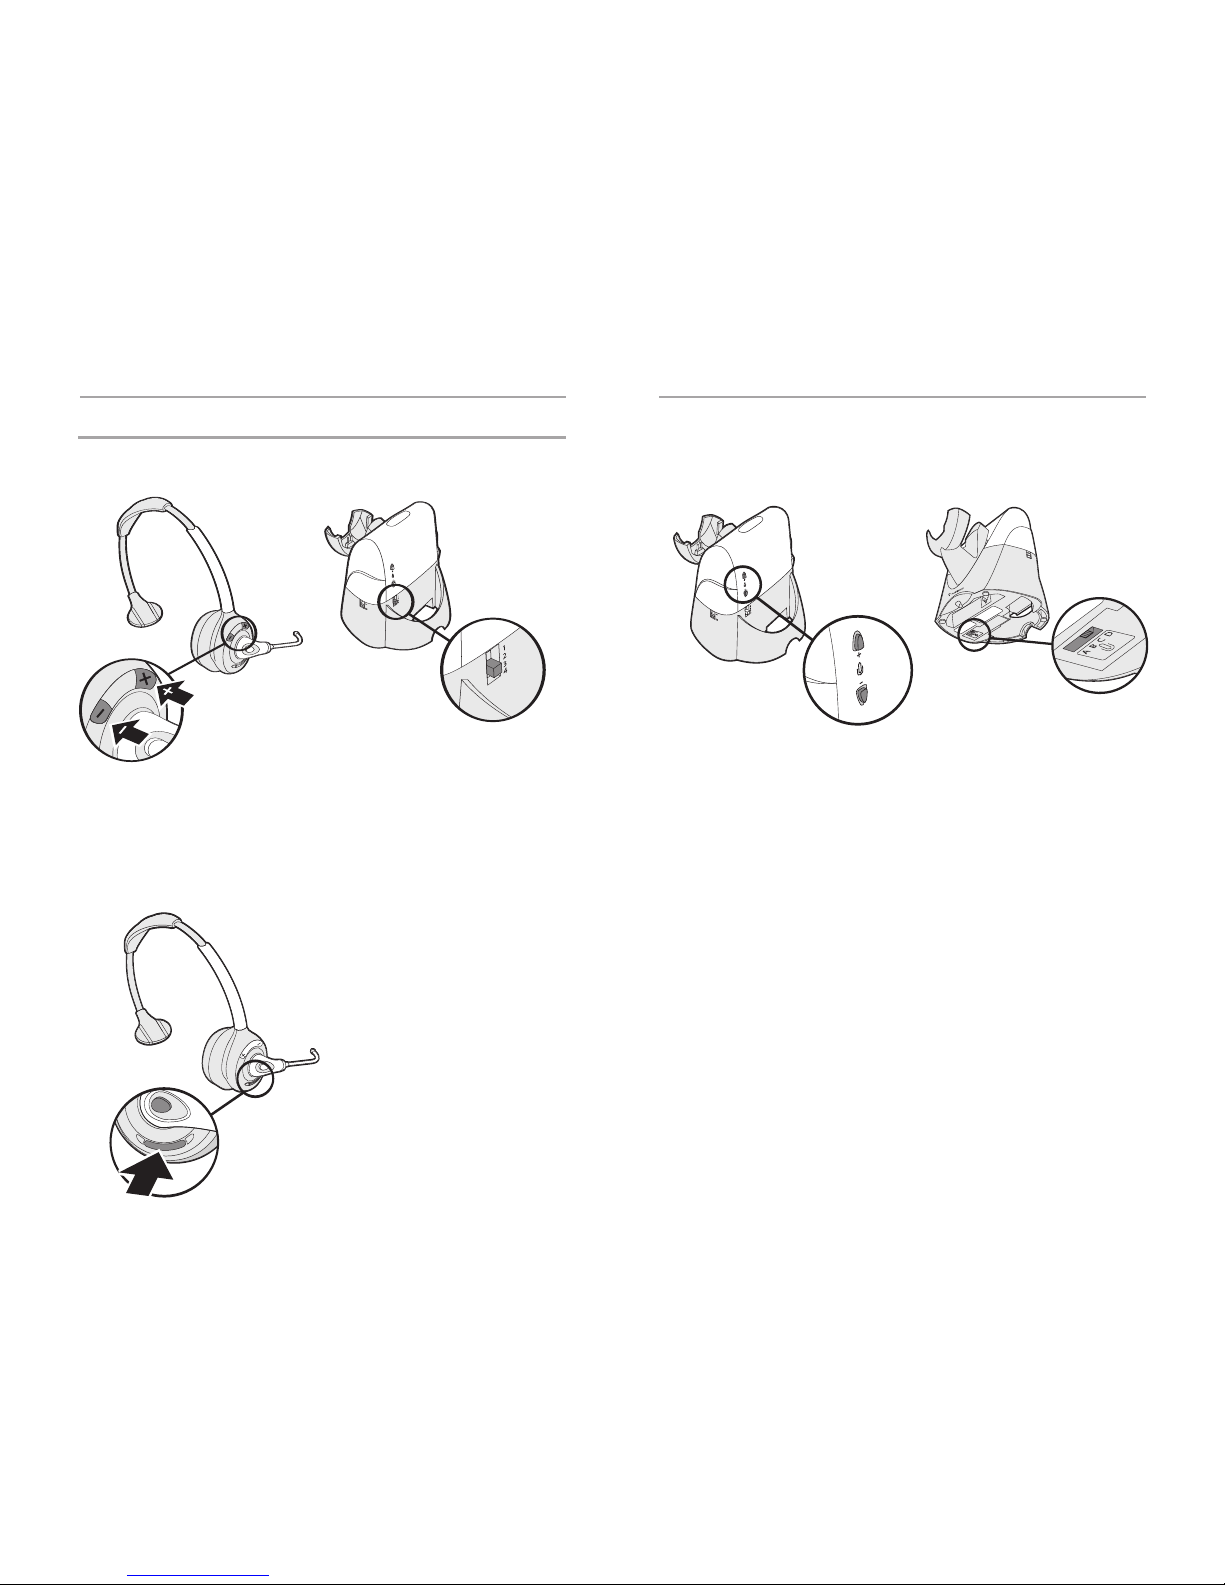
If you cannot hear a dial tone through your headset, use a coin or small screwdriver to
turn the telephone configuration dial until you can. Make sure that a number is aligned
with the position indicator.
1. Place a call to someone you know.
2. While speaking, turn the configuration dial through the four positions.
3. Select the position that provides the best sound quality for both you and the recipient.
NOTE: The compatibility setting of “1” is set at the factory to work with most phones.
However, if you do not hear a dial tone, if either you or the recipient is having trouble hearing,
or if you experience buzzing/hissing, please follow the directions below.
Making/Answering/Ending Calls
Setup 5
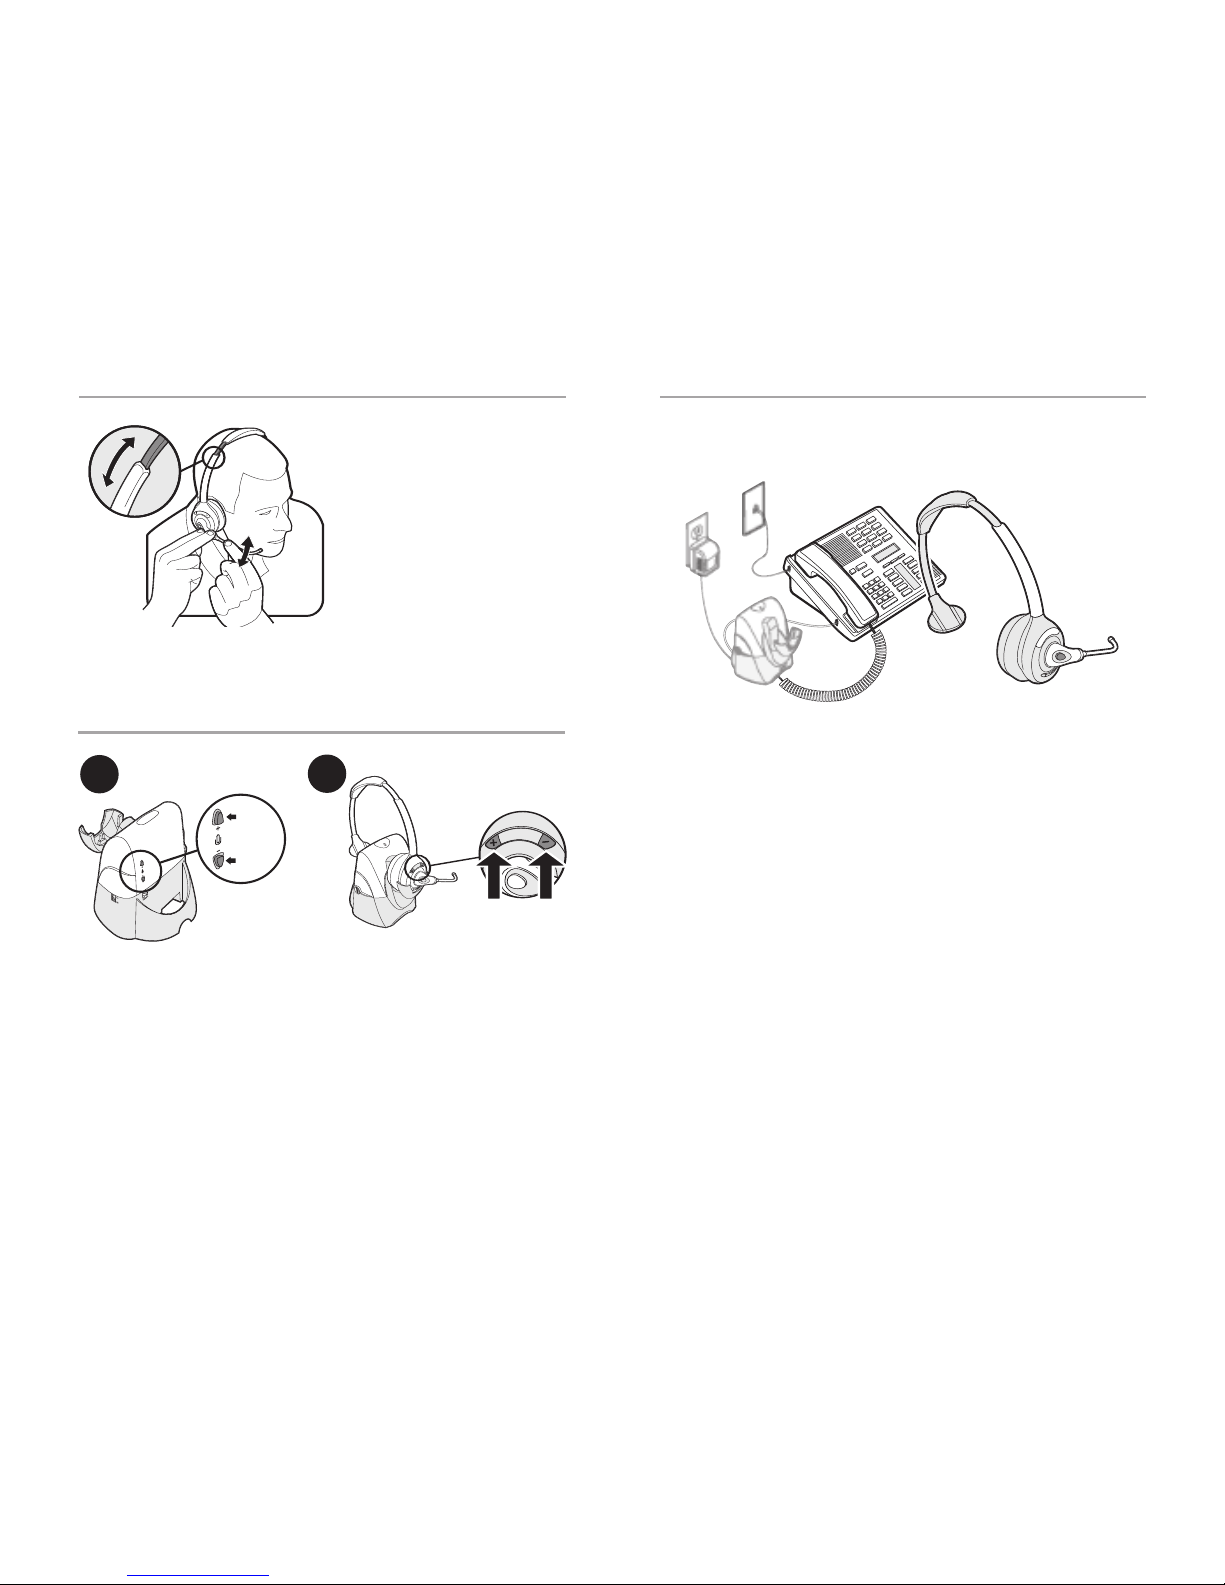
with Optional Handset Lifter
1
1
2
2
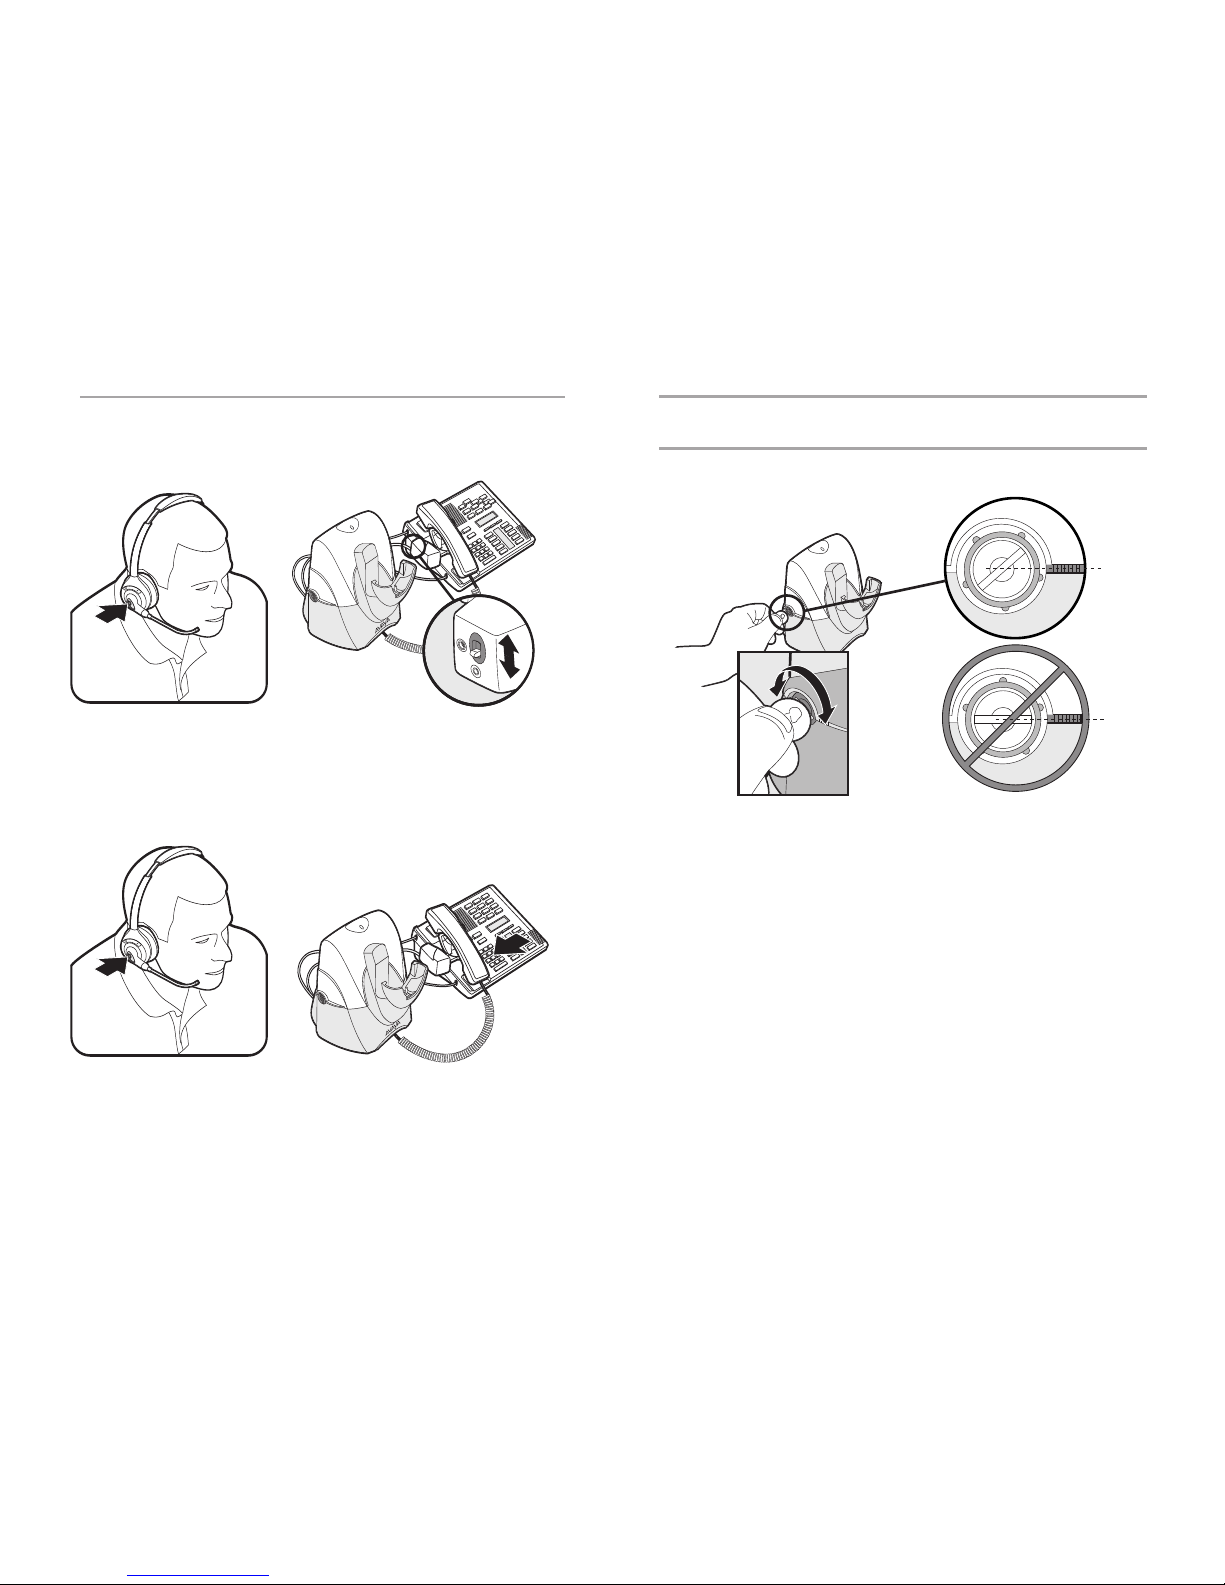
First, test proper set up of the handset lifter.
1. Press the call control button on headset to activate handset lifter and lift handset
from phone. Dial tone should sound if the handset is raised high enough.
2. If no dial tone, adjust handset lifter height switch or reposition the lifter under the
handset.
Use mounting tape to secure the handset lifter in position.
To make/answer a call:
1. Press the call control button to raise the handset lifter.
2. Use the telephone keypad to dial the number.
To end a call, press the call control button to lower the handset lifter. The handset will
return to the base.
If either you or the recipient have trouble hearing, please check compatibility (page 15).

17
16
Speaking Volume
Major Adjust
Minor Adjust
Use the speaking volume minor adjust
control on the back of the base for
minor incremental adjustments.
Use the speaking volume major adjust
control on the bottom of the base for
large incremental adjustments.
NOTE: A is the most quiet setting.
Bis the most common setting.
Dis the loudest setting.
Listening Volume
Major Adjust
Minor Adjust Headset Mute
Push the “+” and “–” buttons to adjust
listening volume for minor incremental
adjustments.
Use the listening volume major adjust
control on the back of the base for large
incremental adjustments.
NOTE: 1 is the loudest setting.
4is the most quiet setting.
NOTE: Be sure to set your telephone’s volume at the mid range before adjusting
the SupraElite™ Wireless volume.
Headset Mute
To mute the headset, press the mute
button straight in. Press again to
unmute.
The talk indicator light on the base will
flash while muted.
You will hear 3 rapid beeps every 30
seconds to indicate that the mute is on.

19
18
Base Indicator LightsHeadset Controls
Listening volume
major adjust
Speaking volume
major adjust
Speaking volume
minor adjust
Answering/
ending calls
Slide switch Increase in
overall volume
Singletone,
3tones at limit
Ascending/descending
tones
Slide switch No tone
Short keypress
Short keypress
Short keypress
Press
+
to increase
or
–
to decrease
Mid tone
Low battery
warning
Replace headset in
charging cradle 1tone every 10
seconds
Mute
Listening volume
minor adjust
Key Feature Action Tone
Base Features
A
D
BC
1
2
3
4
Out ofrange
warning Move closer to base 2tones
3 mid tones = Mute
3low tones = Unmute
NOTE: Tones repeat every
30 seconds when muted.
N/A
Incoming call
notification*
Press call control
buttonto
answer call
3 repetitive tones
N/A
* Only workswhen using optional Handset Lifter.
FullyCharged Solid amber
Charging Flashes amber
Solid green
Power Solid red
Talking
Flashes greenMuted
Action Light
Indicator Lights
Talking/Muted (Green)
Power (Red)
Charging (Amber)

21
20
TroubleshootingTroubleshooting
Problem Solution Problem Solution
Ipluggedeverything in but
the lights won’t comeon.
•Check thatthe AC charger jackis connected to the base unit.
•Check thatthe AC charger is securely connectedto a
working wall outlet.
•Check thatthe AC charger is the model supplied by Avaya.
My headset doesnot work
with the baseunit.
•Check thatthe phone is connectedto the baseunit’s phone
cord jackand it is pushed in firmly.
•Check thatthe phone handsetis connected to the base’s
phonehandset jack and it is pushed in firmly.
•Headset may be outof rangeof the base. Movecloser to
base unit until headsetis within range. Range varies with
office environment.
•Headset battery is dead. Recharge the battery by placing
the headsetin the headsetchargingcradle. See page11.
•Listeningvolume too low. Press the volumeup button on the
headset.If the volume is still too low, select another
listening volume major adjust switchsetting.See page16.
•Incorrect configurationdial setting for your phone. Tryother
phoneconfiguration dial settings on thebase unit. Ensure
the selected number is in linewith thepositionindicator.
See page15.
•Youmay haveto resubscribeyour headsetwith thebase.
See page22.
•Headset is muted. Press themute button on headset to
unmute the microphone. See page16.
•Speak volume is too low.Increasethe speaking volume by
adjusting the speaking volume minor adjust buttons on the
base unit as described on page 17. If thevolume is still too
low, selectanother speaking volume major adjust setting
as described on page17.
•Incorrect configurationdial setting for your phone. Try
otherphoneconfiguration dialsettingson the baseunit.
Ensure the selected number is in linewith theposition
indicator. See page 15.
Ican hearadial tonein
more thanone
configuration position.
Phonewill workin more thanone configurationdial
position. Use thepositionthat soundsbest to youand the
person you call.
Icannot hearadial tonein
any configurationposition.
•Check thatthe phone is connectedto the base’s phone
cord jack. See pages 6–10.
•Check thatthe phone handsetis connected to the base’s
phonehandset jack. See pages 6–10.
Icannot hearcaller/dialtone.•Check thatall cords and jacks are connectedcorrectly.
•Check thatthe basehas power (redindicator light) and
the headsetbattery is fully charged.
•Tryotherphoneconfigurationdial settings on thebase
unit.Ensure the selected number is in linewith the
positionindicator. See page15.
•Ensureyou are in headset mode. Press the talk buttonto
select correct mode. The talk indicator light on the base
is green.
Callers cannothear me.
Soundin handset is
distorted/hearecho in
handset.
•Reducespeakingvolume by changing the speaking volume
majoradjust switch setting. See page 17.
•Point microphone towardsyour chin.
•Listeningvolume too high on phone. If your phone has a
handset volumecontrol,lowerthis until thedistortion
disappears.
•If thedistortion is still present, lower the listeningvolume
adjust button on the headset. If the distortion persists,
select anotherlistening volume major adjust switch
setting.See page16.
•Base is too close to computer or phone.See page11 for
proper positioning.
•Systemneeds to be reset.Perform systemresetas
described on page22.
Icanhear too much
background conversation,
noiseor sidetone.
Speakingvolume is too high. Lower thespeakingvolume by
adjusting the speaking volumeminoradjust buttons on the
base.If the volume is still too high, select another speaking
volume major adjust setting. See page17.
People Italk to can hear a
buzz in the background.
•AC charger is plugged into apower strip.Plug theAC
charger into the wall directly.
•Picking up anotherradiofrequency. Call the AvayaHeadset
Helpdeskfor an RF filter.
Battery talk timeperformance
is significantly degraded even
afterafull recharge.
Battery is going bad. Replacethe battery withanew
battery pack. See page23.
The call is dropped.(Talk
indicator on the headsetand
base will not be illuminated.)
Headset lost subscription.Try to resetthe system.See
page 22.If this doesnot work, try theresubscription
procedure on page22.
Ihear static that doesnot
allowme to communicate. •Link to headsetis lost. Tryto reestablishalink by pressing
the headsettalk button.
•Unplugthe AC charger from the base for 7 seconds, then
plug back in.
•Reset thewholesystem as described on page 22.
Ihear beeps in the headset. •Onebeep every 10 seconds is caused by a low battery
warning.Rechargebattery by returningit to the base
charge cradle for one to three hours until charge light stays
lit or quits blinking.
•Twobeepsis an out of range warning. Movecloser to the base.
•Three rapid beepsevery30 seconds indicatesyour mute is
on. Press the mute controldial once to turn mute off.
•When an optional lifter is connected, three repetitivebeeps
indicateacall is coming into the headset. Press the talk
button on the headsetto answer the call.
Handset lifteris installed
but doesnot lifthandset.
Be sure thehandset lifterpowercord is firmlypushed into
the handsetlifter jackon the base.
My handset lifteroperates
everytime I remove or
replace my headset in the
base unit.
IntelliStand is enabled. To disablethe handsetlifter, move
the IntelliStand switchto position.

1 2
23
22
Subscription Battery Replacement
The headset and base unit are supplied subscribed to each other. However, if you wish
to use a replacement headset with the base unit, then the units must be re-subscribed.
To do so, please follow the instructions on page 12 for Multi-Shift Pairing.
System Reset
To recover from some fault conditions (refer to the Troubleshooting Section), you may need
to perform a system reset. To perform the system reset, follow this procedure:
AND
ANDAND
1
1
(
)
1. Simultaneously press the call control button and both the "+"and "–" volume buttons
for 5 seconds. When the talk indicator light on the headset blinks, release all buttons.
2. Press the call control button again. The talk indicator light will again blink briefly to
indicate the headset is back to normal operation mode.
3. Disconnect the AC charger from the AC charging jack for 5 seconds.
4. Reconnect.
The system reset operation is complete.
1 2
4
3
6
5
The custom battery supplied should last 2–3 years. When talk time decreases significantly, you
should replace the battery. Call Avaya at (800) 544-4779 to order one. Once you receive it, follow
directions below to replace. The tool shown in Steps 2 and 5 is included with your replacement
battery.
Use hook end of tool to
hook battery wires and
pull toward open battery
door until battery moves
out from behind post.
Use fingernail to lift off
and flip open battery door.
Once battery is removed,
gently disconnect battery
connector; do not pull hard.
Before replacing battery
into compartment, please
be sure battery wires are
on side closest to opened
battery door; the battery
cannot be installed
properly if wires are on
other side.
Using the "Y" end of the
tool, press the battery
backwards and away from
battery door until the left
corner of the battery tucks
under the post in the
battery compartment. Tuck
all of the battery wires and
connectors into the battery
compartment.
Close door so
that it is flush
with headset.
Maintenance
Voice Tube Replacement
1.
Replace voice tube every 6–9 months (voice tube models only).
2. Unplug the unit from the telephone and the AC charger from the power source before cleaning.
3. Clean the equipment with a damp (not wet) cloth.
4. Do not use solvents or other cleaning agents.
To replace voice tube:
1.
Slide old voice tube out.
2. Slide in sparevoice tube.

25
24
Regulatory Notices
This device complies with Part 15 of the FCC Rules. Operation is subject to the following two conditions:
1. This device may not cause harmful interference, and
2. This device must accept any interference received, including interference that may cause
undesired operation.
This equipment has been tested and found to comply with the limits for a Class B digital device, pur-
suant to Part 15 of the FCC Rules. These limits are designed to provide reasonable protection against
harmful interference in a residential installation. This equipment generates, uses, and can radiate
radio frequency energy and, if not installed and used in accordance with the instructions, may cause
harmful interference to radio communications. However, there is no guarantee that interference will
not occur in a particular installation. If this equipment does cause harmful interference to radio or
television reception which can be determined by turning the radio or television off and on, the user is
encouraged to try to correct interference by one or more of the following measures:
1. Reorient or relocate the receiving antenna.
2. Increase the separation between the equipment and receiver.
3. Connect the equipment into an outlet on another circuit.
4. Consult the dealer or an experienced radio/TV technician for help.
The internal wireless radio operates within the guidelines found in radio frequency safety standards and
recommendations, which reflect the consensus of the scientific community. Independent studies have
shown that the internal wireless radio is safe for use by consumers. Visit www.avayaheadsets.com for
more information.
NOTE: Modifications not expressly approved by Avaya could void the user's authority to operate the
equipment.
Exposure to RF Radiation
FCC Requirements – Part 15
FCC Requirements – Part 68
The Avaya Headset Helpdesk is ready to assist you! Dial (800) 544-4779, or
visit the support section of our website at www.avayaheadsets.com.
Technical Assistance
This equipment complies with Part 68 of the FCC rules and the requirements adopted by ACTA. On
the exterior of this equipment is a label that contains a product identifier in the format
US:AAAEQ##TXXXX. If requested, this information must be provided to your telephone company.
A plug and jack used to connect this equipment to the premises wiring and telephone network must
comply with the applicable FCC Part 68 rules and requirements adopted by ACTA. A compliant tele-
phone cord and modular plug is provided with this product. It is designed to be connected to a com-
patible jack that is also compliant. See installation instructions for details.
The REN is useful to determine the quantity of devices you may connect to your telephone line.
Excessive RENs on a telephone line may result in the devices not ringing in response to an incoming
call. In most, but not all areas, the sum of the RENs should not exceed five (5.0). To be certain of the
number of devices you may connect to your line, as determined by the REN, contact your local tele-
phone company. For product approved after July 23, 2001, the REN for this product is part of the
product identifier that has the format US:AAAEQ##TXXXX. The digits represented by ### are the
REN without the decimal point. (For example, 03 represents a REN of 0.3.) For earlier producers, the
REN is separately shown on the label.
If this telephone equipment causes harm to the telephone network, the telephone company will noti-
fy you in advance that temporary discontinuance of service may be required. But if advance notice
isn’t practical, the telephone company will notify the customer as soon as possible. Also, you will be
advised of your right to file a complaint with the FCC if you believe it is necessary.
The telephone company may make changes in its facilities, equipment, operations, or procedures
that could affect the proper functioning of your equipment. If they do, you will be notified in advance
in order for you to make necessary modifications to maintain uninterrupted service.
If trouble is experienced with this unit, for repair or warranty information, please contact customer
service at (800) 544-4779. If the equipment is causing harm to the network, the telephone company
may request that you disconnect the equipment until the problem is resolved.
DO NOT DISASSEMBLE THIS EQUIPMENT: it does not contain any user serviceable components.
We recommend the installation of an AC surge arrester in the AC outlet to which this equipment is
connected. Telephone companies report that electrical surges, typically lighting transients, are very
destructive to customer terminal equipment connected to AC power sources.
Accessing the Avaya Unified
Communication Center (UCC)
from the SupraElite Wireless
1. Connect the SupraElite Wireless to the Avaya telephone. Follow the instructions in
this user guide.
2. Ask your switch administrator to configure your telephone for ringdown to the UCC
in your telephone first call appearance.*
*Notes for switch administrators on configuring ringdown for your AVAYA telephones:
• Some phones allow for direct ringdown configuration, i.e. 2500.
• Other phones do not allow for direct ringdown configurations, i.e. 64XX. In order
to configure the ringdown in these phones, the administrator needs to:
• Create a phantom extension setup as a 2500 type.
(No real port has to be assigned.)
•Create a ringdown to the UCC for the phantom extension.
• Bridge the phantom extension to the telephone call appearance 1
(configure it as an “abrdg-appr” and setup the “Auto Select Any Idle Appearance”
to Yes).
Table of contents
Other Avaya Headset manuals

Avaya
Avaya PhoneTech P20USBM Supplement

Avaya
Avaya L139 User manual

Avaya
Avaya C500 Series Supplement

Avaya
Avaya AWH-55USB User manual

Avaya
Avaya L119 User manual

Avaya
Avaya L149 User manual

Avaya
Avaya ABT-35 User manual

Avaya
Avaya AWH65+ User manual

Avaya
Avaya Supra User manual

Avaya
Avaya AWH-55 User manual