Spraying Systems TeeJet MATRIX PRO 840 GS User manual

MATRIX®PRO GS
-HOW TO CHECK -
This guide explain how to check, maintain
and update a Matrix PRO GS console.

Copyrights
© 2015 TeeJet Technologies. All rights reserved. No part of this document or the computer programs described in it may be reproduced,
copied, photocopied, translated, or reduced in any form or by any means, electronic or machine readable, recording or otherwise, without
prior written consent from TeeJet Technologies.
Trademarks
Unless otherwise noted, all other brand or product names are trademarks or registered trademarks of their respective companies or
organizations.
Limitation of Liability
TEEJET TECHNOLOGIES PROVIDES THIS MATERIAL “AS IS” WITHOUT WARRANTY OF ANY KIND, EITHER EXPRESSED OR
IMPLIED. NO COPYRIGHT LIABILITY OR PATENT IS ASSUMED. IN NO EVENT SHALL TEEJET TECHNOLOGIES BE LIABLE FOR ANY
LOSS OF BUSINESS, LOSS OF PROFIT, LOSS OF USE OR DATA, INTERRUPTION OF BUSINESS, OR FOR INDIRECT, SPECIAL,
INCIDENTAL, OR CONSEQUENTIAL DAMAGES OF ANY KIND, EVEN IF TEEJET TECHNOLOGIES HAS BEEN ADVISED OF SUCH
DAMAGES ARISING FROM TEEJET TECHNOLOGIES SOFTWARE.

1
Matrix®- how to check
Table of contents
INTRODUCTION 2
MATRIX PRO GS 2
Matrix PRO GS..............................................................................................................................................................................2
Software versions for Matrix PRO GS ...........................................................................................................................................2
AVAILABLE TEEJET APP’S 3
Update Application software ..........................................................................................................................................................3
Update GPS receiver rmware......................................................................................................................................................3
Force - calibration of touch screen ................................................................................................................................................3
Force - delete JOB data (Data-killer).............................................................................................................................................3
Matrix PRO GS from V4.11............................................................................................................................................................3
Matrix PRO GS from V4.20 ...........................................................................................................................................................3
WHAT IS THE PROBLEM? 4
POWER SUPPLY 5
ANTENNA 5
Type:..............................................................................................................................................................................................5
Antenna Installation: ......................................................................................................................................................................6
Antenna cable and connector:.......................................................................................................................................................6
TEST GPS RECEIVER 7
TEST CANBUS AND CAMERA 8
MATRIX PRO GS CONNECTIONS 9
Notes / Usefull part numbers: ........................................................................................................................................................9

2www.teejet.com
Matrix® how to check
INTRODUCTION
This guide is made to help identifying and solving problems with Matrix PRO GS consoles - in eld.
It is only some problems which can be solved by updating the application software, GPS rmware or replacing
antenna/cable. If the operating system or the GPS receiver has a critical error, it can only be solved by shipping
the console to TeeJet for repair.
MATRIX PRO GS
Matrix PRO GS
Matrix PRO GS is the third generation of the Matrix series. Below is a list with the most important of the console
specication:
800 MHz, ARM Cortex A8
512 MB DDR2 SRAM
512 MB NAND Flash
2 UARTS bvcjb’ CAN 2.0
Display - 570 5.7” QVGA (320x240),
Display - 840 8,4” SVGA (800x600)
4-wire resistive touch screen
Wide temp range
High speed refresh rate for video playback
Internal GPS receiver (NovAtel OEMStar)
L1 with EGNOS and GLONASS capability
Tested for CE requirements – emissions, immunity, power
line and I/O transients
Lightweight & durable plastic enclosure
Sunlight readable LED guidance light bar
9 - 16 VDC operating range
low power consumption (< 9 watts @12 VDC)
High performance Graphics Processing Unit (GPU) results
in smooth real-time graphics performance
Single direct camera connection, up to 8 cameras via
additional interface
USB connection for rmware updates, data transfer
Software versions for Matrix PRO GS
The initial Matrix PRO GS version was V2.50. The following releases are listed below:
Version Date Description
V3.04 October
2013 Unlock code issues (Minor update) .
V3.05 April
2014 Update to support Production requirements (Minor update).
V4.00 June
2014
Third-Party Rate control (VRA) added.
(Major update - see a complete release description in doc: 98-01430).
V4.10 September
2014
TeeJet compatible ISOXML prescription maps can be imported for
variable rate applications (Minor update).
V4.11 April
2015
GLONASS included as standard feature in all Matrix Pro GS units
(Major update - see a complete release description in doc: 98-01430)
V4.12 November
2015
Boot time reduced. Corrected language (Japanese and Czech)
(Minor update - see a complete release description in doc: 98-01430)
V4.20 April
2016
First Release for FieldPilot Pro & UniPilot Pro Autosteering systems. Autosteer Demo
mode built into application. Internal GNSS Receiver now operates at 115200 baud,
8-N-1 GGA @ 10 Hz, VTG @ 10 Hz, ZDA @ 1 Hz. Several bug x’s.
(Major update - see a complete release description in doc: 98-01430 R10)
V4.21 August
2016
Curved AB guidance mode added for FieldPilot Pro and UniPilot Pro systems. Support
for optional External Lightbar. Enhanced Reverse Sense performance when operating
FieldPilot Pro and UniPilot Pro. SCM Pro can be enabled from the GUI – no need for
USB Drive app. See a complete release description in doc: 98-01430 R13)
V4.31 July 2017
New Adaptive Curve guidance mode added. Reset the ClearPath Filter using GNSS
Refresh button. Multiple new mapping functions and several xes.
(Major update - see a complete release description in doc: 98-01430-ENUS R17)

3
Matrix®- how to check
AVAILABLE TEEJET APP’S
TeeJet has developed App’s which makes it possible, via the USB port, to update the application software, update
GPS receiver rmware, force -delete job data in memory or force -touch screen calibration. The App’s and their
support documents are placed on: ftp://ftp.support.teejet.dk/Tech_Support/OEM_Tech_Support/Matrix_GS/
Select one of the below folders and the actual version, e.g. V4.31
Update Application software
ftp://ftp.support.teejet.dk/Tech_Support/OEM_Tech_Support/Matrix_GS/01_Application_Update/
Update GPS receiver rmware
ftp://ftp.support.teejet.dk/Tech_Support/OEM_Tech_Support/Matrix_GS/02_GPS_Receiver_Update/
Force - calibration of touch screen
ftp://ftp.support.teejet.dk/Tech_Support/OEM_Tech_Support/Matrix_GS/04_Tools/Force_TouchScreen_
Calibration/
Force - delete JOB data (Data-killer)
ftp://ftp.support.teejet.dk/Tech_Support/OEM_Tech_Support/Matrix_GS/04_Tools/Force_Delete_Data/
ClearPath Filter reset option for Matrix Pro GS consoles:
(! Only Matrix PRO GS V4.11, V4.12, V4.20 and V4.21)
Customers who operate their Matrix Pro GS units in marginal GNSS reception conditions while transporting to
the eld with the Matrix Pro GS console turned on will benet from a new ClearPath lter reset procedure. Reset-
ting the ClearPath lter will purge the GNSS receiver of bad data that can accumulate while operating under
trees and in close proximity to structures while transporting to the eld. Please read the instructions in the docu-
ment named 98-01506-EN.
ftp://ftp.support.teejet.dk/Tech_Support/OEM_Tech_Support/Matrix_GS/03_ClearPath_Reset_On-O/
In this folder you will nd the App to enable or disable the ClearPath Filter Reset feature.
! The ‘ClearPath Filter Reset’ option is now implemented in Matrix V4.31 and it’s no longer required to acti-
vate it with an App. We recommend to update to the latest version.
FieldPilot & Unipilot PRO
(! Only Matrix PRO GS V4.20)
Enable FieldPilot & Unipilot PRO:
In order to reduce the time needed for consoles to power up and be ready to operate, all consoles shipped from
TeeJet before and after March 28th, 2016 are congured to not search for the SCM Pro module during boot. All
consoles to be used with an SCM Pro in a UniPilot Pro or FieldPilot Pro system must be updated with the USB
Drive app ‘Enable_fppro_probe’.
GPS Receiver settings (Internal and external):
FieldPilot Pro operates with internal and external receivers set to 115,200 baud rate, GGA & VTG @ 10 Hz, ZDA @
1 Hz. New consoles shipping from TeeJet after March 28th, 2016 will have internal receivers operating at these
settings. Consoles shipped from TeeJet prior to March 28th, 2016 that will be used with FieldPilot Pro and UniPi-
lot Pro must be updated with the USB Drive app ‘Update_receiver_frequencies’’
ftp://ftp.support.teejet.dk/Tech_Support/OEM_Tech_Support/Matrix_GS/05_FieldPilotPRO/
In this folder you will nd the two App’s and the latest rmware for the SCM PRO module.
! From Matrix V4.21 it’s no longer required to enable the auto steering feature with an App. This is now pos-
sible directly in the application. We recommend to update to the latest version.

4www.teejet.com
Matrix® how to check
WHAT IS THE PROBLEM?
The error description and possible solution below are similar to cases where we had success, solving the
problem by updating software - deleting data - improving GPS signal reception, in eld.
Error description Possible error Possible solution
Console do not start,
screen remains black
No power supply to the
console
Ensure correct power supply to the console, replace fuse
-> (See g. 1)
Console starts, but the touch
screen do not react
Touch screen is out of
calibration
Calibrate touch screen ->
Download the ‘Force - calibration of touch screen’
app and follow the instruction in the document named
‘Forced Touch Screen Calibration’
Console starts, but the
screen behave strange
Defect screen or processor
board
The console must be send in for repair
-> (See g. 7)
Console continue to show:
‘Must have valid GNSS signal,
before starting job. Please
wait’
The GNSS port is set to
‘External’ in GNSS receiver
conguration, but there is
no external GPS receiver
connected
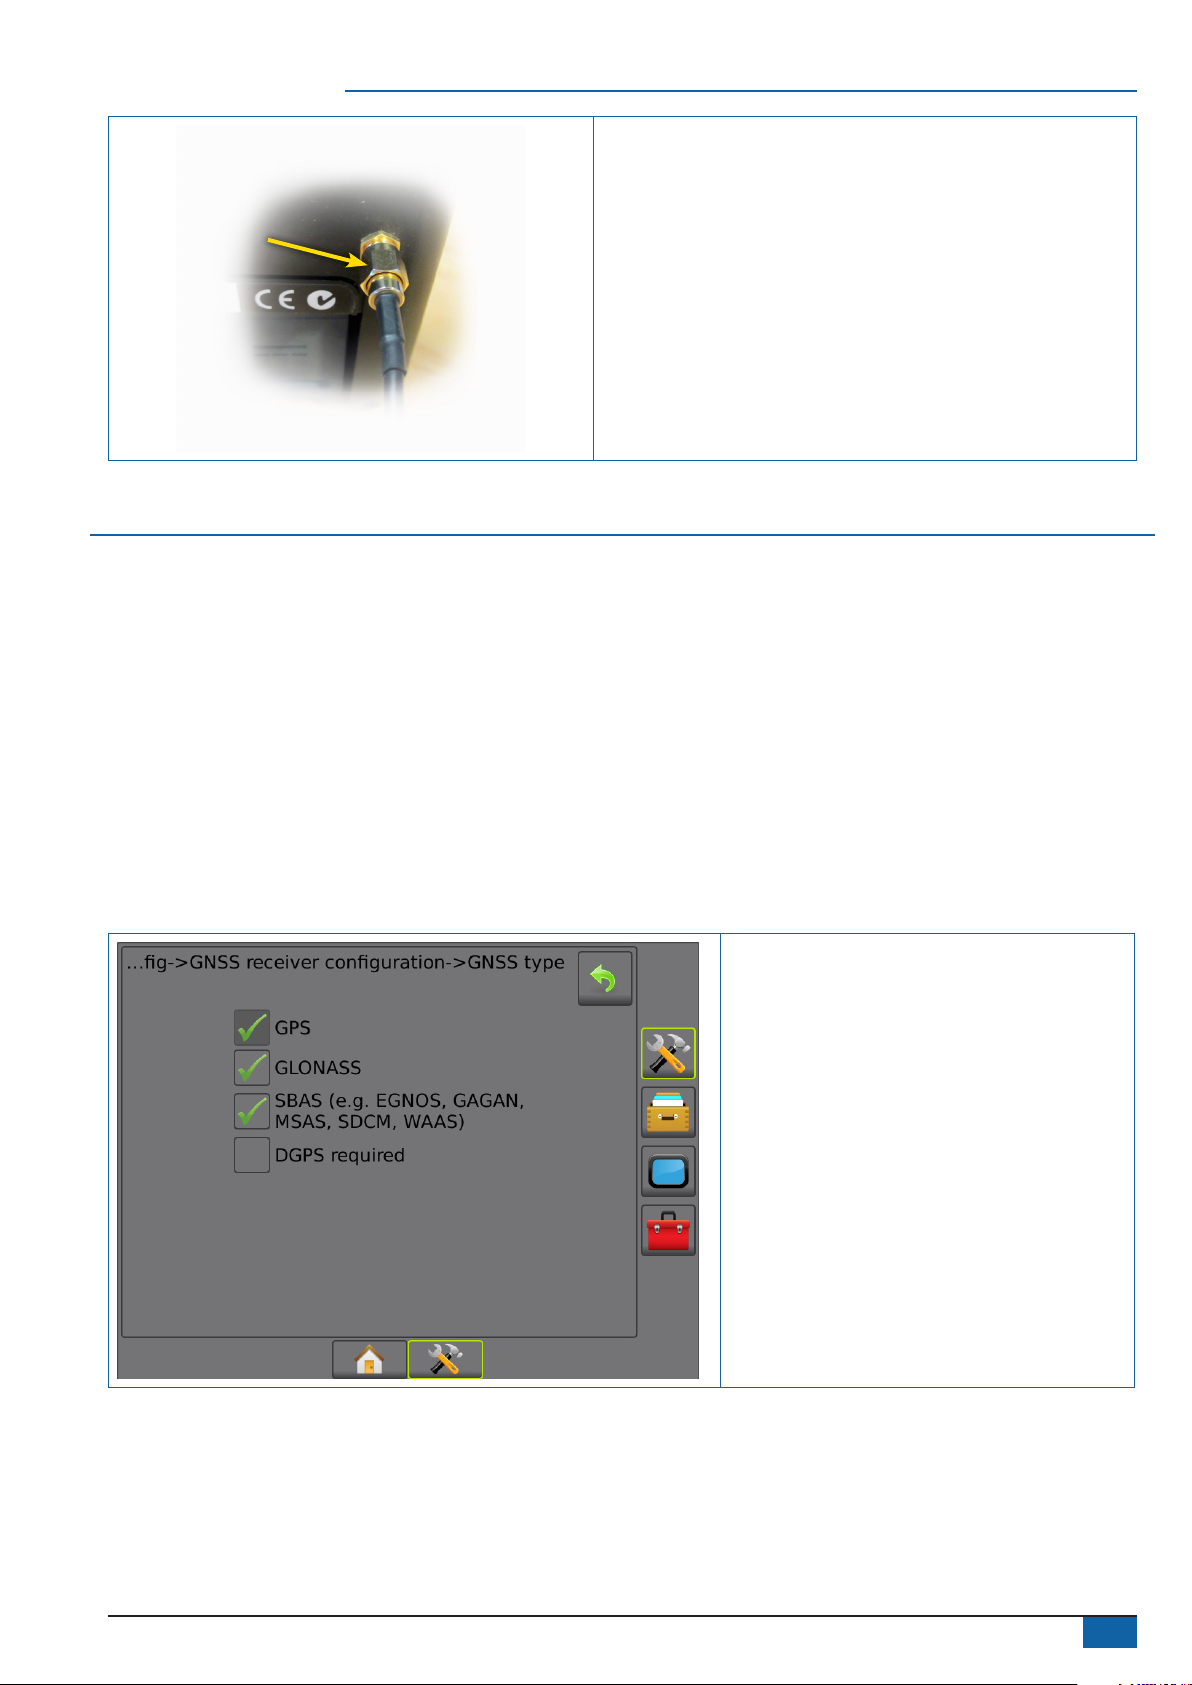
No antenna connected or
cable/connector is defect
Connect an external GPS receiver or set the GNSS port to
‘Internal’ if the console has an internal GPS receiver
Connect antenna, check cable and connector
-> (See g. 3)
Console starts, but the
application software stop
working
Job data in the internal
memory is invalid
Delete job data in memory ->
Download the ‘Force - delete JOB data (Data-killer)’
app and follow the instruction in the text le Named
‘How to...’
Console starts, but the
application software stop
working
The application software is
damaged
Update application software ->
Download the ‘Update Application software’ app and
follow the instruction in the document named
‘98-01483’
Guidance performance is
not constant, GPS position
continue to drift
GPS receiver rmware is not
the latest version
Update GPS receiver rmware ->
Download the ‘Update GPS receiver rmware’ app
and follow the instruction in the document named
‘98-01514’
GPS continue to switch
between DGPS and GPS
(Green <> Yellow satellite)
GPS receiver rmware is not
the latest version
Update GPS receiver rmware ->
Download the ‘Update GPS receiver rmware’ app
and follow the instruction in the document named
‘98-01514’
Guidance performance is
not constant, GPS position
continue to drift
(Note-1)
Bad data that can accumulate
in the ClearPath buer oper-
ating under trees and in close
proximity to structures while
transporting to the eld
Customers who operate their Matrix Pro GS units in
marginal GNSS reception conditions while transporting
to the eld with the Matrix Pro GS console turned on, will
benet from the ‘ClearPath Filter reset option for Ma-
trix Pro GS consoles’ option as described on page 3
Guidance performance is
not constant, GPS position
continue to jump/drift
Antenna installation is not
optimal
Optimize antenna installation
-> (See g. 2)
Guidance performance is
not constant, GPS position
continue to jump/drift
Antenna or it’s connections
are defect
Replace antenna and/or cable
-> (See g. 3)
Console do not recognize the
attached BoomPilot unit
(Setting of sections not
possible)
The Matrix console is turned
on before the BoomPilot unit
In cases where the Matrix console is connected to a 3rd
party rate controller via CANBUS, it’s important the rate
controller is turned on rst, before the Matrix console
-> (See g. 5)
Note-1: The ‘ClearPath Filter reset option’ is only available from V4.11
If the above proposals don’t solve the problem, we recommend to send the console in for repair.

5
Matrix®- how to check
POWER SUPPLY
Figure 1: Power supply
B
A
• Check the 3-Amp fuse pos. A (PN 166-403)
• Check there is +12V on pin ‘15/30’ in the 3P power
connector, pos. B
• Check there is Ground on pin‘31’ in the 3P power
connector, pos. B
Warning: When connecting the system to 12V power
it’s very important that the polarity is correct, if not the
system can be damaged.
ANTENNA
Type:
TeeJet oer two anttena types - Patch and RXA-30
Patch antenna • Active antenna with amplier and lter
• Magnetic mount
• 5m xed 3mm antenna cable
• Fed with 5V supply through cable
• Metal plate (10x15cm)
• Glonass compatible (2015 kits)
If you upgrade the GPS receiver to include Glonass,
remember to check if the patch antenna is Glonass
compatible.
RXA-30 antenna • High performance active antenna with amplier and
lter
• Magnetic mount
• 6m connected 5mm antenna cable
• Fed with 5V supply through cable
• Glonass compatible (All)

6www.teejet.com
Matrix® how to check
Antenna Installation:
The GPS Antenna base is magnetic. Position the antenna in the centre of the vehicle at the highest point with
a clear view of the sky. A metal plate with adhesive strips has been included in the kit for easy mounting and
installation.
Figure 2: Antenna installation
For the ‘Patch antenna’ it’s STRONGLY recommended to use this metal plate underneath the antenna as
it will improve signal acquisition. Once the antenna has been positioned, route the antenna cable
carefully to avoid damage.
Antenna cable and connector:
Both the Patch and RXA-30 antenna is an‘Active antenna’. The 5V power supply and GND to antenna is sourced
via the antenna cable. It’s very important the antenna cable is undamaged and the antenna cable connector is
fastened enough.
Figure 3: Antenna cable
Check the antenna cable carefully, look for:
• Damaged isolation.
• Places where the cable has been bent, squeezed etc.
Check the antenna cable connector carefully, look for:
• Inner part of the cable is pushed backwards (No or
poor connection).
Correct

7
Matrix®- how to check
• Fastend the antenna cable connector enough
to ensure the 5V power supply to the antenna is
established and constant.
TEST GPS RECEIVER
Place the Matrix PRO GS console in a vehicle and ensure the antenna is placed correct. Find a place with clear sky
and optimal signal reception where you can drive the vehicle without risk to other road users. It’s also important
your test lane has a straight line/edge you can follow or it’s possible to establish one.
Start the console and wait until the satellite is green, wait another 10-15 minutes before you start the test (to
avoid drift problems).
Make an accurate straight A/B line, turn the vehicle and follow the same line, watching the guidance
performance is accurate, steady and without abnormal drift.
If the guidance performance is poor/unsteady and you can’t identify the cause, you may want to try with another
antenna and ensure the Matrix PRO GS incl. The GPS receiver, is fully updated, before you send the console in for
repair.
Figure 4: GPS settings:
• From version 4.11 and the GPS receiver
fully updated, it’s possible to activate
GLONASS and SBAS at the same time.
Fig. 4 shows the prefered GNSS receiver
conguration in areas where EGNOS is
available.

8www.teejet.com
Matrix® how to check
TEST CANBUS AND CAMERA
To test the CANBUS and camera input requires some hardware. You may already have access to some of it, e.g.
via a Section Control Module , Smart cable, camera etc.
If you need help to identify hardware to establish a‘Test tool’, please contact TeeJet Technologies - Technical
Support. Below is shown an example how to test the CANBUS.
Figure 5: Test CANBUS:
B A
A B
BA
SDM MODULE
PN 78-05072
PN 198-413 PN 45-05648
PN 45-05845
1008-0293
Turn on the Matrix with the Section Driver Module connected as shown (See g. 5) and check in the
‘Cong->Implement’ page (See red circle). If it’s possible to select the number of sections, the CANBUS and it’s
connections are ok. In the same way it’s easy to test the camera input, just connecting a camera.

9
Matrix®- how to check
MATRIX PRO GS CONNECTIONS
Figure 6: Connections.
Figure 7: Screen examples.
The two screen examples above indicate a problem with the display or the processor board, in this case it’s not
possible to repair the console in-eld.
Notes / Useful part numbers:
Glonass compatible patch antenna incl. 5 meter cable, PN 78-50190. Complete kit incl. Metal plate, PN 902-029.
RXA-30 antenna kit incl. 6 meter cable and metal plate , PN 90-02720.
USB stick, PN 98-50139.

MATRIX® PRO GS
- HOW TO CHECK -
TeeJet Aabybro
Mølhavevej 2
DK 9440 Aabybro
Danmark
www.teejet.com
1548-1429-UK R6 English
© TeeJet Technologies 2017
This manual suits for next models
1
Table of contents
Other Spraying Systems Farm Equipment manuals

Spraying Systems
Spraying Systems TeeJet Aeros 9040 User manual

Spraying Systems
Spraying Systems TeeJet Matrix PRO840GS User manual

Spraying Systems
Spraying Systems TeeJet Aeros 9040 User manual

Spraying Systems
Spraying Systems TeeJet Matrix 570VT User guide

Spraying Systems
Spraying Systems TeeJet BoomPilot 90-02671 User manual