Spraying Systems TeeJet Matrix 570VT User guide

MATRIX® 570VT
SETUP MANUAL
Software version 1.00

Table of Contents
CHAPTER 1– PRODUCT OVERVIEW 3
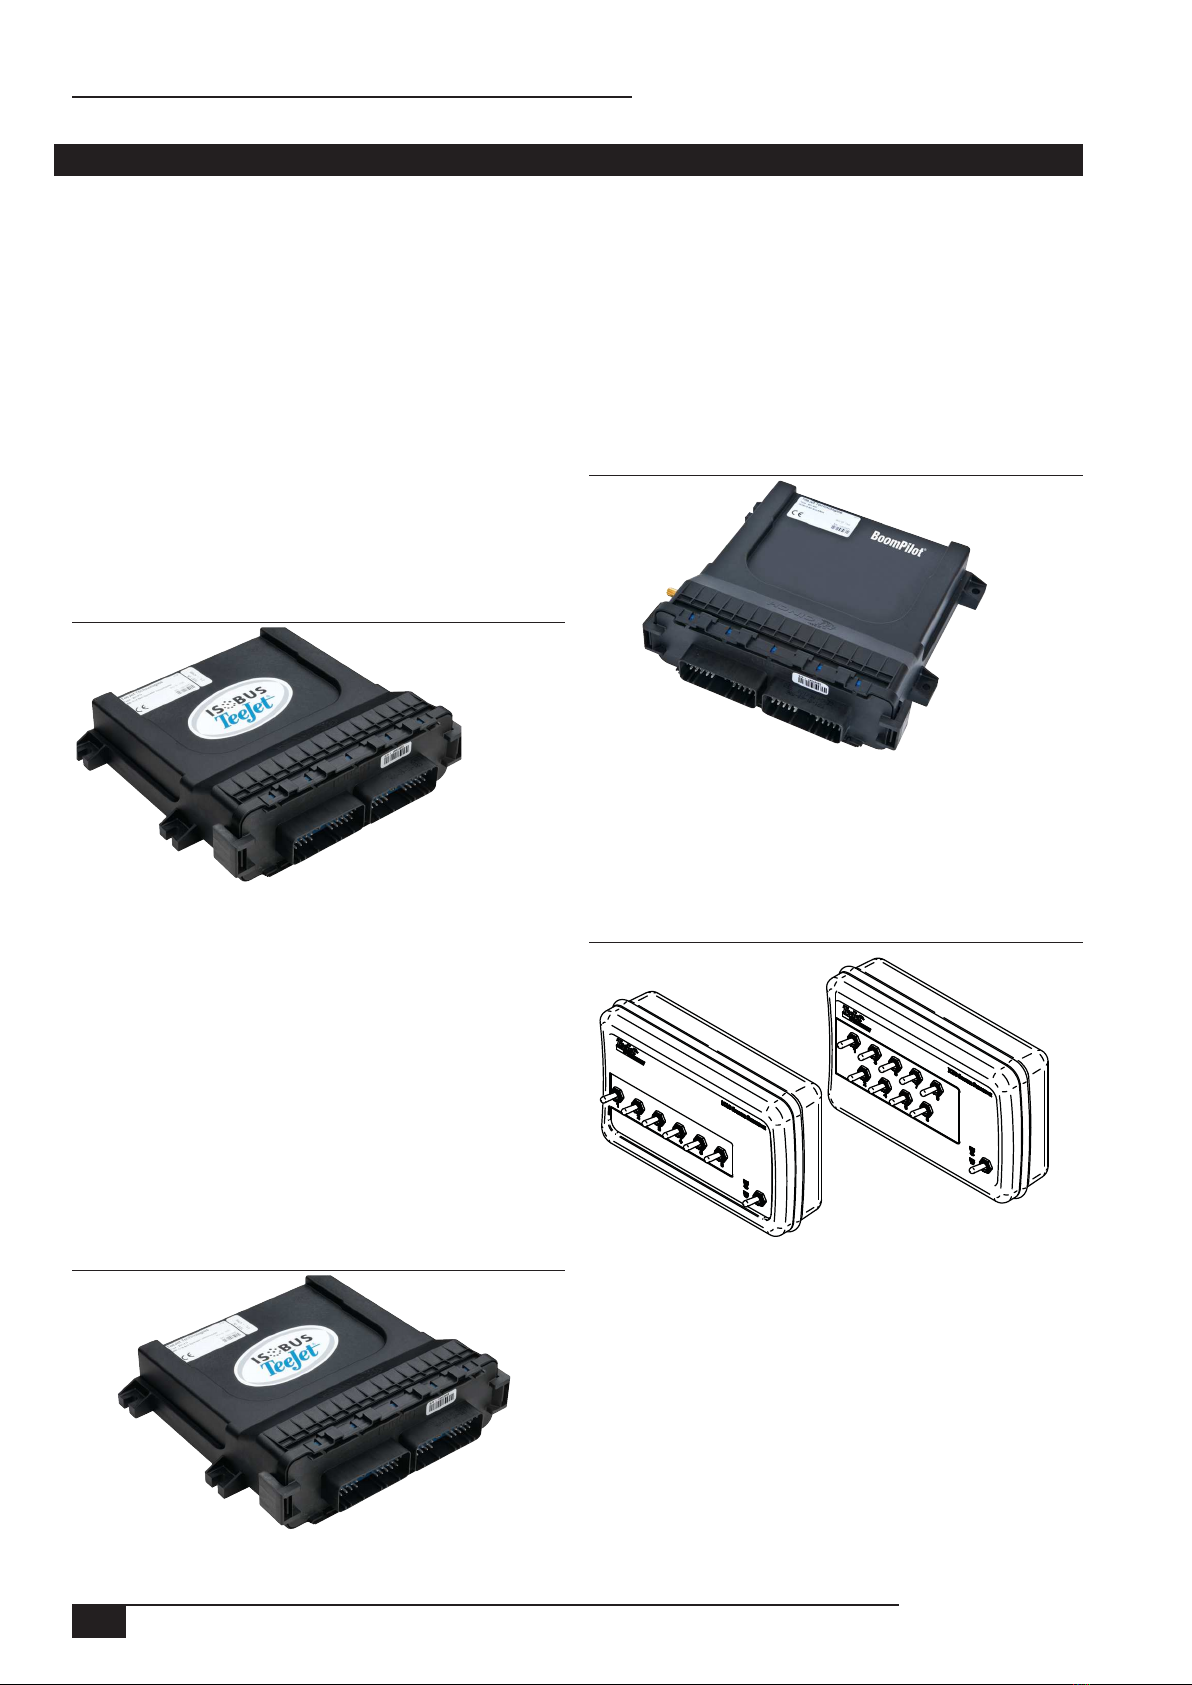
OPTIONAL SYSTEM COMPONENTS 4
POWER ON/OFF 5
Start Up Sequence ................................................................................................................................................................................ 5
GENERAL OPERATION INFORMATION 5
CHAPTER 2 – SYSTEM SETUP 6
CULTURE 6
Units.................................................................................................................................................................................................... 6
Language .......................................................................................................................................................................................... 7
Time Zone ......................................................................................................................................................................................... 7
CONSOLE 7
Volume ............................................................................................................................................................................................... 7
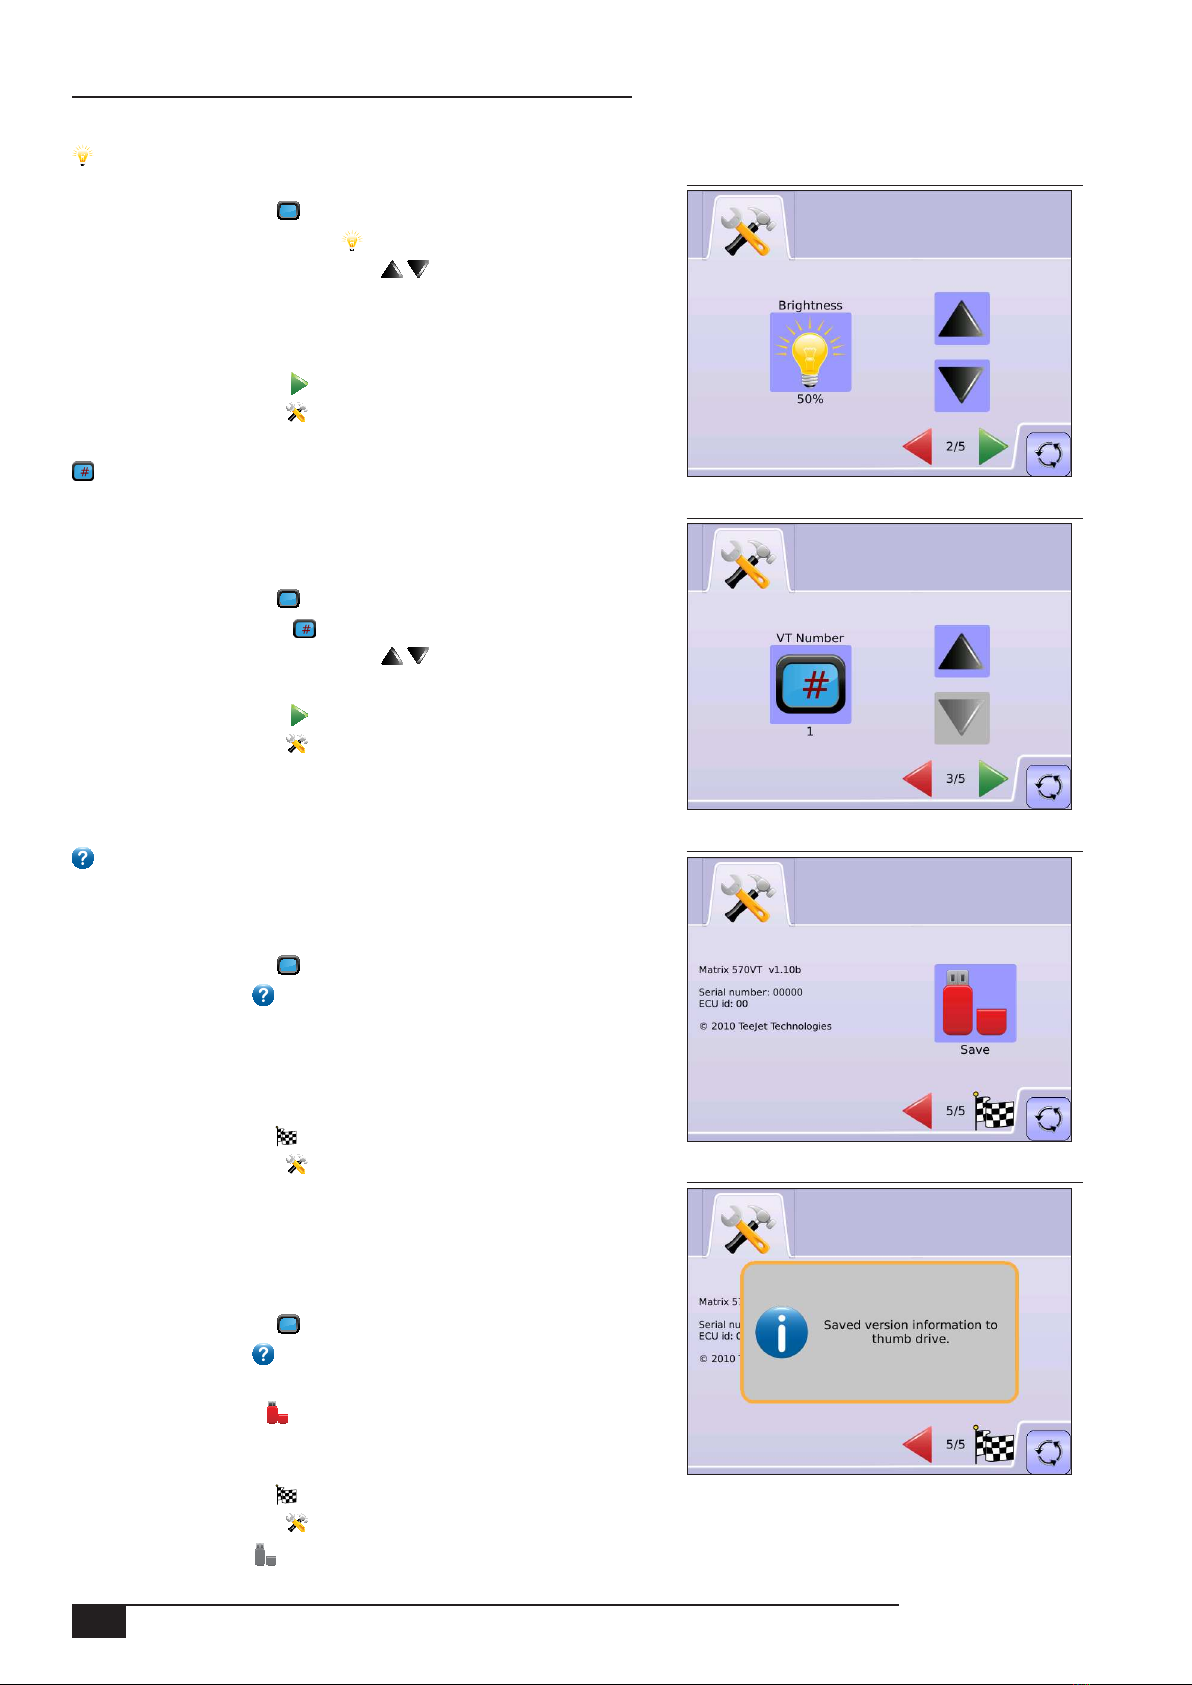
LCD Brightness ................................................................................................................................................................................ 8
Virtual Terminal Number.............................................................................................................................................................. 8
About/Save....................................................................................................................................................................................... 8
Save About Information ...................................................................................................................................................8
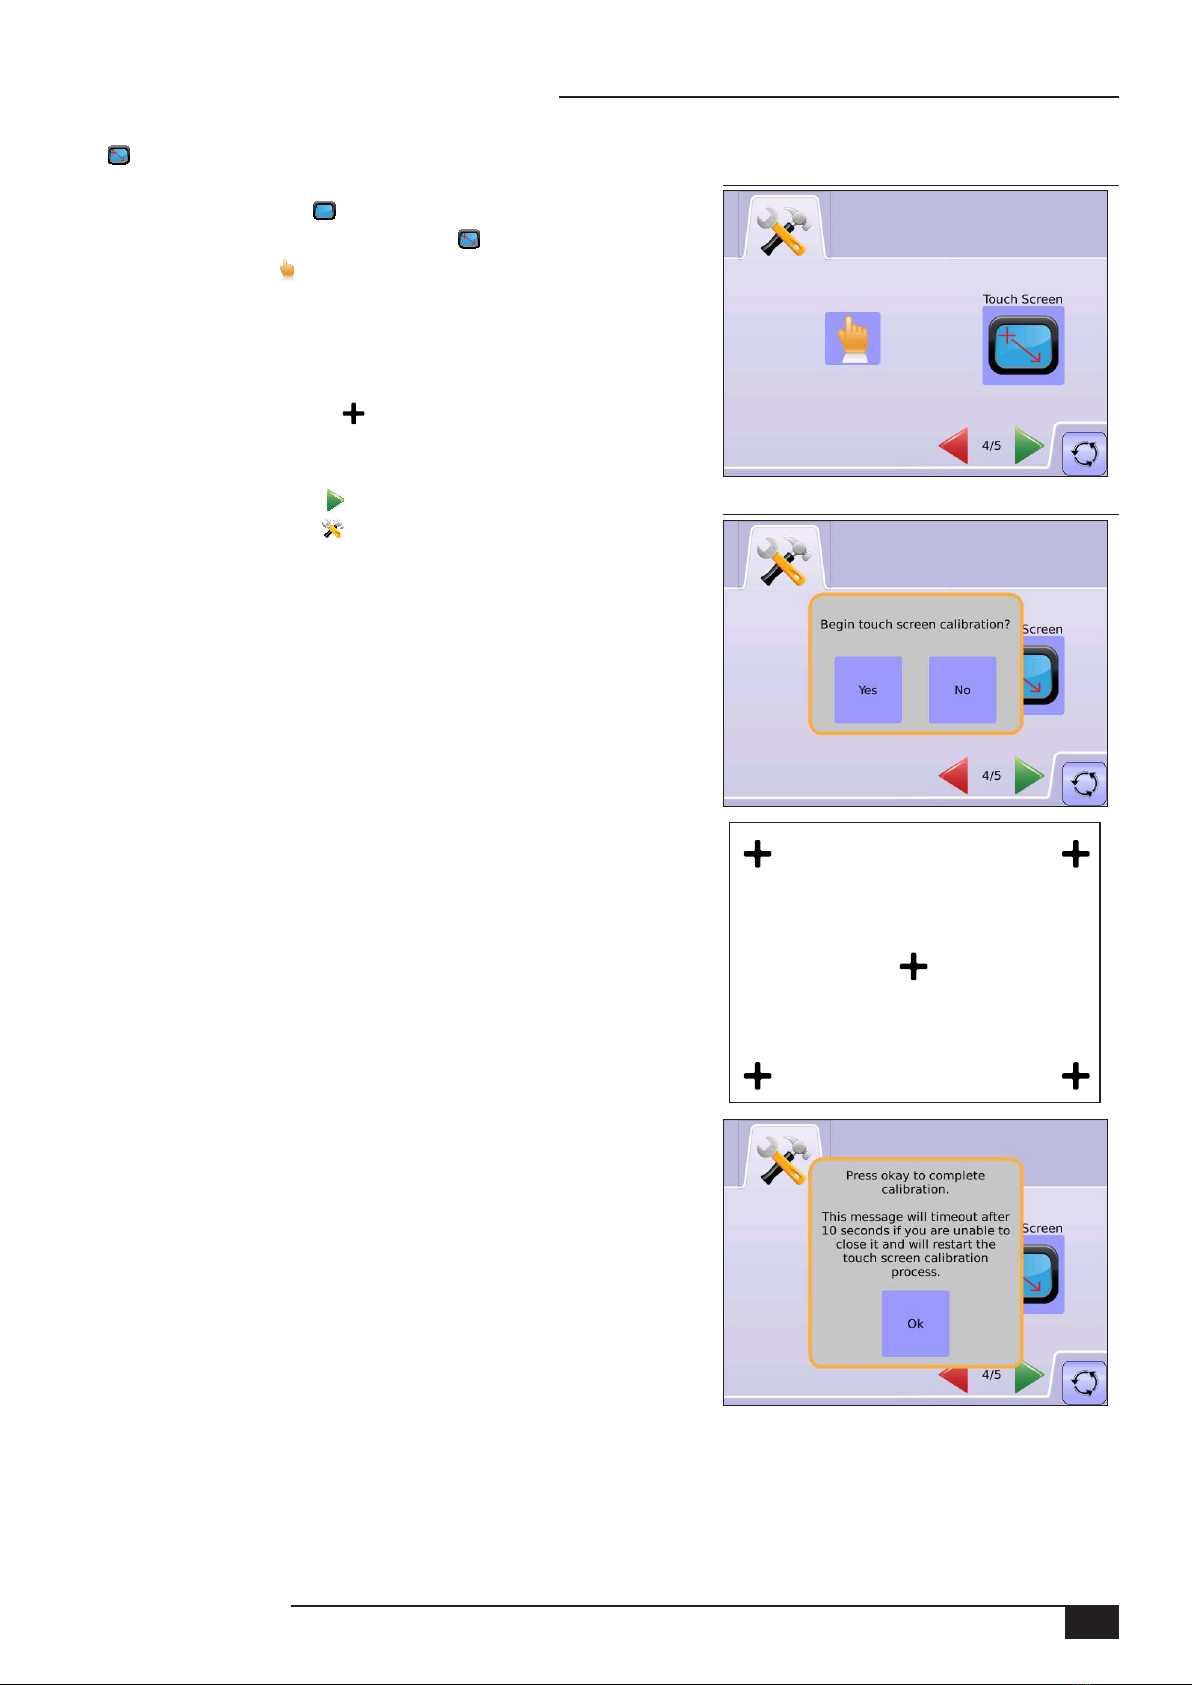
Touch Screen Calibration............................................................................................................................................................. 9
APPENDIX A - TIME ZONES 10
APPENDIX B - UNIT SPECIFICATIONS 11
COPYRIGHTS
© 2011 TeeJet Technologies. All rights reserved. No part of this document or the computer programs described in it may be reproduced,
copied, photocopied, translated, or reduced in any form or by any means, electronic or machine readable, recording or otherwise, without
prior written consent from TeeJet Technologies.
TRADEMARKS
Unless otherwise noted, all other brand or product names are trademarks or registered trademarks of their respective companies or
organizations.
LIMITATION OF LIABILITY
TEEJET TECHNOLOGIES PROVIDES THIS MATERIAL “AS IS” WITHOUT WARRANTY OF ANY KIND, EITHER EXPRESSED OR
IMPLIED. NO COPYRIGHT LIABILITY OR PATENT IS ASSUMED. IN NO EVENT SHALL TEEJET TECHNOLOGIES BE LIABLE FOR
ANY LOSS OF BUSINESS, LOSS OF PROFIT, LOSS OF USE OR DATA, INTERRUPTION OF BUSINESS, OR FOR INDIRECT,
SPECIAL, INCIDENTAL, OR CONSEQUENTIAL DAMAGES OF ANY KIND, EVEN IF TEEJET TECHNOLOGIES HAS BEEN ADVISED OF
SUCH DAMAGES ARISING FROM TEEJET TECHNOLOGIES SOFTWARE.
To ensure optimal use of the equipment, please read this manual thoroughly. Please contact TeeJet Technologies Customer Support or an
authorized TeeJet Technologies dealer if additional support is required.

3
98-05266 R0 US
Matrix® 570VT ● ISOBUS
CHAPTER 1– PRODUCT OVERVIEW
The Matrix 570VT is designed to provide years of service under typical agricultural operating conditions. A tight tting enclosure, combined
with rubber covers for all connectors mean that typical dusty environments will not cause operational problems. While occasional splashing
of water will not damage the unit, the Matrix 570VT is not designed for direct exposure to rain. Take care not to operate the Matrix in wet
conditions.
Figure 1-1: Console Front & Back
Power Button
Power Button
USB Port with Rubber Cover
Standard RAM Bracket
Bright Touch Screen
Rubber Connector
Covers
Integrated RAM Mount
Speaker
Recessed Connectors
Connection ports are not usedPower Connection

4www.teejet.com
Matrix® 570VT ● ISOBUS
OPTIONAL SYSTEM COMPONENTS
IC18 Sprayer/NH3 ECU
Use with your existing VT or Matrix® 570VT
• Works seamlessly and displays on any ISOBUS VT
• Easy navigation menu and data rich display
• IC18 Sprayer ECU suitable for use with NH3 and liquid
fertilizer
• Automatic boom section control upgrade option
• Variable rate control available providing your VT has GPS and
task control capability
• Add additional ISOBUS ECUs as your needs change
• Provides basic rate control
• Standardized plugs, cables and software simplify installation
and connectivity and result in true “plug and play” technology.
IC18 ECU resides on the implement, reducing hardware in the
cab
Figure 1-2: IC18 Job Computer
IC18 Spreader
Electronic Control Unit
Use with your existing VT or the Matrix 570VT for dry product
application
• Works seamlessly and displays on any ISOBUS VT
• Easy navigation menu and data rich display
• Add additional ISOBUS ECUs as your needs change
• Provides basic rate control
• Standardized plugs, cables and software simplify installation and
connectivity and result in true “plug and play” technology. IC18
ECU resides on the implement, reducing hardware in the cab
Figure 1-3: IC18 Spreader Electronic Control Unit
BoomPilot
Electronic Control Unit for IC18
BoomPilot (automatic boom section control) is possible in
combination with software built into the IC18 Sprayer/NH3
Electronic Control Unit (ECU). The ECU should be combined with
the appropriate cable to interface with your BoomPilot system,
spray controller and/or spraying machine for quick and easy
installation. Electronic Control Units and their related cables are
designed to control as many boom sections as the spray controller
to which they are connect, up to a maximum of 9 boom sections.
Figure 1-4: BoomPilot Electronic Control Unit
Switchbox
Manual section control with remote master capibility. The
switchboxs are available in two congurations.
►9 sections output or 8 sections and a master output
►6 sections output or 5 sections and a master output
Figure 1-5: Switchboxes
Extended Warranty
TeeJet offers an extended warranty for many guidance products.
Not available in all markets. Contact your TeeJet dealer for details.

5
98-05266 R0 US
Matrix® 570VT ● ISOBUS
POWER ON/OFF
Figure 1-6: Power Button
Power Button
USB Port with
Rubber Cover
Press the POWER BUTTON to power on the console. Upon power up,
the Matrix VT will begin its Start Up Sequence.
Press and briey hold the POWER BUTTON (until the screen turns
black) to power off the console.
Start Up Sequence
The console takes approximately 40 seconds to power up. During this time
the TeeJet Technologies logo will be displayed (brightness levels will uctuate).
Figure 1-7: Master Screen
Matrix VT Setup Key
IC18 NH3
IC18 Crop Sprayer
BoomPilot
Master Screen Key
Options [as available] on the ISOBUS system
will ll in empty squares.
GENERAL OPERATION INFORMATION
A rm touch is required when selecting a screen icon.
Figure 1-8: Example of Information Text Box
For rapid adjustment of a setting, press and hold the
UP/DOWN ARROW ICONS
All changes are saved automatically.
The console needs to be cycled off and back on when changing or attaching
equipment to the Matrix system.
Press the icon of any menu item to display a denition of that item. To remove the
information box, press anywhere on the screen.
Cleaning suggestions – Matrix consoles should be cleaned with mild cleaners,
such as glass cleaner, and a soft cloth. Take care not to rub dust or other abrasive
materials into the touch screen surface.
• Use a soft lint-free cloth.
• The cloth may be used dry, or lightly dampened with a mild cleaner or Ethanol.
• Be sure the cloth is only lightly dampened, not wet. Never apply cleaner
directly to touch panel surface; if cleaner is spilled onto touch panel, soak it up immediately with absorbent cloth.
• Cleaner must be neither acid nor alkali (neutral pH).
• Wipe the surface gently; if there is a directional surface texture, wipe in the same direction as the texture.
• Never use acidic or alkaline cleaners, or organic chemicals such as: paint thinner, acetone, tolulene, xylene, propyl or isopropyl
alchohol, or kerosene.
• Suitable cleaning products are commercially available pre-packaged for use; one example of such a product is Klear Screen™, or
commercially available off-the-shelf retail brands such as Glass Plus® Glass and Surface Cleaner made by Reckitt-Benckiser.
• Use of incorrect cleaners can result in optical impairment of touch panel and/or damage to functionality.

6www.teejet.com
Matrix® 570VT ● ISOBUS
CHAPTER 2 – SYSTEM SETUP
System Setup is used to congure cultural and console settings.
NOTE: All settings are automatically saved when selected.
Figure 1-9: Master Screen
Figure 1-10: System Setup Tab
To access the System Setup screens:
1. Select MATRIX VT SETUP KEY from Master Screen.
2. Select from:
►Culture – used to congure Units ,
Language and Time Zone .
►Console – used to congure Volume ,
LCD Brightness , Virtual Terminal Number
and Screen Calibration settings, as well as view About information and
Save system software information .
NOTE: While in a setting screen, press icon to view available factory settings and
setting ranges.
NOTE: Press & hold UP/DOWN ARROW ICONS to quickly adjust settings.
CULTURE
Culture is used to congure Units, Language and Time Zone settings.
Figure 1-11: Culture
Figure 1-12: Units
1. Press CULTURE ICON .
2. Select from:
►Units – denes the system measurements
►Language – denes the system language
►Time Zone – establishes the local time zone
OR
Press PAGE RIGHT ARROW to cycle through all settings.
Units
Units denes the system measurements.
1. Press CULTURE ICON .
2. Press UNITS ICON .
3. Press UP/DOWN ARROW ICONS to change between:
►U.S.
►Metric
►Imperial
4. Press
►PAGE RIGHT ARROW to proceed to Language.
►SYSTEM SETUP TAB to return to main System Setup screen.

7
98-05266 R0 US
Matrix® 570VT ● ISOBUS
Language Figure 1-13: Language
Figure 1-14: Time Zone
Languages denes the system language.
1. Press CULTURE ICON .
2. Press LANGUAGE ICON .
3. Press UP/DOWN ARROW ICONS to change between languages.
4. Press
►PAGE RIGHT ARROW to proceed to Time Zone.
►SYSTEM SETUP TAB to return to main System Setup screen.
Time Zone
Time zone establishes the local time zone.
1. Press CULTURE ICON .
2. Press TIME ZONE ICON .
3. Press UP/DOWN ARROW ICONS to select the appropriate time zone.
4. Press
►CHECKERED FLAG to complete Culture Setup.
►SYSTEM SETUP TAB to return to main System Setup screen.
Time zones are listed alphabetically by continent then city. A list of the continents
and cities is in Appendix A.
CONSOLE
Console Setup is used to congure Volume, LCD Brightness, Virtual Terminal Number and Screen Calibration settings, as well as view
About information and Save system software information.
Figure 1-15: Console
Figure 1-16: Volume
1. Press CONSOLE ICON .
2. Select from:
►Volume – adjusts the volume level of the audio speaker
►LCD Brightness – adjusts the brightness of the console display
►Virtual Terminal Number – denes the unique number for this specic VT
terminal
►Touch Screen Calibration – used to force a touch screen calibration
►About/Save – displays the system software version as well as the
software versions of modules connected to the CAN bus
OR
Press PAGE RIGHT ARROW to cycle through all settings.
Volume
Volume adjusts the volume level of the audio speaker. Range is 0 - 100.
1. Press CONSOLE ICON .
2. Press VOLUME ICON .
3. Press the UP/DOWN ARROW ICONS to adjust volume level.
• Higher the number, the louder the sound
• Lower the number, the softer the sound
4. Press
►PAGE RIGHT ARROW to proceed to LCD Brightness.
►SYSTEM SETUP TAB to return to main System Setup screen.

8www.teejet.com
Matrix® 570VT ● ISOBUS
LCD Brightness Figure 1-17: LCD Brightness
Figure 1-18: Touch Screen Calibration
Figure 1-19: About Matrix 570G
Figure 1-20: About Verification
LCD Brightness adjusts the brightness of the console display. Range is 0 - 100.
1. Press CONSOLE ICON .
2. Press LCD BRIGHTNESS ICON .
3. Press the UP/DOWN ARROW ICONS to adjust LED brightness.
• Higher the number, the brighter the LCD
• Lower the number, the dimmer the LCD
4. Press
►PAGE RIGHT ARROW to proceed to VT Number.
►SYSTEM SETUP TAB to return to main System Setup screen.
Virtual Terminal Number
Virtual Terminal Number denes the unique number for this specic VT terminal.
On systems with multiple VTs, each VT much have a unique VT number. Only VT
number 1 can show the auxiliary input allocation; therefore, there shall always be a
VT number 1. The remaining VTs can use any number. Range is 1 - 32.
1. Press CONSOLE ICON .
2. Press VT NUMBER ICON .
3. Press the UP/DOWN ARROW ICONS to adjust VT number.
4. Press
►PAGE RIGHT ARROW to proceed to Touch Screen Calibration.
►SYSTEM SETUP TAB to return to main System Setup screen.
WARNING! This number should not be changed from "1" unless there is more than
one virtual terminal on the system.
About/Save
About/Save screen displays the system software version as well as the software
versions of modules connected to the CAN bus.
To view system information:
1. Press CONSOLE ICON .
2. Press ABOUT ICON to view data including:
• Unit Model Number
• Software Version
• Connected Modules
3. Press
►CHECKERED FLAG to complete Console Setup.
►SYSTEM SETUP TAB to return to main System Setup screen.
Save About Information
To aid when troubleshooting problems in the eld, an end user can use Save to
download a text le containing current software information to a USB drive, then
e-mail the le to support personnel.
1. Press CONSOLE ICON .
2. Press ABOUT ICON .
3. Insert a USB drive in the USB port.
4. Press the SAVE ICON .
“Saved version information to USB drive” will conrm save.
5. Press
►CHECKERED FLAG to complete Console Setup.
►SYSTEM SETUP TAB to return to main System Setup screen.
NOTE: The SAVE ICON is not available for selection (grayed out) until a USB drive is inserted properly.

9
98-05266 R0 US
Matrix® 570VT ● ISOBUS
Touch Screen Calibration Figure 1-21: Touch Screen Calibration
Figure 1-22: Touch Screen Calibration Process
Touch Screen Calibration is used to activate a touch screen calibration.
1. Press CONSOLE ICON .
2. Press CALIBRATE TOUCH SCREEN ICON .
3. Press HAND ICON to enable the touch screen calibration process.
4. “Begin touch screen calibration?”
Press
►Yes – to begin the Touch Screen Calibration.
►No – to return to the Touch Screen Calibration screen
5. Press series of 5 crosshairs .
6. Press OK to complete the touch screen calibration.
7. Press
►PAGE RIGHT ARROW to proceed to Screenshot.
►SYSTEM SETUP TAB to return to main System Setup screen.

10 www.teejet.com
Matrix® 570VT ● ISOBUS
APPENDIX A - TIME ZONES
Africa
Abidjan
Accra
Addis Ababa
Algiers
Asmara
Bamako
Bangui
Banjul
Bissau
Blantyre
Brazzaville
Bujumbura
Cairo
Casablanca
Ceuta
Conakry
Dakar
Dar es Salaam
Djibouti
Douala
El Aaiun
Freetown
Gaborone
Harare
Johannesburg
Kampala
Khartoum
Kigali
Kinshasa
Lagos
Libreville
Lome
Luanda
Lubumbashi
Lusaka
Malabo
Maputo
Maseru
Mbabane
Mogadishu
Monrovia
Nairobi
Ndjamena
Niamey
Nouakchott
Ouagadougou
Porto-Novo
Sao Tome
Tripoli
Tunis
Windhoek
America
Adak
Anchorage
Anguilla
Antigua
Araguaina
Argentina - Buenos Aires
Argentina - Catamarca
Argentina - Cordoba
Argentina - Jujuy
Argentina - La Rioja
Argentina - Mendoza
Argentina - Rio Gallegos
Argentina - San Juan
Argentina - Tucuman
Argentina - Ushuaia
Aruba
Asuncion
Atikokan
Bahia
Barbados
Belem
Belize
Blanc-Sablon
Boa Vista
Bogota
Boise
Cambridge Bay
Campo Grande
Cancun
Caracas
Cayenne
Cayman
Chicago
Chihuahua
Costa Rica
Cuiaba
Curacao
Danmarkshavn
Dawson
Dawson Creek
Denver
Detroit
Dominica
Edmonton
Eirunepe
El Salvador
Fortaleza
Glace Bay
Godthab
Goose Bay
Grand Turk
Grenada
Guadeloupe
Guatemala
Guayaquil
Guyana
Halifax
Havana
Hermosillo
Indiana - Indianapolis
Indiana - Knox
Indiana - Marengo
Indiana - Petersburg
Indiana - Vevay
Indiana - Vincennes
Indiana - Winamac
Inuvik
Iqaluit
Jamaica
Juneau
Kentucky - Louisville
Kentucky - Monticello
La Paz
Lima
Los Angeles
Maceio
Managua
Manaus
Martinique
Mazatlan
Menominee
Merida
Mexico City
Miquelon
Moncton
Monterrey
Montevideo
Montreal
Montserrat
Nassau
New York
Nipigon
Nome
Noronha
North Dakota - Center
North Dakota - New
Salem
Panama
Pangnirtung
Paramaribo
Phoenix
Port-au-Prince
Port of Spain
Porto Velho
Puerto Rico
Rainy River
Rankin Inlet
Recife
Regina
Resolute
Rio Branco
Santiago
Santo Domingo
Sao Paulo
Scoresbysund
Shiprock
St Johns
St Kitts
St Lucia
St Thomas
St Vincent
Swift Current
Tegucigalpa
Thule
Thunder Bay
Tijuana
Toronto
Tortola
Vancouver
Whitehorse
Winnipeg
Yakutat
Yellowknife
Antarctica
Casey
Davis
DumontDUrville
Mawson
McMurdo
Palmer
Rothera
South Pole
Syowa
Vostok
Arctic
Longyearbyen
Asia
Aden
Almaty
Amman
Anadyr
Aqtau
Aqtobe
Ashgabat
Baghdad
Bahrain
Baku
Bangkok
Beirut
Bishkek
Brunei
Calcutta
Choibalsan
Chongqing
Colombo
Damascus
Dhaka
Dili
Dubai
Dushanbe
Gaza
Harbin
Hong Kong
Hovd
Irkutsk
Jakarta
Jayapura
Jerusalem
Kabul
Kamchatka
Karachi
Kashgar
Katmandu
Krasnoyarsk
Kuala Lumpur
Kuching
Kuwait
Macau
Magadan
Makassar
Manila
Muscat
Nicosia
Novosibirsk
Omsk
Oral
Phnom Penh
Pontianak
Pyongyang
Qatar
Qyzylorda
Rangoon
Riyadh
Saigon
Sakhalin
Samarkand
Seoul
Shanghai
Singapore
Taipei
Tashkent
Tbilisi
Tehran
Thimphu
Tokyo
Ulaanbaatar
Urumqi
Vientiane
Vladivostok
Yakutsk
Yekaterinburg
Yerevan
Atlantic
Azores
Bermuda
Canary
Cape Verde
Faroe
Jan Mayen
Madeira
Reykjavik
South Georgia
St Helena
Stanley
Australia
Adelaide
Brisbane
Broken Hill
Currie
Darwin
Eucla
Hobart
Lindeman
Lord Howe
Melbourne
Perth
Sydney
Europe
Amsterdam
Andorra
Athens
Belgrade
Berlin
Bratislava
Brussels
Bucharest
Budapest
Chisinau
Copenhagen
Dublin
Gibraltar
Guernsey
Helsinki
Isle of Man
Istanbul
Jersey
Kaliningrad
Kiev
Lisbon
Ljubljana
London
Luxembourg
Madrid
Malta
Mariehamn
Minsk
Monaco
Moscow
Oslo
Paris
Podgorica
Prague
Riga
Rome
Samara
San Marino
Sarajevo
Simferopol
Skopje
Soa
Stockholm
Tallinn
Tirane
Uzhgorod
Vaduz
Vatican
Vienna
Vilnius
Volgograd
Warsaw
Zagreb
Zaporozhye
Zurich
Indian
Antananarivo
Chagos
Christmas
Cocos
Comoro
Kerguelen
Mahe
Maldives
Mauritius
Mayotte
Reunion
Pacic
Apia
Auckland
Chatham
Easter
Efate
Enderbury
Fakaofo
Fiji
Funafuti
Galapagos
Gambier
Guadalcanal
Guam
Honolulu
Johnston
Kiritimati
Kosrae
Kwajalein
Majuro
Marquesas
Midway
Nauru
Niue
Norfolk
Noumea
Pago Pago
Palau
Pitcairn
Ponape
Port Moresby
Rarotonga
Saipan
Tahiti
Tarawa
Tongatapu
Truk
Wake
Wallis

11
98-05266 R0 US
Matrix® 570VT ● ISOBUS
APPENDIX B - UNIT SPECIFICATIONS
Dimensions 161.5 mm x 149.1 mm x 58.4 mm
Weight 0.794 kg
Connector Power/CAN 8 pin Conxall
Not Used 1 5 pin Conxall
Not Used 2 4 or 8 pin Conxall
Environmental Storage -10 to +70°C
Operating 0 to +50°C
Humidity 90% non-condensing
Display 320 x 240 resolution
14.5 cm (5.7 in.)
Input/Output USB 2.0
Power Requirement < 9 watts @ 12 VDC

MATRIX® 570VT
SETUP MANUAL
1801 Business Park Drive
Springeld, Illinois 62703 USA
Tel: (217) 747-0235 • Fax: (217) 753-8426
www.teejet.com
98-05266 R0 UK
© TeeJet Technologies 2011
Table of contents
Other Spraying Systems Farm Equipment manuals

Spraying Systems
Spraying Systems TeeJet Matrix PRO840GS User manual

Spraying Systems
Spraying Systems TeeJet BoomPilot 90-02671 User manual

Spraying Systems
Spraying Systems TeeJet MATRIX PRO 840 GS User manual

Spraying Systems
Spraying Systems TeeJet Aeros 9040 User manual

Spraying Systems
Spraying Systems TeeJet Aeros 9040 User manual