Spring NeoTap Operating instructions

+ 6 4 0 9 6 3 6 - 7 0 7 0 | W W W . S P R I N G N Z . C O . N Z | S A L E S @ S P R I N G N Z . C O . N Z
Please read these instructions completely before operating this unit
Sparkling Plumbed In
Sparkling, Boil, Chill Benchtop Unit
(Freestanding Cabinet Optional)
INSTALLATION AND OPERATION GUIDE
Preface/Parts
Piping Installation - Diagram
Piping Installation
2
3
4
5
6
CONTENTS
Push Lock Fitting and Plumbers Delight - Installation
Co2 Bottle Installation
HOT, SPARKLING, COLD - Water Operation
Trouble Shooting
Leakage Detection Diagram and Swivel Tap - Warning
Specification Sheet
1
7
8
9

+ 6 4 0 9 6 3 6 - 7 0 7 0 | W W W . S P R I N G N Z . C O . N Z | S A L E S @ S P R I N G N Z . C O . N Z
PREFACE/PARTS
Before using this machine, we advise you to read this manual
thoroughly.
Please follow the instructions to ensure proper operation and the
lasting of the machine
Neotap - Freestanding Co2 Bottle Regulator Brass Tee-Off Valve
(Plumbers Delight)
Pressure Reducing Valve 1/4" Pipe Power Cord KDF30

+ 6 4 0 9 6 3 6 - 7 0 7 0 | W W W . S P R I N G N Z . C O . N Z | S A L E S @ S P R I N G N Z . C O . N Z
PIPING INSTALLATION - DIAGRAM
2. Using the 1/4" Pipe provided connect the 1/4" Inlet ball valve to the Pressure
Reducing Valve. The PRV is then connected to the KDF30 Filter and finally into the
Water inlet. Please ensure the filter has been flushed before cnnecting. The PRV
and Filter have a directional water flow, please connect as marked. See drawing B
Co2 bottle
Co2 Connector
KDF30 Filter
(Directional Flow. Flush all black carbon
dust before connecting to machine)
Water
Inlet
PRV
(Directional Flow)
Brass Tee Off
Valve
(Plumbers
Delight)
1/4" Pipe

PIPING INSTALLATION
1. Isolate the water supply. Disassemble the original COLD water Tap/Flexihose
connections. Reconnect the plumbers delight inline
2. Using the 1/4" Pipe provided connect the 1/4" inlet ball valve to the Pressure
Reducing Valve. The PRV is then connected to the KDF30 Filter and finally into
the water inlet. Please ensure the filter has been flushed before connecting. The
PRV and Filter have a directional water flow, connect as marked on the part
3. Connect the machine to the power supply using the cord at the rear of the unit.
Leave power and water supply OFF
4. Place the Co2 bottle upright as close to the NEOTAP unit as possible.
5. Turn the knob fully anti-clockwise to ensure the regulator is in the OFF position
6. Connect the Co2 bottle to the regulator by screwing the regulator onto the
bottle firmly (Clockwise). Be careful not to over-tighten to avoid damaging the
nut
7. Attach the regulator to the Co2 connector at the rear of the unit using the 1/4"
pipe provided. DO NOT OPEN REGULATOR - This is addressed in Co2 Operation
8. Ensure the whole unit and its components have at least 150mm ventilation
surrounding
9. Ensure all fittings, electrical connections and piping are secure to and from the
unit.
10.Turn on the Water and Power supply
+ 6 4 0 9 6 3 6 - 7 0 7 0 | W W W . S P R I N G N Z . C O . N Z | S A L E S @ S P R I N G N Z . C O . N Z
We recommend the instructions specified in this guide be followed in sequence by a
qualified tradesperson for successful installation.
This Neotap has a 12 month warranty from purchase, but this may be voided if
unsatisfactory installation results in damage to the unit.

+ 6 4 0 9 6 3 6 - 7 0 7 0 | W W W . S P R I N G N Z . C O . N Z | S A L E S @ S P R I N G N Z . C O . N Z
PUSH LOCK FITTING - INSTRUCTIONS
1. Cut the 1/4" Pipe square and push into the fitting.
You must remove burrs and chamfer tube end for
metal pipes to prevent the 0-ring seal being damaged.
2. The Push lock fitting will grip before it seals. Ensure
the pipe is pushed into the fitting completely
3. Pipe is secured in position
Disconnection
Push the collet against the pipe and slide out of the
push lock fitting to disconnect
PLUMBERS DELIGHT - INSTALLATION
Disassemble the original Cold Water Tap and/or Flexihose connection. Reconnect
the plumbers delight inline and use tee-off for the 1/4 inch connection to feed
machine

+ 6 4 0 9 6 3 6 - 7 0 7 0 | W W W . S P R I N G N Z . C O . N Z | S A L E S @ S P R I N G N Z . C O . N Z
Co2 BOTTLE - INSTALLATION
1. Ensure the Co2 bottle is connected firmly to the regulator and the Co2 tube is
fitted correctly.
2. Slowly turn the dial on the regulator clockwise until the gauge reads 3BAR
(Note: If you want to reduce the pressure you must first turn the dial anticlockwise
and then vent to relieve existing pressure. The gauge will then settle and read
accurately)
3. Turn off the water at the valve and purge any air from the sparkling line by
pressing the sparkling button on the tap for 30 seconds.
4. Turn the water back on at the valve and the SODA switch at the rear of the unit.
5. Press the sparkling button on the tap for 15 seconds to allow any excess Co2 to
be dispensed
6. Operate the sparkling button on the tap 2-3 times for 15seconds each time
(1minute cooldown) until you notice the water is sparkling. Pressure will fluctuate
between 3-4 bar
All Co2 bottles should be upright during use, storage and transit. If the bottle has
been left horizontal, place upright and stand for 60+ minutes before use to allow
contents to settle
Co2 Refill Tube
Pressure Gauge
Pressure
Regulator
1/4" Pipe
Co2 Bottle
TOP VIEW - Co2 Bottle
+ 6 4 0 9 6 3 6 - 7 0 7 0 | W W W . S P R I N G N Z . C O . N Z | S A L E S @ S P R I N G N Z . C O . N Z
Water Operation Method
For security reasons the water will stop running after 1 minute. If you need more water
please re-push the water button
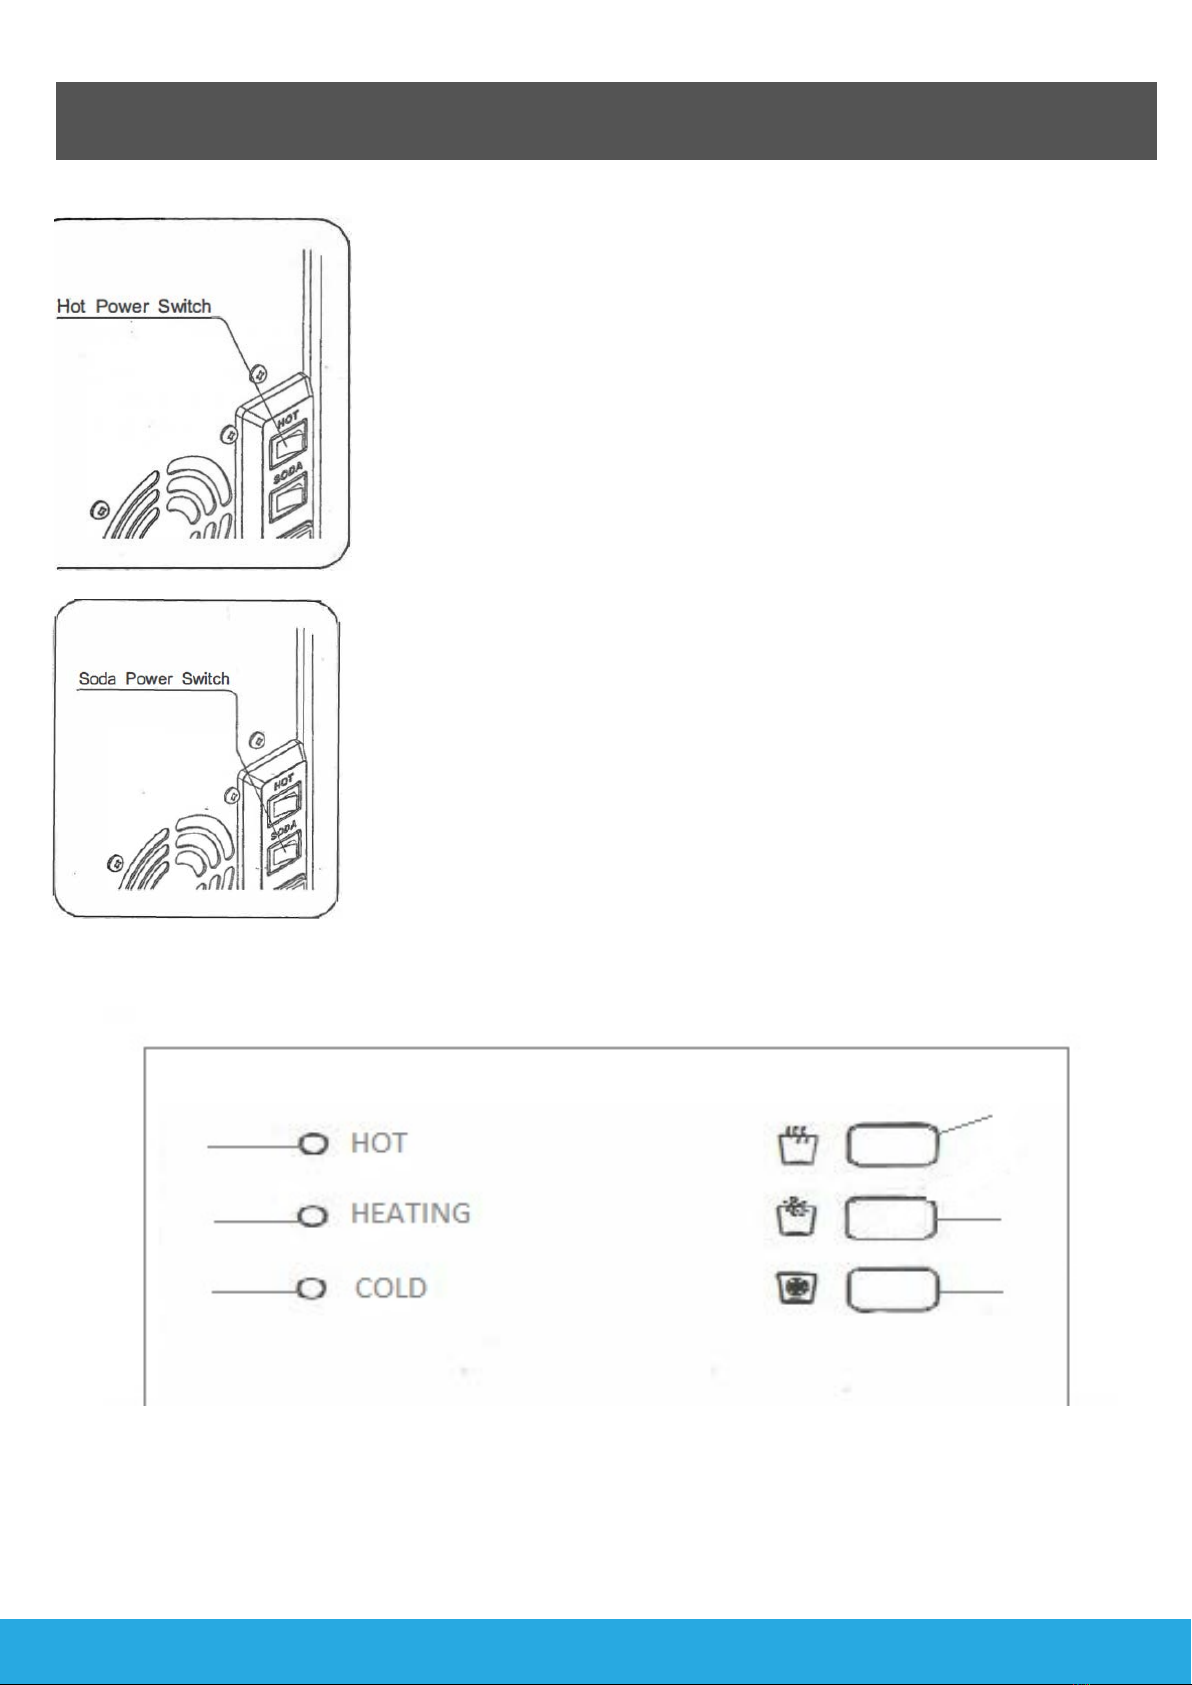
COLD OPERATION
Press the COLD button for Chilled water
Hot Water Button
Cold Water
Button
Cold Power Indicator
Heating system Indicator
Hot Power Indicator
HOT OPERATION
1. Turn on the Power supply
2. Push the HOT button on the machine and make sure
the water flows before you turn on the HOT switch at
the back of the unit (This will ensure the HOT tank is
full to prevent burning out the element
3. Once the HOT switch is on the LED light will
illuminate. It will turn off once the water is heated
4. Press the HOT button twice for HOT water (First to
unlock, second for water to flow)
SPARKLING OPERATION
1. After connecting the machine to the Co2 bottle turn
on the SODA switch at the rear of the unit
2. Press any button to fill the SODA Tank (Allow 40
minutes cooling time)
3. Press the SODA button for Sparkling Water
Sparkling Water
Button
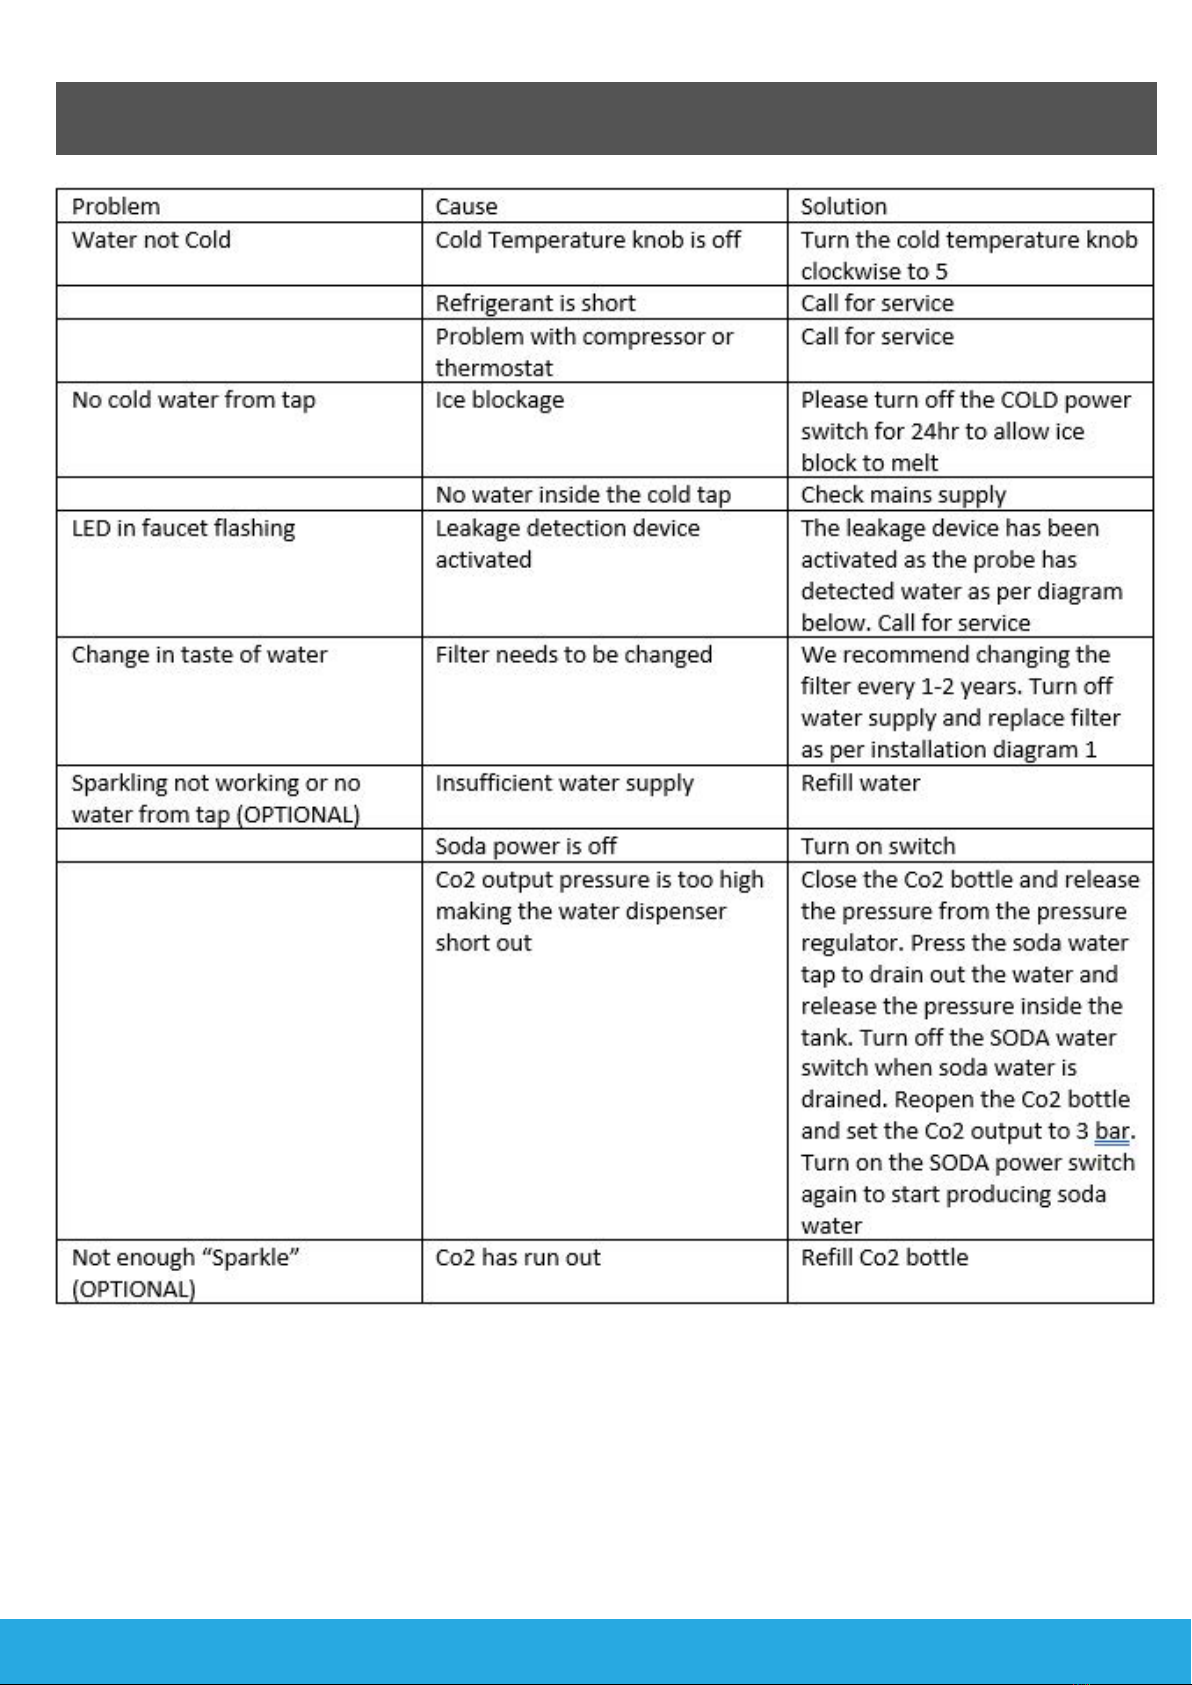
Trouble Shooting
+ 6 4 0 9 6 3 6 - 7 0 7 0 | W W W . S P R I N G N Z . C O . N Z | S A L E S @ S P R I N G N Z . C O . N Z

+ 6 4 0 9 6 3 6 - 7 0 7 0 | W W W . S P R I N G N Z . C O . N Z | S A L E S @ S P R I N G N Z . C O . N Z
This device has a leakage detection probe
fitted for safety purposes.
When the probe detects moisture you may
notice the LED on the machine flashing
accompianied by a beeping noise
We recommend turning off the electricity at
the power supply and calling a qualified
technician to carry out this work for your
safety.
Internal tubes and cables within the faucet
cannot handle completed rotation and will be
damaged if turned more than 180 degrees.
Swivel feature is intended to find correct
placement on the benchtop. Once placed,
the tap should be left alone to avoid damage
LEAKAGE DETECTION - DIAGRAM
TAP SWIVEL - WARNING
Spring NeoTap
INSTANT TAP
+ 6 4 0 9 6 3 6 - 7 0 7 0 | W W W . S P R I N G N Z . C O . N Z | S A L E S @ S P R I N G N Z . C O . N Z
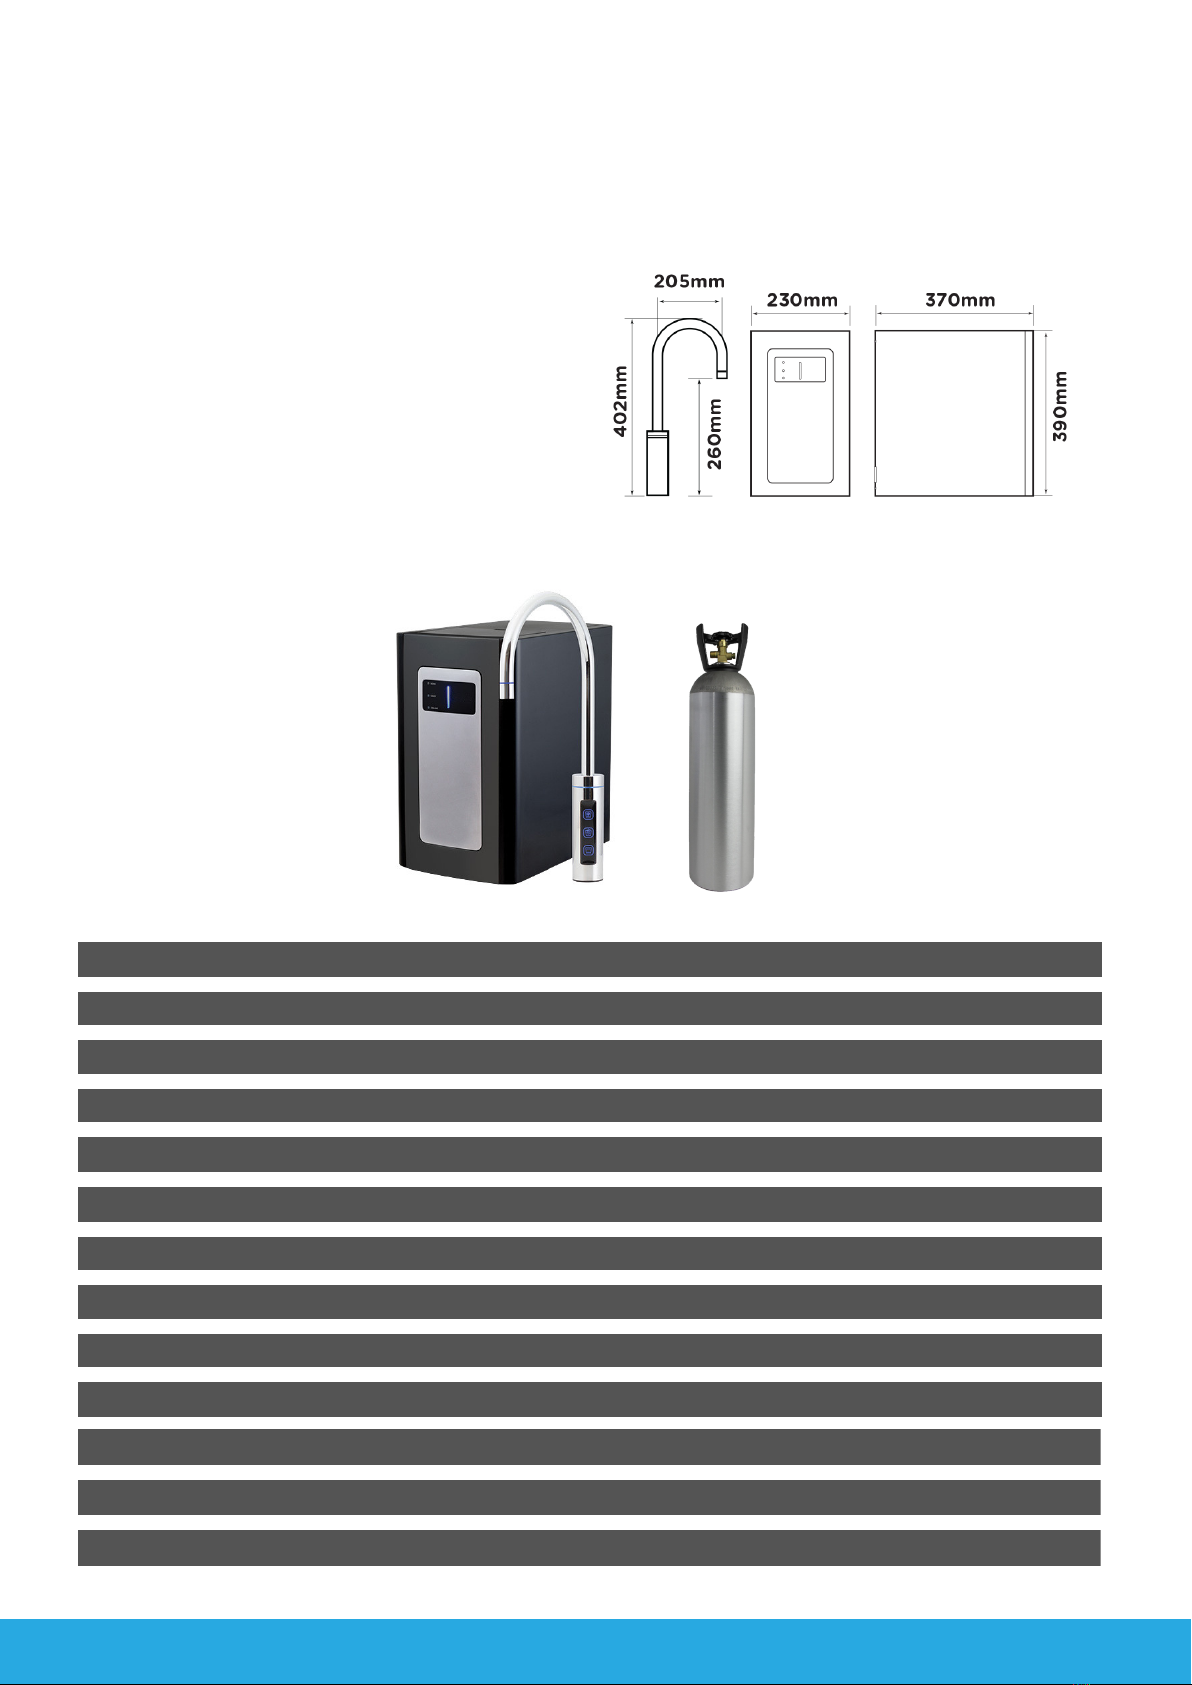
Overview
Underbench filter with integrated
unit for boiling, chilled, sparkling and
ambient drinking water.
Sparkling, Boiling & Chilled, Boiling, Chilled & Ambient, Sparkling, Chilled & Ambient
Premium KDF/GAC 30, 1 Micron Filtration
4C to 10C
Model
Filtration
Cold Temperature
Chilling Capacity
Maximum Power consuption
Weight
Heating Capacity
20 Litres per hour
12 Litres per hour
Direct chill system 100W
18kg
Finish Chrome
Water connection
Power requirements
Max. recommended inlet pressure
Required hole for the tap
Ideal under sink dimension
1/2 inch
Standard 10amp power outlet (earth leakage protected
500 kPa
25mm
(w x d h) 750 x 660 x 520mm
PRODUCT DATA SHEET
Table of contents
Other Spring Kitchen Appliance manuals


Popular Kitchen Appliance manuals by other brands

Tayama
Tayama TYG-35AF instruction manual

AEG
AEG 43172V-MN user manual

REBER
REBER Professional 40 Use and maintenance

North American
North American BB12482G / TR-F-04-B-NCT-1 Assembly and operating instructions

Presto
Presto fountain popper instruction manual

Westmark
Westmark 1035 2260 operating instructions


