SR Suntour NCX 2019 User manual

1
SUSPENSION SEATPOST
OWNER’S MANUAL
Important safety information…………………………..…………………………….…………2
Before every ride………………………………………….……………………………………………2
Suspension seatpost installation.…………………………………………………..….…..….3
Installation instruction………………………………………………………………………………4
Pre-load adjustment………………………………………………………………………………..5
Maintenance……….…………………..………………………….………………..……….…………6
ENGLISH
This instruction sheet contains important information about the correct installation,
service and maintenance of your suspension seatpost. Nevertheless please be
informed that special knowledge is essential to install, service and maintain the SR
SUNTOUR suspension seatpost. Common mechanical knowledge may not be
sufficient to repair, service or maintain it. Therefore we strongly recommend getting
your suspension seatpost installed, serviced and/or maintained by a trained and
qualified bike mechanic. Improper installation, service or maintenance can result in
failure of the product, accident, injury or even death.
WARNING !
We have language options for CN, DE, EN, ES, FR, IT, JA & NL on our
website. Please navigate to:
www.srsuntour-cycling.com > Service > Download area > Consumer
Downloads > Bike > Owners manuals > Suspension seatpost Manual

2
IMPORTANT SAFETY INFORMATION
ØRead this manual thoroughly before using your suspension seatpost.
ØUse only genuine SR SUNTOUR parts. The use of aftermarket replacement and spare parts
voids the warranty of your seatpost and might cause failure. This could result in an accident,
injury or even death.
ØThese instructions contain important information about the correct installation, service and
maintenance of your suspension seatpost. Common mechanical knowledge may not be
sufficient. Your suspension seatpost should only be installed, serviced and/or maintained by a
trained and qualified bicycle mechanic with specialized tools.
ØIf your are going to use your seatpost in combination with a child seat, we strongly
recommend using the SR SUNTOUR neoprene protection cover to prevent your child’s finger
from being accidentally pinched.
ØStudy all other owner’s manuals provided with your bike and make yourself familiar with the
components mounted to your bike.
WARNING !
Failure to follow all warnings and safety instructions can cause your product to
malfunction, resulting in an accident, severe personal injuries or even death to
the rider.
BEFORE EVERY RIDE
ØInspect your bicycle and suspension system including the handlebars, pedals, crank arms, seat
post, saddle, etc. for any cracks, dents, bent or tarnished parts. Also search for any oil leaking
out of your shocks. Be sure to check hidden areas on the underside of your bike. If any
condition exists, consult a trained and qualified bicycle mechanic to determine the cause and
make any necessary correction.
ØMake sure your seatpost is fastened with the proper torque value according to the frame’s
seat-clamp’s specifications. If you are using a quick release seat-clamp, make sure it is closed
properly. An improperly tightened seat-clamp increases the risk that your seatpost might twist
while riding. This implies the risk of an accident and fatal injuries. Please inspect by view and
twisting of the saddle the seatpost for any unusual movement!
ØMake sure the bolts which are securing the saddle are fastened with the proper torque value
of 15-18Nm. A loose saddle could provoke an accident and/or fatal injuries.
WARNING !
Avoid serious personal injury or even death. Do not ride the bicycle if any of the
following criteria is not met ! Correct any condition before you ride.

3
SUSPENSION SEATPOST INSTALLATION
1. Remove your old seatpost.
2. Clean the inside of the seat tube to make sure no old grease or dirt remains inside. You also
should make sure that the seat-tube itself has no burrs which could scratch the seatpost. If
found, you must remove these burrs so that the seatpost can slide in smoothly.
3. Install your seatpost and insert it past the “MIN INSERT“ mark so that the marking is at least
completely below the top of the seat-tube. When correctly installed, no part of the “MIN
INSERT” mark should be visible.
WARNING !
We strongly recommend that your suspension seatpost is installed and set up by
a qualified and trained bicycle mechanic. Improper installation can result in
failure of the product, accident, injuries or even death. If you are going to install
the suspension seatpost by your own, the installation should be inspected by a trained and
qualified bicycle mechanic. The inspection needs to be confirmed by the dealer by signing
this owner’s manual on the last page along with the dealer’s official stamp.
MIN INSERT
MARK

4
INSTALLATION INSTRUCTION
1. Unscrew the two fixing
bolts on both sides using a
5mm Allen wrench.
Unscrew them until the rail
of the saddle can fit
between the 2 halves of
the clamp.
2. Install the saddle by
inserting the rail into the
clamp from one side.
3. Press the saddle down
until you hear the
“click“ noise.
4. Adjust the saddle so that it
is centered and the top
surface to be horizontal
(recommended) as shown
in the picture on the right.
5. Tighten the fixing bolt by a
5mm Allen wrench.
Suggested tightening
torque is 15-18Nm.
5
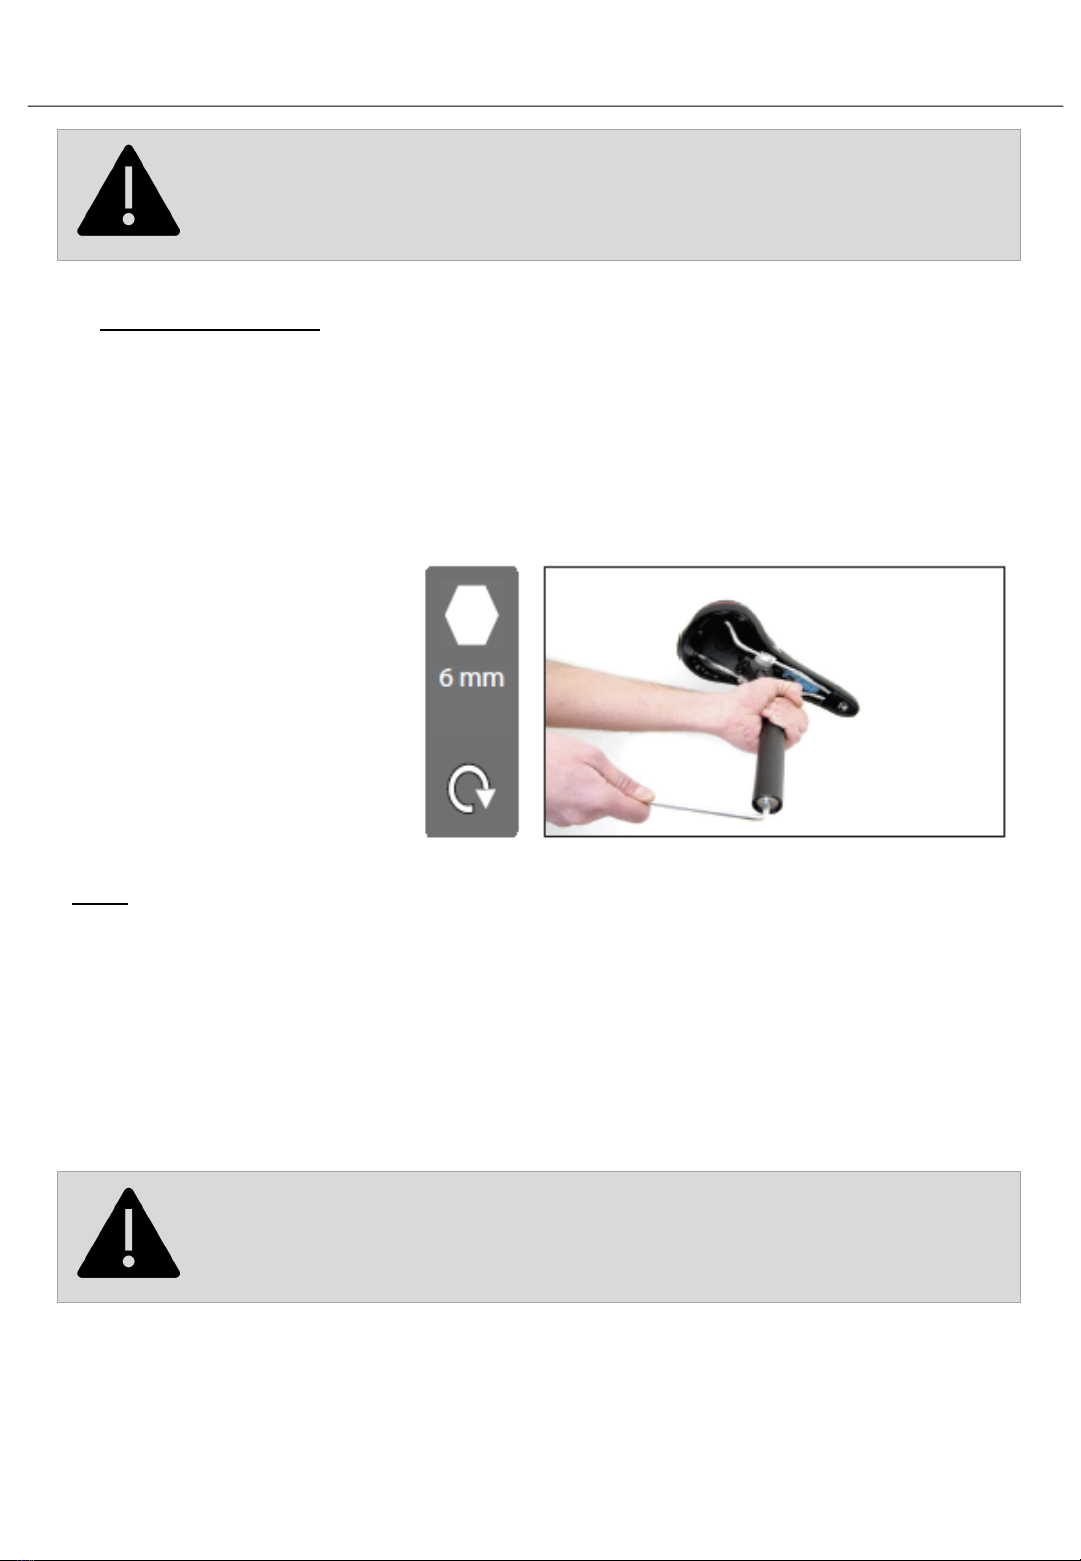
PRELOAD ADJUSTMENT
1. Check the adjustment:
With somebody’s support, sit on the bike with your hands and feet positioned normally. Have
the supporter looking and confirm that the seatpost is approximately 1/3 compressed.
2. If the compression is not within the range as explained above, remove the seatpost from the
bicycle frame.
3. To increase the preload, with a 6 mm Allen key, turn the adjuster clockwise. To decrease the
preload, turn the adjuster counter-clockwise, taking care to leave a minimum 10mm of
exposed threads visible at the bottom of the seatpost.
WARNING !
Proper preload adjustment is critical for the safe functioning of the SUSPENSION
seatpost. Repeated bottoming-or topping-out under use can lead to a structural
failure of the suspension seatpost, resulting in accidents and/or injuries.
Note:
In case if the above-mentioned preload adjustment does not allow the adjustment within the
range, then you may have to use an optional softer or harder spring from your authorized SR
SUNTOUR dealer. If exchanging the spring still does not allow setup within the range, the
seatpost might not be compatible with your bike/weight/use/terrain setup.
•Part number PES104 (soft-spring): for rider’s weight up to 65kg
•Part number PES106 (hard-spring): for rider’s weight up to 120kg
WARNING !
Do not turn the adjuster bolt counter-clockwise beyond the initial position at
delivery. In this original position, around 10mm of the seatpost thread should
be visible.
6
MAINTENANCE
As long as moving parts are exposed to moisture and contamination, the performance of your
suspension system might be reduced after several rides. To maintain high performance, safety and
long life of your suspension system, periodic maintenance is required.
ØWe recommend that your suspension seatpost is being serviced frequently as indicated below
if you ride in extreme weather (winter time) and terrain conditions.
ØIn case if you may feel that your suspension seatpost performance has changed or handles
differently, immediately call on your local dealer to inspect your suspension seatpost.
ØCheck the tightening torque of the saddle fixing screws to see if it is properly fixed.
ØTest the clamping torque of the seat clamp bolt, tightness of the seatpost quick release
lever on the bike seat-tube.
ØAfter every ride: Clean the parallelogram part and maintain with an oily cloth. Check the
upper body if there are dents, scratches or other discoloration.
ØEvery 100 hours or once a year: Maintenance 1 (at dealer)
Note for the Maintenance 1
1. Disassemble the seatpost from your frame.
2. Unscrew the adjuster bolt and slide out the coil spring.
3. Clean the seatpost from the in-and outside.
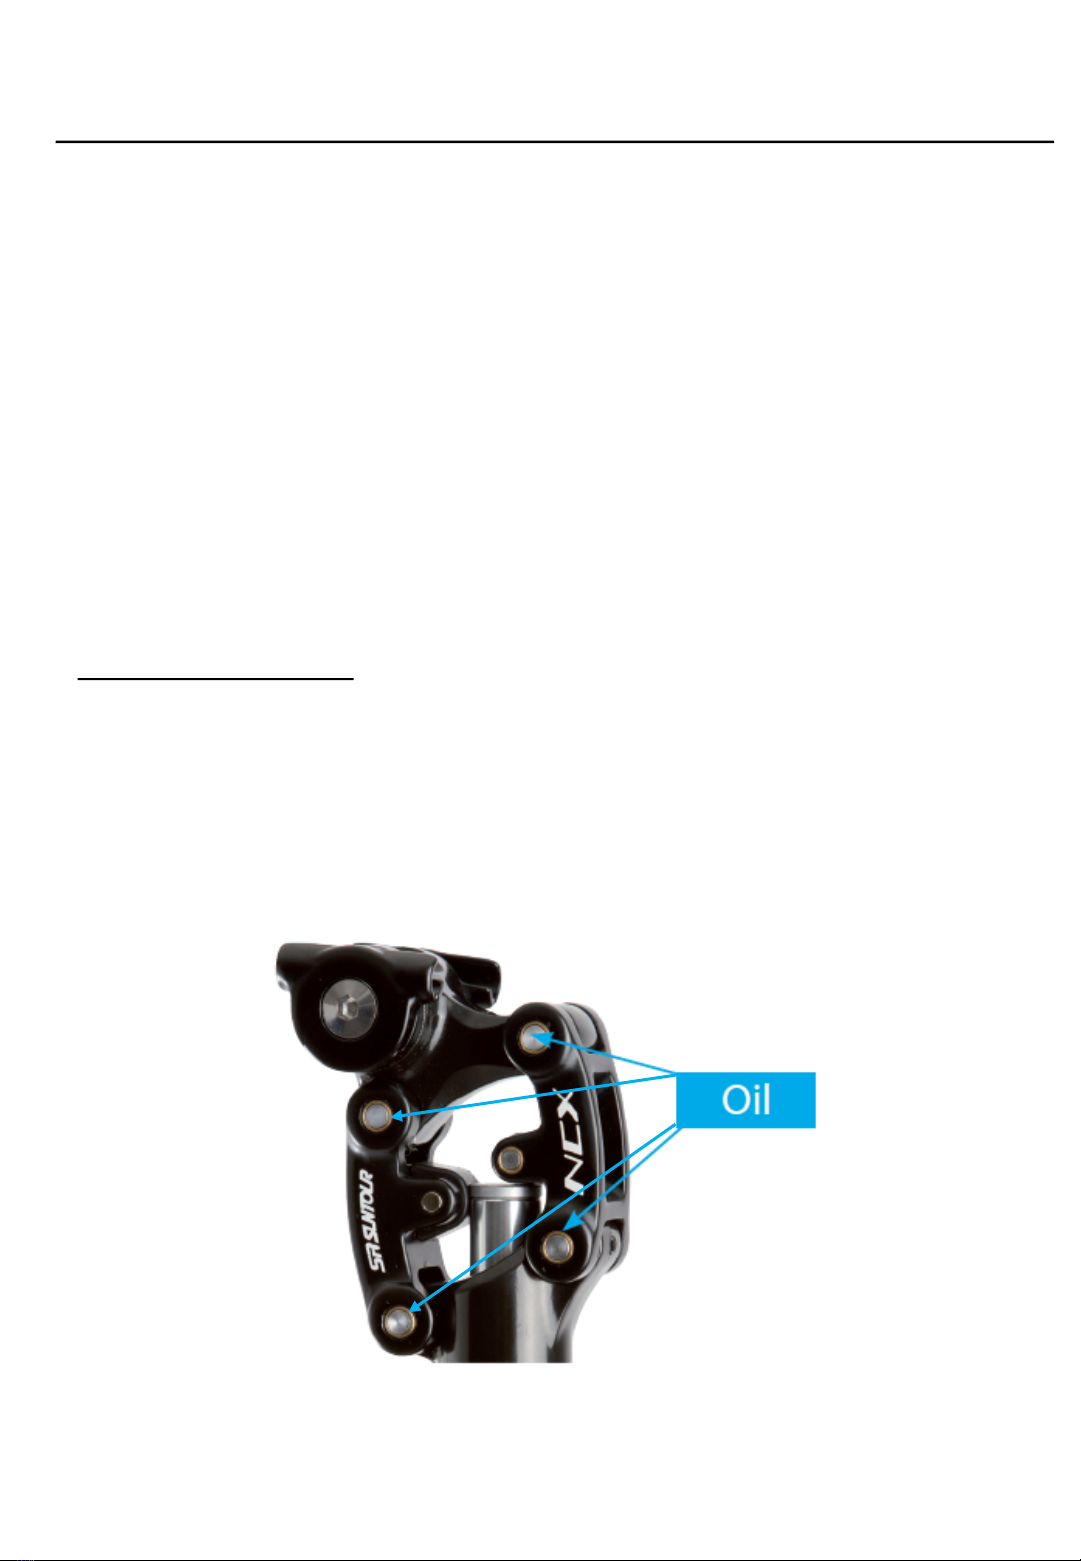
4. Grease the seatpost inside (use SR SUNTOUR No. 9170-001 grease). Lubricate the pressure
roller. Additionally you should lubricate the joints. We recommend bicycle chain lubricant.
Use a pressure spray, it allows you to spray away any contamination.

CUSTOMER SUPPORT OFFICES
WEB LINKS
For further information please visit www.srsuntour-cycling.com. There you will also find:
uService request: http://www.srsuntour-cycling.com/service/service-request
uTech videos: http://www.srsuntour-cycling.com/service/tech-videos
uDownload area: http://www.srsuntour-cycling.com/service/download-area
uOwners manuals: http://www.srsuntour-cycling.com/service/download-area/consumer-
downloads/bike/owners-manuals/
uWarranty: http://www.srsuntour-cycling.com/service/warranty
Copyright © 2019 SR SUNTOUR Inc. All rights reserved. KAE802
ASIA, OCEANIA
SR SUNTOUR INC.
#7 Hsing Yeh Road
Fu Hsing Industrial Zone
Chang Hua, Taiwan, R.O.C.
Tel: +886-(0)4-769-5115
service@srsuntour.com.tw
SR SUNTOUR INTERNATIONAL CO., LTD.
No. 1500 Honghu Road, Penglang
Kunshan, Development Zone
Jiang Su Province, China ZIP 215333
Tel: +86-512-5517-1127
sr-service@srsuntour.com.cn
SRS INTERNATIONAL TRADING LTD.
Room 501, 5th floor, Building No. 2
Jiaxing Industrial Zone, Shubei Road
Gongming Town, Guangming District
Shenzhen City, China 518106
Tel: +86-755-271-084 83
service@srsuntour.com.cn
SR SUNTOUR JAPAN
NR Bldg. 4F, 3-13-13 Kuramae
Taito-ku, Tokyo, 111-0051
Tel: +81-3-5829-9211
EUROPE
SR SUNTOUR EUROPE GmbH
Riedstrasse 31
83627 Warngau, Germany
Tel: +49-(0)802-150-793-0
service@srsuntour-cycling.com
SR SUNTOUR Technical Service Center
Max-Planck-Str. 4
97526 Sennfeld, Germany
Tel: +49-(0)9721-473-4896
service@srsuntour-cycling.com
SAV SR SUNTOUR FRANCE
604 voie Galilee
73800 Sainte Helene du Lac, France
Tel: +33-(0)981-241650
sav@srsuntour-cycling.com
USA
SR SUNTOUR North America Inc.
7509 S. 5th Street Suite 124
Ridgefield, Washington 98642
Tel: +1-360-737-6450
Sales: ssna@srsuntourna.com
Service, warranty: service@srsuntourna.com
SR SUNTOUR Madison
910 Watson Avenue
Madison, Washington 53713 USA
Tel: +1-608-229-6610
service@usulcorp.com
Table of contents
Other SR Suntour Bicycle Accessories manuals

SR Suntour
SR Suntour HESC ATS Rear Motor System User manual

SR Suntour
SR Suntour SR Suntour User manual

SR Suntour
SR Suntour NCX NEX User manual

SR Suntour
SR Suntour REAR SHOCK User manual

SR Suntour
SR Suntour NRX Series User manual

SR Suntour
SR Suntour Epicon User manual

SR Suntour
SR Suntour HESC User manual

SR Suntour
SR Suntour COIL SPING Series User manual

SR Suntour
SR Suntour RAIDON User manual

SR Suntour
SR Suntour HESC User manual


