manuals.online logo
Brands
  1. Home
  2. •
  3. Brands
  4. •
  5. Specialized
  6. •
  7. Bicycle Accessories
  8. •
  9. Specialized Transition Carbon-All Models Manual

Specialized Transition Carbon-All Models Manual

This manual suits for next models

1

Other Specialized Bicycle Accessories manuals

Specialized Globe Throttle User manual

Specialized

Specialized Globe Throttle User manual

Specialized SPEEDZONE SPORT CYCLOCOMPUTER User manual

Specialized

Specialized SPEEDZONE SPORT CYCLOCOMPUTER User manual

Specialized FireBalls Comp User manual

Specialized

Specialized FireBalls Comp User manual

Specialized SpeedZone Sport Bicycle User manual

Specialized

Specialized SpeedZone Sport Bicycle User manual

Specialized SpeedZone Elite User manual

Specialized

Specialized SpeedZone Elite User manual

Specialized SpeedZone User manual

Specialized

Specialized SpeedZone User manual

Specialized Speedzone Sport CR2032 User manual

Specialized

Specialized Speedzone Sport CR2032 User manual

Specialized Speedzone Pro Cyclocomputer User manual

Specialized

Specialized Speedzone Pro Cyclocomputer User manual

Specialized TERO EQ KIT User manual

Specialized

Specialized TERO EQ KIT User manual

Specialized SPEEDZONE SPORT DOUBLE WIRELESS User manual

Specialized

Specialized SPEEDZONE SPORT DOUBLE WIRELESS User manual

Specialized S-WORKS CARBON HARDTAIL Manual

Specialized

Specialized S-WORKS CARBON HARDTAIL Manual

Specialized Command Post 34.9 User manual

Specialized

Specialized Command Post 34.9 User manual

Specialized Turbo Comp User manual

Specialized

Specialized Turbo Comp User manual

Specialized Speedzone Comp User manual

Specialized

Specialized Speedzone Comp User manual

Specialized HPRT-0027 User manual

Specialized

Specialized HPRT-0027 User manual

Specialized Roval Rapide Wheelset None User manual

Specialized

Specialized Roval Rapide Wheelset None User manual

Specialized Transition Transition Bicycles User manual

Specialized

Specialized Transition Transition Bicycles User manual

Specialized Stumpjumper Adjustable Dropout User manual

Specialized

Specialized Stumpjumper Adjustable Dropout User manual

Specialized Command Post Adjustable Height Seat Post User manual

Specialized

Specialized Command Post Adjustable Height Seat Post User manual

Specialized Globe Haul ST Wheel Protector User manual

Specialized

Specialized Globe Haul ST Wheel Protector User manual

Specialized Turbo Pro 23A User manual

Specialized

Specialized Turbo Pro 23A User manual

Specialized SpeedZone Sport User manual

Specialized

Specialized SpeedZone Sport User manual

Specialized TURBO SPORT CYCLOCOMPUTER 2004 User manual

Specialized

Specialized TURBO SPORT CYCLOCOMPUTER 2004 User manual

Specialized SpeedZone Pro User manual

Specialized

Specialized SpeedZone Pro User manual

Popular Bicycle Accessories manuals by other brands

Galeo Galeo user guide

Galeo

Galeo Galeo user guide

Shimano DURA-ACE FC-R9100 Dealer's manual

Shimano

Shimano DURA-ACE FC-R9100 Dealer's manual

BAFANG BT C01.340.UART Customer's manual

BAFANG

BAFANG BT C01.340.UART Customer's manual

Minshine T154 Series manual

Minshine

Minshine T154 Series manual

Cateye TRIPLE SHOT PRO HL-EL830RC instruction manual

Cateye

Cateye TRIPLE SHOT PRO HL-EL830RC instruction manual

Navad Trail 200 Quick manual guide

Navad

Navad Trail 200 Quick manual guide

Sigma BC 16.16 manual

Sigma

Sigma BC 16.16 manual

Playcore Dero Setbacks installation instructions

Playcore

Playcore Dero Setbacks installation instructions

VDO Cyclecomputing x3dw instruction manual

VDO Cyclecomputing

VDO Cyclecomputing x3dw instruction manual

Cateye RAPID X2 manual

Cateye

Cateye RAPID X2 manual

buratti meccanica Clorofilla Trail Use and maintenance manual

buratti meccanica

buratti meccanica Clorofilla Trail Use and maintenance manual

Shimano SG-8R20 Service instructions

Shimano

Shimano SG-8R20 Service instructions

BOB YAK owner's manual

BOB

BOB YAK owner's manual

APLIC 303303/20190717TW012 user manual

APLIC

APLIC 303303/20190717TW012 user manual

Polini HI-SPEED E-BIKE quick start guide

Polini

Polini HI-SPEED E-BIKE quick start guide

SRAM AXS BlipBox user manual

SRAM

SRAM AXS BlipBox user manual

Shimano FD-RX810 Dealer's manual

Shimano

Shimano FD-RX810 Dealer's manual

Shimano SM-BB80 Service instructions

Shimano

Shimano SM-BB80 Service instructions

manuals.online logo
manuals.online logoBrands
  • About & Mission
  • Contact us
  • Privacy Policy
  • Terms and Conditions

Copyright 2025 Manuals.Online. All Rights Reserved.

BICYCLE/FRAME INSTRUCTION GUIDE
TRANSITION CARBON - ALL MODELS
Congratulations! The Specialized bicycle you have chosen is among
the finest of advanced composite products available in cycling.
Carbon fiber is a very special material that requires particular care
during assembly, storage and riding. This installation guide contains
instructions and warnings, plus torque specifications.
Please read the following instructions. If you have any doubt regarding
your mechanical ability and/or installation of this product, visit your
local authorized dealer. Specialized recommends that components be
installed on the frame using a torque wrench, by a qualified mechanic.
Please read the following Warnings. Because the failure to follow any
Warning may result in a catastrophic failure of the frame, resulting in
serious personal injury or death, this phrase may not be repeated in
connection with each Warning.
To ensure the best assembly possible and to prevent any damage
to the components or frame, follow all torque specifications. Please
refer to the specific owner’s manual for mating component’s correct
torque specifications. If the mating component’s recommended torque
exceeds the frame’s recommended torque, use the lower torque spec.
Due to torque considerations, not all components will be compatible.
Warning! Failure to follow the torque specifications in this
installation guide will void the warranty, but most importantly
may result in damage to the frame which may not be visible.
If the frame is damaged, this can result in loss of structural
integrity, which may result in serious personal injury or death.
Bicycle components such as a handlebar, handlebar stem, seat post,
saddle, brakes, all must be compatible with each other, the frame
and the intended use. Any doubt regarding compatibility should be
discussed with your local authorized Specialized retailer.
Warning! When placing the frame and/or bicycle in a repair
stand, clamp the stand using a frame clamp specifically designed
for thin-wall carbon tubes, for example the Park Tools 100-X4 Ex-
treme Range Clamp. Clamping the frame with a standard clamp
can cause damage to the frame that may or may not be visible.
The Specialized Transition frames require a proprietary seat post,
available in 3 different setbacks. The Transition seat post system allows
for an extremely wide seat tube angle range which is infinitely variable
inside that range, to help the rider achieve the optimal riding position.
To help the Transition frame achieve its aerodynamic benefits, the
frame was designed with a very short seat post vertical adjustment
range. Proper installation of the Transition Seat Post requires the use
of a dedicated Transition Fit Kit tool set.
This setup (fitting and cutting) MUST be performed by an authorized
Specialized dealer to ensure that the seat post is cut to the optimal
length, to maximize the +/- vertical adjustment range.
INSTALLING THE SEAT POST & SADDLE
THIS INSTALLATION GUIDE CONTAINS IMPORTANT INFORMATION.
PLEASE READ CAREFULLY AND STORE IN A SAFE PLACE.
Warning!
Due to the nature of the seatpost having to be
cut to a specific length, the seat post is NOT marked with a
minimum insertion line. For proper seatpost insertion, ensure
that the seat post extends below the minimum insertion hole
located at the back of the seat tube area. Extension beyond
the minimum insertion hole in the frame can result in failure.
Warning! Do not grease the seat tube surface that contacts
the seat post. Grease reduces the friction that is critical to
proper seat post grip. Remove any grease from the surfaces
of the seat tube and seat post.
TECH TIP:
Specialized recommends the application of carbon
assembly compound between the seat tube and post to increase
friction. Recommended compounds can be found at www.tacx.com.
See your authorized Specialized retailer if you have any questions.
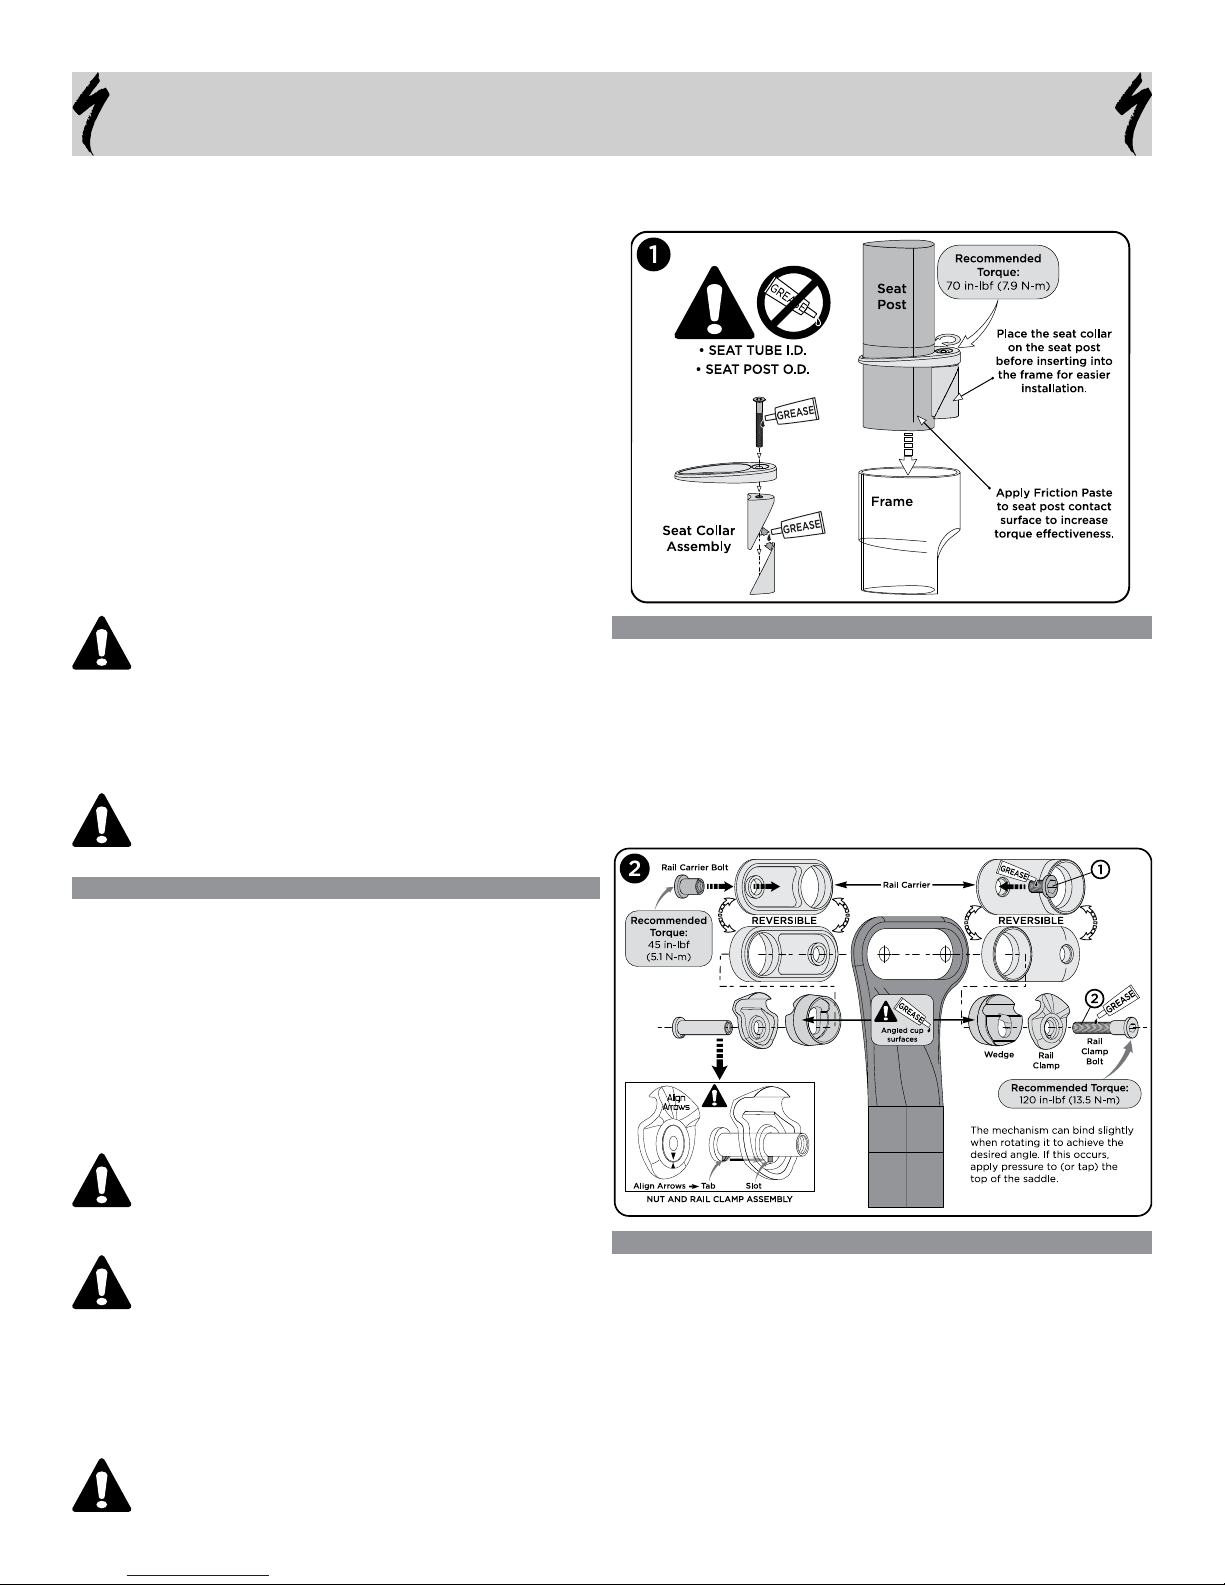
Tighten seat collar bolt to recommended torque of 70in-lbf (7.9 N-m).
See fig.1 for proper grease and assembly compound application zones.
GENERAL WARNINGS
FORK: Do not remove the small bumpers on the side/back of the fork
legs. These are to protect the frame from fork contact.
REAR WHEEL: Due to variables in tire manufacture, heat expansion,
foreign debris, etc. Specialized recommends a minimum rear wheel-
to-frame clearance of 2mm. The UCI requires sufficient clearance such
that a credit card must fit between the rear tire and the back of the seat
tube.
Thread the horizontal dropout screws in or out to fine-tune the alignment
and fore-aft position of the wheel. To ensure that the rear wheel can’t slip
forward in the dropouts under torque, make sure that the rear axle butts
up against the dropout screws before tightening the Quick-Release.
Contact between the frame and tire can cause wear and damage to the
frame, which can result in failure.
ADJUSTING THE SEAT POST
• Install the seat post into the seat tube (fig.1).
• Install the rail clamp carrier in the chosen direction (reversible) and
tighten the alloy rail carrier bolt (bolt #1, fig.2).
• Grease the contact surfaces and bolt threads of the rail clamp
Mechanism, then install it in the rail clamp carrier.
• Install the saddle in the rail clamp mechanism.
• Adjust the saddle to the desired height, angle and fore-aft position.
• Torque the rail clamp bolt to the recommended setting. To avoid
damage, the nut tab must be properly lined up with the rail clamp
slot (bolt #2, fig.2).
• Torque the seat collar bolt to the recommended setting (fig.1).
Warning! Exceeding the specified recommended torque limit
can result in damage to the seat post and/or frame.
Warning!
Great care should be taken not to damage composite
materials, including the frame and any composite components.
Any damage may result in a loss of structural integrity, which
may result in a catastrophic failure. This damage may not be
visible in inspection. Before each ride, and after any crash,
carefully inspect the bicycle for and dents, fraying, gouging,
scratches through the paint, chipping, bending or any other
signs of damage. Do not ride if the bicycle shows any signs of
these signs. After any crash, and before riding any further, take
the bicycle to an authorized Specialized retailer for a complete
inspection.
The following illustration highlights all the Transition’s relevant
geometry measurements and angles.
The following charts outline the measurements for each frame size
according to the “Reach & Stack” method as well as show the standard
method using the effective top tube length and seat tube angle.
The Geometry measurements are separated into three charts, one for
each seat post setback (Zero, Standard, Team).
Recommendations about Tri bike fit and how
it differs from traditional road bike fit:
• The saddle is typically more forward.
• The saddle position is partly dependant
on the amount of handlebar drop and vice
versa.
• Position depends on the rider’s goals,
flexibility, event style and intended riding
experience.
To optimize the comfort, performance and
control of the Transition bike, see a qualified
Tri Bike fitter.
TEAM SETBACKSTANDARD SETBACKZERO SETBACK
HEADSET
Your Specialized frame does not require any
head tube pre-installation preparation. All
surfaces are already prepared from the factory,
with the exception of greasing the cups.
Use 36° x 45° x 38mm (1”) cartridge bearings.
No tools are required for the installation or re-
moval of the cartridge bearings.
BOTTOM BRACKET
Your Specialized frame does not require any
bottom bracket pre-installation preparation. All
surfaces are already prepared from the factory,
with the exception of greasing the threads. It
is acceptable to chase the threads if applicable
and necessary. Do not face the bottom bracket
shell surfaces.
THREADED: Ensure that the bottom bracket shell
threads are clean and greased prior to installation.
Recommended torque is 442 in-lbf (50 N-m).
OVERSIZED BB: Please refer to the carbon
crank installation guide for assembly
instructions and compatible tools.
COMPONENT TORQUE SETTINGS
TRANSITION CARBON - ALL MODELS
• Braze-on front derailleur: Recommended
torque is 44 in-lbf (5.0 N-m).
• Rear derailleur: Recommended torque is
70 in-lbf (7.9 N-m). Ensure threads are clean
prior to installation.
• Seat collar: Recommended torque is 70 in-lbf
(7.9 N-m).
• Downtube (@ BB) Brake Cable Stop:
Recommended torque is
35 in-lbf (4.0 N-m).
• Water bottle cage:
Recommended torque is
35 in-lbf (4.0 N-m).
SPECIALIZED BICYCLE COMPONENTS
15130 Concord Circle, Morgan Hill, CA 95037 (408) 779-6229
Please note all instructions are subject to change for improvement without notice.
Rev.1, December 2007
WARRANTY
For the complete warranty provisions and any additional information,
please refer to the Specialized Owner’s Manual or www.specialized.com.