SR Suntour RAIDON User manual

RAIDON/XCR/XCM/XCT/M3000/M2000/XCU0
M2025
M3000AL
XCU
Owners Manual
COIL SPING SERIES

SR SUNTOUR - OWNERS MANUAL RAIDON / XCR /XCM / XCT / M3000AL / M2025
English
1
Owners Manuals
INTENDED USE ................................................................................ 1
IMPORTANT SAFETY INFORMATION .............................................. 4
BEFORE EACH RIDE! ........................................................................ 5
FORK INSTALLATION ....................................................................... 5
TIRE CLEARANCE ! ........................................................................... 6
REMOTE LOCK LEVER INSTALLATION
RAIDON RL / XCR RL SERIES ............................................................... 8
LOCK-OUT SYSTEMS ......................................................................10
REBOUND DAMPING ADJUST .......................................................11
Qloc HUB REQUIREMENTS ............................................................11
QLOCK SYSTEM 15mm ..................................................................12
FORK MAINTENANCE ....................................................................13
LIMITED WARRANTY......................................................................14
TABLE OF CONTENTS
INTENDED USE
Category Freeride All Mountain XC ATB
RAIDON
XCR / XCM
XCT / M
Make sure to select the correct fork according to your frames build in height and per-
sonal riding style. Please note that the AXON, EPICON and RAIDONair series forks were
not designed for jumping, dropping, aggressive downhill riding, freeriding or urban
style riding. Not following these instructions could result into a failure of the product,
accident and even death of the rider. Not following these instructions will void the
fork‘s warranty!

SR SUNTOUR - OWNERS MANUAL RAIDON / XCR /XCM / XCT / M3000AL / M2025
English
2
SR SUNTOUR - OWNERS MANUAL RAIDON / XCR /XCM / XCT / M3000AL / M2025
MAX ROTOR DIAMETER
[ mm ]
RAIDON / XCR / XCM V2 SERIES 185
XCT V2 / M SERIES 160
Stanchion
Tubes
12
4
3
Bottom Case
Dropouts
Fork Crown
Steerer Tube
A
E
C
B
D
RLD = Remote Lock Out +
Rebound Damping Adjust
LOD = Speed Lock Out +
Rebound Damping Adjust
HLO = Hydraulic Lock Out
RL = Remote Lock
LO = Speed Lock
MLO = Mechanical Lock Out
Model Speed
Lock Out
Remote
Lock Out
Preload
Adjuster
Rebound
Adjuster
RAIDON RLD / RLD 15QLC 1 2 3
RAIDON LOD / LOD 15QLC 1 2 3
RAIDON RLD 15QLC 29“ 1 2 3
SR SUNTOUR - OWNERS MANUAL RAIDON / XCR /XCM / XCT / M3000AL / M2025 SR SUNTOUR - OWNERS MANUAL RAIDON / XCR /XCM / XCT / M3000AL / M2025
English
3
Model Speed
Lock Out
Remote
Lock Out
Preload
Adjuster
Rebound
Adjuster
RAIDON LOD 15QLC 29“ 1 2 3
XCR RL / RL 15QLC 1 2
XCR LO / LO 15QLC 1 2
XCR 15QLC 1+2
XCR & XCR 24“ 1+2
XCM V2 HLO / V2 PM HLO 1 2
XCM V2 / V2 PM 1+2
XCT V2 MLO 1 2
XCT V2 1+2
XCT V2 JR MLO 24“ 1 2
XCT JR 24“ & XCT JR 20“ 1 1+2
M2025 MLO 1+2
M- Series 1
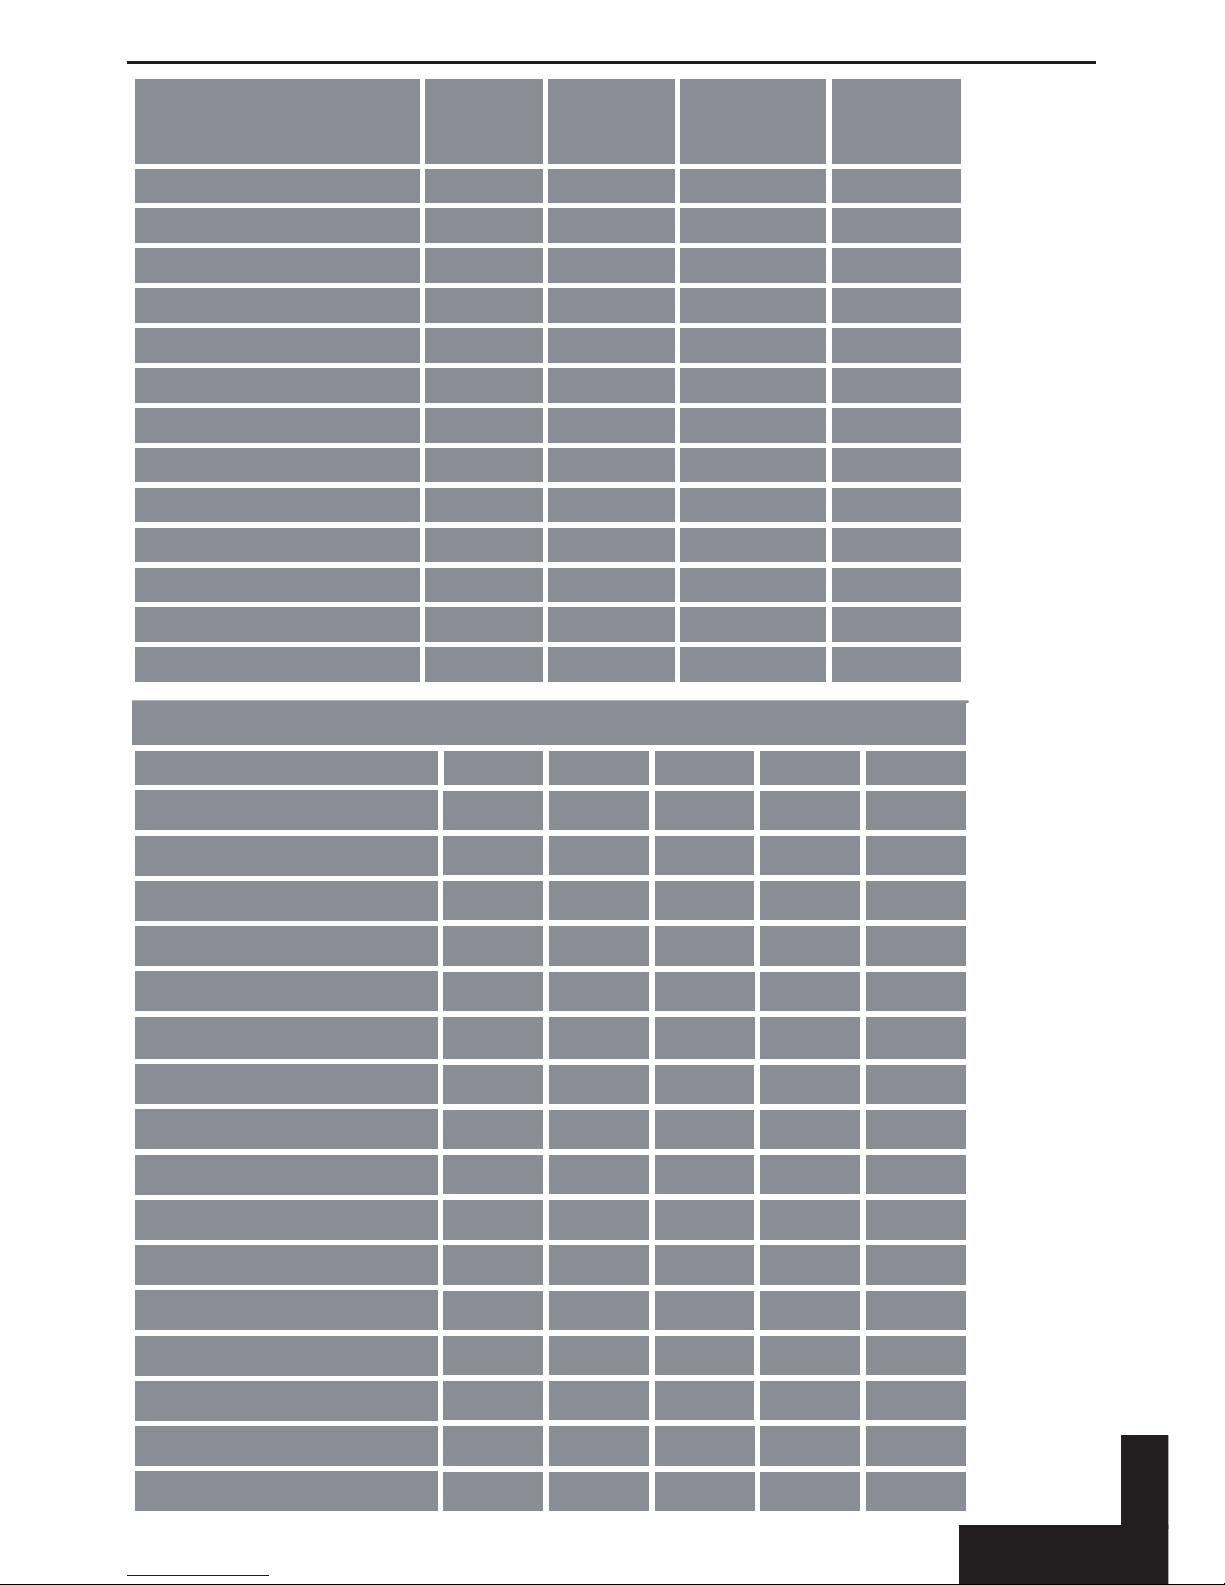
TORQUE VALUES (all values including a tolerance of ± 10%)
MODEL ABCDE
RAIDON RLD / RLD 15QLC 10Nm 10Nm 6Nm 10Nm 7Nm
RAIDON LOD / LOD 15QLC 10Nm 10Nm 6Nm 10Nm 7Nm
RAIDON RLD 15QLC 29“ 10Nm 10Nm 6Nm 10Nm 7Nm
RAIDON LOD 15QLC 29“ 10Nm 10Nm 6Nm 10Nm 7Nm
XCR RL / RL 15QLC 10Nm 4Nm 10Nm 10Nm 7Nm
XCR LO / LO 15QLC 10Nm 4Nm 10Nm 10Nm 7Nm
XCR 15QLC 4Nm 4Nm 10Nm 10Nm 7Nm
XCR & XCR 24“ 4Nm 4Nm 10Nm 10Nm 7Nm
XCM V2 HLO / V2 PM HLO 10Nm 4Nm 10Nm 10Nm 7Nm
XCM V2 / V2 PM 4Nm 4Nm 10Nm 10Nm 7Nm
XCT V2 MLO 4Nm 4Nm 10Nm 10Nm 7Nm
XCT V2 4Nm 4Nm 10Nm 10Nm 7Nm
XCT V2 JR MLO 24“ 4Nm 4Nm 10Nm 10Nm 7Nm
XCT JR 24“ & XCT JR 20“ 4Nm 4Nm 10Nm 10Nm 7Nm
M2025 MLO 4Nm 4Nm 10Nm 10Nm 7Nm
M- Series 4Nm 4Nm 10Nm 10Nm 7Nm

SR SUNTOUR - OWNERS MANUAL RAIDON / XCR /XCM / XCT / M3000AL / M2025
English
4
SR SUNTOUR - OWNERS MANUAL RAIDON / XCR /XCM / XCT / M3000AL / M2025
Caution
WARNING !
Failure to comply with the given warnings and instructions may
cause damage to the product, injuries or even death to the rider.
ŹBe sure to read this manual carefully before using your suspension fork. Inappropriate
usage of your suspension fork may cause damage to the product, serious injuries or
even death to the rider.
ŹSuspension forks contain uids and gases under extreme pressure, warnings included
in this manual must be followed in order to reduce the possibility of injuries or possible
death. Never try to open any SR SUNTOUR cartridge, as stated above they contain uids
and gases under high pressure. Opening any SR SUNTOUR cartrigde implies the risk of
getting seriously injured.
ŹOnly use genuine SR SUNTOUR parts. The use of aftermarket replacement and spare
parts voids the warranty of your fork and might cause failure to the fork. This could
result into an accident, injury or even death.
Ź SR Suntour suspension forks are designed for the usage by a single rider.
Ź This instruction sheet contains important information about the correct installation,
service and maintenance of your suspension fork. Nevertheless please be informed
that special knowledge and tools are essential to install, service and maintain SR
SUNTOUR forks. Common mechanical knowledge may not be sucient to repair,
service or maintain a suspension fork. Therefore we strongly recommend getting your
fork installed, serviced and/or maintained by a trained and qualied bicycle mechanic.
Improper installation, service or maintenance can result in failure of the product,
accident, injury or even death.
ŹAlways be equipped with proper safety gear. This includes a properly tted and fastened
helmet. According to your riding style you should use additional safety protection.
Make sure your equipment is in awless condition.
Ź Make sure to select the correct fork according to your frame’s built in height and your
personal riding style. Installing a fork which does not match the geometry of your frame
could result into a failure of the fork itself and will void the forks warranty. Installing a
suspension fork will change the geometry and handling of your bike. Learn how to ride
and train your skills. Know your limits and never ride beyond those.
Ź When using a bike carrier please always fully release the quick release fastener. Not
properly unfastened quick releases may result into bending, breaking or other structural
damage while removing your bike of the bike carrier. If your bike fell othe carrier
please do not ride it, until it has been inspected by a qualied bike mechanic. When
using a bike carrier which just secures the bike by clamping the forks dropouts, make
sure to fasten your rear wheel as well. A not accurate fastened rear wheel could allow
the bike to jiggle which might result into a breakage of the dropouts.
ŹPlease note that SR SUNTOUR suspension forks do not come with the proper reectors
for on road riding. If you intend to ride on public roads or bicycle lanes your dealer
should mount the required reectors to your fork.
Ź Study all other owner’s manuals provided with your bike and make yourself familiar
with the components mounted to your bike.
IMPORTANT SAFETY INFORMATION
SR SUNTOUR - OWNERS MANUAL RAIDON / XCR /XCM / XCT / M3000AL / M2025 SR SUNTOUR - OWNERS MANUAL RAIDON / XCR /XCM / XCT / M3000AL / M2025
English
5
Caution
BEFORE EACH RIDE!
ŹDo you notice any cracks, dents, bent or tar-
nished parts at your suspension fork or any
other part of your bicycle? If so, please con-
sult a trained and qualied bicycle mechanic
to check your fork or bike.
ŹCan you notice any oil leaking out your fork?
Also check out hidden areas like the bottom
side of your fork crown. If so, please consult
a trained and qualied bicycle mechanic to
check your fork or bike.
ŹCompress your fork with your body weight. If
it feels too soft, relating to the proper pressu-
re to achieve an accurate SAG, inate it until
you have reached the required value. Please
also refer to chapter “ SETTING SAG”
ŹMake sure your brakes are properly installed/
adjusted and work appropriate. This also
applies to every other part of your bike like
handlebars, pedals, crank arms, seat post,
saddle etc. Also refer to the owner‘s manuals
provided by all other component manufac-
turers.
ŹMake sure your wheels are centered perfect-
ly in order to avoid any contact with your
suspension fork or brake system.
ŹIf you are using a quick release system to fas-
ten your wheel set, make sure that all levers
and nuts are adjusted properly. In case you
are using a through axle system, make sure
that all xing bolts are tightened with the
appropriate torque values.
ŹCheck the cable length and routing of your
components. Make sure they do not interfe-
re your steering actions.
ŹIf you are using reectors for on-road cyc-
ling, make sure they are clean and properly
installed.
ŹBounce your bike slightly on the ground
while looking and listening for anything
which might be loose.
FORK INSTALLATION
WARNING!
SR SUNTOUR strongly recommends that your fork is being installed by a trained and qualied
bicycle mechanic. Special knowledge and tools are essential to install SR SUNTOUR forks.
Common mechanical knowledge may not be sucient to install a SR SUNTOUR suspension
fork. If you intend to install the fork by yourself, the whole job has to be inspected by a
trained and qualied bicycle mechanic. Please note, that improperly installed forks are
extremely dangerous and can cause damage to the product, serious injuries or even death.
Note! All xing bolts have to be tightened with the proper fasting torque stated by the
manufacturers
Remove the existing fork from your bicycle. Afterwards remove the crown race from the1.
fork.
Measure the length of your old fork’s steerer tube against the length of the SR SUNTOUR2.
fork steerer. SR SUNTOUR suspension forks are delivered with a standard steerer tube
length of 255mm. Therefore the steerer tube may need cutting to the proper length.
INSTALLATION INSTRUCTIONS
Do not ride your bike, if one of the following test criteria can’t be passed!
Riding your bike without eliminating any defect or carrying out the neces-
sary adjustments can result into an accident, fatal injury or even death.
SR SUNTOUR - OWNERS MANUAL RAIDON / XCR /XCM / XCT / M3000AL / M2025
English
6
SR SUNTOUR - OWNERS MANUAL RAIDON / XCR /XCM / XCT / M3000AL / M2025
FORK INSTALLATION
3. In order to dene the proper length of your steerer tube you can apply the
following formula:
Frame‘s head tube+Head sets stack height+Spacers+Stem‘s clamp height-3mm clearance
Install the headset crown race (30mm for 1 1/8”) rmly against the top of your fork4.
crown. Install the fork unit (headset,spacers,stem) back on the bike. Adjust the headset
until you do not feel play anymore. Also refer to the headset’s manufacturer installation
instructions.
Install the brakes according to the manufacturer’s instructions. Make sure to adjust the5.
brake pads properly. If you use a disc brake, only mount your brake to the original disc
brake mounting holes. Only use cantilever brakes which are intended to be used with
a hangerless brace. Check the installation instructions of your brake manufacturer and
follow them. Make sure you choose the correct length of the brake cable in order to not
interfere the performance of the fork.
Re-install the wheel back on to your bike. If you are using a6. quick release system to
fasten your wheel set, make sure that all fasteners and nuts are adjusted properly (four
or more threads have to be engaged in the nut when it is closed) In case your fork comes
with a through axle system, make sure that all xing bolts are tightened with the
appropriate torque values. Please also refer to the Qloc section of this manual.
Warning!
If your SR SUNTOUR fork does come with a threadless steerer tube, do not add a
thread to it. SR SUNTOUR’S fork steeres are a one time press t which can not be
removed. Do not try to replace the steerer tube by a steerer tube with a threaded
steerer. This will void the warranty of your fork and result into a failure of the
product or could cause fatal injuries or even death to the rider.
Your SR SUNTOUR suspension fork is designed to be used with 26” tires. Each tire has a
dierent outer diameter (tire width and height).Therefore the clearance between your tire
and fork needs to be checked, to make sure your tire does not get in contact with any
part of your fork. Keep in mind that the narrowest part of your fork is located at the brake
bosses. If you want to remove your wheel, you might have to deate your tire, in order to
be able to pass it through your brake bosses.
Tire Clearance Test:
Note! Using a tire which exceeds the maximum tire size suitable to your fork is very
dangerous and could cause an accident, fatal injuries or even death to the rider
Release all air of your fork1.
Compress your fork completely2.
Measure the distance between the top of your tire and the bottom of the crown.3.
Make sure the gap is not less than 10mm! Exceeding maximum tires size will cause
the tire to jam against the bottom of the crown when the fork is fully compressed.
Inate the fork again4.
Keep in mind that if you are using a mudguard the clearance is limited! Repeat the “Tire
Clearance Test” again to make sure the gap is big enough. Every time you are going to
change your tires you have to repeat the test again!
TIRE CLEARANCE !

SR SUNTOUR - OWNERS MANUAL RAIDON / XCR /XCM / XCT / M3000AL / M2025 SR SUNTOUR - OWNERS MANUAL RAIDON / XCR /XCM / XCT / M3000AL / M2025
English
7
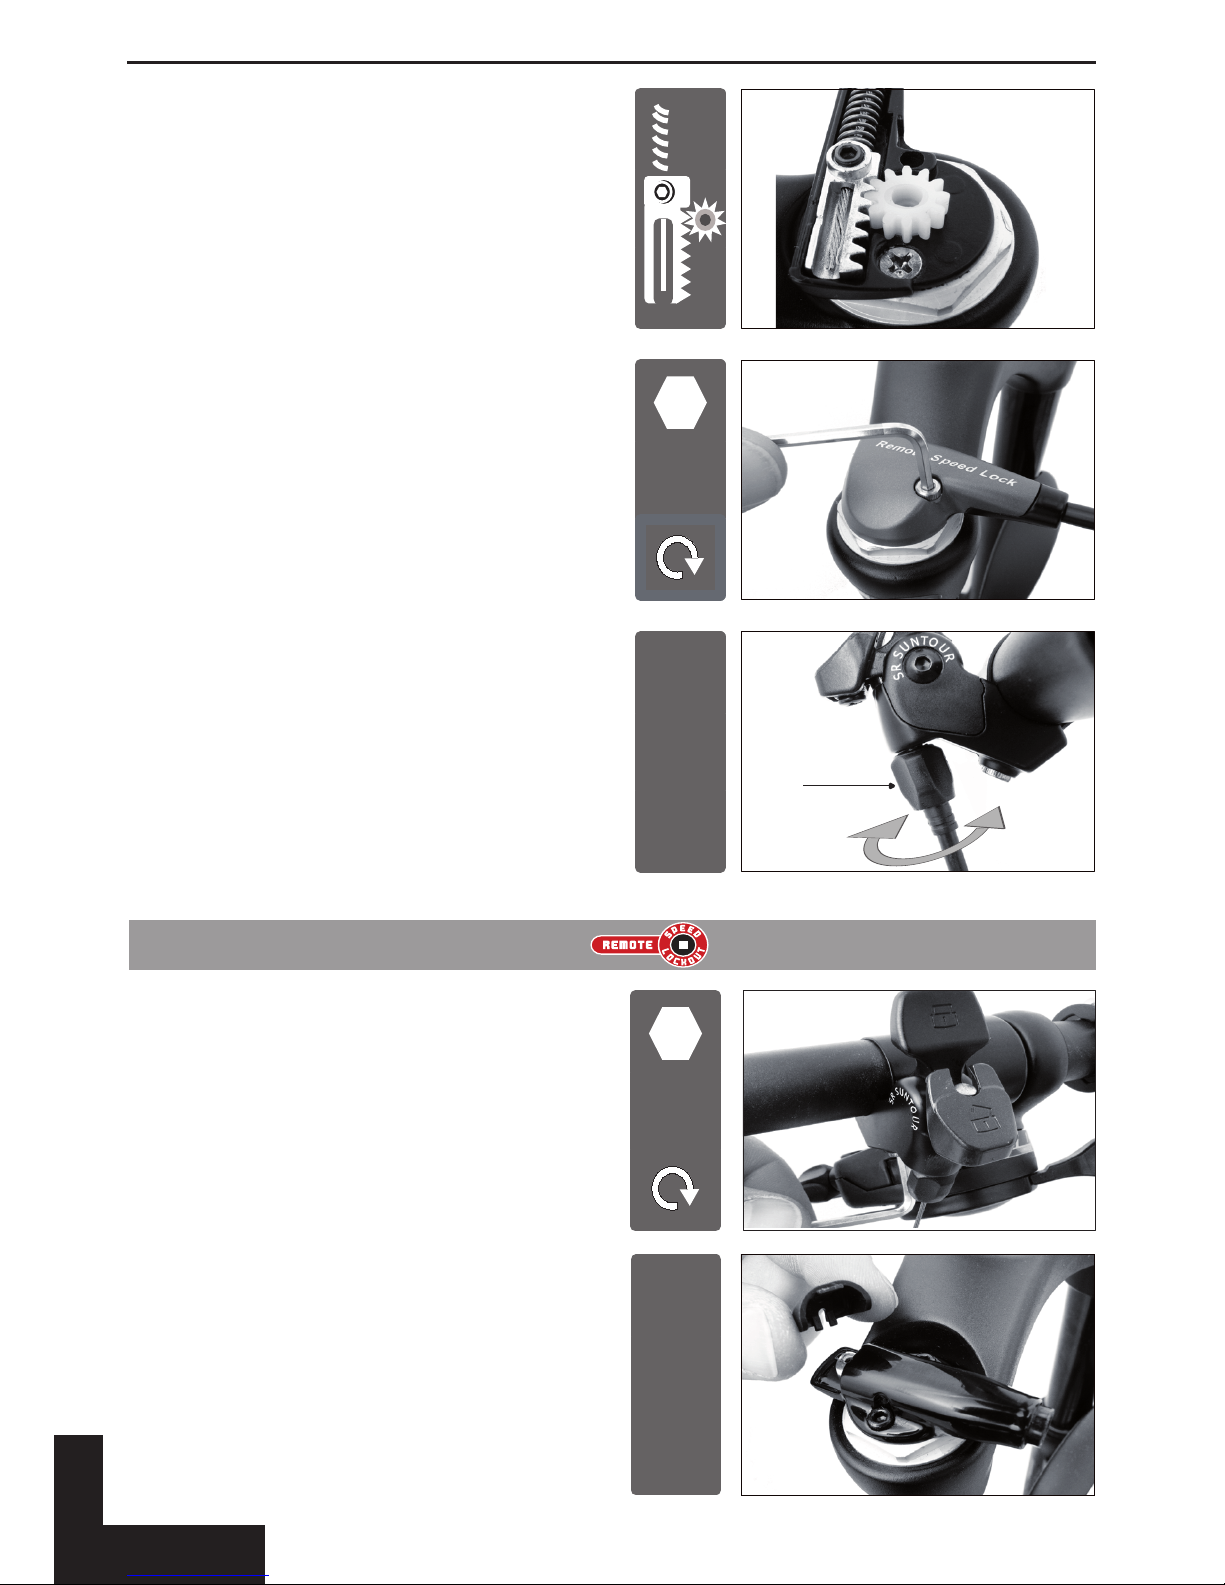
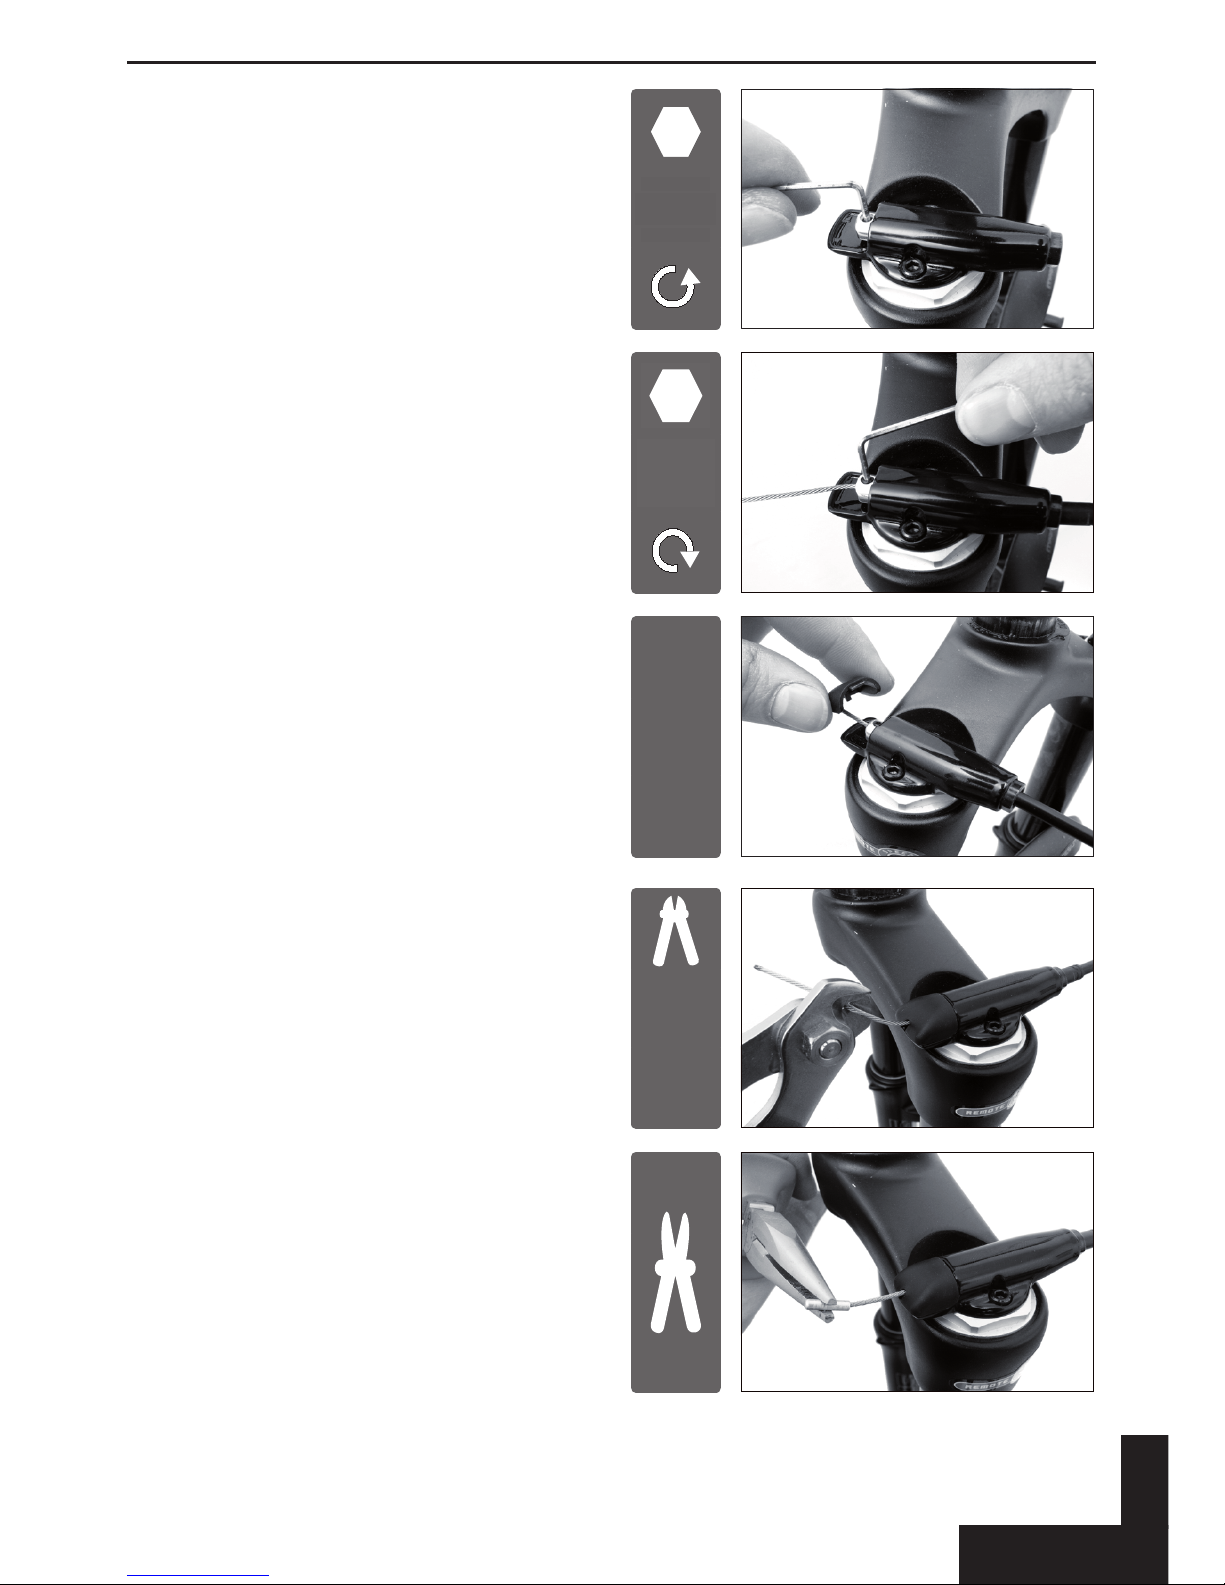
REMOTE LOCK LEVER INSTALLATION RAIDON RLD SERIES
Mount the „Remote-Lock-Lever“ on your
handlebar using a 3mm Allen key. After-
wards you can mount your brake and shif-
ting lever back on again.
3mm
1.5 Nm
Take othe plastic cover cap using a
2.5mm Allen key.
2.5mm
Unscrew the cable xing bolt using a 2mm
Allen key.
2.0mm
Thread the cable through the outer casing
stopper and through the cover unit hole.
Tension the cable slightly and tighten it
using a 2mm Allen key. 2mm
0.5 Nm
Cut the cable to a proper length to make
sure it will still t into the sliding carriage.
7mm
CUT
SR SUNTOUR - OWNERS MANUAL RAIDON / XCR /XCM / XCT / M3000AL / M2025
English
8
SR SUNTOUR - OWNERS MANUAL RAIDON / XCR /XCM / XCT / M3000AL / M2025
This pictures shows the remote lock unit
in the „OPEN“ position. The cable is cut
perfectly, still ts into the sliding carriage.
Reassemble the plastic cover cap using a
2.5mm Allen key. Tighten it slightly.
2.5mm
0.5 Nm
If the fork does not lock, the tension of the
cable is probably too low. In this case you
have to increase the tension of the cable
by turning the adjustment barrel counter-
clockwise. If the cable‘s tension is too high
and the fork does not unlock, you have to
turn the adjust barrel clockwise.
TURN
Adjustment
Barrel
REMOTE LOCK LEVER INSTALLATION RAIDON RL / XCR RL SERIES
Mount the „Remote-Lock-Lever“ on your
handlebar using a 3mm Allen key. After-
wards you can mount your brake and shif-
ting lever back on again.
3mm
1.5 Nm
Take othe plastic cover
TAKE OFF
SR SUNTOUR - OWNERS MANUAL RAIDON / XCR /XCM / XCT / M3000AL / M2025 SR SUNTOUR - OWNERS MANUAL RAIDON / XCR /XCM / XCT / M3000AL / M2025
English
9
Reinstall the plastic cover cap again..
CLIP ON
Thread the cable through the outer casing
stopper and through the cover unit hole.
Tension the cable slightly and tighten it
using a 1.5mm Allen key. 1.5mm
0.5 Nm
Unscrew the cable xing bolt using a
1.5mm Allen key
1.5mm
Install a cable end cap at the end of the
cut cable using a needle nose pliers.
Cut the cable to a proper length. Approxi-
mately 12mm is recommended.
12mm
CUT

SR SUNTOUR - OWNERS MANUAL RAIDON / XCR /XCM / XCT / M3000AL / M2025
English
10
SR SUNTOUR - OWNERS MANUAL RAIDON / XCR /XCM / XCT / M3000AL / M2025
In order to lock your fork you have to
push the „Remote-Lock-Lever“ towards
your handlebar. For unlocking you
have to press the blue release button.
RAIDON RLD / RAIDON RL SERIES
XCR RL SERIES
LOCK-OUT SYSTEMS
The „Lock-Out“ function of SR SUNTOUR forks is intended to reduce teetering during rides out of
saddle or uphill riding. The forks will not be locked 100%. A few millimeters of travel will remain,
according to our„Anti-Blow-O-System“. This system will protect you in case you have forgotten to
unlock the fork while riding in rough terrain.
Nevertheless, you should never set your fork to the„Lock-Out-Mode“ while riding
in rough terrain, going down hill or jumping. This implies the risk that the fork will
get damaged when it‘s being compressed under high load. This could also result
into an accident, injuries or even death of the rider.
Adjustment
Barrel
If the fork does not lock, the tension of the
cable is probably too low. In this case you
have to increase the tension of the cable
by turning the adjustment barrel counter-
clockwise. If the cable‘s tension is too high
and the fork does not unlock, you have to
turn the adjust barrel clockwise.
TURN
Adjustment
Barrel
Never Lock your fork while it‘s being compressed. This is a missuse of your fork and
implies the risk that it‘s getting damaged. Moreover this could result into an acci-
dent, injuries or even death.
In order to unlock your fork you
have to turn the „Speed Lock
Out“ knob 90° counter-clockwise. 90°
RAIDON LO / LOD SERIES
XCR LO SERIES
XCM V2 HLO SERIES

SR SUNTOUR - OWNERS MANUAL RAIDON / XCR /XCM / XCT / M3000AL / M2025 SR SUNTOUR - OWNERS MANUAL RAIDON / XCR /XCM / XCT / M3000AL / M2025
English
11
In order to lock your fork you have to
turn the lock out lever clockwise. Lo-
cking or unlocking your fork while ri-
ding is not posssible.
XCT V2 MLO SERIES
M2025 MLO SERIES
REBOUND DAMPING ADJUST
The rebound function of SR SUNTOUR hydraulic suspension forks allows you to tune your fork ac-
cording to your personal preferences and the terrain you are riding on. This function enables you
to control the speed of your fork‘s rebound after it‘s being compressed.
If you are going to ride on a terrain with a lot of small and fast bumps, we recommend to increase
your forks rebound speed. Otherwise it implies the risk that your front wheel loses its contact to
the ground. If you are going to ride on a terrain with a lot of big and slow bumps, we recommend
to decrease your forks rebound speed.
In order to increase the rebound speed
of your fork you have to turn the adjus-
ter knob counter clock-wise. To decrease
the speed you have to turn it clockwise.
RAIDON RLD SERIES
RAIDON LOD SERIES
TURN
Adjuster
Knob
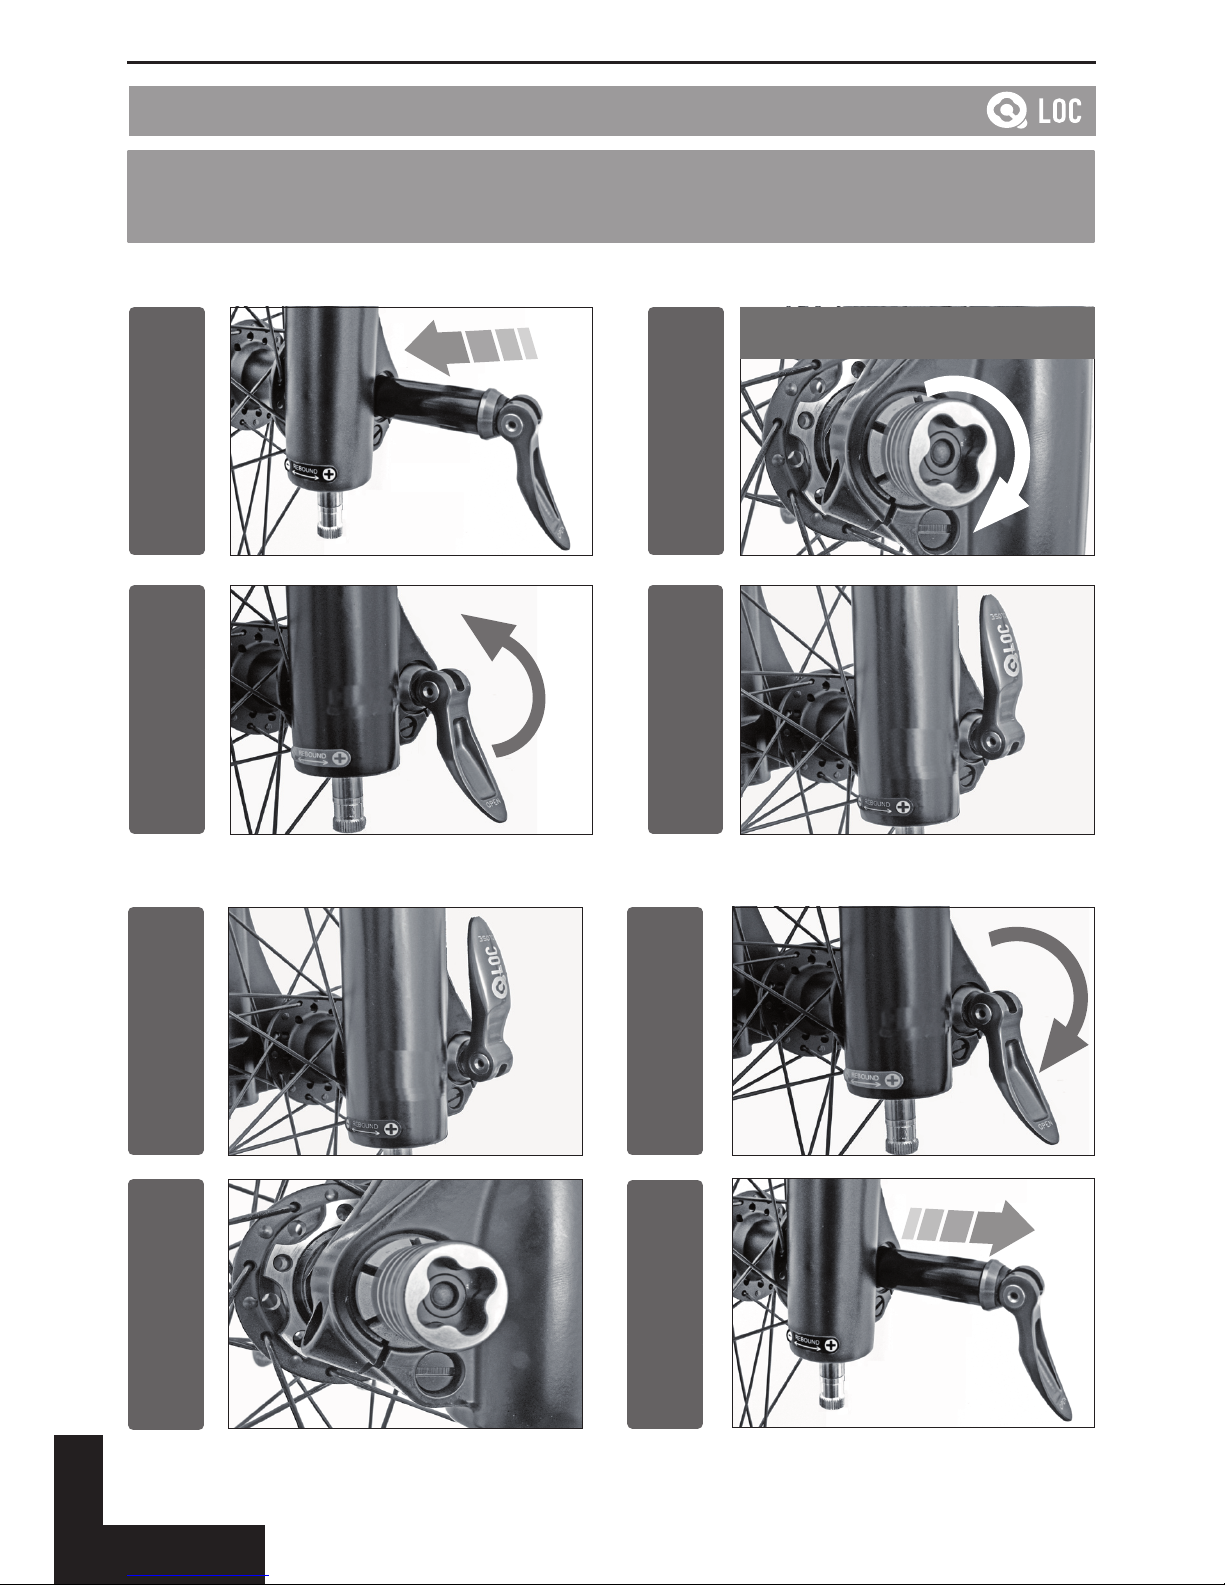
Qloc hub requirements
According to function of our Qloc system there are some requirements hub‘s have to fulll to
make this system work smoothly. Please nd the explanation down below:
Non-Recommend Shape
Limited Function
Edges within the hub can
cause the axle to get stuck
Recommend Shape
Full Function
No Edges
SR SUNTOUR - OWNERS MANUAL RAIDON / XCR /XCM / XCT / M3000AL / M2025
English
12
SR SUNTOUR - OWNERS MANUAL RAIDON / XCR /XCM / XCT / M3000AL / M2025
QLOCK SYSTEM 15mm
ALL RAIDON 15QLC MODELS
ALL XCR 15QLC MODELS
1. SLIDE IN
3. CLOSE
4. CLOSED
2. ADJUST
C
L
O
S
E
CLICK!
Adjust until nding the proper tighte-
ning torque for closing the QR lever.
4. PULL OUT
3. PRESS + PUSH
1. CLOSED
2. OPEN
O
P
E
N
P
R
E
S
S
P
R
E
S
S
P
R
E
S
S
P
R
E
S
S
SR SUNTOUR - OWNERS MANUAL RAIDON / XCR /XCM / XCT / M3000AL / M2025 SR SUNTOUR - OWNERS MANUAL RAIDON / XCR /XCM / XCT / M3000AL / M2025
English
13
SR SUNTOUR forks are designed to be nearly maintenance free. However, as long as moving parts
are exposed to moisture and contamination, the performance of your fork might be reduced after
several rides. To maintain a high performance, safety and a long life of your fork, a periodic main-
tenance is required.
Please keep in mind that a fork which has not been serviced in accordance with
the maintenance instructions will loose its warranty!
Never use a pressure washer or any water under pressure to clean your fork as
water may enter the fork at the dust seal level.
We recommend that your fork is being serviced more fequently as indicated
below if you ride in extreme weather (winter time) and terrain conditions.
Any case you may feel that your forks performance has changed or handles die-
rently immediately call on your local dealer to inspect your fork.
FORK MAINTENANCE
SERVICE 1: Checking fork‘s functions / cleaning and greasing bushings / lubricate remote lock
cable and housing / checking torque values / checking air pressure / checking fork for
any scratches, dents, cracks, bent or tarnished parts and stress marks.
SERVICE 2: Service 1 + disassembling / cleaning whole fork / lubricating dust seals and oil wipers /
greasing remote lock and travel adjust top caps / sealing air valve top caps by greasing
it / checking for any air leakings / checking torque values / tuning according to rider‘s
personal preferences.
FORK MAINTENANCE
Maintenance Schedule after each ride every 25h every 50h every 100h
clean stanchion tubes and dust
seals
inspect upper tubes for
scratches
check main xing bolts for
proper torque (Nm)
check air pressure
oil dust seals with teon oil (e.g.
Brunox Fork Deo)
service 1 (at the dealer)
service 2 (at the dealer)

SR SUNTOUR - OWNERS MANUAL RAIDON / XCR /XCM / XCT / M3000AL / M2025
English
14
WEAR AND TEAR PARTS:
ʇDust Seals
ʇO-rings
ʇRubber Moving Parts
ʇStanchion Tubes
Please note that there is a limited warranty of 1 year on all SR SUNTOUR cartridges!
Please note that there is a limited warranty on sleeves and glide rings of 6 month!
The obligation of this “Limited Warranty” is restricted to repairs and replacements of the suspen-
sion fork or any parts of it in which there is a defect in materials or workman-ship within a period
of two years.
SR SUNTOUR makes no express or implied warranties of tness or merchatability of any kind, ex-
cept as set forth above. Under no circumstances will SR SUNTOUR be liable for incidental or con-
sequential damages.
Damages which are caused by the use of other manufacturer‘s replaceements parts or damages
which are caused by the use of parts that are not compatible or suitable to SR SUNTOUR suspensi-
on forks are not covered by this warranty.
This warranty does not apply to normal wear and tear.
LIMITED WARRANTY
SR SUNTOUR warrants its suspension forks to be free from defects in material and workmanship
under normal use for a period of two years from the date of original purchase. This warranty is
made by SR SUNTOUR Inc. with only the original purchaser and is not transferable to any third
party. Lodging a claim under this warranty must be made through the dealer where the bicycle
or SR SUNTOUR suspension fork was purchased. To prove the original purchase the original retail
invoice has to be provided.
LOCAL LAW:
This warranty gives you specic legal rights. According to the state (USA) or province (Canada)
or every other country you are living in, you may have other rights than explained within these
warranty regulations. These regulations shall be insofar adapted to the local law to be consistent
with such law.
LIMITATION OF WARRANTY
This limited warranty does not apply to any defect of the suspension fork caused by: improper
installation, disassembling and re-assembling, intentional breakage, alterations or modication to
the fork, any unreasonable use or abuse of the product or any use for which this product was not
intended for, accidents, crashes, improper maintenance, repairs improperly performed.

SR SUNTOUR HEADQUATER
SR SUNTOUR INC.
#7 Hsing Yeh Rd
Fu Hsing Industrial Zone
Chang Hua
Twaiwan, R.O.C.
Tel.: +886 4 769115
Fax: +886 4 7694028
email: orders@srsuntour.com.tw
SR SUNTOUR EUROPE
SR SUNTOUR EUROPE GMB H
Am Marschallfeld 6a
83626 Valley
Germany
Tel.: +49 8024 473 99 0
Fax: +49 8024 4730984
email: service@srsuntour-cycling.com
SR SUNTOUR USA
SR SUNTOUR USA
503 Columbia Street,
Vancouver, WA 98660
USA
Tel.: +1 (360) 737 6450
Fay: +1 (360) 60 737 6452
email: service@usulcorp.com
www.srsuntour-cycling.com
www.srsuntour-tuning-base.com
August 2009
BICYCLE OWNER’S MANUAL

3
Bicycle Owner’s Manual
This manual meets EN Standards 14764, 14766 and 14781.
IMPORTANT:
This manual contains important safety, performance and service
LQIRUPDWLRQ5HDGLWEHIRUH\RXWDNHWKH¿UVWULGHRQ\RXUQHZELF\FOHDQG
keep it for reference.
$GGLWLRQDOVDIHW\SHUIRUPDQFHDQGVHUYLFHLQIRUPDWLRQIRUVSHFL¿F
components such as suspension or pedals on your bicycle, or for
accessories such as helmets or lights that you purchase, may also be
available. Make sure that your dealer has given you all the manufacturers’
OLWHUDWXUHWKDWZDVLQFOXGHGZLWK\RXUELF\FOHRUDFFHVVRULHV,QFDVHRID
FRQÀLFWEHWZHHQWKHLQVWUXFWLRQVLQWKLVPDQXDODQGLQIRUPDWLRQSURYLGHGE\
DFRPSRQHQWPDQXIDFWXUHUDOZD\VIROORZWKHFRPSRQHQWPDQXIDFWXUHU¶V
instructions.
,I\RXKDYHDQ\TXHVWLRQVRUGRQRWXQGHUVWDQGVRPHWKLQJWDNH
UHVSRQVLELOLW\IRU\RXUVDIHW\DQGFRQVXOWZLWK\RXUGHDOHURUWKHELF\FOH¶V
manufacturer.
NOTE:
This manual is not intended as a comprehensive use, service, repair or
maintenance manual. Please see your dealer for all service, repairs or
maintenance. Your dealer may also be able to refer you to classes,
clinics or books on bicycle use, service, repair or maintenance.
You may also purchase repair manuals at: www.bbinstitute.com
Note this manual is available online at: www.marinbikes.com/manuals
Please note that Marin customer service for USA/Canada purchasers is at:
www.marinbikes.com/customer_service
PRODUCT REGISTRATION:
,QRUGHUWRLPSURYHZDUUDQW\VHUYLFH\RXPXVWFRPSOHWHO\¿OORXWWKHRQOLQH
Bicycle Registration at time of purchase.
This can be found at: http://www.marinbikes.com/registration.
7RVHH0DULQ¶VFXUUHQWOLPLWHGZDUUDQW\DQGUHODWHGZDUUDQW\FODLPV
information please visit: http://www.marinbikes.com/warranty
2XWVLGHWKH86$DQG&DQDGDWKH:$55$17<5(*,675$7,21&$5'
included in the back of this 2ZQHUV0DQXDOPXVWEH¿OOHGRXWLPPHGLDWHO\
and returned to the Marin Bikes distributor in your country or at their
ZHEVLWHLIWKDWGLVWULEXWRURIIHUVZHEEDVHGZDUUDQW\UHJLVWUDWLRQ7KH
FRQWDFWLQIRUPDWLRQRIWKHGLVWULEXWRULQWKHFRXQWU\LQZKLFK\RXERXJKWWKH
bicycle is listed at: www.marinbikes.com/international_distributors
3OHDVHGRQRWDVVXPHWKDWWKH:DUUDQW\SROLFLHVVKRZQIRUWKH86$DQG
Canada apply in your country. Warranty policies vary depending upon the
0DULQ'LVWULEXWRULQWKHFRXQWU\RI\RXUSXUFKDVH3OHDVHFKHFNZLWK\RXU
0DULQ'HDOHURUWKH0DULQ'LVWULEXWRULQ\RXUFRXQWU\IRUWKHZDUUDQW\SROLF\
covering your purchase or check: www.marinbikes.com/warranty

4
5
CONGRATULATIONS!
<RX¶YHMXVWERXJKWRQHRIWKH¿QHVWELF\FOHVLQWKHZRUOGD0DULQ6LQFH
RXUEHJLQQLQJLQZH¶YHEHHQGHYHORSLQJDQGUH¿QLQJWKHTXDOLW\RI
RXUELF\FOHV:HKDYHEHHQDQLQGXVWU\OHDGHUZRUNLQJZLWKWRSQDPH
VXSSOLHUVWRLGHQWLI\WKHEHVWQHZPDWHULDOVDQGODWHVWGHYHORSPHQWVLQ
technology. All of these improvements are the result of several factors:
First: We race our top end bicycles on the toughest trails and roads in the
ZRUOGWKURXJKRXUQDWLRQDODQGLQWHUQDWLRQDOUDFHWHDPVLQ1RUWK$PHULFD
and Europe.
Second: :HULGHDQGUH¿QHWKHELF\FOHVRXUVHOYHV:HDUHELF\FOH
enthusiasts, and have been since our inception. We ride Marin bikes daily
to test and re-test our race-proven and time-tested frames. The result is a
FROOHFWLRQRIGXUDEOHOLJKWZHLJKWKLJKSHUIRUPDQFHELF\FOHVWKDWZH¶UHVXUH
\RXZLOOEHSURXGWRRZQDQGULGH
:HDUHH[WUHPHO\SURXGRIWKHSURGXFWVZHRIIHUDQGWKHVHUYLFHRIIHUHG
by our staff and our distributors. We have been recognized year after year,
DQGLQFRXQWULHVDURXQGWKHZRUOGIRURXUVXSHULRUIUDPHGHVLJQVDQG
XQLTXHSHUIRUPDQFHFKDUDFWHULVWLFV:HDUHFHUWDLQRXUKDUGZRUNZLOOEH
HYLGHQWHYHU\WLPH\RXJRIRUDULGH6RKHUH¶VZLVKLQJ\RXPDQ\\HDUVRI
HQMR\PHQW
Thanks for investing in a Marin,
Marin Bikes
Table of Contents
GENERAL WARNING..................................................................................6
A Special Note for Parents...........................................................................6
Chapter 1: First 7
A. Bike Fit......................................................................................................7
B. Safety First................................................................................................7
C. Mechanical Safety Check.........................................................................8
')LUVW5LGH...................................................................................................9
Chapter 2: Safety 10
A. The Basics.............................................................................................10
B. Riding Safety..........................................................................................10
C. Off Road Safety......................................................................................12
':HW:HDWKHU5LGLQJ
E. Night Riding...........................................................................................12
F. Extreme, Stunt or Competition Riding....................................................14
G. Changing Components or Adding Accessories.....................................15
Chapter 3: Fit 16
A. Standover Height....................................................................................16
B. Saddle Position.......................................................................................16
C. Handlebar Height and Angle...................................................................18
'&RQWURO3RVLWLRQ$GMXVWPHQWV
E. Brake Reach...........................................................................................19
Chapter 4: Tech 20
A. Wheels...................................................................................................20
)URQW:KHHO6HFRQGDU\5HWHQWLRQ'HYLFHV
:KHHOVZLWK&DP$FWLRQ6\VWHPV
5HPRYLQJDQG,QVWDOOLQJ:KHHOV
B. Seat Post Cam Action Clamp................................................................25
C. Brakes...................................................................................................26
'6KLIWLQJ *HDUV
E. Pedals...................................................................................................30
F. Bicycle Suspension...............................................................................31
G. Tires and Tubes.....................................................................................32
Chapter 5: Service 34
$ 6HUYLFH ,QWHUYDOV
% ,I <RXU %LF\FOH 6XVWDLQV DQ ,PSDFW
Appendix A: ,QWHQGHG8VH
Appendix B: Lifespan of Your Bike and its Components........................42
Appendix C: Coaster Brakes..................................................................48
Appendix D: )DVWHQHU7RUTXH6SHFL¿FDWLRQV

6
7
Chapter 1: First
NOTE: We strongly urge you to read this Manual in its entirety before your
¿UVWULGH$WWKHYHU\OHDVWUHDGDQGPDNHVXUHWKDW\RXXQGHUVWDQGHDFK
SRLQWLQWKLVVHFWLRQDQGUHIHUWRWKHFLWHGVHFWLRQVRQDQ\LVVXHZKLFK
you don’t completely understand. Please note that not all bicycles have all
of the features described in this Manual. Ask your dealer to point out the
features of your bicycle.
A. Bike Fit
,V\RXUELNHWKHULJKWVL]H"7RFKHFNVHH6HFWLRQ$,I\RXUELF\FOHLV
WRRODUJHRUWRRVPDOOIRU\RX\RXPD\ORVHFRQWURODQGIDOO,I\RXUQHZ
bike is not the right size, ask your dealer to exchange it before you ride it.
,VWKHVDGGOHDWWKHULJKWKHLJKW"7RFKHFNVHH6HFWLRQ%,I\RXDGMXVW
\RXUVDGGOHKHLJKWIROORZWKH0LQLPXP,QVHUWLRQLQVWUXFWLRQVLQ6HFWLRQ
3.B.
$UHVDGGOHDQGVHDWSRVWVHFXUHO\FODPSHG" A correctly tightened saddle
ZLOODOORZQRVDGGOHPRYHPHQWLQDQ\GLUHFWLRQ6HH6HFWLRQ%
$UHWKHVWHPDQGKDQGOHEDUVDWWKHULJKWKHLJKWIRU\RX"
,IQRWVHH6HFWLRQ&
&DQ\RXFRPIRUWDEO\RSHUDWHWKHEUDNHV",IQRW\RXPD\EHDEOHWR
DGMXVWWKHLUDQJOHDQGUHDFK6HH6HFWLRQ'DQG(
'R\RXIXOO\XQGHUVWDQGKRZWRRSHUDWH\RXUQHZELF\FOH"
,IQRWEHIRUH\RXU¿UVWULGHKDYH\RXUGHDOHUH[SODLQDQ\IXQFWLRQVRU
IHDWXUHVZKLFK\RXGRQRWXQGHUVWDQG
B. Safety First
$OZD\VZHDUDQDSSURYHGKHOPHWZKHQULGLQJ\RXUELNHDQGIROORZWKH
KHOPHWPDQXIDFWXUHU¶VLQVWUXFWLRQVIRU¿WXVHDQGFDUH
'R\RXKDYHDOOWKHRWKHUUHTXLUHGDQGUHFRPPHQGHGVDIHW\HTXLSPHQW"
6HH6HFWLRQ,W¶V\RXUUHVSRQVLELOLW\WRIDPLOLDUL]H\RXUVHOIZLWKWKHODZVRI
WKHDUHDVZKHUH\RXULGHDQGWRFRPSO\ZLWKDOODSSOLFDEOHODZV
'R\RXNQRZKRZWRFRUUHFWO\VHFXUH\RXUIURQWDQGUHDUZKHHOV" Check
6HFWLRQ$WRPDNHVXUH5LGLQJZLWKDQLPSURSHUO\VHFXUHGZKHHO
FDQFDXVHWKHZKHHOWRZREEOHRUGLVHQJDJHIURPWKHELF\FOHDQGFDXVH
serious injury or death.
,I\RXUELNHKDVWRHFOLSVDQGVWUDSVRUFOLSOHVV³VWHSLQ´SHGDOV, make
VXUH\RXNQRZKRZWKH\ZRUNVHH6HFWLRQ(7KHVHSHGDOVUHTXLUH
VSHFLDOWHFKQLTXHVDQGVNLOOV)ROORZWKHSHGDOPDQXIDFWXUHU¶VLQVWUXFWLRQV
for use, adjustment and care.
'R\RXKDYH³WRHRYHUODS´" On smaller framed bicycles your toe or
WRHFOLSPD\EHDEOHWRFRQWDFWWKHIURQWZKHHOZKHQDSHGDOLVDOOWKHZD\
IRUZDUGDQGWKHZKHHOLVWXUQHG5HDG6HFWLRQ(WRFKHFNZKHWKHU\RX
have toeclip overlap.
'RHV\RXUELNHKDYHVXVSHQVLRQ",IVRFKHFN6HFWLRQ)6XVSHQVLRQ
FDQFKDQJHWKHZD\DELF\FOHSHUIRUPV)ROORZWKHVXVSHQVLRQ
manufacturer’s instructions for use, adjustment and care.
GENERAL WARNING:
Like any sport, bicycling involves risk of injury and damage. By choosing
to ride a bicycle, you assume the responsibility for that risk, so you need to
NQRZ²DQGWRSUDFWLFH²WKHUXOHVRIVDIHDQGUHVSRQVLEOHULGLQJDQGRI
proper use and maintenance. Proper use and maintenance of your bicycle
reduces risk of injury.
7KLV0DQXDOFRQWDLQVPDQ\³:DUQLQJV´DQG³&DXWLRQV´FRQFHUQLQJWKH
FRQVHTXHQFHVRIIDLOXUHWRPDLQWDLQRULQVSHFW\RXUELF\FOHDQGRIIDLOXUHWR
IROORZVDIHF\FOLQJSUDFWLFHV
7KHFRPELQDWLRQRIWKHVDIHW\DOHUWV\PERODQGWKHZRUGWARNING
LQGLFDWHVDSRWHQWLDOO\KD]DUGRXVVLWXDWLRQZKLFKLIQRWDYRLGHGFRXOG
result in serious injury or death.
7KHFRPELQDWLRQRIWKHVDIHW\DOHUWV\PERODQGWKHZRUGCAUTION
LQGLFDWHVDSRWHQWLDOO\KD]DUGRXVVLWXDWLRQZKLFKLIQRWDYRLGHGPD\UHVXOW
in minor or moderate injury, or is an alert against unsafe practices.
7KHZRUGCAUTIONXVHGZLWKRXWWKHVDIHW\DOHUWV\PEROLQGLFDWHVD
VLWXDWLRQZKLFKLIQRWDYRLGHGFRXOGUHVXOWLQVHULRXVGDPDJHWRWKHELF\FOH
RUWKHYRLGLQJRI\RXUZDUUDQW\
0DQ\RIWKH:DUQLQJVDQG&DXWLRQVVD\³\RXPD\ORVHFRQWURODQGIDOO´
%HFDXVHDQ\IDOOFDQUHVXOWLQVHULRXVLQMXU\RUHYHQGHDWKZHGRQRW
DOZD\VUHSHDWWKHZDUQLQJRISRVVLEOHLQMXU\RUGHDWK
%HFDXVHLWLVLPSRVVLEOHWRDQWLFLSDWHHYHU\VLWXDWLRQRUFRQGLWLRQZKLFKFDQ
RFFXUZKLOHULGLQJWKLV0DQXDOPDNHVQRUHSUHVHQWDWLRQDERXWWKHVDIHXVH
RIWKHELF\FOHXQGHUDOOFRQGLWLRQV7KHUHDUHULVNVDVVRFLDWHGZLWKWKHXVH
RIDQ\ELF\FOHZKLFKFDQQRWEHSUHGLFWHGRUDYRLGHGDQGZKLFKDUHWKH
sole responsibility of the rider.
A Special Note for Parents:
As a parent or guardian, you are responsible for the activities and safety of
your minor child, and that includes making sure that the bicycle is properly
¿WWHGWRWKHFKLOGWKDWLWLVLQJRRGUHSDLUDQGVDIHRSHUDWLQJFRQGLWLRQWKDW
you and your child have learned and understand the safe operation of the
ELF\FOHDQGWKDW\RXDQG\RXUFKLOGKDYHOHDUQHGXQGHUVWDQGDQGREH\QRW
RQO\WKHDSSOLFDEOHORFDOPRWRUYHKLFOHELF\FOHDQGWUDI¿FODZVEXWDOVRWKH
common sense rules of safe and responsible bicycling. As a parent, you
VKRXOGUHDGWKLVPDQXDODVZHOODVUHYLHZLWVZDUQLQJVDQGWKHELF\FOH¶V
IXQFWLRQVDQGRSHUDWLQJSURFHGXUHVZLWK\RXUFKLOGEHIRUHOHWWLQJ\RXUFKLOG
ride the bicycle.
WARNING: Make sure that your child always wears an approved
bicycle helmet when riding; but also make sure that your child
understands that a bicycle helmet is for bicycling only, and must be
removed when not riding. A helmet must not be worn while playing, in
play areas, on playground equipment, while climbing trees, or at any
time while not riding a bicycle. Failure to follow this warning could
result in serious injury or death.
This manual suits for next models
6
Table of contents
Other SR Suntour Bicycle Accessories manuals

SR Suntour
SR Suntour NRX Series User manual

SR Suntour
SR Suntour NCX NEX User manual

SR Suntour
SR Suntour SR Suntour User manual

SR Suntour
SR Suntour NCX 2019 User manual

SR Suntour
SR Suntour HESC User manual

SR Suntour
SR Suntour HESC User manual

SR Suntour
SR Suntour AURON User manual

SR Suntour
SR Suntour Epicon User manual

SR Suntour
SR Suntour COIL SPING Series User manual

SR Suntour
SR Suntour RUX RC2 DH User manual


