SR Suntour REAR SHOCK User manual

1
REAR SHOCK
OWNER’S MANUAL
Overview……………………………………………….……………………………………….………2-4
Important safety information…………………………..…………………………….…………5
Before every ride………………………………………………………………………….……………6
Rear shock installation…………………………….…………………………………..……...….7
Setting SAG and air pressure…………………………….…..…………………………………8
Setting SAG…………………………………………………………….…..……………………………9
Air pressure adjust………………….…..………………………………………………………….10
Air volume adjust……………………………………………………………………………….11-12
Rebound damping adjust………………………………………………………………….……13
3-step low-speed compression damping adjust……………………………………….14
2-step low-speed compression damping adjust……………………………………….15
Infinite low-speed compression damping adjust.…………………….………………16
Lock-out operation………………..………………………………………………………………17
Remote lock-out operation………………………………………………………………………18
Maintenance……….……………………..………………………….………………..……………19
ENGLISH
This instruction sheet contains important information about the correct installation,
service and maintenance of your rear shock. Nevertheless please be informed that
special knowledge and tools are essential to install, service and maintain SR
SUNTOUR shocks. Common mechanical knowledge may not be sufficient to repair,
service or maintain a rear shock. Therefore we strongly recommend getting your
rear shock installed, serviced and/or maintained by a trained and qualified bike
mechanic. Improper installation, service or maintenance can result in failure of the
product, accident, injury or even death.
WARNING !
We have language options for Chinese, Dutch, English, French,
German, Italian, Japanese and Spanish on our website. Please scan
the QR code here to navigate to:
www.srsuntour-cycling.com > Service > Download area > Consumer
Downloads > Bike > Owners manuals > General Rear Shock Manual

2
TRIAIR2
Built-in length
Lower
eyelet
Damper
body
Reservoir valve cap
Air canister (Internal)
Air sleeve (External) Rebound
adjust knob
Compression
adjust knob Air valve
Reservoir
Upper eyelet
TRIAIR Built-in length
Lower eyelet
Damper
body Reservoir
valve cap
Upper eyelet
Rebound
adjust knob
Compression
adjust knob
Air valve
Reservoir
Air canister (Internal)
Air sleeve (External)

3
EDGE
Lockout knob
Rebound adjust knob
Damper body
EDGE
Air canister
Built-in length
EDGE-comp
Built-in length
Lower
eyelet
Damper
body Air sleeve
Rebound adjust knob
Low speed compression
adjust knob
Air valve
Upper
eyelet
Air canister
Mounting hardware

4
RAIDON
Upper eyelet
Lockout knob
Air canister
Damper body
Lower eyelet

5
IMPORTANT SAFETY INFORMATION
ØRead this manual thoroughly before using your rear shock.
ØOur rear shocks contain fluids and gases under extreme pressure, so warnings in this manual
must be followed in order to avoid the possibility of injuries or possible death. Never try to
open any SR SUNTOUR rear shock ! Opening any SR SUNTOUR rear shock implies the risk of
getting seriously injured.
ØUse only genuine SR SUNTOUR parts. The use of third-party supplier spare parts voids the
warranty of your rear shock and might cause failure to it. This could result into an accident,
injury or even death.
ØSR SUNTOUR rear shocks are designed for the usage by a single rider.
WARNING !
Failure to follow all warnings and safety instructions can cause your product to
malfunction, resulting in an accident, severe personal injuries or even death to
the rider.
WARNING !
These instructions contain important information about the correct installation,
service and maintenance of your rear shock. Common mechanical knowledge
may not be sufficient. Your rear shock should only be installed, serviced and/or
maintained by a trained and qualified bicycle mechanic with specialized tools.
ØAlways be equipped with proper safety gear. This includes a properly fitted and fastened
helmet. According to your riding style you should use additional safety protection. Make sure
your equipment is in flawless condition.
ØSelect the correct rear shock according to your frame’s built in height and your personal riding
style. Installing a rear shock which does not match the geometry of your frame could result
into a failure of the rear shock itself and will void the shock’s warranty.
ØKnow the limits of your skill and experience, and never ride beyond them.
ØRead, understand and follow all owner’s manuals provided with your bike and all of its
components.
WARNING !
SR SUNTOUR recommends having the shock installed, maintained and/or
serviced by a trained and qualified bike mechanic.

6
ØInspect your bicycle and suspension system including the handlebars, pedals, crank arms, seat
post, saddle, etc. for any cracks, dents, bent or tarnished parts. Also search for any oil leaking
out of your shocks. Be sure to check hidden areas on the underside of your bike. If any
condition exists, consult a trained and qualified bicycle mechanic to determine the cause and
make any necessary correction.
ØCompress your rear shock with your body weight. If it feels too soft, relating to the proper
pressure to achieve an accurate SAG, inflate it until you have reached the required value.
Please also refer to the chapter “SETTING SAG”.
ØMake sure your brakes are properly installed/adjusted and work correctly.
ØIf you are using a quick release system to fasten your wheel set, make sure that all levers and
nuts are properly tightened. In case you are using a through axle system, make sure that all
fixing bolts are tightened with the appropriate torque values. Strictly follow the instructions
provided by the manufacturer of the quick release or through axle system.
ØCheck the cable length and routing of your components. Make sure they do not interfere with
your steering actions.
ØIf you are using reflectors for on-road riding, make sure they are clean and properly installed.
ØBounce your bike slightly on the ground while looking and listening for anything which might
be loose.
WARNING !
Avoid serious personal injury or even death. Do not ride the bicycle if any of the
following criteria is not met ! Correct any condition before you ride.
BEFORE EVERY RIDE

7
1. Make sure that the “eye-to-eye length”, stroke and mounting hardware are the same as of the
originally installed rear shock. The “eye-to-eye length” is the distance from the center of the
upper fixing bolt to the center of the lower fixing bolt. Please also refer to the drawing shown
on the page 2-3.
2. Remove the old shock off your bike. Clean the inside surface of the frame and swing arm,
removing any dirt and make sure that all surfaces are clean.
3. Make sure that the inner and the outer diameter, as well as the width of the aluminum
bushings are correct to fix the rear shock properly and without any play to the frame and swing
arm.
4. Check the movement of your new SR SUNTOUR rear shock by releasing all air and moving the
swing arm through its complete stroke. Make sure that there is sufficient clearance between
the rear shock and all other components. Also keep in mind to check the clearance between
your rear shock and a lowered seat post. Make sure the shock does not hit against the seat
post in any position.
5. Tighten the screws in accordance with the bicycle’s or frame’s manufacturers specifications.
To replace your old rear shock and upgrade your bike with a SR SUNTOUR rear shock you have
to follow the hereafter mentioned steps. Please note that we strongly recommend your new SR
SUNTOUR rear shock to be installed by a qualified and trained bike mechanic.
WARNING !
If a longer than the original shock length is installed, the geometry of your bike
will change. This can lead to steering problems and a higher bottom bracket
which disables you to place your feet on the ground. If you are going to install a
shock which is shorter than the originally installed one, it will have the same, but inverted
negative effects. All this can result into a loss of control and serious injuries or even death.
WARNING !
Insufficient clearance between the shock, seat post, swingarm and frame can
result into a loss of control of your bike, serious injuries or even death.
REAR SHOCK INSTALLATION

8
SETTING SAG AND AIR PRESSURE
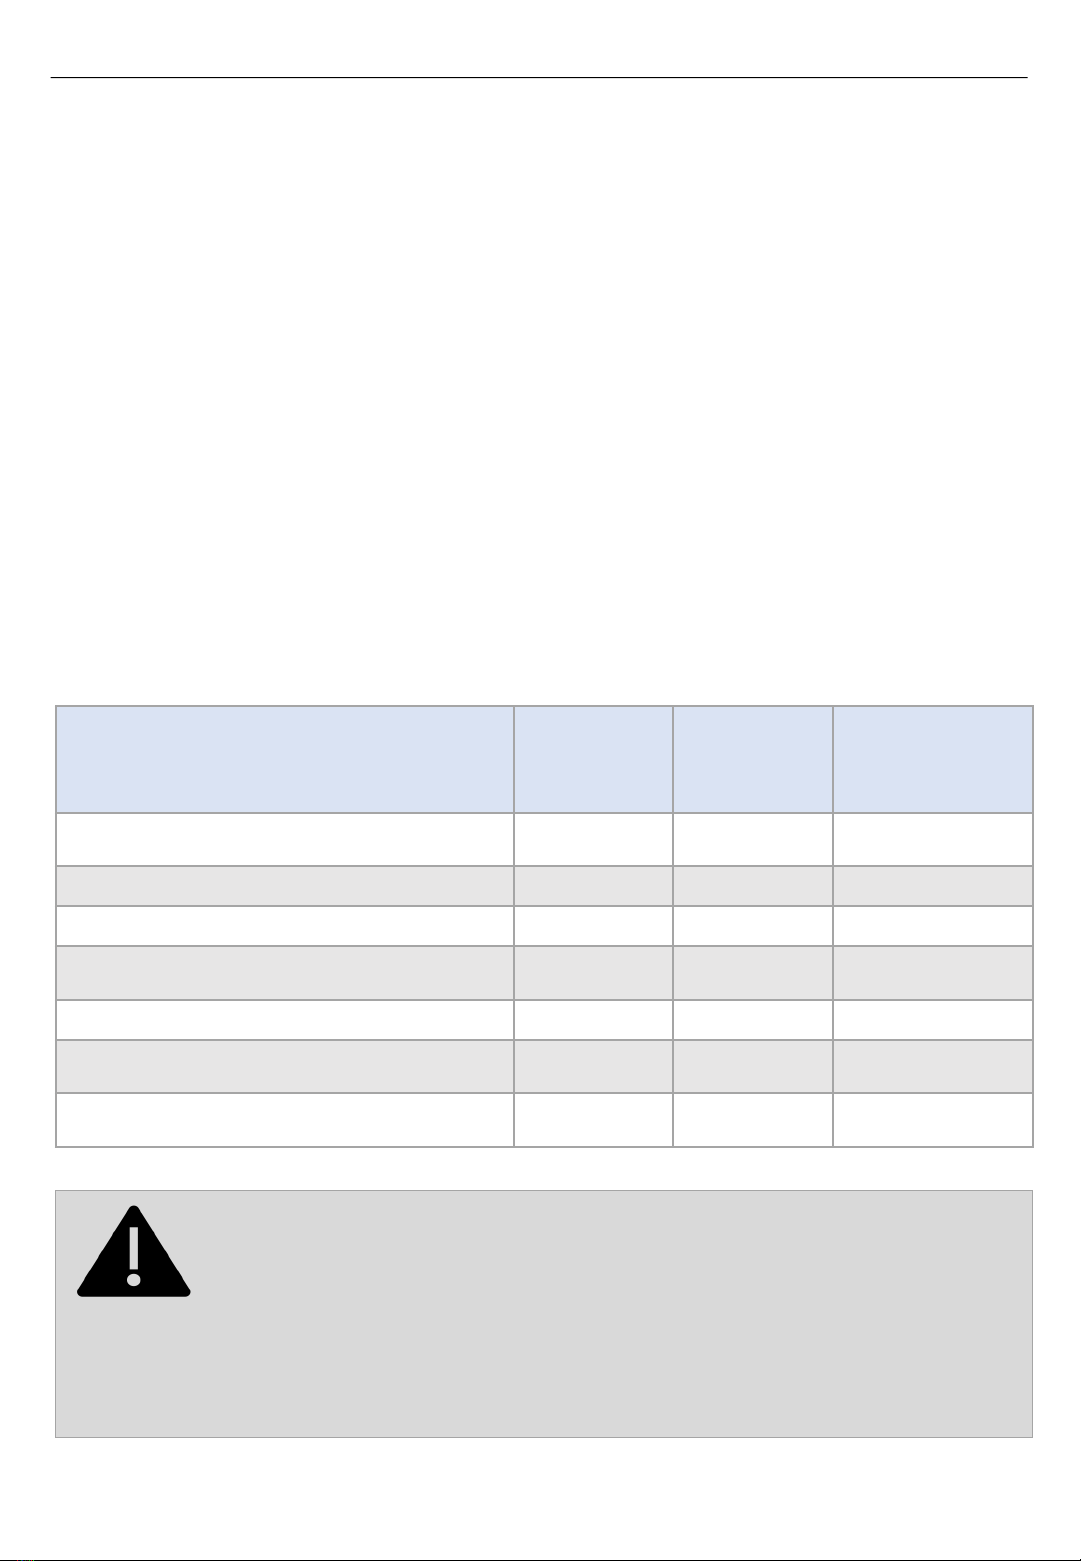
Shock travel SAG (%) SAG (mm)
75mm
25 -35%
18.75 –26.25mm
70mm 17.50 -24.50mm
65mm 16.25 -22.75mm
60mm 15.00 -21.00mm
55mm 25 -30% 13.75 –16.50mm
50mm
20 -25%
10.00 -12.50mm
45mm 9.00 -11.25mm
40mm 8.00 -10.00mm
35mm 7.00 –8.75mm
30mm 6.00 -7.50mm
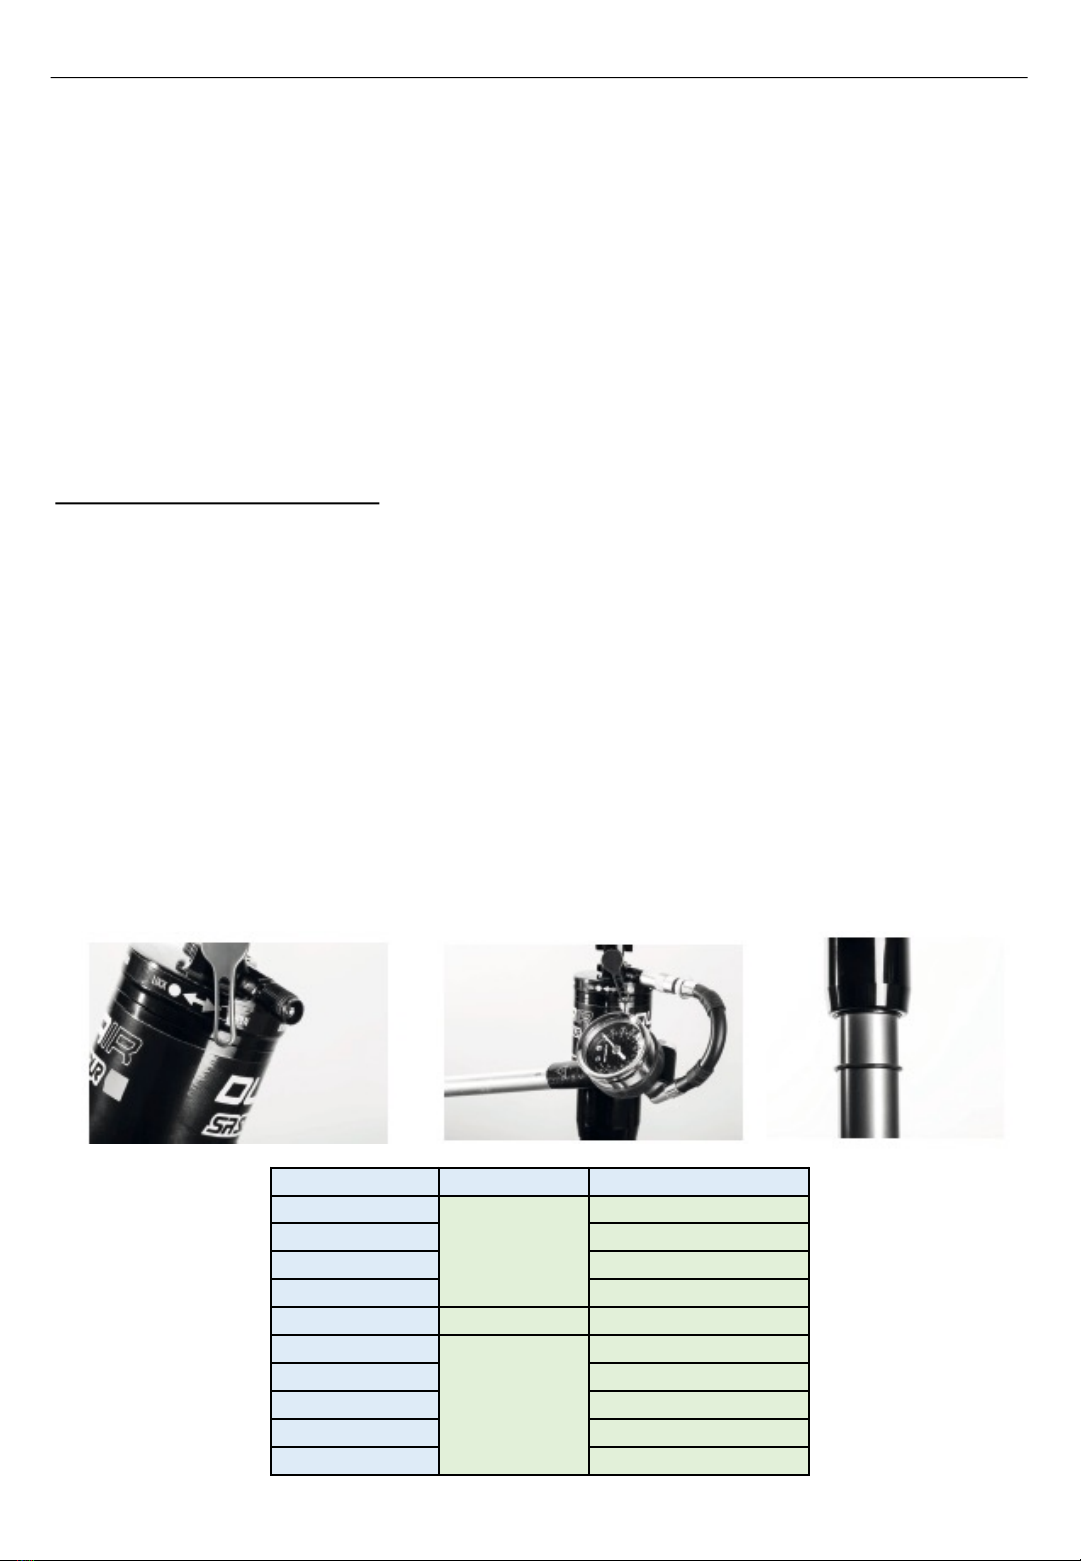
To achieve the best performance from your SR SUNTOUR air spring rear shocks, adjust the air pressure to
attain your proper sag setting. Sag is the amount your shock compresses under your weight and riding
gear and luggage. Sag range should be set of total shock travel. Make sure to set sag with the
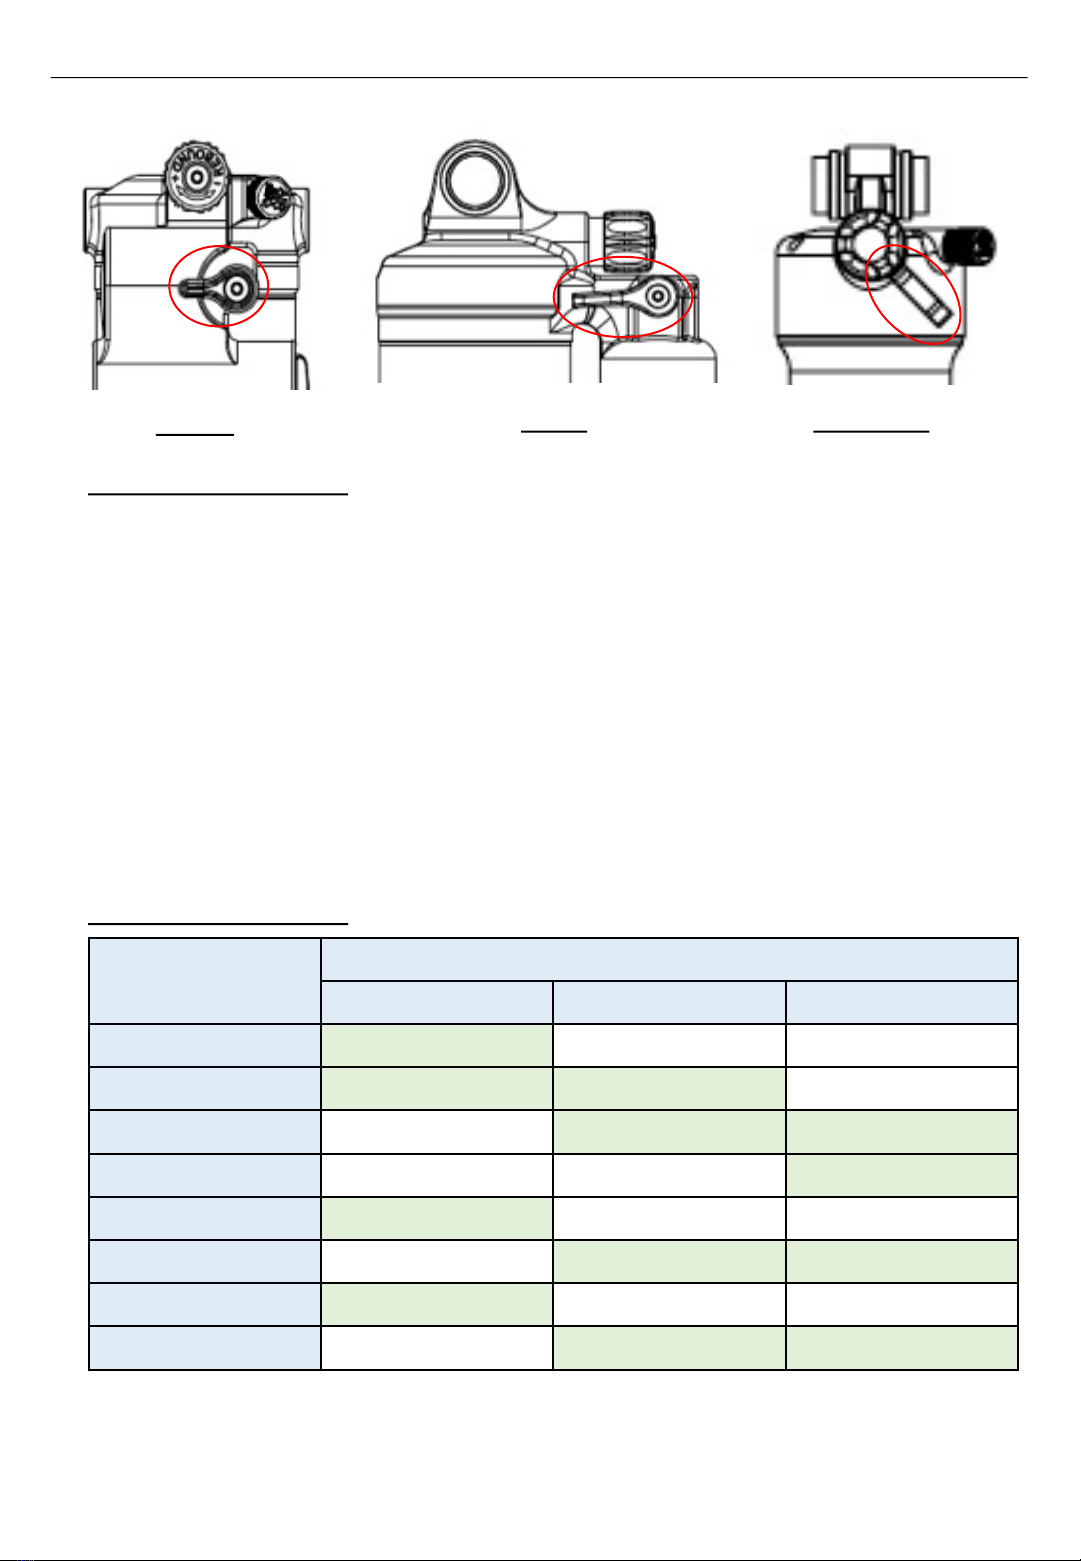
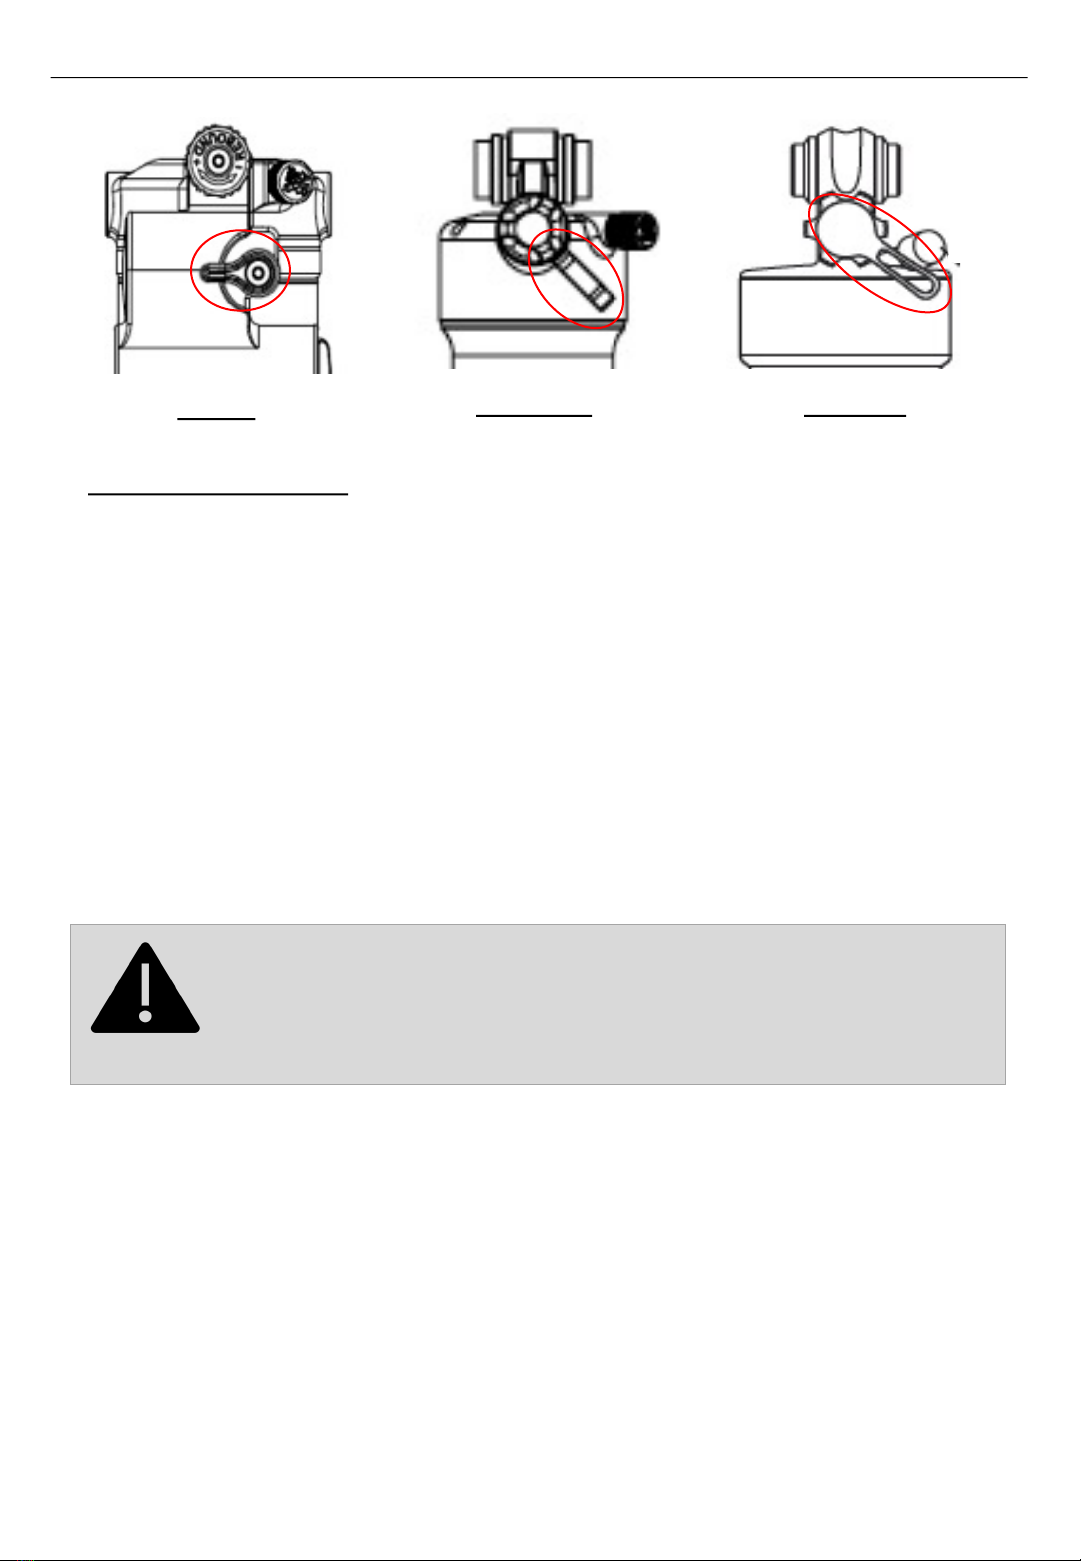
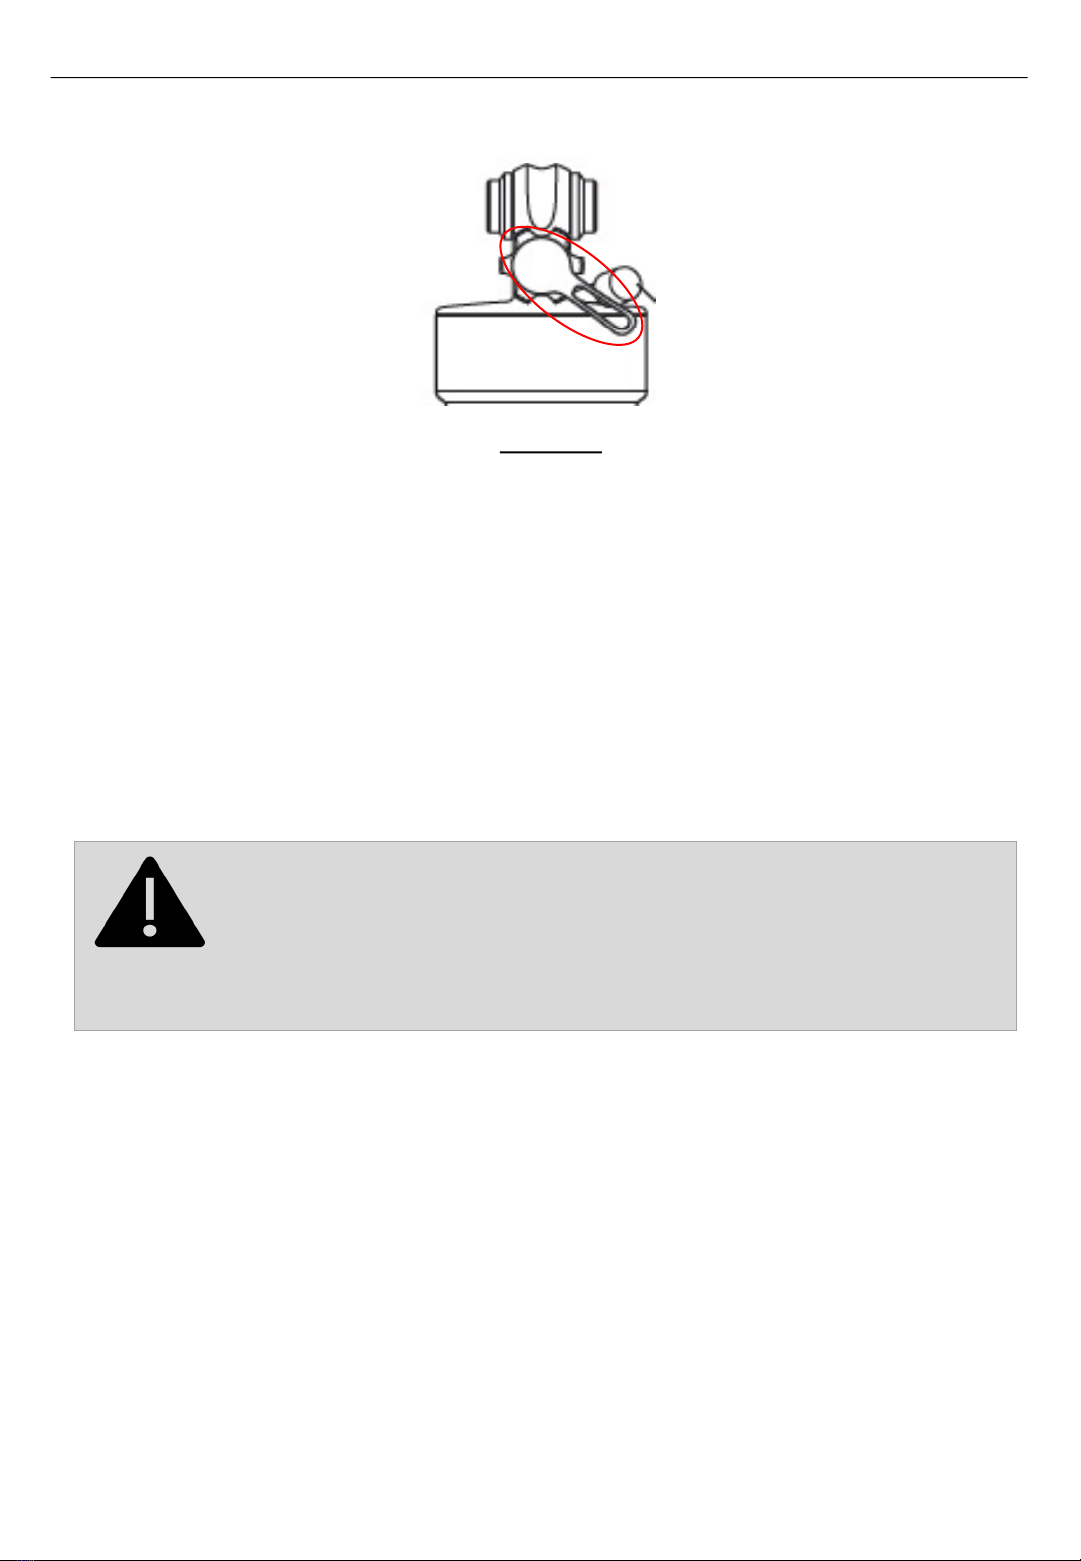
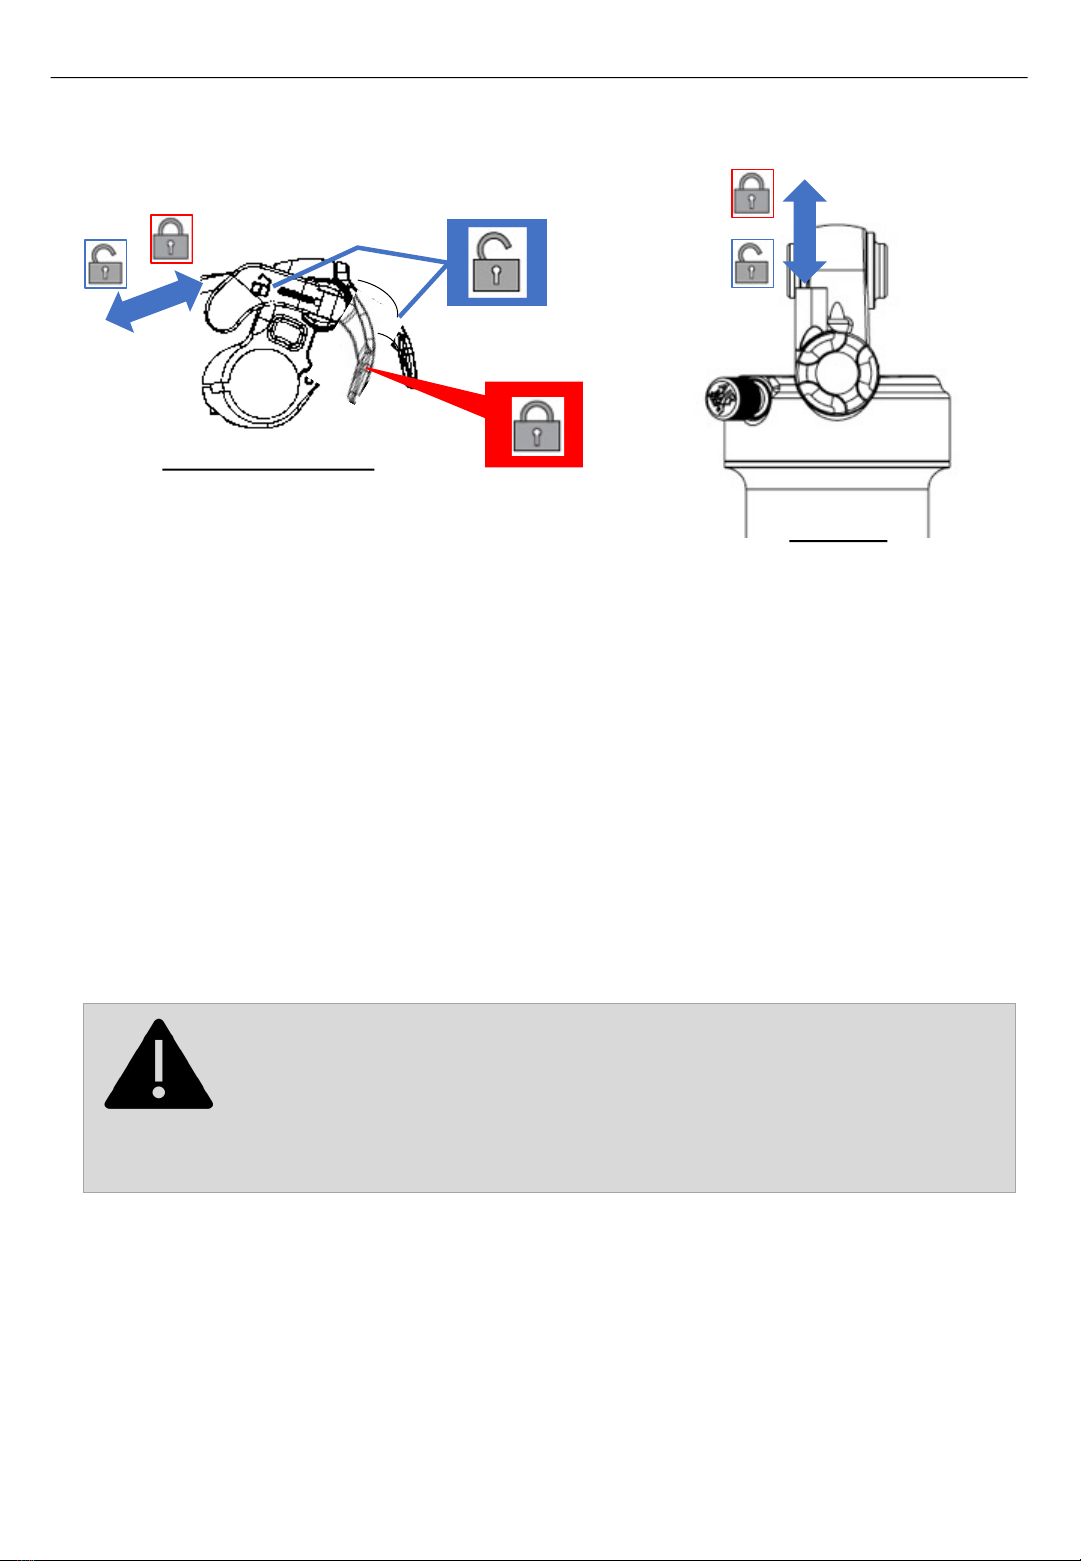
compression knob in the OPEN position.
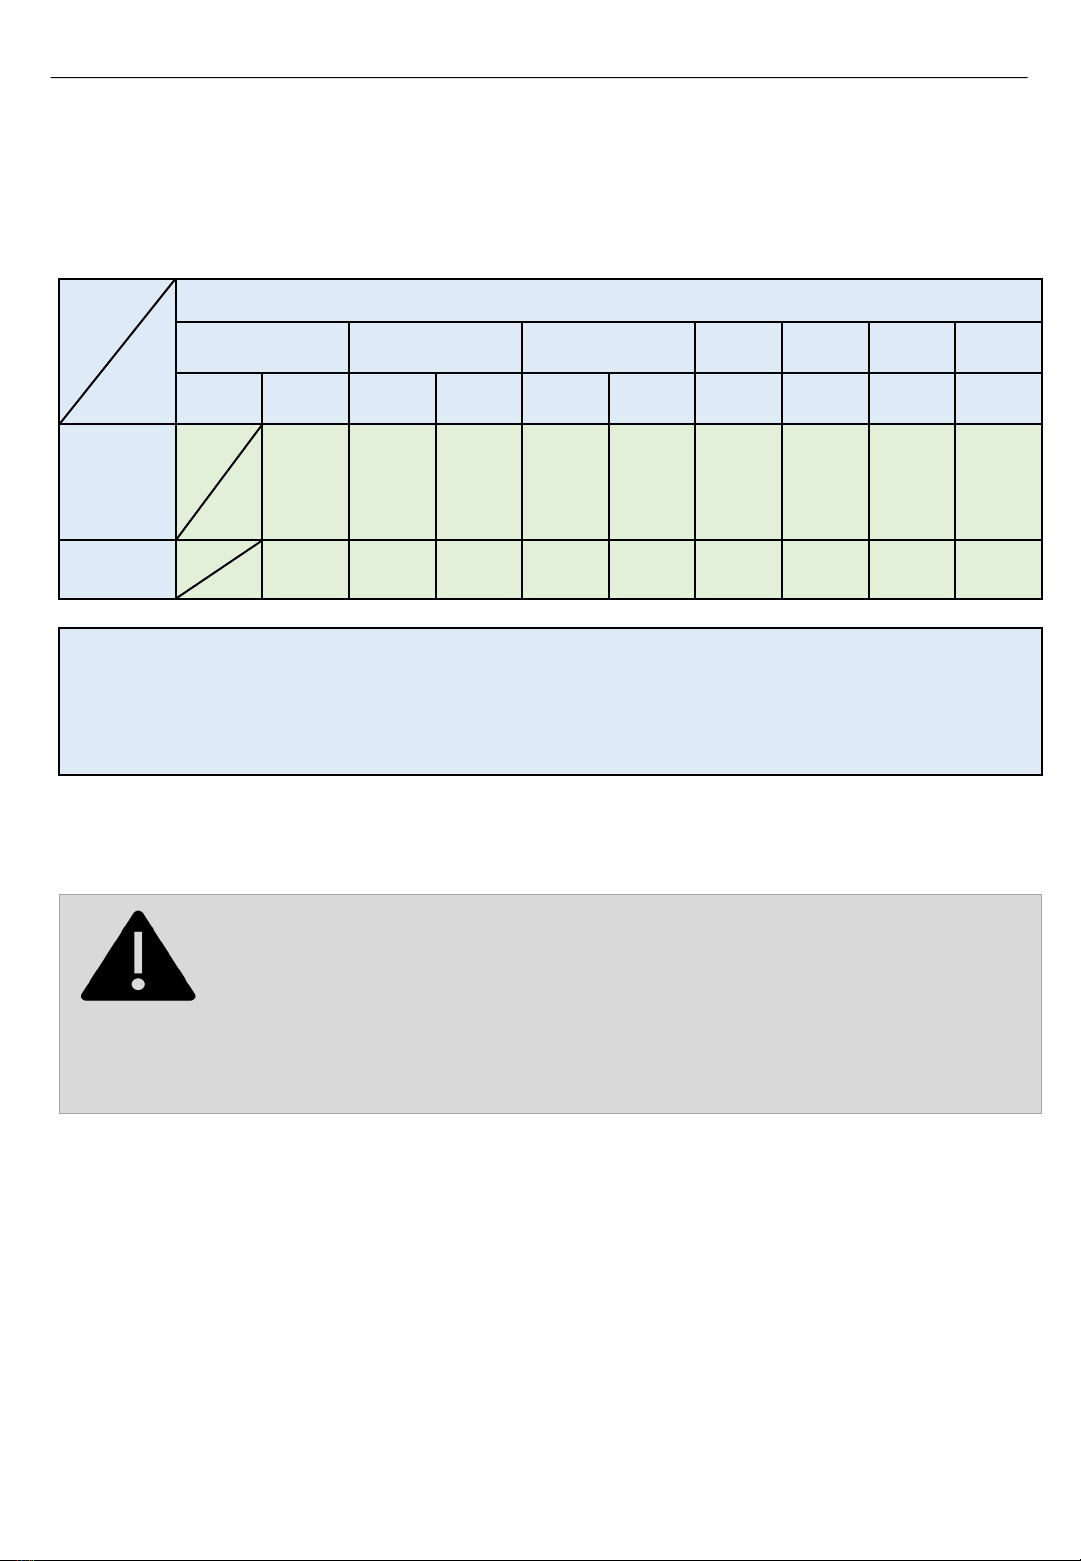
ØBelow chart is the suggested SAG range and the original air pressure chart, set for the SR SUNTOUR air
spring rear shock from the factory. Remember that these are the starting points. Adjustments will vary
based on rider ability, trail conditions, frame design, and personal preference. After setting up your
rear shock, check your sag to make sure that you are within the recommended SAG settings.
ØThe SAG is the compression which is caused by the rider’s weight including equipment (such as
backpack), seating position and the frame’s geometry and not as a result of riding. Every rider has a
different weight and seating position. Therefore, the rear shock will sag more or less. To assure a
proper function of rear shock and not to interfere its performance, setting a proper SAG is the
important way to find the correct air pressure for your air spring rear shock.
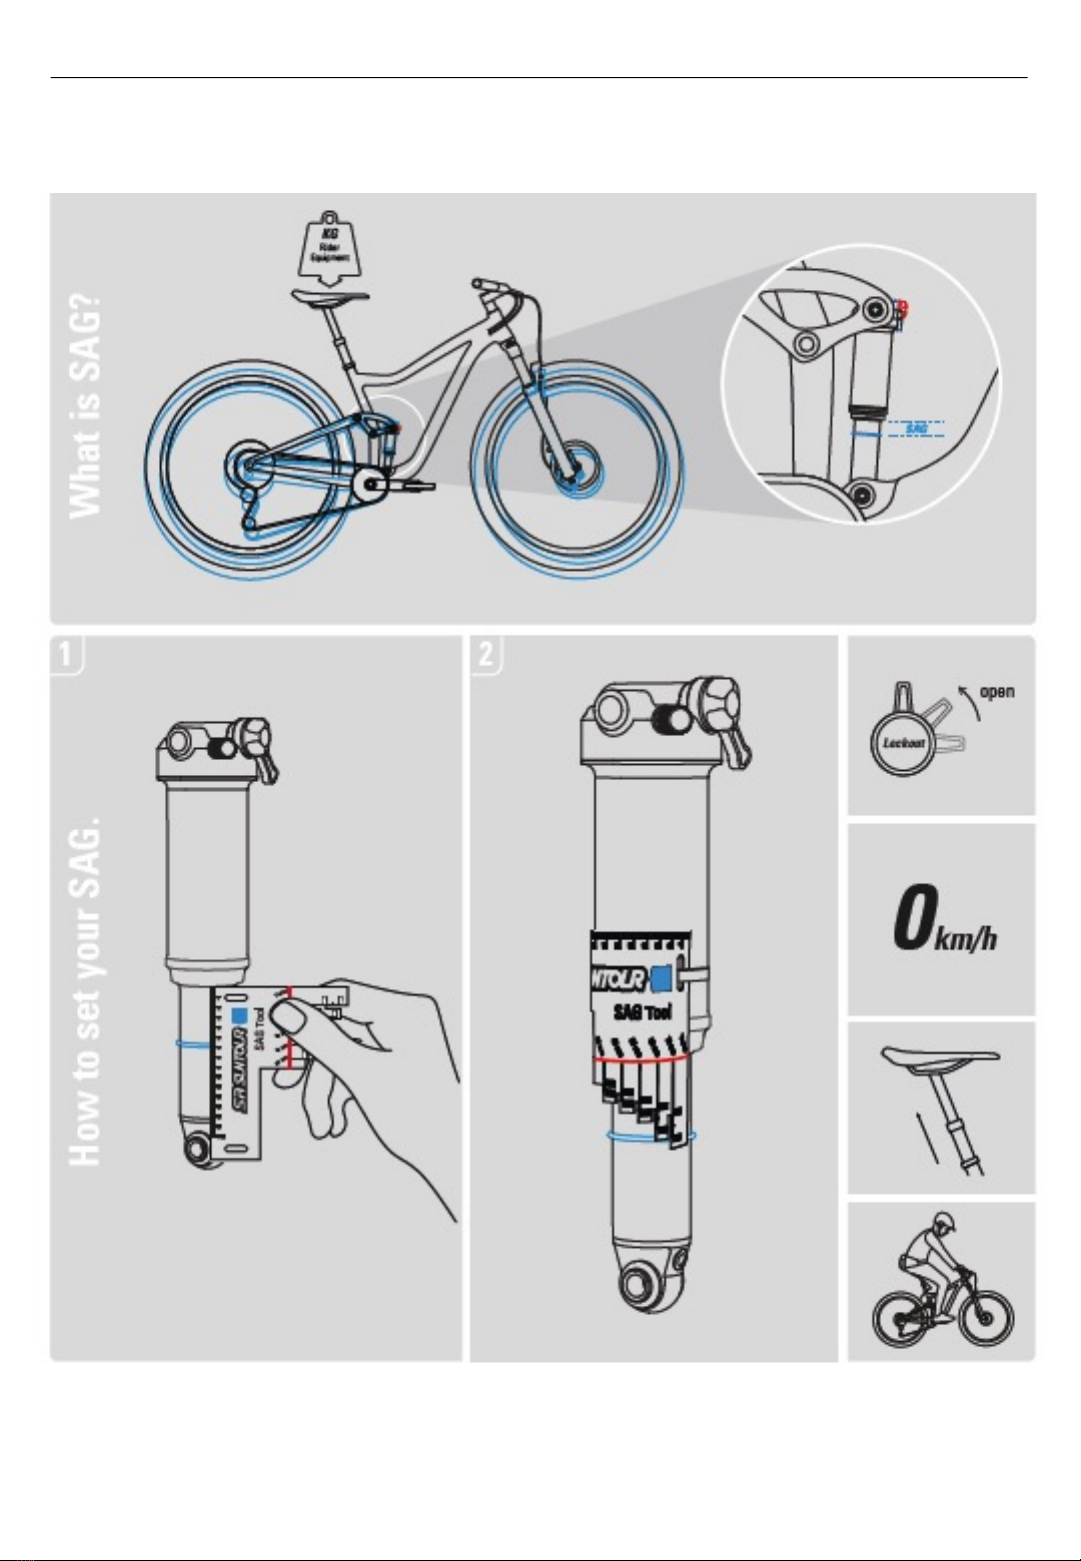
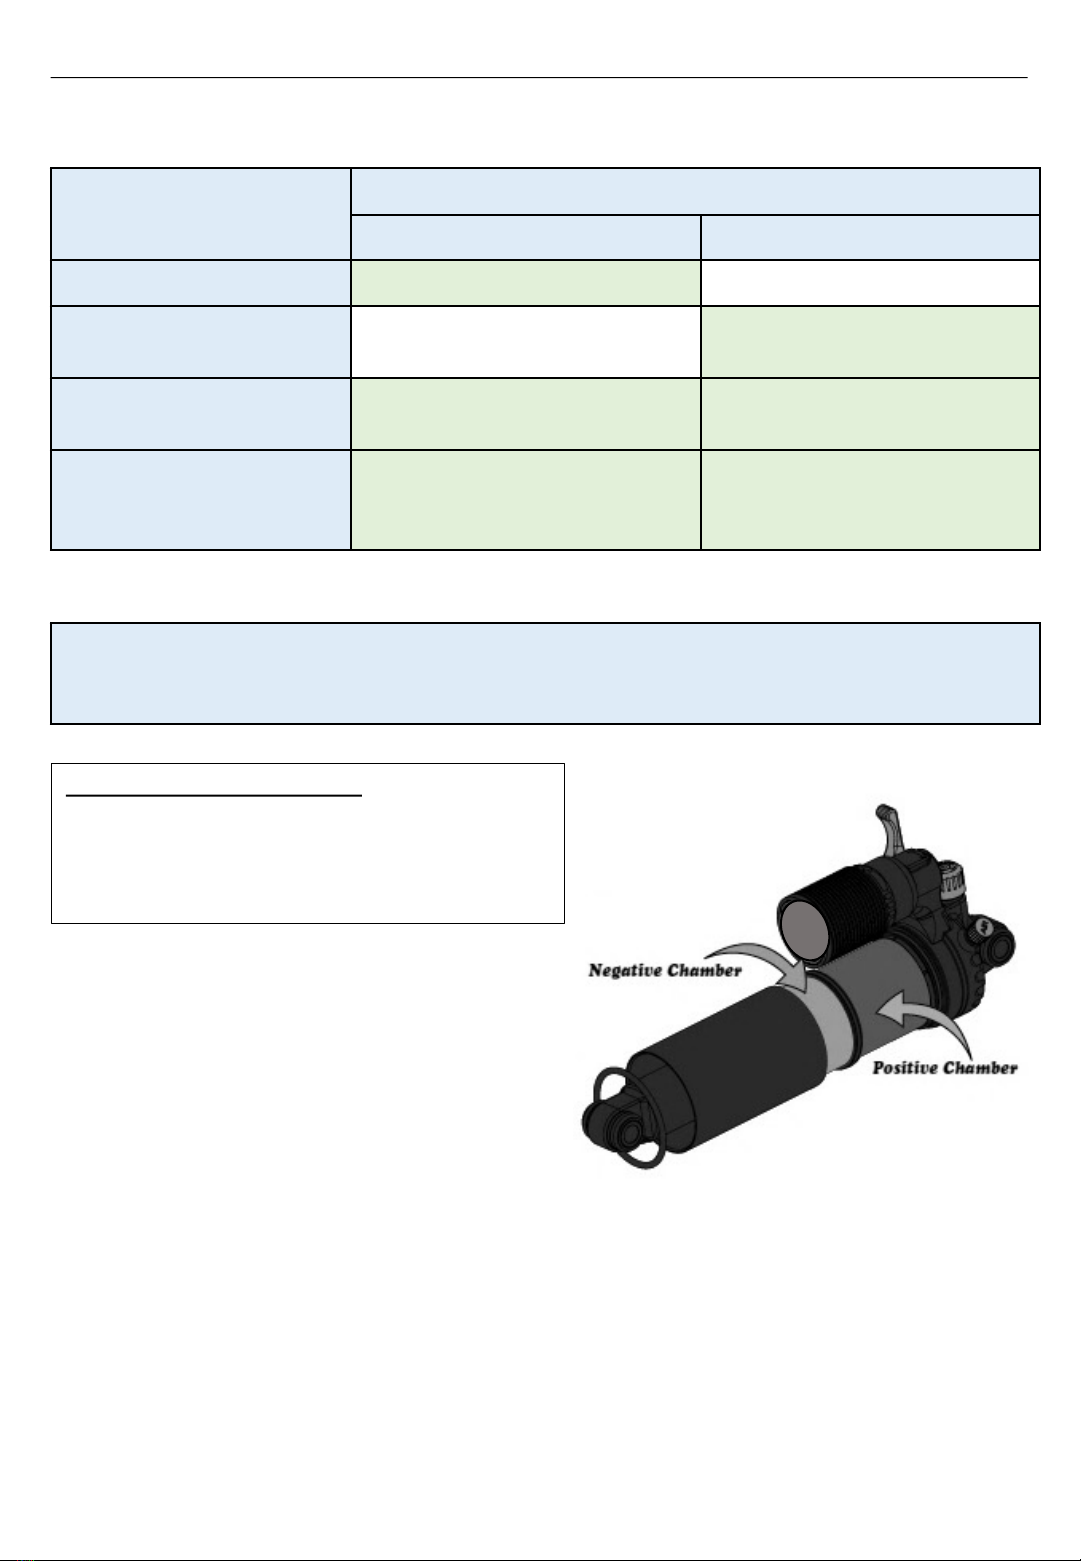
Setting tip for air spring rear shocks
ØStep 1: Pump up to the suggested air pressure and compress the rear shock at least 50% of full travel
several times in order to equalize the air pressure between the positive and negative air chamber.
ØStep 2: Sit on the bike with equipment (such as backpack) and ask somebody to hold the bike, stand on
the pedals, and compress the rear shock several times. Then sit on your bike in your normal riding
position.
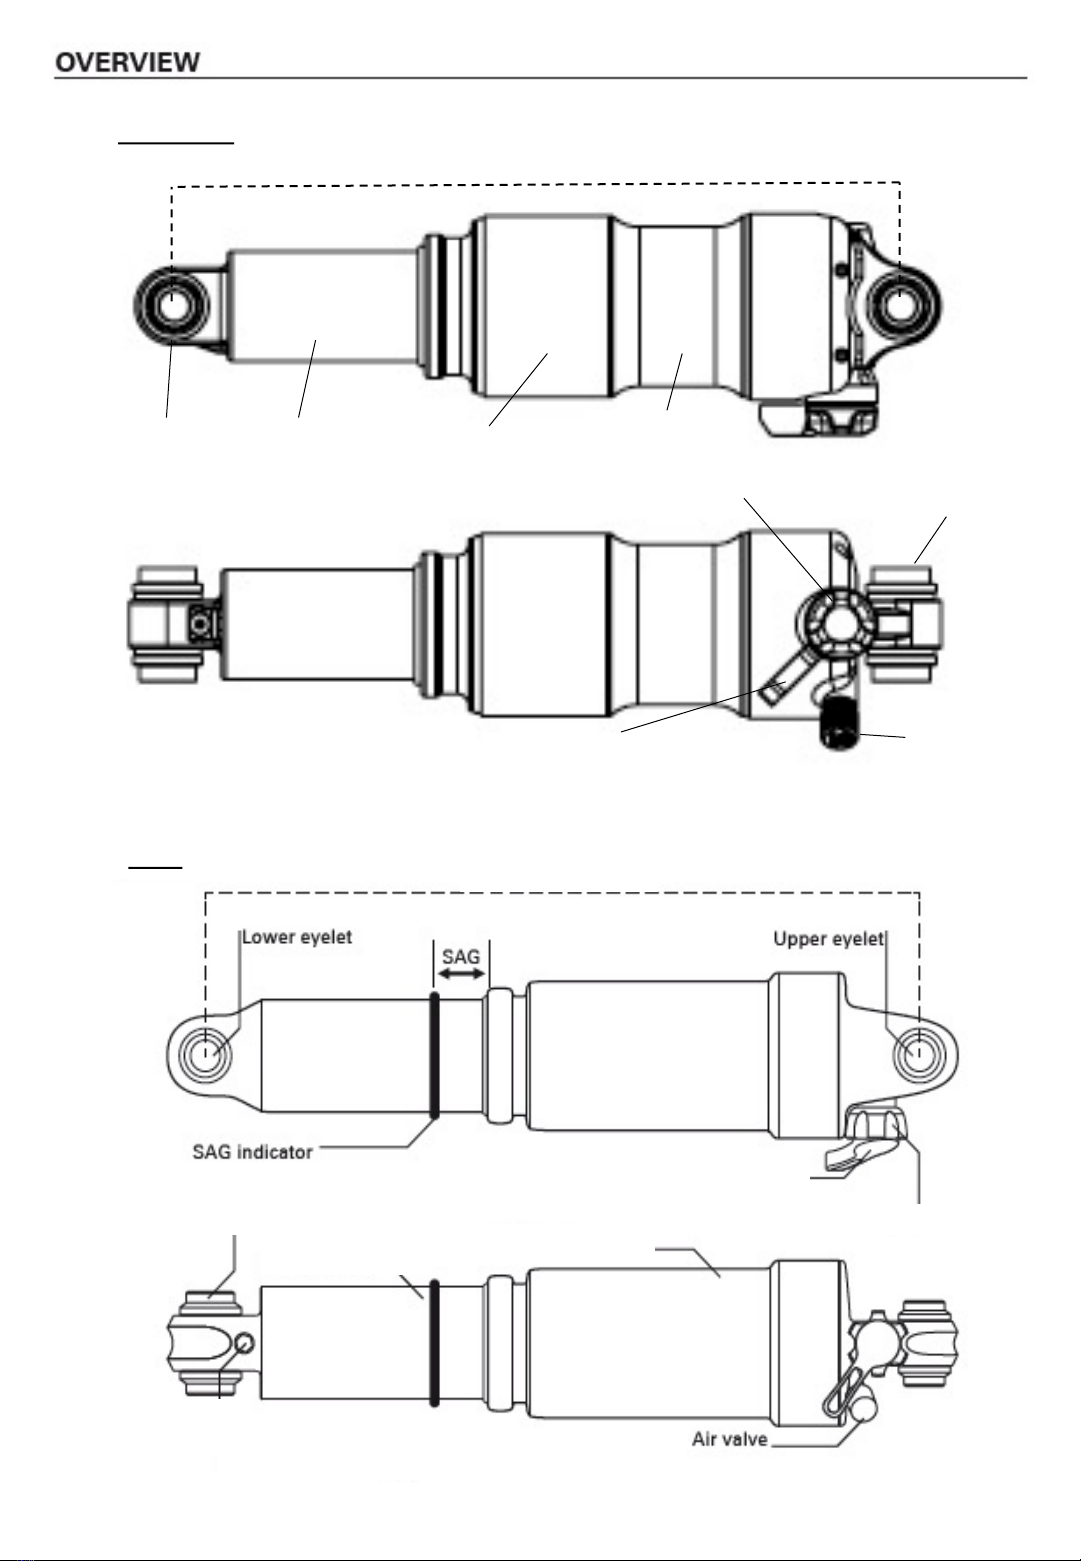
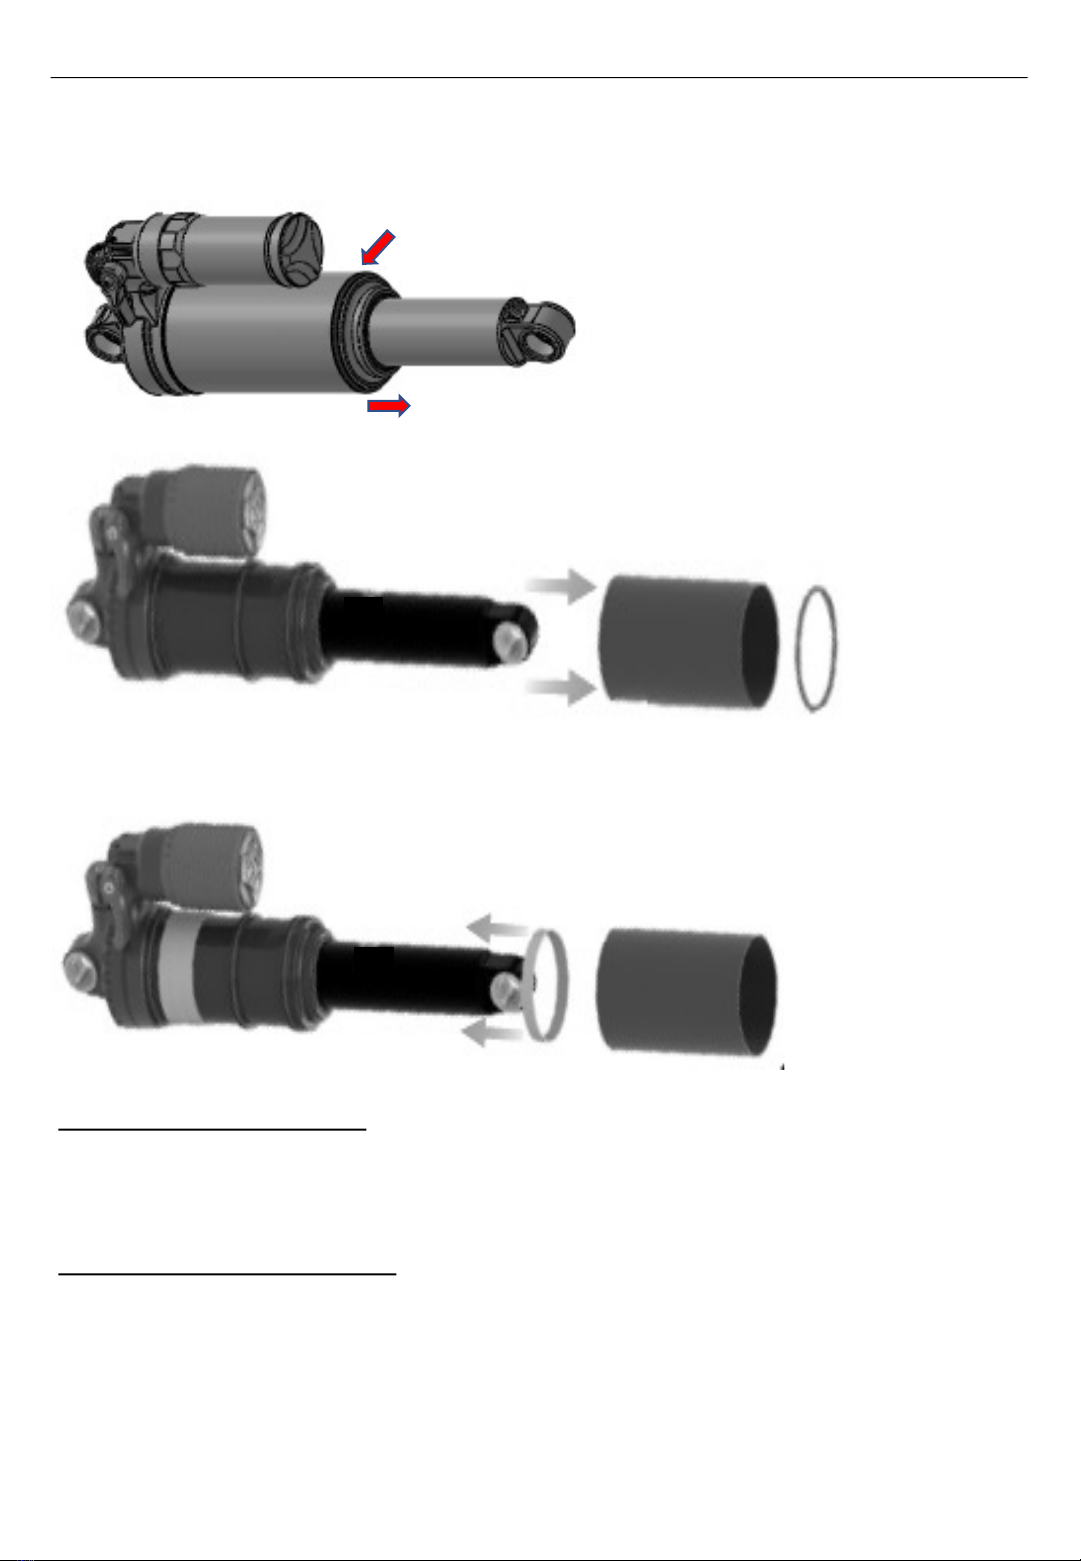
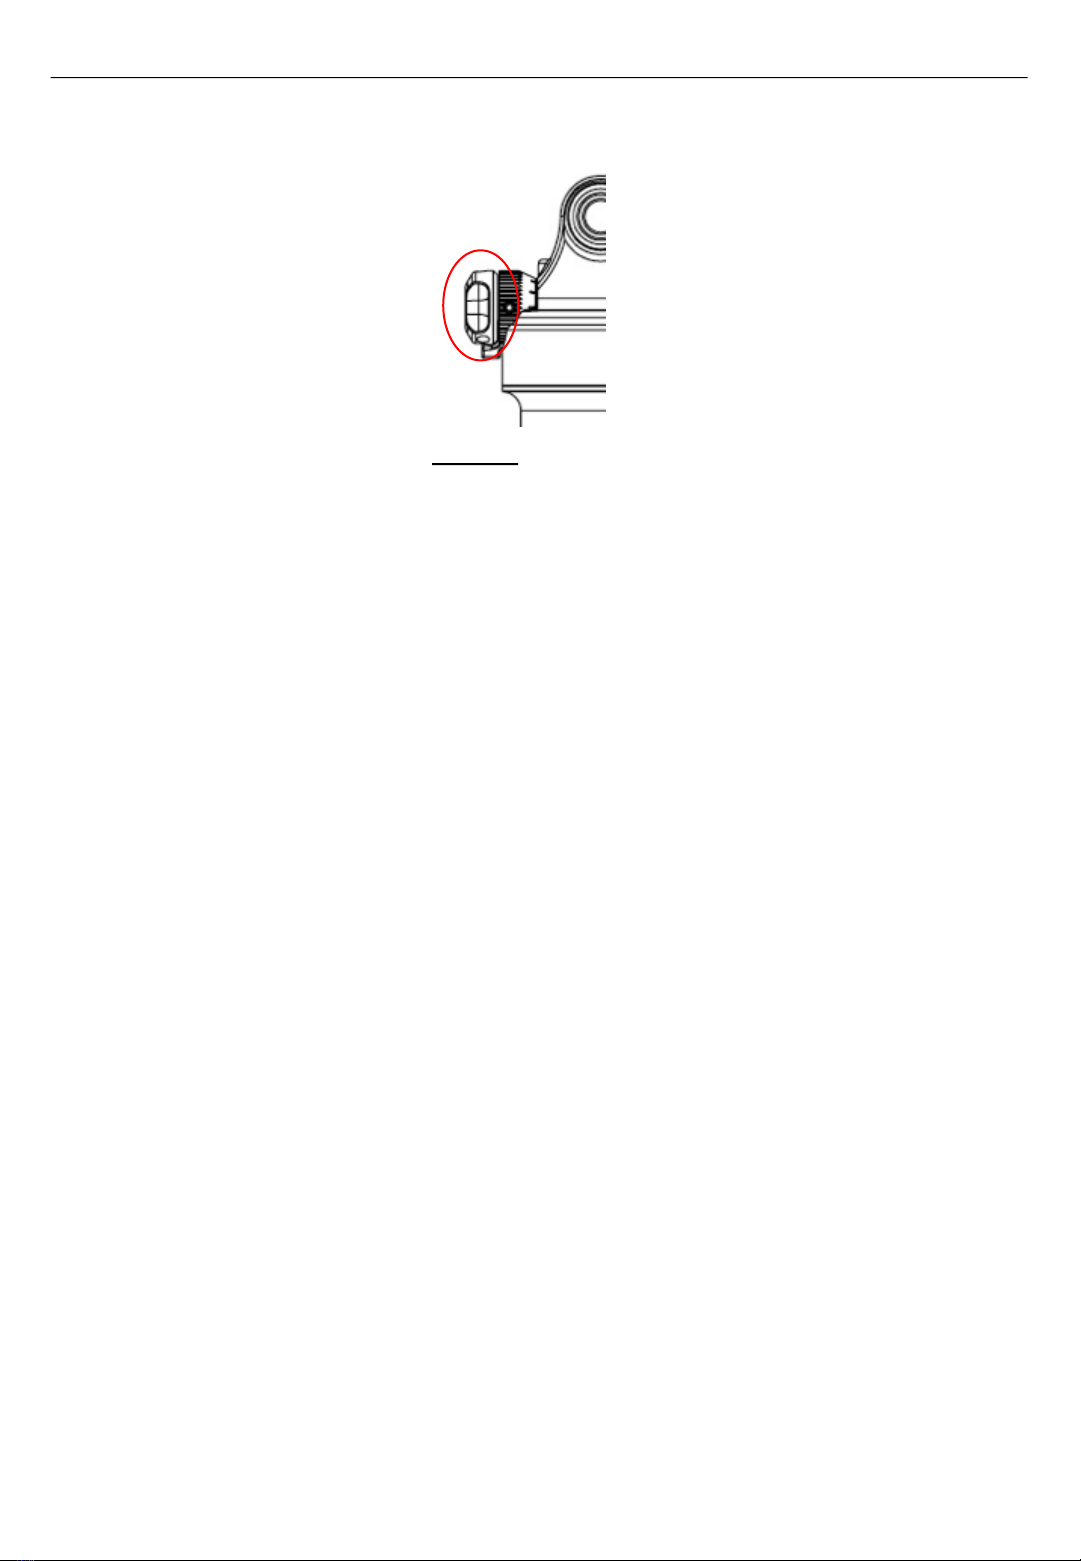
ØStep 3: Slide the SAG indicator O-ring down to the top of the dust seal.
ØStep 4: Gently step off the bike without compressing the rear shock furthermore.
ØStep 5: Check the O-ring position to see if the SAG setting is properly done.
ØStep 6: In case if the SAG setting is not properly done, air pressure must be adjusted.
•In order to increase the SAG, decrease the air pressure.
•In order to decrease the SAG, increase the air pressure.
üRepeat the above procedure until you can find the correct SAG setting.
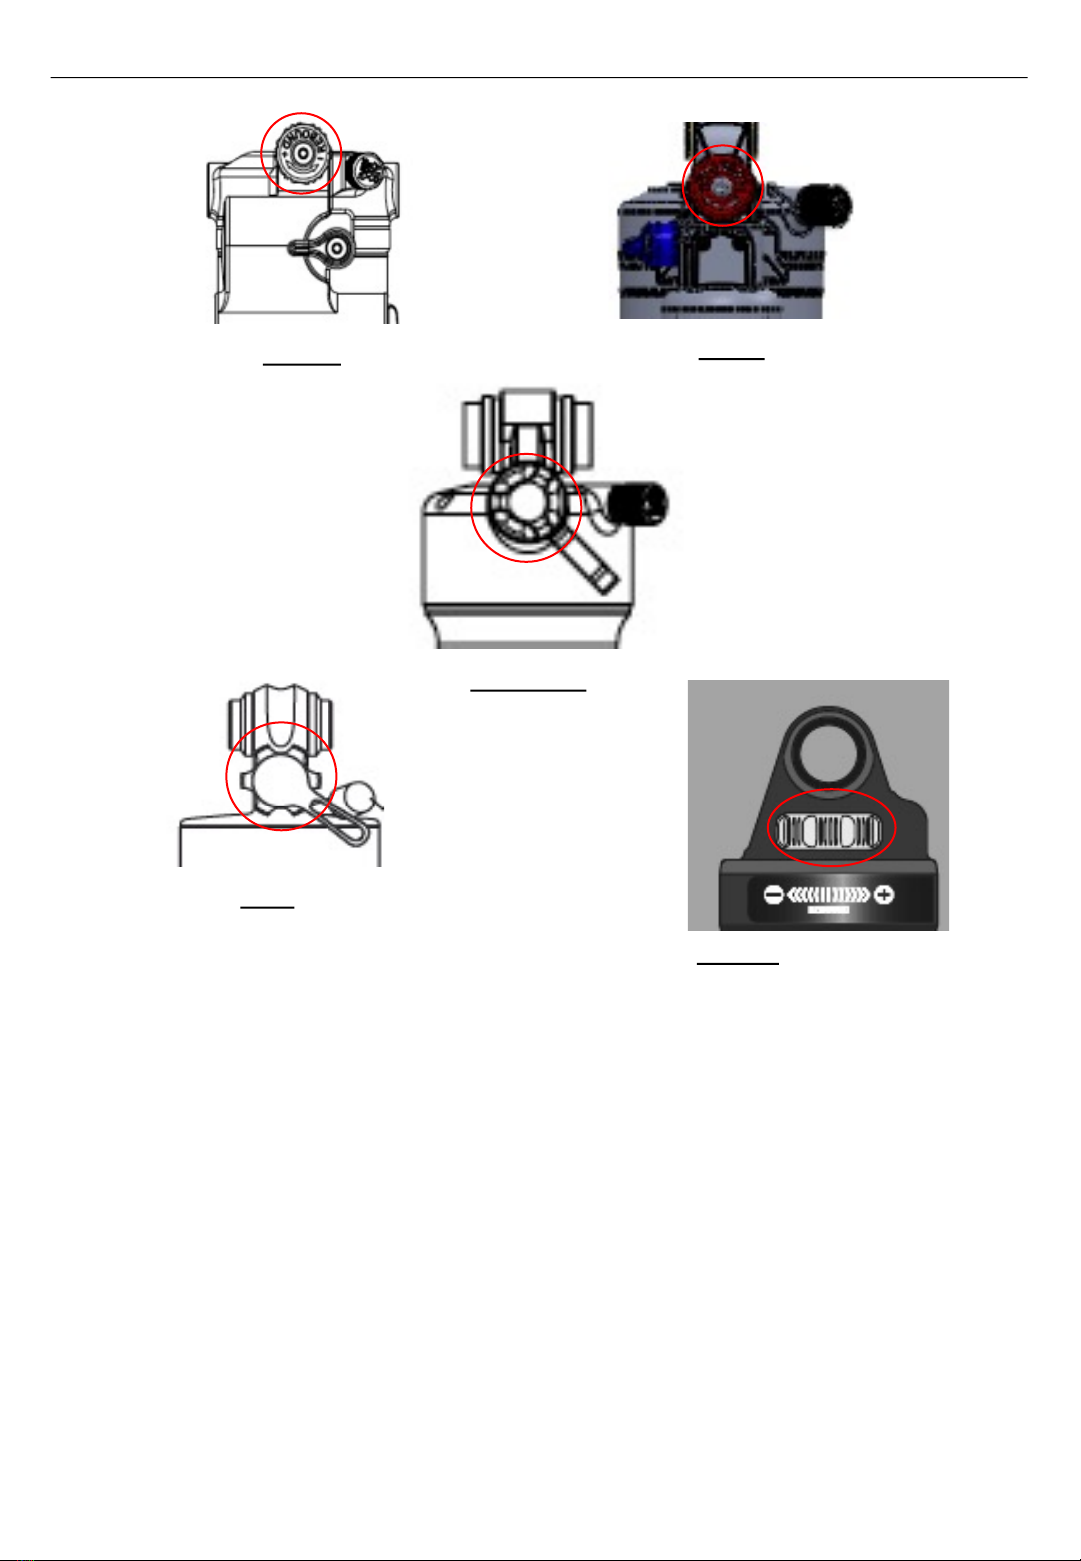
üUse SR SUNTOUR genuine SAG checking tool as shown in the next page.
üThe recommended SAG range is 20% - 35%, depending on the stroke.Refer to the chart below to find
the proper SAG.

9
SETTING SAG

10
Below is the original air pressure setting when the SR SUNTOUR rear shock is shipped out from the
factory. Remember that these are the starting points and adjustments will vary based on rider ability,
trail conditions, frame design, and personal preference. After setting up your rear shock, check your
sag to make sure that you are within the recommended sag settings.
Suggested air pressure (psi)
Vorocoil Triair2 Triair EDGE-
comp
EDGE-
plus EDGE
RAIDON
Main
body
Reservoir
(IFP)
Main
body
Reservoir
(IFP)
Main
body
Reservoir
(IFP)
Main
body
Main
body
Main
body
Main
body
Air
pressure
(factory
setting)
200 180 180 180 200 110 110 110 110
Max.
pressure 250 300 240 300 240 300 300 300 300
Note:
* It’s important to keep in mind that air pressures will vary depending on the leverage rate of your
frame. This is just a starting point until you check your SAG on the following page.
* Above numbers are for reference only. The correct air pressure might be different according to the
frame design, so must be adjusted by individual rider while checking the SAG.
WARNING !
Riding your bike with an improper air pressure can result in a loss of control,
serious injury or even death.
Never exceed the maximum air pressure as shown in the above chart. This can lead to the
breakage of the rear shock, serious injuries and voids the warranty of your SR SUNTOUR rear
shock.
AIR PRESSURE ADJUST

11
1. Let all air out of the main canister.
Remove the o-ring underneath the
air chamber. Be cautious not to
damage the o-ring.
If you are looking for further tuning, the spring curve of the air shock can be adjusted using volume
spacers. Air pressure can be used to achieve the correct SAG. If you are harshly bottoming out, the
volume spacers will control the progressiveness of the shock.
2. Twist and push downward to
remove the air sleeve.
3. Add or remove your desired amount
of air volume spacers. Reinstall the air
canister and make sure it is sealed
with no gaps present. Reinstall the o-
ring and you’re ready to ride!
AIR VOLUME ADJUST
ADDING AIR VOLUME SPACERS
Adding air volume spacers will create a more progressive feeling to your air shock. A more
progressive feeling will prevent harsh bottom outs and keep the shock from sitting deep in the
stroke.
REMOVING AIR VOLUME SPACERS
Removing air volume spacers will create a more linear feeling to your air shock. A more linear
feeling will make it easier to use the full stroke of the shock. If you can’t achieve full travel or
the shock becomes very harsh towards the end of the stroke, removing air volume spacers will
help alleviate that.

12
Air volume adjustable feature
•Triair2: Positive & negative
•Triair: Positive & negative
•EDGE-comp: Negative
•EDGE & EDGE-plus: Positive & negative
Symptom
Solution
Positive chamber Negative chamber
Bottom out too easily Add 1-2 positive spacers
Lacking support for
pedaling Add 1-2 negative spacers
Looking for more mid-
stroke support Add 1-2 positive spacers Add 1-2 negative spacers
Cannot get full travel 1st step) Remove 1-2 positive
spacers
2nd step) If 1st step doesn’t
work, add 1-
2 negative spacers
and decrease the air pressure
Note:
Be careful of contamination when removing the air sleeve. Getting dirt inside the air chamber can
cause leaks or failures. Always keep your shock clean when doing this procedure.
AIR VOLUME ADJUST

13
Rebound controls the speed at which the shock extends after compression.
Rebound damping control is relative to the main spring rate. Higher pressures
require more rebound damping. Lower pressures require less rebound
damping, so please adjust accordingly.
üFor slower (more rebound damping) = Turn clockwise
üFor faster (less rebound damping) = Turn counter clockwise
REBOUND DAMPING ADJUST
EDGE
RAIDON
TRIAIR2
EDGE-comp
TRIAIR
Note:
Rebound settings will vary greatly on bike design, trail conditions and rider
preference. It’s best to start with the rebound adjuster in the closed setting
(full clockwise) and adjust out in two-click increments.

14
3C COMPRESSION ADJUST
The SR SUNTOUR Triair series and EDGE-comp shocks offers 3-steps compression settings
quickly & easily to allow for the rider to adjust the compression damping for any trail
condition.
1. Open: it reduces compression damping allowing the oil to easily flow through the circuit,
offering maximum sensitivity. Open position is also best for lighter riders or for dry, dusty
terrain, where maximum traction is required.
2. Middle: it is for traversing. Sections of the trail where you need it to be active but still
maintain a good pedaling platform.
3. Close: it is great for climbing, in order to reduce undesirable suspension bob. The
heavy/closed setting is NOT a lock-out, but does offer significant resistance to weight &
pedal induced suspension movement.
3-STEP LOW-SPEED COMPRESSION DAMPING ADJUST
TRIAIR
TRIAIR2 EDGE-comp
Compression setting chart
Trail style Compression setting
OPEN MIDDLE CLOSE
Rough DH Plush
Smooth DH Plush Supportive
Technical climb Supportive Firm
Smooth climb Firm
Sandy DH Plush
Sandy climb Supportive Firm
Muddy DH Plush
Muddy climb Supportive Firm

15
2C COMPRESSION ADJUST
The SR SUNTOUR Triair2, EDGE-comp and EDGE-plus shocks offers 2-steps compression
settings quickly & easily to allow for the rider to adjust the compression damping for any
trail condition.
1. Open: it reduces compression damping allowing the oil to easily flow through the circuit,
offering maximum sensitivity. Open position is also best for lighter riders or for dry, dusty
terrain, where maximum traction is required.
2. Close: it is great for climbing, in order to reduce undesirable suspension bob. The
heavy/closed setting is NOT a lock-out, but does offer significant resistance to weight &
pedal induced suspension movement.
2-STEP LOW-SPEED COMPRESSION DAMPING ADJUST
TRIAIR2 EDGE-comp EDGE-plus
WARNING !
Nevertheless, you should never set your rear shock to the „Close mode”
while riding in rough terrain, or when the suspension is needed heavily. This
implies the risk that the shock will get damaged when it‘s being compressed
under high load. This could also result into an accident, injuries or even death of the rider.

16
The compression damping adjust function of your SR SUNTOUR rear shocks allows you to tune
your shock according to your personal preferences and the terrain you are riding on. This
function controls the speed of your rear shock while being compressed.
lWhen riding on terrain with a lot of small and fast bumps:
Choose a faster set up in order to bring the maximum possible wheel traction and an sensitive
bump compliance. In this mode, your rear shock will react pretty sensitive/fast to every bump.
Do not choose this setting on a terrain with big bumps and square edge hits because the risk of
bottom out of your rear shock is going to be higher.
lWhen riding on terrain with big bumps and square edge hits:
Choose a slower set up. In this mode your rear shock will move slower while being compressed.
Therefore it will reduce bottom outs and provides maximum bump absorption. Using this mode
on a terrain with small and fast bumps will bring bad traction to your bike. Additionally your
rear shock will not use it‘s full travel if being set to the slow/firm on fast terrain.
INFINITE LOW-SPEED COMPRESSION DAMPING ADJUST
EDGE-RC

17
The Lockout function prevents the shock from compressing until significant impact or
downward force occurs. The shock will compress when the force exceeds the damper blow-
off circuit resistance. Use the Lockout function for maximum pedaling efficiency on smooth or
rolling terrain. Operate the lockout knob to use the lock and unlock function.
Note:
LOR: 100% lock-out
LOR8: 80% lock-out
WARNING !
Nevertheless, you should never set your rear shock to the „Lock-Out
mode“ while riding in rough terrain, or when the suspension is needed heavily.
This implies the risk that the shock will get damaged when it‘s being
compressed under high load. This could also result into an accident, injuries or even death
of the rider.
LOCK-OUT OPERATION
EDGE-plus

18
EDGE-RLR
Remote lockout lever
The operation of remote lockout function can be done from the remote lever on the handle-
bar, while gripping the grip without taking your hand off from the handlebar. The remote
lever is to use the lock and unlock function.
The Lockout function prevents the shock from compressing until significant impact or
downward force occurs. The shock will compress when the force exceeds the damper blow-
off circuit resistance. Use the Lockout function for maximum pedaling efficiency on smooth or
rolling terrain.
Note:
RLR: 100% lock-out
RLR8: 80% lock-out
WARNING !
Nevertheless, you should never set your rear shock to the „Lock-Out
mode“ while riding in rough terrain, or when the suspension is needed
heavily. This implies the risk that the shock will get damaged when it‘s being
compressed under high load. This could also result into an accident, injuries or even death
of the rider.
REMOTE LOCK-OUT OPERATION

19
SR SUNTOUR rear shocks are designed for simple maintenance. However, as long as moving parts
are exposed to moisture and contamination, the performance of your rear shock might be
reduced after several rides. Please keep in mind that a rear shock which has not been serviced in
accordance with the maintenance instructions might loose its warranty !
ØNever use a pressure washer or any water under pressure to clean your rear shock, as water
might enter the shock at the dust seal level. Never use aggressive cleaners. We recommend
to use clear water.
ØTo maintain a high performance, safety and a long life of your rear shock, a periodic
maintenance is required.
ØWe recommend that your rear shock is being serviced frequently as indicated below if you
ride in extreme weather (winter time) and terrain conditions.
ØIn case if you may feel that your rear shock performance has changed or handles differently,
immediately call on your local dealer to inspect your rear shock.
ØAfter every ride: Clean the damper body and dust seals and maintain with an oily cloth.
Check the damper body for dents, scratches or other discoloration or leaking oil.
ØEvery ride: Maintenance 1
ØEvery 50 hours: Maintenance 2 (at the dealer)
ØEvery 100 hours or once a year: Maintenance 3 (at the dealer, ideally before winter time in
order to protect all parts from the effects of weather by proper greasing)
WARNING !
Please note that your SR SUNTOUR rear shock is filled with oil and nitrogen.
This makes it impossible to open the rear shock without having the knowledge
and the special tools on how to carry out this task. Please do not try to open the
rear shock for service issues, as this implies a very high risk of getting seriously injured. Besides
this, you will not be able to reassemble the shock anymore. Opening the shock will void its
warranty. If there is any problem with your rear shock, please consult a dealer and get in
contact with SR SUNTOUR.
Maintenance 1
(Every ride)
Maintenance 2
(Regularly)
Maintenance 3
(every 100 hours /
annually whichever
comes first)
Clean exterior with mild soap and water only and
wipe dry with a soft towel
○
Inspect the shock for visual damage
○
Check the function of controls knobs
○
Check the air pressure (it is normal for air shocks
to lose pressure over time)
○
Check the sag and the damper settings
○
Check the mounting hardware for proper torque
settings
○
Full shock service including damper rebuild and air
seal replacement
○
MAINTENANCE

WEB LINKS
For further information please visit www.srsuntour-cycling.com. There you will also find:
uService request: http://www.srsuntour-cycling.com/service/service-request
uTech videos: http://www.srsuntour-cycling.com/service/tech-videos
uDownload area: http://www.srsuntour-cycling.com/service/download-area
uOwners manuals: http://www.srsuntour-cycling.com/service/download-area/consumer-
downloads/bike/owners-manuals/
uWarranty: http://www.srsuntour-cycling.com/service/warranty
Copyright © 2021 SR SUNTOUR Inc. All rights reserved. KAE310
ASIA, OCEANIA
SR SUNTOUR INC.
#7 Hsing Yeh Road
Fu Hsing Industrial Zone
Chang Hua, Taiwan, R.O.C.
Tel: +886-(0)4-769-5115
service@srsuntour.com.tw
SR SUNTOUR INTERNATIONAL CO., LTD.
No. 1500 Honghu Road, Penglang
Kunshan, Development Zone
Jiang Su Province, China ZIP 215333
Tel: +86-512-5517-1127
sr-service@srsuntour.com.cn
SRS INTERNATIONAL TRADING LTD.
Room 501, 5th floor, Building No. 2
Jiaxing Industrial Zone, Shubei Road
Gongming Town, Guangming District
Shenzhen City, China 518106
Tel: +86-755-271-084 83
service@srsuntour.com.cn
SR SUNTOUR JAPAN
NR Bldg. 4F, 3-13-13 Kuramae
Taito-ku, Tokyo, 111-0051
Tel: +81-3-5829-9211
EUROPE
SR SUNTOUR EUROPE GmbH
Riedstrasse 31
83627 Warngau, Germany
Tel: +49-(0)802-150-793-0
service@srsuntour-cycling.com
SR SUNTOUR Düsseldorf GmbH
Fichtenstrasse 115,
40233 Düsseldorf Germany
Tel: +49-(0)211-5426-8950
service@srsuntour-cycling.com
SAV SR SUNTOUR FRANCE
604 voie Galilee
73800 Sainte Helene du Lac, France
Tel: +33-(0)981-241650
sav@srsuntour-cycling.com
USA
SR SUNTOUR North America Inc.
7509 S. 5th Street Suite 124
Ridgefield, Washington 98642
Tel: +1-360-737-6450
Sales: ssna@srsuntourna.com
Service, warranty: service@srsuntourna.com
SR SUNTOUR Madison
910 Watson Avenue
Madison, Washington 53713 USA
Tel: +1-608-229-6610
service@usulcorp.com
CUSTOMER SUPPORT OFFICES
Table of contents
Other SR Suntour Bicycle Accessories manuals

SR Suntour
SR Suntour HESC User manual

SR Suntour
SR Suntour SR Suntour User manual

SR Suntour
SR Suntour Epicon User manual

SR Suntour
SR Suntour NRX Series User manual

SR Suntour
SR Suntour NCX NEX User manual

SR Suntour
SR Suntour V-Boxx FR9 User manual

SR Suntour
SR Suntour NCX 2019 User manual

SR Suntour
SR Suntour HESC User manual

SR Suntour
SR Suntour RUX RC2 DH User manual

SR Suntour
SR Suntour HESC ATS Rear Motor System User manual