SR Suntour COIL SPING Series User manual
RAIDON/XCR/XCM/XCT/M3000/M2000/XCU0
M2025
M3000AL
XCU
Owners Manual
COIL SPING SERIES

SR SUNTOUR - OWNERS MANUAL RAIDON / XCR /XCM / XCT / M3000AL / M2025 / XCU
English
1
Owners Manuals
INTENDED USE ............................................................................................................3
IMPORTANT SAFETY INFORMATION....................................................................4
BEFORE EACH RIDE! ..................................................................................................5
FORK INSTALLATION..................................................................................................5
TIRE CLEARANCE ! .....................................................................................................6
RAIDON RLD / RL / XCR RL REMOTE LOCK LEVER INSTALLATION .............7
LOCK-OUT SYSTEMS..................................................................................................8
REBOUND DAMPING ADJUST................................................................................9
FORK MAINTENANCE ............................................................................................. 10
LIMITED WARRANTY............................................................................................... 11
TABLE OF CONTENTS

SR SUNTOUR - OWNERS MANUAL RAIDON / XCR /XCM / XCT / M3000AL / M2025 / XCU
English
2
SR SUNTOUR - OWNERS MANUAL RAIDON / XCR /XCM / XCT / M3000AL / M2025 / XCU
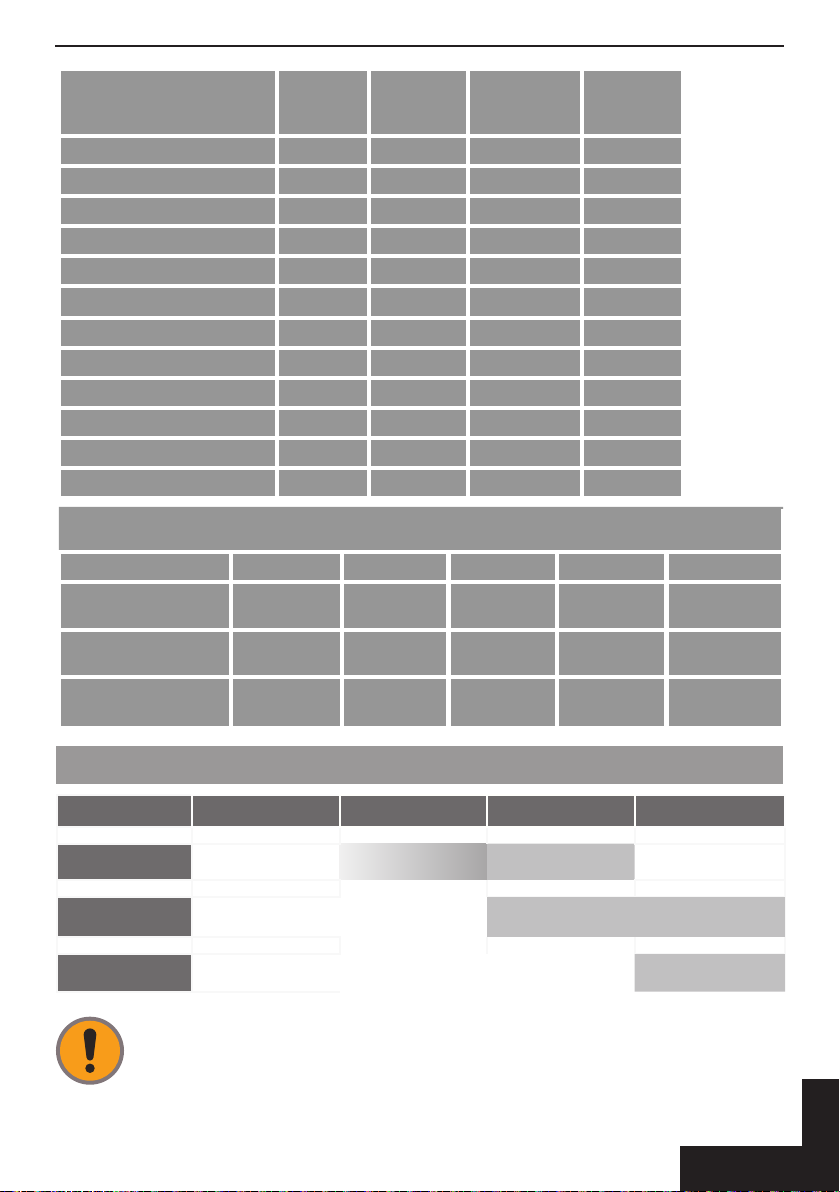
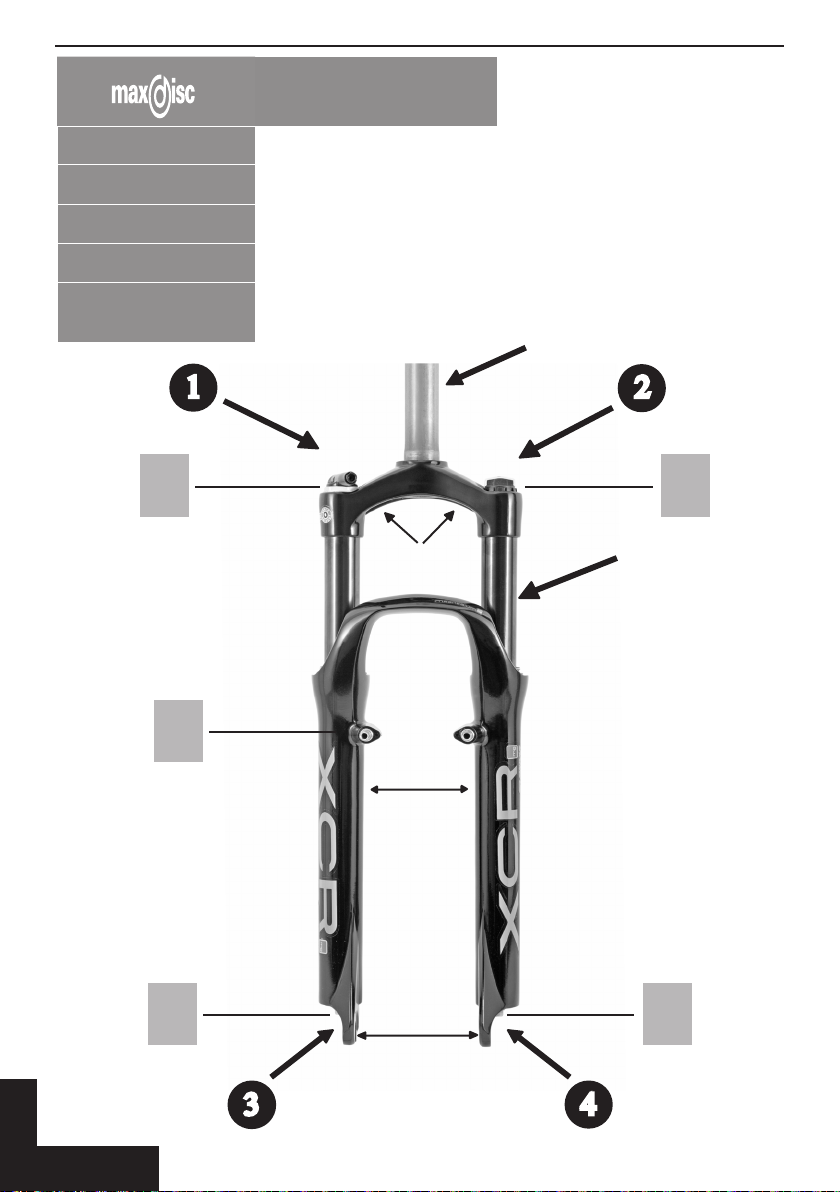
MAX ROTOR DIAMETER
[ mm ]
RAIDON SERIES 185
XCR SERIES 185
XCM V2 SERIES 185
XCT V2 SERIES 160
XCU & M SERIES 160
Stanchion
Tubes
12
4
3
Bottom Case
Dropouts
Fork Crown
Steerer Tube
A
E
C
B
D
RLD = Remote Lock Out +
Rebound Damping Adjust
LOD = Speed Lock Out +
Rebound Damping Adjust
HLO = Hydraulic Lock Out
RL = Remote Lock
LO = Speed Lock
MLO = Mechanical Lock Out
SR SUNTOUR - OWNERS MANUAL RAIDON / XCR /XCM / XCT / M3000AL / M2025 / XCU SR SUNTOUR - OWNERS MANUAL RAIDON / XCR /XCM / XCT / M3000AL / M2025 / XCU
English
3
Model Speed
Lock Out
Remote
Lock Out
Preload
Adjuster
Rebound
Adjuster
RAIDON RLD 1 2 3
RAIDON LOD 1 2 3
XCR RL 1 2
XCR LO 1 2
XCR & XCR 24“ 1+2
XCM V2 HLO 1 2
XCM V2 2
XCT V2 MLO 1 2
XCT V2 1+2
XCT JR 24“ & XCT JR 20“ 1
M2025 MLO 1 2
M- Series / XCU
INTENDED USE
Category Freeride All Mountain XC ATB
RAIDON
XCR / XCM
XCT / M / XCU
Make sure to select the correct fork according to your frames build in height and per-
sonal riding style. Please note that the AXON, EPICON and RAIDONair series forks were
not designed for jumping, dropping, aggressive downhill riding, freeriding or urban
style riding. Not following these instructions could result into a failure of the product,
accident and even death of the rider. Not following these instructions will void the
fork‘s warranty!
TORQUE VALUES
MODEL A B C D E
RAIDON RLD 10Nm ± 10% 10Nm ± 10% 6Nm ± 10% 10Nm ± 10% 7Nm ± 10%
RAIDON LOD 10Nm ± 10% 10Nm ± 10% 6Nm ± 10% 10Nm ± 10% 7Nm ± 10%
ALL OTHER FORKS 10Nm ± 10% 10Nm ± 10% 10Nm ± 10% 10Nm ± 10% 7Nm ± 10%

SR SUNTOUR - OWNERS MANUAL RAIDON / XCR /XCM / XCT / M3000AL / M2025 / XCU
English
4
SR SUNTOUR - OWNERS MANUAL RAIDON / XCR /XCM / XCT / M3000AL / M2025 / XCU
Caution
WARNING !
Failure to comply with the given warnings and instructions may
cause damage to the product, injuries or even death to the rider.
►Be sure to read this manual carefully before using your suspension fork. Inappropriate
usage of your suspension fork may cause damage to the product, serious injuries or
even death to the rider.
►Suspension forks contain uids and gases under extreme pressure, warnings included
in this manual must be followed in order to reduce the possibility of injuries or possible
death. Never try to open any SR SUNTOUR cartridge, as stated above they contain uids
and gases under high pressure. Opening any SR SUNTOUR cartrigde implies the risk of
getting seriously injured.
►Only use genuine SR SUNTOUR parts. The use of aftermarket replacement and spare
parts voids the warranty of your fork and might cause failure to the fork. This could
result into an accident, injury or even death.
► SR Suntour suspension forks are designed for the usage by a single rider.
► This instruction sheet contains important information about the correct installation,
service and maintenance of your suspension fork. Nevertheless please be informed
that special knowledge and tools are essential to install, service and maintain SR
SUNTOUR forks. Common mechanical knowledge may not be sucient to repair,
service or maintain a suspension fork. Therefore we strongly recommend getting your
fork installed, serviced and/or maintained by a trained and qualied bicycle mechanic.
Improper installation, service or maintenance can result in failure of the product,
accident, injury or even death.
►Always be equipped with proper safety gear.This includes a properly tted and fastened
helmet. According to your riding style you should use additional safety protection.
Make sure your equipment is in awless condition.
► Make sure to select the correct fork according to your frame’s built in height and your
personal riding style. Installing a fork which does not match the geometry of your frame
could result into a failure of the fork itself and will void the forks warranty. Installing a
suspension fork will change the geometry and handling of your bike. Learn how to ride
and train your skills. Know your limits and never ride beyond those.
► When using a bike carrier please always fully release the quick release fastener. Not
properly unfastened quick releases may result into bending, breaking or other structural
damage while removing your bike of the bike carrier. If your bike fell o the carrier
please do not ride it, until it has been inspected by a qualied bike mechanic. When
using a bike carrier which just secures the bike by clamping the forks dropouts, make
sure to fasten your rear wheel as well. A not accurate fastened rear wheel could allow
the bike to jiggle which might result into a breakage of the dropouts.
►Please note that SR SUNTOUR suspension forks do not come with the proper reectors
for on road riding. If you intend to ride on public roads or bicycle lanes your dealer
should mount the required reectors to your fork.
► Study all other owner’s manuals provided with your bike and make yourself familiar
with the components mounted to your bike.
IMPORTANT SAFETY INFORMATION
SR SUNTOUR - OWNERS MANUAL RAIDON / XCR /XCM / XCT / M3000AL / M2025 / XCU SR SUNTOUR - OWNERS MANUAL RAIDON / XCR /XCM / XCT / M3000AL / M2025 / XCU
English
5
Caution
BEFORE EACH RIDE!
►Do you notice any cracks, dents, bent or tar-
nished parts at your suspension fork or any
other part of your bicycle? If so, please con-
sult a trained and qualied bicycle mechanic
to check your fork or bike.
►Can you notice any oil leaking out your fork?
Also check out hidden areas like the bottom
side of your fork crown. If so, please consult
a trained and qualied bicycle mechanic to
check your fork or bike.
►Compress your fork with your body weight. If
it feels too soft, relating to the proper pressu-
re to achieve an accurate SAG, inate it until
you have reached the required value. Please
also refer to chapter “ SETTING SAG”
►Make sure your brakes are properly installed/
adjusted and work appropriate. This also
applies to every other part of your bike like
handlebars, pedals, crank arms, seat post,
saddle etc. Also refer to the owner‘s manuals
provided by all other component manufac-
turers.
►Make sure your wheels are centered perfect-
ly in order to avoid any contact with your
suspension fork or brake system.
►If you are using a quick release system to fas-
ten your wheel set, make sure that all levers
and nuts are adjusted properly. In case you
are using a through axle system, make sure
that all xing bolts are tightened with the
appropriate torque values.
►Check the cable length and routing of your
components. Make sure they do not interfe-
re your steering actions.
►If you are using reectors for on-road cyc-
ling, make sure they are clean and properly
installed.
►Bounce your bike slightly on the ground
while looking and listening for anything
which might be loose.
FORK INSTALLATION
WARNING!
SRSUNTOUR stronglyrecommendsthatyourfork is beinginstalled byatrained andqualied
bicycle mechanic. Special knowledge and tools are essential to install SR SUNTOUR forks.
Common mechanical knowledge may not be sucient to install a SR SUNTOUR suspension
fork. If you intend to install the fork by yourself, the whole job has to be inspected by a
trained and qualied bicycle mechanic. Please note, that improperly installed forks are
extremely dangerous and can cause damage to the product, serious injuries or even death.
Note! All xing bolts have to be tightened with the proper fasting torque stated by the
manufacturers
Remove the existing fork from your bicycle. Afterwards remove the crown race from the1. fork.
Measure the length of your old fork’s steerer tube against the length of the SR SUNTOUR2. fork steerer. SR SUNTOUR suspension forks are delivered with a standard steerer tube
length of 255mm. Therefore the steerer tube may need cutting to the proper length.
INSTALLATION INSTRUCTIONS
Do not ride your bike, if one of the following test criteria can’t be passed!
Riding your bike without eliminating any defect or carrying out the neces-
sary adjustments can result into an accident, fatal injury or even death.

SR SUNTOUR - OWNERS MANUAL RAIDON / XCR /XCM / XCT / M3000AL / M2025 / XCU
English
6
SR SUNTOUR - OWNERS MANUAL RAIDON / XCR /XCM / XCT / M3000AL / M2025 / XCU
FORK INSTALLATION
3. In order to dene the proper length of your steerer tube you can apply the
following formula:
Frame‘s head tube+Head sets stack height+Spacers+Stem‘s clamp height-3mm clearance
Install the headset crown race (30mm for 1 1/8”) rmly against the top of your fork4. crown. Install the fork unit (headset,spacers,stem) back on the bike. Adjust the headset
until you do not feel play anymore. Also refer to the headset’s manufacturer installation
instructions.
Install the brakes according to the manufacturer’s instructions. Make sure to adjust the5. brake pads properly. If you use a disc brake, only mount your brake to the original disc
brake mounting holes. Only use cantilever brakes which are intended to be used with
a hangerless brace. Check the installation instructions of your brake manufacturer and
follow them. Make sure you choose the correct length of the brake cable in order to not
interfere the performance of the fork.
Re-install the wheel back on to your bike. If you are using a6. quick release system to
fasten your wheel set, make sure that all fasteners and nuts are adjusted properly (four
or more threads have to be engaged in the nut when it is closed) In case your fork comes
with a through axle system, make sure that all xing bolts are tightened with the
appropriate torque values. Please also refer to the Qloc section of this manual.
Warning!
If your SR SUNTOUR fork does come with a threadless steerer tube, do not add a
thread to it. SR SUNTOUR’S fork steeres are a one time press t which can not be
removed. Do not try to replace the steerer tube by a steerer tube with a threaded
steerer. This will void the warranty of your fork and result into a failure of the
product or could cause fatal injuries or even death to the rider.
Your SR SUNTOUR suspension fork is designed to be used with 26” tires. Each tire has a
dierent outer diameter (tire width and height).Therefore the clearance between your tire
and fork needs to be checked, to make sure your tire does not get in contact with any
part of your fork. Keep in mind that the narrowest part of your fork is located at the brake
bosses. If you want to remove your wheel, you might have to deate your tire, in order to
be able to pass it through your brake bosses.
Tire Clearance Test:
Note! Using a tire which exceeds the maximum tire size suitable to your fork is very
dangerous and could cause an accident, fatal injuries or even death to the rider
Release all air of your fork1. Compress your fork completely2. Measure the distance between the top of your tire and the bottom of the crown.3. Make sure the gap is not less than 10mm! Exceeding maximum tires size will cause
the tire to jam against the bottom of the crown when the fork is fully compressed.
Inate the fork again4.
Keep in mind that if you are using a mudguard the clearance is limited! Repeat the “Tire
Clearance Test” again to make sure the gap is big enough. Every time you are going to
change your tires you have to repeat the test again!
TIRE CLEARANCE !
SR SUNTOUR - OWNERS MANUAL RAIDON / XCR /XCM / XCT / M3000AL / M2025 / XCU SR SUNTOUR - OWNERS MANUAL RAIDON / XCR /XCM / XCT / M3000AL / M2025 / XCU
English
7
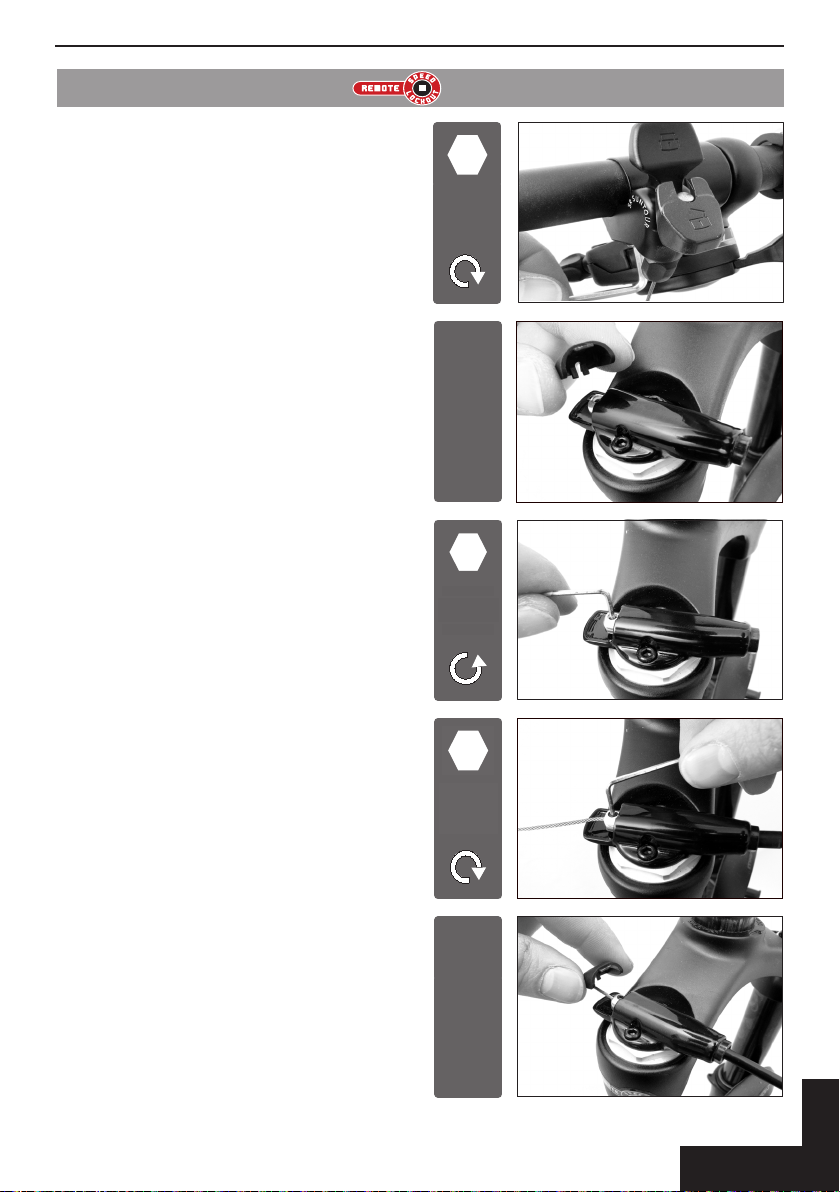
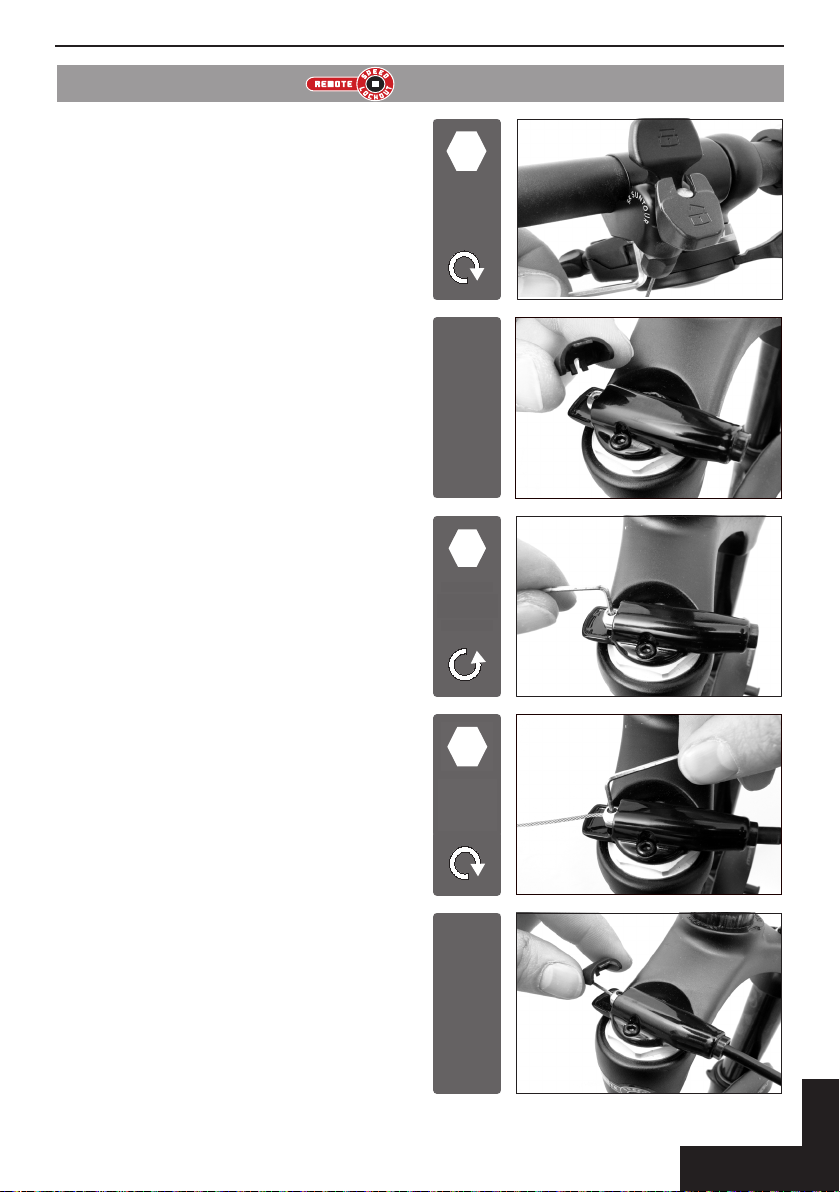
RAIDON RLD / RL / XCR RL REMOTE LOCK LEVER INSTALLATION
Mount the „Remote-Lock-Lever“ on your
handlebar using a 3mm Allen key. After-
wards you can mount your brake and shif-
ting lever back on again.
3mm
1.5 Nm
Take o the plastic cover
TAKE OFF
Reinstall the plastic cover cap again..
CLIP ON
Thread the cable through the outer casing
stopper and through the cover unit hole.
Tension the cable slightly and tighten it
using a 1.5mm Allen key. 1.5mm
0.5 Nm
Unscrew the cable xing bolt using a
1.5mm Allen key
1.5mm

SR SUNTOUR - OWNERS MANUAL RAIDON / XCR /XCM / XCT / M3000AL / M2025 / XCU
English
8
SR SUNTOUR - OWNERS MANUAL RAIDON / XCR /XCM / XCT / M3000AL / M2025 / XCU
In order to lock your fork you have to
push the „Remote-Lock-Lever“ towards
your handlebar. For unlocking you
have to press the blue release button.
RAIDON RLD / RAIDON RL
XCR RL
Install a cable end cap at the end of the
cut cable using a needle nose pliers.
Cut the cable to a proper length. Approxi-
mately 12mm is recommended.
12mm
CUT
LOCK-OUT SYSTEMS
The„Lock-Out“ function of SR SUNTOUR forks is intended to reduce teetering during rides out of
saddle or uphill riding. The forks will not be locked 100%. A few millimeters of travel will remain,
according to our„Anti-Blow-O-System“. This system will protect you in case you have forgotten to
unlock the fork while riding in rough terrain.
Nevertheless, you should never set your fork to the„Lock-Out-Mode“ while riding
in rough terrain, going down hill or jumping. This implies the risk that the fork will
get damaged when it‘s being compressed under high load. This could also result
into an accident, injuries or even death of the rider.
Adjustment
Barrel
If the fork does not lock, the tension of the
cable is probably too low. In this case you
have to increase the tension of the cable
by turning the adjustment barrel counter-
clockwise. If the cable‘s tension is too high
and the fork does not unlock, you have to
turn the adjust barrel clockwise.
TURN
Adjustment
Barrel
Never Lock your fork while it‘s being compressed. This is a missuse of your fork and
implies the risk that it‘s getting damaged. Moreover this could result into an acci-
dent, injuries or even death.

SR SUNTOUR - OWNERS MANUAL RAIDON / XCR /XCM / XCT / M3000AL / M2025 / XCU SR SUNTOUR - OWNERS MANUAL RAIDON / XCR /XCM / XCT / M3000AL / M2025 / XCU
English
9
In order to lock your fork you have
to turn the lock out lever counter-
clockwise. For unlocking you have
to press the blue release button.
XCT V2 MLO
M2025 MLO
In order to unlock your fork you
have to turn the „Speed Lock
Out“ knob 90° counter-clockwise. 90°
RAIDON LOD
XCR LO
XCM V2 HLO
REBOUND DAMPING ADJUST
The rebound function of SR SUNTOUR hydraulic suspension forks allows you to tune your fork ac-
cording to your personal preferences and the terrain you are riding on. This function enables you
to control the speed of your fork‘s rebound after it‘s being compressed.
If you are going to ride on a terrain with a lot of small and fast bumps, we recommend to increase
your forks rebound speed. Otherwise it implies the risk that your front wheel loses its contact to
the ground. If you are going to ride on a terrain with a lot of big and slow bumps, we recommend
to decrease your forks rebound speed.
In order to increase the rebound speed
of your fork you have to turn the adjus-
ter knob counter clock-wise. To decrease
the speed you have to turn it clockwise.
RAIDON LOD
TURN
Adjuster
Knob

SR SUNTOUR - OWNERS MANUAL RAIDON / XCR /XCM / XCT / M3000AL / M2025 / XCU
English
10
SR SUNTOUR - OWNERS MANUAL RAIDON / XCR /XCM / XCT / M3000AL / M2025 / XCU
SR SUNTOUR forks are designed to be nearly maintenance free. However, as long as moving parts
are exposed to moisture and contamination, the performance of your fork might be reduced after
several rides. To maintain a high performance, safety and a long life of your fork, a periodic main-
tenance is required.
Please keep in mind that a fork which has not been serviced in accordance with
the maintenance instructions will loose its warranty!
Never use a pressure washer or any water under pressure to clean your fork as
water may enter the fork at the dust seal level.
We recommend that your fork is being serviced more fequently as indicated
below if you ride in extreme weather (winter time) and terrain conditions.
Any case you may feel that your forks performance has changed or handles die-
rently immediately call on your local dealer to inspect your fork.
FORK MAINTENANCE
SERVICE 1: Checking fork‘s functions / cleaning and greasing bushings / lubricate remote lock
cable and housing / checking torque values / checking air pressure / checking fork for
any scratches, dents, cracks, bent or tarnished parts and stress marks.
SERVICE 2: Service 1 + disassembling / cleaning whole fork / lubricating dust seals and oil wipers /
greasing remote lock and travel adjust top caps / sealing air valve top caps by greasing
it / checking for any air leakings / checking torque values / tuning according to rider‘s
personal preferences.
FORK MAINTENANCE
Maintenance Schedule after each ride every 25h every 50h every 100h
clean stanchion tubes and dust
seals
inspect upper tubes for
scratches
check main xing bolts for
proper torque (Nm)
check air pressure
oil dust seals with teon oil (e.g.
Brunox Fork Deo)
service 1 (at the dealer)
service 2 (at the dealer)

SR SUNTOUR - OWNERS MANUAL RAIDON / XCR /XCM / XCT / M3000AL / M2025 / XCU SR SUNTOUR - OWNERS MANUAL RAIDON / XCR /XCM / XCT / M3000AL / M2025 / XCU
English
11
WEAR AND TEAR PARTS:
► Dust Seals
► O-rings
► Rubber Moving Parts
► Stanchion Tubes
Please note that there is a limited warranty of 1 year on all SR SUNTOUR cartridges!
Please note that there is a limited warranty on sleeves and glide rings of 6 month!
The obligation of this “Limited Warranty” is restricted to repairs and replacements of the suspen-
sion fork or any parts of it in which there is a defect in materials or workman-ship within a period
of two years.
SR SUNTOUR makes no express or implied warranties of tness or merchatability of any kind, ex-
cept as set forth above. Under no circumstances will SR SUNTOUR be liable for incidental or con-
sequential damages.
Damages which are caused by the use of other manufacturer‘s replaceements parts or damages
which are caused by the use of parts that are not compatible or suitable to SR SUNTOUR suspensi-
on forks are not covered by this warranty.
This warranty does not apply to normal wear and tear.
LIMITED WARRANTY
SR SUNTOUR warrants its suspension forks to be free from defects in material and workmanship
under normal use for a period of two years from the date of original purchase. This warranty is
made by SR SUNTOUR Inc. with only the original purchaser and is not transferable to any third
party. Lodging a claim under this warranty must be made through the dealer where the bicycle
or SR SUNTOUR suspension fork was purchased. To prove the original purchase the original retail
invoice has to be provided.
LOCAL LAW:
This warranty gives you specic legal rights. According to the state (USA) or province (Canada)
or every other country you are living in, you may have other rights than explained within these
warranty regulations. These regulations shall be insofar adapted to the local law to be consistent
with such law.
LIMITATION OF WARRANTY
This limited warranty does not apply to any defect of the suspension fork caused by: improper
installation, disassembling and re-assembling, intentional breakage, alterations or modication to
the fork, any unreasonable use or abuse of the product or any use for which this product was not
intended for, accidents, crashes, improper maintenance, repairs improperly performed.

SR SUNTOUR - OWNERS MANUAL RAIDON / XCR /XCM / XCT / M3000AL / M2025 / XCU
English
12

SR SUNTOUR – BENUTZER-HANDBUCH RAIDON/XCR /XCM /XCT /M3000AL/M2025/XCU
Deutsch
1
Benutzerhandbücher
EINSATZBEREICHE .....................................................................................................3
WICHTIGE SICHERHEITSHINWEISE........................................................................4
VOR JEDER FAHRT! .....................................................................................................5
GABELMONTAGE .......................................................................................................5
REIFENABSTAND!........................................................................................................6
RAIDON RLD/RL/XCR RL REMOTE LOCK HEBEL INSTALLATION .................7
LOCK-OUT SYSTEME..................................................................................................8
EINSTELLUNG DER ZUGSTUFE ..............................................................................9
WARTUNG DER GABEL .......................................................................................... 10
EINGESCHRÄNKTE GARANTIE............................................................................. 11
INHALTSVERZEICHNIS
SR SUNTOUR – BENUTZER-HANDBUCH RAIDON/XCR /XCM /XCT /M3000AL/M2025/XCU
Deutsch
2
SR SUNTOUR – BENUTZER-HANDBUCH RAIDON/XCR /XCM /XCT /M3000AL/M2025/XCU
MAX. SCHEIBEN-
DURCHMESSER
[ mm ]
RAIDON BAUREIHE 185
XCR-BAUREIHE 185
XCM V2-BAUREIHE 185
XCT V2-BAUREIHE 160
XCU- UND
MBAUREIHE 160
Standrohre
4
3
Tauchrohre
Ausfallenden
Gabelkrone
Gabelschaft
A
E
C
B
D
RLD = Lockout per
Fernbedienung + Einstellung der
Ausfederungsdämpfung
LOD = Speed-Lockout
+ Einstellung der
Ausfederungsdämpfung
HLO = Hydraulik-Lockout
RL = Lockout per Fernbedienung
LO = Speed-Lockout
MLO = Mechanik-Lockout
1 2

SR SUNTOUR – BENUTZER-HANDBUCH RAIDON/XCR /XCM /XCT /M3000AL/M2025/XCU SR SUNTOUR – BENUTZER-HANDBUCH RAIDON/XCR /XCM /XCT /M3000AL/M2025/XCU
Deutsch
3
EINSATZBEREICHE
Kategorie Freeride All Mountain XC ATB
RAIDON
XCR / XCM
XCT / M / XCU
Wählen Sie die richtige Gabel anhand der Rahmenhöhe und Ihrem persönlichen Fahr-
stil aus. Beachten Sie, dass die Gabelbaureihen AXON, EPICON und RAIDONair nicht für
Sprünge, Absprünge, aggressive Downhill-Abfahrten, Freerides oder Urban Style vor-
gesehen sind.Wenn diese Anleitung nicht eingehalten wird, kann das Produkt versagen
und es können Unfälle oder sogar der Tod des Fahrers daraus resultieren. Wenn diese
Anleitung nicht eingehalten wird, verfällt die Garantie der Gabel!
ANZUGSDREHMOMENTE
MODELL A B C D E
RAIDON RLD
10 Nm ± 10 % 10 Nm ± 10 % 6 Nm ± 10 % 10 Nm ± 10 % 7 Nm ± 10 %
RAIDON LOD
10 Nm ± 10 % 10 Nm ± 10 % 6 Nm ± 10 % 10 Nm ± 10 % 7 Nm ± 10 %
ALLE ÜBRIGEN
GABELN
10 Nm ± 10 % 10 Nm ± 10 % 10 Nm ± 10 % 10 Nm ± 10 % 7 Nm ± 10 %
Modell Speed
Lock Out
Remote
Lock Out
Vorlast-Einstell-
vorrichtung
Zugstufen-
einstellung
RAIDON RLD 1 2 3
RAIDON LOD 1 2 3
XCR RL 1 2
XCR LO 1 2
XCR & XCR 24“ 1+2
XCM V2 HLO 1 2
XCM V2 2
XCT V2 MLO 1 2
XCT V2 1+2
XCT JR 24“ & XCT JR 20“ 1
M2025 MLO 1 2
M- Baureihen / XCU

SR SUNTOUR – BENUTZER-HANDBUCH RAIDON/XCR /XCM /XCT /M3000AL/M2025/XCU
Deutsch
4
SR SUNTOUR – BENUTZER-HANDBUCH RAIDON/XCR /XCM /XCT /M3000AL/M2025/XCU
WICHTIGE SICHERHEITSHINWEISE
Vorsicht
WARNUNG !
Wenn diese Warnungen und Hinweise nicht eingehalten werden,
kann das Produkt beschädigt werden und es kann zu Verletzungen
oder sogar zum Tod des Fahrers kommen.
►
Lesen Sie diese Anleitung sorgfältig durch, bevor Sie Ihre Federgabel verwenden. Durch
falsche Verwendung der Federgabel, kann das Produkt beschädigt werden und es kann zu
schweren Verletzungen oder sogar zum Tod des Fahrers kommen.
►
Federgabeln enthalten Flüssigkeiten und Gase, die unter hohem Druck stehen. Die in dieser
Anleitungen enthaltenen Warnungen müssen genauestens befolgt werden, damit die Ge-
fahr von Verletzungen undTodesfällen reduziert wird. Versuchen Sie niemals, SR-SUNTOUR-
Dämpferpatronen zu önen, da sie Flüssigkeiten und Gase enthalten, die unter hohem
Druck stehen. Wenn Sie SR-SUNTOUR-Dämpferpatronen önen, setzen Sie sich dem Risiko
schwerwiegender Verletzungen aus.
►
Verwenden Sie nur Originalersatzteile von SR SUNTOUR. Durch die Verwendung von Zu-
behör- und Ersatzteilen anderer Hersteller, verfällt die Garantie Ihrer Gabel, und die Gabel
funktioniert u. U. nicht richtig. Darüber hinaus kann es zu Unfällen und sogar zu Personen-
schäden mit Todesfolge kommen.
►
SR-Suntour-Federgabeln sind für die Verwendung mit einem Fahrer vorgesehen.
►
Diese Bedienungsanleitung enthält wichtige Informationen zur richtigen Montage, War-
tung und Pege Ihrer Federgabel. Beachten Sie jedoch, dass Fachwissen und Spezialwerk-
zeuge notwendig sind, um SR-SUNTOUR-Gabeln zu montieren, zu warten und zu pegen.
Allgemeines Mechanikwissen reicht u. U. nicht aus, um Federgabeln zu reparieren, zu war-
ten oder zu pegen. Wir empfehlen daher, die Gabel von einem geschulten und quali-
zierten Fahrradmechaniker montieren, warten bzw. pegen zu lassen. Eine unsachgemäße
Montage, Pege oder Wartung kann eine Fehlfunktion des Produkts oder sogar Personen-
schäden mit Todesfolge verursachen.
►
Fahren Sie ausschließlich mit geeigneter Schutzkleidung. Dies schließt die Verwendung
eines passenden und fest sitzenden Helms mit ein. Je nach persönlichem Fahrstil sollten Sie
darüber hinaus zusätzliche Schutzvorrichtungen verwenden. Stellen Sie sicher, dass Ihre
Ausrüstung stets in einwandfreiem Zustand ist.
►
Wählen Sie die richtige Gabel anhand der Rahmenhöhe und Ihrem persönlichen Fahrstil
aus. Wenn eine Gabel montiert wird, die nicht der Geometrie des Rahmens entspricht, kann
die Gabel beschädigt werden und die Garantie der Gabel verfällt. Durch die Montage einer
Federgabel wird die Geometrie des Fahrrads und der Umgang damit verändert. Gewöhnen
sie sich schrittweise daran und trainieren Sie Ihre Fähigkeiten. Schätzen Sie Ihre Grenzen
richtig ein und überschreiten Sie sie nie.
►
Wenn Sie das Fahrrad auf einem Fahrradträger transportieren, muss der Schnellspanner
immer vollständig gelöst werden. Wenn der Schnellspanner nicht vollständig gelöst wird,
kann die Gabel verbogen werden, zerbrechen oder andere strukturelle Schäden erleiden,
wenn das Fahrrad vom Fahrradträger gehoben wird. Wenn das Fahrrad vom Fahrradträger
gefallen ist, fahren Sie bitte erst dann wieder damit, wenn es von einem qualizierten Fahr-
radmechaniker inspiziert wurde. Wenn Sie einen Fahrradträger verwenden, der das Fahrrad
nur an den Gabelausfallenden hält, muss auch das Hinterrad befestigt werden. Wenn das
Hinterrad nicht ordnungsgemäß befestigt wurde, kann das Fahrrad wackeln und die Ausfal-
lenden können brechen.
►
Beachten Sie, dass die Federgabeln von SR SUNTOUR nicht mit den entsprechenden Rück-
strahlern für den Einsatz im Straßenverkehr ausgestattet sind. Wenn Sie das Fahrrad auf
öentlichen Straßen oder Fahrradwegen verwenden möchten, müssen die benötigten
Rückstrahler an der Gabel befestigt werden. Wenden Sie sich hierfür an Ihren Fachhändler.
►
Lesen Sie sich die im Lieferumfang Ihres Fahrrads enthaltenen Benutzer-Handbücher sorg-
fältig durch und machen Sie sich mit den einzelnen Komponenten Ihres Fahrrads vertraut.
SR SUNTOUR – BENUTZER-HANDBUCH RAIDON/XCR /XCM /XCT /M3000AL/M2025/XCU SR SUNTOUR – BENUTZER-HANDBUCH RAIDON/XCR /XCM /XCT /M3000AL/M2025/XCU
Deutsch
5
VOR JEDER FAHRT!
►Sind Risse, Dellen,Verformungen oder stump-
fe Stellen an der Federgabel oder an einem
anderen Teil Ihres Fahrrads zu sehen? Wenden
Sie sich in diesem Fall an einen geschulten
und qualizierten Fahrradmechaniker, um die
Gabel bzw. das Fahrrad zu überprüfen.
►Tritt Öl aus der Gabel aus? Überprüfen Sie
auch verborgene Stellen wie z. B. die Untersei-
te der Gabelkrone. Wenden Sie sich in diesem
Fall an einen geschulten und qualizierten
Fahrradmechaniker, um die Gabel bzw. das
Fahrrad zu überprüfen.
►
Tauchen Sie die Gabel mit Ihrem Körperge-
wicht ein. Wenn sie zu weich erscheint (wenn
der Druck für einen genauen Negativfeder-
weg nicht stimmt), pumpen Sie die Gabel
auf, bis der gewünschte Wert erreicht wird.
Weitere Informationen nden Sie auch im
Abschnitt „EINSTELLUNG DES NEGATIVFE-
DERWEGS”.
►Überprüfen Sie, dass die Bremsen ordnungs-
gemäß montiert und eingestellt sind und
funktionieren. Dies gilt auch für alle anderen
Fahrradteile wie Lenkstange, Pedale, Tretkur-
bel, Sattelstütze, Sattel usw. Weitere Informa-
tionen nden Sie auch in den Bedienungsan-
leitungen der anderen Teilehersteller.
►Überprüfen Sie, dass die Laufräder perfekt
zentriert sind, damit sie die Federgabel und
das Bremssystem nicht berühren.
►Wenn Sie ein Schnellspannsystem verwen-
den, um die Laufräder zu befestigen, über-
prüfen Sie, dass alle Spanner und Muttern
ordnungsgemäß festgezogen sind. Wenn Sie
ein Steckachsensystem verwenden, überprü-
fen Sie, dass alle Befestigungsschrauben mit
den entsprechenden Drehmomenten ange-
zogen sind.
►Überprüfen Sie die Kabellänge und die Ka-
belführung der Bauteile. Die Kabel dürfen die
Lenkbewegungen nicht beeinträchtigen.
►Wenn Sie Rückstrahler für den Straßenverkehr
verwenden, überprüfen Sie, dass sie sauber
und ordnungsgemäß montiert sind.
►Lassen Sie Ihr Fahrrad leicht auf den Boden
springen und prüfen Sie, ob lose Teile zu hö-
ren sind.
GABELMONTAGE
WARNUNG !
SR SUNTOUR empehlt, die Gabel von einem geschulten und qualizierten Fahrradmecha-
niker montieren zu lassen. Zur Installation der Gabeln von SR SUNTOUR sind Fachwissen
und Spezialwerkzeuge notwendig. Zur Montage einer Federgabel von SR SUNTOUR ist me-
chanisches Allgemeinwissen u. U. nicht ausreichend. Wenn Sie Ihre Gabel selbst montieren
möchten, muss das Ergebnis von einem geschulten und qualizierten Fahrradmechaniker
inspiziert werden. Beachten Sie, dass falsch montierte Gabeln sehr gefährlich sind und zu
Schäden am Produkt, zu schwerwiegenden Verletzungen und zum Tod führen können.
MONTAGEANLEITUNG
Hinweis! Alle Befestigungsschrauben müssen mit den entsprechenden Drehmomenten, die
vom Hersteller bestimmt wurden, angezogen werden.
Bauen Sie die alte Gabel aus dem Fahrrad aus. Nehmen Sie dann die Gabellagerschale1. von der Gabel ab.
Messen Sie die Länge des Gabelschaftrohrs der alten Gabel, im Vergleich zur Länge des2. Gabelschafts der SR-SUNTOUR-Gabel. Die Standardlänge des Gabelschaftrohrs von SR-
SUNTOUR-Federgabeln beträgt 255 mm. Daher muss das Gabelschaftrohr möglicher-
weise auf die entsprechende Länge zurechtgesägt werden.
Fahren Sie nicht mit dem Fahrrad, wenn eines der folgenden Kriterien
nicht erfüllt wird! Wenn das Fahrrad beschädigt ist oder wenn die not-
wendigen Einstellungen nicht vorgenommen wurden und das Fahrrad
dennoch verwendet wird, kann dies zu Unfällen, schwerwiegenden Ver-
letzungen und zum Tod führen.

SR SUNTOUR – BENUTZER-HANDBUCH RAIDON/XCR /XCM /XCT /M3000AL/M2025/XCU
Deutsch
6
SR SUNTOUR – BENUTZER-HANDBUCH RAIDON/XCR /XCM /XCT /M3000AL/M2025/XCU
GABELMONTAGE
3. Zur Bestimmung der richtigen Länge des Gabelschafts, können Sie folgende Formel ver-
wenden:
Steuerkopf des Rahmens + Steuersatzhöhe + Abstandshalter + Höhe der Vorbaukralle – 3 mm
Abstand
WARNUNG !
Wenn Ihre SR-SUNTOUR-Gabel in der gewindelosen Ausführung geliefert wird,
darf kein Gewinde eingeschnitten werden. Die Gabelschäfte von SR SUNTOUR
sind eingepresst und können nicht demontiert werden. Versuchen Sie nicht, den
Gabelschaft durch einen Gabelschaft mit Gewinde zu ersetzen. Dadurch verfällt
die Garantie der Gabel; es kann zu Schäden am Produkt kommen bzw. es können
schwerwiegende Verletzungen oder Tod des Fahrers verursacht werden.
Montieren Sie die Gabellagerschale (30 mm für 14. ⁄") fest oben an der Gabelkrone. Brin-
gen Sie die Gabel (Steuersatz, Abstandshalter, Vorbau) wieder am Fahrrad an. Stellen Sie
den Steuersatz so ein, dass kein Spiel mehr zu spüren ist. Weitere Informationen finden
Sie auch in der Montageanleitung vom Hersteller des Vorbaus.
Montieren Sie die Bremsen entsprechend der Anleitung des Herstellers. Stellen Sie die5. Bremsbacken richtig ein. Wenn Sie eine Scheibenbremse verwenden, montieren Sie die
Bremse nur in den ursprünglichen Montagelöchern für die Scheibenbremse. Verwen-
den Sie ausschließlich Cantileverbremsen, die für Gabelbrücken ohne Bremskabelauf-
hängung vorgesehen sind. Befolgen Sie die Montageanleitung des Bremsenherstellers.
Wählen Sie die richtige Länge für das Bremskabel, damit der Einsatz der Gabel nicht be-
einträchtigt wird.
Setzen Sie das Rad wieder ein. Falls Sie ein6. Schnellspannsystem zur Befestigung Ihrer
Räder verwenden, stellen Sie bitte sicher, dass sämtliche Befestigungsvorrichtungen und
Muttern ordnungsgemäß angezogen sind (beim Anbringen der Mutter müssen minde-
stens vier Gewinde eingedreht werden). Falls Sie ein Steckachsensystem verwenden,
stellen Sie bitte sicher, dass alle Befestigungsschrauben mit den entsprechenden Dreh-
momenten angezogen sind. Weitere Informationen nden Sie auch im Abschnitt Qloc in
dieser Anleitung.
REIFENABSTAND!
Ihre Federgabel von SR SUNTOUR ist für 26"-Reifen vorgesehen. Jeder Reifen weist einen
anderen Außendurchmesser (Reifenbreite und -höhe) auf. Aus diesem Grund muss das Spiel
zwischen Ihrem Reifen und der Gabel sorgfältig überprüft werden, um sicherzustellen, dass
Ihr Reifen zu keinem Zeitpunkt die Gabel berührt. Denken Sie daran, dass sich der engste
Teil der Gabel an den Anlötsockeln der Bremse bendet. Wenn Sie das Rad ausbauen möch-
ten, müssen Sie u. U. die Luft aus dem Reifen lassen, damit es durch die Anlötsockel passt.
Reifenabstand-Test:
Hinweis! DieVerwendung eines Reifens, der die maximale Reifengröße für Ihre Ga-
bel übersteigt, ist sehr gefährlich und kann zu Unfällen, schwerwiegenden Verlet-
zungen und zum Tod des Fahrers führen.
Lassen Sie die Luft aus der Gabel.1. Tauchen Sie die Gabel bis zum Anschlag ein.2. Messen Sie den Abstand zwischen der Oberseite des Reifens und der Unterseite3. der Gabelkrone. Der Abstand darf nicht unter 10 mm liegen! Wenn der Reifen zu
groß ist, schlägt er gegen die Unterseite der Gabelkrone, wenn die Gabel bis zum
Anschlag eingetaucht ist.
Entlasten Sie die Gabel wieder.4.
Beachten Sie, dass der Abstand verringert wird, wenn Sie ein Schutzblech verwenden!
Wiederholen Sie den „Reifenabstand-Test”, um sicherzustellen, dass der Abstand groß
genug ist. Wiederholen Sie den Test auch jedes Mal, wenn Sie den Reifen wechseln!
SR SUNTOUR – BENUTZER-HANDBUCH RAIDON/XCR /XCM /XCT /M3000AL/M2025/XCU SR SUNTOUR – BENUTZER-HANDBUCH RAIDON/XCR /XCM /XCT /M3000AL/M2025/XCU
Deutsch
7
RAIDON RLD/RL/XCR RL REMOTE LOCK HEBEL INSTALLATION
Montieren Sie den „Remote Lock Hebel“
mit einem Inbusschlüssel (3 mm) an der
Lenkstange. Danach können Sie die Brem-
se und die Gangschalthebel wieder an-
bringen.
3mm
1.5 Nm
Nehmen Sie die Plastikhaube ab.
ABNEHMEN
Setzen Sie die Plastikhaube wieder auf.
EINSCHNAPPEN
Ziehen Sie den Seilzug durch die äußere
Kabelhalterung und durch das Loch in
der Abdeckung. Spannen Sie den Seilzug
leicht und ziehen Sie ihn mit einem Inbus-
schlüssel (1,5 mm) fest.
1.5mm
0.5 Nm
Lösen Sie die Schraube, die den Seilzug
hält, mit einem Inbusschlüssel (1,5 mm).
1.5mm
This manual suits for next models
20
Table of contents
Languages:
Other SR Suntour Bicycle Accessories manuals

SR Suntour
SR Suntour NCX 2019 User manual

SR Suntour
SR Suntour AURON User manual

SR Suntour
SR Suntour HESC User manual

SR Suntour
SR Suntour NCX NEX User manual

SR Suntour
SR Suntour RAIDON User manual

SR Suntour
SR Suntour Epicon User manual

SR Suntour
SR Suntour SR Suntour User manual

SR Suntour
SR Suntour NRX Series User manual

SR Suntour
SR Suntour RUX RC2 DH User manual

SR Suntour
SR Suntour HESC User manual


