SSI IMMUVIEW READER User manual
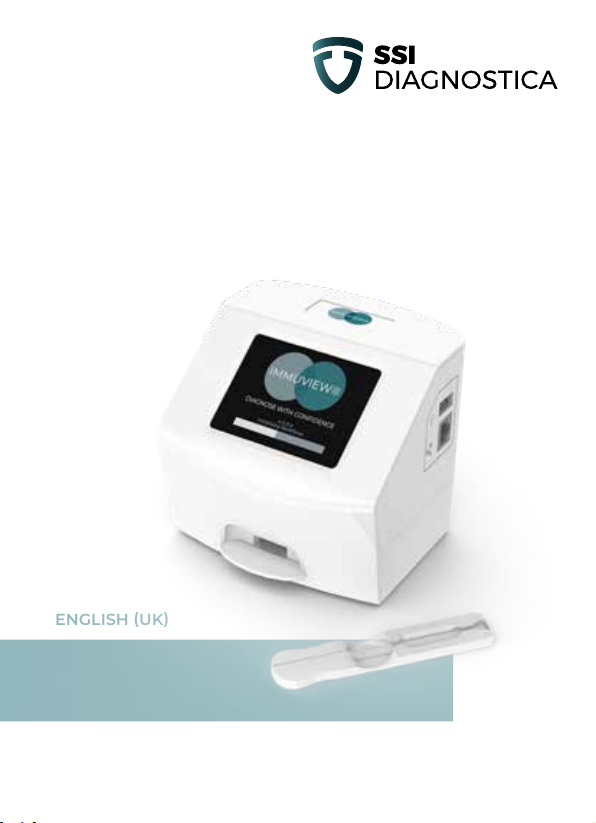
ENGLISH (UK)
QUICK GUIDE
IMMUVIEW® READER
Instrument for automated
interpretation of results for
ImmuView®lateral flow test

2
IMMUVIEW®READER
Introduction
This short ImmuView®Reader Quick Guide provides an overview of how to perform
a test with the ImmuView®Reader, and an ImmuView®strip. The ImmuView®
Reader is an instrument for automated interpretation of results for ImmuView®
lateral ow test.
This ImmuView®Reader is pre-set for basic daily use. You can customise your Im-
muView® Reader to t your personal settings and quality assurance requirements.
Please refer to the ImmuView®Reader manual for more detailed information about
the different functions of the reader.
Intended use
The ImmuView® Reader is an adjunctive instrument for automated reading and
interpretation of results for ImmuView® lateral ow immunochromatographic in
vitro diagnostics test strips.
Materials provided
The following content are supplied with the ImmuView®Reader:
• ImmuView®Reader
• 1 x Instrument check cartridge
• 2 x Strip-Carriers
• Power supply (With adaptors for US, EU, UK, Canada, and AUS)
• 3 x Ferrites (clip on for accessories only)
• 1 x Quick guide
• 1 x Certicate of Analysis (CoA)
Scan the QR code to access ImmuView®Reader
Manual via hyperlink or use the following link to access
it manually by entering this hyperlink in your browser:
http://ssidiagnostica.com/manualimmuviewreader/

3
The ImmuView® Reader, consumables, and its ports
Figure 1 ImmuView®Reader - Front View
Figure 2 ImmuView®Reader - Rear View
TFTLCD COLOUR
DISPLAY & TOUCH
SCREEN
LED STATUS
INDICATOR
USB
CONNECTION
USB
CONNECTION
ETHERNET
CONNECTION
CARTRIDGESTRIP
CARRIER SLOT
STRIP CARRIERINSTRUMENT CHECK CARTRIDGE
COMPANY LOGO
RATING LABEL
AUDIO SPEAKER
SERIAL NUMBER
UDI LABEL
SECURITY LOCK SLOT POWER CONNECTION POWER BUTTON

4
Start up the ImmuView®Reader
Turn on the reader by pressing and holding the power button for 2-3 seconds
(until a tone sounds). The power button is found on the left side of the ImmuView®
Reader (see picture of reader on page 3).
The start-up sequence is an automated test that is performed to verify correct
internal system functionality of the reader. If the reader is left turned on, the self-
test is automatically performed every 24hrs. The startup sequence takes around 3
minutes.
This is how the startup sequence appears on the ImmuView®Reader:
• Hourglass icon appears
• Loading bar appears and begins to load till full
•“ImmuView®” logo is displayed with indication
of start-up progress
Main menu
Once the start-up sequence is completed, the rst
screen you will see is “The Home menu screen”. You are
per default logged-in as Default User. To log-in push the
“key” button (lower left corner) and type in your initials.
The Home menu screen gives you the following options:
•Test, for running a test
•Results, for reviewing previously run test results
•Settings, for conguring the instrument
Further details and options for “Results” or user/admin
“Settings” can be found in the user manual.

5
How to run a test
Step 1: Press “TEST” on the Screen
The Test menu shows the different types of tests that
can be performed on the ImmuView®Reader:
•Perform Test
•Instrument Check
For further test settings, please refer to
section 8.7 in the user manual
Step 2: Press “Perform Test” on the screen
Step 3: Enter Patient ID
• Enter a unique patient ID using the onscreen
keyboard, or a scanner*.
•Press √ [Accept] to save the patient ID.
NB: If you Press X[Cancel] it cancels the test and test
data is not saved.
*A handheld scanner can be attached to the reader.
We recommend Datalogic QuickScan QD2430 2D

6
Step 4: Insert the strip into the Strip Carrier
Please refer to the section “How to insert the ImmuView®strip in the Strip Carrier”,
at the end of this quick guide, for a detailed description.
Step 5: Insert the Strip Carrier in the ImmuView® Reader
Insert the Strip Carrier (including the ImmuView®strip)
in the ImmuView® Reader when the screen says, “Insert
Test”. When you hear/feel a “click”, the Strip Carrier is in
place and the ImmuView® Reader will start to analyse the
strip.
Once you have inserted the Strip Carrier, no further actions are required.
The reading takes around 40 seconds.
When the reading is done, the test result will
automatically be shown on the screen.
The Strip Carrier must be left inserted in the ImmuView®
Reader during this phase of analysis.
Result
After the analysis, the ImmuView® Reader makes a
sound, to indicate that the analysis is nished.
This example shows that both Legionella and
S. pneumoniae are negative. Please also notice
the text “Control: VALID”, which indicates that
the test is valid.
Back Front
Strip placement
Make sure ”P&L” is visible & placed as shown in the picture.
7
You can remove the Strip Carrier from the ImmuView®Reader now.
ImmuView® Reader results outcomes:
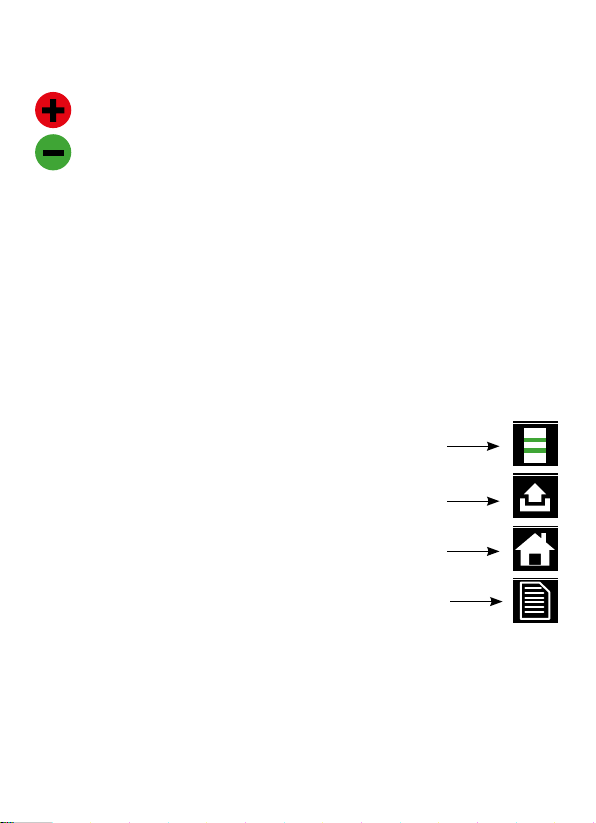
A positive result will display a “Red Plus” next to the text.
A negative result will display a “Green Minus” next to the text.
Boil & Re-test Sample; and an IFU icon: Please refer to the ImmuView®IFU
interpretation of result section for further explanation.
Invalid; and an IFU icon: Potential error related to the Strip Carrier or the
ImmuView®strip. Refer to “How to insert the ImmuView®strip in the Strip
Carrier” section of this Quick Guide, and/or the ImmuView®IFU interpreta-
tion of result section.
The ImmuView®Reader will automatically save the result, which
can be accessed in the “Results” – please refer to section 8.12 in the
ImmuView®Reader user manual for more information.
To perform another test, press this icon.
To export the test result, press this icon.
Only possible if the ImmuView®Reader is connected to LIS or an
USB key is inserted into one of the ImmuView®Reader USB ports
If you want to go back to the main menu, press this icon (home)
To print the results, press this icon:
You need an external printer for this. We recommend the
Seiko Smart Label 620 Labelprinter.

8
Other essential features
Performing an Instrument Check
To perform an Instrument Check:
Follow step 1 and in step 2
[on page 5 in this Quick Guide] press the
‘Instrument Check’.
Unpack the Instrument Check Cartridge.
Follow Step 5 and insert the Instrument Check Cartridge
in the reader. The arrow on the Instrument Check
Cartridge needs to enter the
ImmuView®Reader
rst.
The
ImmuView®Reader
will perform the Instrument check.
The result will either be a pass or fail.
A pass describes that the
ImmuView®Reader
is within the specications.
A fail describes that the
ImmuView®Reader
is outside the specications, and the
reader is to be put in quarantine and sent to the supplier
(please refer to the manual).
Note: The
ImmuView®Reader
is by default pre-set to prompt the user every 7 days
for an Instrument Check.
LIS integration and other tasks
The ImmuView®Reader can be connected to the LIS system. Please refer to section 9.19
(Data connectivity) in the manual to learn how to transfer data from the ImmuView®
Reader to LIS.
Other features
Refer to the manual for detailed information of other
ImmuView®Reader
features
like printing results, storing data etc.
Instrument Check Cartridge

9
How to insert the ImmuView®strip in the Strip Carrier
Step 1: Follow the
procedure as
described
in the ImmuView®
S. pneumoniae &
Legionella IFU
Step 2: After 15 minutes remove
the ImmuView®strip from the
test tube, and gently dap off
excess sample uid, e.g. in a
napkin.
Step 3: Insert the ImmuView®strip in the Strip Carrier
Firstly, have a look at the design of the Strip Carrier, pictured bellowed.
Back
Front
”Finger” grip. To help to
insert and remove strip.
”Well” to ease the
removal of the strip
Insert strip here
THE STRIP CARRIER
Add test and wait
15 minutes
Add running buffer
and whirl gently
Sample addition
3 drops
(120 µL)
2 drops
(90 µL)
Legionella and
S. pneumoniae
positive
A
B
C
Legionella and
S. pneumoniae
positive*
A
B*
C*
Legionella
positive
A
B
C
S. pneumoniae
positive
A
B
C
Negative
A
B
C
Result interpretation
A: Control
B: Legionella
C: S. pneumoniae
* Look closely.
The intensity of
the lines B and C
may vary from
very clear to faint.
Invalid test
13246
Incomplete line -
retest sample
A
B
C
9
Three grey/purple
lines - boil
and retest
A
B
C
5
No control -
retest sample
A
B
C
8
No control -
retest sample
A
B
C
7

10
Next, follow step A, B and C, and you are ready to
insert the Strip Carrier in the ImmuView®Reader
A. Gently insert the ImmuView®strip in the Strip Carrier. Make sure “arrows”
goinrst,andthe“P&L”textisattheback.
B. Continue to gently
push the ImmuView®
strip in the Strip Carrier.
C. Once the ImmuView®strip
reaches the front of the Strip
Carrier, the ImmuView®strip
is in place, and you can now insert
the Strip Carrier in the
ImmuView®
Reader
.
Step 4: Insert the Strip Carrier in the
ImmuView®Reader
(please see section 5 in the
Quick Guide for correct sequence).
On the reader it will say “insert test” when
it is time to insert the Strip Carrier.
Back Front
Strip placement
Make sure ”P&L” is visible & placed
as in the picture.
NOTICE THE ARROW.
The arrow always needs to be visible
when it is inserted in the reader or the
reader may report invalid results

11
Removal of ImmuView®strip
A. To remove the ImmuView®
strip, simply slide it back from
the Strip Carrier and gently
remove it. You can use your
thumb for this.
B. Next, continue to remove the
strip from the Strip Carrier.
C. Discard the used strip and
clean the Strip Carrier.
Cleaning the Strip Carrier:
Cleaning with 70% Isopropanol and 10% Bleach. See manual for further details.
Quality certificate
SSI Diagnostica’s development, production and sales of
in vitro
diagnostics are
quality assured and certied in accordance with ISO 13485.
Information and ordering
SSI Diagnostica A/S - Herredsvejen 2 - 3400 Hillerød - Denmark
T +45 4829 9100 - [email protected]om - immuview.com
© 2016-2020 SSI Diagnostica A/S all rights reserved.
Gently press here
Edition 1.0.2 • November 2020 • 99160
18344

IMMUVIEW.COM
Table of contents
Other SSI Test Equipment manuals


