Störk-Tronic ST710-PWHVM.26 User manual

ST710-PWHVM.26
Six-stage controller
Order number 900205.004
Old Id.Nr.: 175539
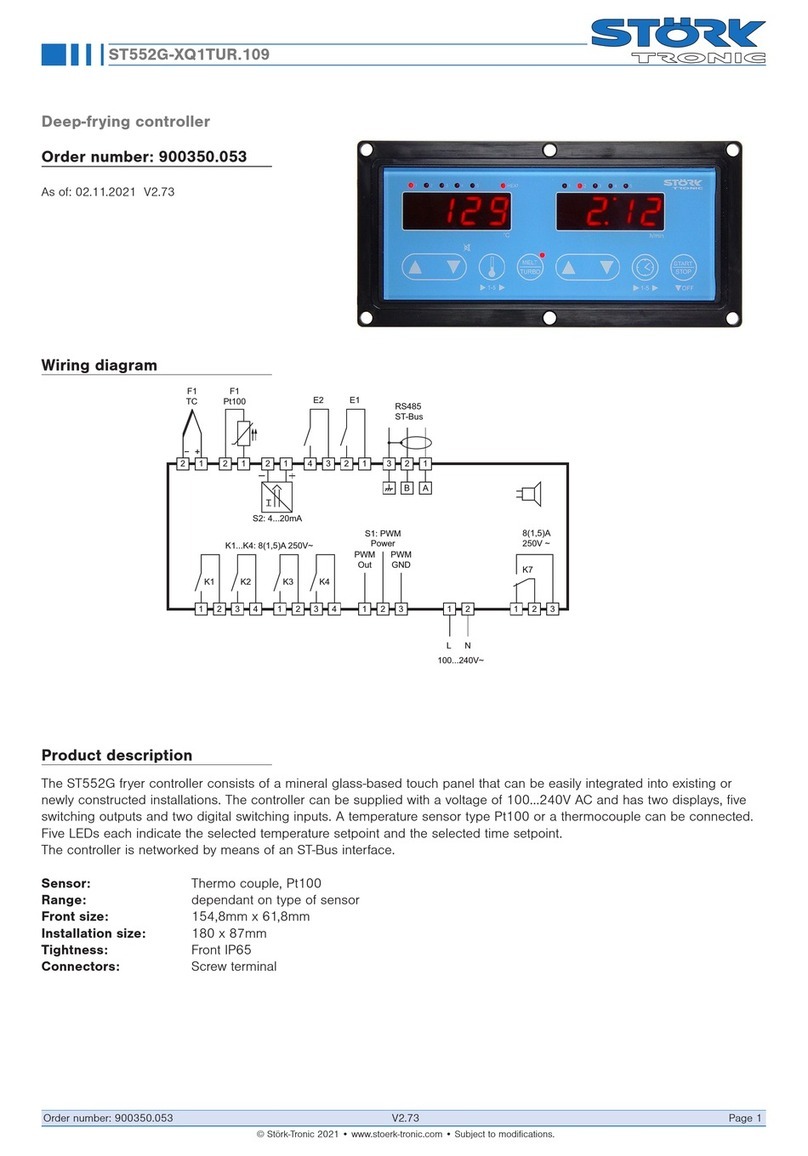
Wiring diagram
Product description
The six-stage controller was developed for the control of compressor groups of up to 6 machines,
and/or the control of compressors with bypass-valves (max. 3 machines). The basic gas charac-
teristics are part of the fixed program data - therefore, it is possible to execute a pressure control
(4...20mA) and to show the temperature values at the same time. The compressor running times
can be optimised by help of the sequential or time-conditioned load replacement. The controller
that can be parametered in various ways has an alarm contact and a hour meter.
Front size: 84mm x 42mm
Panel cut-out: 67.5mm x 31.5mm
Connector: plug and socket
1

2

SOFTWARE .26
Adjustment options
Key UP
Pressing this key you can increase the parameter or parameter value or scroll the
parameter list.
Key DOWN
Pressing this key you can decrease the parameter or parameter value or scroll the
parameter list. At alarm the buzzer function can be switched off with this key.
Key Display:
Shortly pressing this key shows the other value (“°C”, “bar”) of the actual display for 3
seconds. Pressing it for more than 5 seconds switches over to power display or back to
temperature display. The LEDs indicate the actual display value.
Key SET
While SET key is pressed, the setpoint is indicated.
In addition, the SET key is used for setting parameters.
Key Standby
This key puts the controller into standby mode. Pressing the key a second time, restarts
the unit. The key can be deactivated.

First control level:
After switching-on the mains voltage the display shows “OFF” if standby mode is activated and the
actual value if the controller is not in standby mode.
The LEDs have the following functions:
“°C” = temperature display in °C (upper LED)
“bar” = pressure display in bar (middle LED)
“%” = power display in % (lower LED).
Note: The setpoint can also be adjusted by the LON-network. On every setpoint adjustment via
LON-network the new value will be verified if in control range limitations.
Parameter setting of the main setpoint
If none of the keys is pressed, the display indicates the actual value of the temperature. Pressing
the SET key, the setpoint shows on the display.
If the setpoint is to be changed, the SET key is to be kept pressed while adjusting the setpoint with
the keys UP and DOWN.
Please note that the setpoint can only be changed within the set setpoint limits.
The setpoint S1’ (if available) can be adjusted in the same way. If setpoint S1’ is activated it is
indicated and relevant for the control in case of closed switching input E1.
.
Para-
meter Function description Adjustment range Standard
setting Custom
setting
S1 Setpoint P4...P5 0.0°C
S1' Setpoint S1'
(E1 closed) -99.9 ... +99.9 K or:
P17...P18 -5.0 K or
10.0°C
Note: The setpoint can also be adjusted via LON-network. On every setpoint adjustment via LON-
network the new value will be verified if in control range limitations.

Second control level (P parameters):
Setting of control parameters
Simultaneously pressing the UP and DOWN key for at least 4 seconds opens a parameter list
containing control parameters.
With the UP and DOWN keys the list can be scrolled in both directions.
Pressing the SET key will give you the value of the respective parameter. Pressing also the UP or
DOWN key at the same time the value can be adjusted.
Return to the initial position takes place automatically, if no key is pressed for 60 seconds.
Important advice:
The parameters P1-P5 as well P30+P31 are saved separately as absolute und relative values in
the controller. The parameters A10-A14 resp. A17 of the third control level determine which group
of values is accessed. It s recommended to adjust these parameters of the third control level first,
otherwise performed adjustments of the respective P-parameters have to be repeated
Because a change of the display value with A15 and/or the refrigerant with A37 can cause a forced
reset of the P-parameters, these parameters (A15 and A37) should be adjusted first as well.
To delete or change the operating times P33-P34 parameter A42 must be set to “0”.
Para-
meter Function description Adjustment range Standard
setting Custom
setting
P1 Setpoint 2
Delta W1 -99.9 ... 999.0°C
-99.9 ... 99.9 K
10.0 K
P2 Setpoint 3
Delta W2 -99.9 ... 999.0°C
-99.9 ... 99.9 K
20.0 K
P3 Setpoint 4
Delta W3 -99.9 ... 999.0°C
-99.9 ... 99.9 K
30.0 K
P4 Setpoint 5
Delta W4 -99.9 ... 999.0°C
-99.9 ... 99.9 K
40.0 K
P5 Setpoint 6
Delta W5 -99.9 ... 999.0°C
-99.9 ... 99.9 K
500 K
P11 Hysteresis 1 for K1 0.1...99.9 K 1.0 K
P12 Hysteresis 2 for K2 0.1...99.9 K 1.0 K
P13 Hysteresis 3 for K3 0.1...99.9 K 1.0 K
P14 Hysteresis 4 for K4 0.1...99.9 K 1.0 K
P15 Hysteresis 5 for K5 0.1...99.9 K 1.0 K
P16 Hysteresis 6 for K6 0.1...99.9 K 1.0 K
P17 Control range limitation –
minimum setpoint -99.9°C...P18 -99.9°C
P18 Control range limitation –
maximum setpoint P17...999.0°C 999.0°C
P19 Key-lock 0: no key-lock
1: key-lock 0
P20 Indication actual value 1 N/A
P21 Actual value correction -30.0...+30.0 K 0.0 K
P30 Lower alarm value -99.9°C...P31 or
-99.9...999.0 K -99,9°C or
-10,0 K
P31 Upper alarm value P30...999.0°C or
-99.9...999.0 K 999,0°C or
+10,0 K
P32 Alarm hysteresis 0.1...99.9 K 1.0 K

Para-
meter Function description Adjustment range Standard
setting Custom
setting
P33 Total operating time contact K1
in years 0 ... 25 years 0 years
P34 Total operating time contact K1
in days 0 ... 364 days 0 days
P35 Total operating time contact K2
in years 0 ... 25 years 0 years
P36 Total operating time contact K2
in days 0 ... 364 days 0 days
P37 Total operating time contact K3
in years 0 ... 25 years 0 years
P38 Total operating time contact K3
in days 0 ... 364 days 0 days
P39 Total operating time contact K4
in years 0 ... 25 years 0 years
P40 Total operating time contact K4
in days 0 ... 364 days 0 days
P41 Total operating time contact K5
in years 0 ... 25 years 0 years
P42 Total operating time contact K5
in days 0 ... 364 days 0 days
P43 Total operating time contact K6
in years 0 ... 25 years 0 years
P44 Total operating time contact K6
in days 0 ... 364 days 0 days
Note: To delete or change the operating times P33-P34 parameter A42 must be set to “0”.

Parameter description:
P1: Setpoint 2 / Delta W1
P2: Setpoint 3 / Delta W2
P3: Setpoint 4 / Delta W3
P4: Setpoint 5 / Delta W4
P5: Setpoint 6 / Delta W5
Adjustment of the secondary setpoints. The respective secondary setpoint can be adjusted by
parameters A10-A14 to be relative, i.e. going along with the main setpoint S1, or absolute, i.e.
independent of the main setpoint.
Note that P3 together with P1 is effective for contact K2 if operating mode is A44=12.
P11-P16: Hysteresis K1-K6
The hysteresis can be adjusted separately for the main setpoint (P11) and the secondary setpoints
(P12-P16) and is set symmetrically at the setpoints, i.e. half of the hysteresis’ value is effective
below and half of the value above the switching point. Note that a small hysteresis permits a more
exact regulation, however also leads to more frequent switching frequency decreasing the lifetime
of the relay.
P17: Control range limitation – minimum setpoint
P18: Control range limitation – maximum setpoint
The adjustment range of the setpoint can be limited in both directions. This is to prevent the end
user of a unit from setting inadmissible or dangerous setpoints.
P19: Key-lock
The key-lock allows blocking of the control keys. In locked condition parameter adjustments with
keys is not possible. At the attempt to adjust the parameters despite key-lock the message "==="
appears in the display.
P20: Actual value
The here indicated temperature presents the actual measured value.
P21: Actual value correction
This parameter allows the correction of actual value deviations caused for example by sensor
tolerances or extremely long sensor lines. The regulation measure value is increased or decreased
by the here adjusted value.
P30: Lower alarm value
P31: Upper alarm value
The alarm exit K7 evaluates an upper and a lower limit value, whereas a selection is possible (with
parameter A17) as to whether the alarm is active if the temperature lies within these two limits
(range alarm), or whether the alarm is released if the temperature lies beyond them (boundary
alarm). In the case of sensor error, the alarm is activated independently of this adjustment.
Depending on parameter A17 both at the boundary alarm and the range alarm, limit values can be
relative, i.e. going along with the setpoint, or absolute, i.e. independent of the setpoint.
P32: Hysteresis alarm circuit
Hysteresis is set symmetrically at the adjusted limit value. It becomes effective depending on alarm
definition

The operating time recorded by parameters P33-P44 is mainly used in the field of refrigeration
technology to register the operating time of the connected compressors.
P33: Total operating time contact K1 in years
P35: Total operating time contact K2 in years
P37: Total operating time contact K3 in years
P39: Total operating time contact K4 in years
P41: Total operating time contact K4 in years
P43: Total operating time contact K4 in years
These parameters indicate the total operating times in years elapsed with the respective contact
switched on.
P34: Total operating time contact K1 in days
P36: Total operating time contact K2 in days
P38: Total operating time contact K3 in days
P40: Total operating time contact K4 in days
P42: Total operating time contact K4 in days
P44: Total operating time contact K4 in days
These parameters indicate the remaining total operating times in days elapsed with the respective
contact switched on.
Note: Time is recorded in minute cycles. Periods shorter than one minute are ignored. Storage in
the non-volatile memory takes place twice daily, so that an inaccuracy of max. 12 hours may result
if a power failure occurs.
Caution: Parameters P37-P44 are only effective when the pertinent output is available and
activated by parameter A44.
To avoid statistical errors, it is essential that the operating mode set in parameter 44 corresponds
to the number of external loads (e.g. compressors) that are connected.
Failure to do this will result in incorrect operating times being recorded by parameter P33-P44.
Operating times can be updated after replacement of components if parameters P19 and A19
together with parameter A42 are unlocked. Otherwise data can be irretrievable lost.

Third control level, (A parameters):
Setting of control parameters
Access to the third control level is granted when selecting the last P-parameter on the second
control level. Continue to press the UP key for approximately 10 seconds until “PA” appears.
Continue to press the UP key and additionally press the DOWN key for about 4 seconds and the
first A-parameter of the third control level is indicated.
With the keys UP and DOWN you can scroll the list in both directions. Pressing the SET key will
give you the value of the respective parameter. By pressing the UP or DOWN key at the same time
the value can be adjusted.
Return to the initial position takes place automatically, if no key is pressed for 60 seconds, or by
simultaneously pressing the UP and DOWN key for approx. 4 seconds.
Para-
meter Function description Adjustment range Standard
setting Custom
setting
A1 Function of contact K1 at
sensor error 0: relay off
1: relay on 0
A2 Function of contact K2 at
sensor error 0: relay off
1: relay on 0
A3 Function of contact K3 at
sensor error 0: relay off
1: relay on 0
A4 Function of contact K4 at
sensor error 0: relay off
1: relay on 0
A5 Function of contact K5 at
sensor error 0: relay off
1: relay on 0
A6 Function of contact K6 at
sensor error 0: relay off
1: relay on 0
A10 Selection setpoint 2 or
DeltaW1 0: operation with setpoint 2
1: operation with deltaW1
1
A11 Selection setpoint 3 or
DeltaW2 0: operation with setpoint 3
1: operation with deltaW2
1
A12 Selection setpoint 4 or
DeltaW3 0: operation with setpoint 4
1: operation with deltaW3
1
A13 Selection setpoint 5 or
DeltaW4 0: operation with setpoint 5
1: operation with deltaW4
1
A14 Selection setpoint 6 or
DeltaW5 0: operation with setpoint 6
1: operation with deltaW5
1
A15 Display value 0: temperature display
1: pressure display 0
A16 Display mode 0: integrals
1: with decimals
1
A17 Alarm mode
0: Boundary alarm,
relative boundaries
1: Boundary alarm,
absolute boundaries
2: Range alarm,
relative boundaries
3: Range alarm,
absolute boundaries
0
A18
Special function at boundary
alarm 0: not activated
1: flashing display 0
A20 Minimum action time K1 “Off” 0...999 sec. 0 sec.
A21 Minimum action time K2 “Off” 0...999 sec. 0 sec.

Para-
meter Function description Adjustment range Standard
setting Custom
setting
A22 Minimum action time K3 “Off” 0...999 sec. 0 sec.
A23 Minimum action time K4 “Off” 0...999 sec. 0 sec.
A24 Minimum action time K5 “Off” 0...999 sec. 0 sec.
A25 Minimum action time K6 “Off” 0...999 sec. 0 sec.
A30 Mutual delay of contacts 0...999 sec. 0
A31 Delay after “Power-on” 0...999 sec. 0
A32 Alarm suppression after
"Power-On" 0...999 sec. 0
A33 Operating time before time
depending load replacement 0...999 sec. or min. 240
A34 Time scale for parameter A33 0: seconds
1: minutes
1
A35 Measuring input 0: temperature measuring input
1: pressure measuring input 0
A36 Temperature scale 0: Fahrenheit (50 Hz)
1: Celsius (50 Hz)
2: Fahrenheit (60 Hz)
3: Celsius (60 Hz)
1
A37 Refrigerant 0: R134A
1: R22
2: R407C
3: R404A
0
A38 Indication value for lower
value at pressure measuring -99...999 0.0
A39 Indication value for upper
value at pressure measuring -99...999 30.0
A40 Activation of time-dependent
load replacement 0: not activated
1: activated
1
A41 Sequential operation mode 0: not activated
1: activated
1
A42 Interlocking of total operating
times 0: not locked
1: locked
1
A43 Function of switching input E1 0: no function
1: S1’ activated relative to
setpoint S1
2: S1’ activated absolute
(freely adjustable)
3: switch to standby mode
by closing E1
4: switch to standby mode
by opening E1
0

Para-
meter Function description Adjustment range Standard
setting Custom
setting
A44 Operating mode 0: K1-K6 without load replacement
1: K1+K2 with load replacement
2: K1+K2 as bypass-group
(K1 = compressor)
3: K1-K3 with load replacement
4: K1-K4 with load replacement
5: K1-K4 as bypass-groups with
load replacement
(K1+K3 = compressor)
6: K1-K5 with load replacement
7: K1-K6 with load replacement
8: K1-K6 as bypass-groups with
load replacement
(K1+K3+K5 = compressor)
9: like 2, but K2 inverted
10: like 5, but K2+K4 inverted
11: like 8, but K2+K4+K6 inverted
12: K1-K3 as Bypass-group
(K1+K3 = compressor,
K4 = inactive)
13: K1-K6 as double bypass-
groups with load replacement
(K1+K4 = compressor)
0
A45 Function of standby key 0: no function
1: standby function
1
A51 Switch mode K1
(only effective if A44 = 0) 0: heating contact
1: cooling contact
1
A52 Switch mode K2
(only effective if A44 = 0) 0: heating contact
1: cooling contact
1
A53 Switch mode K3 (only
effective if A44=0, 1, 2, 9) 0: heating contact
1: cooling contact
1
A54 Switch mode K4 (only
effective if A44=0, 1, 2, 3, 9) 0: heating contact
1: cooling contact
1
A55 Switch mode K5
(only effective if A44=0, 1, 2,
3, 4, 5, 9, 10, 12)
0: heating contact
1: cooling contact
1
A56 Switch mode K6
(only effective if A44=0, 1, 2,
3, 4, 5, 6, 9, 10, 12)
0: heating contact
1: cooling contact
1
A59 Setpoint offset -99.9 ... 99.9 K 0.0 K
L0 Individual address LON-
network, Node 1 ... 126
(0 reserved for data logger) 1
L1 Individual address LON-
network, Subnet 0 ... 255
1

Parameter description:
The following values can change the equipment characteristics
and are therefore to be set with utmost care.
A1-A6: Function of contact K1-K6 at sensor error
In case of sensor error (open or short circuit) the display shows “F1-“ flashing. At sensor error the
respective relay falls back into the condition pre-set here.
A10: Selection setpoint 2 or DeltaW1
A11: Selection setpoint 3 or DeltaW2
A12: Selection setpoint 4 or DeltaW3
A13: Selection setpoint 5 or DeltaW4
A14: Selection setpoint 6 or DeltaW5
These parameters determine whether the setpoints for thermostat 1 and those of thermostat 2-6
are independently adjustable (Ax=0) or whether they are tied with one another via a switching
offset DeltaW (Ax=1). (see parameter P1-P5)
A15: Display value
The display can indicate either a temperature or a pressure value. Measured value and indicated
value must not be identical, therefore a calculated value can be indicated also. The measuring
input is set with parameter A35. The calculation of the corresponding value depends on the
selected refrigerant according to the setting of parameter A37.
A16: Display mode
The value can be indicated with or without decimals. In general, all parameter indications are
presented in 0.1°K
A17: Alarm mode
The alarm exit evaluates an upper and a lower limit value, whereas a selection is possible as to
whether the alarm is a boundary or a range alarm and weather it has absolute or relative limit
values.
A18: Special function at alarm
Here can be selected whether, in the case of an alarm, the indication is to flash.
A20-A25: Minimum action time contact K1-K6 "Off"
These parameters permit a delay in switching on the relay in order to reduce the switching
frequency. The adjusted time sets the entire minimum time period for a switching-off phase.
A30: Mutual delay of contacts
This parameter makes a mutual switching-on delay of relays possible, depending on whichever
contact is switched first. It ensures that two output contacts do not switch simultaneously. If there
are multiple bypass groups defined with parameter A44 the mutual delay affects entire groups. The
mutual delay affects no free contacts that are not involved in the load replacement. With A44=0 the
delay is always effective.
A31: Delay after “Power-on”
This parameter allows a switching-on delay of relays after switching-on the mains voltage. This
delay corresponds with the time set here. A mutual delay set by parameter A30 becomes effective
as soon as the first contact is switched on. The delay applies not to alarm contact K7
A32: Alarm suppression after "Power-On"
If boundary alarm is selected with parameter A17 this parameter allows a switching-on delay of the
alarm contact K7 after switching on the mains voltage. This delay corresponds with the time set

here. This suppression does not apply to sensor error alarm or, if activated, external alarms. If
range alarm is selected, this parameter is ineffective.
A33: Operating time before time depending load replacement
Load replacement depending on time is mainly used in the field of refrigeration technology to
balance the use of the connected compressors. If only some of the outputs are continuously active,
outputs that have not yet been activated will be used.
This parameter determines the time to elapse before outputs are changed for the first time. If there
are multiple bypass groups defined with parameter A44 the load replacement affects entire groups.
A34: Operating time range
If operating mode with time-dependent load replacement is activated these time ranges are
available for parameter A33.
A35: Measuring input
This parameter selects either temperature or pressure measuring. Deactivated sensors can be
disconnected; their measuring input causes no error message. Note the selection of the display
value with parameter A15. Measured and indicated value must not be the same. It is possible to
indicate a temperature value calculated by a pressure value or to indicate a pressure value
calculated by a temperature value.
A36: Temperature scale
Indication can be switched between Fahrenheit and Celsius. At conversion, the parameters and
setpoints maintain their numerical value and adjustment range
A37: Refrigerant
Selection of the used refrigerant in the plant.
A38: Indication value for lower value at pressure measuring
A39: Indication value for upper value at pressure measuring
If pressure measuring is selected with parameter A35 these parameters allow scaling of the
measuring input. The value to be indicated for the lower and upper measuring value then defines
the range the controller will indicate.
A40: Activation of time-dependent load replacement
This parameter either activates or deactivates time-dependent load replacement to balance the
use of the connected compressors. The replacement takes place after the operating time set with
parameter A33.
A41: Sequential operation mode
This parameter either activates or deactivates the sequential operation mode. If this mode is
activated different compressors or bypass-groups will be activated or deactivated (if possible) at
each change of output stage to ensure an even load of the compressors.
Concerning the switching of the compressors or bypass-groups the following applies:
If several compressors or bypass-groups are activated the first started unit will be deactivated first.
If several units are deactivated the first stopped unit will be activated first.
If in sequential operation mode the connections of the units to the respective output stage is
ineffective. The control prevents the switching of valves if the compressor has not started and
assures the simultaneous switch-off of valves when the compressor is switched off. The minimum
action times (parameters A21-A25) concerning valves will be adjusted to the times of the
respective compressors.
A42: Interlocking of total operating times
This parameter releases the locking of the total operating times in parameters P33-P44. The
adjustment of time values resulting from time registration is only necessary for updating purposes
when plant components are replaces.

A43: Adjustment of setpoint S1‘ (not available on all types of controllers)
By closing switching input E1, setpoint S1 can be switched to a setpoint S1’. Setpoint S1’ can be
either relative to setpoint S1 or an independent, freely adjustable, control setting. The setpoint S1’
can only be accessed if input E1 is closed. An additional option is to activate the standby mode
with the switching input E1. This mode has priority and is not affected by the setting of parameter
A45.
A44: Operation mode
If a sequential operation mode or the time-dependent load replacement is activated with parameter
A40 and A41, parameter A44 selects which outputs are involved in this mode.
Additionally it is possible to define pairs of outputs that work as bypass-groups. In this case the
activation of the valve output leads to a smaller cooling performance. In the bypass-groups there is
a standard linkage of the outputs, i.e. K1=compressor, K2=bypass, K3=compressor, K4=bypass,
K5=compressor, K6=bypass. Bypass-groups with an inverted valve output are intended for plants
where the bypass is switched on together with the compressor and switched off together with the
valve output.
A special function (A44=12) allows the operation of two compressors together with a common
bypass with K1+K3=compressor, K2=bypass. In this case K4 becomes inactive, because
parameters P3 and P14 are reserved. A further special function (A44=13) is intended for the
operation with double bypass-groups with K1=compressor, K2+K3=bypass, K4=compressor,
K5+K6=bypass.
Not that the sequential operation mode and the time-dependent load replacement are effective
independently of each other if activated with parameters A40 and A41. If bypass operation mode is
selected, the required valves are determined summarily in the control program.
If the respective setting requires several bypass valves to be switched on, the output with the
highest number will be switched on first.
A45: Standby mode
Activation or deactivation of the standby key. In standby mode the display indicates “OFF”.
A51-A56: Switch mode K1-K6
The switching sense for the relays, i.e. cooling or heating function, can be programmed
independently.
The respective relay may not be part of the load replacement mode (see parameter A44) or part of
any bypass-group. If this applies the respective relay switches to cooling function independently of
this parameter
Note that the power display indicates the active outputs K1-K6 only summarily, if A44=0 and the
switch modes are different. In this case a differentiation between heating and cooling power is not
possible. In all other operation modes the invertible outputs are not effective for power
determination.
A59: Setpoint offset
The here adjusted value will build the difference to the activated setpoint, i.e. there is no regulation
according to the pre-set value, but according to the sum of setpoint and the value of A59.
All secondary setpoints that apply to outputs involved in the load replacement or bypass-groups
are affected by this parameter as well. The remaining free outputs and the alarm limit values are
not affected.
L0: Individual address in LON-network (Node)
L1: Individual address in LON-network (Subnet)
STOERK TRONIC devices can be hooked with "self installation". In this case, however, each
participant has to be assigned a clear address. This address corresponds to the knot address and
subnet address with Domain=0.
The address of the knot can only be changed, if the knot was not tied externally (SNVT
"nciNetConfig" = CFG_LOCAL), otherwise the changed value is not saved (after releasing the set
key the old value is reset).

Table of operation modes and power stages
A44 = 0 K1 17 %
K1+K2 33 %
K1+K2+K3 50 %
K1+K2+K3+K4 67 %
K1+K2+K3+K4+K5 83 %
K1+K2+K3+K4+K5+K6 100 %
A44 = 1 K1 50 %
K1+K2 100 %
A44 = 2 K1+K2 50 %
K1 100 %
(K2 = bypass)
A44 = 3 K1 33 %
K1+K2 67 %
K1+K2+K3 100 %
A44 = 4 K1 25 %
K1+K2 50 %
K1+K2+K3 75 %
K1+K2+K3+K4 100 %
A44 = 5 K1+K2 25 %
K1 or K1+K2+K3+K4 50 %
K1+K3+K4 75 %
K1+K3 100 %
(K2, K4 = bypass)
A44 = 6 K1 20 %
K1+K2 40 %
K1+K2+K3 60 %
K1+K2+K3+K4 80 %
K1+K2+K3+K4+K5 100 %
A44 = 7 K1 17 %
K1+K2 33 %
K1+K2+K3 50 %
K1+K2+K3+K4 67 %
K1+K2+K3+K4+K5 83 %
K1+K2+K3+K4+K5+K6 100 %
A44 = 8 K1+K2 17 %
K1 or K1+K2+K3+K4 33 %
K1+K3+K4 or K1+K2+K3+K4+K5+K6 50 %
K1+K3 or K1+K3+K4+K5+K6 67 %
K1+K3+K5+K6 83 %
K1+K2+K3 100 %
(K2, K4, K6 = bypass)

A44 = 9 K1 50 %
K1+K2 100 %
(K2 = inverted bypass)
A44 = 10 K1 25 %
K1+K2 or K1+K3 50 %
K1+K2+K3 75 %
K1+K2+K3+K4 100 %
(K2, K4 = invert. Bypass)
A44 = 11 K1 17 %
K1+K2 or K1+K3 33 %
K1+K2+K3 or K1+K3+K5 50 %
K1+K2+K3+K4 or K1+K2+K3+K5 67 %
K1+K2+K3+K4+K5 83 %
K1+K2+K3+K4+K5+K6 100 %
(K2, K4, K6 = invert. Bypass)
A44 = 12 K1+K2 25 %
K1 50 %
K1+K2+K3 75 %
K1+K3 100 %
(K2 = Bypass)
A44 = 13 K1+K2+K3 17 %
K1+K3 or K1+K2+K3+K4+K5+K6 33 %
K1 or K1+K3+K4+K5+K6 50 %
K1+K4+K5+K6 or K1+K3+K4+K6 67 %
K1+K4+K6 83 %
K1+K4 100 %
(K2, K3, K5, K6 = Bypass)
Described are the switched-on outputs without load replacement. At some power stages
further combinations are possible.

Operation with different measuring and indicated value
General notes
Parameters A15 and A35 permit the independent selection of measured and indicated value.
There are the possibilities temperature measuring with temperature display, temperature
measuring with pressure display, pressure measuring with pressure display and pressure
measuring with temperature display.
The measuring values are converted continuously in the equivalent value of the other unit, the
latter can be indicated for 3 seconds by pressing shortly the display key. This conversion always
takes place considering the refrigerant selected with parameter A37.
Note that longer pressing the display key switches the display over to power display.
With parameter A38 and A39 the range of the pressure measuring is defined. Regardless of this
the operating range of the controller is 0.0 … 30.0 bar. In case of temperature measuring with
pressure display and pressure measuring with temperature display the exceeding of this range
leads to the indication of “F b” in the display. Just as “F 1” in case of sensor error this message
switches off the control.
The control parameters exist only once for temperature or pressure values in (not erasable)
EEPROM memory, therefore parameters are reset to harmless values at each change of the
display value with parameter A15.
When switching over to pressure display the reset values depend on the select refrigerant. If the
refrigerant is changed with parameter A37 if pressure display is already selected with parameter
A15, the values are reset again according this refrigerant.
The reset values are listed below.

Partially reset EEPROM to temperature operation:
Setpoints 1 und 1’
S1 = 0.0°C
S1’ absolute = 0.0°C
S1’ relative = 0.0 K
A59 = 0.0 K
Setpoints 2 to 6
P1 absolute = 10.0°C
P1 relative = 10.0 K
P2 absolute = 20.0°C
P2 relative = 20.0 K
P3 absolute = 30.0°C
P3 relative = 30.0 K
P4 absolute = 40.0°C
P4 relative = 40.0 K
P5 absolute = 50.0°C
P5 relative = 50.0 K
Hysteresis’
P11 – P16 = 1.0 K
Control range limitations
P17 = -99.9°C
P18 = 99.9°C
Actual value correction
P21 = 0.0 K
Alarm limit values
P30 absolute = -99.9°C
P30 relative = -10.0 K
P31 absolute = 99.9°C
P31 relative = 10.0 K
Alarm hysteresis
P32 = 1.0 K

Partially reset EEPROM to pressure operation:
for refrigerant R134A (A37 = 0)
Setpoints 1 and 1’
S1 = 2.0 bar (or 0.7°C)
S1' absolute = 2.0 bar
S1' relative = 0.0 bar
A59 = 0.0 K
Setpoints 2 to 6
P1 absolute = 3.1 bar (or 9.6°C)
P1 relative = 1.1 bar
P2 absolute = 4.6 bar (or 19.3°C)
P2 relative = 2.6 bar
P3 absolute = 6.7 bar (or 29.9°C)
P3 relative = 4.7 bar
P4 absolute = 9.2 bar (or 40.1°C)
P4 relative = 7.2 bar
P5 absolute = 12.1 bar (or 49.8°C)
P5 relative = 10.1 bar
Hysteresis
P11 – P16 = 0.2 bar (or 1.7 K)
Control range limitations
P17 = 0.0 bar (or -26.4°C at 4.0 mA)
P18 = 30.0 bar (or 87.5°C at 20.0 mA)
Actual value correction
P21 = 0.0 bar
Alarm limit values
P30 absolute = 0.0 bar
P30 relative = -1.0 bar
(2.0-1.0 bar or -10.1°C for -10.0 K)
P31 absolute = 30.0 bar
P31 relative = 1.1 bar
(2.0+1.1 bar or 9.6°C for +10.0 K)
Alarm hysteresis
P32 = 0.2 bar (or 1.7 K)
for refrigerant R22 (A37 = 1)
Setpoints 1 and 1’
S1 = 4.1 bar (or 0.5°C)
S2 absolute = 4.1 bar
S2 relative = 0.0 bar
A59 = 0.0 K
Setpoints 2 to 6
P1 absolute = 5.8 bar (or 10.0°C)
P1 relative = 1.7 bar
P2 absolute = 8.0 bar (or 19.7°C)
P2 relative = 3.9 bar
P3 absolute = 10.9 bar (or 30.0°C)
P3 relative = 6.8 bar
P4 absolute = 14.2 bar (or 39.8°C)
P4 relative = 10.1 bar
P5 absolute = 18.4 bar (or 50.1°C)
P5 relative = 14.3 bar
Hysteresis
P11 – P16 = 0.2 bar (or 1.9 K)
Control range limitations
P17 = 0.0 bar (or -41.1°C at 4.0 mA)
P18 = 30.0 bar (or 71.7°C at 20.0 mA)
Actual value correction
P21 = 0.0 bar
Alarm limit values
P30 absolute = 0.0 bar
P30 relative = -1.6 bar
(4.1-1.6 bar or -10.4°C for -10.0 K)
P31 absolute = 30.0 bar
P31 relative = 1.7 bar
(4.1+1.7 bar or 10.0°C for +10.0 K)
Alarm hysteresis
P32 = 0.2 bar (or 1.9 K)

For refrigerant R407C (A37 = 2)
Setpoints 1 and 1’
S1 = 3.6 bar (or -0.1°C)
S2 absolute = 3.6 bar
S2 relative = 0.0 bar
A59 = 0.0 K
Setpoints 2 to 6
P1 absolute = 5.4 bar (or 9.8°C)
P1 relative = 1.8 bar
P2 absolute = 7.8 bar (or 20.0°C)
P2 relative = 4.2 bar
P3 absolute = 10.7 bar (or 29.9°C)
P3 relative = 7.1 bar
P4 absolute = 14.4 bar (or 40.0°C)
P4 relative = 10.8 bar
P5 absolute = 18.9 bar (or 50.2°C)
P5 relative = 15.3 bar
Hysteresis
P11 – P16 = 0.2 bar (or 1.2 K)
Control range limitations
P17 = 0.0 bar (or -37.1°C at 4.0 mA)
P18 = 30.0 bar (or 69.4°C at 20.0 mA)
Actual value correction
P21 = 0.0 bar
Alarm limit values
P30 absolute = 0.0 bar
P30 relative = -1.4 bar
(3.6-1.4 bar or -10.2°C for -10.0 K)
P31 absolute = 30.0 bar
P31 relative = 1.9 bar
(3.6+1.9 bar or 10.3°C for +10.0 K)
Alarm hysteresis
P32 = 0.2 bar (or 1.2 K)
For refrigerant R404A (A37 = 3)
Setpoints 1 and 1’
S1 = 5.0 bar (or 0.0°C)
S2 absolute = 5.0 bar
S2 relative = 0.0 bar
A59 = 0.0 K
Setpoints 2 to 6
P1 absolute = 7.1 bar (or 9.7°C)
P1 relative = 2.1 bar
P2 absolute = 9.9 bar (or 20.1°C)
P2 relative = 4.9 bar
P3 absolute = 13.1 bar (or 29.8°C)
P3 relative = 8.1 bar
P4 absolute = 17.2 bar (or 40.1°C)
P4 relative = 12.2 bar
P5 absolute = 21.9 bar (or 50.0°C)
P5 relative = 16.9 bar
Hysteresis
P11 – P16 = 0.2 bar (or 1.0 K)
Control range limitations
P17 = 0.0 bar (or -46.4°C at 4.0 mA)
P18 = 30.0 bar (or 64.0°C at 20.0 mA)
Actual value correction
P21 = 0.0 bar
Alarm limit values
P30 absolute = 0.0 bar
P30 relative = -1.7 bar
(5.0-1.7 bar or -10.2°C for -10.0 K)
P31 absolute = 30.0 bar
P31 relative = 2.2 bar
(5.0+2.2 bar or 10.1°C for +10.0 K)
Alarm hysteresis
P32 = 0.2 bar (or 1.0 K)
Instead of the unit “bar” the unit “Pascal” also comes into use.
1 mbar = 1 hPa.
Other Störk-Tronic Controllers manuals

