Stabilezelte Giant Pro PVC 5m Series User manual

1
AUFBAUANLEITUNG UND WARNHINWEISE
Giant Pro
5m Series PVC
5x6m/5x8m/5x10m/5x12m
Aufbauanleitung
Assembly instruction
Notice de montage
Bitte lesen Sie sich die Warn- und
Aufbauhinweise vor Aufbau des
Zeltes sorgfältig durch
Bitte beachten Sie die Pflegehinweise
damit Sie lange Freude an Ihrem Zelt
haben
Please read the assembly instructions
and warnings carefully before setting
up the tent.
Please follow the care instructions so
you enjoy your tent for a long time.
Veuillez lire attentivement toutes les
consignes de montage et les
avertissements avant de monter la
tente
Veuillez respecter les consignes
d’entretien pour pouvoir vous servir
de votre tente pendant longtemps
Deutsch
1
English
10
Hergestellt für:
Stabilepartyzelte
Andy Kaiser
Wandersmannstr. 60a
665205 Wiesbaden
France
18

2
!!!!! Bitte lesen Sie sich dieses Beiblatt aufmerksam durch !!!!
Wichtig, für spätere Bezugnahme aufbewahren
Sehr geehrte Kundin, sehr geehrter Kunde,
vielen Dank, dass Sie sich für eines unserer Produkte entschieden haben und für das von Ihnen uns
entgegen gebrachte Vertrauen.
Damit Sie sich an Ihrem Pavillon lange Zeit erfreuen können, empfehlen wir Ihnen, nachstehende
Hinweise sorgfältig zu beachten.
-Ihr Pavillon muss gemäß der Aufbauanleitung aufgestellt werden. Insbesondere ist darauf zu achten,
dass die Ecken des Daches vorsichtig über die Eckverbindungen gezogen werden.
-Ihr Pavillon muss immer zusätzlich mit den mitgelieferten Spannleinen und Erdnägel verankert
werden. Bei Verwendung des Pavillons an einem unbeaufsichtigten Ort (Freizeitgrundstück,
Privatgrundstück, Ferienhaus, Campingplatz oder ähnliches…) muss grundsätzlich das Dach, wenn
vorhanden auch die Seitenteileabgenommen werden.
Anderenfalls besteht die Gefahr, dass das gesamte Zelt, trotz ordnungsgemäßen Aufbaus bei Wind
und/oder Windböen beschädigt, oder zerstört wird.
-Schützen Sie Ihr Zelt gegen Wind, indem Sie alle vorgegebenen Befestigungs- und
Abspannmöglichkeiten nutzen. Benutzen Sie auf jeden Fall die Heringe um die Fußstangen mit den
Fußtellern im Erdreich zu fixieren. Das gleiche gilt für die Seitenteile. Das Dach müssen Sie mit den
mitgelieferten Spannseilen abspannen und sichern.
Bei starkem Wind und Windböen muss das Zelt abgebaut werden.
-PE-Planen sind im Gegensatz zu PVC-Planen nicht langzeit- witterungsbeständig und somit nur
für den gelegentlichen und kurzzeitigen Gebrauch geeignet. PVC-Zelte müssen 24 Stunden vor
dem Aufbau bei Raumtemperatur gelagert werden, da das Material so geschmeidig wird und der
Aufbau dadurch vereinfacht wird. PE-Zelte sowie PVC-Zelte dürfen nicht bei Temperaturen unter
+4°C aufgestellt werden, da bei niedrigeren Temperaturen das Gewebe sehr hart und
ungeschmeidig werden kann, was zu Gewebebrüchen führt.
Der Pavillon ist nicht Winterfest.
-Für sämtliche witterungsbedingten Schäden, etwa durch Wind- und Sturmböen, Regen, Schneelast
oder Eisbildung, kann in KEINEM FALL gehaftet werden.
-Verwenden Sie niemals offenes Feuer in der Nähe des Zeltes oder im inneren des Zeltes.
-Ihr Pavillon dient in erster Linie als Sonnen-, Sicht- und Regenschutz. Bei zu starkem Regen darf
das Zelt nicht unbeaufsichtigt gelassen werden und die Bildung von Wassersäcken durch
Abschütten des Regenwassers unterbunden werden z.B. mit einem Besen leicht anheben, damit
das Wasser ablaufen kann.
Verschleißteile wie Spannseile, Spanngummis, Haltegurte, Verankerungsteile oder Ösen sind von
der Gewährleistung ausgeschlossen. Jegliche Haftung entfällt bei unsachgemäßem Gebrauch
des Pavillons und Missachtung unserer Hinweise.
Unter Beachtung obiger Hinweise sind wir davon überzeugt, dass Sie viel Freude an Ihrem
Pavillon haben werden.

3
PFLEGEHINWEISE
!!!!! Bitte lesen Sie sich dieses Beiblatt aufmerksam durch !!!!
Wichtig, für spätere Bezugnahme aufbewahren
-Beachten Sie bitte, dass an den Nähten des Pavillons eine Perforation entsteht – bedingt durch das
Vernähen der Dachteile. Dieses führt dazu, dass Wassertropfen an den Nahtstellen durchdringen
können. Mit einem professionellen Nahtdichter können diese wieder abgedichtet werden. Bei
erneutem auftreten den Vorgang wiederholen. Häufig werden diese Löcher jedoch nach einigen
Wochen bereits durch Schmutz- und Staubpartikel abgedichtet.
-Sollten im Laufe der Zeit an Ihrem Pavillongestell kleine Roststellen auftreten, lassen sich diese
schnell und unproblematisch mit einem handelsüblichen Tupflack überdecken. Rost an Gestänge
oder Ösen stellt keinen Sachmangel dar.
-Schimmel- oder Stockflecken können mit einer milden Chlorlösung entfernt werden. Testen Sie die
Chlorlösung stets an einer nicht sichtbaren Stelle, um sicher zu gehen, dass keine Verfärbungen
auftreten.
-Reinigen Sie Ihr Zelt nur mit milden Seifenreinigern. Säuren, alkalischen Lösungen, Reinigen mit
Dampfstrahlern oder harten Bürsten kann schwere Beschädigungen am Zelt verursachen.
-Lagern Sie Ihr Zelt nur gesäubert und gut abgetrocknet.
Unter Beachtung obiger Hinweise sind wir davon überzeugt, dass Sie viel Freude an Ihrem Pavillon
haben werden.

4
Bezeichnung
Teileliste
Menge
5x6m
Menge
5x8m
Menge
5x10m
Menge
5x12m
(1) Φ50x1170mm
Stange
16
20
24
28
(2) Φ38x1925mm
Stange
21
28
35
42
(3) Φ25x1225mm
Stange
8
10
12
14
(4) Φ25x440mm
Stütze
4
5
6
7
(5) Φ50x1888mm
(2488mm)Stange
8
10
12
14
(6) Φ38x1580mm
Stange
6
6
6
6
(7) 110°3 Wege
Verbinder
4
4
4
4
(8) 140°3 Verbinder
2
2
2
2
(9) 140°4 Verbinder
2
3
4
5
(10) 110°4 Verbinder
4
6
8
10
(11)Kreuz 4
Verbinder
4
6
8
10
(12)“T” 3 Verbinder
4
4
4
4
(13) 3 Verbinder Fuß
4
4
4
4
(14) "T“ 2 Verbinder
Fuß
4
6
8
10
(15) 2 Verbinder Fuß
4
4
4
4
(16) Dachplane
1
1
1
1

5
VOR DEM AUFBAU
Halten Sie Kinder während des Aufbaus fern. Diese können sich an Kleinteilen verschlucken oder es droht
durch die Plastikverpackungen Erstickungsgefahr.
Wählen Sie einen geeigneten Ort für den Aufbau des Zeltes:
Das Zelt muss auf einer ebenen, sicheren und windgeschützten Fläche aufgestellt werden
Beugen Sie Beschädigungen vor indem Sie das Zelt so platzieren, dass das Material weit genug
von spitzen Gegenständen wie z.B. Ästen, Gebäudeteilen, usw. entfernt steht.
Stellen Sie das Zelt weit genug von Feuerstellen entfernt auf.
(17) Seitenteile
6
8
10
12
(18) Giebelteile
2
2
2
2
(19) Abspannseil
4
4
4
4
(20) Spiral Erdhaken
4
4
4
4
(21) Stangen
Erdhaken
12
14
16
18
(22) Planen
Erdhaken
36
42
48
54
(23) Spanngummis
kurz
26
26
26
26
(24) Spanngummis
lang
136
160
184
208
(25) M6x10mm
Schraube
106
132
158
184
(26) M6x30mm
Schraube
16
20
24
28
(27)Flügelmutter
16
20
24
28
(28)Imbus
2
2
2
2
(29)Haken
8
10
12
14

6
SCHRITT 1
Legen Sie sämtliche Stangen und Verbindungselemente gemäß Zeichnung auf dem Boden aus

7
SCHRITT 2
Stecken Sie die Dachkonstruktion des Zeltes wie abgebildet zusammen. Fixieren Sie alles mit den beigelegten
Schrauben. Stellen Sie sich das alle Verbinder eingerastet und fixiert sind.
SCHRITT 3
Heben Sie nun die Dachkonstruktion an einer Seite an und befestigen Sie die Standfußstangen No 5. Je
Standfußstange sollte eine Person anheben. Danach ziehen Sie die Dachplane über das Gestänge. Daraufhin
heben Sie die Konstruktion auf der anderen Seite ebenfalls an und befestigen die restlichen Standfußstangen.

8
SCHRITT 4
Nun befestigen Sie an den Standfußstangen den Grundrahmen. Nutzen Sie hierfür die Füße (13,14,15,) sowie
die Stangen (2,6). Mit den Stangenerdhaken können Sie nun das Gestänge am Boden befestigen. Die Haken
nutzen Sie um die Seiten der Dachplane am unteren Teil der Standfußstangen zu sichern.
SCHRITT 5

9
Befestigen Sie abschließen die Seitenteile mit den langen Spanngummis und Planenerdhaken. Für die.
Giebelteil nutzen Sie die kurzen Spanngummis.
Fixieren nun ebenfalls das Zeltgestänge mit den Abspannseilen.Abschließend spannen Sie die Seiten- und
Giebelwände mit den Planen Erdhaken am Boden ab.
ASSEMBLY INSTRUCTIONS AND WARNINGS
!!!!! Please read this leaflet carefully!!
Important to keep for future reference

10
Dear Customer,
Thank you for choosing our product, as well as for the confidence you have placed in us.
We recommend observing these instructions carefully so that you may enjoy your pavilion for a long
time.
-Your pavilion must be erected in accordance with the assembly instructions. In particular, make sure
that the corners of the roof are carefully pulled over the corner joints.
-Your pavilion must always also be anchored with the included tension rope and earth pin. When
using the pavilion at an unattended location (recreational property, private property, cottage,
campground, or similar...) the roof, and if present, the side panels, must be removed.
Otherwise, there is danger that the entire pavilion, despite proper set up, may be damaged or
destroyed by wind / wind gusts.
-Protect your pavilion from the wind by using all the specified fastening and bracing options. Be sure
to use the pegs to fasten the foot rods with the footplate to the ground. The same applies to the
sides. You must secure and tighten down the roof with the included tension rope
The pavilion must be dismantled if there are strong winds or wind gusts.
-PE tarpaulins, in contrast to PVC tarpaulins, are in no way weather resistant in the long term and
therefore, are only suitable for occasional and short-term use. PVC pavilions must be stored for 24
hours prior to set up at room temperature so the material becomes supple and assembly is
therewith easier. PE pavilions, as well as PVC pavilions may not be set up at temperatures under
+4°C as the material becomes very hard and inflexible at low temperatures and this can lead to
breakage.
The pavilion is not winter proof.
-Under no circumstances may liability be claimed for all weather-related damage such as from wind,
wind gusts, rain, snow loads or ice.
-Never use open flames near or inside the tent.
-Your pavilion primarily serves as protection from the sun, rain and as a privacy screen. The pavilion
may not be left unattended during heavy rain as water pockets may form, which can be avoided by
draining of the rain water by, e.g. lifting it slightly with a broom so that the water can drain.
Wear-and-tear parts such as tension ropes, stretch cords, straps, anchoring parts or eyelets
are excluded from the warranty. Improper use of the pavilion and failing to observe these
instructions eliminates any liability claims.
If you observe the above-mentioned instructions, we are convinced that you will enjoy your
pavilion for a long period of time.

11
CARE INSTRUCTIONS
!!!!! Please read this leaflet carefully!!
Important to keep for future reference
Dear Customer,
Thank you for choosing our product, as well as for the confidence you have placed in us.
We recommend observing these instructions carefully so that you may enjoy your pavilion for a long
time.
-Please note that a perforation occurs at the seams of the pavilion, which is due to the suturing of the
roof parts. This leads to water drops penetrating the seams. These can be resealed with a
professional seam sealer. Upon reappearance, repeat process again. Often, these are sealed after
few weeks due to dirt and dust particles.
-If, over the course of time, small rust spots appear on your pavilion frame, these can be covered
quickly and easily with a commercially available spot paint. Rust on rods or eyelets do not infer a
defect.
-Mould or mildew spots can be removed with a mild chlorine solution. Always test the chlorine
solution on an inconspicuous spot to ensure that there is no discolouration.
-Clean your pavilion with a mild soap cleanser. Acids, alkaline solutions, cleaning with steam
cleaners or abrasive brushes can cause severe damage to the pavilion.
-Only store your pavilion when clean and thoroughly dried.
If you observe the above-mentioned instructions, we are convinced that you will enjoy your
pavilion for a long period of time.

12
Parts
Drawing
Quantity
5x6m
Quantity
5x8m
Quantity
5x10m
Quantity
5x12m
(1) Φ50x1170mm
Pipe
16
20
24
28
(2) Φ38x1925mm
Pipe
21
28
35
42
(3) Φ25x1225mm
Brace
8
10
12
14
(4) Φ25x440mm
Brace
4
5
6
7
(5) Φ50x1888mm
(2488mm)Pipe
8
10
12
14
(6) Φ38x1580mm
Pipe
6
6
6
6
(7) 110° 3 Way
Connector
4
4
4
4
(8) 140° 3 Way
Connector
2
2
2
2
(9) 140° 4 Way
Connector
2
3
4
5
(10) 110° 4 Way
Connector
4
6
8
10
(11)Cross 4
Connector
4
6
8
10
(12)“T” 3 Way
Connector
4
4
4
4
(13) 3 Way Foot
Corner Connector
4
4
4
4
(14) 3 Way Foot
Connector
4
6
8
10
(15) 2 Way Foot
Connector
4
4
4
4

13
PRIOR TO ASSEMBLY
Keep children away during assembly. They can choke on plastic parts and there is the risk of suffocation by
the plastic packaging.
Choose a suitable location for the assembly of the tent:
The tent should be assembled on a flat, safe and in wind-sheltered area.
Prevent damage by placing the tent far enough away from pointed objects, e.g. branches, parts of
buildings, etc.
Set the tent up far enough away from open fire.
(16) Roof
1
1
1
1
(17) Sidewall
6
8
10
12
(18) End wall
2
2
2
2
(19)Guy Rope
4
4
4
4
(20) Spiral peg
4
4
4
4
(21)Thick peg
ø6X180mm
12
14
16
18
(22) Thin peg
ø4X180mm
36
42
48
54
(23) Bungee
short
26
26
26
26
(24) Bungee
long
136
160
184
208
(25)M6x10mm
Screw
106
132
158
184
(26) M6x30mm
Screw
16
20
24
28
(27) Wing nut
16
20
24
28
(28) Imbus
2
2
2
2
(29)Hook
8
10
12
14

14
STEP 1
Select a flat surface for the tent. Unpack the boxes and check it all listed parts are included.Place all joints (7,8,
9, 10, 11 and 12), related pipes (1, 2 ) on the ground as shown.

15
STEP 2
Assemble the roof frame. Use the screws (25) to firmly attach the parts. Make sure that all parts are fixed well
and secured.
Attach the reinforcement braces (3,4) using the screws (25,26) and wing nut (27).
STEP 3
Lift up the roof construction on one side. Assemble the poles (5) to the connectors. Put the roof cover (16)
onto the frame and use the long bungees (24) to fasten it. Be sure not to put to much tension on the bungees
in order not to make attaching the other side more difficult.
It is recommended that these, as well as the following steps, be executed when there is little or no
wind.

16
STEP 4
Now lift up the other side of the frame and assemble the remaining poles (5).
Fix all set of ground bars (2,6) and the connectors (13;14;15) to finish the tent framework as below drawing.
Use the thick ground pegs (21) to fasten all feet to the ground. Attach the side covers to the pipes (5) using
hooks (29).

17
STEP 5
Spread the sidewalls and end walls , and attach the side walls to the frame using the long bungees(24). Attach
the end walls directly to the roof by using the short bungees (23).Use the thin ground pegs (22) to fasten the
end walls and side walls to the ground. The Guy rope runs from every corner of the tent and is braced to the
ground by using spiral pegs (20).

18
MANUEL DE MONTAGE ET AVERTISSEMENTS
!!!!! S'il vous plaît lisez attentivement cette notice !
Important : gardez-la pour une utilisation future !
Chère cliente, cher client,
Merci d'avoir choisi un de nos produits et merci pour la confiance que vous avez placée en nous.
Afin que vous puissiez profiter de votre pavillon pendant une longue période, nous vous
recommandons d'observer les indications suivantes.
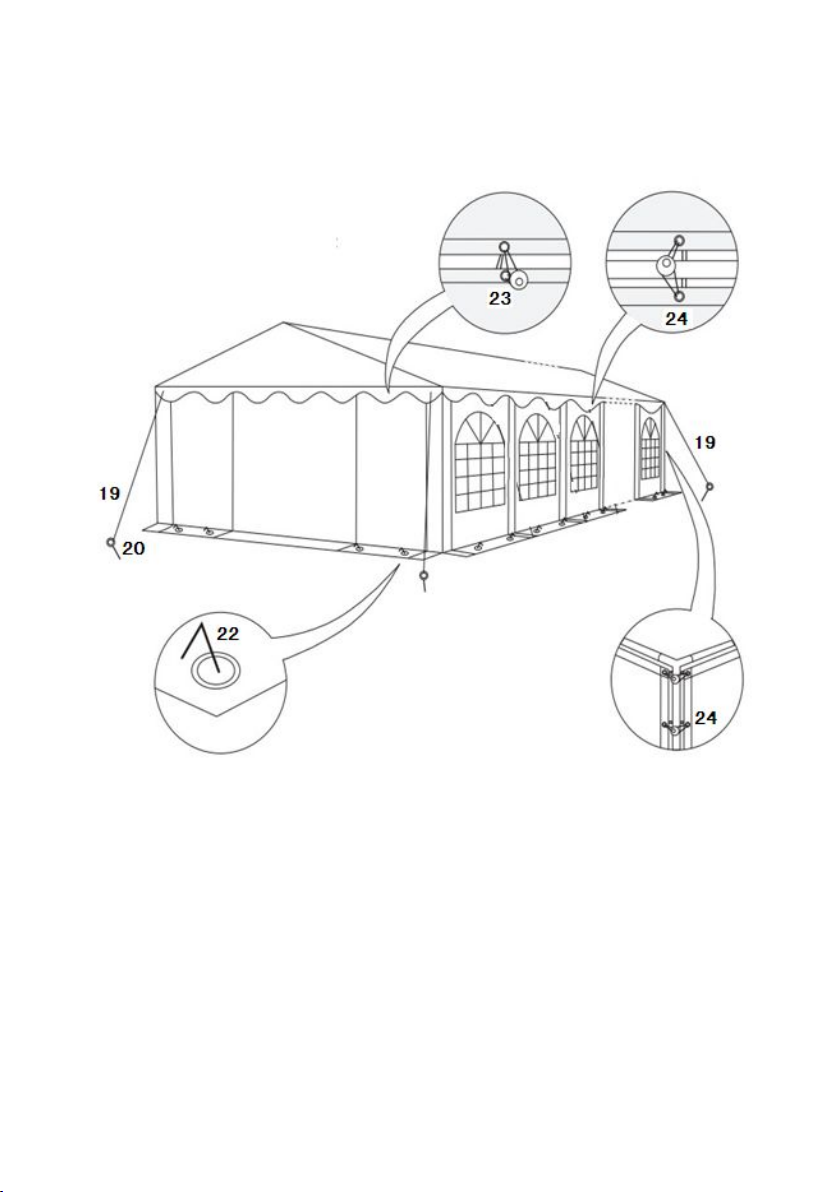
-Votre pavillon sera érigé en conformité avec les instructions d'assemblage. En particulier, assurez-
vous que les coins de la toiture soient soigneusement tirés au-dessus des jonctions des angles.
-Votre pavillon doit être ancré aussi avec les amarres et piquets fournis. Lorsque vous utilisez le
pavillon à un endroit sans surveillance (terrain de loisirs, terrain privé, chalet, terrain de camping ou
similaires...) il faudra enlever le toit et, le cas échéant, aussi les éléments latéraux.
En cas contraire, on risque que la tente entière, malgré un montage correct, soit endommagée ou
détruite en cas de vent intense et/ou de rafales de vent.
-Protégez votre tente contre le vent en utilisant toutes les fixations et options d'ancrage spécifiées.
Utilisez impérativement les piquets pour fixer les barres de pied avec base d'appui dans le sol. Le
même principe s'applique aux éléments latéraux. Vous devez tendre et sécuriser le toit avec les
cordes tendeuses.
S'il y a un vent intense ou des rafales de vent, il faudra démonter la tente.
-Les bâches en PE, à la différence des bâches en PVC, ne sont pas prévues pour une utilisation de
longue durée, ni résistent aux intempéries et conviennent donc uniquement une utilisation
occasionnelle et à court terme. Les tentes en PVC doivent être stockées pendant 24 heures avant
leur montage à la température ambiante, car cela rendra le matériau souple et le montage sera ainsi
simplifié. Les tentes en PE, ainsi que les tentes en PVC, ne doivent pas être montées à des
températures inférieures à +4 ° C, car à des basses températures, le tissu devient très dur et rigide,
ce qui provoque la rupture du tissu.
Le pavillon n'est pas résistant à l'hiver.
-Pour tous les dommages liés aux conditions météorologiques, tels que le vent et les bourrasques, la
pluie, la neige ou la formation de glace, nous n'assumerons en EN AUCUN CAS aucune
responsabilité.
-Ne jamais utiliser une flamme nue près de la tente ou à l'intérieur de la tente.
-Votre pavillon sert principalement de protection contre le soleil, contre les regards et contre la pluie.
Lors de pluies intenses, la tente ne devra pas être laissée sans surveillance et il faudra empêcher la
formation de poches d'eau en levant le toit à l'aide p. ex. d'un balai, afin que l'eau puisse s'écouler.
Les pièces d'usure comme les cordes tendeuses, les élastiques, les sangles, les pièces
d'ancrage ou les œillets sont exclues de la garantie. Une mauvaise utilisation du pavillon et
le non respect de nos instructions éliminera tout droit à la garantie.
Si vous suivez les instructions décrites ci-dessus, nous sommes convaincus que vous
profiterez pleinement de votre pavillon.

19
CONSEILS D'ENTRETIEN
!!!!! S'il vous plaît lisez attentivement cette notice !
Important : gardez-la pour une utilisation future !
Chère cliente, cher client,
Merci d'avoir choisi un de nos produits et merci pour la confiance que vous avez placée en nous.
Afin que vous puissiez profiter de votre pavillon pendant une longue période, nous vous
recommandons d'observer les indications suivantes.
-Vérifiez s.v.p. si au niveau des coutures du pavillon apparaissent des perforations provoquées par
les coutures des parties du toit. Cela, si ça se produit, permettra aux gouttes d'eau de pénétrer à
travers les coutures. Vous pourrez les sceller avec un produit scellant de coutures professionnel.
Répétez l'opération si le phénomène se reproduit. Souvent, ces trous se scellent eux-mêmes au
bout de quelques semaines en raison des dépôts de particules de saleté et de poussière.
-Si on devait observer dans certaines pièces du pavillon des petites taches de rouille, vous pourrez
les éliminer facilement et rapidement avec une laque antirouille disponible dans le marché. La
présence de rouille dans les barres ou dans les œillets n'est pas considérée comme un défaut.
-Les tâches de moisissure peuvent être éliminées avec une solution chlorée douce. Testez toujours
la solution de chlore sur un point peu visible pour vous assurer qu'il n'y ait pas de décoloration.
-Nettoyez votre tente avec un produit nettoyant à base de savon doux. Les acides, les solutions
alcalines, les produits de nettoyage avec des éjecteurs de vapeur à pression ou des brosses dures
peuvent causer des graves dommages dans la tente.
-Stockez votre tente uniquement dans un état nettoyé et soigneusement séchée.
Si vous suivez les instructions décrites ci-dessus, nous sommes convaincus que vous
profiterez pleinement de votre pavillon.

20
WEITERE ARTIKEL BEI UNS ERH LTLICH
This manual suits for next models
4
Table of contents
Other Stabilezelte Tent manuals
Popular Tent manuals by other brands

Boutique Camping
Boutique Camping ADVENTURE TUCANA TENT instruction manual

KING CANOPY
KING CANOPY GOLIATH Setup instructions

skandika outdoor
skandika outdoor TORSKEN 8 Setup Instruction

GenTent
GenTent WeatherProof Product Safety & Installation Manual

Costway
Costway NP11453 manual

White Duck Outdoors
White Duck Outdoors Avalon Series owner's manual