Stageline INCREDIBLE User manual

BEDIENUNGSANLEITUNG • INSTRUCTION MANUAL
MODE D’EMPLOI • ISTRUZIONI PER L’USO • GEBRUIKSAANWIJZING
MANUAL DE INSTRUCCIONES • INSTRUKCJA OBSŁUGI
SIKKERHEDSOPLYSNINGER • SÄKERHETSFÖRESKRIFTER • TURVALLISUUDESTA
LED-DMX-LICHTEFFEKTGERÄT
LED DMX LIGHT EFFECT UNIT
JEU DE LUMIÈRE DMX À LEDS
UNITÀ DMX PER EFFETI DI LUCE CON LED
“INCREDIBLE”
LED-220DMX Best.-Nr. 38.3770

2
3
12
POWER INPUT
DMX INPUT
DMX OUTPUT
ENTERMENU
Function Display
MASTER
DMX SLAVE
SOUND
F
U
S
E
FUSE
ONLY FOR
REMOTE CONTROL
MIN MAX
SENSITIVITY
MIC
3
12
POWER INPUT
DMX INPUT
DMX OUTPUT
ENTERMENU
Function Display
MASTER
DMX SLAVE
SOUND
F
U
S
E
FUSE
ONLY FOR
REMOTE CONTROL
MIN MAX
SENSITIVITY
MIC
18
19
20
8 9 10 11 12 13 14 15 16 17
12 1
34567

3
wwwwww..iimmggssttaaggeelliinnee..ccoomm
Bevor Sie einschalten …
Wir wünschen Ihnen viel Spaß mit Ihrem neuen
Gerät von „img Stage Line“. Bitte lesen Sie diese
Bedienungsanleitung vor dem Betrieb gründlich
durch. Nur so lernen Sie alle Funktionsmöglich-
keiten kennen, vermeiden Fehlbedienungen und
schützen sich und Ihr Gerät vor eventuellen Schä-
den durch unsachgemäßen Gebrauch. Heben
Sie die Anleitung für ein späteres Nachlesen auf.
Der deutsche Text beginnt auf der Seite 4.
Before switching on …
We wish you much pleasure with your new “img
Stage Line” unit. Please read these operating
instructions carefully prior to operating the unit.
Thus, you will get to know all functions of the unit,
operating errors will be prevented, and yourself
and the unit will be protected against any damage
caused by improper use. Please keep the operat-
ing instructions for later use.
The English text starts on page 10.
Avant toute installation …
Nous vous souhaitons beaucoup de plaisir à uti-
liser cet appareil “img Stage Line”. Lisez ce mode
dʼemploi entièrement avant toute utilisation. Uni-
quement ainsi, vous pourrez apprendre lʼensem-
ble des possibilités de fonctionnement de lʼappa-
reil, éviter toute manipulation erronée et vous
protéger, ainsi que lʼappareil, de dommages
éventuels engendrés par une utilisation inadap-
tée. Conservez la notice pour pouvoir vous y
reporter ultérieurement.
La version française se trouve page 16.
Prima di accendere …
Vi auguriamo buon divertimento con il vostro
nuovo apparecchio di “img Stage Line”. Leggete
attentamente le istruzioni prima di mettere in fun-
zione lʼapparecchio. Solo così potete conoscere
tutte le funzionalità, evitare comandi sbagliati e
proteggere voi stessi e lʼapparecchio da even-
tuali danni in seguito ad un uso improprio. Con-
servate le istruzioni per poterle consultare anche
in futuro.
Il testo italiano inizia a pagina 22.
D
A
CH
GB
Antes de la utilización …
Le deseamos una buena utilización para su nue-
vo aparato “img Stage Line”. Por favor, lea estas
instrucciones de uso atentamente antes de hacer
funcionar el aparato. De esta manera conocerá
todas las funciones de la unidad, se prevendrán
errores de operación, usted y el aparato estarán
protegidos en contra de todo daño causado por
un uso inadecuado. Por favor, guarde las instruc-
ciones para una futura utilización.
La versión española comienza en la página 34.
Voor u inschakelt …
Wij wensen u veel plezier met uw nieuwe appa-
raat van “img Stage Line”. Lees deze gebruikers-
handleiding grondig door, alvorens het apparaat
in gebruik te nemen. Alleen zo leert u alle functies
kennen, vermijdt u foutieve bediening en behoedt
u zichzelf en het apparaat voor eventuele schade
door ondeskundig gebruik. Bewaar de handlei-
ding voor latere raadpleging.
De Nederlandstalige tekst vindt u op pagina 28.
Przed uruchomieniem …
Życzymy zadowolenia z nowego produktu “img
Stage Line”. Dzięki tej instrukcji obsługi będą
państwo w stanie poznać wszystkie funkcje tego
urządzenia. Stosując się do instrukcji unikną
państwo błędów i ewentualnego uszkodzenia
urządzenia na skutek nieprawidłowego użytko-
wania. Prosimy zachować instrukcję.
Tekst polski zaczyna się na stronie 40.
Før du tænder …
Tillykke med dit nye “img Stage Line” produkt.
Læs sikkerhedsanvisningerne nøje før ibrugtag-
ning, for at beskytte Dem og enheden mod ska-
der, der skyldes forkert brug. Gem manualen til
senere brug.
Sikkerhedsanvisningerne findes på side 46.
Innan du slår på enheten …
Vi önskar dig mycket glädje med din nya “img
Stage Line” produkt. Läs igenom säkerhetsföre-
skrifterna innan enheten tas i bruk för att undvika
skador till följd av felaktig hantering. Behåll
instruktionerna för framtida bruk.
Säkerhetsföreskrifterna återfinns på sidan 46.
Ennen kytkemistä …
Toivomme Sinulle paljon miellyttäviä hetkiä
uuden “img Stage Line” laitteen kanssa. Ennen
laitteen käyttöä pyydämme Sinua huolellisesti
tutustumaan turvallisuusohjeisiin. Näin vältyt
vahingoilta, joita virheellinen laitteen käyttö saat-
taa aiheuttaa. Ole hyvä ja säilytä käyttöohjeet
myöhempää tarvetta varten.
Turvallisuusohjeet löytyvät sivulta 47.
F
B
CH
I
E
PL DK
SFIN
NL
B

4
D
A
CH
Auf der Seite 2 finden Sie alle beschriebenen Be-
dienelemente und Anschlüsse.
1 Übersicht der Bedienelemente
und Anschlüsse
1.1 Lichteffektgerät LED-220DMX
1Feststellschrauben für den Montagebügel (2)
2Montagebügel
3DMX-Signal-Eingang (3-pol. XLR) zum Anschluss
eines Lichtsteuergerätes;
Pin 1 = Masse, 2 = DMX
-
, 3 = DMX+
4Anschlussbuchse für die Fernbedienung LC-3
5Mikrofon zur Musiksteuerung
6Regler SENSITIVITY für die Ansprechempfindlich-
keit bei Musiksteuerung über das Mikrofon (5)
7Display
8DMX-Signal-Ausgang (3-pol. XLR) zum Anschluss
an den DMX-Eingang eines weiteren DMX-Lichtef-
fektgerätes;
Pin 1 = Masse, 2 = DMX
-
, 3 = DMX+
9LED DMX leuchtet, wenn am Eingang DMX INPUT
(3) DMX-Steuersignale anliegen
10 LED MASTER leuchtet im Master-Modus
(Betrieb ohne DMX-Steuergerät oder mit der Fern-
bedienung LC-3)
11 Taste MENU zum Aufrufen des Einstellmenüs und
zum Anwählen der Menüpunkte
12 Tasten und zum Ändern einer Einstellung im
Menü
13 Taste ENTER zum Aktivieren eines Menüpunktes
und zum Speichern einer Einstellung
14 LED SOUND leuchtet kurz auf bei der Musiksteue-
rung über das Mikrofon (5)
15 LED SLAVE leuchtet im Slave-Modus
(Steuerung durch ein weiteres LED-220DMX)
16 Netzbuchse zum Anschluss an eine Steckdose
(230 V~/50 Hz) über das beiliegende Netzkabel
17 Halterung für die Netzsicherung
Eine geschmolzene Sicherung nur durch eine glei-
chen Typs ersetzen.
1.2 Fernbedienung LC-3
Die Fernbedienung ist als Zubehör erhältlich und
gehört nicht zum Lieferumfang des LED-220DMX.
18 Taste STAND BY zum Aus- und Einschalten der
Lichtstrahlen
19 Taste FUNCTION zur Auswahl verschiedener Funk-
tionen in Abhängigkeit von dem mit der Taste MODE
(20) gewählten Betriebsmodus (Kap. 6.3)
20 Taste MODE zur Auswahl des Betriebsmodus
Hinweis: Zur Steuerung über die Fernbedienung darf am
Eingang DMX INPUT (3) kein DMX-Signal anliegen.
2 Hinweise für den sicheren Gebrauch
Das Gerät entspricht allen erforderlichen Richtlinien
der EU und ist deshalb mit gekennzeichnet.
Beachten Sie auch unbedingt die folgenden Punkte:
GVerwenden Sie das Gerät nur im Innenbereich und
schützen Sie es vor Tropf- und Spritzwasser, hoher
Luftfeuchtigkeit und Hitze (zulässiger Einsatztempe-
raturbereich 0 – 40 °C).
GStellen Sie keine mit Flüssigkeit gefüllten Gefäße,
z. B. Trinkgläser, auf das Gerät.
GNehmen Sie das Gerät nicht in Betrieb oder ziehen
Sie sofort den Netzstecker aus der Steckdose,
1. wenn sichtbare Schäden am Gerät oder an der
Netzanschlussleitung vorhanden sind,
2. wenn nach einem Sturz oder Ähnlichem der Ver-
dacht auf einen Defekt besteht,
3. wenn Funktionsstörungen auftreten.
Geben Sie das Gerät in jedem Fall zur Reparatur in
eine Fachwerkstatt.
GZiehen Sie den Netzstecker nie am Kabel aus der
Steckdose, fassen Sie immer am Stecker an.
GVerwenden Sie für die Reinigung nur ein trockenes,
weiches Tuch, niemals Wasser oder Chemikalien.
GWird das Gerät zweckentfremdet, nicht sicher mon-
tiert, falsch bedient oder nicht fachgerecht repariert,
kann keine Haftung für daraus resultierende Sach-
oder Personenschäden und keine Garantie für das
Gerät übernommen werden.
Soll das Gerät endgültig aus dem Betrieb
genommen werden, übergeben Sie es zur
umweltgerechten Entsorgung einem örtlichen
Recyclingbetrieb.
WARNUNG Das Gerät wird mit lebensgefährli-
cher Netzspannung versorgt. Nehmen
Sie deshalb nie selbst Eingriffe am
Gerät vor. Durch unsachgemäßes Vor-
gehen besteht die Gefahr eines elektri-
schen Schlages.

5
D
A
CH
3 Einsatzmöglichkeiten
Das Lichteffektgerät LED-220DMX ist für den Einsatz
auf Bühnen, in Diskotheken und Partyräumen geeig-
net. Es projiziert farbige Lichtmuster aus 84 superhel-
len LEDs, die in Rot, Grün, Blau und Weiß leuchten.
Dabei sind musikgesteuerte Lauflicht- und Strobo-
skop-Effekte möglich.
Das Gerät ist für die Steuerung über ein DMX-Licht-
steuergerät ausgelegt (28 DMX-Steuerkanäle, um-
schaltbar auf 9 oder 3 Kanäle). Es kann aber auch
allein oder mit der als Zubehör erhältlichen Fernbedie-
nung LC-3 betrieben werden.
4 Montage
GDer Abstand zum angestrahlten Objekt sollte min-
destens 10 cm betragen.
1) Das Lichteffektgerät mit dem Montagebügel (2) an
geeigneter Stelle festschrauben, z. B. an einer Tra-
verse oder einem Leuchtenstativ.
2) Zum Ausrichten des Gerätes die Feststellschrauben
(1) lösen. Die gewünschte Neigung des Gerätes
einstellen und die Schrauben wieder fest anziehen.
5 Inbetriebnahme
Das beiliegende Netzkabel zuerst in die Netzbuchse
(16) stecken und dann in eine Steckdose (230 V~/
50 Hz). Während der Startphase blinken alle LEDs
einige Mal auf und das Display (7) signalisiert während-
dessen . Danach ist das Gerät betriebsbereit und
lässt sich über ein DMX-Lichtsteuergerät bedienen
(Kap. 7) oder durchläuft eigenständig sein Show-
programm (Kap. 6). Zum Ausschalten den Netz-
stecker aus der Steckdose ziehen.
Um einen besseren Bedienkomfort zu erhalten, ist
es empfehlenswert, das Gerät an eine Steckdose an-
zuschließen, die sich über einen Lichtschalter ein- und
ausschalten lässt.
Vorsicht: Das Gerät darf nicht über einen Dimmer an
die Netzspannung angeschlossen werden!
5.1 Grundeinstellungen
Mit Hilfe des Displays (7) und der Bedientasten
(11 – 13) lassen sich die folgenden Grundeinstellun-
gen durchführen. Dazu die Taste MENU (11) so oft drü-
cken, bis die gewünschte Funktion im Display ange-
zeigt wird. Dann die Taste ENTER (13) drücken. Mit
dem Drücken der nächsten Taste nie länger als
10 Sekunden warten, sonst wird der Einstellvorgang
beendet. Die Menüstruktur ist auf der Seite 9 darge-
stellt.
Blackout-Modus aus oder ein
Mit der Taste oder (12) wählen:
Die Lichtstrahlen sind immer eingeschaltet.
Diese Einstellung muss bei der Bedienung
ohne DMX-Steuergerät gewählt werden.
Die Lichtstrahlen sind nur eingeschaltet, wenn
ein DMX-Steuersignal an der Buchse DMX
INPUT (3) anliegt. Sobald das DMX-Steuerge-
rät ausgeschaltet wird, schalten sich die Licht-
strahlen ab.
Zum Speichern die Taste ENTER (13) drücken.
Display ein oder aus
Mit der Taste oder (12) wählen:
Das Display (7) ist immer eingeschaltet.
Das Display schaltet sich ca. 60 Sek. nach dem
letzten Drücken einer Taste aus. Beim nächs-
ten Tastendruck schaltet es sich wieder ein.
Zum Speichern die Taste ENTER (13) drücken.
Display-Darstellung
Mit der Taste ENTER (13) wählen und gleichzeitig
speichern:
normale Darstellung
Darstellung um 180° gedreht
Etwa 10 Sekunden nach dem letzten Drücken einer
Taste wird das Einstellmenü automatisch verlassen.
6 Betrieb ohne DMX-Steuergerät
Liegt kein DMX-Steuersignal an der Buchse DMX
INPUT (3) an, leuchtet die gelbe LED MASTER (10),
das Display (7) zeigt die Nummer des eingestellten
Showprogramms ( … ) an und das Gerät
durchläuft eigenständig sein Showprogramm. Voraus-
setzung dafür ist, dass der Blackout-Modus ausge-
schaltet ist (Kap. 5.1).
Sollen die Lauflicht-Effekte im Rhythmus der Musik
erfolgen, die Musiksteuerung einschalten:
1) Die Taste MENU (11) so oft drücken, bis
(Sound-Modus) im Display (7) angezeigt wird. Mit
dem Drücken der nächsten Taste nicht länger als
10 Sekunden warten, sonst wird der Einstellvor-
gang beendet.
WARNUNG Das Gerät muss fachgerecht und
sicher montiert werden. Wird es an
einer Stelle installiert, unter der sich
Personen aufhalten können, muss
es zusätzlich gesichert werden (z. B.
durch ein Fangseil; das Fangseil so
befestigen, dass der Fallweg des
Gerätes nicht mehr als 20 cm betra-
gen kann).
WARNUNG Blicken Sie nicht direkt die Lichtstrahlen,
das kann zu Augenschäden führen.
Beachten Sie, dass sehr schnelle Licht-
wechsel bei fotosensiblen Menschen
und Epileptikern epileptische Anfälle
auslösen können!

6
D
A
CH
2) Den Menüpunkt mit der Taste ENTER (13)
aktivieren. Das Display zeigt den Betriebszustand
an:
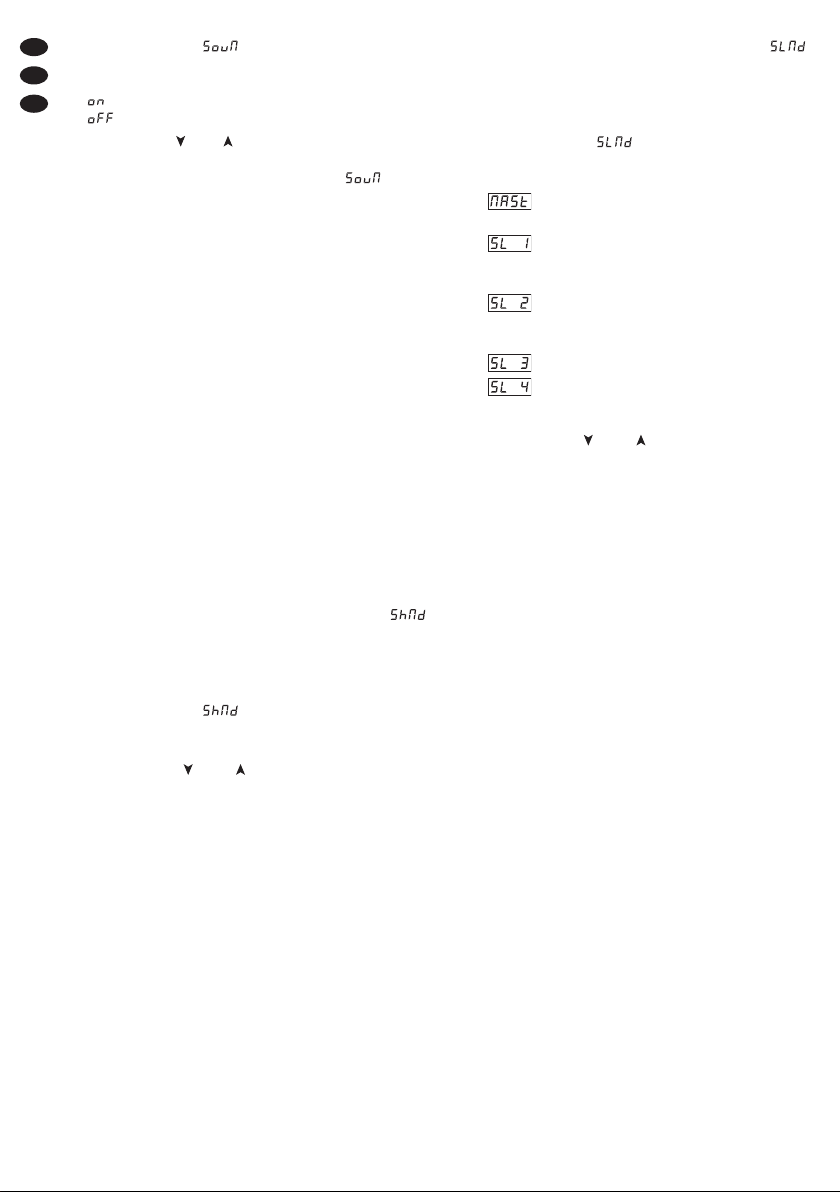
= Musiksteuerung eingeschaltet
= Musiksteuerung ausgeschaltet
3) Mit der Taste oder (12) die Musiksteuerung ein-
oder ausschalten und mit der Taste ENTER bestä-
tigen. Das Display springt zurück auf . Nach
10 Sek. zeigt es wieder die Nummer des eingestell-
ten Showprogramms an und das Gerät startet den
Programmdurchlauf im gewählten Modus.
4) Zur Musiksteuerung den Regler SENSITIVITY (6) für
die Mikrofonempfindlichkeit so einstellen, dass die
Lauflicht-Effekte optimal durch die Musik gesteuert
werden. Bei jedem Steuersignal, das durch den vom
Mikrofon (5) aufgenommenen Schall erzeugt wird,
leuchtet kurz die grüne LED SOUND (14) auf.
Hinweise
1. Beim Ändern der Lautstärke an der Musikanlage muss
auch die Mikrofonempfindlichkeit mit dem Drehregler
entsprechend angepasst werden.
2. In den Musikpausen, bei zu geringer Lautstärke, oder
wenn der Regler SENSITIVITY ganz nach links gedreht
ist, schaltet das Gerät auf ein langsames Lauflicht um.
6.1 Showprogramm wählen
Das LED-220DMX hat 12 musikgesteuerte Showpro-
gramme mit unterschiedlichen Lauflicht-Effekten und
Lichtwechselfolgen zur Auswahl. Ohne Musiksignal
schaltet das Gerät auf ein langsames Lauflicht um.
1) Die Taste MENU (11) so oft drücken, bis
(Show-Modus) im Display (7) angezeigt wird. Mit
dem Drücken der nächsten Taste nicht länger als
10 Sekunden warten, sonst wird der Einstellvor-
gang beendet.
2) Den Menüpunkt mit der Taste ENTER (13)
aktivieren. Das Display zeigt blinkend die Nummer
des eingestellten Showprogramms an.
3) Mit der Taste oder (12) die gewünschte Pro-
grammnummer wählen und mit der Taste ENTER
bestätigen.
6.2 Zusammenschalten mehrerer LED-220DMX
Es lassen sich mehrere Geräte des Modells LED-
220DMX zusammenschalten. Das Hauptgerät (Master)
kann dann alle Nebengeräte (Slave) synchron steuern.
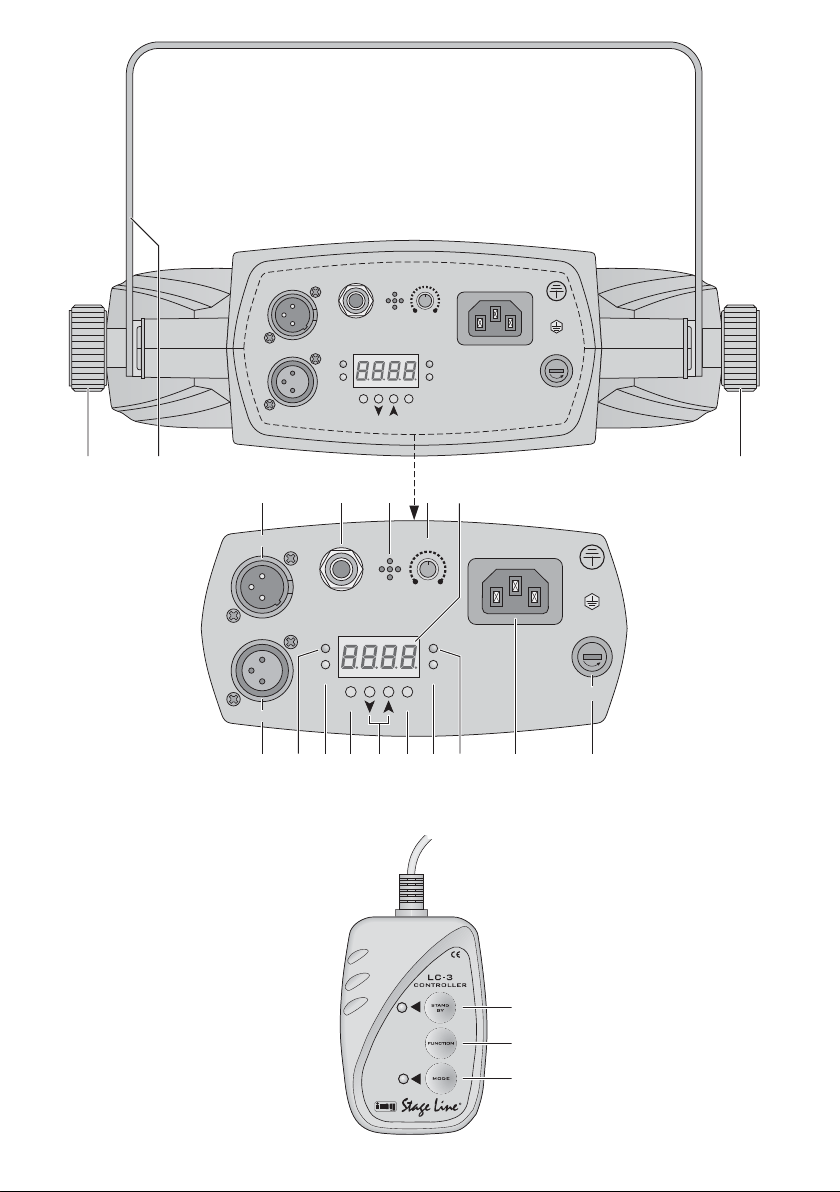
1) Den Anschluss DMX OUTPUT (8) des Hauptgerä-
tes über ein 3-poliges XLR-Kabel (z. B. Serie
MEC-... oder MECN-... aus dem Sortiment von „img
Stage Line“) mit dem Anschluss DMX INPUT (3)
des ersten Nebengerätes verbinden.
2) Den Anschluss DMX OUTPUT des ersten Neben-
gerätes mit dem Anschluss DMX INPUT des zwei-
ten Nebengerätes verbinden usw., bis alle Geräte in
einer Kette angeschlossen sind.
3) Das Hauptgerät auf den Master-Modus einstellen
und die Nebengeräte auf einen der Slave-Modi:
a) Die Taste MENU (11) so oft drücken, bis
(Slave-Modus) im Display (7) angezeigt wird.
Mit dem Drücken der nächsten Taste nicht län-
ger als 10 Sekunden warten, sonst wird der Ein-
stellvorgang beendet.
b) Den Menüpunkt mit der Taste ENTER (13)
aktivieren. Das Display zeigt den eingestellten
Modus an:
Master-Modus: Für das Hauptgerät ein-
stellen.
Slave-Modus 1: Für die Nebengeräte
einstellen, wenn sie vom Hauptgerät
synchron gesteuert werden sollen.
Slave-Modus 2: Für die Nebengeräte
einstellen, wenn sie vom Hauptgerät ent-
gegengesetzt gesteuert werden sollen.
Slave-Modi 3 und 4: Steuerungsvarian-
ten für die Nebengeräte, wenn 3, 4 oder
mehr Geräte des Typs LED-220DMX
eingesetzt sind.
c) Mit der Taste oder (12) den gewünschten
Modus wählen und mit der Taste ENTER bestä-
tigen.
Sobald an den Nebengeräten die Steuersignale
vom Hauptgerät anliegen, leuchtet bei ihnen die
rote LED SLAVE (15) auf.
6.3 Fernbedienung mit der LC-3
Über die als Zubehör erhältliche Fernbedienung LC-3
können verschiedene Funktionen gesteuert werden.
1) Die Fernbedienung an die Buchse ONLY FOR
REMOTE CONTROL (4) anschließen.
2) Am Eingang DMX INPUT (3) darf kein DMX-Signal
anliegen.
3) Über den Ausgang DMX OUTPUT (8) können wei-
tere LED-220DMX angeschlossen werden (Kapi-
tel 6.2), um diese über die Fernbedienung gemein-
sam mit dem Hauptgerät zu steuern.
4) Mit der Taste STAND BY (18) lassen sich die Licht-
strahlen aus- und einschalten. Bei ausgeschalteten
Lichtstrahlen leuchtet zur Kontrolle die LED neben
der Taste STAND BY.
5) Mit der Taste MODE (20) den Betriebsmodus wählen:
a) Leuchtet die LED der Taste MODE nicht, ist
der Stroboskop-Modus eingeschaltet. Durch Ge-
drückthalten der Taste FUNCTION (19) lässt sich
eine der drei Stroboskop-Funktionen aktivieren:
1. Musikgesteuertes Stroboskop* in Salven
2. Musikgesteuertes Stroboskop* in Salven
(bei den Nebengeräten auch im Wechsel,
wenn bei ihnen der Slave-Modus 2, 3 oder 4
eingestellt ist, Kap. 6.2)
3. Dauer-Stroboskop
*Die Musiksteuerung muss eingeschaltet sein
(Kap. 6, Bedienschritte 1 – 4).

Beim erneuten Gedrückthalten der Taste FUNC-
TION ist jeweils die nächste Stroboskop-Funk-
tion aktiviert.
b) Leuchtet die LED der Taste MODE kontinu-
ierlich, kann eines der 12 Show-Programme
mit der Taste FUNCTION ausgewählt werden
(Kap. 6.1). Ohne Musiksignal schaltet das
Gerät auf ein langsames Lauflicht um.
c) Blinkt die LED der Taste MODE, kann ebenfalls
eines der 12 Show-Programme mit der Taste
FUNCTION ausgewählt werden. Ohne Musik-
signal ist das Lauflicht jedoch noch langsamer.
7 Bedienung über ein Lichtsteuergerät
Zur Bedienung über ein Lichtsteuergerät mit DMX512-
Protokoll (z. B. DMX-1440 oder DMX-510USB von
„img Stage Line“) verfügt das LED-220DMX über
28 DMX-Steuerkanäle. Es kann aber auch über nur
3 oder 9 Kanäle gesteuert werden, wenn die vorgege-
benen Farben und Lichtwechselfolgen ausreichend
sind. Die Funktionen der Kanäle und die DMX-Werte
finden Sie auf den Seiten 8 und 9.
7.1 Anschluss
Als DMX-Schnittstelle besitzt das Gerät 3-polige XLR-
Anschlüsse mit folgender Kontaktbelegung:
Pin 1 = Masse, 2 = DMX
-
, 3 = DMX+
Zum Anschluss sollten spezielle Kabel für hohen
Datenfluss verwendet werden. Normale abgeschirmte
Mikrofonkabel mit einem Leitungsquerschnitt von min-
destens 2 × 0,22 mm2und möglichst geringer Kapazität
sind nur bei einer Gesamtkabellänge bis 100 m zu emp-
fehlen. Bei Leitungslängen ab 150 m wird grundsätzlich
das Zwischenschalten eines DMX-Aufholverstärkers
empfohlen (z. B. SR-103DMX von „img Stage Line“).
1) Den DMX-Eingang (3) mit dem DMX-Ausgang des
Lichtsteuergerätes verbinden.
2) Den DMX-Ausgang (8) mit dem DMX-Eingang des
nächsten Lichteffektgerätes verbinden. Dessen
Ausgang wieder mit dem Eingang des nachfolgen-
den Gerätes verbinden usw., bis alle Lichteffektge-
räte in einer Kette angeschlossen sind.
3) Den DMX-Ausgang des letzten DMX-Gerätes der
Kette mit einem 120-Ω-Widerstand (> 0,3 W) ab-
schließen: An die Pins 2 und 3 eines XLR-Steckers
den Widerstand anlöten und den Stecker in den
DMX-Ausgang stecken oder einen entsprechenden
Abschlussstecker (z. B. DLT-123 von „img Stage
Line“) verwenden.
7.2 Startadresse und
Anzahl der DMX-Kanäle einstellen
Um das LED-220DMX mit einem Lichtsteuergerät
bedienen zu können, muss die DMX-Startadresse für
den ersten DMX-Kanal eingestellt werden. Ist z. B. am
Steuergerät die Adresse 17 zur Auswahl der Betriebs-
art vorgesehen, am LED-220DMX die Startadresse 17
einstellen. Die anderen Funktionen des LED-220DMX
sind dann automatisch den folgenden Adressen zuge-
ordnet. Nachfolgend ist ein Beispiel mit der Start-
adresse 17 aufgeführt:
1) Die DMX-Startadresse einstellen:
a) Die Taste MENU (11) einmal drücken, sodass im
Display (7) erscheint. Mit dem Drücken der
nächsten Taste nie länger als 10 Sekunden war-
ten, sonst wird der Einstellvorgang beendet.
b) Die Taste ENTER (13) drücken. Die momentane
Adresse wird angezeigt.
c) Mit der Taste oder (12) die gewünschte
Adresse einstellen und mit der Taste ENTER
speichern.
2) Die Anzahl der DMX-Kanäle einstellen, die zum
Steuern des LED-220DMX benutzt werden sollen.
a) Die Taste MENU so oft drücken, bis im Display
(Channel Mode) erscheint.
b) Die Taste ENTER drücken. Die Anzahl der DMX-
Kanäle wird angezeigt.
c) Mit der Taste oder die Anzahl der DMX-
Kanäle einstellen (3, 9 oder 28) und mit der
Taste ENTER speichern.
3) Zum Ausblenden des Menüs die Taste MENU ge-
drückt halten, bis das Display auf die Startadresse
oder auf die Nummer des gewählten Showpro-
gramms zurückschaltet oder ca. 10 s warten.
4) Sobald die Steuersignale des DMX-Steuergerätes
empfangen werden, leuchtet die rote LED DMX (9)
und das Display zeigt die Startadresse an. Das
LED-220DMX kann nun mit dem DMX-Steuergerät
bedient werden.
Damit im 3-Kanal- oder im 9-Kanal-Modus ein
Lichtstrahl erscheint, den DMX-Kanal 1 für die Be-
triebsart auf einen DMX-Wert größer als 9 einstel-
len und den DMX-Kanal 2 für die Farbe bzw.
Sequenz auf einen DMX-Wert größer als 15.
Anzahl der DMX-Kanäle 3 9 28
belegte DMX-Adressen 17 – 19 17 – 25 17 – 44
nächstmögliche Startadresse für
das nachfolgende DMX-Gerät 20 26 45
7
D
A
CH

F1F2F3F4F5F6F7
GR R
RG G
BW W
WB B
F1, F3, F5, F7
BW W
WB B
GR R
RG G
F2, F4, F6
8 Weitere Funktionen
8.1 Anzeige der Betriebsstunden
und Firmware-Version
Die Taste MENU (11) so oft drücken, bis im Display (7)
der entsprechende Menüpunkt angezeigt wird:
zur Anzeige der Betriebsstunden
zur Anzeige der Firmware-Version
(Betriebssystem des Gerätes)
Die Auswahl mit der Taste ENTER (13) bestätigen und
das Display zeigt die gewünschte Information an.
Nach 10 Sekunden schaltet das Gerät auf den vorhe-
rigen Betriebsmodus zurück.
8.2 Testbetrieb
Zum Testen des Gerätes kann ein Testprogramm
gestartet werden. Die Taste MENU (11) so oft drücken,
bis das Display (7) anzeigt. Die Taste ENTER
(13) drücken und der Testdurchlauf startet. Zum Been-
den des Testprogramm die Taste MENU erneut drü-
cken. Nach 10 Sekunden schaltet das Gerät auf den
vorherigen Betriebsmodus zurück.
9 Reinigung des Gerätes
Die 7 Linsen sollten in regelmäßigen Abständen, je
nach Verschmutzung durch Staub, Rauch oder andere
Schmutzpartikel gereinigt werden. Nur dann kann das
Licht in maximaler Helligkeit abgestrahlt werden. Zum
Säubern den Netzstecker aus der Steckdose zie-
hen. Nur ein weiches, sauberes Tuch und ein Glasrei-
nigungsmittel verwenden.
Zum Reinigen der anderen Gehäuseteile nur ein
weiches, sauberes Tuch benutzen. Auf keinen Fall
eine Flüssigkeit verwenden, die könnte in das Gerät
laufen und es beschädigen.
10 Technische Daten
Stromversorgung: . . . . . 230 V~/50 Hz
Leistungsaufnahme: . . . 25 VA
Lichtquelle: . . . . . . . . . . 84 superhelle LEDs:
21 rote LEDs
21 grüne LEDs
21 blaue LEDs
21 weiße LEDs
Einsatztemperatur: . . . . 0 – 40 °C
Abmessungen: . . . . . . . 290 × 100 × 250 mm
Gewicht: . . . . . . . . . . . . 1,9 kg
Änderungen vorbehalten.
10.1 DMX-Kanäle
3-Kanal- und 9-Kanal-Modus
* im 3-Kanal-Modus
R = rote LEDs
G = grüne LEDs
B = blaue LEDs
W = weiße LEDs
F = LED-Feld
DMX-Kanal DMX-Wert / Funktion
1
Betriebsart
000 – 009 = LEDs aus (Blackout)
010 – 119 = Farbe
120 – 239 = Sequenz
240 – 255 = Showprogramm, musikgesteuert
Kanal 2*
alle LED-
Felder
gemeinsam
bzw.
Kanal 2
Feld 1
Kanal 3
Feld 2
Kanal 4
Feld 3
Kanal 5
Feld 4
Kanal 6
Feld 5
Kanal 7
Feld 6
Kanal 8
Feld 7
→
Farbe
(Kanal 1 = 010 – 119)
000 – 015 = LEDs aus
016 – 031 = R
032 – 047 = G
048 – 063 = B
064 – 079 = W
080 – 095 = R + G
096 – 111 = R + B
112 – 127 = R + W
128 – 143 = G + B
144 – 159 = G + W
160 – 175 = B + W
176 – 191 = R+G+B
192 – 207 = R+G+W
208 – 223 = R+B+W
224 – 239 = G+B+W
240 – 255 = R+G+B+W
→
Sequenz
(Kanal 1 = 120 – 239)
000 – 009 = LEDs aus
010 – 019 = G
↔
R+B
020 – 029 = B
↔
R+W
030 – 039 = W
↔
R+G
040 – 049 = G
↔
B
050 – 059 = G
↔
W
060 – 069 = B
↔
W
070 – 079 = G
→
B
→
R+W
080 – 089 = G
→
W
→
R+B
090 – 099 = G
→
B
→
W
100 – 109 = R+G
↔
B+W
110 – 119 = R+B
↔
W
120 – 129 = R+G+B
→
B+W
→
B+R
→
W
130 – 139 = B+W
↔
W
140 – 149 = G+B
→
R
→
W
150 – 159 = G+B
↔
R+W
160 – 169 = R
↔
B+W
170 – 179 = G+B
↔
W
180 – 189 = G+W
↔
B
190 – 199 = R+G
→
G+B
→
G+W
→
R+W
→
R+B
200 – 209 = G
→
R+W
→
B
210 – 219 = R
→
G
→
B
→
W
220 – 229 = R+G
→
W
→
B+W
→
W
230 – 239 = W
→
B
→
G
→
R
240 – 249 = R
→
G
→
B
→
W
250 – 255 = R
→
G
→
B
→
W
→
B
→
G
3* bzw. 9
000 – 009 = Strobe aus
010 – 255 = Stroboskop
langsam – schnell
000 – 255 = Sequenzge-
schwindigkeit
langsam – schnell
8
D
A
CH

10.2 Menüstruktur
9
D
A
CH
Diese Bedienungsanleitung ist urheberrechtlich für MONACOR
®
INTERNATIONAL GmbH & Co. KG geschützt.
Eine Reproduktion für eigene kommerzielle Zwecke – auch auszugsweise – ist untersagt.
DMX-Startadresse
Betriebsmodus
– MASTER
– SLAVE 1
– SLAVE 4
Blackout-Modus
– aus
– ein
Display
– ein
– aus
Firmware-Version
Display
– normale Ansicht
– 180° gedreht
Testbetrieb
Betriebsstunden
Musiksteuerung
– ein
– aus
Anzahl der DMX-Kanäle
– 3 Kanäle
– 9 Kanäle
– 28 Kanäle
Showprogramm
– Show 0
– Show 1
– Show 11
28-Kanal-Modus
R = Helligkeit der roten LEDs
G = Helligkeit der grünen LEDs
B = Helligkeit der blauen LEDs
W = Helligkeit der weißen LEDs
F = LED-Feld
DMX-Kanal Funktion DMX-Wert
1 R: F 1
0 – 255
2 G: F 1
3 B: F 1
4 W: F 1
5 R: F 2
6 G: F 2
7 B: F 2
8 W: F 2
9 R: F 3
10 G: F 3
11 B: F 3
12 W: F 3
13 R: F 4
14 G: F 4
15 B: F 4
16 W: F 4
17 R: F 5
18 G: F 5
19 B: F 5
20 W: F 5
21 R: F 6
22 G: F 6
23 B: F 6
24 W: F 6
25 R: F 7
26 G: F 7
27 B: F 7
28 W: F 7

All operating elements and connections described
can be found on page 2.
1 Operating Elements and Connections
1.1 Light effect unit LED-220DMX
1Locking screws for the mounting bracket (2)
2Mounting bracket
3DMX signal input (3-pole XLR) for connecting a
light controller;
Pin 1 = ground, 2 = DMX
-
, 3 = DMX+
4Jack for the remote control LC-3
5Microphone for music control
6SENSITIVITY control for music control via the
microphone (5)
7Display
8DMX signal output (3-pole XLR) for connection to
the DMX input of another light effect unit;
Pin 1 = ground, 2 = DMX
-
, 3 = DMX+
9LED DMX; will light up with DMX control signals at
the DMX INPUT (3)
10 LED MASTER; will light up in the master mode
(operation without DMX controller or with the
remote control LC-3)
11 Button MENU to call the adjusting menu and to
select the menu items
12 Buttons and to change an adjustment in the
menu
13 Button ENTER to activate a menu item and to
memorize an adjustment
14 LED SOUND; will shortly light up in case of music
control via the microphone (5)
15 LED SLAVE; will light up in the slave mode
(control via another LED-220DMX unit)
16 Mains jack for connection to a socket (230 V~/
50 Hz) via the connection cable provided
17 Support for the mains fuse
Always replace a fuse that has blown by one of the
same type.
1.2 Remote control LC-3
The remote control is available as an accessory and
not supplied with LED-220DMX.
18 Button STAND BY for activating/deactivating the
light beams
19 Button FUNCTION for various functions depending
on the operating mode selected with the button
MODE (20) [chapter 6.3]
20 Button MODE for selecting the operating mode
Note: For control via the remote control, there must be no
DMX signal at the DMX INPUT (3).
2 Safety Notes
The unit corresponds to all required directives of the
EU and is therefore marked with .
Please observe the following items in any case:
GThe unit is suitable for indoor use only. Protect it
against dripping water and splash water, high air
humidity, and heat (admissible ambient temperature
range 0 – 40 °C).
GDo not place any vessel filled with liquid on the unit,
e. g. a drinking glass.
GDo not operate the unit or immediately disconnect
the mains plug from the mains socket
1. if the unit or the mains cable is visibly damaged,
2. if a defect might have occurred after the unit was
dropped or suffered a similar accident,
3. if malfunctions occur.
In any case the unit must be repaired by skilled per-
sonnel.
G
Never pull the mains cable for disconnecting the mains
plug from the mains socket, always seize the plug.
GFor cleaning only use a dry, soft cloth, never use
chemicals or water.
G
No guarantee claims for the unit and no liability for any
resulting personal damage or material damage will be
accepted if the unit is used for other purposes than
originally intended, if it is not safely mounted or cor-
rectly operated, or if it is not repaired in an expert way.
GImportant for U. K. Customers!
The wires in this mains lead are coloured in accord-
ance with the following code:
green/yellow = earth
blue = neutral
brown = live
As the colours of the wires in the mains lead of this
appliance may not correspond with the coloured
markings identifying the terminals in your plug, pro-
ceed as follows:
1. The wire which is coloured green and yellow must
be connected to the terminal in the plug which is
marked with the letter E or by the earth symbol ,
or coloured green or green and yellow.
2. The wire which is coloured blue must be con-
nected to the terminal which is marked with the
letter N or coloured black.
3. The wire which is coloured brown must be con-
nected to the terminal which is marked with the
letter L or coloured red.
Warning – This appliance must be earthed.
If the unit is to be put out of operation defini-
tively, take it to a local recycling plant for a
disposal which is not harmful to the environ-
ment.
WARNING
The unit uses dangerous mains voltage.
Leave servicing to skilled personnel
only; inexpert handling may result in
electric shock.
10
GB

3 Applications
The light effect unit LED-220DMX is suited for applica-
tions on stage, in discotheques or party rooms. It pro-
jects coloured light patterns via 84 super bright LEDs in
red, green, blue and white and offers music-controlled
light sequence effects and stroboscopic effects.
The light effect unit is designed for control via a
DMX light controller (28 DMX control channels, switch-
able to 9 or 3 channels); however, it can also be oper-
ated on its own or with the remote control LC-3 avail-
able as an accessory.
4 Mounting
GThe minimum distance to the illuminated object
should be 10 cm.
1) Screw the light effect unit with the mounting bracket
(2) to a suitable place, e. g. on a cross bar or a light-
ing stand.
2) To align the light effect unit, release the locking
screws (1). Adjust the desired inclination of the unit,
then fasten the screws again.
5 Operation
Connect the mains cable provided to the mains jack
(16) first, then connect it to a socket (230 V~/50 Hz).
During the starting phase, all LEDs will flash a few
times; the display (7) will show . Then the unit will
be ready for operation and can be controlled via a
DMX controller (chapter 7) or will automatically run
through its show programme (chapter 6). To switch
off the unit, disconnect the mains plug from the socket.
For a more convenient operation, it is recom-
mended to connect the unit to a mains socket which is
switched on and off via a light switch.
Caution: Never connect the unit to the mains voltage
via a dimmer!
5.1 Basic adjustments
The following basic adjustments can be made via the
display (7) and the control buttons (11 – 13). For this
purpose, press the button MENU (11) so many times
until the desired function is displayed. Then press the
button ENTER (13). Make sure that the next button is
pressed within 10 seconds; otherwise the adjusting
process will end automatically. The menu structure is
shown on page 15.
Blackout mode off or on
Use the button or (12) to select:
The light beams will always be on. This adjust-
ment must be selected when the unit is oper-
ated without a DMX controller.
The light beams will only be on with a DMX
control signal at the jack DMX INPUT (3). Once
the DMX controller has been switched off, the
light beams will be off.
To memorize, press the button ENTER (13).
Display on or off
Use the button or (12) to select:
The display (7) will always be on.
The display will be switched off approx. 60 s
after pressing the last button. It will be switched
on again the next time a button is pressed.
To memorize, press the button ENTER (13).
Display representation
Use the button ENTER (13) to select and memorize at
the same time:
normal representation
representation turned by 180°
Approx. 10 s after pressing the last button, the adjust-
ing menu will be exited automatically.
6 Operation without DMX Controller
If there is no DMX control signal at the jack DMX
INPUT (3), the yellow LED MASTER (10) will light up,
the display (7) will show the number of the show pro-
gramme adjusted ( … ) and the unit will
automatically run through its show programme, pro-
vided that the Blackout mode has been deactivated
(chapter 5.1).
For controlling the light sequence effects to the
rhythm of the music, activate the music control:
1) Press the button MENU (11) so many times until
(Sound Mode) is indicated on the display (7).
Make sure that the next button is pressed within
10 seconds; otherwise the adjusting process will
end automatically.
WARNING Never look directly into the light beams;
this may cause eye damage.
Please note that fast changes in light-
ing, e. g. flashing light, may trigger
epileptic seizures with photosensitive
persons or persons with epilepsy!
WARNING Mount the light effect unit safely and
expertly. If it is installed at a place
where people may walk or sit under
it, additionally secure it (e. g. by a
safety rope; fasten the safety rope in
such a way that, even in the event of
a fall, the maximum falling distance
of the unit will not exceed 20 cm).
11
GB

2) Activate the menu item with the button
ENTER (13). The display will show the operating
status:
= music control activated
= music control deactivated
3) Activate or deactivate the music control with the
button or (12) and confirm with the button
ENTER. The display will return to . After
approx. 10 seconds, it will indicate again the num-
ber of the show programme adjusted and the unit
will start the programme run in the mode selected.
4) For music control, adjust the SENSITIVITY control
(6) for the microphone in such a way that the light
sequence effects will be optimally controlled by the
music. With each control signal created by the
sound picked up via the microphone (5), the green
LED SOUND (14) will shortly light up.
Notes
1. When the volume is changed on the music system, the
microphone sensitivity must be adapted accordingly with
the rotary control.
2. In music intervals, when the volume is too low or when
the SENSITIVITY control is turned to the left stop, the
unit will switch over to a slow light sequence.
6.1 Selecting a show programme
LED-220DMX offers 12 music-controlled show pro-
grammes with different light sequence effects and light
changing sequences. Without any music signal, the
unit will switch over to a slow light sequence.
1) Press the button MENU (11) so many times until
(Show Mode) is indicated on the display (7).
Make sure that the next button is pressed within
10 seconds; otherwise the adjusting process will
end automatically.
2) Activate the menu item with the button
ENTER (13). The number of the show programme
adjusted will flash on the display.
3) Use the button or (12) to select the desired pro-
gramme number and confirm with the button
ENTER.
6.2 Interconnecting several LED-220DMX units
Several units of LED-220DMX may be interconnected;
the master unit will control all slaves units in sync.
1) Connect the DMX OUTPUT (8) of the master unit
via a 3-pole XLR cable (e. g. series MEC-… or
MECN-… from the product range of “img Stage
Line”) to the DMX INPUT (3) of the first slave unit.
2) Connect the DMX OUTPUT of the first slave unit to
the DMX INPUT of the second slave unit, etc. until
all units have been connected in a chain.
3) Set the master unit to the master mode and the
slave units to one of the slave modes:
a) Press the button MENU (11) so many times until
(Slave Mode) is indicated on the display
(7). Make sure that the next button is pressed
within 10 seconds; otherwise the adjusting
process will end automatically.
b) Activate the menu item with the button
ENTER (13). The mode adjusted will be dis-
played:
Master mode: Adjustment for the master
unit
Slave mode 1: Adjustment for the slave
units for controlling them in sync with the
master unit.
Slave mode 2: Adjustment for the slave
units for controlling them opposite to the
master unit.
Slave modes 3 and 4: Control variants
for the slave units when 3, 4 or more
LED-220DMX units are used.
c) Use the button or (12) to select the desired
mode and confirm with the button ENTER.
Once the control signals from the master unit have
been applied to the slave units, the red LED SLAVE
(15) will light up on the slave units.
6.3 Remote control LC-3
The remote control LC-3 available as an accessory
allows to control various functions.
1) Connect the remote control to the jack ONLY FOR
REMOTE CONTROL (4).
2) There must be no DMX signal at the DMX INPUT (3).
3) Via the DMX OUTPUT (8), further LED-220DMX
units may be connected (chapter 6.2) in order to
control them together with the master unit via the
remote control.
4) The button STAND BY (18) allows to switch the light
beams on or off. When the light beams are switched
off, the LED next to the button STAND BY will light
up as a check.
5) Select the operating mode with the button MODE
(20):
a) When the LED of the button MODE is off, the
stroboscope mode will be activated. By keeping
the button FUNCTION (19) pressed, one of the
three stroboscope functions can be activated:
1. music-controlled stroboscope* in salvos
2. music-controlled stroboscope* in salvos
(also alternately for the slave units, provided
that the slave mode 2, 3 or 4 has been
adjusted on the slave units, chapter 6.2)
3. permanent stroboscope
12
GB
*The music control must be activated
(chapter 6, steps 1 – 4).

When the button FUNCTION is kept pressed
again, the next stroboscope function respec-
tively will be activated.
b) When the LED of the button MODE is perma-
nently on, one of the 12 show programmes can
be selected with the button FUNCTION
(chapter 6.1). Without any music signal, the
unit will switch over to a slow light sequence.
c) With the LED of the button MODE flashing, it will
also be possible to select one of the 12 show
programmes with the button FUNCTION. With-
out any music signal, however, the light
sequence will be even slower.
7 Operation via a Light Controller
For operation via a light controller with DMX512 proto-
col (e. g. DMX-1440 or DMX-510USB by “img Stage
Line”), LED-220DMX is equipped with 28 DMX control
channels. However, it is also possible to control it via 3
or 9 channels only, provided that the preset colours
and light changing sequences are sufficient. The func-
tions of the channels and the DMX values can be
found on pages 14 and 15.
7.1 Connection
As a DMX interface, the unit is provided with 3-pole
XLR jacks of the following pin configuration:
Pin 1 = ground, 2 = DMX-, 3 = DMX+
For connection, special cables for high data flow
should be used. Standard microphone cables with
screening and a minimum cross section of 2 ×
0.22 mm2and with a capacity as low as possible can
only be recommended for a total cable length of up to
100 m. For cable lengths exceeding 150 m it is recom-
mended to insert a DMX level matching amplifier (e. g.
SR-103DMX by “img Stage Line”).
1) Connect the DMX INPUT (3) to the DMX output of
the light controller.
2) Connect the DMX OUTPUT (8) to the DMX input of
the following light effect unit; connect its output
again to the input of the following unit, etc. until all
light effect units have been connected in a chain.
3) Terminate the DMX output of the last DMX unit in
the chain with a 120 Ω resistor (> 0.3 W): Solder the
resistor to the pins 2 and 3 of an XLR plug and con-
nect the plug to the DMX output or use a corre-
sponding terminating plug (e. g. DLT-123 by “img
Stage Line”).
7.2 Adjusting the start address and
the number of DMX channels
For operating the light effect unit with a light controller,
adjust the DMX start address for the first DMX channel.
If e. g. address 17 on the controller is provided for select-
ing the operating mode, adjust the start address 17
on
LED-220DMX. The other functions of LED-220DMX
will then automatically be assigned to the following
addresses. An example with the start address 17 can
be found below:
1) Adjust the DMX start address:
a) Press the button MENU (11) once so that
will appear on the display (7). Make sure that the
next button is pressed within 10 seconds; other-
wise the adjusting process will end automati-
cally.
b) Press the button ENTER (13). The current
address will be displayed.
c) Use the button or (12) to adjust the desired
address and memorize with the button ENTER.
2) Adjust the number of DMX channels to be used for
controlling LED-220DMX:
a) Press the button MENU so many times until
(Channel Mode) is displayed.
b) Press the button ENTER. The number of DMX
channels will be displayed.
c) Use the button or to adjust the number of
DMX channels (3, 9 or 28) and memorize with
the button ENTER.
3) To deactivate the menu, keep the button MENU
pressed until the start address or the number of the
show programme selected is displayed again or
wait for approx. 10 s.
4) Once control signals from the DMX controller have
been received, the red LED DMX (9) will light up
and the start address will be displayed. It will now
be possible to operate LED-220DMX with the DMX
controller.
For a light beam in the 3-channel or 9-channel
mode, set DMX channel 1 for the operating mode to
a DMX value greater than 9 and DMX channel 2 for
the colour or sequence to a DMX value greater
than 15.
Number of DMX channels 3 9 28
DMX addresses used 17 – 19 17 – 25 17 – 44
next possible start address
for the following DMX unit 20 26 45
13
GB

F1F2F3F4F5F6F7
GR R
RG G
BW W
WB B
F1, F3, F5, F7
BW W
WB B
GR R
RG G
F2, F4, F6
14
GB 8 Additional Functions
8.1 Indication of operating hours
and firmware version
Press the button MENU (11) so many times until the cor-
responding menu item is indicated on the display (7):
indication of operating hours
indication of firmware version
(operating system of the unit)
Confirm with the button ENTER (13); the display will
show the desired information. After 10 seconds, the
unit will return to the previous operating mode.
8.2 Test mode
To test the unit, a test programme can be started.
Press the button MENU (11) so many times until the
display (7) indicates . Press the button ENTER
(13); the test run will start. To exit the test programme,
press the button MENU once again. After 10 seconds,
the unit will return to the previous operating mode.
9 Cleaning the Unit
The 7 lenses should be cleaned at regular intervals,
depending on impurities caused by dust, smoke or
other particles. Only this will ensure that the light is
radiated at maximum brightness. For cleaning, dis-
connect the mains plug from the socket. Only use a
soft, clean cloth and a glass cleaner.
For cleaning the other parts of the housing, only use
a soft, clean cloth. Never use any fluid; it may leak into
the unit and cause damage.
10 Specifications
Power supply: . . . . . . . . 230 V~/50 Hz
Power consumption: . . . 25 VA
Light source: . . . . . . . . . 84 super bright LEDs:
21 red LEDs
21 green LEDs
21 blue LEDs
21 white LEDs
Ambient temperature: . . 0 – 40 °C
Dimensions. . . . . . . . . . 290 × 100 × 250 mm
Weight: . . . . . . . . . . . . . 1.9 kg
Subject to technical modification.
10.1 DMX channels
3-channel mode and 9-channel mode
*in 3-channel mode
R = red LEDs
G = green LEDs
B = blue LEDs
W = white LEDs
F = LED field
DMX Channel DMX value / Function
1
Operating mode
000 – 009 = LEDs off (Blackout)
010 – 119 = colour
120 – 239 = sequence
240 – 255 = show programme, music-controlled
Channel 2*
all LED
fields
together
or
Channel 2
Field 1
Channel 3
Field 2
Channel 4
Field 3
Channel 5
Field 4
Channel 6
Field 5
Channel 7
Field 6
Channel 8
Field 7
→
Colour
(Channel 1 = 010 – 119)
000 – 015 = LEDs off
016 – 031 = R
032 – 047 = G
048 – 063 = B
064 – 079 = W
080 – 095 = R + G
096 – 111 = R + B
112 – 127 = R + W
128 – 143 = G + B
144 – 159 = G + W
160 – 175 = B + W
176 – 191 = R+G+B
192 – 207 = R+G+W
208 – 223 = R+B+W
224 – 239 = G+B+W
240 – 255 = R+G+B+W
→
Sequence
(Channel 1 = 120 – 239)
000 – 009 = LEDs off
010 – 019 = G
↔
R+B
020 – 029 = B
↔
R+W
030 – 039 = W
↔
R+G
040 – 049 = G
↔
B
050 – 059 = G
↔
W
060 – 069 = B
↔
W
070 – 079 = G
→
B
→
R+W
080 – 089 = G
→
W
→
R+B
090 – 099 = G
→
B
→
W
100 – 109 = R+G
↔
B+W
110 – 119 = R+B
↔
W
120 – 129 = R+G+B
→
B+W
→
B+R
→
W
130 – 139 = B+W
↔
W
140 – 149 = G+B
→
R
→
W
150 – 159 = G+B
↔
R+W
160 – 169 = R
↔
B+W
170 – 179 = G+B
↔
W
180 – 189 = G+W
↔
B
190 – 199 = R+G
→
G+B
→
G+W
→
R+W
→
R+B
200 – 209 = G
→
R+W
→
B
210 – 219 = R
→
G
→
B
→
W
220 – 229 = R+G
→
W
→
B+W
→
W
230 – 239 = W
→
B
→
G
→
R
240 – 249 = R
→
G
→
B
→
W
250 – 255 = R
→
G
→
B
→
W
→
B
→
G
3* or 9
000 – 009 = strobe off
010 – 255 = stroboscope
slow – fast
000 – 255 = speed of
sequence
slow – fast

15
GB
All rights reserved by MONACOR
®
INTERNATIONAL GmbH & Co. KG. No part of this instruction manual may
be reproduced in any form or by any means for any commercial use.
10.2 Menu structure
28-channel mode
R = brightness of red LEDs
G = brightness of green LEDs
B = brightness of blue LEDs
W = brightness of white LEDs
F = LED field
DMX Channel Function DMX value
1 R: F 1
0 – 255
2 G: F 1
3 B: F 1
4 W: F 1
5 R: F 2
6 G: F 2
7 B: F 2
8 W: F 2
9 R: F 3
10 G: F 3
11 B: F 3
12 W: F 3
13 R: F 4
14 G: F 4
15 B: F 4
16 W: F 4
17 R: F 5
18 G: F 5
19 B: F 5
20 W: F 5
21 R: F 6
22 G: F 6
23 B: F 6
24 W: F 6
25 R: F 7
26 G: F 7
27 B: F 7
28 W: F 7
DMX start address
Operating mode
– MASTER
– SLAVE 1
– SLAVE 4
Blackout mode
–off
–on
Display
–on
–off
Firmware version
Display
– normal
– turned by 180°
Test mode
Fixture hours
Music control
–on
–off
Number of DMX channels
– 3 channels
– 9 channels
– 28 channels
Show programme
– Show 0
– Show 1
– Show 11

Vous trouverez page 2, lʼensemble des éléments et
branchements.
1 Eléments et branchements
1.1 Jeu de lumière LED-220DMX
1Vis de réglage pour lʼétrier de montage (2)
2Etrier de montage
3Entrée signal DMX (XLR 3 pôles) pour brancher un
contrôleur :
Pin 1 = masse, 2 = DMX
-
, 3 = DMX +
4Prise de branchement de la télécommande LC-3
5Microphone pour la gestion par la musique
6Potentiomètre SENSITIVITY de réglage de la sen-
sibilité pour la gestion par la musique via le micro-
phone (5)
7Affichage
8Sortie signal DMX (XLR 3 pôles) pour brancher à
lʼentrée DMX dʼun autre jeu de lumière DMX
Pin 1 = masse, 2 = DMX
-
, 3 = DMX +
9LED DMX : brille lorsque des signaux de com-
mande DMX sont présents à lʼentrée DMX INPUT
(3)
10 LED MASTER : brille en mode Master
(fonctionnement sans contrôleur DMX ou avec la
télécommande LC-3)
11 Touche MENU pour appeler le menu de réglage et
sélectionner les points du menu
12 Touches et pour modifier un réglage dans le
menu
13 Touche ENTER pour activer un point du menu et
mémoriser un réglage
14 LED SOUND : brille brièvement en mode gestion
par la musique via le microphone (5)
15 LED SLAVE : brille en mode Slave
(gestion via un second LED-220DMX)
16 Prise secteur pour brancher le cordon secteur livré
à une prise 230 V~/50 Hz
17 Porte-fusible : tout fusible fondu doit être remplacé
impérativement par un fusible de même type.
1.2 Télécommande LC-3
La télécommande est disponible en option mais nʼest
pas livrée avec le LED-220DMX.
18 Touche STAND BY pour allumer et éteindre les
faisceaux lumineux
19 Touche FUNCTION pour sélectionner les diffé-
rentes fonctions selon le mode de fonctionnement
choisi avec la touche MODE (20) [chapitre 6.3]
20 Touche MODE pour choisir le mode de fonctionne-
ment
Conseil : Pour une gestion via la télécommande, aucun signal
DMX ne doit pas être présent à lʼentrée DMX INPUT (3).
2 Conseils dʼutilisation et de sécurité
Lʼappareil répond à toutes les directives nécessaires
de lʼUnion européenne et porte donc le symbole .
Respectez scrupuleusement les points suivants :
GLʼappareil nʼest conçu que pour une utilisation en
intérieur. Protégez-le de tout type de projections
dʼeau, des éclaboussures, dʼune humidité élevée de
lʼair et de la chaleur (plage de température de fonc-
tionnement autorisée : 0 – 40 °C).
GEn aucun cas, vous ne devez poser pas dʼobjet
contenant du liquide ou un verre sur lʼappareil.
GNe faites pas fonctionner lʼappareil ou débranchez-
le immédiatement du secteur lorsque :
1. des dommages visibles apparaissent sur lʼappa-
reil ou sur le cordon secteur,
2. après une chute ou un cas similaire, vous avez un
doute sur lʼétat de lʼappareil,
3. des dysfonctionnements apparaissent.
Dans tous les cas, les dommages doivent être répa-
rés par un technicien spécialisé.
GNe débranchez jamais lʼappareil en tirant sur le cor-
don secteur ; retirez toujours le cordon secteur en
tirant la fiche.
GPour le nettoyage, utilisez seulement un chiffon sec
et doux, en aucun cas, de produits chimiques ou
dʼeau.
GNous déclinons toute responsabilité en cas de dom-
mages matériels ou corporels résultants si lʼappareil
est utilisé dans un but autre que celui pour lequel il a
été conçu, sʼil nʼest pas correctement monté, utilisé
ou nʼest pas réparé par une personne habilitée, en
outre, la garantie deviendrait caduque.
Lorsque lʼappareil est définitivement retiré du
service, vous devez le déposer dans une
usine de recyclage adaptée pour contribuer à
son élimination non polluante.
AVERTISSEMENT
Lʼappareil est alimenté par une
tension dangereuse. Ne touchez
jamais lʼintérieur de lʼappareil !
Risque de décharge électrique.
16
F
B
CH

3 Possibilités dʼutilisation
Le jeu de lumière LED-220DMX est particulièrement
adapté pour une utilisation sur scène, en discothèque
et dans des salles de fêtes. Il projète des modèles de
lumière de couleurs à partir de 84 LEDs très claires,
brillant en rouge, vert, bleu et blanc. Des effets strobos-
cope et des effets de défilement lumineux gérés par la
musique sont possibles.
Le jeu de lumière est conçu pour une gestion via un
contrôleur DMX (28 canaux de commande DMX, com-
mutable sur 9 ou 3 canaux), il peut également fonc-
tionner sans contrôleur ou avec la télécommande
LC-3, disponible en option.
4 Montage
GLa distance avec lʼobjet à éclairer devrait être de
10 cm au moins.
1) Vissez le jeu de lumière avec lʼétrier de montage (2)
à lʼendroit voulu par exemple sur une traverse ou un
pied de lumière.
2) Pour orienter le jeu de lumière, desserrez les vis de
réglage (1), réglez lʼinclinaison voulue de lʼappareil
puis revissez les vis.
5 Mise en service
Reliez le cordon secteur livré à la prise secteur (16) et
lʼautre extrémité à une prise 230 V~/50 Hz. Pendant la
phase de démarrage, toutes les LEDs clignotent
quelques fois, lʼaffichage (7) indique . Lʼappareil
est ensuite prêt à fonctionner et peut être utilisé via un
contrôleur DMX (chapitre 7) ou il fait défiler de
manière autonome son programme Show (chapi-
tre 6). Pour lʼéteindre, débranchez le cordon secteur.
Pour un meilleur confort dʼutilisation, il est recom-
mandé de relier lʼappareil à une prise secteur pouvant
être allumée et éteinte via un interrupteur.
Attention : Lʼappareil ne doit pas être relié à la tension
secteur via un dimmer !
5.1 Réglages de base
Les réglages de base suivants peuvent être effectués
à lʼaide de lʼaffichage (7) et des touches de commande
(11 à 13).Appuyez sur la touche MENU (11) jusquʼà ce
que la fonction voulue soit affichée. Appuyez ensuite
sur la touche ENTER (13). Nʼattendez pas plus de 10
secondes avant dʼappuyer sur la touche suivante
sinon vous quittez le processus de réglage. Vous trou-
verez page 21 la structure du menu.
Activation/Désactivation
du mode Blackout
Avec la touche ou (12), sélectionnez :
Les faisceaux lumineux sont tout le temps allu-
més. Ce réglage doit être sélectionné pour une
utilisation sans contrôleur DMX.
Les faisceaux ne sont allumés que lorsquʼun
signal de commande DMX est présent à la
prise DMX INPUT (3). Dès que le contrôleur
DMX est éteint, les faisceaux lumineux sʼétei-
gnent.
Pour mémoriser, appuyez sur la touche ENTER (13).
Activation/Désactivation affichage
Avec la touche ou (12), sélectionnez :
Lʼaffichage (7) est toujours allumé.
Lʼaffichage sʼéteint 60 secondes environ après
la dernière pression sur une touche. Il se ral-
lume dès la prochaine activation dʼune touche.
Pour mémoriser, appuyez sur la touche ENTER (13).
Visualisation affichage
Sélectionnez avec la touche ENTER (13) et simulta-
nément mémorisez :
visualisation normale
visualisation tournée de 180°
10 secondes environ après la dernière pression sur
une touche, le menu de réglage est automatiquement
quitté.
6 Fonctionnement sans contrôleur DMX
Si aucun signal de commande DMX nʼest présent à la
prise DMX INPUT (3), la LED MASTER (10) jaune
brille, lʼaffichage (7) indique le numéro du programme
Show réglé ( … ) et lʼappareil fait défiler de
manière autonome son programme Show. Il est impé-
ratif, dans ce cas, que le mode Blackout soit désactivé
(chapitre 5.1).
Pour gérer les effets de défilement lumineux au
rythme de la musique, activez la gestion par la musique :
1) Appuyez sur la touche MENU (11) jusquʼà ce que
(Sound Mode) soit visible sur lʼaffichage (7).
Nʼattendez pas plus de 10 secondes avant dʼap-
puyer sur la touche suivante, sinon, vous quittez le
processus de réglage.
AVERTISSEMENT Ne regardez jamais directement
le faisceau lumineux, cela peut
générer des troubles de la vue.
Nʼoubliez pas que des change-
ments très rapides de lumière
peuvent déclencher des crises
dʼépilepsie chez les personnes
photosensibles et épileptiques.
AVERTISSEMENT Lʼappareil doit être monté de
manière professionnelle et
sûre. Si lʼappareil doit être
suspendu au-dessus de per-
sonnes, il doit être en plus
assuré (p. ex. avec une corde
de sécurité. Fixez la corde de
telle sorte que la distance de
chute de lʼappareil ne puisse
pas être supérieure à 20 cm).
17
F
B
CH

2) Activez le point de menu avec la touche
ENTER (13). Lʼaffichage indique le mode de fonc-
tionnement :
= gestion par la musique activée
= gestion par la musique désactivée
3) Avec la touche ou (12), activez ou désactivez la
gestion par la musique et confirmez avec la touche
ENTER. Lʼaffichage revient à . 10 secondes
après, il indique à nouveau le numéro du pro-
gramme Show réglé, lʼappareil démarre le défile-
ment de programme dans le mode choisi.
4) Pour une gestion par la musique, réglez le réglage
SENSITIVITY (6) pour la sensibilité du microphone
de telle sorte que les effets de défilement lumineux
soient gérés de manière optimale par la musique. A
chaque signal de commande produit par le son
enregistré par le micro (5), la LED SOUND verte
(14) sʼallume brièvement.
Remarque
1. Si le volume est modifié sur lʼinstallation de musique, la
sensibilité du microphone doit être adaptée en consé-
quence avec le potentiomètre rotatif.
2. Pour des pauses de musique, si le volume est trop faible
ou si le réglage SENSITIVITY est poussé entièrement à
gauche, lʼappareil commute sur un défilement lumineux
lent.
6.1 Sélection dʼun programme Show
Le LE-220DMX possède 12 programmes Show gérés
par la musique avec différents effets de défilement
lumineux et des séquences de changements de
lumière. Sans signal de musique, lʼappareil commute
sur un défilement lumineux lent.
1) Appuyez sur la touche MENU (11) jusquʼà ce que
(Show Mode) soit visible sur lʼaffichage (7).
Nʼattendez pas plus de 10 secondes avant dʼap-
puyer sur la touche suivante, sinon, vous quittez le
processus de réglage.
2) Activez le point de menu avec la touche
ENTER (13), lʼaffichage indique en clignotant le
numéro du programme Show réglé.
3) Avec la touche ou (12), sélectionnez le numéro
de programme souhaité et confirmez avec la
touche ENTER.
6.2 Fonctionnement combiné de plusieurs
LED-220DMX
Il est possible de faire fonctionner ensemble plusieurs
appareils LED-220DMX. Lʼappareil principal (Master)
peut gérer de manière synchrone tous les appareils
auxiliaires (Slave).
1) Reliez la connexion DMX OUTPUT (8) de lʼappareil
principal via un cordon XLR 3 pôles (par exemple
MEC-… ou MECN-… de la gamme “img Stage
Line”) à lʼentrée DMX INPUT (3) du premier appa-
reil auxiliaire.
2) Reliez la sortie DMX OUTPUT du premier appareil
auxiliaire à lʼentrée DMX INPUT du deuxième appa-
reil auxiliaire et ainsi de suite jusquʼà ce que tous
les appareils soient reliés en une chaîne.
3) Réglez lʼappareil principal sur le mode Master et les
appareils auxiliaires sur un des modes Slave :
a) Appuyez sur la touche MENU (11) jusquʼà ce
que (Slave Mode) soit visible sur lʼaffi-
chage (7). Nʼattendez pas plus de 10 secondes
avant dʼappuyer sur la touche suivante, sinon,
vous quittez le processus de réglage.
b) Activez le point de menu avec la touche
ENTER (13), lʼaffichage indique le mode réglé :
Mode Master : réglage pour lʼappareil prin-
cipal
Mode Slave 1 : réglage pour les appareils
auxiliaires lorsquʼils doivent être gérés de
manière synchrone avec lʼappareil principal
Mode Slave 2 : réglage pour les appareils
auxiliaires lorsquʼils doivent être gérés à
lʼinverse de lʼappareil principal
Modes Slave 3 et 4 : variantes de gestion
pour les appareils auxiliaires lorsque 3, 4 ou
plusieurs appareils de type LED-220DMX
sont utilisés.
c) Avec la touche ou (12), sélectionnez le mode
souhaité, confirmez avec la touche ENTER.
Dès que les signaux de commande de lʼappareil Mas-
ter sont présents sur les appareils auxiliaires, la LED
rouge SLAVE (15) brille sur les appareils auxiliaires.
6.3 Télécommande LC-3
La télécommande LC-3 disponible en option, permet
de gérer diverses fonctions.
1) Reliez la télécommande à la prise ONLY FOR
REMOTE CONTROL (4).
2) Aucun signal DMX ne doit être présent à lʼentrée
DMX INPUT (3).
3) Via la sortie DMX OUTPUT (8), on peut brancher
dʼautres LED-220DMX (chapitre 6.2) pour les
gérer via la télécommande, avec lʼappareil principal.
4) Avec la touche STAND BY (18), on peut allumer et
éteindre les faisceaux lumineux. Si les faisceaux
sont éteints, la LED à côté de la touche STAND BY
brille et sert de témoin de contrôle.
5) Avec la touche MODE (20), sélectionnez le mode
de fonctionnement :
a) Si la LED de la touche MODE ne brille pas, le
mode stroboscope est actif. En maintenant la
touche FUNCTION (19) enfoncée, on peut acti-
ver une des trois fonctions stroboscope :
1. Stroboscope en salves géré par la musique*
2. Stroboscope en salves géré par la musique*
(également en alternance pour les appareils
18
F
B
CH
*La gestion par la musique doit être activée
(chapitre 6, points 1 – 4).

auxiliaires, lorsque, sur les appareils auxi-
liaires, le mode Slave 2, 3 ou 4 est réglé,
chapitre 6.2)
3. Stroboscope continu
Si vous maintenez la touche FUNCTION enfon-
cée une nouvelle fois, la prochaine fonction stro-
boscope est activée.
b) Si la LED de la touche MODE brille, un des
12 programmes Show peut être sélectionné
avec la touche FUNCTION (chapitre 6.1).
Sans signal musical, lʼappareil commute sur un
défilement lumineux lent.
c) Si la LED de la touche MODE clignote, on peut
sélectionner également un des 12 programmes
Show avec la touche FUNCTION. Pourtant,
sans signal musical, le défilement lumineux est
encore plus lent.
7 Utilisation via un contrôleur
Pour une utilisation via un contrôleur avec protocole
DMX512 (p. ex. DMX-1440 ou DMX-510USB de “img
Stage Line”), le LED-220DMX dispose de 28 canaux
de commande DMX. Il peut également être géré via
uniquement 3 ou 9 canaux à condition que les couleurs
présélectionnées et les séquences de changements de
lumière soient suffisantes. Les fonctions des canaux et
les valeurs DMX sont décrites pages 20 et 21.
7.1 Branchement
Lʼappareil possède des prises XLR 3 pôles avec la
configuration suivante pour lʼinterface DMX :
Pin 1 = masse, 2 = DMX
-
, 3 = DMX +
Pour le branchement, il est recommandé dʼutiliser des
câbles spécifiques pour des flots importants de don-
nées. Lʼemploi de câbles micro usuels avec blindage et
une section de 2× 0,22 mm2au moins et la capacité la
plus faible possible ne nʼest recommandé que pour des
longueurs de câble de 100 m maximum. Pour des lon-
gueurs de liaison à partir de 150 m, il est recommandé,
en règle générale, dʼinsérer un amplificateur DMX de
signal (par exemple SR-103DMX de “img Stage Line”).
1) Reliez lʼentrée DMX (3) à la sortie DMX du contrô-
leur.
2) Reliez la sortie DMX (8) à lʼentrée DMX de lʼappa-
reil suivant. Reliez sa sortie à lʼentrée du prochain
appareil et ainsi de suite jusquʼà ce que tous les
jeux de lumière soient reliés dans une chaîne.
3) Terminez la sortie DMX du dernier jeu de lumière de
la chaîne avec une résistance 120 Ω (> 0,3 W) :
soudez aux pins 2 et 3 dʼune fiche XLR la résis-
tance et branchez la fiche dans la sortie DMX ou uti-
lisez un bouchon correspondant (p. ex. DLT-123 de
“img Stage Line”).
7.2 Réglage de lʼadresse de démarrage
et du nombre de canaux DMX
Pour pouvoir utiliser le jeu de lumière avec un contrô-
leur, réglez lʼadresse de démarrage DMX pour le pre-
mier canal DMX. Si par exemple, sur le contrôleur,
lʼadresse 17 est utilisée pour sélectionner le mode de
fonctionnement, réglez lʼadresse de démarrage 17 sur
le LED-220DMX. Les autres fonctions du LED-220DMX
sont automatiquement attribuées aux adresses sui-
vantes. Ci-après, un exemple avec lʼadresse de
démarrage 17 :
1) Réglez lʼadresse de démarrage DMX :
a) Appuyez une fois sur la touche MENU (11) pour
que soit visible sur lʼaffichage (7). Nʼatten-
dez pas plus de 10 secondes avant dʼappuyer
sur la touche suivante, sinon vous quittez le pro-
cessus de réglage.
b) Appuyez sur la touche ENTER (13), lʼadresse
actuelle est affichée.
c) Avec la touche ou (12), réglez lʼadresse vou-
lue et mémorisez-la avec la touche ENTER.
2) Réglez le nombre de canaux DMX devant être utili-
sés pour gérer le LED-220DMX.
a) Appuyez sur la touche MENU jusquʼà ce que
(Channel Mode) soit visible sur lʼaffichage.
b) Appuyez sur la touche ENTER. Le nombre de
canaux DMX est affiché.
c) Avec la touche ou , réglez le nombre de
canaux DMX (3, 9 ou 28) et mémorisez avec la
touche ENTER.
3) Pour quitter le menu, maintenez la touche MENU
enfoncée jusquʼà ce que lʼaffichage revienne à
lʼadresse de démarrage ou au numéro du pro-
gramme Show sélectionné ou attendez 10 se-
condes environ.
4) Dès que les signaux de commande du contrôleur
DMX sont reçus, la LED rouge DMX (9) brille, lʼaffi-
chage indique lʼadresse de démarrage. Le LED-
220DMX peut maintenant être utilisé avec le
contrôleur DMX.
Pour quʼun faisceau lumineux apparaisse en
mode 3 canaux ou 9 canaux, réglez le canal DMX 1
pour le mode de fonctionnement sur une valeur
DMX supérieure à 9 et le canal DMX 2 pour la cou-
leur ou la séquence sur une valeur DMX supérieure
à 15.
Nombre de canaux DMX 3 9 28
Adresses DMX configurées 17 – 19 17 – 25 17 – 44
Adresse de démarrage suivante
possible pour l’appareil DMX suivant 20 26 45
19
F
B
CH

8 Autres fonctions
8.1 Affichage du compteur dʼheures de fonc-
tionnement et de la version Firmware
Appuyez sur la touche MENU (11) jusquʼà ce sur lʼaffi-
chage (7), le point de menu correspondant sʼaffiche :
affichage du nombre dʼheures de fonctionne-
ment
affichage de la version Firmware
(système dʼexploitation du jeu de lumière)
Confirmez la sélection avec la touche ENTER (13),
lʼaffichage indique lʼinformation souhaitée. 10 se-
condes après, lʼappareil revient au mode de fonction-
nement précédent.
8.2 Mode test
Pour tester lʼappareil, on peut lancer un programme de
test. Appuyez sur la touche MENU (11) jusquʼà ce que
sur lʼaffichage (7), soit indiqué. Appuyez sur la
touche ENTER (13), le test démarre. Pour terminer le
programme de test, appuyez une nouvelle fois sur la
touche MENU. 10 secondes après, lʼappareil revient
au mode de fonctionnement précédent.
9 Nettoyage de lʼappareil
Les 7 lentilles doivent être nettoyées régulièrement de
toute poussière, fumée ou autres particules de salis-
sure. Cʼest à cette condition que la lumière sera émise
avec une luminosité maximale. Pour procéder au
nettoyage, débranchez la fiche secteur du secteur.
Utilisez uniquement un chiffon doux et propre et un
produit de nettoyage de verres.
Pour nettoyer les autres éléments du boîtier, utilisez
exclusivement un chiffon doux et propre. Nʼutilisez en
aucun cas de liquide, il pourrait couler dans lʼappareil
et créer des dégâts.
10 Caractéristiques techniques
Alimentation : . . . . . . . . 230 V~/50 Hz
Consommation : . . . . . . 25 VA
Source de lumière : . . . 84 LEDs très claires :
21 LEDs rouges
21 LEDs vertes
21 LEDs bleues
21 LEDs blanches
Température fonc. : . . . 0 – 40 °C
Dimensions : . . . . . . . . 290 × 100 × 250 mm
Poids : . . . . . . . . . . . . . 1,9 kg
Tout droit de modification réservé.
10.1 Canaux DMX
Mode 3 canaux et 9 canaux
*en mode 3 canaux
R = LEDs rouges
G = LEDs vertes
B = LEDs bleues
W = LEDs blanches
F = champ de LEDs
Canal DMX Valeur DMX / fonction
1
Mode de fonctionnement
000 – 009 = LEDs éteintes (Blackout)
010 – 119 = Couleur
120 – 239 = Séquence
240 – 255 = Programme Show, géré par la musique
Canal 2*
tous les
champs
de LEDs
ensemble
ou
Canal 2
Champ 1
Canal 3
Champ 2
Canal 4
Champ 3
Canal 5
Champ 4
Canal 6
Champ 5
Canal 7
Champ 6
Canal 8
Champ 7
→
Couleur
(canal 1 = 010 – 119)
000 – 015 = LEDs éteintes
016 – 031 = R
032 – 047 = G
048 – 063 = B
064 – 079 = W
080 – 095 = R + G
096 – 111 = R + B
112 – 127 = R + W
128 – 143 = G + B
144 – 159 = G + W
160 – 175 = B + W
176 – 191 = R+G+B
192 – 207 = R+G+W
208 – 223 = R+B+W
224 – 239 = G+B+W
240 – 255 = R+G+B+W
→
Séquence
(canal 1 = 120 – 239)
000 – 009 = LEDs éteintes
010 – 019 = G
↔
R+B
020 – 029 = B
↔
R+W
030 – 039 = W
↔
R+G
040 – 049 = G
↔
B
050 – 059 = G
↔
W
060 – 069 = B
↔
W
070 – 079 = G
→
B
→
R+W
080 – 089 = G
→
W
→
R+B
090 – 099 = G
→
B
→
W
100 – 109 = R+G
↔
B+W
110 – 119 = R+B
↔
W
120 – 129 = R+G+B
→
B+W
→
B+R
→
W
130 – 139 = B+W
↔
W
140 – 149 = G+B
→
R
→
W
150 – 159 = G+B
↔
R+W
160 – 169 = R
↔
B+W
170 – 179 = G+B
↔
W
180 – 189 = G+W
↔
B
190 – 199 = R+G
→
G+B
→
G+W
→
R+W
→
R+B
200 – 209 = G
→
R+W
→
B
210 – 219 = R
→
G
→
B
→
W
220 – 229 = R+G
→
W
→
B+W
→
W
230 – 239 = W
→
B
→
G
→
R
240 – 249 = R
→
G
→
B
→
W
250 – 255 = R
→
G
→
B
→
W
→
B
→
G
3* ou 9
000 – 009 = strobo éteint
010 – 255 = stroboscope
lent – rapide
000 – 255 = vitesse de
séquence
lent – rapide
20
F
B
CH
F1F2F3F4F5F6F7
GR R
RG G
BW W
WB B
F1, F3, F5, F7
BW W
WB B
GR R
RG G
F2, F4, F6
This manual suits for next models
1
Table of contents
Languages:
Other Stageline Lighting Equipment manuals

Stageline
Stageline Galactic 250-RVP User manual

Stageline
Stageline LSX-049SG User manual

Stageline
Stageline BEAM-40 RGBW User manual

Stageline
Stageline TWIST-75LED User manual

Stageline
Stageline LSE-2LRG User manual

Stageline
Stageline LSX-650SRGB User manual

Stageline
Stageline DDA2 User manual

Stageline
Stageline SCAN-150 User manual