Star Headlight & Lantern Aerostar 6020LX User manual

PLIT599 REV. - 3/11/20
Model
6020LX
LED Minibar
IMPORTANT: Please read all of the following instructions before installing your new warning light.
I
t is the sole responsibility of the owner to ensure the lightbar is
mounted securely. Check your light every time you enter the
vehicle to ensure that it is mounted securely. The manufacturer
assumes no responsibility for the secure mounting of this light.
Hardwire Models : +12-24VDC
Cig Plug Models : +12VDC only
-1-
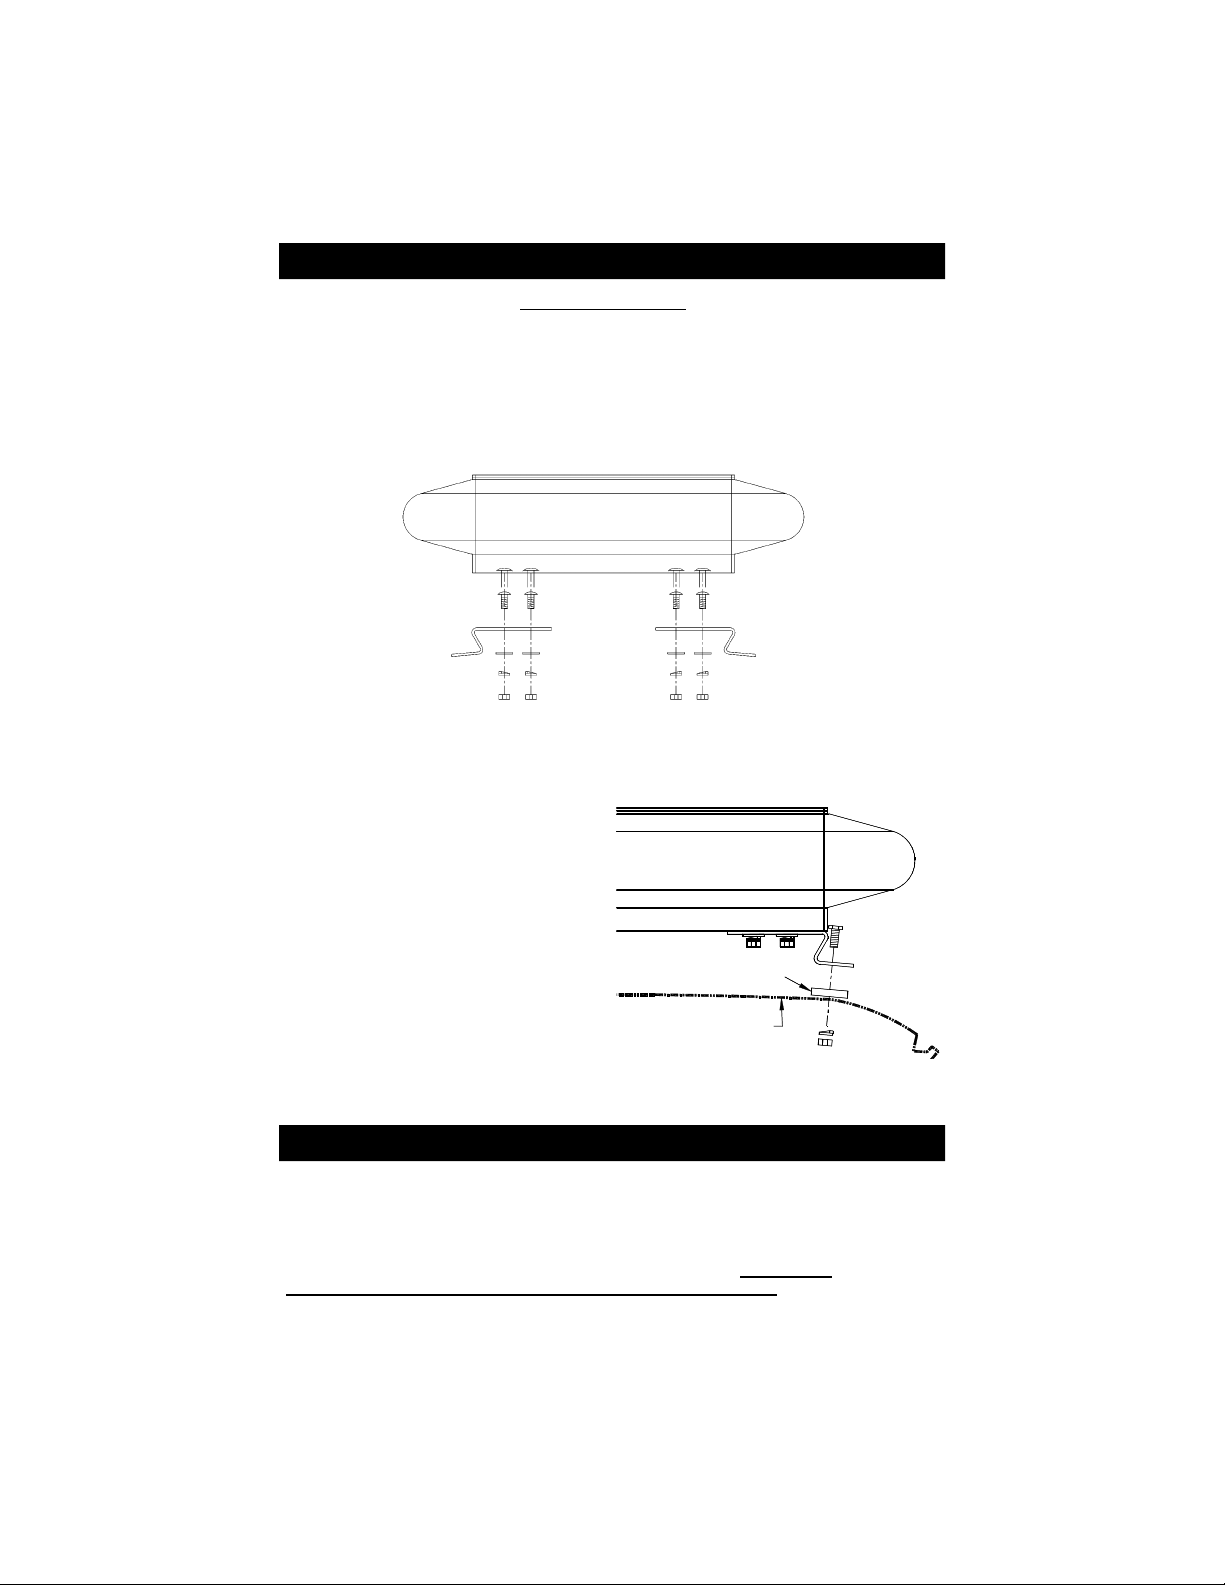
Permanent Mounting
1. Carefully remove the lightbar and the direct mount kit included with the bar from its
shipping carton.
2. Slide the eight enclosed carriage bolts into the channels running underneath the lightbar.
Use four stove bolts for each mounting bracket.
3. Position one bracket on the four bolts at each end of the lightbar and secure both
brackets with one flat washer one lock washer and one hex-nut on each bolt.
ROOF OR
MOUNTING SURFACE
FOAM GASKET
4. Carefully place your lightbar in position onto the roof of the vehicle while using the foot
gasket or a pad to protect the roof from scratches. The tabs on the mounting brackets
can be bent slightly to an angle that matches the curvature of the roof.
5. Using the mounting bracket feet as
templates mark the areas for the holes
to be drilled.
6. Remove the lightbar and drill holes in
the roof of the vehicle. CAUTION:
Tak car not to drill through th
h adlin r b low. Remove any burrs.
7. Use the two foam gaskets attached to
each leg. Place them between the leg
and the roof of the vehicle and attach
the lightbar and brackets to the vehicle
using four suitable fasteners obtained
locally.
Magnet Mounting
If you are mounting the light on the roof of your vehicle take extreme care to ensure that
the magnets are firmly seated on your roof and that the pull of the magnets is sufficient to
secure the light in place. Since the composition of the metal in the roofs of different
vehicles may vary as well as the contour texture and/or condition Star cannot guarantee
the ability of the light to remain in place upon a moving vehicle. It is th sol
r sponsibility of th own r to nsur th warning light is s cur .
-2-
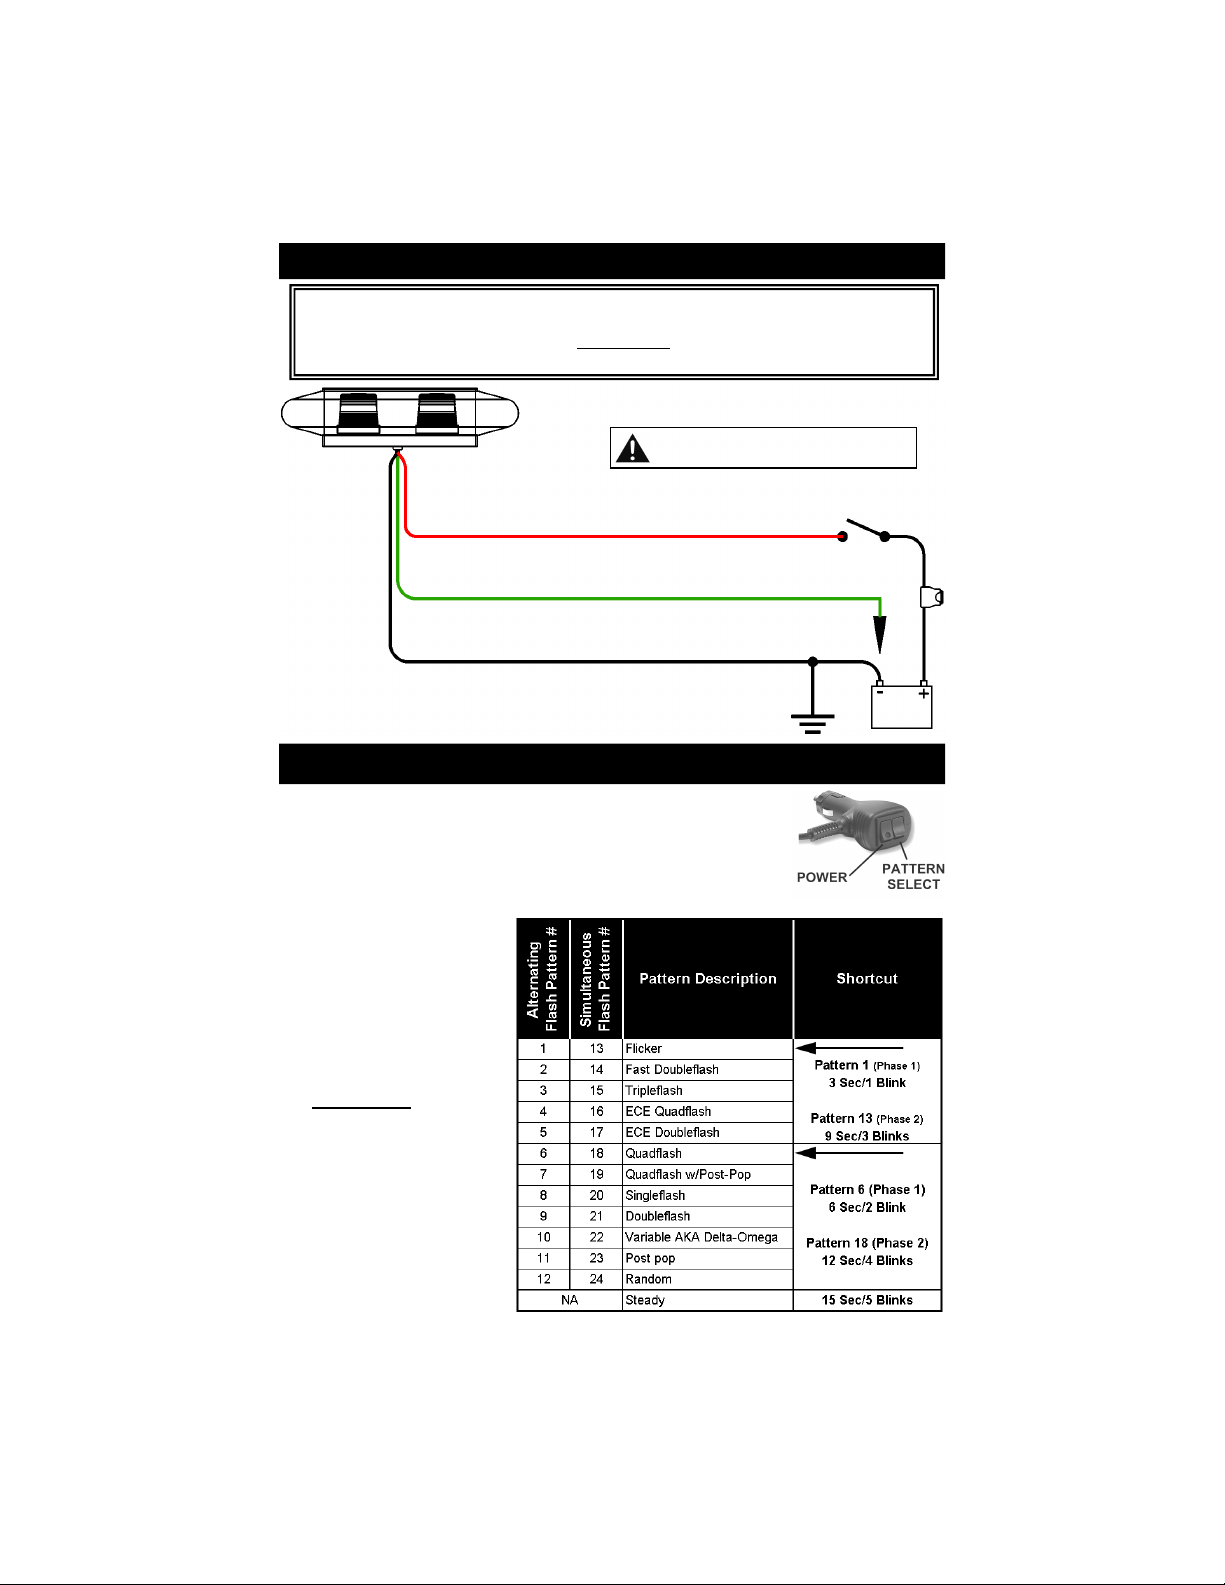
CAUTION: All of our DC powered warning lights are polarity sensitive. These lights are
polarity protected only if the appropriate fuse is used. All wires connected to the positive
terminal of the battery should be fused at the battery for their rated load. T sting th
light b for this fus is prop rly install d will void th warranty on th light.
Wiring for Permanent Mount Models
RED: Power - Connect to +12-24VDC through your
switch and a 5A fuse.
GREEN: Pattern Select - Touch & Release to ground.
BLACK: Ground - Connect to the negative terminal
of the battery or a good chassis ground.
Cig Plug Models : +12VDC only
+12-24VDC
5A
FUSE
1. Power up the light and cycle through the flash patterns listed
below by pressing Pattern Select switch (cig plug versions only),
or briefly touching and releasing the green wire to ground (hard-
wired versions only).
2. After the pattern has
been set tape or place
a wirenut over the end of
the green wire to prevent
it from coming into
contact with ground
again (hard-wired
versions).
3. SH RTCUTS:
Review the chart
below for a list of
how long you need
to touch the green
wire to ground or
hold the Pattern
Select button to
jump directly to a
desired pattern.
Pattern Programming

-3-
LED FIVE YEAR LIMITED WARRANTY
The manufacturer warrants this LED light against factory defects in material and workmanship for five years
after the date of purchase. The owner will be responsible for returning to the Service Center any defective
item(s with the transportation costs prepaid. The manufacturer will, without charge, repair or replace at its
option, products, or part(s , which its inspection determines to be defective. Repaired or replacement
item(s will be returned to the purchaser with transportation costs prepaid from the service point. A copy of
the purchaser's receipt must be returned with the defective item(s in order to qualify for the warranty
coverage. Exclusions from this warranty include, but are not limited to, domes, and/or the finish. This
warranty shall not apply to any light, which has been altered, such that in the manufacturer's judgment, the
performance or reliability has been affected, or if any damage has resulted from abnormal use or service.
There are no warranties expressed or implied (including any warranty of merchantability or fitness , which
extend this warranty period. The loss of use of the product, loss of time, inconvenience, commercial loss or
consequential damages, including costs of any labor, are not covered. The manufacturer reserves the right
to change the design of the product without assuming any obligation to modify any product previously
manufactured.
This warranty gives you specific legal rights. You might also have additional rights that may vary from state to
state. Some states do not allow limitations on how long an implied warranty lasts. Some states do not allow
the exclusion or limitation of incidental or consequential damages. Therefore, the above limitation(s or
exclusion(s may not apply to you.
NOTICE
Due to continuous product improvements, we must reserve the right to change any specifications and information,
contained in this manual at any time without notice. Star Headlight & antern Co., Inc. makes no warranty of any
kind with regard to this manual, including, but not limited to, the implied warranties of merchantability and fitness
for a particular purpose. Star Headlight & antern Co., Inc. shall not be liable for errors contained herein or for
incidental or consequential damages in connection with the furnishing, performance, or use of this manual.
If you have any questions concerning this or any other product
please contact our Custom r S rvic D partm nt at (585) 226-9787.
If a product must be returned for any reason please contact our Customer Service Department to
obtain a Returned Material Authorization number (RMA #) before you ship the product back.
Please write the RMA # clearly on the package near the mailing label.
Please ote: These instructions are provided as a general guideline only. Specific mounting wiring and/or
weather-sealing may be necessary and are the sole responsibility of the installer. Star Headlight & Lantern
Co. Inc. assumes no responsibility for the integrity of the installation for this or any of its products.
Table of contents
Popular Safety Equipment manuals by other brands

Lanex
Lanex PB-20 instruction manual

SKYLOTEC
SKYLOTEC ANCHOR ROPES Instructions for use

Besto
Besto Buoyancy Aid 50N Instructions for use

TEUFELBERGER
TEUFELBERGER NODUS Manufacturer's information and instructions for use

Troy Lee Designs
Troy Lee Designs Tbone Product owners manual

Innova
Innova Xtirpa Instruction and safety manual

bolle SAFETY
bolle SAFETY B810 quick start guide

SHENZHEN FANHAI SANJIANG ELECTRONICS
SHENZHEN FANHAI SANJIANG ELECTRONICS A9060T instruction manual

Hiltron security
Hiltron security POWER8E Installation and use manual

Salewa
Salewa MTN SPIKE user manual

Hatco
Hatco B-950P installation guide

Sitec
Sitec TX MATIC operating manual


