manuals.online logo
Brands
  1. Home
  2. •
  3. Brands
  4. •
  5. Stardom
  6. •
  7. Storage
  8. •
  9. Stardom SOHORAID DR2-B31 User manual

Stardom SOHORAID DR2-B31 User manual

快速安裝導引 x1
打開包裝外盒後,包裝內容應包含下列組件 :
請參照下列步驟,完成 DR2-B31 的硬體安裝 :
1. 請使用零件包中所附的頂針插入鑰匙孔,開啟硬碟抽取盒把手便將抽取盒取出。
2. 將硬碟安裝到抽取盒上,並以零件包內附的螺絲加以固定,以避免不必要的移動對硬碟造成傷害。
產品配件表
產品示意圖與配件表
燈號說明
硬體安裝
產品使用注意事項
DR2-B31 快速安裝導引
USB 3.1 連接線 x1
電源線 x1 螺絲及鑰匙
3. 硬碟安裝完成後,請將抽取盒平移放入主機內,並關上把手。
4.
透過機體背面的 RAID 切換紐,設定所要使用的 RAID 模式。
5.
將相關連接線接上,最後接上電源轉接器。
6. 硬體安裝完成。開啟電源後請透過作業系統進行後續格式化設定。請依照電腦作業系統指示進行
硬碟格式化,完成硬碟格式化後,便可以進行資料的讀寫。
RAID 模式切換設定
RAID 0
本系統同一時間只可透過一組介面與一台電腦執行資料傳輸。
硬碟格式化後,由電腦主機作業系統所辨識 DR2-B31 的實際總容量會與硬碟廠所標
示的容量加總後,將有所差異。
第一次使用本產品進行設定時,資料會被全數清除。請於硬碟置入前,確認硬碟已備
份,避免資料遺失。
在安裝新硬碟到 DR2-B31 之前,請先確認硬碟是沒有壞軌而且是沒有故障的,以避
免資料受損。
當您需要關閉或移除 DR2-B31 時,務必透過您所操作的作業系統中執行硬碟安全移
除後,方可進行電源關閉的動作。
當系統運作時,請勿任意移除任何一顆硬碟,以免導致資料遺失。
完成系統初始化安裝後,在使用上請勿任意變更硬碟位置;此動作將可能導致系統
無法形成 RAID。
在新增或變更 RAID 模式後需重新啟動產品,以確保完成更新為新的 RAID 模式。
RAID 模式一旦設定完成,若要進行切換,因切換過程中將會清除硬碟中的資料,請務
必先將硬碟中的資料另行備份後再行切換。
為了確保節能功能的正常運作,請將 USB 連接線常態性與電腦端保持連接。
當您需要關閉或移除 DR2-B31 時,務必透過您所操作的作業系統中執行硬碟安全移
除後,方進行電源關閉的動作。
當系統溫度達到 55 度時, 機器風扇會全速運轉, 加速機器內部散熱, 當系統溫度降回
50 度以下時, 才會恢復手動風扇轉速設定之狀態。
在資料自動重建狀態下,若電腦端進入系統待命或是休眠狀態,DR2-B31 會持續完
成重建;但當重建完成後將不會進入待命狀態。此時需用手動方式關機,或是先將電
腦系統回復到正常運作狀態後,之後才能再與電腦端同步進入待命或是休眠狀態。
強烈建議除了使用 DR2-B31 的資料儲存功能外,請針對重要資料備份到另一個儲存
裝置上或遠端備份,雙重備份您重要的資料。若您儲存在 DR2-B31 的資料損毀或遺
失,STARDOM 將不負任何的責任。
1.
2.
3.
4.
5.
6.
7.
8.
9.
10.
11.
12.
13.
14.
感謝您使用 銳銨科技股份有限公司 的產品。
本手冊裡的資訊在出版前雖然已經被詳細確認,但實際產品規格將已出貨時為準;任何的產品規格
或相關資訊更新,請您直接上 www.STARDOM.com.tw 網站查詢,或直接與您的業務聯絡窗口聯
繫,本公司將不另行通知。
如果您對 銳銨科技 的產品有任何疑問,或是想獲得最新產品訊息、使用手冊或韌體,請您聯絡
[email protected],我們將儘速回覆您。
本說明相關產品內容歸 銳銨科技股份有限公司 版權所有
前視圖 背視圖 硬碟讀取燈A
硬碟抽取盒把手B
硬碟抽取盒鑰匙孔C
電源開關E
系統指示燈D
電源插座F
USB 3.1 連接埠
(GEN2 10Gbps)
G
RAID 切換鈕H
RESET 按鈕I
防竊鎖孔J
風扇K
風扇轉速切換按鈕L
靜音開關M
J
DR2-B31 主體 x1
電腦 USB 連接埠
RAID 1 JBOD BIG
RAID 0:一個大的獨立資料儲存容量,並可加速資料存取但無資料保護功能。
RAID 1:兩顆硬碟是鏡射關係因此擁有相同的資料,因此有一顆硬碟損毀仍然可以正常運
作。當放入入新硬碟取代損毀硬碟後,系統會自自動將資料重建到新的硬碟。
JBOD :可對兩顆獨立硬碟進行管理的工作,能大幅增加硬碟管理上的便利性,但無資料保護功能。
BIG :兩顆硬碟的容量會被加總成一個大儲存容量,但無資料保護功能。
(預設)
L M
切換RAID設定的標準程序:
步驟1:請在 DR2-B31 連線到電腦後,一併打開電腦和 DR2-B31 的電源開關。
步驟2:請在藍燈恆亮時,將在 DR2-B31 背板上設定 RAID 設定的「切換開關」調到你所要
的設定位置。
步驟3:請使用頂針插入「重置鍵」,待前面板抽取盒上的閃爍藍紫燈結束、並轉成恆亮藍
燈後鬆開頂針。
步驟4:請您再做一次關、開 DR2-B31 電源的動作後,您已經改變、並重新設定了 DR2-B31
的RAID。
狀態 系統指示燈 硬碟狀態燈 蜂鳴器
RAID 0, BIG RAID 1 JBOD
硬碟閒置 藍燈恆亮 藍燈恆亮 藍燈恆亮 藍燈恆亮 N/A
無硬碟 藍燈恆亮 紅燈恆亮 紅燈恆亮 紅燈恆亮 N/A
硬碟故障 藍燈恆亮 紅燈閃爍 紅燈閃爍 N/A N/A
RAID 降級 藍燈恆亮 紅燈閃爍 紅燈閃爍 N/A N/A
資料存取 藍燈恆亮 藍燈閃爍 藍燈閃爍 藍燈閃爍 N/A
資料重建 -來源碟 藍燈恆亮 N/A 呼吸燈(藍燈) N/A N/A
資料重建 -目標碟 藍燈恆亮 N/A 呼吸燈(紫燈) N/A N/A
風扇故障或過熱
(≧55°C) 紫燈閃爍 藍燈恆亮 藍燈恆亮 藍燈恆亮 鳴叫
請先確認相關配件與產品本身是否有受損或是缺少配件,若有任何疑問,請與您的經
銷商或業務人員聯絡。
請前往官網 (www.stardom.com.tw) 下載使用者說明書。
˙
˙
V1.2 (Dec. 2018)
DR2-B31 Quick Setup Guide
Product Illustration and Parts List
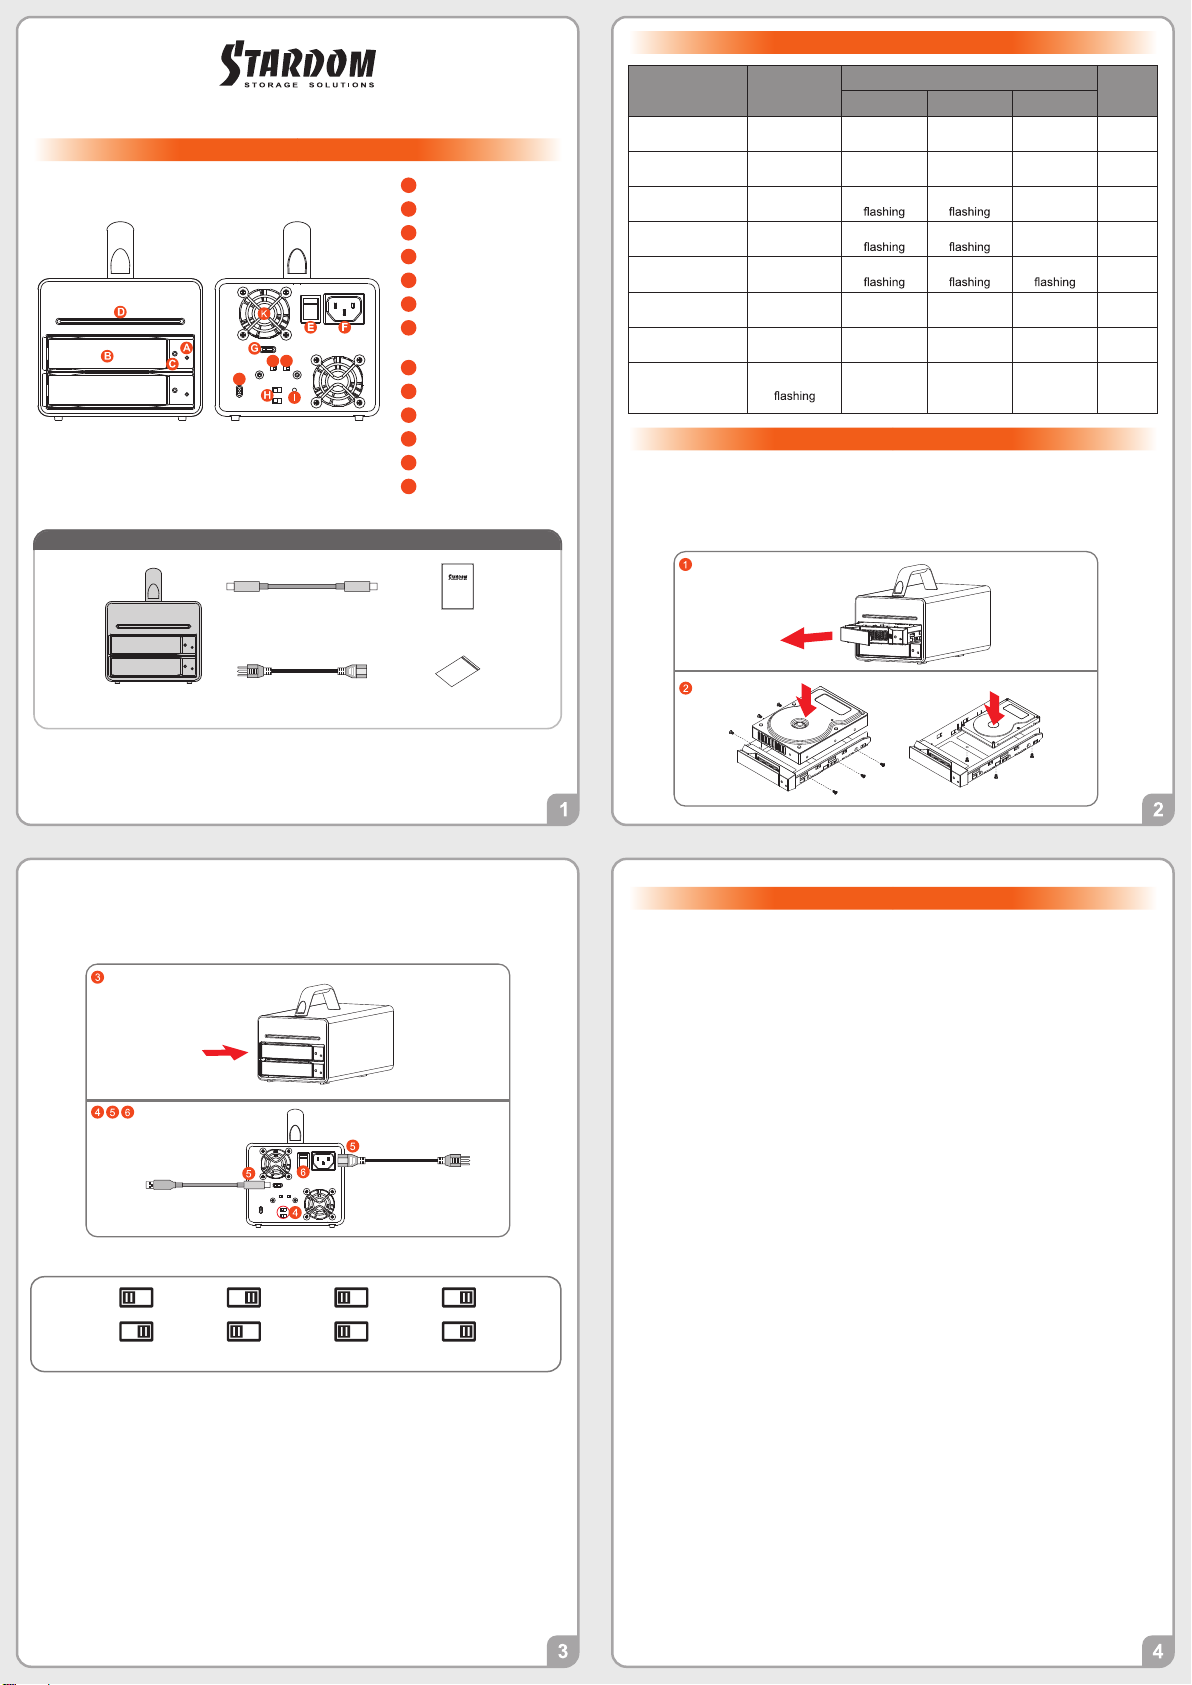
Front View Rear View HDD access lightA
HDD enclosure handleB
HDD enclosure keyholeC
Power switchE
System indicatorD
Power socketF
USB 3.1 port
(GEN2 10Gbps)
G
RAID switchH
RESET holeI
Anti-theft cord slotJ
FanK
Fan speed switchL
Mute switchM
Quick Setup
Guide x1
The following items should be inside the package upon opening:
Product Parts List
USB 3.1 Cable x1
Power Cord x1 Screws and
keys
DR2-B31 Device x1
The Indication of HDD Status
1. Use the provided key in the Accessories Kit and inserted it into the Key Access Opening to eject the
Removable Drive Tray Latch and extract the Removable Drive Tray.
2. Mount your hard drives onto the removable drive tray and secure it with the screws included in the
accessory kit to avoid any damage to the hard drive due to accidental movements.
Please follow the steps below to complete the DR2-B31 hardware setup process:
Hardware Installation
3. After installing two HDDs into Trays, please insert them into DR2-B31, and then latch the handle.
4. Please set RAID mode at the back-plate of DR2-B31 unit for RAID 1, RAID 0, JBOD, and BIG.
5. Please connect the signal cable first, and then power cord later.
6. After completing hardware installation, turn on the power and follow the instruction of Disk Utility to
format the two HDDs, you then could start using your new DR2-B31.
Computer USB Port
RAID 0 RAID 1 JBOD BIG
(
default
)
Important Notice
Thank you for choosing this RAIDON product.
The information provided in this manual was checked before publication, but the actual product
specifications may have changed before shipping; Latest product specifications and updates can be
found at www.STARDOM.com.tw or through your sales representative. No separate notifications will be
provided by our company.
If you have any questions about RAIDON products or would like to receive the latest product information,
instruction manuals, or firmware, please contact [email protected] for assistance.
This system can only transfer data to one computer through one interface at a time.
After the hard disk is formatted, the actual total capacity of the DR2-B31 detected by the
computer operating system will vary from the sum of all hard disk capacities stated by the
manufacturer.
All existing data will be deleted when this product is set up for the first time. Please ensure
that all data on the hard disk has been backed up before installation to avoid data loss.
Before a new HDD is installed in the DR2-B31, please make sure that there are no bad
tracks or defects to avoid data loss.
If the DR2-B31 needs to be shut down or disconnected, please ensure the HDD is safely
removed through your operating system before turning off the power.
To prevent data loss, do not remove any of the hard disks while the system is running.
Once the system has been initialized, do not switch hard disks around during use. Doing
so may prevent the RAID from being recognized by the system.
The product needs to be restarted after adding or changing the RAID mode, and the
update is guaranteed to be the new RAID mode.
Once RAID mode has been set up, the switching of hard drives will lead to the removal of
data from the hard disks. Please be sure to backup the data on the hard disk before making
any switches.
Please always connect the USB cable to the computer to ensure the energy saving
function operating normally.
If the DR2-B31 needs to be shut down or disconnected, please ensure the HDD is safely
removed through your operating system before turning off the power.
The system fan will run at full speed when system temperature reaches 55 degrees to
speed up heat dissipation. The fan will only return to the manual speed setting when
system temperature drops back below 50 degrees.
Once the computer turn to “Standby” or “Sleep” mode, DR2-B31 will still complete the
rebuilding function. However, it will not change to “Standby” mode after rebuilding. You
need to shut down the DR2-B31 manually or wake up the computer to synchronize
“Standby ” or “Sleep” mode together.
We strongly recommend backing up important data stored on the DR2-B31 to another
storage device or a remote site. STARDOM will not be held liable for the damage or loss of
data you stored on the DR2-B31.
1.
2.
3.
4.
5.
6.
7.
8.
9.
10.
11.
12.
13.
14.
All product-related content in this manual are copyrighted by RAIDON TECHNOLOGY, INC.
J
L M
RAID 0:
RAID 1:
JBOD :
BIG :
Provide a big storage capacity and the data transfer efficiency, but no data porotection feature.
Because of this Mirroring feature, your two HDDs/SSDs will keep an identical data after
your wtiting works. In case one of the two HDDs/SSDs is defect, DR2-B31 would still work
fine with only one of them. And once inserting a good HDD/SSD as the defect replacement,
it will do the rebuilding work by itself.
With JBOD mode, you could actually use the two HDDs/SSDs as the normal two storages
for your large memory capacity requirement, but no data porotection feature.
You could enjoy a double memory capacity from this BIG feature, but no data porotection
feature.
RAID Mode Setting:
The Standard Procedure to Switch RAID Setting:
Step 1: Please first connect DR2-B31 to your Mac.
Step 2: Please set RAID Dip Switch to the position you demand.
Step 3: Please use the Key to press the hidden RESET key at the back-panel, hold and wait for
the Blue-Purple LED blinking, and continue to hold it till a stable Blue light comes out.
Step 4: Please turn off your DR2-B31 , and turn it back on again. You now have reset DR2-B31
with anew RAID mode successfully.
Please check the included parts and the product itself for any damage or missing
parts. If you have any questions, please contact the retailer or sales representative.
Please download the user manual from the official website (www.stardom.com.tw)
●
●
Status System status
light
HDD Status Light
Buzzer
RAID 0, BIG RAID 1 JBOD
HDD idle Blue light
always on
Blue light
always on
Blue light
always on
Blue light
always on N/A
No HDD detected Blue light
always on
Red light
always on
Red light
always on
Red light
always on N/A
HDD failure Blue light
always on
Red light Red light
N/A
N/A
RAID Failed Blue light
always on
Red light Red light
N/A
N/A
Data access Blue light
always on
Blue light Blue light Blue light N/A
Rebuilding data -
Source HDD
Blue light
always on
N/A
Breathing
Blue Light
N/A
N/A
Rebuilding data -
Target HDD
Blue light
always on
N/A
Breathing
Purple Light
N/A
N/A
Fan Fail / Over
Temperature
(≧55°C)
Purple light Blue light
always on
Blue light
always on
Blue light
always on Yes
V1.2 (Dec. 2018)

Other Stardom Storage manuals

Stardom SOHORAID DR8-TB2 User manual

Stardom

Stardom SOHORAID DR8-TB2 User manual

Stardom SOHORAID ST2-TB3 User manual

Stardom

Stardom SOHORAID ST2-TB3 User manual

Stardom SOHORAID SR3MSB-B31 User manual

Stardom

Stardom SOHORAID SR3MSB-B31 User manual

Stardom SR2611 Series User manual

Stardom

Stardom SR2611 Series User manual

Stardom ST5610 Series User manual

Stardom

Stardom ST5610 Series User manual

Stardom SOHORAID SR2-SB3+ User manual

Stardom

Stardom SOHORAID SR2-SB3+ User manual

Stardom sohoraid ST2-B31 User manual

Stardom

Stardom sohoraid ST2-B31 User manual

Stardom SOHORAID MR2-B31BP Series User manual

Stardom

Stardom SOHORAID MR2-B31BP Series User manual

Stardom SOHORAID MR2-B31 User manual

Stardom

Stardom SOHORAID MR2-B31 User manual

Stardom SA2TB3 User manual

Stardom

Stardom SA2TB3 User manual

Stardom SOHORAID ST4-TB3 User manual

Stardom

Stardom SOHORAID ST4-TB3 User manual

Stardom SOHORAID SR4-TB2 User manual

Stardom

Stardom SOHORAID SR4-TB2 User manual

Stardom SR4-WBS3 User manual

Stardom

Stardom SR4-WBS3 User manual

Stardom SR3610 Series User manual

Stardom

Stardom SR3610 Series User manual

Stardom SOHORAID SR4-SB3 User manual

Stardom

Stardom SOHORAID SR4-SB3 User manual

Stardom SafeTANK GT5640-B31 User manual

Stardom

Stardom SafeTANK GT5640-B31 User manual

Stardom SOHOTANK US2-B32 User manual

Stardom

Stardom SOHOTANK US2-B32 User manual

Stardom SOHORAID DR8-TB3 User manual

Stardom

Stardom SOHORAID DR8-TB3 User manual

Stardom SOHORAID SR8-TB3 User manual

Stardom

Stardom SOHORAID SR8-TB3 User manual

Stardom SOHORAID DR2-TB3 User manual

Stardom

Stardom SOHORAID DR2-TB3 User manual

Stardom SOHORAID SR4-SB31+ User manual

Stardom

Stardom SOHORAID SR4-SB31+ User manual

Stardom itank i310 User manual

Stardom

Stardom itank i310 User manual

Stardom SOHORAID SR4-TB3 User manual

Stardom

Stardom SOHORAID SR4-TB3 User manual

Stardom SOHORAID ST2-B31+ User manual

Stardom

Stardom SOHORAID ST2-B31+ User manual

Popular Storage manuals by other brands

IBM Manager 3105 Appliance Manual

IBM

IBM Manager 3105 Appliance Manual

Commodore Amiga AS90 Hard Drive Plus user guide

Commodore

Commodore Amiga AS90 Hard Drive Plus user guide

OCZ Deneva 2 user guide

OCZ

OCZ Deneva 2 user guide

Aluratek Cyclone ACDUES350F Specifications

Aluratek

Aluratek Cyclone ACDUES350F Specifications

Olixir 3DX 120GB Specifications

Olixir

Olixir 3DX 120GB Specifications

Exabyte 221L product manual

Exabyte

Exabyte 221L product manual

Buffalo HD-LXU3 user manual

Buffalo

Buffalo HD-LXU3 user manual

D-Link DSN-3200 - xStack Storage Area Network Array Hard... Service manual

D-Link

D-Link DSN-3200 - xStack Storage Area Network Array Hard... Service manual

OnStream SC30 installation guide

OnStream

OnStream SC30 installation guide

ASROCK 939NF6G-VSTA installation guide

ASROCK

ASROCK 939NF6G-VSTA installation guide

Husky H46MWC9XD-TL Use and care guide

Husky

Husky H46MWC9XD-TL Use and care guide

Quantum Atlas 10K III user guide

Quantum

Quantum Atlas 10K III user guide

Dell SCv2080 owner's manual

Dell

Dell SCv2080 owner's manual

Western Digital My Book Studio user manual

Western Digital

Western Digital My Book Studio user manual

Western Digital WDBFKT0040BGY user manual

Western Digital

Western Digital WDBFKT0040BGY user manual

Addonics Technologies NA3MS4HU2B user guide

Addonics Technologies

Addonics Technologies NA3MS4HU2B user guide

QNAP TS-h1886XU-RP Quick installation guide

QNAP

QNAP TS-h1886XU-RP Quick installation guide

Sun Microsystems Sun Enterprise 6500 Reference manual

Sun Microsystems

Sun Microsystems Sun Enterprise 6500 Reference manual

manuals.online logo
manuals.online logoBrands
  • About & Mission
  • Contact us
  • Privacy Policy
  • Terms and Conditions

Copyright 2025 Manuals.Online. All Rights Reserved.