Starkey StarLink Premium Mini User manual

Your StarLink
Charger
User Manual
For charging mRIC R & RIC RT hearing aids
Chargers included:
StarLink Chargers
StarLink Premium Mini Chargers

3 |Intro
Congrats!
The power
to hear better
is yours.
You’ve got a StarLink Charger.
Smart choice.
Now you can get the most out
of every day with reliable charging
to power your hearing aids.
After all – when you hear better,
you live better.
Go ahead, have a read. And get
ready to experience the power
of better hearing.

5 |TOC4 |What’s included
Chargers covered in this user
manual (select yours):
*StarLink Premium Mini Chargers contain an on-board,
rechargeable lithium-ion battery that is not removable.
StarLink Charger
StarLink Premium Mini Charger*
What’s included
1. Get to know your charger
Meet your charger 8
Use your charger 9
Care for your charger 13
2. Troubleshooting guide 16
3. Additional guidance
Intended use 22
FCC information 24
Regulatory information 25
Table of contents

Get to know
your charger
• Meet your charger
• Use your charger
• Care for your charger

8 |Get to know your charger 9 |Get to know your charger
Overview
1. Cleaning tool (included accessory)
2. Earbud/earmold space
3. Charging slots
4. Indicator lights
5. USB-C port
6. Power cord & adapter
Meet your charger
Front view
Back view
3
2
4
5
1
It is recommended that you fully charge
your hearing aids before using them.
To charge your hearing aids
1. Plug your charger into an external
power source, like a wall outlet.
The indicator lights turn white
when your charger is connected.
You’re now ready to charge.
Use your charger
Reminder – StarLink Chargers require
an external power source to charge
hearing aids (e.g., a wall outlet).
StarLink Premium Mini Chargers let
you charge hearing aids cordless or
plugged into an external power source
(e.g., a wall outlet).
6

10 |Get to know your charger 11 |Get to know your charger
2. Place your hearing aids in the
charging slot:
• The right indicator light turns
ON for 10 seconds when you
insert the right hearing aid.
• The left indicator light turns
ON for 10 seconds when you
insert the left hearing aid.
NOTE: If the indicator lights do not turn
ON or follow the indicator status behavior
in step 3, your charger may need to be
plugged in. See the Troubleshooting guide
on p. 16.
• Rest the earbuds or earmolds in
the open earbud/earmold space.
Your hearing aids will turn OFF
and start charging.
Charger can be open or closed
while charging.
Use your charger
3. Check the charging status of your
hearing aids using the indicator
lights on the outside of the charger:
Number of
solid white
lights
Hearing aid
battery level
Hearing aid
charging time
Up to 25%
charged 7 mins*
Up to 50%
charged 1.5 hrs
Up to 75%
charged 2.5 hrs
100%
charged 3.5 hrs
Your hearing aids will fully charge
in 3.5 hours.
4. Take your hearing aids from
the charger. They will turn ON –
ready to wear.
Before using your hearing aids for the
first time, please see Your Rechargeable
Hearing Aid User Manual.
*Turbo Charging
Your charger comes with on-board
turbo charging. Turbo charging
automatically occurs when your
battery is low. The hearing aid will
rapidly charge, giving you 3 hours of
use time in only 7 minutes of charging.
Use your charger

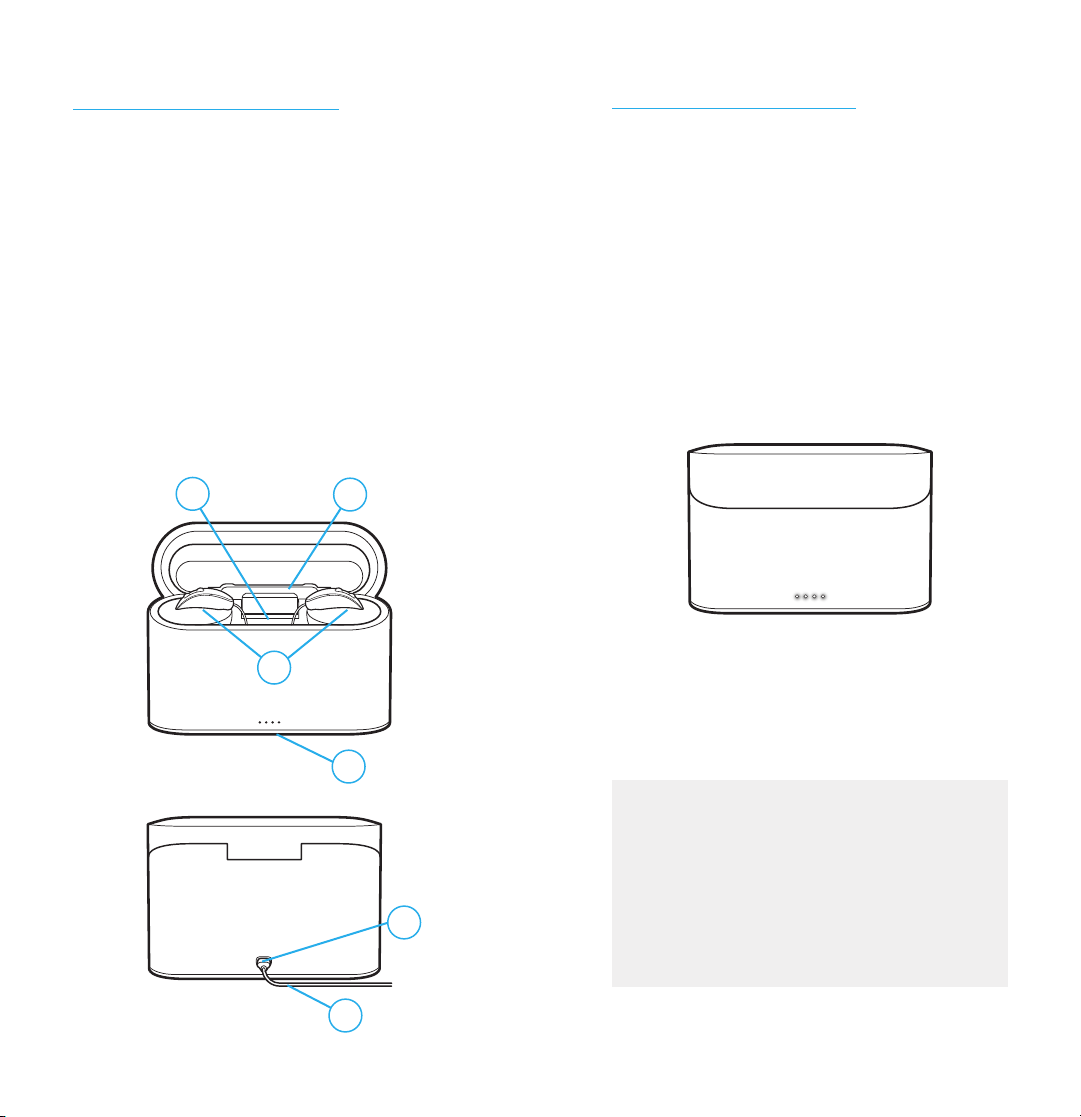
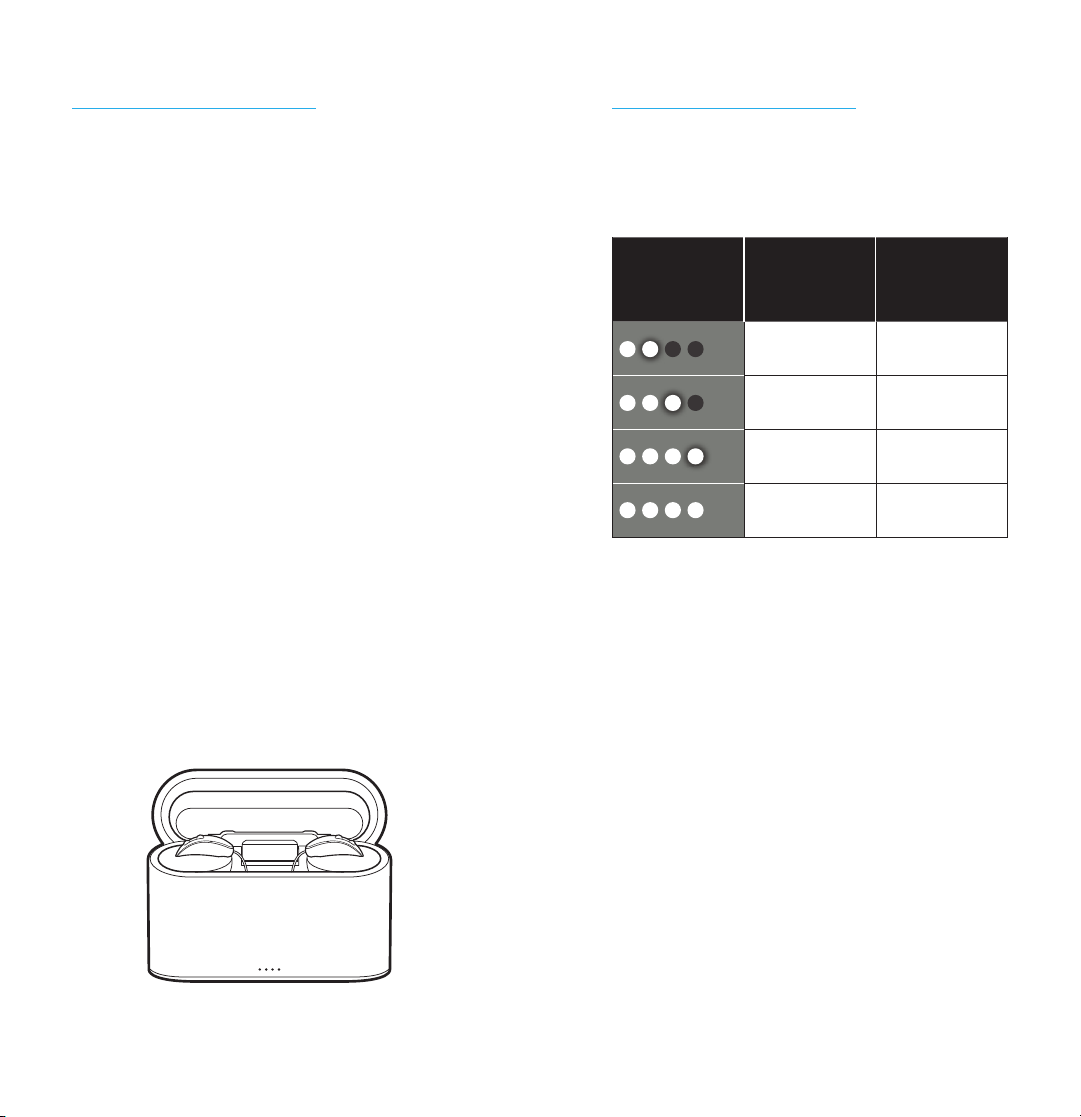
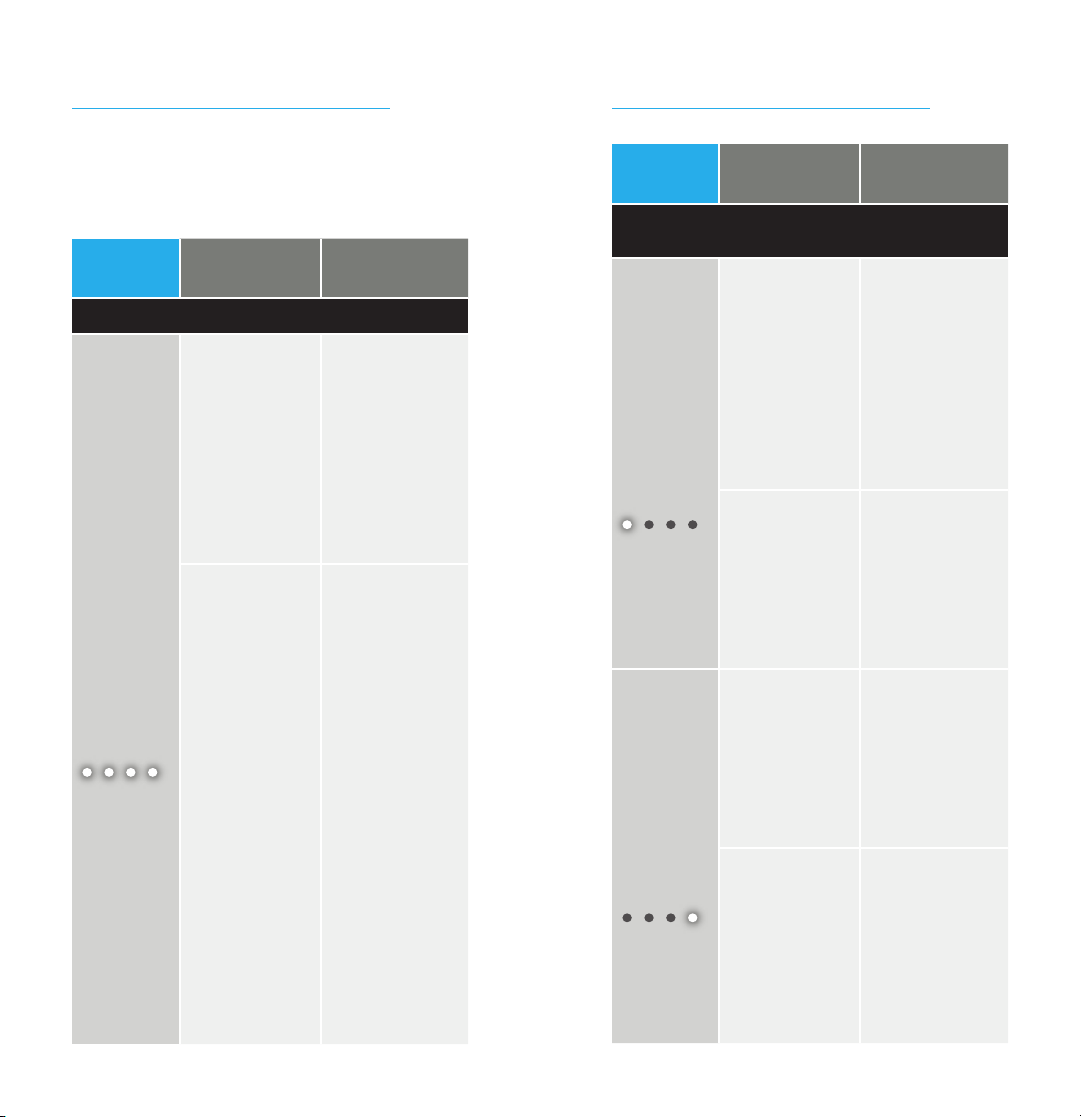
12 |Get to know your charger 13 |Get to know your charger
To charge your StarLink Premium
Mini Charger
1. Plug your charger into an external
power source, like a wall outlet.
2. Check the indicator lights to confirm
the charging status of your charger.
Number of
solid white
lights
Charger
battery level
Charger
charging
time
Up to 25% charged 30 mins
Up to 50% charged 1 hr
Up to 75% charged 1.5 hrs
100% charged 2.5 hrs
Your charger will fully charge in under
3 hours.
NOTE: While the StarLink Premium Mini
Charger’s on-board battery is charging,
indicator lights will default to the hearing
aid charging status if hearing aids are
placed in the charging slots.
Use your charger
Cleaning tips
Keep your charger clean. This helps
prevent damage from moisture and
debris:
• Use the included cleaning tool to
clear debris from the charging ports.
This is where you insert your hearing
aids for charging.
• Do not use water, cleaning fluids
or solvents to clean the charging
contacts. These can damage
your charger.
• Try to keep the lid closed to prevent
buildup of dust and debris.
Storage tips
Store your charger in a clean and
dry area. This helps preserve the life
of your charger and rechargeable
hearing aid batteries:
• Choose a dresser or shelf in a room
other than a bathroom or kitchen.
• Be sure the storage location is
cool to avoid damage. Skip areas
with extreme heat like a windowsill
or hot car.
Care for your charger

14 |Get to know your charger
Troubleshooting
guide
Care for your charger
• It’s safe to leave your charger
plugged in while wearing your
hearing aids. But if you won’t be
using it for an extended period
(over a week), remove the power
cord from your charger and/or
external power source.

16 |Troubleshooting guide 17 |Troubleshooting guide
Symptom Possible
causes Solutions
Applicable charger: StarLink Premium Mini Charger
All 4
indicator
lights are
blinking
(long-short-
long).
Electrical issue:
The temperature
is outside
the charging
limits for your
charger’s
battery.
Return the
charger to a
safe charging
temperature.
Your charger
should
automatically
resume charging
its battery.
Electrical issue:
A charging
circuit fault has
occurred.
If your charger is
plugged in to an
external power
source:
1. Unplug your
charger.
2. Plug it back
in again.
If neither solution
resolves the
issue, contact
your hearing care
professional
for help.
Troubleshooting guide
Problems with your charger? Try these
tips. If issues continue, contact your
hearing care professional.
Symptom Possible
causes Solutions
Applicable chargers: StarLink Charger &
StarLink Premium Mini Charger
Left
indicator
light is
blinking.
Left hearing aid
has an electrical
issue. (This
can prevent
charging.)
Contact your
hearing care
professional
for help.
Charger has
lost or cannot
establish
communication
with the
hearing aid.
1. Take your
left hearing
aid from the
charging slot.
2. Return it to the
charging slot.
Right
indicator
light is
blinking.
Right hearing
aid has an
electrical issue.
(This can prevent
charging.)
Contact your
hearing care
professional
for help.
Charger has
lost or cannot
establish
communication
with the hearing
aid.
1. Take your
right hearing
aid from the
charging slot.
2. Return it to the
charging slot.
Troubleshooting guide

18 |Troubleshooting guide 19 |Troubleshooting guide
Symptom Possible
causes Solutions
Indicator
light
remains
OFF when
hearing aid
is placed
into the
charging
slot.
Applicable charger:
StarLink Premium Mini Charger
Charger battery
is drained.
1. Connect the
power cord to
your charger.
2. Plug your
charger into an
external power
source (e.g.,
a wall outlet).
The charger
indicator
lights will turn
solid for 10
seconds and
then transition
to charging
status.
Applicable chargers:
StarLink Charger &
StarLink Premium Mini Charger
ONLY if using USB-C power cord
Charger is not
plugged into an
external power
source or a
working external
power source.
Test another
external power
source to ensure
your charger
has power
(e.g., a wall outlet
or other power
supply).
No other power
source? Turn OFF
your hearing aid
by pushing and
holding the user
control for 3
seconds.
Troubleshooting guide
Symptom Possible
causes Solutions
Applicable chargers: StarLink Charger &
StarLink Premium Mini Charger
Indicator
light
remains
OFF when
hearing aid
is placed
into the
charging
slot.
Hearing aid is
in the wrong
position in the
charging slot.
1.Take your
hearing aid
from the
charging slot.
2. Return it to the
charging slot.
3. Ensure proper
seating on
charging slot.
Charger failure.
Contact your
hearing care
professional
for help.
Applicable charger: StarLink Premium Mini Charger
Indicator
lights turn
OFF while
charging
cordless.
Hearing aids
have finished
charging,
charger has
moved to
“power save”
mode.
Refresh the
charging LEDs:
1. Take your
hearing aid
from the
charging slot
for 3 seconds.
2. Return it to
the charging
slot. The
indicator lights
should glow
for 10 seconds.
Troubleshooting guide

Additional
guidance
• Intended use
• FCC information
• Regulatory information
Symptom Possible
causes Solutions
Applicable chargers:
StarLink Premium Mini Charger
Indicator
lights turn
ON briefly
and then
turn OFF.
Charger battery
is drained.
1. Connect the
power cord to
your charger.
2. Plug your
charger into an
external power
source (e.g.,
a wall outlet).
The charger
indicator
lights will turn
solid for 10
seconds and
then transition
to charging
status.
Troubleshooting guide

22 |Additional guidance 23 |Additional guidance
Intended Use
These hearing aid chargers are intended to charge lithium-ion
rechargeable hearing aids, and are to be used with the patient’s
selected hearing aid solution. For information about your hearing aid,
please consult the hearing aid specific user manual.
Your charger is designed to operate in public and residential
environments and are designed to comply with international
Electromagnetic Compatibility emissions and immunity standards for
medical devices. However, it is still possible that you may experience
interference caused by power line disturbances, airport metal
detectors, electromagnetic fields from other medical devices, radio
signals and electrostatic discharges.
If you use other medical devices or wear implantable medical devices
such as defibrillators or pacemakers and are concerned that your
hearing instruments might cause interference with your medical
device, please contact your physician or the manufacturer of your
medical device for information about the risk of disturbance.
Your charger should not be used during an MRI procedure or in a
hyperbaric chamber or other oxygen-rich environments.
Your charger is not formally certified to operate in explosive
atmospheres such as may be found in coal mines or certain chemical
factories.
10% rH
95% rH
-10 C
45 C Your charger should be stored and transported
within the temperature, humidity, and pressure
ranges of -10°C (14°F) to +45°C (113°F),10%-95%
rH, and 70 kPa – 106 kPa (equivalent to altitudes
from 1,200 ft (380 m) below sea level to 10,000 ft
(3,000 m).
The charging temperature range is between 10°C (50°F) and 40°C
(104°F) and between 10%-95% RH and 70 kPa-106 kPa.
CAUTIONS:
• If the product is hot, do not touch it until cool.
• If the product is not working, do not disassemble. Due to a shock
hazard, contact the manufacturer and send the device in for repair.
• Keep out of reach from children. Do not ingest anything in the
package, including desiccant, cleaning tool, etc.
• Any cords and AC adapters must be approved or listed by a
Nationally Recognized Testing Laboratory.
Clinical benefit
The charger itself does not provide a direct clinical benefit. An indirect
clinical benefit is provided by enabling the parent device (rechargeable
hearing aids) to achieve their intended purpose.
Intended use
We are required by regulations to provide the following warnings:
WARNING: Use of wireless charger directly next to other
electronic equipment should be avoided because it could result in
improper performance. If such use is necessary, note as to whether
your hearing aids and the other equipment are operating normally.
WARNING: Use of accessories, components or replacement
parts other than those provided by the manufacturer of your charger
could result in increased electromagnetic emissions and decreased
electromagnetic immunity and could result in degradation of
performance.
WARNING: If Portable Radio Frequency communications
equipment is used closer than 30 cm (12 inches) from your charger,
degradation of the performance of your charger could result. If this
occurs, move away from the communications equipment.
DO NOT OPEN CHARGER, NO USER-
SERVICEABLE PARTS INSIDE
The StarLink Chargers and StarLink Premium Mini Chargers have a
rating of IP 22 per IEC 60529. This means the unit is protected against
solid objects over 12 mm, such as fingers and falling water drops,
such as condensation.
Do not connect the charger to any devices not described in this user
manual.
The service life of both the StarLink Chargers and StarLink Premium
Mini Chargers is 3 years.
The StarLink Chargers and StarLink Premium Mini Chargers have
been tested to, and have passed, the following emissions and
immunity tests:
• IEC 60601-1-2 radiated and conducted emissions requirements
for a Group 1 Class B device as stated in CISPR 11.
• Harmonic distortion and voltage fluctuations affecting the power
input source as stated in Table 2 of IEC 60601-1-2.
• RF radiated immunity at a field level of 10 V/m between 80 MHz
and 2.7 GHz as well as higher field levels from communications
devices as stated in Table 9 of IEC 60601-1-2.
• Immunity to power frequency magnetic fields at a field level of
30 A/m and proximity magnetic fields as stated in Table 11 of
IEC 60601-1-2.
• Immunity to ESD levels of +/- 8 kV conducted discharge and
+/- 15 kV air discharge.
• Immunity to Electrical fast transients on the power input at a
level of +/- 2 kV at a 100 Hz repetition rate.
• Immunity to Surges on the power input of +/- 1 kV line to line.
• Immunity to conducted disturbances induced by RF fields on
the power input as stated in Table 6 of IEC 60601-1-2.
• Immunity to voltage dips and interruptions on the power input
as stated in Table 6 of IEC 60601-1-2.
Intended use

24 |Additional guidance 25 |Additional guidance
Starkey Laboratories, Inc.
6700 Washington Ave. South
Eden Prairie, MN 55344 USA
www.starkey.com
Starkey Laboratories (Germany) GmbH
Weg beim Jäger 218-222
22335 Hamburg
Germany
Waste from electronic equipment must be
handled according to local regulations
Consult user manual
Keep dry
Instructions for Disposal of Old Electronics
Starkey Laboratories, Inc. encourages, the EU requires, and your local
community laws may require that your StarLink Premium Mini Charger
be disposed of via your local electronics recycling/disposal process.
The instructions below are provided for the benefit of disposal/
recycling personnel. Please include this manual when disposing of
your charger.
FOR DISPOSAL/RECYCLING
PERSONNEL ONLY
The StarLink Premium Mini Charger contains a Lithium-Ion Polymer
battery. To remove the battery from the charger, follow one of two
options:
Option 1
• Insert pry bars between the plastic and the USB-C metal housing
(top and bottom)
• Pry apart to break the seam
• Clip battery wires and dispose battery
Option 2
• Using the style groove as a guide, sever the plastic case on all
4 sides with a dremel blade, ultrasonic knife, hot wire, or band
saw blade
• In each case, establish a limit guide so entrance over 3/32 inch
beyond the outer shell is prevented
• Clip battery wires and dispose battery
Regulatory information
EU ADVERSE EVENT REPORTING
Any serious incident that has occurred in relation to your Starkey
device should be reported to your local Starkey representative
and the Competent Authority of the Member State in which you
are established. A serious incident is defined as any malfunction,
deterioration in the characteristics and/or performance of the device,
or inadequacy in the device user manual/ labeling which could lead
to the death or serious deterioration in the state of health of the user,
OR could do so upon recurrence.
FCC information
These devices comply with part 15 of the FCC rules and with ISED
Canada license-exempt RSS standards. Operation is subject to the
following two conditions: (1) This device may not cause harmful
interference, and (2) this device must accept any interference received,
including interference that may cause undesired operation of the
device.
NOTE: The manufacturer is not responsible for any radio or TV
interference caused by unauthorized modifications to this equipment.
Such modifications could void the user’s authority to operate the
equipment.
Intended use

27 |Notes
Notes
26 |Additional guidance
Regulatory information
Symbol Symbol
Meaning
Applicable
Standard
Symbol
Number
Manufacturer symbol – To identify the
manufacturer of a product
Manufacturer BS EN ISO
15223-1:2021 5.1.1
EEA/EU/EC European Authorised
Representative symbol
Authorized
representative
in the European
Community
BS EN ISO
15223-1:2021 5.1.2
Date of manufacture symbol – To indicate the
date on which a product was manufactured
Date of
Manufacture
BS EN ISO
15223-1:2021 5.1.3
Indicates the manufacturer’s catalogue
number so the medical device can be
identified
Catalogue
Number
BS EN ISO
15223-1:2021 5.1.6
Serial Number BS EN ISO
15223-1:2021 5.1.7
Medical Device BS EN ISO
15223-1:2021 5.7.7
Keep Dry BS EN ISO
15223-1:2021 5.3.4
Temperature Limit BS EN ISO
15223-1:2021 5.3.7
Humidity
Limitation
BS EN ISO
15223-1:2021 5.3.8
Caution BS EN ISO
15223-1:2021 5.4.4
General warning
sign
EC 60601-1,
Reference no. Table
D.2, Safety sign 2
ISO 7010-
W001
Refer to
instruction
manual/booklet
EC 60601-1,
Reference no. Table
D.2, Safety sign 10
ISO 7010-
M002
WEEE (Waste Electrical and Electronic
Equipment) Directive symbol
Collect Separately DIRECTIVE 201
2/19/EU (WEEE) Annex IX
Class II or double insulated electrical
appliance symbol
Class II equipment
IEC 60417
Reference no.
Table D.1
Symbol 9
(IEC 60417-
5172)
Direct current
IEC 60601-1
Reference no.
Table D.1
IEC 60417-
5031
Recycling Symbol
European Parliament
and Council
Directive 94/62/EC
Annex I-VII

©2022 Starkey Laboratories, Inc. All Rights Reserved. 86726-007 11/22 BKLT3142-00-EN-XX
Patent: www.starkey.com/patents
StarLink and Starkey are trademarks of Starkey Laboratories, Inc.
This manual suits for next models
1
Table of contents
Other Starkey Batteries Charger manuals