Starmix GS series User manual

Typ-Reihe: GS
Bedienungsanleitung (original) Bruksanvisning Instructiuni de utilizare
Operating Instructions Käyttöohje Navadila za uporabo
Notice d‘utilisation Οδηγίες χειρισμού Pъководство на потребителя
Instrucciones para el manejo Kullanım kılavuzu Kasutusjuhend
Instruções de utilização Instrukcja obslug Vartojimo informacija
Istruzioni d’uso Kezelési Utasítás Ekspluatacijas instrukcija
Gebruiksaanwijzing Návod k obsluze Pуководство по зксплуатации
Betjeningsveiledning Instructiuni de utilizare 說明書
Allzweck- und Gewerbesauger GS
zum Nass- und Trockensaugen
Wichtig
Vor Gebrauch sorgfältig lesen
Aufbewahren zum Nachschlagen

2

3
D Original-Bedienungsanleitung..................................................................................... 9
GB Original operatin instructions in German................................................................ 15
F Instructions de service d'origine allemande .............................................................. 21
E Manual de instrucciones original en alemán............................................................. 28
P Manual de instruções original em alemão................................................................. 34
I Istruzioni d'uso originali in tedesco............................................................................. 40
NL Originele gebruiksaanwijzing in het Duits ............................................................... 46
DK Original betjeningsvejledning på tysk..................................................................... 52
S Original-bruksanvisning på tyska.............................................................................. 58
N Original bruksanvisning på tysk................................................................................ 64
FIN alkuperäiskäyttöohje Saksan................................................................................. 70
GR Αυθεντικές οδηγίες χρήσης στα γερμανικά............................................................ 76
TR Almanca orijinal kullanım kılavuzu.......................................................................... 83
PL Oryginalna instrukcja obsługi w języku niemieckim ................................................ 89
H Eredeti kezelési útmutató német............................................................................... 95
CZ Originální návod k obsluze v němčině.................................................................. 101
SK Originálny návod na obsluhu v nemčine............................................................... 107
RO Instrucţiuni de utilizare originale germană.............................................................113
SLO Izvirna navodila za uporabo v nemščini ..............................................................119
BG Оригинален Упътване за експлоатация на немски език ................................. 125
EST Originaalkasutusjuhend saksa............................................................................ 131
LT Originali naudojimo instrukcija vokiečių................................................................. 137
LV Lietošanas pamācība oriģinālvalodā, vācu ........................................................... 143
RUS - Оригинальное руководство по эксплуатации на немецком языке............. 149
CN 原手册德国 ....................................................................................................... 156

4
1
w
5
6
7
1o
A B.bbAA.bb
Abb. C
Abb. D Abb. E Abb. F Abb. G
Abb. H Abb. I Abb. J

5
1
3
6
5
5
w
e
r
p
p
i
q
0
9
8
o
z
t
u
4
1
0
1
A
M
A
V
1
0
1
1
2 2 2 2
ebda
22a
2a
2c
6
7

6
D Beschreibung
①Oberteil ③Kühllufteintritt ⑩Faltenlter-Patrone ⑰Lenkrollen
②Funktionsplatte ④Anschlußleitung ⑪Bajonettverschluß ⑱Papierlterbeutel*e
②a Schalter Ein/Aus (Automatik)* ⑤Gehäuse ⑫Behälter ⑲Parkclip*
②b Schalter Manuell/Automatik/ Vibrationsabreinigung* ⑥Prallschutz ⑬Zyklon-Saugöffnung ⑳Saugrohrhalter*
②c Drehknopf* ⑦Motorschutzlter ⑭Rastverschlüsse
②d Volumenstromanzeige* ⑧Schaumstofflter* ⑮Räder * Je nach Modell
②e Steckdose* ⑨Filtersack* ⑯Achsen
GB Description
①Top Section ③Cold air inlet ⑩Folded-lter cartridge ⑰Steering rollers
②Functional Plate ④Connecting line ⑪Bayonet mount ⑱Paper lter bag*
②a ON/OFF switch (Automatic)* ⑤Case ⑫Container ⑲Parking clip*
②b Switch Manual/Automatic/ Vibration cleaning* ⑥Impact protection ⑬Cyclone suction opening ⑳Suction tube holder*
②c Rotary knob* ⑦Motor protection lter ⑭Lock-in closure
②d Volume ow display* ⑧Foam lter* ⑮Wheels * Depending upon the given mo
②e Socket* ⑨Filter sack* ⑯Axles
F Description
①Partie supérieure ③Entrée d’air de refroidissement ⑩Cartouche de ltre à plis ⑰Rouleaux de guidage
②Plaque de fonction ④Câble de raccordement ⑪Joint à baïonnette ⑱Sachet de ltre en papier*
②a Interrupteur marche/arrêt (Automatique)* ⑤Boîtier ⑫Réservoir ⑲Clip de stationnement*
②b Commutateur manuel/automa tique/nettoyage par vibrations* ⑥Protection contre les chocs ⑬Orice d’aspiration cyclone ⑳Support de tube d’aspiration*
②c Bouton tournant* ⑦Filtre de protection de moteur ⑭Fermeture à crans
②d Indicateur de ux volumique* ⑧Filtre en mousse* ⑮Roues * Suivant le modèle
②e Prise de courant* ⑨Sac de ltre* ⑯Axes
E Descripción
①Parte superior ③Admisión de aire refrigerante ⑩Cartucho de ltro plegado ⑰Ruedas orientables
②Placa de función ④Cable de conexión ⑪Cierre de bayoneta ⑱Bolsa de papel ltrante*
②a Interruptor Conec./Desc. (Automático)* ⑤Carcasa ⑫Depósito ⑲Clip de estacionamiento*
②b Interruptor manual/automático/ limpieza por vibración* ⑥Protección contra el rebote ⑬Abertura de aspiración ciclónica ⑳Soporte de tubo de aspiración*
②c Botón giratorio* ⑦Filtro protector del motor ⑭Cierres de encastre
②d Indicador de la corriente volumétrica* ⑧Filtro de plástico celular* ⑮Ruedas * Según el modelo
②e Caja de enchufe* ⑨Saco ltrante* ⑯Ejes
P Descrição
①Parte superior ③Entrada do ar de arrefecimento ⑩Cartucho de ltro plissado ⑰Rolos dirigíveis
②Placa das funções ④Condutor de alimentação ⑪Fecho de baioneta ⑱Bolsa de ltro de papel*
②a Interruptor ligar/desligar (Automático)* ⑤Caixa ⑫Reservatório ⑲Presilha de repouso*
②b Interruptor manual/automático/ limpeza da vibração* ⑥Protecção de impacto ⑬Orifício de aspirador do ciclone ⑳Suporte do tubo de aspiração*
②c Botão regulador* ⑦Filtro de protecção do motor ⑭Fechos de encaixe
②d Indicador de débito* ⑧Filtro de espuma* ⑮Rodas * Conforme o modelo
②e Tomada* ⑨Saco de ltração* ⑯Eixos
I Descrizione
①Parte superiore ③Ingresso aria di raffreddamento ⑩Cartuccia ltro pieghettato ⑰Rotelline pivottanti
②Piastrina di funzione ④Cavo di collegamento ⑪Chiusura a baionetta ⑱Sacchetto di carta*
②a Interruttore ON/OFF (Automatica)* ⑤Involucro ⑫Contenitore ⑲Clip di parcheggio*
②b Interruttore manuale/automatica/ pulizia a vibrazioni* ⑥Protezione antiurto ⑬Apertura di aspirazione a ciclone ⑳Supporto tubo di aspirazione*
②c Manopola* ⑦Filtro salvamotore ⑭Chiusure a scatto
②d Indicatore di usso volumetrico* ⑧Filtro materiale espanso* ⑮Ruote * A seconda del modello
②e Presa* ⑨Sacchetto in tessuto* ⑯Assi
NL Beschrijving
①Bovenstuk ③Ingang koelingslucht ⑩Vouwlter-patroon ⑰Leirollen
②Functieplaat ④Aansluitingskabel ⑪Bajonetsluiting ⑱Papierlterbuidels*
②a Schakelaar aan/uit (automatisch)* ⑤Behuizing ⑫Reservoir ⑲Parkeerclips*
②b Schakelaar hand/automatisch/ Vibratiereiniging* ⑥Stootbescherming ⑬Cycloon-zuigopening ⑳Zuigbuishouder*
②c Draaiknop* ⑦Motorbeschermingslter ⑭Roostersluitingen
②d Volumestroomweergave* ⑧Schuimstoflter* ⑮Wielen * Al naar gelang model
②e Stopcontact* ⑨Filterzak* ⑯Assen
DK Beskrivelse
①Overdel ③Køleluft ⑩Filterpatron ⑰Styreruller
②Funktionsplade ④Tilslutningskabel ⑪Bajonetlukke ⑱Filterpose (papir)*
②a Kontakt ON/OFF (automatik)* ⑤Kabinet ⑫Beholder ⑲Parkeringsclip*
②b Kontakt manuel/automatik/ vibrationsrengøring* ⑥Stødabsorption ⑬Cyklon-sugeåbning ⑳Sugerørsholder*
②c Drejeknap* ⑦Motorværnlter ⑭Snaplåse
②d Strømvisning (volumen)* ⑧Skumplastlter* ⑮Hjul * Af den pågældende model
②e Stikkontakt* ⑨Filterpose* ⑯Aksler
S Beskrivning
①Ovandel ③Kylluftsinlopp ⑩Vecklter-patron ⑰Länkhjul
②Funktionsplatta ④Anslutningskabel ⑪Bajonettlås ⑱Papperslterpåse*
②a Brytare Till/Från (Auto)* ⑤Kåpa ⑫Behållare ⑲Parkeringsclip*
②b Brytare Manuell/Auto/ Vibrationsrengöring* ⑥Stötskydd ⑬Cyklon-sugöppning ⑳Sugrörshållare*
②c Vridknapp* ⑦Motorskyddslter ⑭Ihakningslås
②d Volymströmindikering* ⑧Skumplastlter* ⑮Hjul * Allt efter modell
②e Apparatuttag* ⑨Filtersäck* ⑯Axlar

7
N Beskrivelse
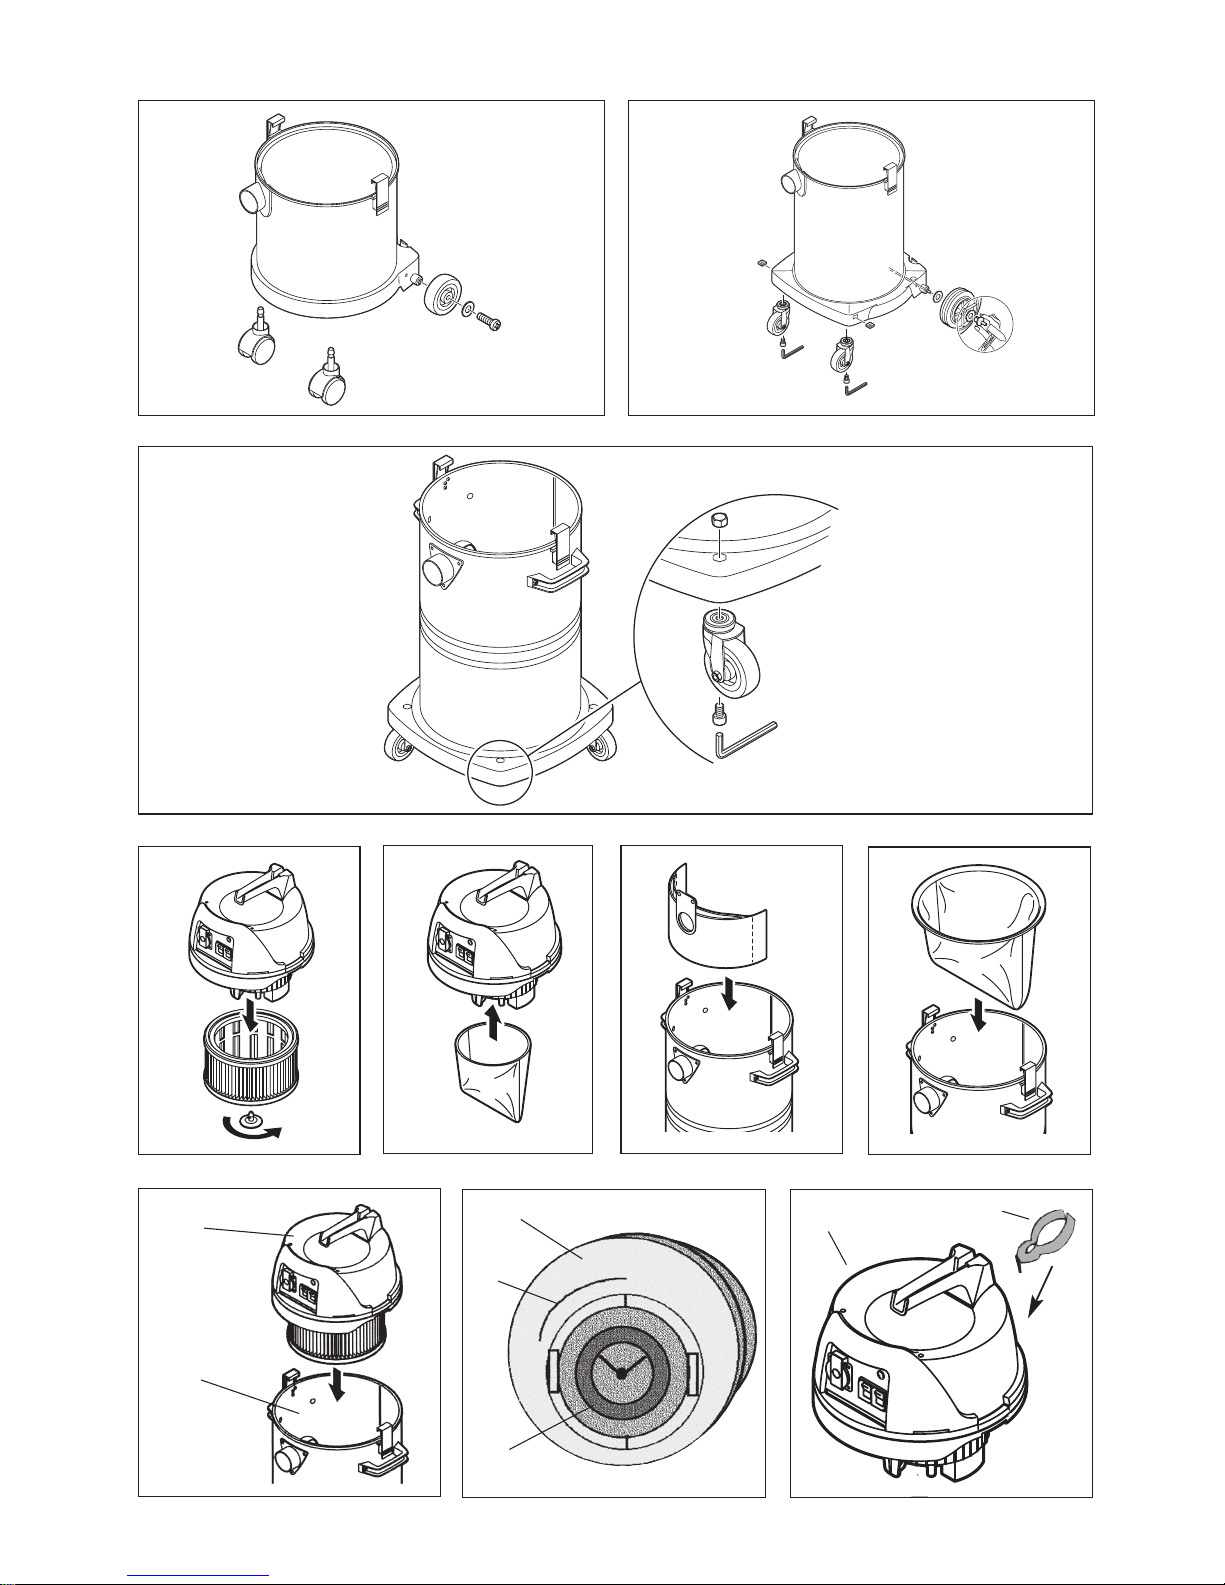
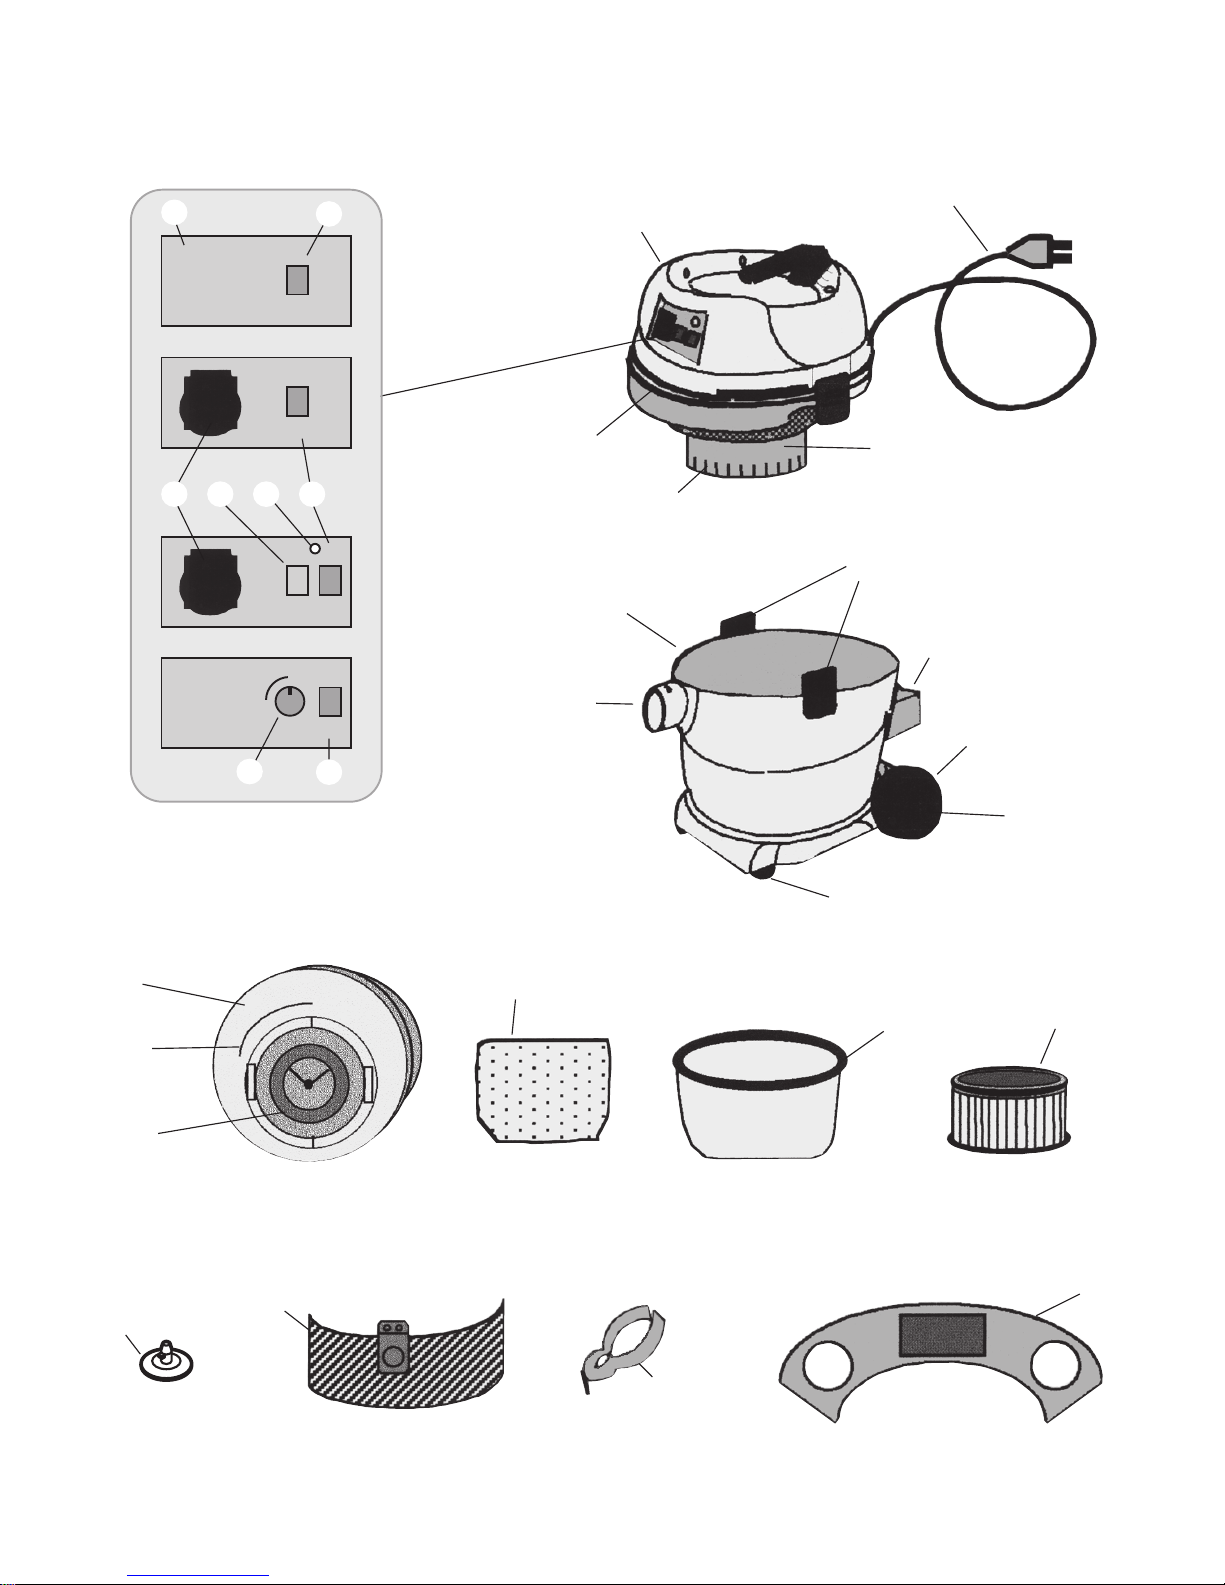
①Overdel ③Kjøleluftinngang ⑩Foldelterpatron ⑰Styreruller
②Funktionsplade ④Stikkledning ⑪Bajonettlås ⑱Papirlterpose*
②a Bryter av/på [automatikk)* ⑤Kabinett ⑫Beholder ⑲Parkeringsklemme*
②b Kontakt manuel/automatik/ vibrationsrengøring* ⑥Støtbeskyttese ⑬Syklon-sugeåpning ⑳Sugerørholder*
②c Dreieknapp* ⑦Motorbeskyttelseslter ⑭Låsemekanismer
②d Volumstrømindikator* ⑧Skumstoff-lter* ⑮Hjul * Je nach Modell
②e Stikkontakt* ⑨Filtersekk* ⑯Aksler
FIN Selostus
①Yläosa ③Jäähdytysilman tuloaukko ⑩Laskossuodattimenpatruuna ⑰Ohjauspyörät
②Toimintolevy ④Liitäntäjohto ⑪Pikasuljin ⑱Paperisuodatinpussi*
②a Kytkin päälle/pois (Automatiika)* ⑤Kotelo ⑫Säiliö ⑲Parkkeerausklipsi*
②b Kytkin Käsi/Automatiika/ Tärytyspuhdistus* ⑥Törmäyssuoja ⑬Sykloni-imuaukko ⑳Imuputkenpidike*
②c Vääntönuppi* ⑦Moottorinsuojasuodatin ⑭Lukitussulkimet
②d Tilavuusvirtanäyttö* ⑧Solumuovisuodatin* ⑮Pyörät * Mallista riippuen
②e Pistorasia* ⑨Suodatinsäkki* ⑯Akselit
GR ΠφΥραφή
①Επάνω τμημα ③Είσοδος αέρα ψJξης ⑩φυαγγα φίλτρου με απλες ⑰Ρολά κατευθυσης
②Πλάκα λειτουργάις ④Καλώδιο ⑪Κλείσμο μπαγιονέτ ⑱ρτινεςσακουλες-φiλτρα*
②a Διακόπτης ON-OFF αυτόματη* ⑤Κέλυφoς; ⑫Δoχείο ⑲Κλιπ για παρκάρισμα*
②b Διακöπτης λειτoυργία xειρoκίνητη/αυτόματη Καθαρισμός
δια δόνησης ⑥Προοταάα κατά πληpJτητας ⑬Οπή αναρρόφησης συστημα
κυκλώνος ⑳Στήριγμα σωλήνα αναρρόφησης*
②c Περιστρεφόμενο κουμπί* ⑦ΠPJστασία φίλτροο κινητήρα ⑭Κλεισίματα
②d Ενδειξη όγκου ρευματος* ⑧Φίλτρο από αφρώδες υλικό* ⑮Tρoχοί * Ανάλογα με το μοντέλλο
②e ΠρΙζα ⑨Σακουλα φίλτροu* ⑯Aξονες
TR Tanım
①Üst parça ③Soğuk hava girişi ⑩Katlanmış ltre elemanı ⑰Kılavuz makaraları
②İşlev plakası ④Bağlantı hattı ⑪Süngü kili ⑱Kağıt ltre torbası*
②a Anahtar Açma/Kapama (Otomatik)* ⑤Gövde ⑫Kap ⑲Durdurma klipsi*
②b Anahtar Manüel/Otomatik/ Titreşimli temizleme* ⑥Çarpma koruması ⑬Siklon emme deliği ⑳Emme borusu tutucusu*
②c Döner düğme* ⑦Motor koruma ltresi ⑭Mandallı kilitlemeler
②d Akım hacmi göstergisi* ⑧Köpüklü plastik ltre* ⑮Tekerlekler * Modele göre
②e Priz* ⑨Filtre torbası* ⑯Akslar
PL Opis
①Część górna ③Wlot powietrza chłodzącego ⑩Wkład ltra labiryntowego ⑰Rolki skrętne
②Panel sterowania ④Przewód zasilania ⑪Zamknięcie bagnetowe ⑱Papierowy ltr workowy*
②a Przełącznik wł./wył. (automatyczny)* ⑤Obudowa ⑫Zbiornik ⑲Zaczep unieruchamiający*
②b Przełącznik Ręczny / Automat / Czyszczenie wibracyjne* ⑥Osłona przed uderzeniem ⑬Cyklonowy otwór ssący ⑳Uchwyt rury ssącej*
②c Pokrętło* ⑦Filtr ochronny silnika ⑭Zamki zatrzaskowe
②d Wskaźnik wydatku przepływu* ⑧Filtr piankowy* ⑮Kółka * w zależności od modelu
②e Gniazdo wtykowe* ⑨Filtr workowy* ⑯Osie
H Leírás
①Felsőrész ③Hűtő levegő belépés ⑩Hajtogatott szűrőbetét ⑰Terelőgörgők
②Funkciós lemez ④Csatlakozó vezeték ⑪Bajonettzár ⑱Papír szűrőzsák*
②a Kapcsoló ki/be (automatika)* ⑤Ház ⑫Tartály ⑲Parkoló csíptető*
②b Kapcsoló kézi/automatika/ vibrációs letisztítás* ⑥Ütközésvédő ⑬Ciklon szívónyílás ⑳Szívócső tartó*
②c Forgatógomb* ⑦Motorvédő szűrő ⑭Pattintó zárak
②d Térfogatáram kijelzés* ⑧Habanyag szűrő* ⑮Kerekek * Modelltől függően
②e Dugaszoló aljzat* ⑨Szűrőzsák* ⑯Tengelyek
CZ Popis
①Horní část ③Vstup chladného vzduchu ⑩Skládaný ltr, vložka ⑰Vodicí kladky
②Funkční deska ④Přívodní vedení ⑪Bajonetový uzávěr ⑱Papírový ltrační sáček*
②a Spínač Zapnuto/Vypnuto (Automatika)* ⑤Těleso ⑫Nádoba ⑲Parkovací spona*
②b Spínač Manuální provoz/ Automatika/Vibrační čištění* ⑥Ochrana proti nárazu ⑬Sací otvor cyklonu ⑳Držák sací trubice*
②c Otočný ovladač* ⑦Ochranný ltr motoru ⑭Zajišťovací uzávě
②d Ukazatel proudění* ⑧Filtr z pěnového materiálu* ⑮Kola * Podle modelu
②e Zásuvka* ⑨Filtrační sáček* ⑯Nápravy
SK Popis
①Horná časť ③Vstup chladiaceho vzduchu ⑩Vložka skladacieho ltra ⑰Vodiace kolieska
②Funkčný panel ④Prívodný kábel ⑪Bajonetový uzáver ⑱Papierové ltračné vrecko*
②a Spínač Zap./Vyp. (automatika)* ⑤Kryt ⑫Nádrž ⑲Parkovacia úchytka*
②b Spínač manuálne/automatika/ vibračné prečistenie* ⑥Ochrana proti nárazom ⑬Sací otvor cyklónu ⑳Držiak sacej trubice*
②c Otočný gombík* ⑦Ochranný lter motora ⑭Zaskakovacie uzávery
②d Ukazovateľ prietokového objemu* ⑧Filter z penovej hmoty* ⑮Kolesá * v závislosti od modelu
②e Zásuvka* ⑨Filtračný vak* ⑯Osi
RO Descrierea
①Partea superioară ③Aducţia aerului de răcire ⑩Cartuşul cu ltru-burduf ⑰Rolele de direcţionare
②Placa funcţională ④Cablul de legătură ⑪Închizătorul-baionetă ⑱Filtrul din hârtie*
②a Comutatorul pornit/oprit (automat)* ⑤Carcasa ⑫Rezervorul ⑲Agrafa de xare*
②b Comutatorul manual/automat/ curăţare cu vibraţii* ⑥Protecţia antișoc ⑬Oriciul de aspirare cu ciclon ⑳Suportul tubului de aspirare*
②c Butonul rotativ* ⑦Filtrul de protecţie a motorului ⑭Închizătoarele cu clichetare
②d Indicatorul debitului volumic* ⑧Filtrul din material spongios* ⑮Roţile * Î funcţie de model
②e Priza* ⑨Sacul ltrant* ⑯Axele

8
SLO Opis
①Gornji del ③Vhod hladilnega zraka ⑩Vložek nagubanega ltra ⑰Krmilna kolesca
②Funkcijska plošča ④Priključni kabel ⑪Bajonetno zapiralo ⑱Papirna ltrirna vrečka*
②a Stikalo za vklop/izklop (avtomatika)* ⑤Ohišje ⑫Posoda ⑲Parkirna priponka*
②b Stikalo ročno/avtomatski/ vibracijsko čiščenje* ⑥Zaščita proti udarcem ⑬Ciklonska sesalna odprtina ⑳Držalo sesalne cevi*
②c Vrtljivi gumb* ⑦Filter za zaščito motorja ⑭Zaskočna zapirala
②d Kazalnik volumskega toka* ⑧Penasti lter* ⑮Kolesa * Odvisno od modela
②e Vtičnica* ⑨Filtrirna vreča* ⑯Gredi
BG Описание
①Горна част ③Вход охлаждащ въздух ⑩Патрон нагънат филтър ⑰Направляващи ролки
②Функционална плоча ④Присъединителен кабел ⑪Байонетна закопчалка ⑱Хартиени филтърни торбички*
②a Прекъсвач Вкл/Изкл (Автоматика)* ⑤Корпус ⑫Резервоар ⑲Клипс паркиране*
②b Прекъсвач Ръчно/Автоматика/Вибрационно почистване* ⑥Отражателна защита ⑬Центробежен смукателен отвор ⑳Носач смукателна тръба*
②c Копче за настройка* ⑦Защитен филтър на мотора ⑭Засичащи закопчалки
②d Индикация обемен ток* ⑧Филтър от пенопласт* ⑮Колела * Cпоред модела
②e Контактна кутия* ⑨Ръкавен филтър* ⑯Оси
EST Kirjeldus
①Pealmine osa ③Jahutusõhu sisenemine ⑩Voltltri padrun ⑰Juhtrullikud
②Funktsiooniplaat ④Voolukaabel ⑪Bajonettkinnitus ⑱Paberist ltrikott*
②a Automaatne sisse-/välja lülitamine* ⑤Korpus ⑫Paak ⑲Kinnitusklipp*
②b Vibropuhastuse lüliti käsitsi/ automaatselt* ⑥Põrkekaitse ⑬Tsüklon-sissetõmbeava ⑳Imitoru hoidja*
②c Pöördlüliti* ⑦Mootori kaitselter ⑭Kinnitused
②d Mahtvoolu näit* ⑧Vahtkummist lter* ⑮Rattad * mudelist sõltuvalt
②e Pistikupesa* ⑨Filtrikott* ⑯Teljed
LT Aprašymas
①Viršutinė dalis ③Šalto oro įėjimo anga ⑩Klostuoto ltro lizdas ⑰Kreipiamieji ritinėliai
②Funkcinis skydelis ④Prijungiamasis laidas ⑪Bajonetinis užraktas ⑱Popierinis ltras*
②a Įjungimo/išjungimo jungiklis (automatinis)* ⑤Korpusas ⑫Bakelis ⑲Laikymo spaustukas*
②b Rankinis/automatinis/ vibracinio nukratymo jungiklis* ⑥Apsauga nuo smūgių ⑬Ištraukimo anga ⑳Įsiurbimo vamzdžio laikiklis*
②c Sukamas mygtukas* ⑦Variklio ltras ⑭Fiksavimo užraktai
②d Tūrinės elektros srovės indikatorius* ⑧Putplasčio ltras* ⑮Ratukai * priklausomai nuo modelio
②e Kištukinis lizdas* ⑨Filtro maišas* ⑯Ašys
LV Apraksts
①Augšējā daļa ③Dzesējošā gaisa ieplūde ⑩Krokotā ltra patrona ⑰Vadības ruļļi
②Funkcionālā plate ④Pieslēguma vads ⑪Bajonetes noslēgs ⑱Papīra ltra kule*
②a Slēdzis Ieslēgt/Izslēgt (Automātika)* ⑤Korpuss ⑫Tvertne ⑲Uzglabāšanas kronšteins*
②b Slēdzis Manuāli/Automātika/ Tirišanas vibracijas* ⑥Piepildījuma aizsardzība ⑬Ciklona iesūkšanas atvere ⑳Iesūcošās caurules turētājs*
②c Pagriežamā poga* ⑦Motora aizsardzības ltrs ⑭Rastra noslēgs
②d Tilpuma plūsmas indikators* ⑧Putuplasta ltrs* ⑮Riteņi * Atkarībā no modeĮa
②e Kontaktligzda* ⑨Filtra maiss* ⑯Asis
RUS Описаниe
①Вeрxняя сeкция ③Пуск охлаждающего воздуха ⑩Складчатый фильтр ⑰Вращающиеся ролики
②Панeль функций ④Кабель ⑪Байонетный замок ⑱Бумажный фильтр*
②a Включатель / Выключатель (автоматический режим)* ⑤Корпус ⑫Контейнер ⑲Держатель трубки*
②b Ручное управление/ Автоматический переключатель/
Очистка фильтра* ⑥Планка на корпусе фильтра для
защиты поверхности фильтра ⑬Отверстие всасывания с принципом
циклона ⑳Место для хранения трубок*
②c Переключатель настройки w* ⑦Защитный фильтр в моторе ⑭Защелки
②d Индикатор объема потока воздуха* ⑧Губчатый фильтр* ⑮Колеса * в зависимости от модели
②e Розетка для электроинструмента* ⑨Фильтр-мешок* ⑯Ось
CN Beschrijving
①上壳 ③冷风进口 ⑩过滤网筒 ⑰转向滚轮
②功能板 ④电源线 ⑪锁销 ⑱纸袋 *
②a 开关(自动)* ⑤电机底座 ⑫桶子 ⑲夹具 *
②b 开关 手动/自动 振动清理 * ⑥撞击保护 ⑬旋风吸孔 ⑳吸管放置架 *
②c 旋钮 * ⑦电机保护滤网 ⑭耳挂钩
②d 体积容量显示 * ⑧海绵滤袋 * ⑮轮子 * 视型号不同而定
②e 插座 * ⑨滤袋 * ⑯轮轴

D - 9
Original-Bedienungsanleitung
Deutsch ( original )
Sicherheitshinweise
Der Sauger ist für den gewerblichen Gebrauch bestimmt. Ideal in Kombination
mit einem Elektrowerkzeug, auf Baustellen, in Werkstätten, etc.
lGefahr!
▶Erstickungsgefahr
● Verpackungsmaterial, wie Folienbeutel, ge hören nicht in die Kinder-
hände.
▶Nie auf den Sauger steigen oder sitzen.
▶Besondere Sorgfalt ist beim Saugen von Treppen geboten. Achten Sie auf
sicheren Stand.
▶Anschlussleitung und Saugschlauch nicht über scharfe Kanten ziehen, kni-
cken oder einklemmen.
▶Anschlussleitung und Saugschlauch immer so verlegen, dass niemand darü-
ber stolpern kann.
▶Bei Austritt von Schaum oder Flüssigkeit den Sauger sofort ausschalten.
▶Das Deckelinnere immer trocken halten.
▶Sauger einschließlich Zubehör nicht in Betrieb nehmen, wenn:
●Sauger erkennbare Schäden (Risse/Brüche) aufweist,
●Netzanschlussleitung defekt ist oder Rissbildung bzw. Alterung aufweisen,
●Verdacht besteht auf einen unsichtbaren Defekt (nach einem Sturz).
▶Rotierende Elektrobürsten nicht mit der Netzanschlussleitung in Berührung
kommen lassen.
▶Der Sauger darf nicht in explosionsgefährdeten Räumen betrieben werden.
▶Den Sauger von entammbaren Gasen und Substanzen fernhalten.
▶Es dürfen keine brennbaren oder ex plosiven Lösungsmittel, mit Lösungsmit-
tel getränktes Gut, explosionsgefährliche Stäube, Flüssigkeiten wie Benzin,
Öl, Alkohol, Verdünnung oder Gut, das heißer als 60 °C ist, aufgesaugt
werden.
▷Es besteht sonst Explosions- und Brandgefahr!

10 - D
Original-Bedienungsanleitung
▶Verwenden Sie die Steckdose am Sauger nur für die in der Bedienungsanlei-
tung festgelegten Zwecke.
▶Bei Zweckentfremdung, unsachgemäßer Bedienung oder nicht fachgerechter
Reparatur übernimmt der Hersteller keine Haftung für Schäden.
▶Keine beschädigten Verlängerungsleitungen verwenden.
▶Wenn die Anschlussleitung des Saugers beschädigt wird, muss sie durch
eine besondere Anschlussleitung ersetzt werden, die beim Hersteller oder
seinem Kundendienst erhältlich ist.
▶Bei Elektrobürsten, die rotierenden Bürsten nicht mit der Netzanschlusslei-
tung in Berührung kommen lassen.
▶Die Spannung auf dem Typenschild muss mit der Netzspannung übereinstim-
men.
▶Nach jedem Gebrauch und vor jeder Wartung Sauger ausschalten und Netz-
stecker ziehen.
▶Nur am Netzstecker, nie an der Anschlussleitung ziehen.
▶Netzstecker nie mit nassen Händen einstecken oder ausziehen.
▶Stromversorgung muss über eine Sicherung mit geeigneter Stromstärke
abgesichert sein.
▶Öffnen Sie niemals den Sauger bei Regen oder Gewitter im Freien.
▶Reparaturen nur von Fachkräften, z.B. Kundendienst, ausführen lassen. Nur
Original-Ersatzteile verwenden.
▶Nicht fachgerecht reparierte Geräte stellen eine Gefahr für den Benutzer dar.
lWarnung!
▶Die Sauger ISP/ISC/IS/HS/GS/AS/ES AR und ISP/ISC/IS/HS/GS/AS/ES ARD
sind nicht zum Auf-/Absaugen gesundheitsgefährlicher Stäube geeignet.
▶Sauger der Klasse M sind geeignet für das Auf-/Absaugen von trockenen,
nicht brennbaren Stäuben, nicht brennbaren Flüssigkeiten, Holzstäuben und
gefährlichen Stäuben mit AGWs ≥ 0,1 mg/m3.

D - 11
Original-Bedienungsanleitung
▶Sauger der Klasse H sind geeignet für das Auf-/Absaugen von trockenen,
nicht brennbaren Stäuben, krebserzeugenden und krankheitserregenden
Partikeln sowie nicht brennbaren Flüssigkeiten, Holzstäuben und gesund-
heitsgefährlichen Stäuben mit AGWs < 0,1 mg/m3.
▶Personen (einschließlich Kinder), die aufgrund ihrer physischen, sensorischen
oder geistigen Fähigkeiten oder ihrer Unerfahrenheit oder Unkenntnis nicht
in der Lage sind, den Sauger sicher zu benutzen, sollten diesen Sauger nicht
ohne Aufsicht oder Anweisung durch eine verantwortliche Person benutzen.
▶Bei Kindern, alten oder gebrechlichen Personen ist in besonderem Maße
Vorsicht geboten.
▶Düse, Schlauch oder Rohr nicht auf Menschen oder Tiere richten.
▶Nur die mit dem Sauger versehenen oder die in der Bedienungsanleitung
festgelegten Bürsten verwenden. Die Verwendung anderer Bürsten kann die
Sicherheit beeinträchtigen.
▶Reinigen und desinzieren Sie den Sauger nach dem Gebrauch sofort, um
Verkeimung durch langfristig nichterfolgte Reinigung vorzubeugen, speziell
beim Einsatz in lebensmittelverarbeitenden Betrieben.
▶Verwenden Sie zur Reinigung keine Dampfstrahlgeräte oder Hochdruckreini-
ger.
▶Säure, Azeton und Lösungsmittel können Saugerteile anätzen.
▶Gerät nicht unbeaufsichtigt lassen. Bei längerer Arbeitsunterbrechung Netz-
stecker ziehen.
▶Filterkassetten nicht mit Druckluft reinigen.
▶Säure, Azeton und Lösungsmittel können Saugerteile anätzen.
▷Behälter und Zubehör mit Wasser reinigen.
▷Oberteil mit feuchtem Tuch abwischen.
▷Behälter und Zubehör trocknen lassen.

12 - D
Original-Bedienungsanleitung
Erzeugnis: Sauger für Nass- und
Trockeneinsatz
Typ:
GS
Die Bauart der Geräte
entspricht folgenden ein-
schlägigen Bestimmungen
EC-Maschinenrichtlinie
2006/42/EG
EC-Richtlinie EMV
2004/108/EG
Angewendete harmonisier-
te Normen:
EN 12100–1, EN 12100–2,
EN 60335–1,
EN 60335–2–69,
EN 55014–1, EN 55014–2,
EN 61000–3–2
Angewendete nationale
Normen und technische
Spezikationen:
DIN EN 60335–1,
DIN EN 60335–2–69
Lesen Sie vor der Inbetriebnahme des Saugers die Bedienungsan-
leitung sorgfältig durch. Sie gibt wichtige Hinweise zur Bedienung,
Sicherheit sowie Wartung und Pege. Bewahren Sie die Bedie-
nungsanleitung sorgfältig auf und geben Sie diese bei Veräußerung
an den Nachbesitzer weiter.
Der Hersteller behält sich Konstruktions- und Ausstattungsände-
rungen vor.
Andere Arbeiten, als in dieser Bedienungsanleitung beschrieben,
dürfen Sie nicht ausführen.
1 Vor dem Gebrauch
▶Achten Sie beim Auspacken auf Vollständigkeit und Transport-
schäden.
▶Vor dem Gebrauch sollten die Benutzer mit Informationen, An-
weisungen und Schulungen für den Gebrauch des Saugers und
der Substanzen, für die es benutzt werden soll, einschließlich
des sicheren Verfahrens der Beseitigung des aufgenommenen
Materials, versorgt werden.
2 Verwenden Sie nur Originalzubehör
Siehe Beilagebl
att.
Weiteres Zubehö
r ersehen Sie aus der Sonderzubehörliste bzw.
auf Anfrage.
3 Einsatzbereiche
Zum Nass- und Trockensaugen. Zum Aufsaugen gesundheitsge-
fährlicher Stäube nicht geeignet. Der Sauger mit Steckdose und
Ein-/Ausschaltautomatik ist für den Anschluss von Elektrowerkzeu-
gen vorgesehen.
4 Zusammenbau.
Achten Sie beim Auspacken auf Vollständigkeit und Transport-
schäden.
4.1 Behälter ⑫.
Bei den 20 L- und 32 L-Behältern Rastverschlüsse r öffnen,
Oberteil ①abheben. Behälter umkipppen und Lenkrollen
mit Zapfen ⑰eindrücken bis sie einrasten. Große
Räder ⑮an Achsen ⑯anschrauben s. Abb. A.
Bei den 45 L-Behältern wird die beiliegende Stahlachse ⑯
durch die Führung am Behälter geschoben. Danach werden
die Räder ⑮und Lenkrollen ⑰wie in Abb. B montiert.
Bei den Geräten mit 22 L-, 35 L- und 55 L-Edelstahlbehältern
mit Fahrtraverse werden die Lenkrollen ⑰entsprechend
Abb. C montiert.
Saugrohrhalter ⑲(wenn im Lieferumfang enthalten) von
oben in die Führung am Behälter einsetzen und bis zum
Einrasten nach unten schieben.
4.2 Filter ⑧ - ⑪
Filter anbringen; je nach Modell:
-Faltenlter-Patrone ⑩gerade bis zum Anschlag über das
Gehäuse ⑤ führen und den Bajonettverschluss q verriegeln,
s. Abb. D. Der Faltenlter ist zum Nass- und Trockensaugen
geeignet.
-Schaumstofflter
Zum Wassersaugen Faltenlter vorher abnehmen, Schaumstoff-
lter ⑧über Gehäuse ⑤schieben s.Abb. E.
-Papierlterbeutel ⑱am Flansch fassen und senkrecht
von oben in die Führung der Zyklonsaugöffnung ⑬bis zum
Anschlag aufschieben. Beutel muss an Behälterwand anliegen,
s. Abb. F. Bei Edelstahlbehältern Flansch erst unten und dann
oben auf den Saugstutzen aufstecken und bis zum Anschlag
aufschieben.
-Beutel erhöht Staubrückhaltevermögen und dient der
hygienischen Entsorgung. Papierlterbeutel nur zum
Trockensaugen verwenden.
-Filtersack ⑨in Behälter ⑪einlegen bzw. bei Edelstahlbe-
hältern über den Behälterrand stülpen, s. Abb. G. Filter zum
Nasssaugen herausnehmen.
4.3 Oberteil ①
Motorschutzlter ⑦von Zeit zu Zeit oder bei nachlassender
Saugleistung zum Reinigen herausnehmen, s. Abb. I.
Oberteil ①entsprechend Abb. H seitenrichtig auf Behälter setzen.
Verdrehschutz beachten. Papierlterbeutel ⑱darf nicht beschädigt
werden und Rastverschlüsse ⑭müssen sicher einrasten.
4.4 Steckdose mit Ein-/Ausschaltautomatik
Für Sauger mit Steckdose und Ein-/Ausschaltautomatik. Die
Steckdose ②e ist für den Anschluss eines Elektrowerkzeugs

D - 13
Original-Bedienungsanleitung
vorgesehen. In Schalterstellung „O“ kann die Steckdose als Verlän-
gerungsleitung (für z. B. Leuchte) genutzt werden.
Anschlusswert: Sauger und Gerät max. 16 A.
Achtung!: E-Werkzeug muss beim Anschluss abgeschaltet sein.
Die Steckdose steht bei eingestecktem Netzstecker unabhängig
von der Schalterstellung immer unter Spannung.
Absaugöffnungen der Elektrowerkzeuge sind noch nicht
genormt. Daher steht der Adapter (Gummimuffe) 547275 zur
Verfügung, der durch Kürzen an das jeweilige Elektrowerkzeug
angepasst werden kann.
Weitere Absaugverbindungen fragen Sie beim Fachhändler bzw.
Hersteller des Elektrowerkzeuges an.
4.5 Filterabreinigung
Geräte, die mit einer elektromagnetischen Abreinigung ausgestattet
sind, können den anhaftenden Staub vom Faltenlter ⑩abrütteln.
Dies gewährleistet eine optimale Nutzung des Faltenlters und
verlängert die Arbeitszyklen.
Spätestens beim Aueuchten der Volumenstromanzeige ②d
(Warnlampe) sollte, die Abrüttelung (Schalterstellung V) betätigt
werden.
5 Inbetriebnahme
Mit Schalter ②a am Oberteil ① Gerät ein-/ausschalten,
(bzw. in Automatikbetrieb schalten).
Schalter ②b zusätzlich bei Saugern mit Ein-/Ausschaltautomatik
und Abrüttelfunktion:
M = Sauger >ein<, (Manueller Betrieb)
A = Bereitschaftsbetrieb für Ein-/Ausschaltautomatik
(Sauger wird vom E-Werkzeug ein- und ausgeschaltet) Steckdose
führt Spannung, unabhängig von der Schalterstellung.
Geräte mit Abrüttelfunktion: Schalter ②b in Position V (Vibration)
bringen um den Rüttler einzuschalten. (Für ca. 15 sec. gedrückt
lassen).
Bei Geräten mit elektronischer Saugkraftregulierung steht ein
Drehknopf 2c zur Verfügung, mit der dem Sauggut entsprechend,
die Saugleistung des Saugers angepasst werden kann.
6 Saugen.
Bei Geräten mit Griffrohr kann mit dem Nebenluftschieber
die Saugleistung dem Sauggut angepasst werden.
6.1 Trockensaugen
Nur mit trockenem Filter, Gerät und Zubehör, damit Staub nicht
haften bleibt und verkrustet.
Wenn Ruß, Zement, Gips, Mehl oder ähnliche Stäube gesaugt
werden, empfehlen wir einen Papierlterbeutel und bei größeren
Mengen zusätzlich einen Filtersack FSP einzusetzen. Papierlter-
beutel immer in Verbindung mit einem zweiten Filter einsetzen.
6.2 Nasssaugen.
Ohne Papierlterbeutel und ohne Filtersack saugen. Der Faltenlter
ist zum Nasssaugen geringer Wassermengen geeignet. Nach dem
Nasssaugen den Faltenlter trocknen lassen, oder bei anschließen-
dem Trockensaugen trockenen Filter einsetzen. Bei größeren
Wassermengen muß der Faltenlter durch den Schaumstofflter
FSS ersetzt werden. Das Schwimmerventil unterbricht bei vollem
Behälter den Saugvorgang. Motor abschalten, Behälter und
gegebenenfalls Faltenlter entleeren.
-Beim Wassersaugen sollte der Nebenluftschieber am Griffrohr
geringfügig geöffnet werden.
-Vor dem Abschalten zuerst den Saugschlauch aus der Flüssig-
keit nehmen.
-Durch hohe Saugleistung und strömungsgünstige Behälterform
kann nach dem Abschalten etwas Wasser aus dem Schlauch
zurücklaufen.
-Beim Saugen größerer Flüssgkeitsmengen kann das
Schwimmerventil vorzeitig ansprechen. Gerät abschalten, Filter
abnehmen und Wasser entleeren.
-Bei überwiegend üssigem Sauggut kann auch ohne Filter
gesaugt werden.
-Bei häugem Wechsel zwischen Trocken- und Nasssaugen
empfehlen wir den Einsatz eines zweiten (Tausch-)Filters.
-Beim Aufsaugen von stark verschmutztem Wasser empfehlen
wir den Einsatz eines waschbaren Schaumstofflters anstatt
des montierten Faltenlters. Sofern der Schaumstofflter nicht
im Lieferumfang enthalten ist, kann dieser Filter unter der
Zubehör- Artikel-Nr. 41 32 97 bestellt werden.
6.3 Behälterentleerung.
Ausschalten ②a, Stecker ④ ziehen, Rastverschlüsse ⑭öffnen.
Oberteil ①und Saugschlauch vom Behälter ⑫nehmen. Behälter
auskippen bzw. Papierlterbeutel ⑱von Saugöffnung abziehen.
7 Reinigung
Filtersack von Zeit zu Zeit abbürsten bzw. ausklopfen. Faltenlter
mit weicher Bürste oder ggf. Wasser reinigen. Filter und Behälter
trocknen lassen, damit Staub nicht an feuchten Teilen haften
bleibt. Um starke Verschmutzung und Verkrustung zu vermeiden,
trockenes Sauggut entfernen, bevor nass gesaugt wird. Behälter
und Zubehör mit Wasser reinigen. Oberteil ①mit feuchtem Tuch
abwischen.
Die Funktion des Schwimmerventils prüfen, regelmäßig reinigen
und auf Anzeichen von Beschädigungen untersuchen. (Oberteil
umdrehen und auf das Schließen des Schwimmers achten.)

14 - D Original-Bedienungsanleitung
7.1 Technische Überprüfung
Der Hersteller oder eine ausgebildete Person muss mindestens
jährlich eine technische Überprüfung durchführen, die zum Beispiel
aus der Überprüfung der Filter auf Beschädigung, der Luftdichtheit
des Saugers und des richtigen Funktionierens der Kontrolleinrich-
tung besteht.
8 Selbsthilfe bei Störungen
Funktionsstörungen sind nicht immer auf Gerätedefekte zurück-
zuführen!
Störung: Mögliche Ursache/Behebung:
Nachlassen der Saugleistung der Filter verschmutzt - reinigen
Papier lter voll – wechseln.
Behälter voll – entleeren.
Motorschutz lter zugesetzt –
reinigen.
Düse, Rohre oder Schlauch
verstopft – reinigen.
Gerät läuft nicht an. Stecker in Steckdose?
Netz spannungslos?
Netzleitung in Ordnung?
Keine weiteren >Eingriffe< vornehmen, sondern an Kundendienst-
werkstatt wenden (siehe Beilageblatt „Kundendienst-Werkstätten”).
9 Technische Daten
Geräteaus-
ausführung Spannung Frequenz Gewicht
GS 10 ... 220 - 240 V~ 50/60 Hz 10 kg
GS 12 ... 220 - 240 V~ 50/60 Hz 10 kg
GS 14 ... 220 - 240 V~ 50/60 Hz 10 kg
Geräteaus-
ausführung Nennleistung max. Leistung
GS 10 ... 1000 W 1200 W
GS 12 ... 1200 W 1400 W
GS 14 ... 1400 W 1600 W
Geräteaus-
ausführung Typischer
Schalldruckpegel
(DIN EN 60704-1)
Typischer
Schalldruckpegel bei
„L-Version“
(DIN EN 60704-1)
GS 10 ... 72,5 dB(A) 68,0 dB(A)
GS 12 ... 73,0 dB(A) 68,5 dB(A)
GS 14 ... 73,5 dB(A) 69,0 dB(A)
Anschlussleitung bei Geräten ohne Steckdose: H05VV F 2 x 1
Anschlussleitung bei Geräten mit Steckdose: H05VV F 3 x 1,5
Wir erklären in alleiniger Verantwortung, dass dieses
Produkt mit den EG-Richtlinien und maßgebenden
Normen übereinstimmt: Maschinenrichtlinie 2006/42/
EG mit Änderungen, EMV–Richtline 2004/108/EG mit
Änderungen. 0
Altgeräte enthalten wertvolle Materialien,
die zur Wiederaufarbeitung geeignet sind.
Gerät nicht dem normalen Hausmüll
beifügen, sondern über geeignete
Sammelsysteme fachgerecht entsorgen,
z.B. über Ihre kommunale
Entsorgungsstelle.
Ls IP240

GB - 15
Original operatin instructions in German
English
Safety advice
The vacuum device is designed for industrial use.
Ideal in combination with an electric tool, on building sites, in workshops, etc.
lDanger
●Keep packaging material such as plastic bags away from children.
▶Never stand or sit upon the vacuum device.
▶Particular caution is advised when ascending stairs. Pay attention to standing
safely.
▶Do not pull the suction hose and connection line over sharp edges, kink it or
shut it.
▶Always lay the suction hose and connection line so that nobody may trip over
them.
▶In case of any leakage of foam or liquid, immediately switch off the vacuum
device.
▶Always keep dry the inside of the lid.
▶Do not start the vacuum device including its accessories if:
●the vacuum device shows detectable damage (ssures/cracks);
●the power connection line is defective or shows ssuring or ageing; or
●any invisible defect is suspected (after a fall).
▶Do not allow the rotating brushes to get into contact with the power connec-
tion line.
▶Do not operate the vacuum device where there is danger of explosions.
▶Keep away the vacuum device from inammable gases and substances.
▶Do not aspirate any combustible or explosive solvents, materials soaked in
solvents, explosive dusts, liquids such as petrol, oil, alcohol, diluents or mate-
rials hotter then 60 °C (140 °F).
▷Otherwise there will be danger of re and explosions!
▶Use the socket of the vacuum device only for the purposes dened in the
instruction manual.

16 - GB
Original operatin instructions in German
▶In case of any inappropriate usage, improper operation or repair, the producer
shall be exempt from liability.
▶Do not use any damaged extension lines.
▶If the connector line of the vacuum device has been damaged, it must be
replaced with a special connector line which is available from the producer or
their service.
▶Electric brushes: Do not allow the rotating brushes to get into contact with the
power connection line.
▶The voltage on the type sign must correspond to the grid voltage.
▶After every use and before any maintenance, switch off the vacuum device
and pull the power plug.
▶Pull on the plug only, not on the line.
▶Never plug or pull the power plug with wet hands.
▶The socket must be secured via a household fuse with a suitable current
rating.
▶Never open the vacuum device outdoors in rain or storm.
▶Have repairs been made only by experts, e. g. the producer’s service. Use
original spare parts only.
▶Improperly repaired devices pose a hazard for the user.
lWarning
▶ISP/ISC/IS/HS/GS/AS/ES-AR and ISP/ISC/IS/HS/GS/AS/ES-ARD-vacuum
devices are not suitable for aspiration/clearing of toxic dusts.
▶Class M vacuum devices are suitable for aspiration/clearing of dry, non-com-
bustible dusts, non-combustible liquids, wood dusts and hazardous dusts with
workplace limit values
of ≥ 0.1 mg/m³.
▶Class H vacuum devices are suitable for aspiration/clearing of dry, non-
combustible dusts, carcinogenic and pathogenic particles as well as non-
combustible liquids, wood dusts and toxic dusts with workplace limit values of
< 0.1 mg/m³

GB - 17
Original operatin instructions in German
▶Persons (including children) who are, due to their physical, sensory or in-
tellectual abilities or lack of experience or knowledge, unable to safely use
the vacuum device should not use it without supervision or instruction by a
responsible person.
▶Particular caution is advised with children, elderly or inrm persons.
▶Do not point nozzle, tube or hose at people or animals
▶ Use only the brushes supplied with the vacuum device or dened in the
instruction manual. Use of any other brushes may pose a safety hazard.
▶Clean and disinfect the vacuum device immediately after use to prevent
microbial contamination due to long-term failure to clean it, especially when
using the device in food-processing.
▶Do not use any steam jets or high-pressure cleaners for cleaning.
▶Acids, acetone and solvents may corrode parts of the vacuum device.
▶Do not leave the device without supervision. In case of longer interruptions of
work, pull the power plug.
▶Do not clean lter cassettes with compressed ai
▶Acids, alkalis and solvents can corrode the vacuum cleaner parts.
▷Clean the container and accessories with water.
▷Wipe the top section with a damp cloth.
▷Allow the container and accessories to dry

18 - GB
Original operatin instructions in German
Product: Vacuum cleaner for wet
and dry applications
Type:
GS
The structure of the equip-
ment is in accordance
with the following relevant
regulations:
EC Machinery Directive
2006/42/EU
EMC Directive 2004/108/
EC
Angewendete harmonisier-
te Normen:
EN 12100–1, EN 12100–2,
EN 60335–1,
EN 60335–2–69,
EN 55014–1, EN 55014–2,
EN 61000–3–2
Angewendete nationale
Normen und technische
Spezikationen:
DIN EN 60335–1,
DIN EN 60335–2–69
Read the operating manual carefully before starting to use the
vacuum cleaner. It provides important instructions for the operation,
safety, care and maintenance. Keep the operating manual in a safe
place and, in case you sell the unit, hand it on to the next owner.
The manufacturer reserves the right to carry out modications to
the design and equipment.
Any other work not covered by this operating manual must not be
carried out.
1 Before use
▶When unpacking, check that the delivery is complete and that
there is no transport damage.
▶Before using, the operators should be provided with information,
instructions and training for the use of the vacuum cleaner
and the substances that it is to be used for, including the safe
procedure for the removal of the gathered material.
2 Only use original accessories
See enclosed sheet.
Further accessories are given in the special acessories list or
upon request.
3 Fields of application
For wet and dry suction cleaning. Not suitable for vacuuming
health hazardous dusts. The suction cleaner with socket and ON/
OFF automatic switching system is intended for the connection of
electric tools.
4 Assembly
When unpacking, check that the appliance is complete and that
there is no transport damage.
4.1 Container ⑫
Open the lock-in closures ⑭ of the 20-l and 32-l container, and
lift off the top section ①. Tip over the container and press in the
steering rollers with pivot ⑰until they lock into place. Screw the
large wheels ⑮onto the axles ⑯; see g. A.
The supplied steel axle ⑯for the 45-l container is pushed through
the guide on the container, after which the wheels ⑮and steering
rollers ⑰ are mounted as indicated in g. B.
The steering rollers ⑰ for appliances with 22-l, 35-l and 55-l
stainless steel containers with chassis crosshead are mounted as
indicated in g. C.
Insert suction tube ⑲(when contained in scope of supply) into the
container guide from above and push down until it engages.
4.2 Filters ⑧ - ⑪
Fitting the lters, depending upon the given model:
-Push the folded lter cartridge ⑩in a straight manner over
the case ⑤, right up to the stop point, and lock the bayonet
mount ⑪; see g. D. The folded lter is suitable for wet and dry
suction cleaning.
-Foam lter
To suction the water, rst remove the folded lter; push the foam
lter ⑧over the casing ⑤, see Fig. E
-Take hold of the paper lter bag ⑱ at the ang and push ver-
tically from above into the guide of the cyclone suction opening
⑬until the stop point is reached. The bag must rest against the
container wall; see g. F.
For stainless steel containers, push the ange onto the suction
opening at the bottom rst and then at the top, then keep
pushing as far as it will go.
-The bag increases the dust retaining capacity and is
intended for hygienic disposal. Paper lter bags can only
be used for dry suction cleaning.
-Place the lter sack ⑨in the container ⑫respectively for
stainless steel containers slip over the edge of the container,
see g. G.
Remove the lter for wet suction cleaning.
4.3 Top section ①
From time to time, or when the suction force decreases, take out
the motor protection lter ⑦ for cleaning; see g. I. Place the top
section ① right-way-round on the container as indicated in g. H.
Observe the anti-rotation protection. The paper lter bag ⑱must
not be damaged, and the lock-in closure ⑭must engage securely..
4.4 Socket with ON/OFF automatic switching system
For suction cleaners with socket and ON/OFF automatic switching
system.

GB - 19
Original operatin instructions in German
The socket ②e is intended for the connection of electrical tools. In
the “0“ switch setting, the socket can be used as an extension line
(e.g. for a light).
Connected load: Suction unit and appliance max. 16 A
WARNING! An electric tool must be switched off when it is connec-
ted. The socket is always live when the plug is inserted in a mains
socket, irrespective of the switch position
The suction openings of electric tools are not standard.
Consequently, an adapter (Rubber sleeve) 547275 is available that
can be shortened to t the given electric tool.
For other suction connections contact your dealer or the manufac-
turer of the given electric tool.
4.5 Filter cleaning
Appliances tted with an electromagnetic cleaning device can
remove the dust adhering to the folded lter ⑩by vibration. This
ensures optimal use of the folded lter and extends the operating
cycles.
The vibrating device should be activated (switch setting V) at the
latest when the volume ow display ②d (warning light) lights up.
5 Setting into operation
The appliance is switched ON/OFF or switched into automatic
mode with the switch ②a on the top section ①.
The switch ②b is an additional feature on suction cleaners with an
ON/OFF automatic switching system and vibrating function:
M = suction cleaner >ON< (manual operation)
A = Operating readiness for the ON/OFF automatic
switching system. (Suction cleaner is switched on
and off by the connected electric tool.)
The socket is always live, irrespective of the switch position.
Appliances with a vibrating function:
Adjust the switch ②c to the V setting (vibration) to turn on
the vibrator.
Appliances with an electronic suction force control feature
a rotary knob ②d with which the suction force can be
adapted to the object that is being suction cleaned.
6 Suction cleaning
The suction force of appliances with a handle tube can be matched
to the object being suction cleaned with the secondary air slide.
6.1 Dry suction cleaning
Dry suction cleaning must only be performed with a dry lter,
appliance and accessories so that the dust cannot adhere and
become encrusted.
If the appliance is used to vacuum soot, cement, gypsum, our and
similar dusts, it is advisable to use a paper lter bag, and an additio-
nal FSP lter sack when larger quantities are involved.
The paper lter bag must always be used in conjunction with
a second lter.
6.2 Wet suction cleaning
Suction cleaning is performed without a paper lter bag and without
a lter sack. The folded lter is suitable for wet suction cleaning.
Use a dry lter for subsequent dry suction cleaning. An FSS
foam lter should be used for larger quantities of water. The oat
valve interrupts suction when the container is full. Turn off the motor
and empty the container and, if necessary the folded lter.
-When taking up water, the supplementary air slide on the handle
should be opened slightly.
-Always lift the suction hose out of the liquid before switching off.
-Due to the high suction force and ow-promoting container
shape, some water may ow out of the hose when the appliance
is switched off.
-The oat valve can respond prematurely when larger quantities
of uid are sucked up. Turn off the appliance, remove the lter
and empty out the water.
-The lter can be dispensed with when liquid is primarily sucked
up.
-A second (exchangeable) lter should be used for frequent
changeover between dry and wet suction cleaning.
-When taking up strongly contaminated water, we recommend
the use of a washable foam lter instead of the folded lter
which has been tted. If the foam lter is not part of the scope
of delivery, this lter can be ordered under the accessory article
no. 41 32 97..
6.3 Emptying the container.
Turn off ②a, disconnect the plug ④, and open the lock-in closure
⑭. Remove the top section ①and hose from the container w.
Empty the container or remove the paper lter bag ⑱from the
suction opening.
7 Cleaning
From time to time the lter sack should be brushed or beaten.
Folded lters should be cleaned with a soft brush or, possibly, with
water. Dry the lter and container thoroughly so that dust cannot
adhere to moist parts. To prevent dirt accumulation and encrustati-
on, dry dust must be removed before changing over to wet suction
cleaning. Clean the container and accessories with water. Wipe the
top section ①with a moist cloth.
Check the function of the oat valve, clean regularly and always
inspect for signs of damage. (Turn the top section around and see
that the oat closes properly.)

20 - GB
Original operatin instructions in German
7.1 Technical testing
A technical examination must be carried out at least once a year
by a trained person: check the lter for damage, ensure that the
vacuum cleaner is air-tight and check that the monitoring equip-
ment functions correctly.
8 Remedying faults
Functional faults are not necessarily always due a defective
appliance.
Fault:: Possible Cause/Remedy:
Decreasing suction force: Clogged lter – Clean.
Paper lter is full – Change
Container is full – Empty.
Clogged motor protection lter
– Clean.
Clogged nozzle, tube or hose
– Clean.
Appliance does not start: Is the plug insertes in the socket?
Mains failure?
Is the power supply cable broken?
No other “interventions“ are allowed; consult the servicing work-
shop (see enclosed sheet “Customer Service Workshops”)..
9 Technical data.
Appliance
version Voltage Frequency Weight
GS 10 ... 220 - 240 V~ 50/60 Hz 10 kg
GS 12 ... 220 - 240 V~ 50/60 Hz 10 kg
GS 14 ... 220 - 240 V~ 50/60 Hz 10 kg
Appliance
version Rated capacity Maximum
capacity
GS 10 ... 1000 W 1200 W
GS 12 ... 1200 W 1400 W
GS 14 ... 1400 W 1600 W
Appliance
version
Typical sound level
(acc. to DIN EN
60704-1)
Typical sound level
with “L“ Verlon
(acc. to DIN EN
60704-1)
GS 10 ... 72,5 dB(A) 68,0 dB(A)
GS 12 ... 73,0 dB(A) 68,5 dB(A)
GS 14 ... 73,5 dB(A) 69,0 dB(A)
Connecting cable for appliances without socket: H05VV F 2x1
Connecting cable for appliances with socket: H05VV F 3x1.5
We declare, with exclusive responsibility, that this
product complies with the EU Directive and the rel-
evant standards: Machinery Directive 2006/42/EU
with modications, EMC Directive 2004/108/EC with
modications. 0
Old appliances contain valuable materials
that can be recycled. Do not dispose of
such appliance with the normal domestic
waste but rather by way of appropriate
collecting points.
Ls IP240
Table of contents
Languages: