Steamfast SF-292 User manual

MODEL SF-292
Multi-Purpose Steamer
V080602
Top Innovations, Inc.
6655 Troost Ave. • Kansas City, MO 64131
TEL: (800) 711-6617 / (816) 584-9700
FAX: (816) 584-9066
www.SteamFast.com
PRINTED IN CHINA
by Top Innovations, Inc.
Please read all instructions before use.
Mail in your warranty registration card.

192 Top Innovations, Inc.
LETTER FROM THE CEO
Top Innovations, Inc.
WARRANTY INFORMATION
Before returning a product for any reason, you must call or e-mail
Top Innovations Warranty Service at (800) 711-6617 or
30-DAY MONEY BACK POLICY
If this item does not meet your expectations, it may be returned within 30 days of the date of purchase for either a
replacement or full refund of the purchase price less any shipping charges. In some circumstances, an additional
restocking fee will apply.
ONE YEAR LIMITED WARRANTY
(If outside USA, additional shipping charges may apply)
Top Innovations, Inc., warrants this product to be free from defects in material and workmanship for a period of
one (1) year from the date of purchase. This warranty does not cover damage caused by misuse, negligence, use
by improper current or voltage, commercial use, use contrary to operating instructions or disassembly, repair or
alteration by any person other than Top Innovations, Inc. Warranty Service Department.
Top Innovations, Inc., will repair or replace at its option. This warranty gives you specific legal rights and may
have other rights, which may vary from state to state.
Should there be any missing or defective parts or accessories, please contact Customer Support. In most cases, it
is not necessary to return the entire unit. We can ship most replacement parts directly to your home.
Upon expiration of your one (1) year limited warranty, you will be advised of the cost of repair before any servic-
ing is done. You must have a Return Authorization Number. For non-warranty service, please enclose a check
for the amount required. Or, you may pay by money order, Visa, MasterCard, AmEx or Discover credit card.
If you need to request warranty service, or have any questions about coverage under this warranty, please visit the
Warranty Service Request page on our Web site, www.SteamFast.com. You may also email
customerser[email protected], or phone (800) 711-6617, ext 130 or 131.
Please have your product serial number ready before contacting Warranty Service Department. The serial number
is located on the back or bottom of your unit.
Performance of any obligation of this Warranty, or 30-Day Money Back Policy, may be obtained by:
returning your unit. Failure to obtain a Return Authorization Number will cause a delay in service.
2. Include a copy of purchase receipt.
3. Box the item securely, in its original packaging if available. Include original packing materials and accessories
unless advised otherwise by a Customer Service agent.
4. Include your name, address, telephone number, and Return Authorization Number on returned package.
Send unit postage/freight-prepaid (Top Innovations does not accept “collect” or COD returns) to:
Top Innovations, Inc.
Warranty Service Department
6655 Troost Ave.
Kansas City, MO 64131
Call Top Innovations, Inc., Customer Service at (800) 711-6617, or (816) 584-9700 if you have any questions
about the procedures described above.
Dear Valued Customer,
Congratulations on purchasing your new SF-292 Multi-Purpose Steamer. This unique product
not only replaces the traditional mop and bucket as a simple and effective floor cleaning
solution, but it conveniently doubles as a handheld steam cleaner / fabric steamer as well.
Turn on your Multi-Purpose Steamer and in less than a minute you are ready to clean your
hard surface floors, without the mess and hassle of conventional mopping. Use it on all types
of hard floors - tile, marble, linoleum, sealed hardwood and more. Then, when the job is done,
the Multi-Purpose Steamer is quick and easy to store - no need to hassle with a dirty mop and
sloppy water bucket.
Once you’re finished with your floors, convert your Multi-Purpose Steamer to the handheld
mode and use it to clean and freshen the rest of your home. Set the Steam Control Dial to
“HIGH” and use hot steam to blast away grease and grime from tile & grout, grills, oven racks,
and much more. Or, set it to “LOW” to gently refresh fabrics and smooth wrinkles without
need for conventional ironing.
Additionally, using steam provides a variety of other unique benefits. It’s natural and
environmentally friendly, eliminating the need for potentially harmful cleaning chemicals. It
also helps to reduce smoke and other unpleasant odors, rather than covering them up with
artificial scents. Finally, it’s ideal for refreshing upholstery and helping to reduce smoke and
other unpleasant odors, making your carpet and furniture like new again.
Top Innovations, Inc. would like to invite you to visit our Customer Support Web site at:
www.SteamFast.com
On this Web site you will find additional information about many other exciting products that
are available, helpful tips on ways in which you can utilize your Multi-Purpose Steamer, and
other useful information to assist you in maximizing the power of steam!
Enjoy your new SF-292 Multi-Purpose Steamer!
Benny Lee
Chairman and CEO
Top Innovations, Inc.

318
CUSTOMER SUPPORT &
TECHNICAL SPECIFICATIONS
PRODUCT SPECIFICATIONS
VOLTAGE: 120V
WATTAGE: 1300W
AMPERAGE: 11A
WATER CAPACITY: 15 OZ. (450 ML.)
HEATING TIME: 30 SEC. (APPROXIMATE)
CONTINUOUS STEAM TIME: 20-32 MIN. (VARIES BASED ON STEAM SETTING)
UNIT WEIGHT: 3.5 LBS. (1.6 KG.)
UNIT DIMENSIONS (LxWxH): 53.1” (135.0 CM) x 10.6” (27.0 CM) x 4.5” (11.5 CM)
CUSTOMER SUPPORT
For problems with your Multi-Purpose Steamer, please refer to the troubleshooting guide
located on Page 17. Additional inquiries should be directed to our Customer Support services
through our Web site, www.SteamFast.com, on the Contact Us Web page.
If you do not have internet access, you may also contact our Customer Support Department by
telephone, at 1-800-711-6617 or 1-816-584-9700, ext. 130 or 131.
NOTE: In order for our customer service representatives to help you as quickly and
efficiently as possible, please have the following information ready before calling:
• Purchase information (where and when you purchased this product)
• Copy of purchase receipt / proof of purchase
• Product Serial Number
PRODUCT SERIAL NUMBER
For your convenience, space has been provided below for you to record the serial number of
your unit (located on the back or bottom of the unit) for easy reference when contacting our
Customer Service Department.
__________________ - _____________________________________
IMPORTANT SAFETY INSTRUCTIONS
WARNING: To reduce the risk of fire, electrical shock, or injury, the
following basic safety precautions should always be followed when using
an electrical appliance.
READ ALL INSTRUCTIONS BEFORE USE
DANGER
Any appliance is electrically live even when switch is off. To reduce risk of electrical shock:
1. Always unplug power cord immediately after using.
2. Do not place or store unit where it can fall or be pulled into a sink or tub.
3. Do not place in, or drop into water or other liquid.
4. If unit falls into water, immediately unplug power cord. Do not reach into the water.
WARNING
To reduce risk of burns, electrocution, fire, or injury to persons:
1. Use Multi-Purpose Steamer only for its intended purpose as indicated in this manual.
2. Before plugging power cord into electrical outlet, be sure that all electrical information on rating
label agrees with your power supply.
3. To reduce likelihood of circuit overload, DO NOT operate another high wattage appliance on the
same circuit as this unit.
4. To protect against risk of electrical shock, do not immerse unit in water or other liquids. Do not
use power cord as handle, allow it to hang over edge of counters, or be crimped or closed in
doors.
5. Steam Control Dial should always be set to “OFF” position before plugging or unplugging unit
from outlet. Never yank power cord to disconnect from outlet; instead, grasp plug and pull to
disconnect.
6. Do not operate unit with a damaged power cord or if the unit has been dropped or damaged. To
avoid risk of electrical shock, do not disassemble unit; take it to a qualified service repair person
for examination and repair. Incorrect reassembly can cause a risk of electrical shock when unit is
used.
7. Close supervision is required for any appliance being used near children, pets and plants. Do not
leave unit unattended while plugged in.
WARNING: To reduce the risk of electrical shock, this appliance has a
grounded (three-pronged) plug. This plug will fit in a polarized wall outlet
only one way. If the plug does not fit fully in the outlet, contact a licensed
electrician to install a proper outlet. DO NOT attempt to modify the plug
or defeat this safety feature.
Top Innovations, Inc. Top Innovations, Inc.

4 17
TROUBLESHOOTING GUIDE
PROBLEM POSSIBLE CAUSE SOLUTION
Unit fails to heat up. Power
Indicator Light does not
illuminate.
Unit is not plugged in. Plug electrical cord into outlet.
Household circuit breaker / ground
fault interrupter has tripped or
blown a fuse.
Reset circuit breaker / ground fault
interrupter, or replace fuse. If you
need assistance, contact a licensed
electrician.
Unit heats up, but fails to steam.
Power Indicator Light does
illuminate.
(NOTE: Always allow proper time
for unit to heat up and begin
producing steam.)
Water Tank is empty. Refill Water Tank using
procedures on Page 11 of this
manual.
Mineral build-up in unit. Refer to Removing Mineral
Build-Up section on Page 16 of
this manual for removal
procedure.
Steam output is weak or
intermittent.
Mineral build-up in unit. Refer to Removing Mineral
Build-Up section on Page 16 of
this manual for removal
procedure.
Steam Control Dial is set to LOW. Increasing the setting of the Steam
Control Dial to MEDIUM or
HIGH will result in a stronger
(and wetter) flow of steam. Refer
to Pages 12 & 14 of this manual
for more information.
Rattling sound is heard coming
from Water Tank.
Sound is being caused by
weighted brass ball connected to
end of water tube inside Tank.
The weighted brass ball is an
intentional design that helps the
unit more efficiently utilize all
water inside of Tank.
If brass ball has become
disconnected from tube, simply
reattach it by sliding it back onto
end of tube.
Unit is emitting water in the steam
flow.
Steam Control Dial is set to
HIGH.
At the HIGH setting, small
amounts of water may be released
along with the steam. Decreasing
the setting of the Steam Control
Dial to MEDIUM or LOW will
reduce this water spotting.
Weighted brass ball connected to
end of water tube inside Water
Tank may have come loose.
If brass ball has become
disconnected from tube, simply
reattach it by snapping it back
onto black nozzle at end of tube.
8. This unit is not intended for use by persons (including children) with reduced physical, sensory
or mental capabilities, or lack of experience and knowledge, unless they have been given
supervision or instruction concerning use of the unit by a person responsible for their safety.
9. If Power Indicator Light does not illuminate when Steam Control Dial is set to one of three
steam intensity settings, unit is not operating normally. Immediately turn unit off and disconnect
from power supply - have unit serviced by qualified service personnel.
10. Unplug power cord before filling Water Tank with water.
11. Do not use unit where aerosol-based products are being used, or where oxygen is being
administered.
12. Unit is only meant to be used with recommended SF-292 accessories. Using other types of
attachments may cause damage to unit or injury.
13. When filling Water Tank, only water should be used in unit - other cleaning agents could damage
unit or cause injury. Distilled or de-mineralized water is highly recommended, in order to
minimize potential build-up of mineral deposits. Do not overfill unit.
14. Do not attempt to use unit without properly filling Water Tank.
15. To reduce risk of contact with hot water emitting from Steam Nozzle, check appliance before
each use by positioning it away from body and turning it on. Do not operate unit if
Steam Nozzle is blocked.
16. Burns can occur from touching hot metal parts, hot water, or steam. Do not touch Steam Nozzle
or attempt to connect accessories while unit is in use. Use caution when you turn unit upside-
down - there may be hot water in unit.
17. When steaming any item for the first time, it is recommended that you consult the
manufacturer’s guidelines for material being steamed. For items in question, test on an
inconspicuous area before proceeding.
18. Steaming unsealed floor surfaces such as hardwood is not recommended, and may result in
warping or damage to the surface.
19. Do not allow power cord to touch hot surfaces during use. Wrap cord loosely around Cord
Brackets when storing.
20. Always allow Multi-Purpose Steamer to cool completely (at least 30 minutes) and empty Water
Tank before storing.
SAVE THESE INSTRUCTIONS!
FOR HOUSEHOLD USE ONLY
IMPORTANT SAFETY INSTRUCTIONS
Top Innovations, Inc. Top Innovations, Inc.

5
PRODUCT INFORMATION
The following features and accessories are included with your Multi-Purpose Steamer. Carefully
inspect Styrofoam packing material for all parts listed below. To obtain possible missing parts, refer
to the Customer Support section on Page 18 of this manual.
16
CARE &STORAGE GUIDELINES
PROPER STORAGE
Preparing your Multi-Purpose Steamer for storage is quick and simple. When you have finished
your steaming tasks, follow the steps listed below.
1. Unplug power cord from electrical outlet.
2. Allow unit time to cool (at least 5 minutes).
3. Remove all accessories from unit.
4. Remove Water Tank Cap and drain any remaining water from Water Tank into a sink or tub to
minimize potential mineral build-up. Replace Water Tank Cap when done.
5. Collapse Extension Pole to shortest length (if storage space is limited), and wrap power cord
around Cord Brackets.
6. Store Multi-Purpose Steamer in a cool, dry location, along with all attachments.
REMOVING MINERAL BUILD-UP
A common maintenance need for steam appliances is the removal of build-up caused by high
mineral content in many municipal water supplies. This mineral build-up may limit the
effectiveness and reduce the life of your Multi-Purpose Steamer.
The best way to minimize mineral build-up is to use distilled or de-mineralized water when
using your Multi-Purpose Steamer. In addition, it is recommended that the cleaning procedure
below be followed at least once a month in order to remove any deposits that form. This will help
to extend the life of your Multi-Purpose Steamer and keep it functioning at its maximum potential.
1. Follow STEPS 1-4 under Proper Storage section above. However, do not replace Water Tank
Cap at the end of STEP 4.
2. Insert tip of Cleaning Pin into opening of Steam Nozzle to remove mineral build-up in nozzle.
This may also be done to clean accessories such as the Jet Nozzle.
3. Fill included Measuring Cup with 3.5 oz. (100 ml.) distilled water, and mix in Lemon Acid
Packet. Stir thoroughly to ensure lemon acid is completely dissolved.
If no Lemon Acid Packet is available, use Measuring Cup to make a mixture of approximately
3.5 oz. (100 ml.) distilled water and 1.5 oz. (50 ml.) vinegar. Additional Lemon Acid Packets
may be obtained by visiting www.SteamFast.com or calling (800) 711-6617.
4. Slowly pour lemon-acid or water-vinegar solution into Water Tank through fill hole, then replace
Water Tank Cap.
5. Plug in power cord, set Steam Control Dial to HIGH, and spray full contents of Water Tank into a
sink or tub.
6. Once Water Tank is drained, turn unit off and refill Tank with 15 oz. (450 ml.) of fresh distilled
water. Set Steam Control Dial back to HIGH and repeat STEP 5. If you used a water-vinegar
solution, you may need to repeat this until vinegar odor dissipates.
7. Replace Water Tank Cap, unplug power cord, and store Multi-Purpose Steamer as usual.
IMPORTANT: On average, it is recommended that you follow the Removing Mineral
Build-Up procedure once per month (if unit is used once every week). More frequent use may
require following the procedure more often in order to keep your Multi-Purpose Steamer
operating at full potential. Do not exceed 20 hours of use without cleaning out mineral
build-up.
UNIT FEATURES &
ACCESSORIES
Steam Nozzle
Water Tank
Water Tank Cap
Power Indicator Light
Steam Control Dial
Extension Pole
Handle
Cord Brackets
Mop Head
Clamps
Measuring Cup
Small Cloth
Jet Nozzle
Lemon Acid Packet
Cleaning Pin
Squeegee
Utility Head
Utility Brushes (3)
Microfiber Cloths (2)
1.
2.
2A.
3.
4.
5.
5A.
5B.
6.
6A.
7.
8.
9.
10.
11.
12.
13.
14.
15.
Top Innovations, Inc. Top Innovations, Inc.

6
PRODUCT INFORMATION
•The Steam Nozzle (1) emits a flow of hot, penetrating steam. The Mop Head, Jet Nozzle and
Utility Head all connect to the Steam Nozzle.
•The Water Tank (2) is the reservoir where water is held before being transferred to the boiler and
converted to steam. The Water Tank holds 15 oz. (444 ml.) of water.
• The Water Tank Cap (2A) covers the Water Tank fill hole, and must be removed in order to fill the
Water Tank with water.
• The Power Indicator Light (3) illuminates when the Steam Control Dial is set to any of the three
steam intensity settings, to indicate that the unit is powered on and heating.
•The Steam Control Dial (4) turns the unit on and off, and is used to set the desired steam intensity
(chosen from three available setting options - LOW, MED & HIGH).
•The Extension Pole (5) connects to the main body of the steamer, and is designed for convenient
use on floors, windows, ceilings, and other out-of-reach surfaces.
•The Handle (5A) provides a comfortable grip when using the Extension Pole.
•The Cord Brackets (5B) provide a safe and convenient way to store the power cord when not in
use.
•The Mop Head (6) connects to the Steam Nozzle, for steam cleaning a variety of hard surface floors.
NOTE: It is not recommended that this unit be used on unsealed floors. Use care when
steaming floors that may be warped or damaged by heat and moisture, and limit use of this
unit on these types of surfaces.
•The Clamps (6A) are used to connect the Microfiber Cloths to the Mop Head.
• The Measuring Cup (7) aids in easily filling the Water Tank with water.
•The Small Cloth (8) fits on the Utility Head, absorbing excess moisture and preventing water
spotting on delicate fabrics. This enables the unit to function effectively as a fabric steamer.
• The Jet Nozzle (9) connects to the Steam Nozzle, and is designed to focus the flow of steam for
concentrated cleaning.
• The Lemon Acid Packet (10) is mixed with water and run through the unit in order to clean
mineral deposits that may build up inside the boiler.
• The Cleaning Pin (11) is used to remove mineral deposits that may form in the opening of the
Steam Nozzle and the attachments.
• The Squeegee (12) connects to the Utility Head, and is used for cleaning windows, mirrors, and
other smooth surfaces.
•The Utility Head (13) connects to the Steam Nozzle, and serves as an adapter for connecting both
the Squeegee and Small Cloth.
• The 3 Utility Brushes (14) connect to the Jet Nozzle, and are designed for scrubbing tough stains.
There is a soft-bristled brush for scrubbing delicate items (such as children’s toys), a firm-bristled
brush for general scrubbing (such as carpet), and a brass-bristled brush for scrubbing metal
surfaces (such as oven and grill racks).
NOTE: Some delicate surfaces, such as stainless steel, may be scratched or damaged by the
brass bristles. Use careful judgement when deciding what surface to clean with the brass
Utility Brush. If you are unsure if a surface will be damaged, it is recommended that you test
a small inconspicuous spot before proceeding.
•The 2 Microfiber Cloths (15) clip to the Mop Head and are designed to clean scuffs and stains
from hard surface floors. The Microfiber Cloths are reusable and machine washable.
NOTE: Microfiber Cloths are not designed to absorb and collect dirt. For best results, it is
recommended to vacuum floor before mopping.
15
USING THE
MULTI-PURPOSE STEAMER
GENERAL STEAMING TIPS
You will find nearly limitless uses for your Multi-Purpose Steamer. There are no rules when it
comes to steam cleaning and/or the attachments you received with your unit. Use whichever
attachment seems to accomplish the intended job quickly and easily. Below are a few guidelines
for starting out:
•Many surfaces only require to be sprayed with the Jet Nozzle to clean and disinfect them, then
wiped with a clean dry cloth, towel, or paper towel.
EX: kitchen counters, microwaves, stove tops, bathroom sinks, kitchen and bath fixtures
•The nylon Utility Brushes can be used on most surfaces for hard-to-remove dirt, grime spots or
stains.
EX: baked on food on ovens and oven doors, baked on stovetop spills, bath and/or kitchen
grease and grime, rubber seal on the refrigerator, under/around bath and kitchen fixtures,
bath tile seams, grouting
•The nylon Utility Brushes are also very effective in removing spots and stains from clothing and
upholstery. This can be done with steam alone or with a stain remover designed for your specific
use. DO NOT put any type of chemical or liquid product in your steamer however; only water is
to be used in the unit.
•The Mop Head with Microfiber Cloth is designed primarily for use on floors, including linoleum,
tile, marble, stone and more. However, it can also be used on upholstery, depending on the type of
fabric being cleaned.
•When dried, some stains (whether on carpet or other surfaces) may require a bit of extra scrubbing
with one of the Utility Brushes and/or a product designed for stain removal. It is helpful on carpet
and cloth surfaces to blot with a clean dry towel to help remove the spot/stain.
•The brass Utility Brush is useful for heavy duty jobs such as your BBQ grill, oven rack, tire
wheels, etc. DO NOT use this brush on anything that the hard brush bristles might scratch or
damage.
•The Extension Pole should be attached for mopping floors, but is also useful for reaching overhead
or otherwise hard-to-reach places. When raising unit to reach high places, it is best to grasp Pole
with both hands for better support.
This should help to get you started with your new Multi-Purpose Steamer. As you use your steamer,
you will find what works best for you and your cleaning projects. Should you have any questions
on how to best utilize you new steamer, please feel free to contact our Customer Support
Department at (800) 711-6617 or (816) 584-9700, ext. 130 or 131 or
customerser[email protected].
Top Innovations, Inc. Top Innovations, Inc.

7
ASSEMBLING THE
MULTI-PURPOSE STEAMER
14
USING THE
MULTI-PURPOSE STEAMER
SELECTING STEAM SETTINGS
Below is a general listing of just some of the possible uses for the Multi-Purpose Steamer, separated
by intensity setting of Steam Control Dial. These are only meant to provide some general guidelines
for using your steamer; you will likely discover a wide variety of other uses around your home.
Refer to General Steaming Tips section on Page 15 for more ideas on utilizing the power of steam.
If you still have questions, please visit www.SteamFast.com, or contact our Customer Service
Department directly by telephone at (800) 711-6617 or (816) 584-9700, ext. 130 or 131, or by fax at
(816) 584-9066.
NOTE: When steaming, it is best to use the lowest possible Steam Control Dial setting that
completes the task while remaining easy and convenient. Start with lower settings and
increase only if needed to quickly and easily accomplish the required cleaning task.
Higher steam setting increase the amount of moisture being emitted with the steam.
FIGURE 1
EXTENSION POLE
1. Insert threaded connector on bottom of Extension Pole into pole base on main unit
(FIGURE 1-A).
2. Rotate Extension Pole in a clockwise direction as shown to screw it into pole base (FIGURE 1-B).
Make sure Pole is tightly secured to main unit.
3. To adjust length of Extension Pole:
1) Rotate thicker top section of Extension Pole (with Handle) in “UNLOCK” direction indicated
on label to unlock it (FIGURE 1-C).
2) Adjust top section to desired length (FIGURE 1-D).
3) Rotate top section of Extension Pole in “LOCK” direction indicated on label to lock it back in
place (FIGURE 1-E).
LOW
• Varnished / laminate hardwood flooring
• Delicate fabrics
• Wood cabinetry
MEDIUM
• Most flooring (sealed marble, stone & ceramic, vinyl etc.)
• Countertops
• Bath and kitchen fixtures
• Most fabrics
• Most routine cleaning tasks
HIGH
• Flooring in high-traffic areas (HIGH setting not recommended for
hardwood floors)
• Tough grime and stains (stuck-on grease, etc.)
• Heavy linens and fabrics
A
B
CDE
Top Innovations, Inc. Top Innovations, Inc.
POLE
BASE
13
USING THE
MULTI-PURPOSE STEAMER
OPERATING THE MULTI-PURPOSE STEAMER
STEAM CLEANING
•Make sure desired cleaning accessories (Jet Nozzle, Utility Brush, Utility Head with Squeegee) are properly
connected. Refer to Pages 8, 9 & 10 for details.
• For general cleaning convenience, Extension Pole should be removed so that unit functions as a handheld steam
cleaner. However, Pole may be attached for cleaning hard-to-reach spots, such as floor grout or ceilings. BE
CAREFUL TO SUPPORT POLE WITH TWO HANDS WHEN LIFTING.
•Follow General operating instructions on Page 12 to begin steaming. Refer to Selecting Steam Settings
guidelines on Page 14 to choose the steam intensity setting appropriate for the surface you are cleaning.
• Direct Jet Nozzle towards surface you wish to steam. Use a slight back-and-forth motion over area to enhance
the cleaning process. To sanitize surfaces, set Steam Control Dial to HIGH and hold Jet Nozzle approximately
1/2 inch from surface for at least 5 seconds. This will most effectively kill germs and bacteria.
• When using Squeegee, start by thoroughly steaming entire window or mirror, then turn steam off. Next, press
Squeegee to top of window or mirror, and pull slowly downward. Move slowly from one side of the surface to
the other in this fashion until entire surface is clean.
•Wipe steamed areas with a clean cloth to remove loosened dirt and grime. Wiping the area while it is still wet
is recommended, but use caution when wiping surfaces such as metal that may still be hot.
FABRIC STEAMING
•Make sure desired steaming accessories (Utility Head with Small Cloth) are properly connected. Refer to
Pages 9 & 10 for details.
• For general steaming convenience, Extension Pole should be removed so that unit functions as a handheld
fabric steamer. However, Pole may be attached for cleaning hard-to-reach spots, such as high curtains. BE
CAREFUL TO SUPPORT POLE WITH TWO HANDS WHEN LIFTING.
•Follow General operating instructions on Page 12 to begin steaming. Refer to Selecting Steam Settings
guidelines on Page 14 to choose the steam intensity setting appropriate for the material you are steaming.
• For fabrics and linens, direct Utility Head towards material you wish to steam, and keep the flow of steam
focused there. Using a slight back-and-forth motion over the area you are steaming will further enhance the
steaming process.
• For garments:
-Hang garment from a clean, rust-free hanger.
-Direct Utility Head towards bottom of garment. Steam will rise along inside and outside of material,
removing wrinkles. Slowly slide Utility Head upward from bottom to top of garment.
-Direct Utility Head away from garment and smooth material with your free hand.
-Repeat as necessary until garment is fresh and wrinkle-free.
• General steaming tips:
-Curtains and draperies can be steamed while still hanging.
-To remove wrinkles from towels, handkerchiefs and napkins, drape them over a rod or towel rack and gently
steam them.
-Heavier fabrics may require repeated steaming to achieve desired results.
-To remove exceptionally stubborn wrinkles, steam both sides of fabric.
-Be especially careful when steaming delicate fabrics and those likely to be damaged by water spotting.
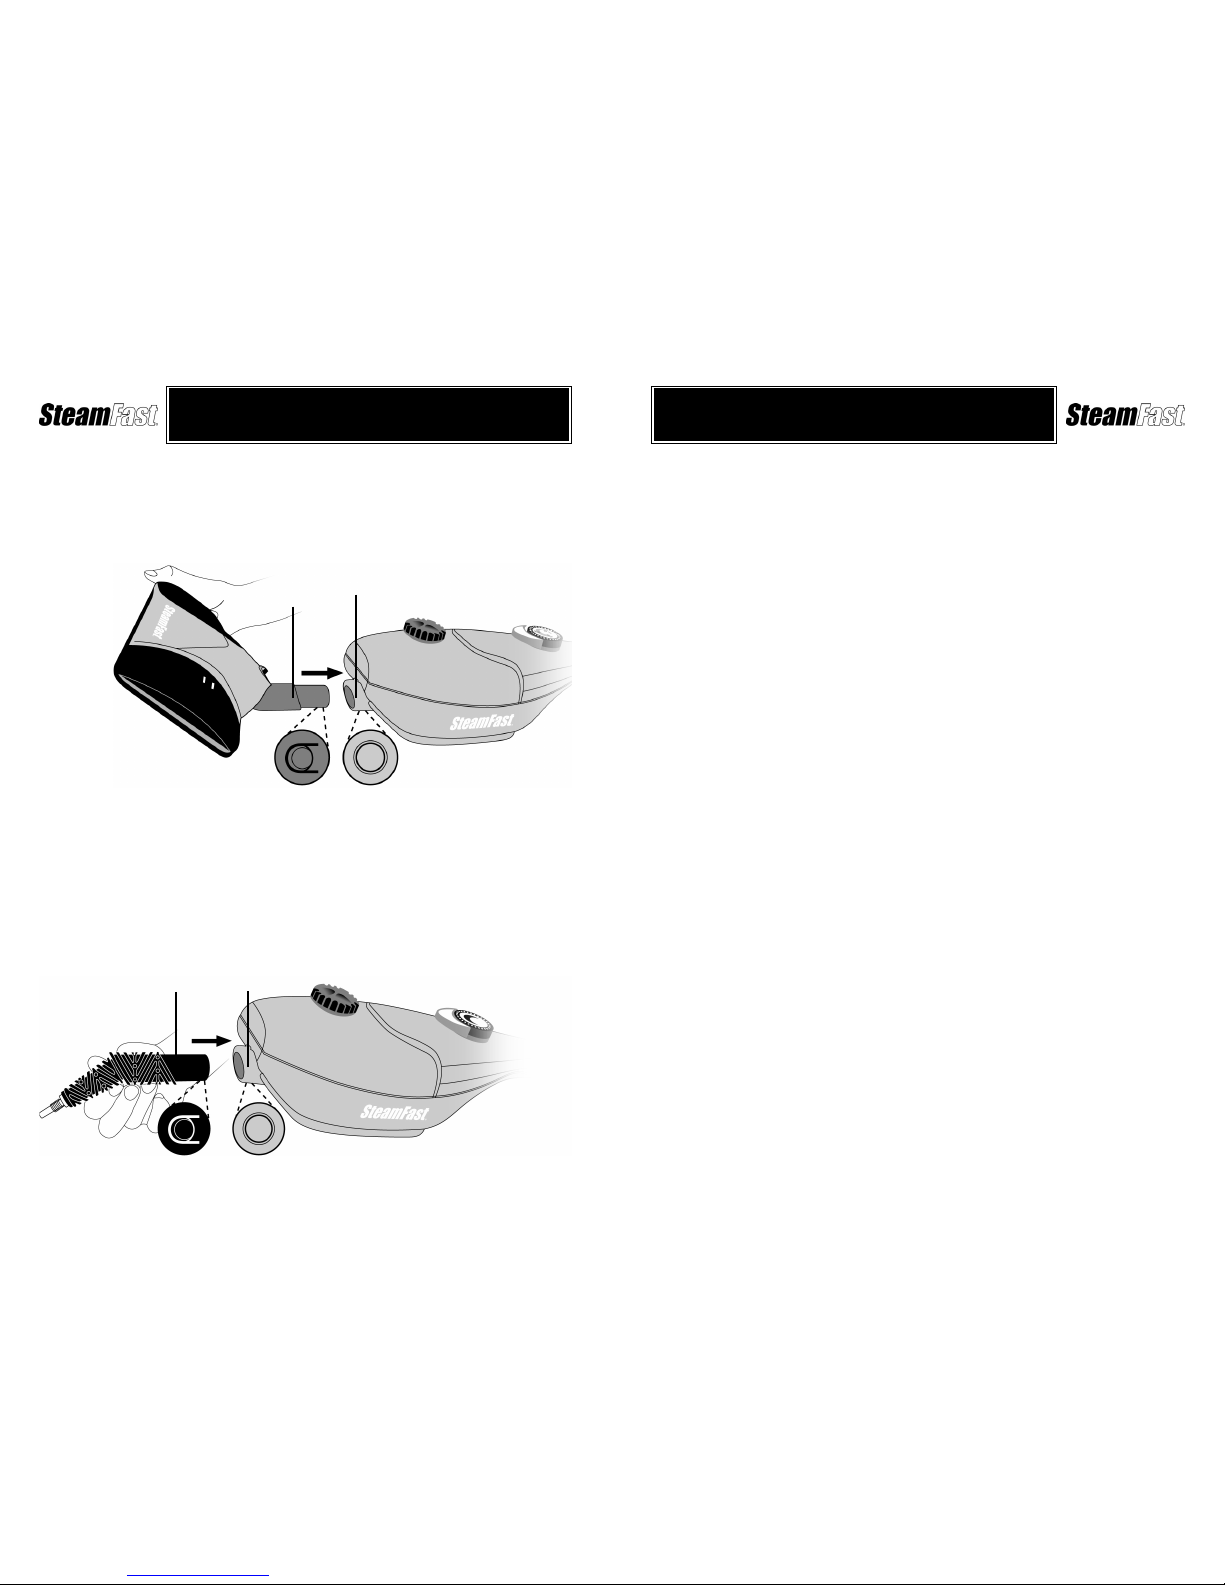
MOP HEAD
1. Align Mop Head with main unit as shown (FIGURE 2), so that neck is in line with Steam Nozzle.
2. Slide Mop Head neck into Steam Nozzle, pressing firmly until release button snaps through hole.
3. To remove Mop Head, press firmly on release button while simultaneously pulling Mop Head
away from Steam Nozzle.
JET NOZZLE
CAUTION: Metal tip of Jet Nozzle becomes hot during use. Do not touch tip to avoid burns.
1. Align Jet Nozzle with Steam Nozzle as shown (FIGURE 3).
2. Slide Jet Nozzle into Steam Nozzle, pressing firmly until release button snaps through hole.
3. To remove Jet Nozzle, press firmly on release button while simultaneously pulling Jet Nozzle
away from Steam Nozzle.
8
ASSEMBLING THE
MULTI-PURPOSE STEAMER
FIGURE 2
FIGURE 3
RELEASE BUTTON
MOP
HEAD
NECK
STEAM
NOZZLE
HOLE
RELEASE BUTTON HOLE
JET
NOZZLE
STEAM
NOZZLE
Top Innovations, Inc. Top Innovations, Inc.
912
ASSEMBLING THE
MULTI-PURPOSE STEAMER
USING THE
MULTI-PURPOSE STEAMER
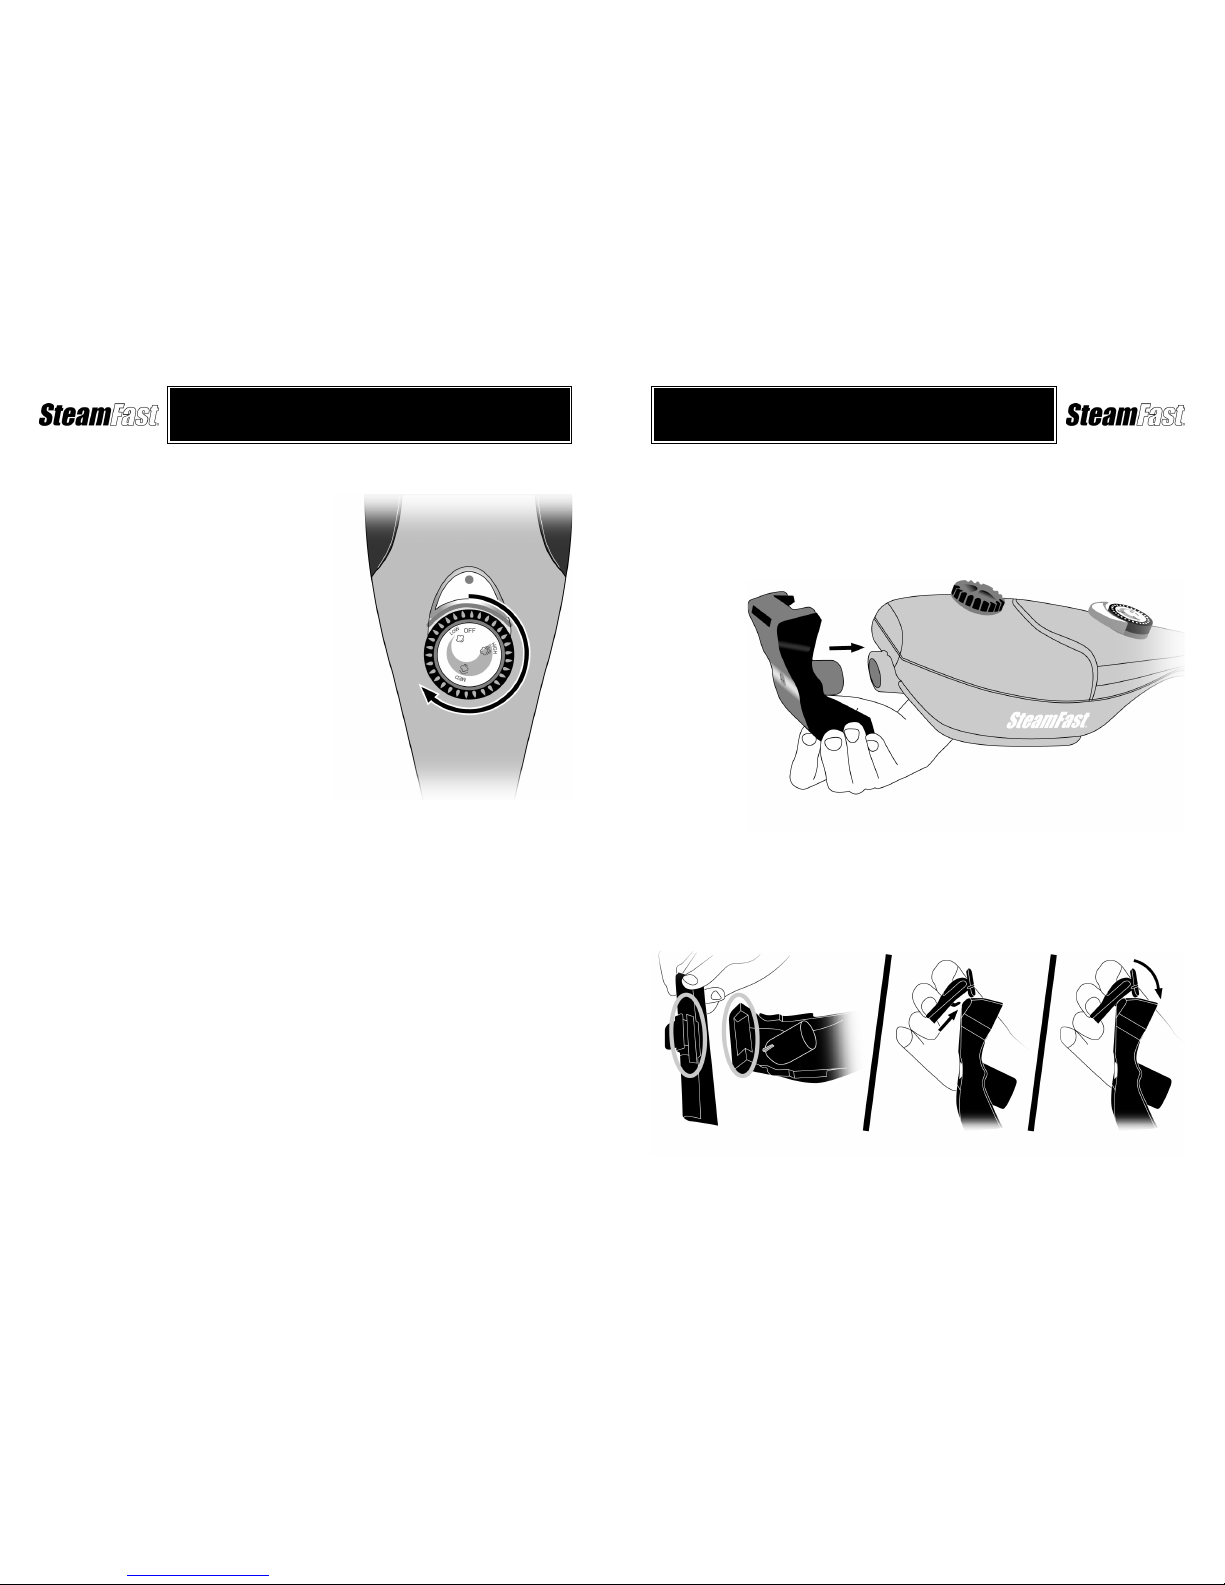
UTILITY HEAD
1. Align Utility Head with Steam Nozzle as shown (FIGURE 4).
2. Slide Utility Head into Steam Nozzle, pressing firmly until it slides all the way in.
3. To remove Utility Head, simply grasp it and pull it away from Steam Nozzle.
NOTE: The Utility Head does not utilize a release button like the Mop Head and Jet Nozzle.
SQUEEGEE
1. Note tabs on Squeegee (FIGURE 5-A), which fit into slots on top of Utility Head (FIGURE 5-B).
2. Insert front Squeegee tab into front Utility Head slot (FIGURE 5-C).
3. Tilt Squeegee back as shown (FIGURE 5-D) and press firmly until rear tab fits into rear Utility
Head slot. Squeegee should snap securely into place.
OPERATING THE MULTI-PURPOSE STEAMER
GENERAL
NOTE: Be sure that Water Tank has been filled and all
desired accessories are connected before following these
steps.
1. For first-time use, remove protective plastic cover that is
shipped on electrical plug. Plug power cord into a
convenient electrical outlet.
2. Turn Steam Control Dial clockwise from “OFF” position to
one of three settings: LOW, MED, or HIGH (FIGURE 10).
Power Indicator Light will immediately illuminate to
indicate that unit is powered on and heating.
NOTE: The desired steam intensity setting depends on
the current steaming task. Refer to Page 14 for some
general guidelines outlining which steam setting is best
suited to different steaming tasks.
3. After approximately 30 seconds, you will hear a buzzing
sound as unit begins to emit steam.
4. Direct Steam Nozzle (with any connected accessories)
towards surface you wish to steam. Refer to Steam
Mopping section below, as well as Steam Cleaning and
Fabric Steaming sections on Page 13, for further details.
CAUTION: Always be sure that Steam Nozzle and any
accessories are pointed in a safe direction (away from
yourself, other people, pets and plants) when steam
is being emitted.
STEAM MOPPING
NOTE: It is recommended to vacuum floors before mopping in order to remove dust and dirt particles.
•Make sure Extension Pole, Mop Head and Microfiber Cloth are all properly connected. Refer to Pages 7, 8 &
10 for details.
• For mopping, make sure Extension Pole is properly connected (refer to Page 7 for details).
•Follow General operating instructions above to begin steaming. Refer to Selecting Steam Settings guidelines
on Page 14 to choose the steam intensity setting appropriate for the floor surface you are cleaning.
•Use a steady back-and-forth motion over the floor, pushing Mop away and pulling it back towards you. Work
your way backwards over the floor, in order to avoid walking over the freshly mopped area.
•The Microfiber Cloth will absorb moisture during mopping. However, depending on floor surface and
steam intensity setting, some residual moisture may be left behind. In this case, it is recommended to allow
floor time to air-dry. A fan may be directed towards mopped area to facilitate drying.
NOTE: Setting Steam Control Dial to LOW setting will help to minimize moisture left on floor.
NOTE: To avoid warping or damage caused by heat and moisture, the Multi-Purpose Steamer should
only be used on properly sealed floor surfaces.
•Due to large size of the Mop Head, it may have difficulty completely cleaning certain types of floors (such as
ceramic tile) that include crevices of grouting. To more thoroughly clean floor grout, it is recommended to use
Multi-Purpose Steamer in steam cleaning mode. Refer to Steam Cleaning section on Page 13 for details.
FIGURE 10
FIGURE 4
FIGURE 5
AB
D
C
Top Innovations, Inc. Top Innovations, Inc.
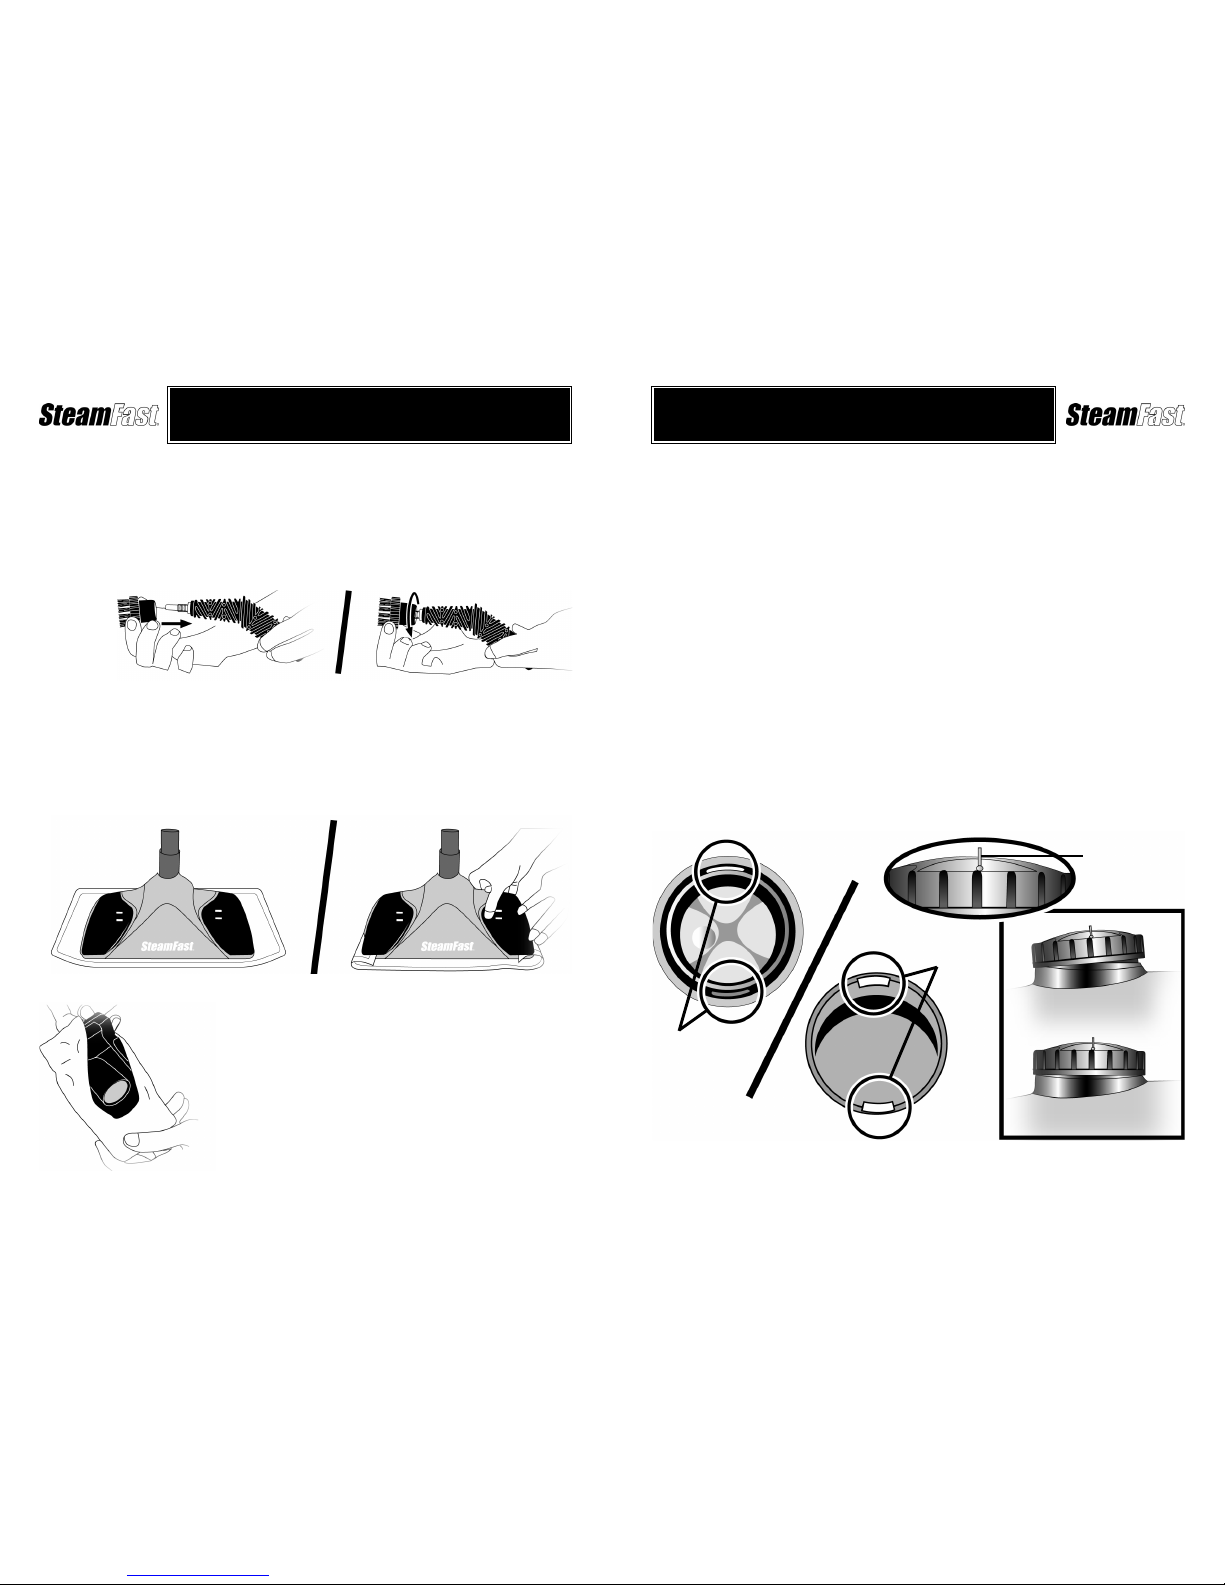
UTILITY BRUSHES
CAUTION: Metal tip of Jet Nozzle becomes hot during use. Allow Jet Nozzle to cool for at
least 5 minutes before attempting to connect/disconnect a Utility Brush.
1. Align Utility Brush with tip of Jet Nozzle as shown (FIGURE 6-A), and press it firmly on as far
is it will go. Rotate Utility Brush as shown to screw it onto Jet Nozzle (FIGURE 6-B) - continue
until it is secured tightly in place.
MICROFIBER CLOTHS
1. Lay a Microfiber Cloth on floor - soft Microfiber side should be face-down. Place Mop Head on
top of Cloth as shown (FIGURE 7-A).
2. Locate two large Clamps on top of Mop Head. Push down on one Clamp as shown to open it,
then tuck the Microfiber Cloth underneath. Repeat for second Clamp to secure Microfiber Cloth
to Mop Head (FIGURE 7-B).
SMALL CLOTH
1. Stretch Small Cloth around Utility Head as shown (FIGURE 8).
Four seams in Cloth should align with four corners of Utility
Head.
2. Connect Utility Head to Steam Nozzle as usual (refer to Page 9
for details).
10
ASSEMBLING THE
MULTI-PURPOSE STEAMER
FIGURE 6
FIGURE 7
AB
AB
FIGURE 8
Top Innovations, Inc. 11
USING THE
MULTI-PURPOSE STEAMER
FIGURE 9
FILLING WATER TANK
NOTE: Do not remove or cut small rubber air valve on top of Water Tank Cap (FIGURE 9-A).
Do not turn unit upside-down when Water Tank is full - some water may leak through air valve.
1. Make sure Steam Control Dial is set to “OFF” position.
2. Rotate Water Tank Cap one quarter turn in “Unlock” direction (counter-clockwise) indicated by
illustration on Cap, and remove.
3. Carefully fill Measuring Cup with maximum amount of water (5 oz. / 150 ml.) and pour into
Water Tank through fill hole. Repeat up to two more times to fill Water Tank to maximum
capacity (Tank holds a maximum of 15 oz. / 450 ml. of water).
NOTE: In order to significantly reduce mineral build-up and prolong the life of your
Multi-Purpose Steamer, use of distilled or de-mineralized water in the unit is highly
recommended. Refer to Page 16 for more information about mineral build-up.
4. Replace Water Tank Cap so that thread grooves on bottom of Cap (FIGURE 9-B) align with tabs
inside fill hole (FIGURE 9-C) . Press Water Tank Cap down so that it sits flush with top of fill
hole (FIGURE 9-D). Rotate one quarter turn in clockwise direction (as indicated by “Lock”
illustration on Cap) to lock it in place.
NOTE: The tube which transfers water from the Water Tank to the boiler is weighted down
with a brass ball. This is an intentional design to improve efficiency of water usage. It is
normal for this ball to create a rattling sound inside of Water Tank during use.
If you think brass ball has come loose from tube, refer to Troubleshooting Guide on Page 17 for
directions to reconnect it.
B
C
A
Top Innovations, Inc.
AIR VALVE
INCORRECT
CORRECT D
GROOVES
TABS
Other manuals for SF-292
1
Table of contents
Other Steamfast Kitchen Appliance manuals

Steamfast
Steamfast SF-510 User manual

Steamfast
Steamfast SF-420 User manual

Steamfast
Steamfast SF-540 User manual

Steamfast
Steamfast SF-410 User manual

Steamfast
Steamfast Salton SF-450 User manual

Steamfast
Steamfast SF-565 User manual

Steamfast
Steamfast SF-450 User manual

Steamfast
Steamfast MODEL SF-407 User manual

Steamfast
Steamfast SF-562 User manual

Steamfast
Steamfast SF-562 User manual


