Steamfast SF-562 User manual

CANISTER FABRIC STEAMER
OWNER’S GUIDE
SF-562

2 |ENGLISH
READ ALL INSTRUCTIONS BEFORE
USING
IMPORTANT SAFETY INSTRUCTIONS
This owner's guide and any additional inserts are considered part of the product.
They contain important information about safety, use, and disposal. Before using the
product, please familiarize yourself with all operating and safety instructions. Please
keep all documents for future reference and pass these documents on, together with
the product, to any future owner. See steamfast.com for the most current version of
this owner’s guide.
INTENDED USE: This product is intended to be used indoors for the steaming
of garments and other fabrics in the United States and/or Canada. This product
is not intended for commercial or industrial uses. The manufacturer assumes no
responsibility for damage or injury due to unauthorized use or product modication.
Failure to follow these directions will void the product warranty.
WARNING: Risk to Children and Impaired Persons.
Supervision is required during the installation, operation, cleaning and maintenance
of this product by children 12 years of age and younger and anyone with reduced
physical, sensory or mental capabilities. Children should be supervised to ensure that
they do not play with the appliance, its parts and packaging material.
Directions to reduce risk of re, electrical shock, and injury:
INSTALLATION WARNING – To reduce risk of re, electrical shock and injury to
persons, observe the following:
When using your appliance, basic precautions should always be followed, including
the following:
- Read all instructions before use.
- Use appliance only for its intended use.
- To reduce the risk of electric shock, do not immerse the appliance in water or other
liquids.
- Always disconnect appliance from electrical outlet when lling with water or
emptying, and when not in use.
- Do not allow cord to touch hot surfaces. Let appliance cool completely before
putting away. Loop cord loosely around appliance when storing.
- Never yank cord to disconnect from outlet. Instead, grasp just the plug and pull
todisconnect.

ENGLISH |3
- Do not operate appliance with a damaged cord, or if the appliance has been
dropped or damaged. To reduce the risk of electric shock, do not disassemble or
attempt to repair the appliance, take it to a qualied service person for examination
and repair. Incorrect reassembly or repair could cause a risk of re, electric shock,
or injury when the appliance isused.
- A loose t between wall outlet (receptacle) and plug may cause overheating and
distortion of the plug. Discontinue use of the product in this outlet. Contact a
qualied electrician to replace loose or worn outlets.
- To reduce the likelihood of circuit overload, do not operate another high wattage
appliance on the same circuit.
- If an extension cord is absolutely necessary, a 15 amp rated cord should be used.
Cords rated for less amperage may overheat. Care should be taken to arrange the
cord so that the cord cannot be pulled or tripped over.
- This product's power cord is equipped with a three-prong, grounded plug that
must be inserted into a grounded receptacle.
SAFE USE WARNING – To reduce risk of re, electrical shock and injury to
persons, observe the following:
- Close supervision is required for any appliance used by or near children. Do not
leave the appliance unattended while it is connected.
- Use caution when handling this steam unit. Burns could occur from touching hot
metal parts, hot water, or steam. Use special care to avoid contact with hot water
when turning the product upside down to empty the reservoir.
- To reduce the risk of contact with hot water emitting from steam vents, check
appliance before each use by holding it away from body and operating Steam
Button. Do not operate unit if steam vents are blocked.
- When lling unit, only distilled water should be used - other cleaning agents could
damage unit or cause injury.
- Unit is only meant to be used with recommended Canister Fabric Steamer (model
SF-562) accessories. Using other types of attachments may cause damage to unit or
injury.
- Do not attempt to use unit without properly lling Water Tank. To avoid burns
from escaping steam when relling tank: Allow all remaining steam pressure to
release and always allow unit to cool before relling.
- Use caution when carrying unit up stairs or over obstacles, or when using unit on or
near an uneven surface.
- Burns can occur from touching hot plastic parts, hot water, or steam. Do not
touch Steam Nozzle or attempt to connect any accessories while unit is in use. Use
caution when you turn unit upside-down - there may be hot water inside.
- When steaming any fabric for the rst time, it is recommended that you consult the
manufacturer’s guidelines for the material being steamed. For items in question,
test on an inconspicuous area before proceeding.

4 |ENGLISH
- Synthetic materials (such as 100% nylon or polyester) are sensitive to heat, and
may be damaged by exposure to hot steam. Steam is recommended for use only
on natural bers such as cotton, linen or wool, as well as nylon or polyester blends.
- Do not use unit where aerosol-based products are being used, or where oxygen is
being administered.
SERVICING WARNING – To reduce risk of re, electrical shock and injury to
persons, observe the following:
- If Lighted On/Off Switch does not illuminate when unit is plugged in and Switch is
set to “ON” position, unit is not operating normally. Immediately disconnect cord
from power supply, then refer to troubleshooting guide for assistance.
- Always allow unit to cool (30 minutes for complete cooling) and empty Water Tank
before storing.
- Clean your product regularly, only as is instructed in this manual. Prior to cleaning,
turn off the power on your product and unplug. Do not use gasoline, thinners,
solvents, ammonias or other chemicals for cleaning. Refer to the cleaning
instructions provided.
WARNING: Changes or modications to this unit not expressly approved by the
party responsible for compliance could void the user’s authority to operate the
equipment.
READ AND SAVE THESE
INSTRUCTIONS
ENGLISH |5
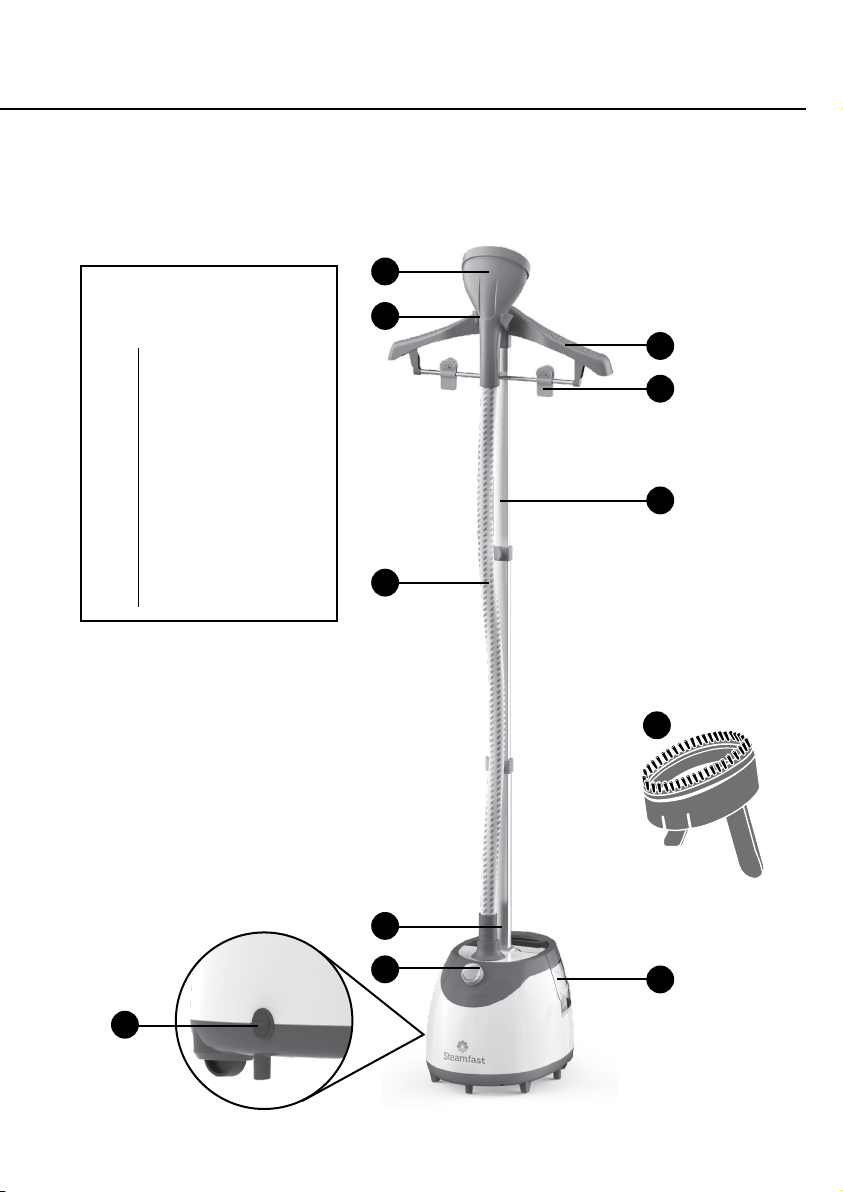
The following features and accessories are included with your unit. Carefully inspect the packing
material for all parts listed below. To obtain possible missing parts, refer to Product Support
for Consumer Service contact information.
UNIT FEATURES
& ACCESSORIES
Steam Nozzle
Steam Nozzle Cradle
Hanger
Garment Clip
Telescopic Pole
Pole Base
Hose
Steam Dial
Water Tank
Drain Plug
Fabric Brush and
Crease Tool
1
2
3
4
5
5a
6
7
8
9
10
2
5a
10
5
7
1
8
9
3
4
6
FEATURES

6 |ENGLISH
•The Steam Nozzle (1) emits the ow of hot, penetrating steam produced by the Boiler. The
Fabric Brush connects to the Steam Nozzle.
•The Steam Nozzle Cradle (2) provides a safe and convenient place to hang the Steam Nozzle
when not in use.
• The Hanger (3) connects to the Telescopic Pole, and is designed to support garments for easy,
accessible steaming. The Hanger can be removed for easy storage.
•The Garment Clips (4) fasten to the Hanger and are designed to grip the top of a garment or
piece of fabric. Two garment clips are included with the unit.
•The Telescopic Pole (5) is divided into three sections and can be extended and lowered to a
variety of heights for optimal user comfort and convenient storage.
•The Pole Base (5a) is the receptacle into which the Telescopic Pole is inserted and secured to
the top of the main unit.
•The Hose (6) directs steam ow from the main unit to the Steam Nozzle.
• When illuminated blue, Steam Dial (7) shows that the unit is powered ON and either heating
up or producing steam. There are two settings to chose from- high or low steam.
•The Water Tank (8) is the container that holds water to be transferred into the Water
Reservoir. The Water Tank is removable for convenient lling, up to a maximum capacity of 86
oz (2,543 ml).
•The Drain Plug (9) is used for draining water and is the location on the back of the main unit.
•The Fabric Brush and Crease Tool (10) connects to the Steam Nozzle and is designed to
brush away particles such as lint, hairs and loose thread. This 2-in-1 accessory also serves as
a Crease Tool designed to create crisp creases by gently "pinching" fabric against the Steam
Nozzle.
ENGLISH |7
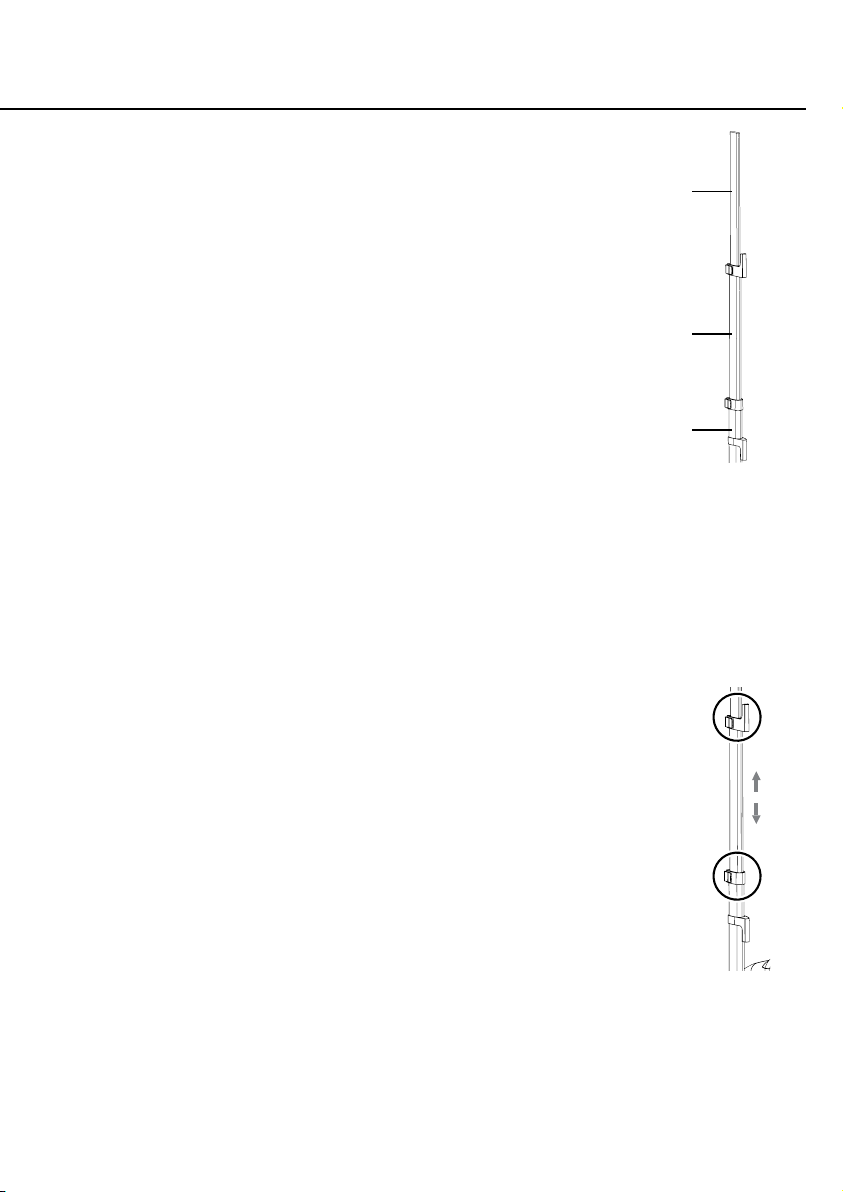
TELESCOPIC POLE
The Telescopic Pole is made up of three sections:
•TOP (SECTION 1)
•MIDDLE (SECTION 2)
•BOTTOM (SECTION 3)
Sections 1 & 2 are adjustable in length. Section 3 is not adjustable.
By using the two extension locks, these sections may be extended
or retracted to achieve desired length. Refer to Adjusting Telescopic
Poles section below for more details.
CONNECTING TELESCOPIC POLE
Insert the thicker, green bottom side of the telescopic pole into the Pole Base on top of the unit.
REMOVE TELESCOPIC POLE
To remove telescoping pole from unit, grab the pole and pull upwards out of the Pole Base.
ADJUSTING TELESCOPIC POLE
1. Release extension lock directly below SECTION 1 by swinging hinge
outward. SECTION 1 can then be extended or retracted.
2. Once SECTION 1 is at desired length, close hinge to once again secure
extension lock.
3. Repeat Steps 1 & 2 for remaining hinges.
NOTE: It is recommended to extend Telescoping Pole to their full height
during steamer operation; this will ensure optimal steam ow through the
Hose.
SECTION 1
(TOP)
SECTION 2
(MIDDLE)
SECTION 3
(BOTTOM)
ASSEMBLING YOUR CANISTER FABRIC STEAMER

8 |ENGLISH
CONNECTING HANGER
Locate slot on the bottom of the Hanger. Insert Section 1 of the Telescopic Pole into the slot on
the Hanger.
CONNECTING STEAM HOSE
Locate the bottom of the Hose, this is the side that does not have the Steam Nozzle on it. Screw
the bottom of the Hose into the black holder on the top of the unit. Note, tighten the hose as
much as possible to avoid potential issues.
CONNECTING FABRIC BRUSH
1. Make sure Steam Dial is turned to Off position, and that unit is not emitting any steam.
CAUTION: Do not try to connect Fabric Brush while unit is emitting steam, as this can cause
burns and injury.
2. Align outer rings of the Fabric Brush with the outer edge of the Steam Nozzle. Snap Fabric
Brush into place.
3. Press Fabric Brush rmly onto Steam Nozzle until it ts snug and rmly into place.

ENGLISH |9
FILLING WITH WATER
1. Remove Water Tank from main unit.
2. Holding Water Tank upside-down, unscrew and remove Valve Cap by rotating it in a
counterclockwise direction.
3. Fill Water Tank with water through Valve Cap hole. At full capacity, the Water Tank holds
86 oz (2,543 ml) of water, and depending on the steam setting selected, will provide a
continuous steam time of 96 minutes.
NOTE: In order to signicantly reduce mineral build-up and prolong the life of your
Canister Fabric Steamer, use of distilled or de-mineralized water in the unit is highly
recommended.
CAUTION: Only water and vinegar should be used in unit – other chemicals or cleaning
agents may cause internal damage. If vinegar is used, please be aware that it will create
a smell. Do not attempt to substitute any other water tank for the one designed for use
with this unit.
4. Replace Valve Cap by rotating it in a clockwise direction.
5. Place Water Tank back onto main unit. The sound of water owing from Water Tank into
Water Reservoir should be audible for a short period of time.
NOTE: Water Tank can be removed and relled at any time during operation – there is no
need to turn unit off or allow any cooling period.
IMPORTANT: Do not attempt to operate unit with an empty Water Tank.
GENERAL OPERATION
NOTE: Be sure that Water Tank has been lled and, if desired, the Fabric Brush is
connected before following these steps.
1. For rst-time use, remove protective plastic cover that is shipped on electrical plug. Plug
power cord into a convenient electrical outlet.
2.Turn Steam Dial counterclockwise to power unit ON. When unit is ON, the ring inside the
Steam Dial will turn to blue. If ring is not illuminated, the unit is powered OFF.
Using Your Canister Fabric Steamer

10 |ENGLISH
3.Turn Steam Dial to desired steam level.
4. After approximately 45 seconds of heating time, unit will begin producing a ow of steam
from Steam Nozzle.
NOTE: It is common for the unit to produce gurgling sounds and small amounts of water
during the rst few minutes of steaming. This is due to water condensation inside cold
Hose, and should be reduced as the Hose heats up.
5. Hold the neck of the Steam Nozzle during use to avoid potential burns.
6. When you are nished using the Canister Fabric Steamer, immediately turn Steam Dial to
“Off” position and unplug power cord from electrical outlet. Refer to Storage and Care for
proper cleaning and storage procedures.
FABRIC STEAMING
STEAMING GARMENTS:
1. To ready garment for steaming, hang it on the Hanger or clip using the Garment Clips.
CAUTION: Use care when handling garments hanging on unit. Pulling on the garment with
too much force may cause the unit to tip over.
2. Direct Steam Nozzle towards bottom of garment. Steam will rise along inside and outside of
fabric, removing wrinkles. Slowly slide Steam Nozzle vertically, from bottom to top of garment.
NOTE: Do not allow kinks to form in Hose at any time during use.
3. Direct Steam Nozzle away from garment and smooth fabric with your free hand.
4. Repeat STEPS 2 & 3 as necessary until fabric is fresh and wrinkle-free.
GENERAL STEAMING TIPS:
• For most effective results, hold Steam Nozzle within 1/2” of fabrics, or press it directly against
surfaces. Avoid direct contact to silk.
• Check the fabric care label for manufacturer recommendations. Test the fabric on an
unobtrusive area such as an inner seam.
• Test the strength of the color of the fabric on an area of the fabric that is not visible.
• Curtains and draperies can be steamed while still hanging.
• To remove wrinkles from towels, handkerchiefs and napkins, drape them over a rod or towel
rack and gently steam them.
• Heavier fabrics may require repeated steaming to achieve desired results.
• To remove exceptionally stubborn wrinkles, steam both sides of fabric.
• Be careful when steaming any delicate fabrics that may be damaged by heat or water spotting.
• To remove particles like lint, hairs and threads, connect the Fabric Brush to the Steam Nozzle.
• Certain fabrics are smoothed more easily from the inside.

ENGLISH |11
CAUTION: When using garment clips, grip clip handles securely and keep ngers away from
grip pads to prevent pinching.
STEAM SETTING RECOMMENDATIONS
HighLow
•Silk
•Cashmere
•Satin
•Velvet
•Rayon
•Polyester
•Nylon
•Jersey
•Cotton
•Denim
•Wool
•Khaki

12 |ENGLISH
PROPER STORAGE
Preparing your unit for storage is quick and simple. When you have nished your steaming tasks, follow the
steps listed below.
1. Turn Steam Dial to Off position, and unplug power cord from electrical outlet.
2. Allow unit to cool (30 minutes for complete cooling).
3. Bring unit to convenient sink or tub.
4. Remove Water Tank from unit. Unscrew Valve Cap and drain all remaining water from Water Tank.
Replace Valve Cap when nished.
5. Open Drain Plug on side of unit by turning counter-clockwise and drain all remaining water. Securely
replace Drain Plug.
6. For storage convenience, you may wish to collapse the Telescopic Poles to their most compact height.
7. Store unit in a cool dry location.
MINERAL BUILD-UP
A common maintenance need for steam appliances is the removal of build-up caused by high mineral
content in many municipal water supplies. This mineral build-up may limit the effectiveness and reduce the
life of your unit.
The best way to minimize mineral build-up is to use distilled or de-mineralized water when using your unit.
In addition, it is recommended that the cleaning procedure below be followed at least once a month in
order to remove any deposits that form. This will help to extend the life of your Canister Fabric Steamer
and keep it functioning at its maximum potential.
To remove mineral build-up:
1. Turn Steam Dial to “OFF” position and unplug power cord from electrical outlet.
2. Allow unit to cool (30 minutes for complete cooling).
3. Bring unit to a convenient sink or tub.
4. Remove Water Tank from unit. Unscrew Valve Cap and drain all remaining water from Water Tank.
5. Drain all remaining water through Drain Plug.
6. Fill a measuring cup (not included) with 12 oz (355 ml) vinegar.
7. Pour vinegar into Water Tank, then replace Valve Cap and place Water Tank back onto main unit.
8. Plug power cord into an electrical outlet and set Steam Dial to “ON” position. Allow unit to steam until
no vinegar remains.
CAUTION: Do not allow unit to continue running with an empty water tank.
9. Drain any remaining cleaning solution through Drain Plug.
10. Remove and rell Water Tank to maximum capacity (86 oz / 2,543 ml) with fresh water and place it back
onto main unit. Allow all fresh water to be steamed out. Rell and repeat as necessary until vinegar
odor has completely dissipated.
11. When nished, turn Steam Dial to “OFF” position and unplug power cord from electrical outlet. Follow
normal storage procedure as outlined in Proper Storage.
Storage & Care

ENGLISH |13
CONSUMER SERVICES
For problems with your unit, please refer to the troubleshooting guide located above.
Additional inquiries should be directed to our consumer support services through our website,
www.steamfast.com. If you do not have internet access, you may also contact our Consumer
Service Department by telephone, at 1-800-711-6617.
NOTE: In order for our Consumer Service representatives to help you as quickly and
efciently as possible, please have the following information ready before calling:
• Purchase information (where and when you purchased this product)
• Copy of purchase receipt / proof of purchase
• Product serial number (located near electrical specication label on bottom of unit)
Troubleshooting
PROBLEM POSSIBLE CAUSE SOLUTION
Unit fails to heat up. When turned,
Steam Dial DOES NOT
illuminate when set to “ON” posi-
tion.
Unit is not plugged in. Plug power cord into electrical outlet.
Household circuit breaker / ground
fault interrupter has tripped or
blown a fuse.
Reset circuit breaker / ground fault inter-
rupter, or replace fuse. For assistance,
contact a licensed electrician.
Unit is damaged or otherwise in
need of repair.
Immediately cease usage and unplug. Con-
tact Consumer Service for
assistance (see below for details).
Unit fails to heat up. When turned,
Steam Dial DOES illuminate when
set to “ON” position.
NOTE: Always allow sufcient
time for unit to heat up and begin
producing steam.
No water in unit. Refer to Filling With Water procedure to ll
unit with water.
Mineral build-up in unit. Refer to Mineral Build-Up section for
details.
Unit is damaged or otherwise in
need of repair.
Immediately cease usage and unplug. Con-
tact Consumer Service for assistance (see
below for details).
Excessive gurgling in Hose and
Steam Nozzle / water drips from
Steam Nozzle.
Condensation build-up inside of
Steam Nozzle / Hose.
Some gurgling is a natural effect of the
steaming process. For excessive gurgling
or dripping water, point Steam Nozzle
downward and shake thoroughly to remove
excess water droplets or extend hose
vertically to allow water to drain back into
water reservoir. Condensation build-up inside
hose may cause excess water to escape from
nozzle. To prevent build-up, periodically
straighten hose during use.
Mineral build-up in unit. Refer to Mineral Build-Up section for
details.
Steam output is weak or intermit-
tent.
Water level in Water Tank is
running low.
Refer to Filling With Water procedure to
rell unit with water.
Mineral build-up in unit. Refer to Mineral Build-Up section for
details.

14 |ENGLISH
PRODUCT SPECIFICATIONS
SF-562
120V-60Hz
1500W
12.5A
86 OZ (2,543 ML)
45 SEC (APPROXIMATE)
96 minutes (APPROXIMATE)
8.38 LBS. (3.8 KG.)
13.9” (35.3 CM) x 13.9” (35.3 CM) x 47.24” (120.0 CM)
6.3' (192 CM)
MODEL
VOLTAGE
WATTAGE
AMPERAGE
WATER CAPACITY
HEATING TIME
CONTINUOUS STEAM TIME
UNIT WEIGHT
UNIT DIMENSIONS
POWER CORD LENGTH
ACCESSORIES & PARTS
When ordering replacement parts and accessories for your unit, you may refer to the part num-
bers below. Parts and accessories may be ordered through our Website:
www.steamfast.com
You may also contact Consumer Service directly:
FABRIC BRUSH
A562-005
HANGER
A562-002
GARMENT CLIPS
A562-003
Product Support

ENGLISH |15
Steamfast, a division of Vornado Air, LLC. Steamfast warrants to the original consumer or pur-
chaser this Steamfast (“Product”) is free from defects in material or workmanship for a period
of one (1) year from the date of purchase. If any such defect is discovered within the warranty
period, Vornado, at its discretion, will repair or replace the Product at no cost.
a Return Authorization (“RA”). Please have or include your Product’s model number and serial
number, as well as your name, address, city, state, Zip code, email, and phone number when
contacting Vornado for warranty service. To le a contactless warranty claim, visit www.steam-
fast.com/contact
After receiving the RA, ship your Product to: Vornado Air LLC Attn: Warranty & Repair 415
East 13th Street, Andover, KS 67002. For your convenience, please have your model number
and serial number when contacting Vornado with service inquiries. To ensure proper handling,
packages must be clearly marked with the RA number. Packages not clearly marked with the RA
number may be refused at the receiving dock. Please allow 2–3 weeks for warranty service and
return of your Product after the Product is received.
This warranty does not apply to defects resulting from abuse of the Product, modication,
alteration, mishandling, improper maintenance, commercial use or repair or service of the Prod-
uct by anyone other than Vornado; damages which occur in shipment or are attributed to acts
of God. Improper product use, which includes using an external device that alters or converts
the voltage or frequency of electricity, or shipping a Vornado product to a country not intended
for use will void all warranties. Any unauthorized product modication, repair by unauthorized
repair center or use of non-approved replacement parts is not recommended and any conse-
quences will not be covered by support services or product warranties.
The product warranty will be honored only on models that are being used in the country intend-
ed. REPAIR OR REPLACEMENT AS PROVIDED UNDER THIS WARRANTY IS THE EXCLUSIVE
REMEDY OF THE CONSUMER. VORNADO SHALL NOT BE LIABLE FOR ANY INCIDENTAL OR
CONSEQUENTIAL DAMAGES FOR BREACH OF ANY EXPRESS OR IMPLIED WARRANTY ON
THIS PRODUCT. EXCEPT TO THE EXTENT PROHIBITED BY APPLICABLE LAW, ANY IMPLIED
WARRANTY OF MERCHANTABILITY OR FITNESS FOR A PARTICULAR PURPOSE ON THIS
PRODUCT IS LIMITED IN DURATION TO THE DURATION OF THIS WARRANTY. Some states
do not allow the exclusion or limitation of incidental or consequential damages, or allow limita-
tions on how long an implied warranty lasts, so the above limitations or exclusions may not ap-
ply to you. This warranty gives you specic legal rights, and you may have other rights that vary
from state to state. The manufacturer assumes no responsibility for damage or injury caused
by failure to follow these instructions, improper product use or unauthorized product modica-
tions. Any such actions will invalidate the product warranty.
All company names and product names are trademarks of their respective owners. ©All rights
reserved. All technical information, data and instructions for the installation, connection and
operation contained in these instructions for use correspond to the latest available informa-
tion at time of printing. The contents of this manual may differ slightly from the actual product.
Observe any additional supplements.
© 2023 Vornado Air, LLC. Andover, KS 67002, U.S. Specications subject to change without
notice. Steamfast® is a trademark owned by Vornado Air, LLC. Manufactured in China.
Warranty Information

Steamfast
415 East 13th, Andover, KS 67002
T562-001 RA, V00
Other manuals for SF-562
2
Table of contents
Other Steamfast Kitchen Appliance manuals

Steamfast
Steamfast SF-450 User manual

Steamfast
Steamfast SF-540 User manual

Steamfast
Steamfast SF-565 User manual

Steamfast
Steamfast Salton SF-450 User manual

Steamfast
Steamfast SF-292 User manual

Steamfast
Steamfast SF-510 User manual

Steamfast
Steamfast SF-562 User manual

Steamfast
Steamfast SP-350 Series User manual

Steamfast
Steamfast SF-420 User manual

Steamfast
Steamfast SF-562 User manual


