Steamist Total Sense TSC-550 User manual

®
RELAX. REST O R E . RENE W .
Intro - Page 1
System and Display Settings - Pages 2, 3 & 9
*Wi-Fi Settings - Page 3
Firmware Update and Language Settings - Page 4
Clock Settings - Page 4
Steam Settings - Page 5
AudioSense Settings - Pages 6 & 10
ChromaSense Settings - Page 7
ShowerSense Settings - Pages 7 & 8
InstaMist and *Bluetooth Settings - Page 9
Device Information - Page 9
Remote Activation - Page 10
Standby Screen Settings - Page 10
Total Sense
Touch Control
™
MODEL TSC-550
(Product 550, 550M, SH-550 and SH-550M)
Total Sense™Touch Control
The Total Sense
™
TSC-550 Touch Control has a built-in temperature sensor and therefore MUST be installed
inside the steamroom. This control is compatable to work with Steamist 2017, TSG and SMP model steam
generators, AudioSense, ChromaSense, AromaSense and ShowerSense Spa options (sold separately).
Page 1 Pub. No. 311-A
Set Temperature
Time
Ambient Temperature
AudioSense
™
Settings
Steam & AromaSense
™
Settings
Personal Settings
Drop Down Arrow
for Settings and
Direct Access to
Audio and Light ( )
Power Button
InstaMist
™
On
ChromaSense
™
Settings
ShowerSense
™
Menu
Time
Bluetooth Available
Time Left
Personal
Settings Number
Bluetooth Connected
Wi-Fi Connected
WARNING: Elderly persons, pregnant women, or those suering from heart disease, high blood pressure,
diabetes or who are not otherwise in good health, do not use this device unless directed to do so by a physician.
Also, do not use steambath while under the inuence of alcohol.
06/17
!
Firmware update
notication indicator ( ! )
70ºF
70°F

Initial System Settings
Congratulations on the purchase of the Steamist TSC-550 control.
When the control is powered up for the rst time, the screen orientation may not be correct. If the screen
orientation is incorrect, the control may be rotated 90 degrees from Landscape to Portait mode in the system
display settings. It cannot be rotated 180 degrees. If the control is mounted upside down, it will need to be
removed o the wall and rotated to the proper orientation.
To utilize the full potential of this control, a wireless connection to the internet is required. This connection
allows for necessary periodic updates and clock sync for accuracy. An internet connection is also necessary
for streaming your favorite music to the Steamist AudioSense module (purchased separately). Although this
control will function without an internet connection, it is strongly recommended to have a connection to get
the latests software updates. Follow on screen instructions when prompted.
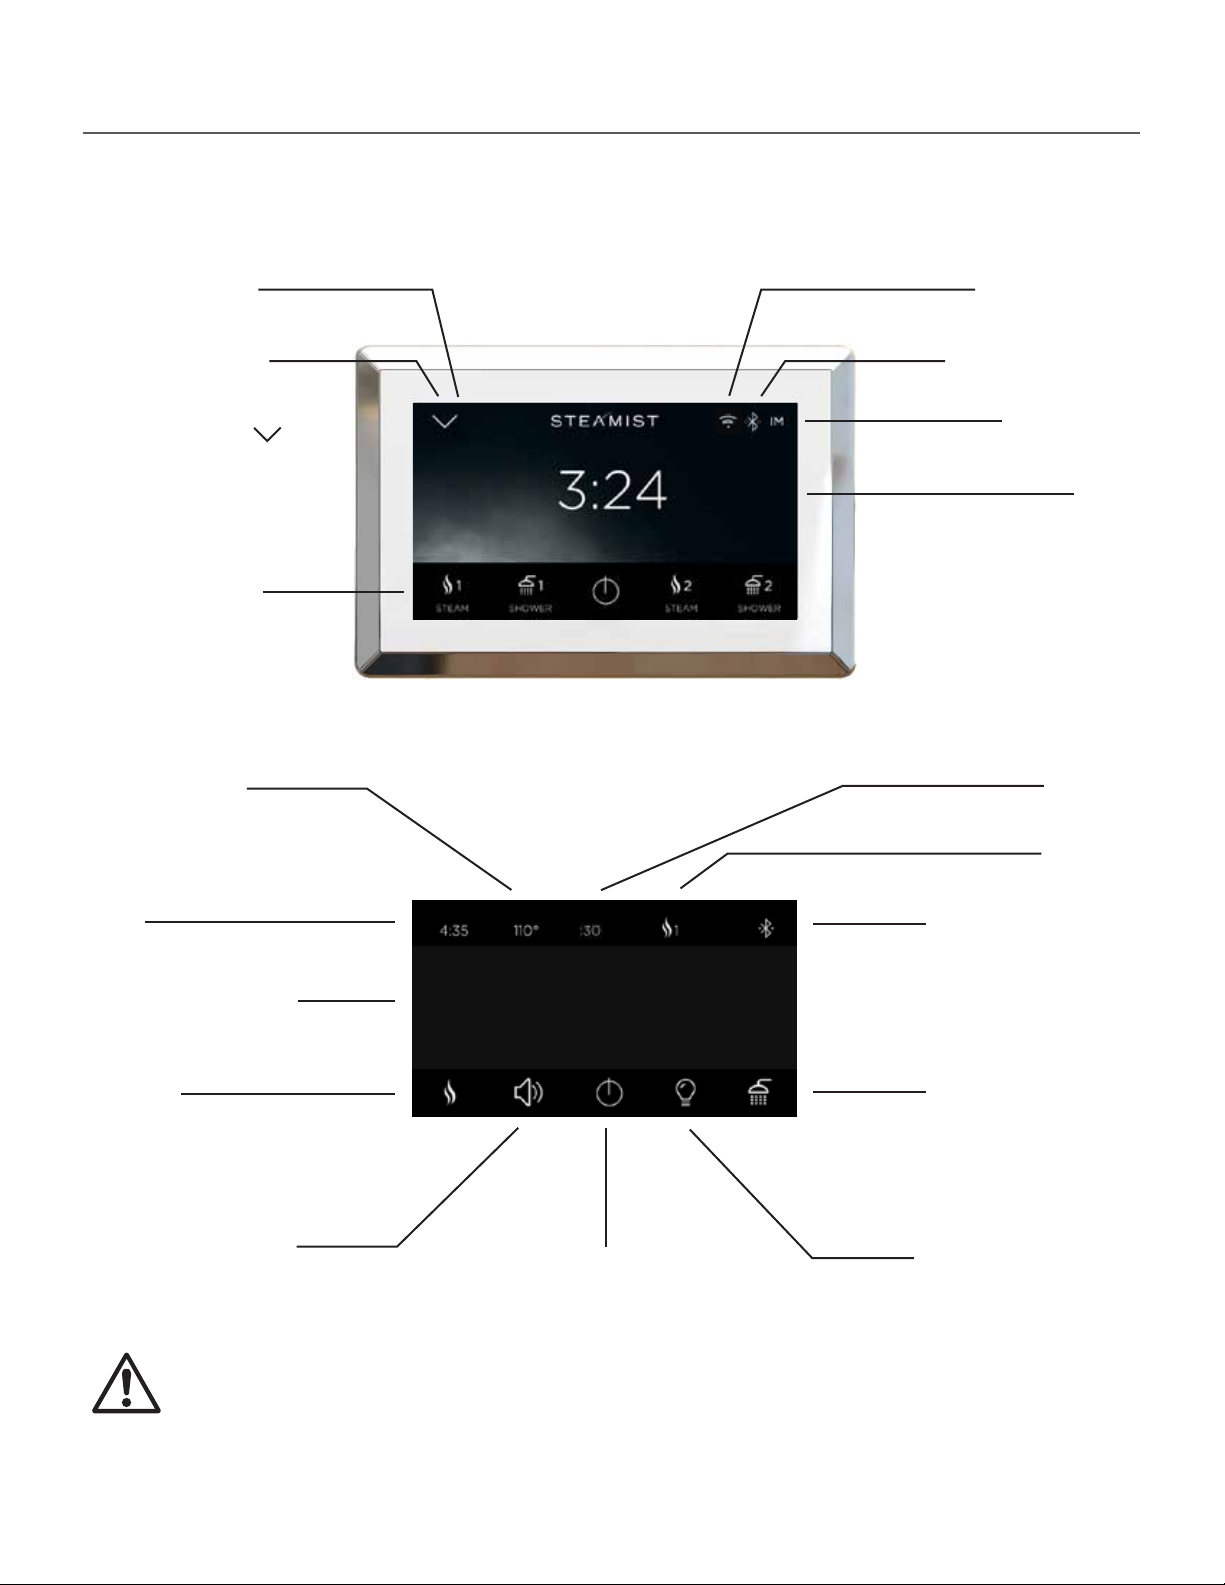
Display Settings
• Shown to the left is the home screen. This is the
normal display mode. Icons for ShowerSense and
Steam are both shown (if both are installed).
• Press the drop down arrow to access the
Tools icon and for Direct Access to
AudioSense and ChromaSense (if installed).
• When the top bar drops down, a Tools icon will
be displayed. If other options, such as Audio-
Sense and ChromaSense are installed, a speaker
and or light icon will be displayed. These two
icons are the Direct Access keys for these options.
These options are described under steam
settings.
• When an exclamation mark ( ! ) is displayed
next to the Tools icon, a Firmware Update is
available. Please see Firmware update settings.
• Press the Tools icon.
• The Tools screen shows all the system settings.
Depending on the installed options you may or
may not have all these icons.
• Press the DISPLAY icon.
NOTE: FIRMWARE CHECK is used to check for and
update the control with newest software avail-
able. Make sure the control is connected to Wi-Fi,
then check for updates.
Page 2 Pub. No. 311-A
06/17
STEAMIST-_:_ _:_ _
!

Display Settings
Wi-Fi Settings
• Press the ORIENTATION icon to rotate the
screen 90° if necessary. If the screen is upside
down, the control will need to be removed o
the wall to x the orientation.
• From this screen, the Font may be increased in
size with the FONT icon, Temperature display
may be changed from F to C, and the Backlight
may be adjusted.
• Once all the display settings are adjusted, press
the Return icon to return to the previous screen.
• DEMO mode should remain OFF unless this
control is used as a sales demo to show all
functions.
• From the Tools screen, press the Wi-Fi icon.
• The Wi-Fi screen shows the default UNIT NAME
of this control. The name can be changed by
selecting it. There is no need to change this
unless there are multiple controls on the same
WiFi network and you want to acces it remotely.
• Press the Wi-Fi Settings icon to connect the
control to Wi-Fi.
• Make sure Wi-Fi is turned on. It should display
the available networks in the list. Select your
network and enter a password if required.
Connecting to Wi-Fi allows unsecured remote
activation of the system. Make sure your network
is secure and only trusted people have access to
it. If Wi-Fi network you are trying to reach is out
of range, you may need to relocate your wireless
router to a closer location.
• Press the Triangle icon to return to the previous
screen.
• Press the Return icon again to return to the
tools screen.
Page 3 Pub. No. 311-A06/17
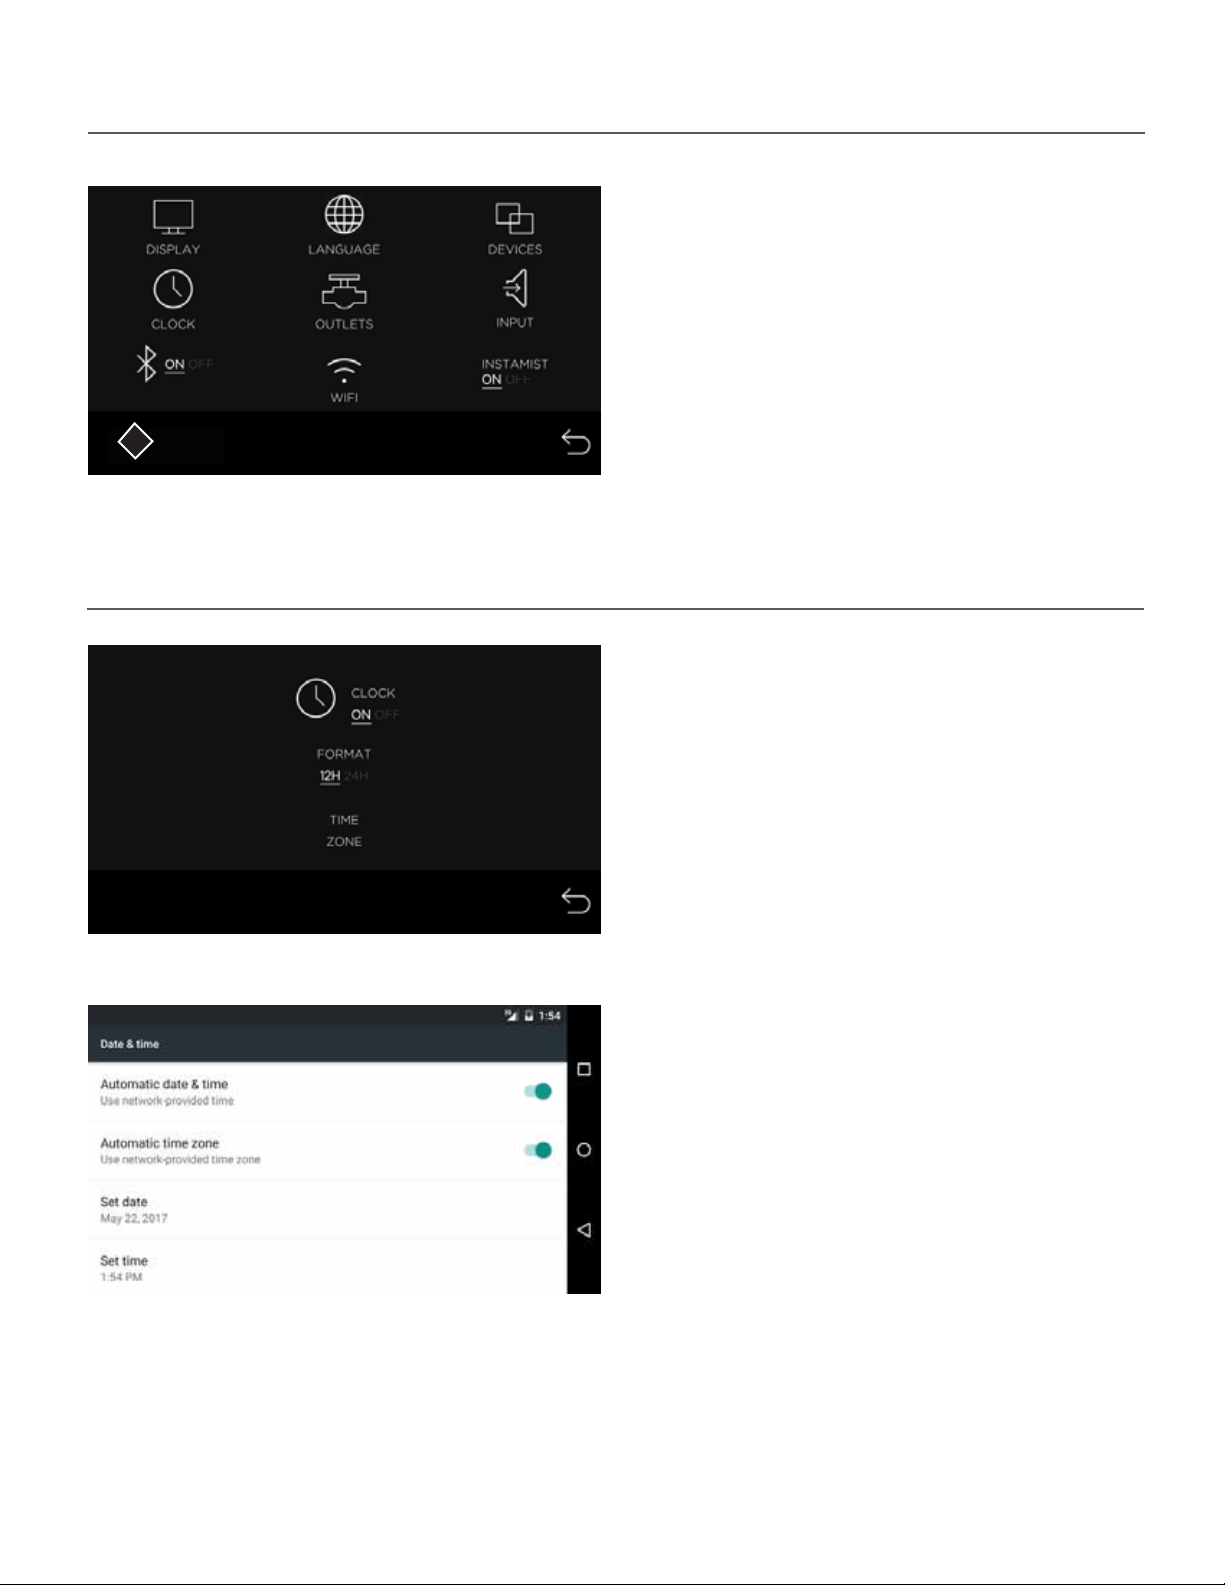
Firmware Update and Language Settings
Clock Settings
Important: The TSC-550 will only display the appropriate icons for the features connected to the system. If your
control is not showing all the connected devices, press the Power icon to toggle the display o then touch the
display and press yes to turn on. This will force the control to scan for all connected devices.
The TSC-550 allows you to program two steam memory cycles, two shower memory cycles, plus a Direct Access
audio and light setting. If your control is displaying all features, including options not installed, go to display
settings and turn the Demo mode o.
• When a SYSTEM UPDATE exclamation symbol is
displayed, it indicates that a new Firmware
Update is available. Press the SYSTEM UPDATE
icon and the new software will begin installation.
The display screen will show “System updating”,
do not press any icons when update occurs.
Control MUST be connected to Wi-Fi to update
Firmware.
• The language may be adjusted by pressing the
Language icon. From the language screen select
• Press the CLOCK icon to adjust the clock
settings.
• The clock may be turned off if it is not desired,
with the ON/OFF icon.
• The time format may also be changed.
• Press the TIME ZONE icon to set the clock to
automatically update over Wi-Fi.
• If you turn Automatic date & time off, you may
set the clock to any time you like.
• If you turn Automatic date and time on, you
need to select the appropiate time zone. This will
keep your clock accurate to that time zone.
• Use the Triangle icon to return to the previos
screen.
• Press the Return icon to return to the settings
screen.
Page 4 Pub. No. 311-A06/17
STEAMIST-_:_ _:_ _
UPDATE
SYSTEM
!

Personal SettingsSteam Settings
• Select Steam 1 or 2 to start a steam cycle and
customize your settings.
• The current temperature of the room will be
displayed in the center.
• Press the steam icon to personalize your steam
settings.
For new users, Steamist recomends you start with
a temperature between 102°F and 110°F until
you become accustomed to the steambath
temperatures.
Status Bar:
• The status bar on the top of the Steam screen, it shows the current time, the set temperature, the time
remaining, the personal steam cycle that was started, and the status of Bluetooth. The Bluetooth icon shown
here with two extra marks means a personal device is connected to the TSMU AudioSense module.
• By default the STEAM TEMP icon is pre-selected.
Use the plus (-) and minus (+) icons to adjust the
steam bath temperature setting.
• Press the CYCLE TIME icon to adjust default
timer setting. This is for future cycles.
• Press the TIME LEFT icon to change the time of
the current cycle.
• If AromaSense option was installed you will see
an AROMA icon. Pressing this icon toggles
between AROMA OFF, 1 and 2 for dierent
fragrences. The plus and minus icons are used to
adjust the intensity of the aroma.
• Press the Return icon to return to the previous
screen.
Page 5 Pub. No. 311-A06/17
70ºF
70ºF
70°F

AudioSense Settings
• If AudioSense is installed, you should see a
Speaker icon to access the AudioSense settings.
This icon is also available from the ShowerSense
screen and from the Direct Access icons under
the dropdown arrow on the home screen.
NOTE: Each music App has it’s own unique
properties, such as login screen, where in
*Spotify it’s only displayed in Portrait orientation,
even though the control is in Landscape mode.
Some Apps start music automatically, others
require you to go to the App and press Play.
• In the audio screen you may select the source
of your music by pressing A, B, Bluetooth or one
of the music apps.
• Skip Forward, Pause/Play and Skip Back all work
with the music apps and Bluetooth, not with
audio A or B inputs.
• Volume, Balance, Bass, and Treble are all
adjusted with the plus and minus icons by
selecting the feature.
• Press the Return icon when you are done with
the music settings.
• If the volume level is too low or high and the
source volume cannot be adjusted, go to
Settings and adjust the Input levels.
Audio Input Settings
• Audio A is the 3.5mm input jack on the side of the TSMU module. Audio B are the RCA jacks on the side of
the TSMU module.
• The music Apps will require a Wi-Fi connection and a login, just like your mobile phone or tablet and work
the same way. The music apps only allow one login per device. This means the same login will be used for all
user settings, STEAM 1, 2, SHOWER 1, 2.
• To use the Bluetooth input you must rst pair your device with the AudioSense TSMU module. This is done
with the Bluetooth settings on your device. Open the settings in your device and search for the Steamist
Bluetooth network. If there are multiple Steamist networks nearby, search for the Steamist - _ : _ _ : _ _ name
in the TSC-550 settings menu. In the TSC-550 settings menu, below the Bluetooth icon you will nd the full
name of the Bluetooth network. The Bluetooth network is not secured so it can be accessed by anyone in it’s
range. If this is a concern, the Bluetooth network can be disabled in the TSC-550 settings.
Page 6 Pub. No. 311-A06/17
70ºF
70°F

ChromaSense Settings
• If ChromaSense is installed you should see a
Light icon to access the ChromaSense settings
screen. This icon is also available from the
ShowerSense screen and also from the Direct
Access icons under the dropdown arrow on the
home screen.
• Press the Light icon
• Select desired ChromaSense color choice and
use the plus and minus icons to adjust the
intensity.
• Press the Return icon to return to the previous
screen.
Page 7 Pub. No. 311-A06/17
ShowerSense Settings
• If the ShowerSense option was installed,
Shower 1 and Shower 2 icons should appear on
the home screen.
• Press one of the Shower icons to set the
personal settings for that user preference.
70ºF
70°F

ShowerSense Settings
• If ShowerSense is installed you will see a
Shower icon from the steam screen. Pressing the
Shower icon will start a shower session while the
steam continues to operate.
• See ShowerSense settings for more on Shower-
Sense.
• Pressing the Power icon will save all of your last
settings to this personal setting.
• If this is the rst time using the ShowerSense,
you will come to this settings screen to congure
the outlets of the shower installation.
• As you press icons 1, 2 and 3, you will toggle
through dierent Shower icons. This should be
done to match the properly displayed icon to the
matching shower outlet.
• After you made at least one selection, you may
press the Return icon to get to the Shower
screen. If you need to adjust these settings in the
future, you may access them from the settings
screen.
The Shower settings screen is used to congure the icons to match the shower outlets. At least one outlet
must be congured before you can open the shower screen. This screen is always accessable through the
System settings. It is the OUTLET valve icon in the System settings screen.
• In the Shower settings screen you may select
any of the three outlets by pressing the corre-
sponding icon. The selected output will change
from grey to white when selected.
• Press the Flow icon to adjust the Flow.
Note: Most shower xtures are ow restricted
and the ow setting is already below the adjust-
ment range.
• Press the Temp icon to adjust the water
temperature.
• Unlike a steam cycle, the shower is not timed and will run for as long as it is left on.
• The status bar on top of the shower screen shows the current time, the water temperature, the personal
shower cycle that was started, and BlueTooth status.
• If AudioSense and or ChromaSense are installed, you will have two additional icons which take you to their
settings screen. These settings are described in the steam settings section.
• All the settings will be remembered to this personal setting by pressing the Power icon.
Page 8 Pub. No. 311-A06/17
70ºF
70°F

System Settings
• From the home screen, press the Drop Down
arrow and press the Tools icon to acces the
System Settings.
• The Display, Language, Clock and Wi-Fi settings
are explained in the beginning of this manual
under Initial System Settings.
• The OUTLETS setting is described under
Shower Settings.
InstaMist setting:
• InstaMist may be turned on or off by pressing
the INSTAMIST icon. InstaMist preheats the water
inside the steam generator for faster starts.
Bluetooth setting:
• Pressing the Bluetooth icon turns the Bluetooth
on or o. The Bluetooth name will be displayed
as Steamist - _ : _ _ : _ _ .
InstaMist and Bluetooth Settings
Device Information
• Press the DEVICES icon to see what is
connected to the system.
• This screen is for is for troubleshooting
purpopses only. Listed are all the possible
connected devices and the version numbers will
show if they are commuincating with the
TSC-550 control.
• The system Reset feature is used to restore
factory defaults. You will be prompted to erase
system settings and/or music App settings.
• Press the Return icon to return to the Settings
screen.
Page 9 Pub. No. 311-A06/17
STEAMIST-_:_ _:_ _

Audio Input Settings
Remote Activation
• The Input setting is used to adjust the Audio
inputs. This is not necessary unless you are using
multiple inputs and want to balance the volume.
The default setting which is a middle setting for
each input is a good starting point. Weak signals
can be boosted here and very strong signals can
be reduced. Boosting normal signals will only
result in distortion and possibility of shutting
down the amplier.
• Bluetooth is also used to adjust the Music App
levels.
• When a memory cycle is started with your
mySteamist app or another remote device, the
home screen will show a 15:00 minute count-
down timer and your Personal Setting icon will
ash.
• The Personal Setting icon needs to be pressed
before the time expires to conrm the cycle.
When conrmed, the cycle continues and the
normal operating screen is displayed.
• When the ShowerSense is started remotely, the
water will only run long enough to get the water
up to temperature and then it will pause. The
timer will continue to count down while the
water is paused.
Page 10 Pub. No. 311-A06/17
Standby Screen
• When the control is off, you have an option to
either see the Clock standby screen or a black out
standby screen.
• When the control is off and is in the Clock view
screen, press the Power icon to enter the black
out standby screen. To turn the control on, touch
the screen and you will see a promt asking if you
would like to turn the control on or not.
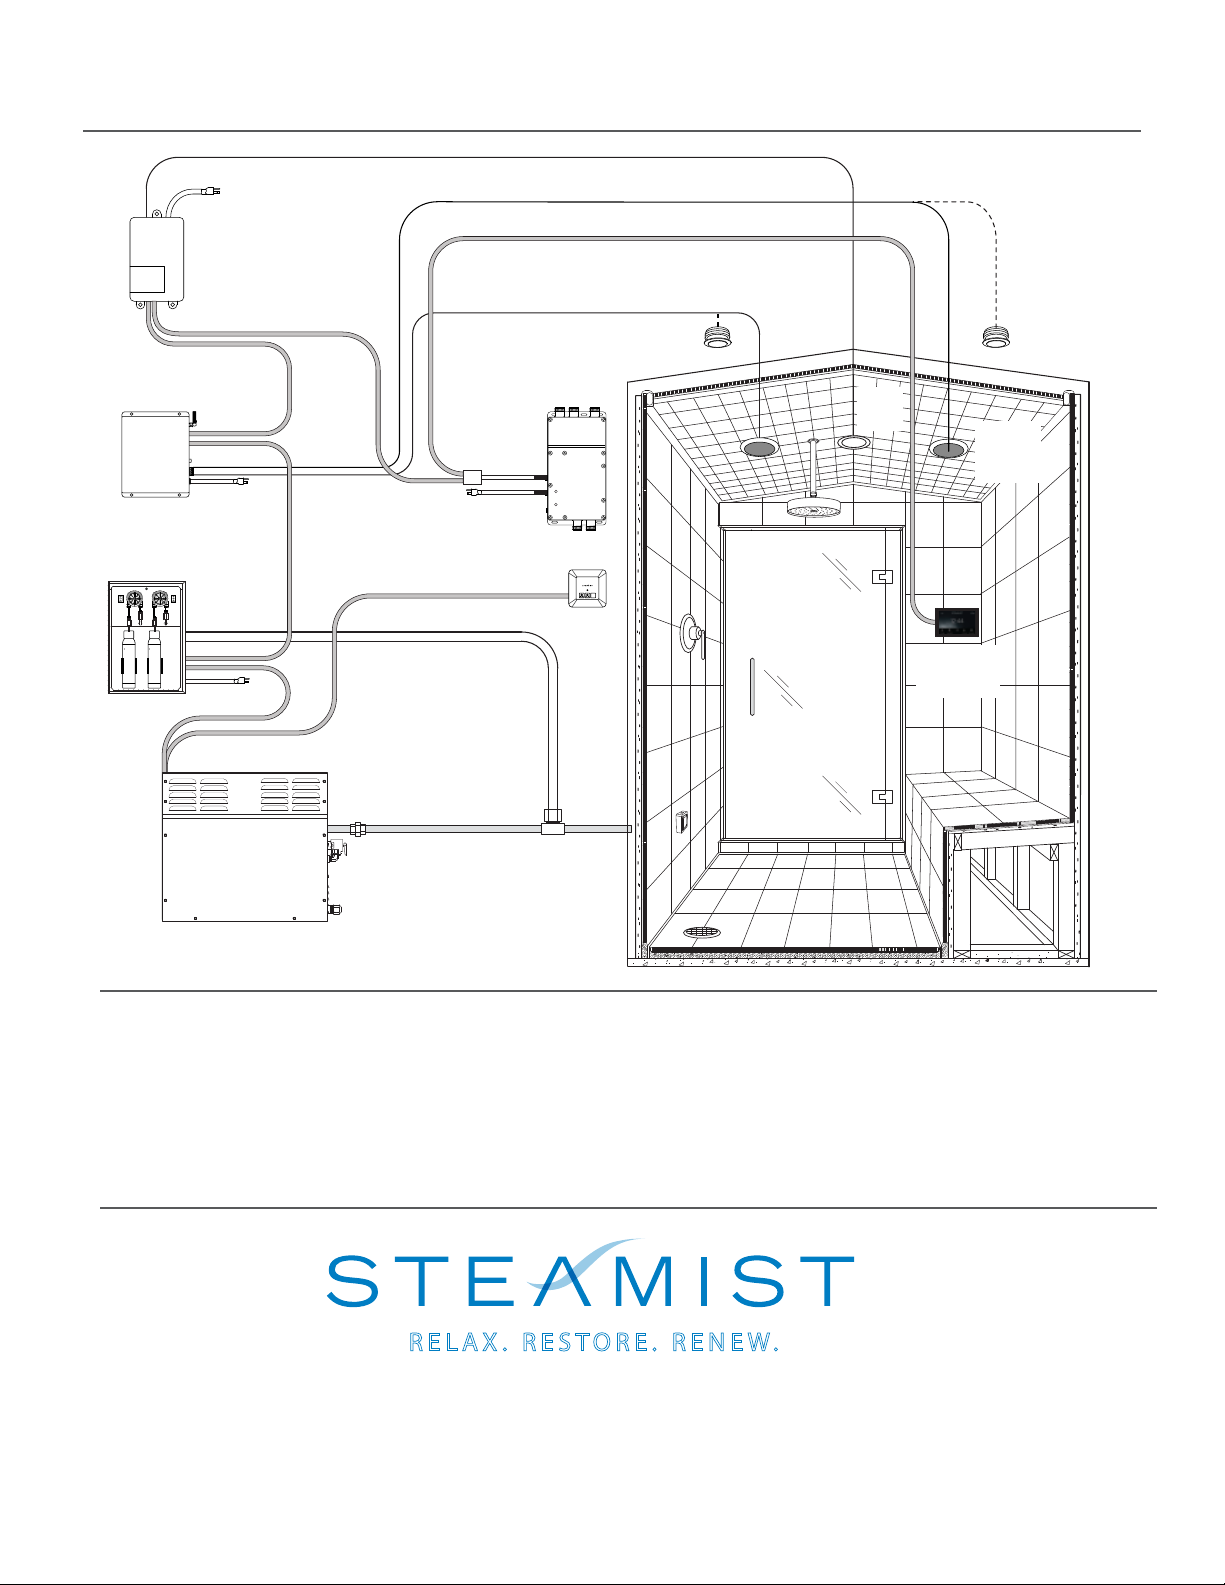
Wiring layout with Spa Options
120V
Standard Speaker Wire
Control Cable
Standard Speaker Wire
Control
Cable
TSA
Aroma
Injection Tee
TSS-IN
Invisible
Speakers
TSX-220
Control
..
.
.
.
.
.
.
.
.
.
...
..
.
.
.
.
.
.
.
.
.
...
..
.
.
.
.
.
.
.
.
.
...
..
.
.
.
.
.
.
.
.
.
...
..
.
.
.
.
.
.
.
.
.
...
..
.
.
.
.
.
.
.
.
.
...
..
.
.
.
.
.
.
.
.
.
...
..
.
.
.
.
.
.
.
.
.
...
..
.
.
.
.
.
.
.
.
.
...
..
.
.
.
.
.
.
.
.
.
...
..
.
.
.
.
.
.
.
.
.
...
..
.
.
.
.
.
.
.
.
.
...
..
.
.
.
.
.
.
.
.
..
.
.
.
.
.
.
.
.
.
...
..
.
.
.
.
.
.
.
.
.
...
..
.
.
.
.
.
.
.
.
.
.
.
.
.
.
.
.
.
..
.
.
.
.
.
.
.
.
.
...
..
.
.
.
.
.
.
.
.
.
...
..
.
.
.
.
.
.
.
.
.
...
..
.
.
.
.
.
.
.
.
.
...
..
.
.
.
.
.
.
.
.
.
...
..
.
.
.
.
.
.
.
.
.
...
..
.
.
.
.
.
.
.
.
.
...
..
.
.
.
.
.
.
.
.
.
...
..
.
.
.
.
.
.
.
.
.
...
..
.
.
.
.
.
.
.
.
.
...
..
.
.
.
.
.
.
.
.
.
...
..
.
.
.
.
.
.
.
.
.
...
..
.
.
.
.
.
.
.
.
..
.
.
.
.
.
.
.
.
.
...
..
.
.
.
.
.
.
.
.
.
...
..
.
.
.
.
.
.
.
.
.
.
.
.
.
.
.
.
.
..
.
.
.
.
.
.
.
.
.
...
..
.
.
.
.
.
.
.
.
.
...
..
.
.
.
.
.
.
.
...
..
.
.
.
.
.
.
.
.
.
..
.
.
.
.
.
.
.
.
..
..
.
.
.
.
.
.
.
.
.
...
..
.
.
.
.
.
.
.
.
...
Control
Cable
120V
Aroma
Injection Tubes
Control Cable
Control Cable
TSS-CL
Classic
Speaker
TSMU
Control
Cable
120V
2
1
respiratory
ESSENTIALOIL
restore
ESSENTIALOIL
TSCH
TSCH
Light
120V
TSSH
Shower Valve
550 Spa
Control
x
Corporate Headquarters
25 East Union Ave. East Rutherford, NJ 07073
Tel: 800-577-6478 / Fax: 201-933-0746
www.steamist.com
®
RELA X . REST O R E . RENE W .
Page 11 Pub. No. 311-A06/17
Note: *SPOTIFY and the SPOTIFY logos are trademarks of Spotify AB, registered in the U.S. and other countries.
IHEART and the IHEART logos are trademarks of IHM IDENTITY, INC., registered in the U.S. and other countries.
PANDORA and the Pandora logos are trademarks of PANDORA MEDIA, INC., registered in the U.S. and other coun-
tries. Wi-Fi is a trademark of the Wi-Fi Alliance, registered in the U.S. and other countries. Bluetooth logos are
trademarks of Bluetooth Sig Inc., registered in the U.S. and other countries. iPhone is a trademark of Apple Inc.,
registered in the U.S. and other countries. Android is a trademarks of Google inc., registered in the U.S. and other
countries. All other trademarks and registered trademarks are the property of their respective holders.
Table of contents
Other Steamist Control Panel manuals


