Steamist TC-110 User manual

Model: TC-110
Steambath Control
WARNING: Elderly persons, pregnant women, or those suffering from heart disease, high blood
pressure, diabetes, or who are otherwise not in good health, do not use this device unless
directed to do so by a physician. Also, do not use steambath while under the influence of alcohol.
!
07/07 Pub. No. 526-D
CUS
®
LISTED 995C
Installation and Operating Instructions
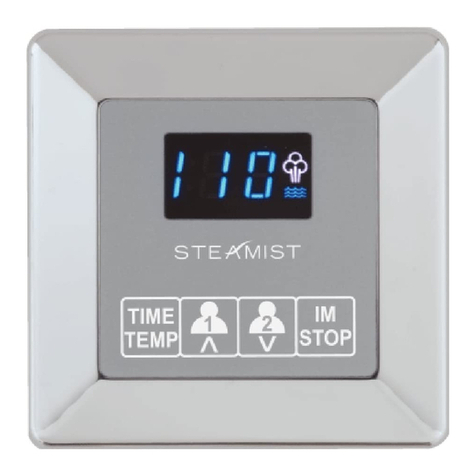
TC-110
NOTE: This control may be installed inside or outside the
steam room for operation of the system.
Start/Stop Key Pad: Press key pad and generator will
begin producing steam in minutes. The generator will
remain on for 30 minutes when used with the model
SM-46, SM-79 SM-4, SM-5, SM-7, or SM-8 steam
generators and 60 minutes for larger generators.
Pressing the key pad a second time will stop the
Steam Generator.
Start/Stop Light: Indicates the Steam Generator is
activated.
Cleaning Instructions: Use a damp cloth and mild soap.
Do NOT use abrasive cleaners which might scratch the
surface or the base of the control.
- 1 -
Control Features
Installation Instructions
The TC-110 control may be installed inside or
outside the steam room. For convenience the
recommended height from the floor is four feet.
Provide a 1” hole in the wall at this location (see
Figure 1).
IMPORTANT: Multi-conductor cable must be
installed so that the end will not be buried inside the
wall. The unit will not operate unless the control is
installed.
1. Pre-Installation - Control Location
a)
Remove the multi-conductor cable from the control
packing box. Carefully route the multi-conductor
control cable from the Steambath Generator to the
TC-110 located either inside or outside the
steamroom (see Figure 2). Route multi-conductor
cable though a ¾” conduit to protect the cable from
damage and to facilitate replacement if necessary.
2. Electrical Rough-in
a)
IMPORTANT: The TC-110 Control will only function with one of the following Steamist Generator models:
SM-46, SM-79, SM-4, SM-5, SM-7, SM-8, SM-11, SM-12, and SM-15. (It will not work with Models:
System-18, System-24, & System-30 unless used in cunjuction with a Steamist thermostatic controller, such
as Model# TC-135 or DSC-425).
START
STOP
1.
2.
Timer and Start/Stop Switch
1“ Hole
located four feet
from the floor
Double-sided
Adhesive Pad
TC-110 Timer and
Start/Stop Switch
Figure 1
IMPORTANT: Run the
Control Cable through a
¾” conduit.
2
1

07/07 Pub. No. 526-D- 2 -
Locate the previously installed cable and black
plastic strain relief clamp which is in the control
packing box. Locate the knock-out on the steam
generator for the control cable (see Figure 2).
Place strain relief around cable about seven inches
from the end and insert into the hole. Remove the
protective covering labeled, “Remove before
installation,” from the modular jack found on the PC
board.
If a second control will be installed, plug the splitter
into the modular jack, this will allow two cables to be
plugged into the PC board.
IMPORTANT: The Steamist supplied splitter must
be used. Locally purchased telephone splitters will
NOT work and void the warranty.
Remove the protective cap from the
multi-conductor cable plug. Connect the cable to
the modular jack located on the printed circuit board
of the Steam Generator.
Close and secure generator cover.
Plug cable into receptacle on the back of the
TC-110 control. The receptacle is keyed for proper
installation.
WARNING: Test the control for operation before
continuing on to the next step.
3. Control and Cable Installation
a)
b)
c)
d)
e)
f)
Peel adhesive liner from back of the control. Apply
the control to the wall. Press firmly and hold for a
few seconds.
After the control is in place, apply silicone
(supplied) around the control to form a water tight
seal (see Figure 3).
IMPORTANT: If the TC-110 is mounted on the
inside of the shower, the adhesive backing on the
control will NOT seal it to the wall. It is the
responsibility of the installer to seal this control to
the wall using the silicone sealant provided.
Warranty is voided if the control is not completely
sealed to the wall.
g)
h)
E
N
O
C
I
L
I
S
R
A
E
L
C
.
Z
O
.
L
F
2
/
1
t
e
N
0
2
5
1
3
.
o
N
m
e
t
I
.
A
.
S
.
U
N
I
E
D
A
M
Figure 3
Optional Splitter
for two controls
Protective Covering
“Remove Before
Installation”
Modular Jack
Knock-outs for
Strain Relief
Clamps
Cable Installation
on Steam Generator
Figure 2
Printed
Circuit Board
Multi-conductor
Control Cable
(25 feet)
¾“ Conduit
To Control

07/07 Pub. No. 526-D- 3 -
IMPORTANT: The Steam Generator will NOT
operate without water.
Be sure all plumbing has been completed, then
open the water valve.
Once all electrical connections are complete, turn
the breaker on.
Touch the Start/Stop keypad on the TC-110 control.
At this point the green light on the control panel will
light and after a few minutes steam will enter the
Tub/Shower enclosure.
When the Timer runs down the Steam Generator
will stop and all the lights will go off.
4. Start-up and Testing
a)
b)
c)
d)
Installation Instruction for Steamhead & Escutcheon
(See Figure 4)
1.
2.
3.
4.
5.
Be sure the steam pipe is installed with the proper
length pipe protruding through the wall.
Apply silicone sealant around the pipe to seal the
pipe to the wall.
Slip the Escutcheon over the steamhead loosely.
Screw on the steamhead making sure the steam
opening is facing down.
Hold the Escutcheon against the wall and tighten the
retaining screw facing down.
Steam Pipe
Apply silicone around
the steam pipe to form
a water tight seal
Escutcheon
Steamhead
Tighten the screw to the
steamhead with the screw
to face down
Figure 4
Steamhead Installation
All instructions must be given to the
homeowner for future reference.
WARNING: When installing a steam pipe into a steam
room made out of Acrylic, Cultured Marble, Corian,
Swanstone, Resin, Plastic or an equivalent type of
material, consult the manufacturer of the material for their
recommendation on location of the steam pipe. Verify that
the type of material used for the construction of the steam
room is rated for a steam room environment. When
installing a steam pipe, in the mentioned material type
rooms, it is very critical in making sure that when the
steam pipe protrudes into the steam room that it is
centered in its 1¼” hole and does not touch the edge of
the wall material around the steam pipe.
IMPORTANT: An optional steam diffuser (Not Included)
is strongly recommended for small steam rooms. This
option helps to better diffuse the steam and makes the
steambath more comfortable. This option may not be
necessary in larger steam rooms where the bather is
sitting a few feet away from the steamhead.

07/07 Pub. No. 526-D- 4 -
Installation Suggestions
START
STOP
Figure 5
Installation Suggestions
Outside Installation
TC-110 Control
START
STOP
Inside Installation
TC-110 Control. Locate away from the
direct line of shower spray and do
NOT locate above steamhead.
Steamhead Installation
Steamhead should be mounted 18” above
the finished floor or 6” above the rim of the
tub as far from the bather as possible
All Instructions must be given to the homeowner for future use.
East Coast Office: 275 Veterans Blvd., Rutherford, NJ 07070 ●Tel: (800) 577-6478 ●Fax: (201) 933-0746
West Coast Office: 315 W. Pondera St., Suite F, Lancaster, CA 93534 ●Tel: (800) 355-6478 ●Fax: (661)940-1617
Table of contents
Other Steamist Control Panel manuals
