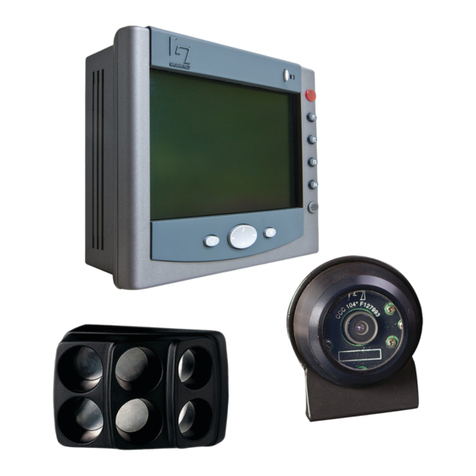
Steel mate PTS600MM User manual

PTS600MM
PTS800MM
All rights reserved
The trademark, patent and copyright are owned by Steelmate Co., Ltd.
The right to change the design and specifications for improving the product is reserved
Parking Assist System
Front & Rear Protetion

1
Parking Assist
System
User's Manual
Parking assist systems help to provide assistance
when reversing and parking. Driving skills, such as
slowing down, use of mirrors etc. are always
essential.
1. This unit is for vehicles with 12V DC only.
2. Unit should be installed by a professional auto
technician.
3. Route wiring harness away from heat sources
and electrical components.
4. It is strongly recommended to check the position
of the sensors before the actual drilling of the
holes.
5. Perform test after installation.
Important notice
The parking assist system is designed as a driver
assistance device, and should not be used as a
substitute for safe parking practices. The area into
which the vehicle is driving or to be reversed must
be constantly visually monitored while parking.
The manufacturer and its distributors do not
guarantee or assume liability for collisions or
damages while parking your vehicle.
Disclaimer
1. Professional manufacturer with high quality
standards.
2. Complete range of products, you can easily
select a product to match.
3. There are agents/distributors in more than 80
countries to supply local service.
4. More than 100 engineers in the company, you
can enjoy the latest technology.
5. More than 300 patents.
6. Products have international approvals, high
quality guaranteed.
7. Leading manufacturer in automotive industry,
ISO9001, ISO/TS16949, ISO14001 and
OHSAS18001 certified.
Reasons to choose Steelmate
1
1
1
2
2
2
3
4
4
4
5
6
7
10
10
11
12
12
14
16
16
17
22
25
29
Contents
Reasons to choose Steelmate -----------------------
Important notice ------------------------------------------
Disclaimer --------------------------------------------------
About the product ----------------------------------------
Key features ------------------------------------------------
Technical specifications -------------------------------
LED display ------------------------------------------------
Volume adjustment --------------------------------------
Radio mute function -------------------------------------
6 / 8-sensor automatic recognition -----------------
Self-test function ----------------------------------------
Learning function ---------------------------------------
How does the system work ---------------------------
Attention ----------------------------------------------------
Sensor maintenance ------------------------------------
Troubleshooting ------------------------------------------
Warranty terms --------------------------------------------
Warranty card ---------------------------------------------
Brief installation diagram ------------------------------
Packing list -------------------------------------------------
Installation tools ------------------------------------------
Sensor installation ---------------------------------------
Display installation --------------------------------------
Installation diagram -------------------------------------
Function test after installation -----------------------
User's Manual Installation Manual

2
About the product
Parking assist system is an ultrasonic distance
monitoring system. It electronically detects the area
in front of and at the rear of your vehicle while parking,
and alerts you with audible and visual warnings. It
assists the driver when parking and in a maneuvering
situation.
The PTS600MM/PTS800MM series products are front
and rear parking assist systems with two independent
ECUs and displays. The front system is designed for
front bumper protection and can work as a 2-sensor
system. The rear system is ideal for cars with tow bars
or spare wheels. Combined with functions such as
automatic radio mute, self-test function, and intelligent
detection for spare tire or metal bar (front & rear), the
PTS600MM/PTS800MM can provide you with complete
protection.
The M5, M6 and M8 displays can be used for both
front and rear systems. They are slim and stylish. It
is easy for you to get the information of the obstacle
directly and they are all easy to install. When using
them for a front system, they can be mounted on the
dashboard or on top of the rear-view mirror. When
using them for a rear system, they can be installed on
the rear headlining.
All parts of our products have passed the most stringent
testing before they are released into the market. The
product is reliable at a wide temperature range (-40°C
~ +80°C/-40°F~+185°F) meaning it will still continue
to function when you are parking on a raining day,
snowing day or at night etc. With the help of Steelmate
parking assist system, you can enjoy a more relaxed
and safer parking experience.
Key features
l8-sensor system, complete front and rear
protection
l2 control units designed for luxury vehicles
lAutomatic radio mute function while reversing
lIntelligent detection, compatible with spare tire
or metal bar (front & rear)
lAnti-false alert technology
lCan be used as 6-sensor system (PTS600MM
series)
lDetachable sensors with waterproof wire
connectors
lSelf-test function
lAll weather design (-40*~ +85*/-40°F~+185°F)
Input voltage: 9 ~ 16V DC
Operating temperature: -40°C ~ +85°C/
-40°F ~ +185°F
Beep volume: 70 ~ 90 dB
Display range: Front 0.3m ~ 1m/1ft ~ 3.2ft
Rear 0.3 ~ 1.5m/1ft ~ 4.9ft
Technical specifications
3
LED display
Display M5
Display M6
Volume button
Warning light & damaged
sensor location indication Obstacle distance indication
E F G H
Front display
Rear display
M5
M5
M6
M6
M8
M8
Display M8
Waming light & damaged
sensor location indication Obstacle distance indication
Volume button
Digital distance
A B C D
M8 display digital distance adjustment
When the M8 display is installed at the rear headlining, the digital distance on the display need to be adjusted
for the driver to see the number correctly from the rearview mirror. Press and hold the Volume button for 5
seconds, until the display shows " " in the middle, press the button once again, it will show " " with a buzzer
beep, indicating the adjustment is successfully saved.
Different display for PTS600MM/PTS800MM series
Warning light & damaged
sensor location indication
Volume button
Obstacle distance indication
A B C D

Front display
With the ignition turned on, press the volume button
to select a suitable volume or turn off the buzzer.
Rear display
With reverse gear selected, press the volume button
to select a suitable volume or turn off the buzzer.
4
Volume adjustment
Low volume Turn off
High volume
Factory setting: high volume
Radio mute function 6 / 8-sensor automatic recognition
When reverse gear is engaged, the system will
automatically mute the car audio.
This function aims to help the driver to reverse
safely without distraction.
This system can be used as a 6 or 8-sensor system.
This has to be done by connecting the 2 middle
sensors (F & G) or 2 side sensors (E & H) in the
front.
Note:
The warning distance for E & H sensor is <0.9m/2.7ft.
The warning distance for F & G sensor is <1.0m/3.2ft.
5
Sensor E GH
F
Be...Be...Be...
Sensor A C D
Be...Be...Be...
B
Self-test function
Be...Be...Be...
Sensor E F GH Sensor E GH
Be...Be...Be...
F
Number of
damaged sensors
The front system will keep working for 5 seconds when the footbrake is released.
Be...Be...Be...
Sensor A B C D Sensor A C D
Be...Be...Be...
B
Number of
damaged sensors
M5 display M6 display M8 display
M5 display M6 display M8 display
Front display
When the ignition is turned on, the system will test the front sensors E, F, G and H automatically.
If a damaged or defective sensor is detected, then the system will:
Beep three times.
The locations of the damaged or defective sensors will be shown on the display
Other sensors will continue to function normally
Once the self-test procedure is completed, the system will detect the obstacle in front of the car for 30 seconds.
Rear display
When reverse gear is selected, the system will test the rear sensors A, B, C and D automatically.
If all sensors are working normally, the display will beep once.
If a damaged or defective sensor is detected, then the system will:
Beep three times.
The locations of the damaged or defective sensors will be shown on the display
Other sensors will continue to function normally

Learning function
Be Be
Be
6
Learning function for cars with front metal bar
Turn the ignition on, press the footbrake and connect the green learning wire (located in the main front ECU
wiring loom) to a +12V power supply. The system will perform learning procedure.
The LED light will flash once, then turn on and give 2 audible tones. This indicates that the learning function
is successful and the system will ignore the front protrusion. Once programmed, disconnect the green wire
and insulate it.
Learning function for cars with rear tow-bar or spare wheel
Turn the ignition on, then within 10 seconds, shift the vehicle in and out of reverse gear 5 times staying in
reverse position on the 5th time.
The display will flash and give an audible tone, this indicates that the learning function is successful and
the system will not warn for tow-bar or spare wheel.
M5 display M6 display M8 display
M5 display M6 display M8 display
Be Be Be Be
Note: if the vehicle does not have front metal bar or other front protrusion, the above procedure is not needed.
Be Be
Note: If the vehicle does not have rear tow-bar/spare wheel, the above procedure is not needed.
How does the system work
Driving forward
7
Be ****
Distance: <0.3m/0.9ft
Be ** Be **
Distance: 0.6m/2.2ft
No beep
Distance: 1m/3.3ft
The front system will keep working for 5 seconds after the footbrake is released.

9
Be--Be--Be--
Distance: 0.4m/1.3ft
Be-Be-Be-Be-
Distance: 0.6m/1.9ft
No beep
Distance: 0.6m/1ft
Be ****
Distance: 0.3m/0.9ft
Zigzag reversing
8
Reversing
No beep
Distance: 1m/3.2ft
Be--Be--Be--
Distance: 0.5m/1.5ft
Be-Be-Be-Be-
Distance: 0.8m/2.6ft
No beep
Distance: >1.5m/4.9ft Be ****
Distance: < 0.3m/0.9ft
Be ****
Distance: <0.3m/0.9ft

11
Troubleshooting
After installation, the display doesn't work
a) Are all wires connected properly?
b) Is the vehicle's ignition ON?
Damaged sensor detected
a) Are all sensors plugged into the ECU correctly
and tightly?
b) Is the sensor wire broken?
c) Is the sensor covered by mud or snow?
d) Is the sensor damaged?
False warning
a) Are all sensors plugged into the ECU in the
correct position tightly?
b) Does any sensor detect the ground?
c) Does rubber ring in the sensor come out (14D
sensor)?
Warning sound is too low or too high
a) Press the Volume button to adjust the volume
to a suitable level.
If the problem persists, please follow these
steps
a) For consumer contact your dealer or nearby
service centre.
b) For installer or dealer
1) Test the sensors with certified ECU by using
a flat wooden board.
2) Replace the ECU and recheck the system.
3) Plug the certified sensors into the ECU and
recheck.
4) Email your question to us and we will reply
ASAP.
Attention Sensor maintenance
Do not wash the sensor with squirt gun or
swab them forcibly.
Please wash car with low-pressure water.
Please melt the ice with water when the
sensors are covered by ice.
Please clean the sensors with cloth or low-
pressure water when the sensors are covered
by mud or snow.
10
False detection may occur in the following
situations:
*After installation, please fully test the system
before use.
*Heavy rain, dirty or damaged sensors may result
in false alarm occasionally.
*Ensure that the self-test procedure is completed
and all sensors are functioning before reversing.

12
Warranty terms
User
Tel
Vehicle Reg No.
Product Model No.
Serial No.
Date of Installation
Name of the Retailer
Signed by Retailer
The unit is warranted for a limited period of time
from the date of purchase. In the unlikely event
of a defect arising in this product when used in
accordance with the manufacturer's instructions,
the parts would be repaired or replaced free of
charge.
Warranty card
It is required to show warranty card when
making any warranty claims.
The model and the unit's serial number must
be the same as the information on the warranty
card.
This warranty is non-transferable and is
automatically void if
The original purchaser has not completed the
warranty card.
The unit's serial number is defaced, missing
or altered.
The unit has been modified or used in a manner
contrary to its intended purpose.
The unit has been damaged by accident,
unreasonable use, neglect, improper installation
or service.
The warranty does not cover
Damage caused by incorrect or poor installation
problems which may be caused by anomalies
in the vehicle's electrical system or originating
from the environment in which the system is
operated.
Damage to the system caused by accident or
improper use in any manner whatsoever not
the fault, including but not limited to damage
by water or as a result of excess voltage
applied to the system or if misused or repaired
or altered in any way other than by it's authorized
agent.
False information displayed in the panel of the
dash board that is caused by car with CAN bus
system.
a)
b)
a)
b)
c)
d)
a)
b)
c)
13
Parking Assist
System
Installation Manual

15
Reversing
light
Radio mute wire
Front display
Front ECU
Rear display
DC
B
A
Rear ECU
Footbrake
ACC
14
Brief installation diagram
Front display
Front ECU
Rear display
DC
B
A
Rear ECU
Footbrake
ACC
Reversing
light
Radio mute wire

17
Sensor installation
H < 45cm/1.5ft
1
L1 L2 L1
H
H > 45cm/1.5ft
H < 60cm/2.0ft
35cm/1.2ft<L1<45cm/1.5ft
50cm/1.6ft<L2<76cm/2.5ft
45cm/1.5ft<H<60cm/2.0ft
H > 60cm/2.0ft
16
Installation tools
30' ~ 60'
Packing list
* The actual sensor may vary from the image shown above
* Your product may be any two from the three displays shown above.
**

18
H > 45cm/1.5ft
H < 65cm/2.1ft
=1/8L
=2/8L
=1/8L
< 45cm/1.5ft < 45cm/1.5ft < 45cm/1.5ft
H < 45cm/1.5ft
H > 65cm/2.1ft
a
b
c
c b a a b c
45cm<H<65cm
19
Check the size of the hole saw packed in
the product to be matching the diameter
of the sensors before drilling any holes.
2

20
4
ABCD
3
5
E
F
G
H
21
A
B
CD
E
F
G
H
6

22
Display installation
Front display installation
A
B
* The display can be one of the three displays shown above depending on the product ordered.
*
*
23
Installation steps for M5
A
B
1. Remove the paper liner from 3M adhesive
pad on the display. 2. Stick the display to a desired location.
Rear display installation
*

24
2. Once the display is fixed, clip the cover on.
Installation steps for M6 and M8
1. Fix the display with two screws.
25
Installation diagram
Front unit:
4-front-sensor system
Pink (ACC)
Red (Reversing light +12V)
White (Footbrake light + 12V)
Blue (Radio mute wire)
Green (Learning wire)
Black (GND)
H
G
F
E
ECU
Positive output (+)
Negative output (-)

26
2-front-sensor system
Note:
E & H sensor detection range: 0.1m/0.3ft*0.9m/2.7ft.
Pink (ACC)
Red (Reversing light +12V)
White (Footbrake light + 12V)
Blue (Radio mute wire)
Green (Learning wire)
Black (GND)
H
E
ECU
Positive output (+)
Negative output (-)
27
Pink (ACC)
Red (Reversing light +12V)
White (Footbrake light + 12V)
Blue (Radio mute wire)
Green (Learning wire)
Black (GND)
G
F
ECU
Positive output (+)
Negative output (-)
Note:
G & F sensor detection range: 0.1m/0.3ft*1.0m/3.3ft.
2-front-sensor system

29
Function test after installation
1.0m/3.3ft
1.0m/3.3ft
Rear sensor function test
Front sensor function test
Function test is possible by
holding a wooden board (30
x100cm/1x3.3ft) standing
at the front or rear of the
car, and drive the car
forward and backward to
test each function
respectively as shown in
this manual.
1.5m/5.0ft
28
PARKING ASSIST SYSTEM
12V
Display
GND
Reversing light
Red
Black
Rear unit:
D
C
B
A
D
C
B
A
This manual suits for next models
1
Table of contents
Other Steel mate Automobile Electronic manuals
Steel mate
Steel mate PTS800V8 User manual

Steel mate
Steel mate PTS400EX User manual

Steel mate
Steel mate PTS400EX User manual
Steel mate
Steel mate PTS400EX-F User manual
Steel mate
Steel mate PTS800V7 User manual

Steel mate
Steel mate PTS400W1 User manual

Steel mate
Steel mate PTS810V7 BTI User manual

Steel mate
Steel mate PTS400EX-F User manual

Steel mate
Steel mate PTS400EX User manual
