manuals.online logo
Brands
  1. Home
  2. •
  3. Brands
  4. •
  5. Steren
  6. •
  7. Recording Equipment
  8. •
  9. Steren HER-253 User manual

Steren HER-253 User manual

Product / Producto: TONE
GENERATOR AND AMPLIFIER
PROBE / GENERADOR DE TONO
ECONÓMICO PARA IDENTIFICACIÓN
DE CABLES
Model / Modelo: HER-253
Brand / Marca: Steren
CONDICIONES
1. Para hacer efectiva esta garantía se requiere: La presentación de esta póliza y del producto, en el lugar en donde fue adquirido o en ELECTRONICA STEREN S.A. DE C.V.
2. ELECTRONICA STEREN S.A. DE C.V. se compromete a reparar el producto en caso de estar defectuoso sin ningún cargo al consumidor.
3. El tiempo de reparación en ningún caso será mayor a 30 días contados a partir de la recepción del producto en cualquiera de los sitios en donde pueda hacerse efectiva la
garantía.
4. El lugar donde puede adquirir partes, componentes, consumibles y accesorios, así como hacer válida esta garantía es: En cualquiera de las direcciones arriba mencionadas.
ESTA GARANTIA NO ES VALIDA EN LOS SIGUIENTES CASOS:
1. Cuando el producto ha sido utilizado en condiciones distintas a las normales.
2. Cuando el producto no ha sido operado de acuerdo con el instructivo de uso.
3. Cuando el producto ha sido alterado o reparado por personas no autorizadas por ELECTRONICA STEREN S.A. DE C.V.
Nota: El consumidor podrá solicitar que se haga efectiva la garantía ante la propia casa comercial, donde adquirió el producto. Si la presente garantía se extraviara, el
consumidor puede recurrir a su proovedor para que le expida otra póliza de garantía, previa presentación de la nota de compra o factura respectiva.
DATOS DEL DISTRIBUIDOR
DISTRIBUTION / NOMBRE / DISTRIBUIDOR:
ADDRESS / DOMICILIO:
PRODUCT / PRODUCTO: BRAND / MARCA:
MODEL / MODELO: SERIAL NUMBER / No. DE SERIE:
DATE OF DELIVERY / FECHA DE ENTREGA:
Call Center / Centro de Atención a Clientes
del Interior 01 800 500 9000
Mexico City / Cd. de México: 53 54 22 90
Warranty
CONDITIONS:
1. This warranty card with all the required information, the invoice or purchase ticket, the packing or package, must be presented with the product when warranty
service is required.
2. If product hasn’t exceed warranty period, the company will repair it free of charge including transportation charges.
3. The repairing time will not exceed 30 natural days, from the day the claim was received.
4. Steren sells parts, components, consumables and accessories to customer, as well as warranty service, at any of the following addresses:
THIS WARRANTY IS VOID ON THE NEXT CASES:
If the product has been damage by an accident, acts of God, mishandling, leaky batteries, failure to follow enclosed instructions, improper repair by unauthorized
personnel, improper safe keeping.
Notes:
a) The customer can also claim the warranty service on the purchase establishment.
b) If you lose the warranty card, we can reissue it just showing the invoice or purchase ticket.
Póliza de Garantía
This Steren product is guaranteed under
normal usage against defects in
workmanship and materials to the original
purchaser for one year from the date of
purchase.
Garantiza este producto por el término de
un año en todas sus partes y mano de obra
contra cualquier defecto de fabricación y
funcionamiento, a partir de la fecha de
entrega.
INSTRUCTIVO DE USO DE GENERADOR DE TONO ECONÓMICO
PARA IDENTIFICACIÓN DE CABLES
Modelo: HER-253
Marca: Steren
Antes de utilizar su nuevo Generador de Tono lea este instructivo
para evitar cualquier mal funcionamiento. Guárdelo para futuras
referencias.
Su nuevo generador de tonos le permite identificar cables eléctricos e
incluso cables telefónicos y de datos. Cuenta con selector de tono o de
continuidad así como LEDs indicadores de uso.
El receptor cuenta con ajuste de volumen y un botón para activar la
detección. Se alimentan a través de una batería de 9V cada uno.
IMPORTANTE
No use ni almacene este equipo en lugares donde existan goteras o
salpicaduras de agua. Puede causar un mal funcionamiento o un choque
eléctrico.
No intente abrir el equipo, puede ocasionar malfuncionamiento y
anulación de la garantía.
No exponga el equipo a temperaturas extremas.
Siempre utilice un paño suave limpio y seco para limpiar el equipo.
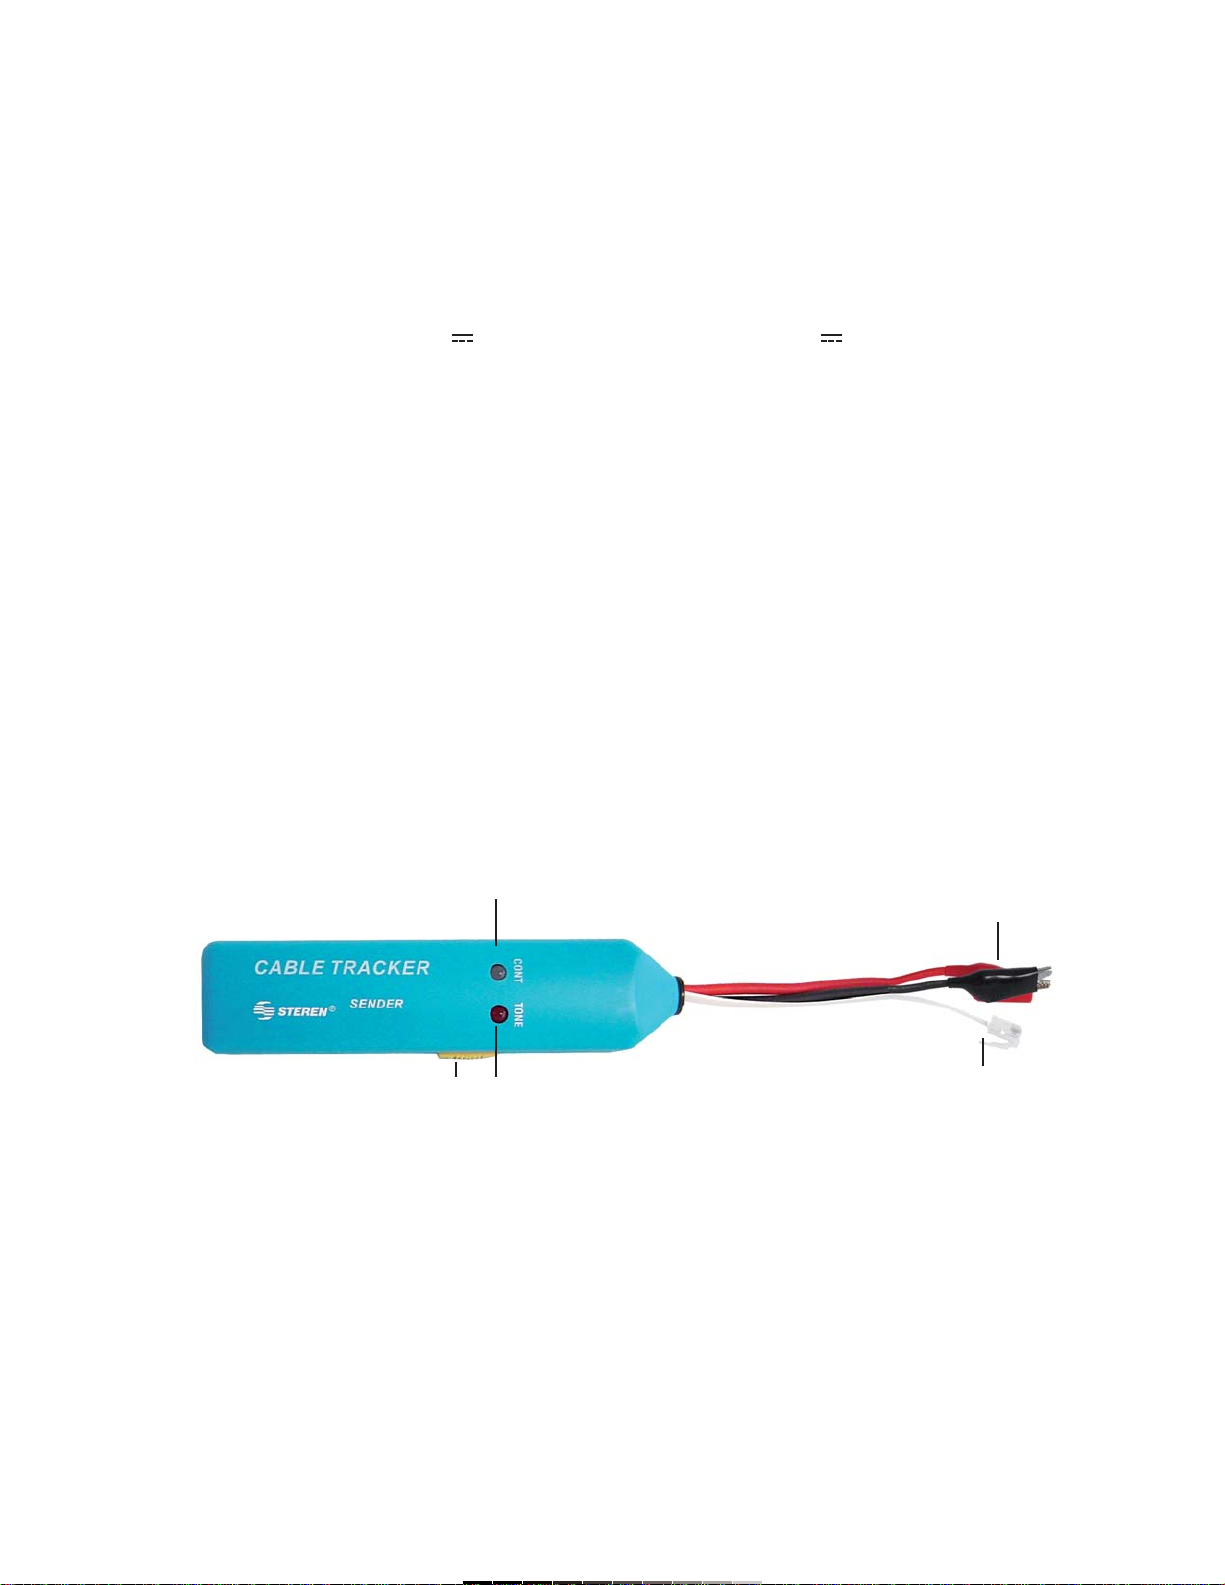
CONTROLES
Generador de tonos
1.- Indicador LED de continuidad ....... Enciende cuando el equipo está
en modo de Continuidad
2.- Indicador LED de Tono .................. Enciende cuando el equipo está
en modo de Tono
3.- Selector de función ........................ Apaga el equipo / selecciona el
modo de Continuidad / selecciona
el modo de Tono
4.- Caimanes ....................................... Permite conectar los cables que
se desean probar
5.- Plug telefónico ................................ Permite conectar a jacks
telefónicos para su prueba
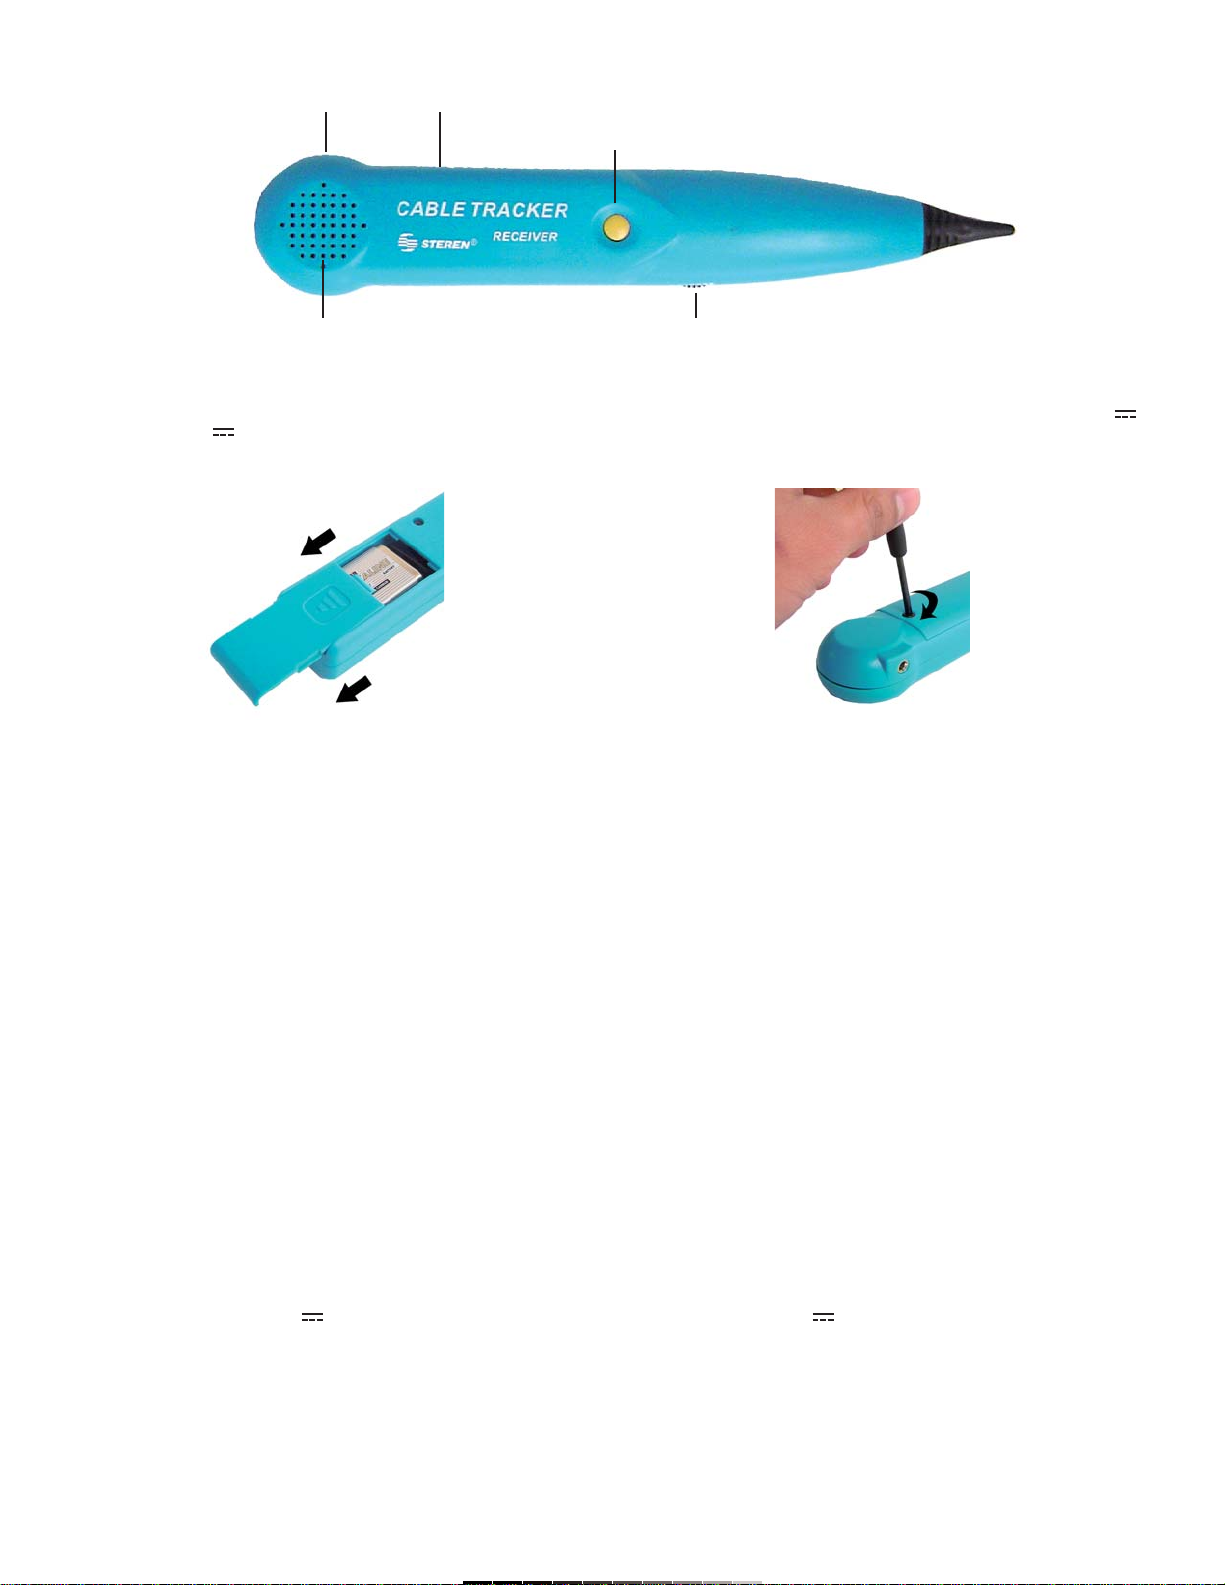
Receptor
1.- Encendido & Apagado / Volumen ... Enciende o Apaga el equipo /
Permite ajustar el volumen de
la bocina
2.- Bocina ............................................. Se activa cuando el equipo
detecta el cable o conector
adecuado
3.- Botón de prueba ............................. Presione el botón para comenzar
con la prueba
4.- Punta de detección ......................... Ubique la punta de detección en
el lugar deseado a fin de
reconocer el cable correcto de
la prueba
5.- Entrada de audífono
INSTRUCTION MANUAL FOR TONE GENERATOR AND AMPLIFIER
PROBE
Model: HER-253
Brand: Steren
Before using your new Tone Generator and Amplifier Probe, please
read this instruction manual to prevent any damage. Put it away in a
safe place for future references.
Your new tone generator allows you to quickly trace and identify electrical
cables telephone and data cables. Includes a tone or continuity selector
switch and indicator LEDs.
The probes includes a volume control and a power button to activate the
trace. Power up by a 9V battery each.
IMPORTANT
Do not use or store the equipment near wet places. May cause
malfunction or electrical shock.
Do not try to open the equipment, may cause malfunction and warranty
repeal.
Do not expose the equipment to extreme weather.
Clean only with a soft, dry cloth.
CONTROLS
Tone generator
1.- Continuity indicator LED ................. Lights on when the equipment is
in Continuity mode
2.- Tone indicator LED ......................... Lights on when the equipment is
in Tone mode
3.- Function selector ............................ Turns off the equipment
/ choose the Continuity mode
/ Choose Tone mode
4.- Test leads ........................................ Allows one to connect the cables
that you want to test
5.- Modular connector .......................... Allow one to plug into
the mating cable connectors
Amplifier Probe
1.- On / Off / Volume ............................. Power on - off the equipment
/ Set the volume level of the
speaker
2.- Speaker ........................................... It activates when the equipment
detects the right cable or
connector
3.- Power on button .............................. Press to start testing
4.- Probe tip .......................................... Aim the probe tip in the desired
place in order to know the right
cable in the test
5.- Headphone jack
1
23
4
5
INSTALACIÓN DE BATERÍAS
Antes de comenzar a utilizar el equipo, asegúrese de instalar una batería
nueva alcalina de 9V en el receptor y en el generador de tonos.
En el caso del receptor utilice un desarmador para retirar la cubierta del
compartimiento de baterías.
BÚSQUEDA DE CABLES
1.- Conecte el generador de tonos al cable.
- Para cables con una sola terminal, conecte el caimán rojo al cable y el
caimán negro a la tierra del equipo.
- Para cables sin terminales, conecte el caimán rojo a un cable y el
caimán negro al otro cable.
- Para cables con conector modular, inserte el plug RJ11 directamente en
el jack.
2.- Coloque el selector de función en la posición de Tono (Tone).
3.- En el receptor, mantenga presionado el botón Prueba.
4.- Sostenga la punta de detección y diríjala hacia los cables, de tal forma
que pueda recibir la señal originada por el generador de tonos.
5.- Ajuste el nivel de volumen a fin de obtener la mejor señal enviada por
el generador de tonos.
6.- El tono emitido será más alto en los cables conectados al generador
de tonos.
PRUEBA DE CONTINUIDAD
1.- Conecte los caimanes en el cable que desee probar.
2.- Encienda el generador de tonos en la posición CONT.
3.- El LED indicador se encenderá cuando se encuentre continuidad en el
cable de prueba.
ESPECIFICACIONES
Generador y Receptor
Entrada: 9V (1 x 9V)
Frecuencia de tono: 1,8kHz
Dimensiones: G: 35 x 145 x 25mm
R: 235 x 45 x 25mm
Peso: G: 83,2g
R: 77,6g
Nota:
El diseño del producto y las especificaciones pueden cambiar sin previo
aviso.
BATTERY INSTALLATION
Before to start to use the equipment, assure to install one new 9V
alkaline battery in the tone generator and the probe.
Use a screwdriver to place a new battery on the Amplifier Probe, in order
to release the battery compartment cover.
CABLE / WIRE TRACING
1.- Connect the tone generator to the cable.
- For cables terminated at one end, connect the red alligator clip to a wire
and the black alligator clip to equipment ground.
- For undermined cables, connect the red alligator clip to one wire and the
black alligator clip to another wire.
- For cables with modular connectors, plug the RJ11 connector directly into
the mating cable connector.
2.- Set the tone generator function selector button to the TONE position.
3.- On the amplifier probe, press and hold the power switch.
4.- Hold the insulated probe tip against the wire in question to pick up the
signal generated by the tone generator.
5.- Set the volume level to obtain the better signal sent by the tone
generator.
6.- The tone will be the loudest on the wires connected to the tone
generator.
CONTINUITY TESTING
1.- Connect the test leads to the wire pair under test.
2.- Switch the tone generator to the CONT position.
3.- The indicator LED will lights on when the equipment finds continuity in
the wire tested.
SPECIFICATIONS
Tone generator and amplifier probe
Input: 9V (1 x 9V)
Tone output : 1,8kHz
Dimensions: T: 1,3 x 5,7 x 0,9in
P: 9,2 x 1,7 x 0,9in
Weight: T: 83,2g
P: 77,6g
Note:
Product design and specifications are subject to change, without notice.
12
3
45

Other Steren Recording Equipment manuals

Steren MIX-160 User manual

Steren

Steren MIX-160 User manual

Steren 200-387 User manual

Steren

Steren 200-387 User manual

Steren 200-384 User manual

Steren

Steren 200-384 User manual

Steren K-400 User manual

Steren

Steren K-400 User manual

Steren SEL-400 User manual

Steren

Steren SEL-400 User manual

Steren MS-505 User manual

Steren

Steren MS-505 User manual

Steren EL-167 User manual

Steren

Steren EL-167 User manual

Steren 252-905 User manual

Steren

Steren 252-905 User manual

Popular Recording Equipment manuals by other brands

ICON 32Ci quick start guide

ICON

ICON 32Ci quick start guide

Cochlear Aqua+ for Kanso 2 user guide

Cochlear

Cochlear Aqua+ for Kanso 2 user guide

BOSSCO ME-50B owner's manual

BOSSCO

BOSSCO ME-50B owner's manual

Elation DMX DUO user manual

Elation

Elation DMX DUO user manual

Mesa 4I60 manual

Mesa

Mesa 4I60 manual

Digikeijs DR5000 quick guide

Digikeijs

Digikeijs DR5000 quick guide

Mitsubishi Electric DX-NT400E Specification sheet

Mitsubishi Electric

Mitsubishi Electric DX-NT400E Specification sheet

Sanyo SRT-600P Service manual

Sanyo

Sanyo SRT-600P Service manual

Fostex AR-4i owner's manual

Fostex

Fostex AR-4i owner's manual

Yellowtec PUC2 Briefing Book

Yellowtec

Yellowtec PUC2 Briefing Book

AMX IRIS Operation/reference guide

AMX

AMX IRIS Operation/reference guide

Niles SPS-6 Technical data sheet

Niles

Niles SPS-6 Technical data sheet

Honeywell CONTROLBUS QS7800B Product data

Honeywell

Honeywell CONTROLBUS QS7800B Product data

Akai MPC Reference manual

Akai

Akai MPC Reference manual

Lexicon PCM 80 - REV 1 Quick reference guide

Lexicon

Lexicon PCM 80 - REV 1 Quick reference guide

Zahl AIRCOM manual

Zahl

Zahl AIRCOM manual

STEINWAY LYNGDORF P200 installation manual

STEINWAY LYNGDORF

STEINWAY LYNGDORF P200 installation manual

Focusrite RedNet installation guide

Focusrite

Focusrite RedNet installation guide

manuals.online logo
manuals.online logoBrands
  • About & Mission
  • Contact us
  • Privacy Policy
  • Terms and Conditions

Copyright 2025 Manuals.Online. All Rights Reserved.