Stirling SC-380 User manual

INSTRUCTION MANUAL
Model Number SC-380
Steam Cleaner
N13275
AFTER SALES SUPPORT
AUS Hotline Costs
AUS
MODEL: SC-380 PRODUCT CODE: 36451 09/2014

2
AFTER SALES SUPPORT
AUS Hotline Costs
AUS
MODEL: SC-380 PRODUCT CODE: 36451 09/2014
Contents
03 Warranty Details
04 Welcome
05 General Safety Instructions
07 Product Overview
09 Getting Started
12 Features
13 Instructions
15 Other Useful Information
19 Repair and Refurbished Goods or Parts Notice

3
AFTER SALES SUPPORT
AUS Hotline Costs
AUS
MODEL: SC-380 PRODUCT CODE: 36451 09/2014
Steam Cleaner
Warranty Details
The product is guaranteed to be free from defects in workmanship and parts
for a period of 12 months from the date of purchase. Defects that occur
within this warranty period, under normal use and care, will be repaired,
replaced or refunded at our discretion, solely at our option with no charge for
parts and labour. The benefits conferred by this warranty are in addition
to all rights and remedies in respect of the product that the consumer
has under the Competition and Consumer Act 2010 and similar state and
territory laws.
Our goods come with guarantees that cannot be excluded under the
Australian Consumer Law. You are entitled to a replacement or refund for
a major failure and to compensation for any other reasonably foreseeable
loss or damage. You are also entitled to have the goods repaired or
replaced if the goods fail to be of acceptable quality and the failure does
not amount to a major failure.
YEAR WARRANTY
1

4
AFTER SALES SUPPORT
AUS Hotline Costs
AUS
MODEL: SC-380 PRODUCT CODE: 36451 09/2014
Welcome
Congratulations on choosing to buy a Stirling®product.
All products brought to you by Stirling®are manufactured to the highest
standards of performance and safety and, as part of our philosophy of customer
service and satisfaction, are backed by our comprehensive 1 Year Warranty. We
hope you will enjoy using your purchase for many years to come.

5
AFTER SALES SUPPORT
AUS Hotline Costs
AUS
MODEL: SC-380 PRODUCT CODE: 36451 09/2014
Read this manual thoroughly before first use, even if you are familiar with this
type of product. The safety precautions enclosed herein reduce the risk of
fire, electric shock and injury when correctly adhered to.
Keep the manual in a safe place for future reference, along with the completed
warranty card, purchase receipt and carton. If applicable, pass these instructions
on to the next owner of the appliance.
Always follow basic safety precautions and accident prevention measures when
using an electrical appliance, including the following:
Electrical safety and cord handling
• Protect the power supply cord: do not pull the cord; do not use the cord as
a handle; do not close a door on the cord; do not pull the cord around sharp
edges or corners; keep the cord away from heated surfaces.
• Do not handle the cord, plug or the appliance with wet hands or operate it
without wearing shoes.
• Do not use the steam cleaner with an extension cord.
• Make sure your outlet voltage and circuit frequency correspond to the voltage
stated on the appliance rating label and your outlet socket is properly earthed.
• Do not leave the steam cleaner plugged in. Always disconnect it from the
electrical outlet when filling with water, when refilling or emptying the water
tank and when not in use.
• Never pull the cord to disconnect the steam cleaner from the electrical outlet;
always grasp and pull the plug to disconnect.
• Do not immerse any part of the steam cleaner in water or other liquids.
• Do not leave the steam cleaner unattended while connected to power.
• Do not use the steam cleaner if it has been dropped or if its cord, plug or any
other part is damaged.
• Do not disassemble or attempt to repair the steam cleaner yourself. Incorrect
repair and assembly can cause a risk of electrical shock or injury to persons
when the steam cleaner is used.
• In case of damage, contact our after sales support line for advice on
repair or return of the damaged product.
• Unless your home is already fitted with a residual current device (safety
switch), we recommend installing an RCD with a rated residual operating
current not exceeding 30mA to provide additional safety protection when
using electrical appliances. See your electrician for professional advice.
General Safety Instructions

6
AFTER SALES SUPPORT
AUS Hotline Costs
AUS
MODEL: SC-380 PRODUCT CODE: 36451 09/2014
General Safety Instructions (Cont.)
Usage conditions and restrictions
• Only use the steam cleaner for its intended purpose, as described in this
manual and only with the supplied or recommended accessories.
• Do not use the steam cleaner outdoors; do not use it in areas where
explosive and/or flammable fumes are present.
• Never use any chemicals or substances other than tap water in the machine.
Use of cleaning solutions, scented perfumes, oil or any other chemicals may
damage the machine, make it unsafe for use and will automatically void your
warranty.
• Only use regular water in the machine, or distilled/purified water if the tap
water in your area is very hard.
• Do not put any objects into openings; do not use the steam cleaner with any
opening blocked.
• Keep your work area well lit.
• Never turn the appliance over or on its side when using steam.
• Never direct steam towards people, animals or plants. The steam is very hot
and can cause burns.
• Burns can occur from contact with hot metal parts, hot water or steam. Use
caution when turning the unit upside down as there may be hot water inside.
• Never direct steam or hot water towards equipment containing electrical
components, such as the interior of ovens.
• Let the steam cleaner cool down completely before storage and before
opening the water tank (removing the safety cap).
• Always turn the safety cap slowly when opening the water tank to allow any
remaining steam to escape gradually. Wear protective gloves, if necessary.
• Do not allow children to use the appliance as a toy. Supervise children to
ensure they do not play with the appliance. Close supervision is necessary
when the appliance is used by or near children, or near pets and plants.
• Store your appliance indoors in a cool, dry area, with the cord wrapped
loosely around the steam cleaner.
• This appliance is not intended for use by persons (including children) with
reduced physical, sensory or mental capabilities, or lack of experience
and knowledge, unless they have been given supervision or instruction
concerning use of the appliance by a person responsible for their safety.
• We assume no liability for any eventual damages caused by improper or
faulty use.

7
AFTER SALES SUPPORT
AUS Hotline Costs
AUS
MODEL: SC-380 PRODUCT CODE: 36451 09/2014
Product Overview
Unit parts
1 Main unit
2 Nozzle (with concentrator nozzle)
3 Safety cap
4 Steam trigger button
5 Handle
6 Steam ready indicator light
1
2 3 4
5
6
8
AFTER SALES SUPPORT
AUS Hotline Costs
AUS
MODEL: SC-380 PRODUCT CODE: 36451 09/2014
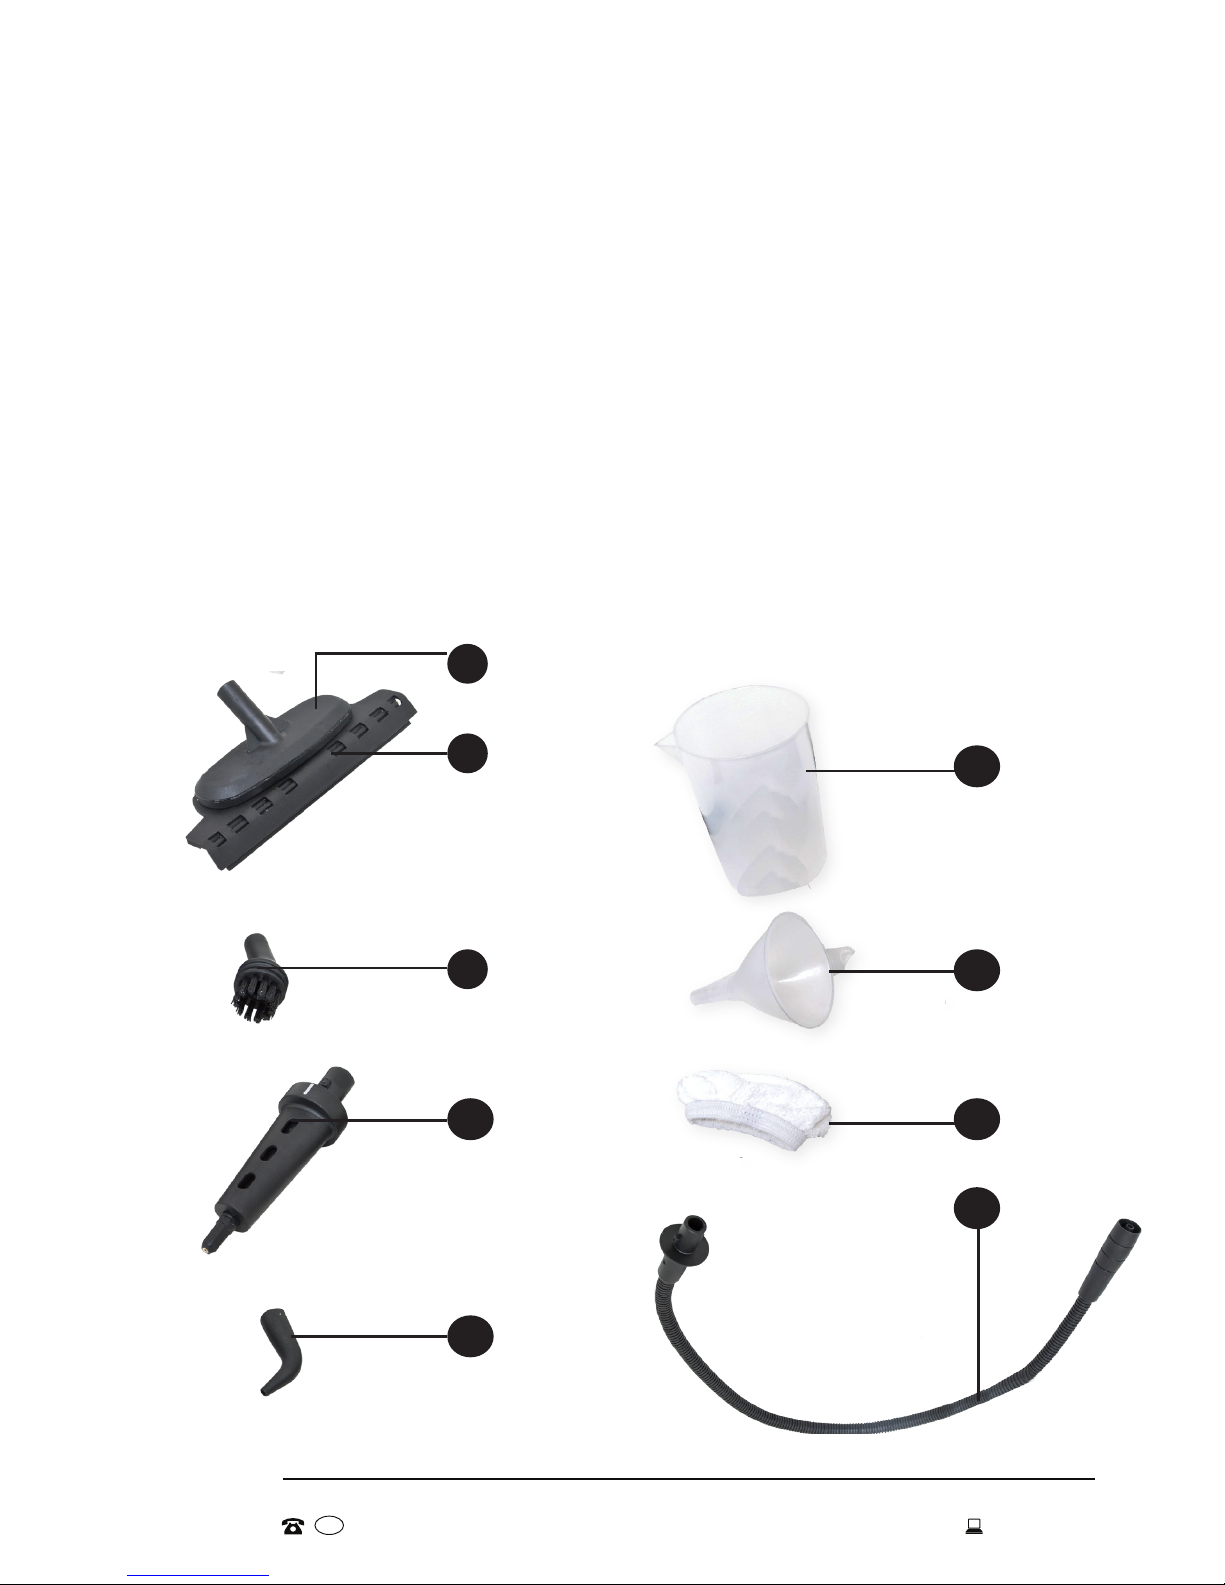
Product Overview (Cont.)
Accessories
7 Steam diffuser
8 Squeegee attachment
9 Detail brush
10 Concentrator nozzle
11 Angle adaptor
12 Measuring cup
13 Funnel
14 Cleaning cloth
15 Hose
7
8
9
11
10
12
13
14
15

9
AFTER SALES SUPPORT
AUS Hotline Costs
AUS
MODEL: SC-380 PRODUCT CODE: 36451 09/2014
Before first use
• Unpack the appliance but keep all packaging materials until you have made
sure your new steam cleaner is undamaged and in good working order.
• Plastic wrapping can be a suffocation hazard for babies and young children,
so ensure all packaging materials are out of their reach.
• Inspect the cord for damage or wear before each use. Do not use the
appliance if the appliance or its cord are damaged or not working properly. In
case of damage, contact our after sales support line.
Setting up the steam cleaner
Getting Started
CAUTION!
Always ensure the unit is unplugged from the electrical
outlet before filling or refilling the water tank.
1. Disconnect the unit from the power supply.
2. Unscrew the safety cap: turn it counterclockwise to remove it and open the
tank.
3. Use the measuring cup and funnel to fill the tank with fresh tap water, taking
care not to overfill the tank.
NOTE: Fill less than 500ml (maximum tank capacity) of water into the tank so
there is enough room for the water to expand when it is heating up.
NOTE: Only use regular water in the machine, or distilled/purified water if the
tap water in your area is very hard.
4. Close the tank by replacing the safety cap: turn it clockwise and press down
firmly to tighten.
5. If required, attach the hose to the steam cleaner. Push the hose into the
appliance and turn it clockwise (in the direction of the arrow mark) until it is
securely locked in place. (See page 11 for how to attach the concentrator
nozzle.)
6. Plug the unit into a standard 220-240V wall socket, the power indicator will
light up.
NOTE: Heat-up time is approximately 5 – 8 minutes. Filling the boiler with hot
water will shorten the heat-up time.
7. At the start, some water will come out of the nozzle. This is normal.

10
AFTER SALES SUPPORT
AUS Hotline Costs
AUS
MODEL: SC-380 PRODUCT CODE: 36451 09/2014
Getting Started (Cont.)
Refilling the water tank
It is time to refill your steam cleaner when there is no more steam coming out of
the nozzle. Because the water tank is pressurised, use caution when opening the
unit for refilling.
CAUTION!
This appliance is under pressure.
Before removing the safety cap, press the trigger button
until all pressure has been released and no more steam
is escaping. Wear protective gloves, if necessary.
CAUTION!
When refilling the steam cleaner while it is still hot,
the first drops of water might bubble up. Always take
extreme care when opening the safety cap.
1. Disconnect the unit from the power supply and let it cool down for at least
5 minutes.
2. Press the trigger button while carefully unscrewing the safety cap
counterclockwise, half a turn only – do not fully unscrew the cap at this
stage!
3. Wait until all pressure has been released and the hissing noise from escaping
steam has stopped. Then push down the red valve and unscrew the safety
cap completely.
4. When the unit has cooled down, slowly refill the tank, following steps 3 – 5
on the previous page.
NOTE: Do not overfill. Always leave some room for the water to expand.

11
AFTER SALES SUPPORT
AUS Hotline Costs
AUS
MODEL: SC-380 PRODUCT CODE: 36451 09/2014
Getting Started (Cont.)
Squeegee attachment
To attach the squeegee to the steam diffuser,
place the two hinges at the back of the
squeegee into the two open tabs at the back
of the steam diffuser (see illustration B, right).
Push the squeegee up against the bottom of the
steam diffuser until the locking tab engages.
To remove the squeegee from the steam
diffuser, push the squeegee outward.
The attachments
Concentrator nozzle, steam diffuser and
other attachments
Align the line mark on the concentrator nozzle
with the top line mark on the steam cleaner.
Push the attachment onto the nozzle firmly, then
turn it clockwise (in the direction of the arrow
mark) until the line mark on the attachment is
aligned with the lower line mark on the appliance
(see illustration A, right). The attachment is now
locked into position. The steam diffuser and other
attachments fit onto the concentrator nozzle.
CAUTION!
When cleaning outside windows, avoid any
sudden changes in temperature to prevent
breakage or cracks.
Detail brush and angle adaptor
Both the angle adaptor and the small detail brush
can be used on the concentrator nozzle. Push
the attachment onto the end of the concentrator
nozzle (see illustration C, above right).
Cleaning cloth
The cleaning cloth is used with the steam
diffuser, just slip it over the steam diffuser (see
illustration D, right).Then attach the steam
diffuser to the concerntrator nozzle. This
attachment can be used for cleaning upholstery.
B
C
A
D

12
AFTER SALES SUPPORT
AUS Hotline Costs
AUS
MODEL: SC-380 PRODUCT CODE: 36451 09/2014
Features
This steam cleaner uses pressurised steam to remove tough grease, dirt and
grime from all hard surfaces in your home. Steam is nature’s purest and most
powerful cleaner for safely cleaning without harsh chemicals and without
harming the environment.
Your new steam cleaner comes with various attachments, which make it a very
versatile tool for cleaning many hard household surfaces, windows, upholstery
and much more, for example:
• Clean hard surfaces in your kitchen and bathroom: benchtop, sink, basin,
shower door, tracks etc.
• Clean sealed grout between tiles.
• Clean windows, glass doors and mirrors.
• Clean and refresh curtains, blinds, cushions, upholstery, bedding and other
soft furnishings.
• Clean difficult-to-reach areas with ease using the angle adaptor and/or
concentrator nozzle.
WARNING!
• The steam cleaner is designed to clean hard surfaces and upholstery
that will withstand high heat.
• Do not use it on soft plastics, unsealed wood and cold glass.
• Using the steam cleaner on unsealed wood could cause the wood grain
to expand. Test an isolated area of the surface to be cleaned before
proceeding.
• On some surfaces, including those which have been treated with wax,
the heat and steam from the steam cleaner may remove the sheen.
• Do not add cleaning solutions to the water tank. Only use the steam
cleaner with tap water (or purified/distilled water).
13
AFTER SALES SUPPORT
AUS Hotline Costs
AUS
MODEL: SC-380 PRODUCT CODE: 36451 09/2014
Instructions
Cleaning upholstery
CAUTION!
Always determine the colour-fastness of any fabric first, especially
with reds or blues. Take a clean, moist, warm towel and gently
rub a small, inconspicuous area (on the back or far down) on the towel. If
the colour stains the towel, you may need to have the piece dry cleaned.
Cleaning windows, glass surfaces and mirrors
• To use the squeegee, work your way from the top to the bottom of the glass
panel with the steam jet down. To do this without leaving streaks, use lateral
movements (from left to right and back), starting at the top of the glass panel
in one corner and working your way down to the bottom.
Cleaning the bathroom
• To clean the bathtub or shower area, use the small detail brush for grout,
shower door tracks, hard-to-reach areas and heavily soiled areas. Allow
plenty of time for the heat to penetrate the surface. This is especially useful
when cleaning the grout in a tiled shower area.
• To clean the toilet, use the small detail brush. Use a terry towelling cloth or
paper towel to wipe up excess moisture and residue.
• To clean the sink and taps, use the small detail brush.
• Use the steam diffuser with the cleaning cloth for cleaning upholstery and
other fabrics.
• Use fast, light strokes and avoid getting the fabric wet.
• Be patient with stubborn spots, work on a spot gently for no more than a
minute at a time, then wait five minutes for the area to dry and repeat.
• Use circular movements or back-and-forth and side-to-side movements to
clean all sides of the surface fibres.
• Finish with brush strokes in one direction to give the fabric a uniform
appearance.

14
AFTER SALES SUPPORT
AUS Hotline Costs
AUS
MODEL: SC-380 PRODUCT CODE: 36451 09/2014
Removing soap scum
• Soap scum dissolves almost immediately when treated with a combination of
heat and moisture.
• Rinse the surface with a small amount of water afterwards or go back over it
once more with a clean terry towelling cloth.
NOTE: Soap scum sometimes will develop a hard surface from waterborne
minerals. If this is the case, use the small detail brush first to break up
this surface. Alternatively, spray or wipe the area first with water and
either lemon, vinegar or bicarbonate of soda to soften the minerals.
NOTE: Moving too slowly can dry out the soap scum and cause it to
granulate, the surface will have a gritty feel. If this happens, apply
steam to the surface with the small detail brush again and clean the
area once more.
Instructions (Cont.)

15
AFTER SALES SUPPORT
AUS Hotline Costs
AUS
MODEL: SC-380 PRODUCT CODE: 36451 09/2014
• Let the appliance cool down completely before cleaning or storing.
• Empty all water from the water tank after each use.
• Store the unit indoors in a dry, cool place.
Rinsing the tank
After the tank has been filled 10 - 15 times, we recommend rinsing it to remove
any mineral deposits that may have accumulated inside the tank.
• Fill the tank with water and shake it vigorously.
• Tilt the cleaner upside down to empty the water and any scale deposits out
of the tank.
Cleaning the nozzles
Your steam cleaner should not normally require cleaning, however, should you
notice a marked decrease in steam output, it may be necessary to remove
mineral deposit build-up from the nozzle opening.
First ensure that there is water in the tank. If the tank is empty, fill it with
water (we recommend using distilled/purified water). Then restart the unit
noting whether the steam output is normal. If it is still low, follow the cleaning
instructions below.
1. Unplug the steam cleaner from the wall outlet.
2. Take a stiff metal wire with a small diameter (such as a straightened metal
paperclip) and carefully insert the end of the wire into the nozzle opening.
3. Move the wire back and forth several times to remove any deposits.
4. Reconnect the appliance to the power outlet, switch it on and note the steam
output.
5. If the steam performance has not improved, repeat steps 1 to 4 above.
Other Useful Information
CAUTION!
Always ensure the unit is unplugged from the electrical outlet and has cooled
down completely before carrying out any cleaning and maintenance tasks.
Care and maintenance

16
AFTER SALES SUPPORT
AUS Hotline Costs
AUS
MODEL: SC-380 PRODUCT CODE: 36451 09/2014
Responsible disposal
At the end of its working life, do not throw this appliance out with your household
rubbish. Electrical and electronic products contain substances that can have
a detrimental effect on the environment and human health if disposed of
inappropriately. Observe any local regulations regarding the disposal of electrical
consumer goods and dispose of it appropriately for recycling. Contact your local
authorities for advice on recycling facilities in your area.
Technical specifications
Voltage: 220-240VAC 50Hz
Power: 1000W
Other Useful Information (Cont.)

17
AFTER SALES SUPPORT
AUS Hotline Costs
AUS
MODEL: SC-380 PRODUCT CODE: 36451 09/2014
This page has been left blank intentionally.

18
AFTER SALES SUPPORT
AUS Hotline Costs
AUS
MODEL: SC-380 PRODUCT CODE: 36451 09/2014
This page has been left blank intentionally.

19
AFTER SALES SUPPORT
AUS Hotline Costs
AUS
MODEL: SC-380 PRODUCT CODE: 36451 09/2014
Repair and Refurbished
Goods or Parts Notice
Unfortunately, from time to time, faulty products are manufactured which need to
be returned to the supplier for repair.
Please be aware that if your product is capable of retaining user-generated data
(such as files stored on a computer hard drive, telephone numbers stored on
a mobile telephone, songs stored on a portable media player, games saved on
a games console or files stored on a USB memory stick) during the process of
repair, some or all of your stored data may be lost. We recommend you save this
data elsewhere prior to sending the product for repair.
You should also be aware that rather than repairing goods, we may replace them with
refurbished goods of the same type or use refurbished parts in the repair process.
Please be assured though, refurbished parts or replacements are only used
where they meet ALDI’s stringent quality specifications.
If at any time you feel your repair is being handled unsatisfactorily, you may
escalate your complaint. Please telephone us on 1300 886 649 or write to us at:
Tempo (Aust) Pty Ltd ABN 70 106 100 252
PO BOX 6056 Frenchs Forest, Sydney, Australia NSW 2086
Telephone: 1300 886 649 (Aust) - Fax: (02) 9975 2688
Tempo Help Desk: 1300 886 649 (Aust)
(Operating Hours: Mon-Fri 08:30am to 06:00pm EST)
Email: [email protected]g
Steam Cleaner
YEAR WARRANTY
1

AFTER SALES SUPPORT
AUS Hotline Costs
AUS
MODEL: SC-380 PRODUCT CODE:36451 09/2014
Warranty returns
Should you for any reason need to return
this product for a warranty claim, make sure to
include all accessories with the product.
Product does not work?
If you encounter problems with this product, or if it fails to
perform to your expectations, make sure to contact our
After Sales Support Centre on 1300 886 649
before returning it to the store for a refund.
Table of contents
Other Stirling Steam Cleaner manuals

Stirling
Stirling SM-102 User manual

Stirling
Stirling GS511 User manual

Stirling
Stirling SC-389 User manual

Stirling
Stirling SC-389 Specification sheet

Stirling
Stirling GS511 User manual

Stirling
Stirling IA3744 User manual

Stirling
Stirling GS511 User manual

Stirling
Stirling GSTT1100 User manual

Stirling
Stirling IA3744 User manual

Stirling
Stirling SC-270S User manual


