Stirling IA3744 User manual

PREMIUM GARMENT STEAMER
& FABRIC SHAVER
Model Number IA3744
INSTRUCTION MANUAL

02
AFTER SALES SUPPORT
1300 777 137
MODEL: IA3744 PRODUCT CODE: 712159 07/2023
Welcome
Congratulations on choosing to buy a Stirling®appliance.
All appliances brought to you by Stirling®are manufactured to the highest
standards of performance and safety and as part of our philosophy of customer
service and satisfaction are backed by our comprehensive 12 month warranty.
We hope you will enjoy using your purchase for many years to come.

03
AFTER SALES SUPPORT
1300 777 137
MODEL: IA3744 PRODUCT CODE: 712159 07/2023
Contents
02 Welcome
04 Warranty Details
05 General Information & Safety Instructions
10 Product Overview
12 Getting Started
13 Instructions
13 Filling the Water Tank
14 Using the Garment Steamer
17 Using the Fabric Shaver
18 Cleaning and Maintenance
18 Cleaning the Garment Steamer
18 Descaling the Garment Steamer
19 Cleaning the Fabric Shaver
22 Storage
23 Frequently Asked Questions
26 Other Useful Information
27 Repair and Refurbished Goods or Parts Notice

YEAR WARRANTY
1
04
AFTER SALES SUPPORT
1300 777 137
MODEL: IA3744 PRODUCT CODE: 712159 07/2023
Premium Garment Steamer & Fabric Shaver
Warranty Details
REGISTER YOUR PURCHASE AT www.aldi.com.au/en/about-aldi/product-registration/
TO KEEP UP-TO-DATE WITH IMPORTANT PRODUCT INFORMATION
The product is guaranteed to be free from defects in workmanship and parts for a period of
12 months from the date of purchase. Defects that occur within this warranty period, under
normal use and care, will be repaired, replaced or refunded at our discretion. The benets
conferred by this warranty are in addition to all rights and remedies in respect of the product
that the consumer has under the Competition and Consumer Act 2010 and similar state and
territory laws.
Our goods come with guarantees that cannot be excluded under the Australian Consumer Law.
You are entitled to a replacement or refund for a major failure and for compensation for any
other reasonably foreseeable loss or damage. You are also entitled to have the goods repaired or
replaced if the goods fail to be of acceptable quality and the failure does not amount to a major
failure.

05
AFTER SALES SUPPORT
1300 777 137
MODEL: IA3744 PRODUCT CODE: 712159 07/2023
General Information & Safety Instructions
Read this manual thoroughly before first use, even if you are familiar with this type of product. The
safety precautions enclosed reduce the risk of fire, electric shock and injury when correctly adhered
to. Please keep this user manual in a safe place along with your purchase receipt, warranty certificate
and carton for future reference. If applicable, pass these instructions and packaging on to the next
owner of the appliance. Always follow basic safety precautions and accident prevention measures
when using an electrical product.
Electrical Safety and Cord Handling
1. Before turning on the Stirling®Garment Steamer ensure the electrical voltage and frequency
of the circuit corresponds to those indicated on the rating label of the product.
2. To protect against fire and electric shock, do not immerse these appliances, cord, plug or USB
charging cable in water or any other liquid.
3. Do not use an extension cord unless completely necessary with the Garment Steamer. If an
extension cord is used please ensure that it has a rating equal or exceeding the rating of this
product.
4. Do not use the Garment Steamer with a power board or double adaptor as this may overheat
and create a fire risk.
5. Do not pull or carry the Garment Steamer by the cord, use the cord as a handle, close a door on
the cord or pull the cord around sharp edges or corners. Keep the cord away from heated surfaces.
6. Do not pull or carry the Fabric Shaver by the USB charging cable.
7. Do not bend or damage the power cord or the USB charging cable.
8. Never force the plug into an outlet.
9. Always unplug the Garment Steamer when not in use. To disconnect from the power
supply, grip the plug and pull from the power outlet. Never pull by the cord. The plug must
be removed from the power outlet before cleaning, servicing, maintenance or moving the
Garment Steamer.
10. The Garment Steamer and Fabric Shaver are not intended to be operated by means of an
external timer or separate remote control system.
11. Do not use the Garment Steamer if the plug, cord or the Garment Steamer itself is damaged.
Do not use the Fabric Shaver if the USB charging cable or the Fabric Shaver itself is damaged.
Please contact our After Sales Support line for further advice.

06
AFTER SALES SUPPORT
1300 777 137
MODEL: IA3744 PRODUCT CODE: 712159 07/2023
General Information & Safety Instructions (cont.)
12. Unless your home is already fitted with a residual current device (safety switch), we
recommend installing an RCD with a rated residual operating current not exceeding 30mA to
provide additional safety protection when using electrical appliances. See your electrician for
professional advice.
Usage Conditions and Restrictions
1. The Garment Steamer and Fabric Shaver are intended for indoor household use only and not
for commercial purposes.
2. Do not use the Garment Steamer or Fabric Shaver for reasons other than their intended use.
3. The Garment Steamer and Fabric Shaver are not toys. Supervise children to ensure they do not
play with these appliances. Keep the Garment Steamer and Fabric Shaver out of reach of children.
4. The Garment Steamer and Fabric Shaver are not intended for use by persons (including
children) with reduced physical, sensory or mental capabilities or lack of experience or
knowledge unless they have been given supervision or instruction concerning use of the
product by a person responsible for their safety.
5. Do not leave the Garment Steamer unattended when plugged in. Always switch o and unplug
when you are not using the Garment Steamer.
6. Do not leave the Fabric Shaver unattended when charging. Always unplug the USB charging
cable from the USB charging port when finished charging.
7. Do not cover the Garment Steamer or Fabric Shaver whilst in use. If covered there may be a
risk of fire.
8. These units have no user-serviceable parts contained within. Do not attempt to repair,
disassemble or modify the Garment Steamer or Fabric Shaver. This will void the warranty.
9. Improper installation may result in the risk of fire, electric shock or injury to person.
10. The manufacturer is not responsible for any eventual damage caused by improper or faulty use.
11. The use of attachments not sold or recommended by the manufacturer may cause fire or
electric shock or injury.
12. To reduce the risk of electrocution, never operate these appliances with wet hands, submerge
underwater or spill liquids into the Garment Steamer or Fabric Shaver.
13. Do not use the Garment Steamer or Fabric Shaver outdoors or near any source of water
including in the immediate surroundings of a bath, shower or swimming pool.

07
AFTER SALES SUPPORT
1300 777 137
MODEL: IA3744 PRODUCT CODE: 712159 07/2023
General Information & Safety Instructions (cont.)
14. Do not use the Garment Steamer or Fabric Shaver directly under an open window as rain may
cause electric shock.
15. The Garment Steamer and Fabric Shaver are not intended to be operated by means of an
external timer or any type of separate remote control system.
Handling and Usage
Garment Steamer:
1. Always operate the Garment Steamer on a dry, flat, heat resistant surface, such as an ironing
board. Operating on sinks or uneven surfaces should be avoided.
2. It is recommended to use de-ionised, demineralised or distilled water (available from most large
supermarkets) in the Garment Steamer as tap water contains minerals which can be left behind
(in the form of lime scale) and over time can aect the performance of the Garment Steamer.
3. Do not touch hot surfaces and always allow the Garment Steamer to cool down before refilling
the water tank, cleaning, descaling or storing the Garment Steamer.
4. Do not use the Garment Steamer on an inclined or unstable surface.
5. Do not use the Garment Steamer if the unit has been dropped, there are visible signs of
damage or the Garment Steamer is leaking.
6. Never add cleaning detergents to the Garment Steamer water tank. This will make the
operation unsafe and damage the unit.
7. Do not operate the Garment Steamer when the water tank is empty as this may damage the
appliance.
8. Never block the steam openings of the Garment Steamer or leave it on a soft surface, where
the steam openings may be blocked. Keep the steam openings free of lint, hair and the like. Do
not use the Garment Steamer if any openings are blocked.
Fabric Shaver:
1. Always operate the Fabric Shaver on a dry, flat, stable surface. Operating on sinks or uneven
surfaces should be avoided.
2. Only charge the Fabric Shaver with the 5V USB charging cable that has been supplied with the unit.
3. Always unplug the USB charging cable from the Fabric Shaver once finished and before
cleaning or assembling.

08
AFTER SALES SUPPORT
1300 777 137
MODEL: IA3744 PRODUCT CODE: 712159 07/2023
General Information & Safety Instructions (cont.)
4. Always unplug the USB charging cable from the charging port before using the Fabric Shaver.
5. Do not use the Fabric Shaver on an inclined or unstable surface.
6. Do not use the Fabric Shaver if the unit has been dropped or there are visible signs of damage.
7. Keep your hands away from blade attachment of the Fabric Shaver to reduce the risk of injury.
The end of the cleaning brush or other suitable tool should be used when removing the blade
attachment.
8. Be careful when handling the blade attachment, especially when cleaning, as the razor blades
are very sharp.
9. Do not come into contact with the moving parts of the Fabric Shaver.
10. Do not operate the Fabric Shaver without the mesh blade protector and lint catcher correctly
and securely attached. This is extremely dangerous.
11. Do not wash or rinse the blade attachment, mesh blade cover or lint catcher. Only use the
cleaning brush (included) to clean these parts. You may use a soft, dry cloth to remove any
remaining lint particles on the mesh blade cover and lint catcher.
12. Do not use the blade attachment, mesh blade protector or lint catcher if they are cracked or
broken.
13. Only use the Fabric Shaver on a dry, flat, stable surface. Do not use the Fabric Shaver on a
garment while you are wearing it.
14. Never use the Fabric Shaver on anything other than fabric.
15. Never use the Fabric Shaver on skin, or to remove body hair. This is extremely painful and
dangerous.
16. To prevent damage to the fabric:
a. Always test the Fabric Shaver on a small, inconspicuous area before using on the whole
garment, furniture, rug etc.
b. Avoid using the Fabric Shaver on delicate areas such as buttons, zips and decorations.
c. Take care when using on delicate and fine fabrics. Do not use the Fabric Shaver on soft
materials such as mohair, cashmere or silk.

09
AFTER SALES SUPPORT
1300 777 137
MODEL: IA3744 PRODUCT CODE: 712159 07/2023
General Information & Safety Instructions (cont.)
17. It is recommended to clean the Fabric Shaver and blade attachment immediately after each
use to maintain the blade attachment and motor performance.
WARNING: The Garment Steamer operates with steam. Be extremely careful when using to avoid
scalding and burns.
WARNING: Steam can scald. Take care to avoid contact with any steam emitted from the Garment
Steamer when in use. Keep all body parts, including hands and feet away from escaping steam.
Never turn the Garment Steamer upside down when it is in use.
WARNING: Never direct steam towards people, animals, plants or equipment containing electrical
components.
WARNING: Do not leave your Garment Steamer stationary whilst in use at any time to avoid any
possible damage to your garments or fabrics.
WARNING: Never use the Garment Steamer without water in the water tank. Do not remove the
water tank when the Garment Steamer is in operation.
WARNING:Do not attempt to steam any garments whilst being worn by a person. Steam will
penetrate the garment and can scald.
WARNING: Always unplug the Garment Steamer from the power outlet before removing the water
tank.
WARNING: Do not attempt to use the Fabric Shaver on any garments whilst being worn by a
person.
NOTE: This Fabric Shaver has a safety mechanism which deactivates the unit when the mesh blade
cover is removed or not correctly attached. This is a safety feature, so that the Fabric Shaver does
not accidentally power on, while you are disassembling the unit for cleaning or reassembling the unit.
NOTE: The Fabric Shaver contains batteries that are non-replaceable.
NOTE: The Fabric Shaver will not operate unless the mesh blade cover is attached. This is a safety
feature and not a product fault.
WARNING: Keep the appliance dry.
Read this instruction manual carefully
before using the Garment Steamer
& Fabric Shaver and keep it in a safe
place for future reference.
The Regulatory Compliance Mark
(RCM) shows that a product is safe
to supply to the Australia market.
Product Overview
10
AFTER SALES SUPPORT
1300 777 137
MODEL: IA3744 PRODUCT CODE: 712159 07/2023
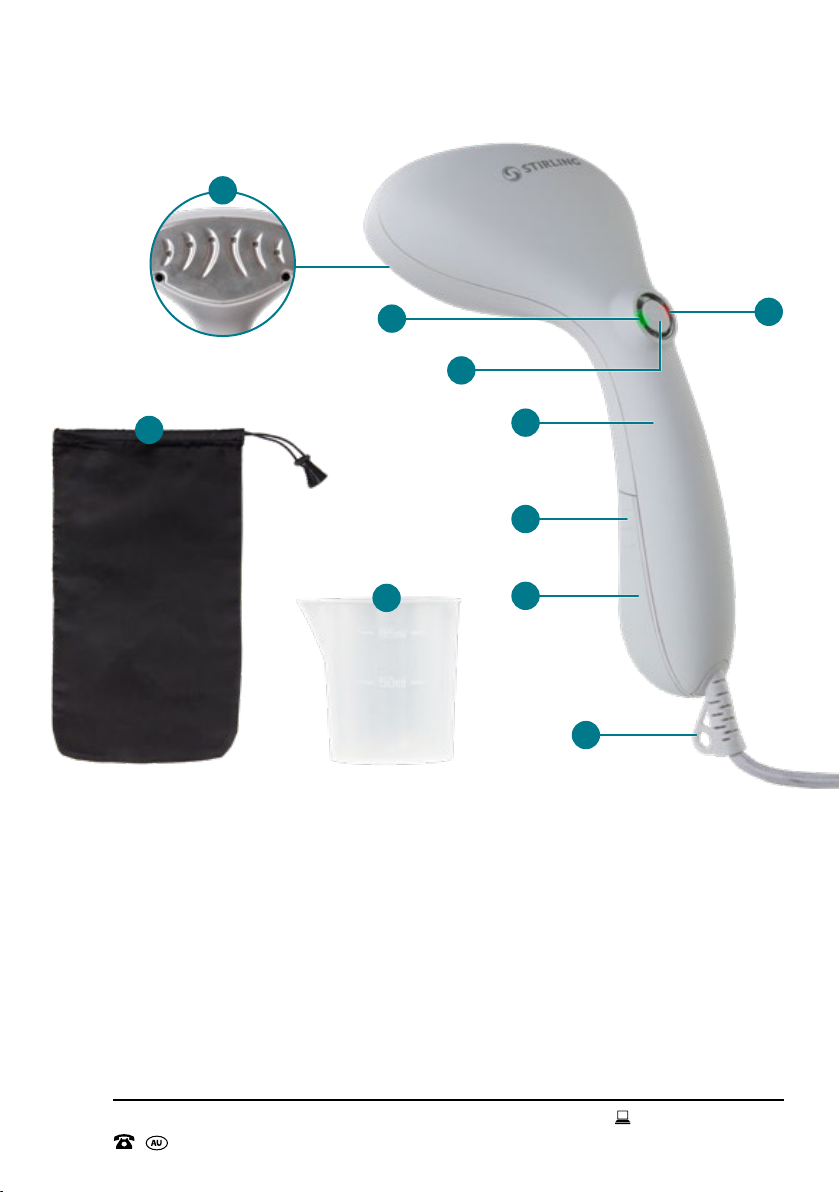
Garment Steamer
1. Steam Plate
2. Ready Indicator Light (green)
3. Heating Indicator Light (orange)
4. Steam Button
5. Main Body
6. Water Tank Side Grips
7. Water Tank
8. Hanging Loop
9. Measuring Cup
10. Protective Pouch
Included (not pictured): Instruction Manual, Quick Start Guide, Warranty Certificate.
7
6
5
2
4
3
8
10
9
1

Product Overview (cont.)
11
AFTER SALES SUPPORT
1300 777 137
MODEL: IA3744 PRODUCT CODE: 712159 07/2023
Fabric Shaver
1. Power Button
2. Main Body
3. Contour Grip
4. USB Charging Port
5. Blade Attachment
6. Mesh Blade Cover
7. Lint Catcher
8. Magnetic Cover
9. Power (green) / Charge (red) Indicator Light
10. Cleaning Brush
11. Micro USB Charging Cable
12. Protective Pouch
1
8
5
6
7
2
3
4
12
11
10
9

12
AFTER SALES SUPPORT
1300 777 137
MODEL: IA3744 PRODUCT CODE: 712159 07/2023
Getting Started
Prior to using your Garment Steamer and Fabric Shaver, please read all the safety and operating
instructions thoroughly. Please ensure you follow the steps below before using these appliances. We
recommend storing the Garment Steamer and Fabric Shaver in their protective pouches and keep
the combined units in the original packaging when not in use.
1. Unpack the appliances but keep all packaging material until you have made sure your new
Garment Steamer and Fabric Shaver are undamaged and in good working order. Plastic
wrapping can be a suocation hazard for babies and children, so ensure all packaging materials
are out of their reach.
2. Ensure you have all items and accessories listed in the Product Overview section of this
instruction manual.
3. Remove the cable ties, uncoil the power cord and USB charging cable and straighten them
to remove any kinks. Do not use the Garment Steamer or Fabric Shaver if these parts are
damaged. In case of damage, phone the After Sales Support line on 1300 777 137 for
advice.
4. Inspect the power cord, USB charging cable, Garment Steamer and Fabric Shaver for damage
or wear before each use.
NOTE: You may notice a slight odour being emitted from the Garment Steamer and Fabric Shaver
during the initial use. This is normal and will cease with continued use.
13
AFTER SALES SUPPORT
1300 777 137
MODEL: IA3744 PRODUCT CODE: 712159 07/2023
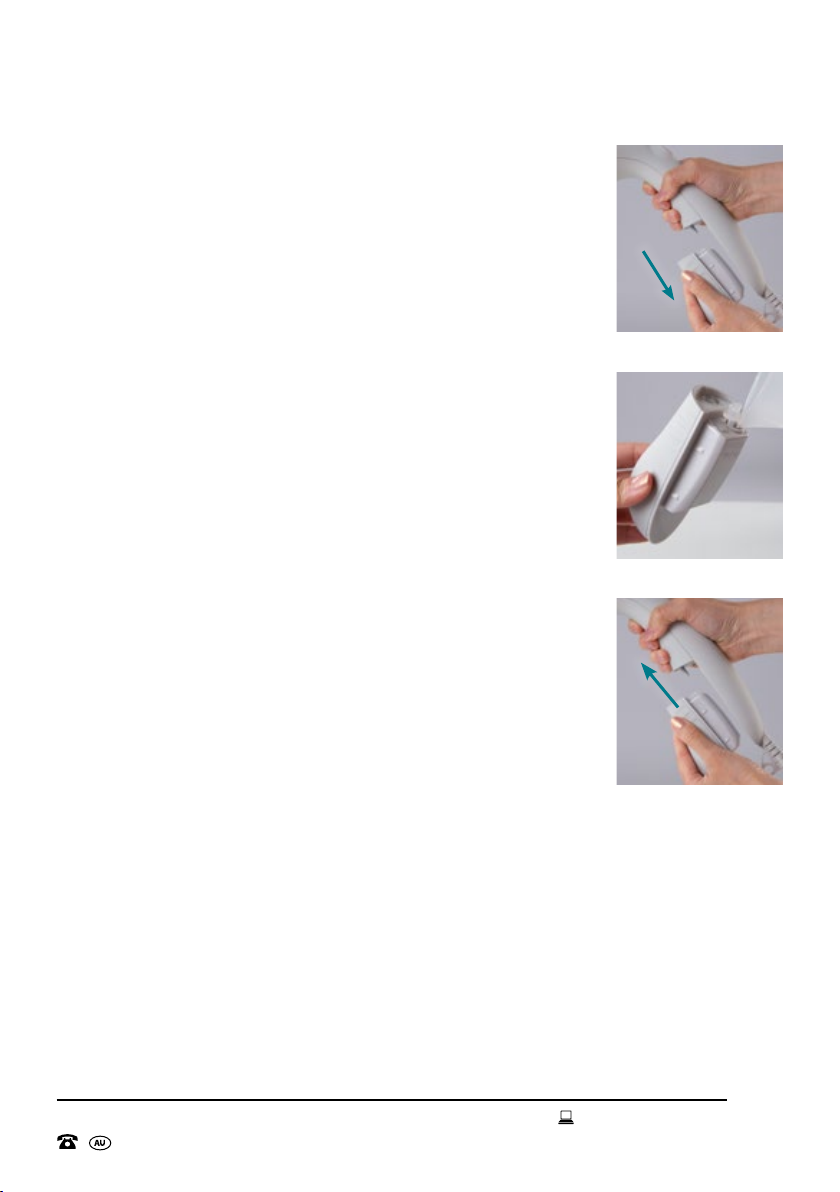
Filling the Water Tank
Before operating the Garment Steamer, the water tank must first be filled
before use. Please follow the instructions below on how to fill the water
tank of the Garment Steamer.
TIP: It is recommended to only use purified or distilled water in the
Garment Steamer.
1. Ensure that the Garment Steamer is completely cool, and the power
cord is disconnected from the power outlet.
2. To detach the water tank, hold the Garment Steamer upright in one
hand. With the other hand, grasp the side grips and slide the water
tank downwards and away from the main body (Fig. 1).
3. Fill the measuring cup (included), up to the 85ml mark.
NOTE: The maximum water capacity of the Garment Steamer is 85ml. Do
not overfill the water tank as this can damage the Garment Steamer.
4. Lift the water tank plug and carefully pour the water into the tank
slowly, to allow the air inside the water tank to escape (Fig. 2).
5. Close the water tank plug. Ensure it is pressed into place and secure.
6. To reattach the water tank, hold the Garment Steamer upright in one
hand. With the other hand, position the water tank so that the tabs on
the water tank align with the grooves on the main body. Then slide the
water tank upwards until it is securely attached to the main body (Fig. 3).
NOTE: Do not overfill the water tank as this will aect the operation of the
Garment Steamer.
CAUTION: Ensure the outside of the water tank is dry before reattaching to the Garment Steamer.
WARNING: Never use the Garment Steamer without water in the water tank. Do not remove the water
tank when the Garment Steamer is in operation.
WARNING: Do not attempt to fill the water tank while the Garment Steamer is still hot or
connected to a power outlet. Always switch o and unplug from the power outlet and allow the
Garment Steamer to cool completely before filling the water tank.
Instructions
Fig. 1
Fig. 2
Fig. 3

14
AFTER SALES SUPPORT
1300 777 137
MODEL: IA3744 PRODUCT CODE: 712159 07/2023
NOTE: When the water tank requires refilling, the sound of the water pump will increase in volume
and there will be less steam being emitted from the Garment Steamer. When this occurs, turn o the
Garment Steamer immediately, disconnect the power cord from the power outlet, allow time for the
Garment Steamer to cool and then follow the instructions on page 13 for how to fill the water tank.
Using the Garment Steamer
Steaming is an easy, innovative, and eective alternative to ironing. The hot steam helps keep
clothes fresh, smooth, and crinkle-free. The Garment Steamer can be used on most fabrics,
including garments and household fabrics such as rugs and upholstery. Please follow the instructions
below to achieve the best results when using the Garment Steamer.
1. Before using the Garment Steamer, ensure the water tank is filled
with water and securely attached to the Garment Steamer. Please
see page 13 for instructions on how to fill the water tank.
WARNING: Never plug the Garment Steamer into a power outlet
and switch on, unless the water tank is filled with water and securely
attached to the Garment Steamer.
2. Place the Garment Steamer horizontally on a flat, stable, heat
resistant surface with the steam plate pointing away from you.
3. Plug the cord into a power outlet and switch on the outlet. The
heating indicator light will illuminate, indicating the Garment
Steamer is on and is in the process of heating up (Fig. 4).
4. Once the heating indicator light turns o and the ready indicator
light illuminates, the Garment Steamer is ready to use (Fig. 5).
NOTE: The Garment Steamer will take approximately 25-30 seconds to
heat up once it is plugged into a power outlet and switched on at the outlet.
NOTE: During steaming the heating indicator and ready indicator lights
will cycle on and o as the thermostat regulates the steam temperature.
It is recommended to stop steaming while the heating indicator light
is on. You can continue to use the Garment Steamer while the heating
light is illuminated, however a small amount of water may emit from the
Garment Steamer. This is normal and not a product fault.
5. Place the steam plate against the garment and press and hold
the steam button ( button). Move the Garment Steamer in an
upward and downward motion or side to side motion, to remove
the creases (Fig. 6).
Instructions (cont.)
Fig. 4
Fig. 5
Fig. 6

15
AFTER SALES SUPPORT
1300 777 137
MODEL: IA3744 PRODUCT CODE: 712159 07/2023
Instructions (cont.)
NOTE: When using the Garment Steamer, a small amount of water may emit from the steam plate.
This is normal and not a product fault.
NOTE: A full water tank will supply approximately 8-9 minutes of continuous steam. Steam will run
continuously until the water tank is empty or the steam button (button) is released.
NOTE: If the water tank needs to be refilled during a steaming job, turn o the Garment Steamer
immediately, disconnect the power cord from the power outlet, allow time for the Garment Steamer
to cool and then follow the instructions on page 13 for how to fill the water tank.
NOTE: It is recommended to use the Garment Steamer for a maximum
of 8 minutes in one steaming session. Allow the Garment Steamer to
rest and cool down completely before resuming steaming.
WARNING: We recommend conducting a patch test on an
inconspicuous area prior to using the Garment Steamer on the whole
garment or fabric.
6. To remove creases on t-shirts, blouses, shirts, and other similar
garments, steam the garment from the inside (Fig. 7).
WARNING: When steaming the garment from the inside, always
ensure you are pointing the steam plate away from you. Never use the
Garment Steamer with the steam plate pointing towards you.
7. To use the Garment Steamer horizontally like an iron, place the
garment on a dry, flat, heat resistant surface such as an ironing board.
Holding the garment in place with one hand, move the Garment
Steamer horizontally in a forward and backward motion (Fig. 8).
NOTE: When using the Garment Steamer horizontally, a small amount
of water may emit from the steam plate. This is normal and not a product fault.
8. Once you have finished steaming, release the steam button ( button). Place the Garment
Steamer on a flat, dry, heat resistant surface, with the steam plate pointing away from you.
Switch o and unplug from the power outlet. Allow the Garment Steamer to cool down
completely before cleaning and storing in the protective pouch.
TIP: You can use the Garment Steamer to refresh household fabrics such as rugs or upholstery.
Before using the Garment Steamer on these items, is recommended to vacuum first to remove any
dust, hair, animal fur and any other debris.
WARNING: Do not attempt to steam any garments whilst being worn by a person. Steam will
penetrate the garment and can scald.
Fig. 7
Fig. 8

16
AFTER SALES SUPPORT
1300 777 137
MODEL: IA3744 PRODUCT CODE: 712159 07/2023
Instructions (cont.)
WARNING: Do not operate the Garment Steamer for longer than 8 consecutive minutes as this
may cause damage to the unit.
WARNING: Steam can scald. Take care to avoid contact with any steam emitted from the Garment
Steamer when in use. Keep all body parts, including hands and feet away from escaping steam.
Never turn the Garment Steamer upside down when it is in use.
WARNING: Never direct steam towards people, animals, plants or equipment containing electrical
components.
WARNING: Never press the steam button (button) before the ready indicator light (green light)
illuminates.
WARNING: Do not hold the Garment Steamer stationary while steaming to avoid any possible
damage to the fabric.
WARNING: Do not leave the Garment Steamer unattended while it is connected to a power outlet.
WARNING: Water from the steam plate may be hot after a steaming session. Let the appliance
cool down for at least 60 minutes before cleaning or handling.
WARNING: Never tilt the Garment Steamer backwards while steaming, doing so may result in hot
water discharge.
WARNING: Do not allow the Garment Steamer to boil dry as this may damage the unit. Carefully
monitor the water level as you are using the Garment Steamer. When the water tank requires
refilling, the sound of the water pump will increase in volume and there will be less steam being
emitted from the Garment Steamer. When this occurs, turn o the Garment Steamer immediately,
disconnect the power cord from the power outlet, allow time for the Garment Steamer to cool and
then follow the instructions on page 13 for how to fill the water tank.
WARNING: Steam will continue to flow out of the steam plate after the Garment Steamer has been
switched o. Always ensure that the Garment Steamer is not left unattended while it is still hot.
WARNING: Do not leave the Garment Steamer unsupervised once switched o. The residual
steam inside the Garment Steamer can scald after the unit has been switched o.
Thermostat Function
The thermostat regulates the steam temperature of the Garment Steamer. Please note that this
will cause the heating indicator light to cycle on and o; this is not a product fault and is part of the
operation of the Garment Steamer. When the water is heating up, the heating indicator light will
illuminate. Once the water has reached working temperature, the heating indicator light will turn o
and the ready indicator light will illuminate. Both the heating and ready indicator lights will cycle on
and o during use, as the thermostat regulates the steam temperature.

17
AFTER SALES SUPPORT
1300 777 137
MODEL: IA3744 PRODUCT CODE: 712159 07/2023
Instructions (cont.)
NOTE: It is recommended to stop steaming while the heating indicator light (orange light) is on.
You can continue to use the Garment Steamer while the heating light is illuminated, however a small
amount of water may emit from the Garment Steamer. This is normal and not a product fault.
Using the Fabric Shaver
The Fabric Shaver gently removes pills from fabric to repair and smooth the damaged fabric surface.
The Fabric Shaver can be used on most fabrics, including garments and household fabrics such as
rugs and upholstery. Please follow the instructions below to achieve the best results when using the
Fabric Shaver.
1. Charge the Fabric Shaver fully before use with the USB charging cable (included). The power
indicator light will illuminate red while the Fabric Shaver is charging. Once the Fabric Shaver is
fully charged, the power indicator light will illuminate green and the Fabric Shaver is ready for
use.
NOTE: The Fabric Shaver will take approximately 3-4 hours to charge.
It will arrive partially charged, but for maximum power, ensure it is fully
charged before first use.
2. Place the garment on a dry, flat, stable surface. Remove the
magnetic cover (Fig. 9). Press the button to turn the Fabric
Shaver on. The power indicator light will illuminate green, the
Fabric Shaver will make a buzzing sound and the blades inside
will rotate. Using light pressure, carefully start circling the area
intended for maintenance. (Fig. 10). Gradually increase the
pressure.
3. Once you are finished using the Fabric Shaver, press the button
to turn the Fabric Shaver o. Replace the magnetic cover.
TIP: Before using the Fabric Shaver on household fabrics such as rugs
and upholstery, it is recommended to vacuum first, to remove any dust,
hair, animal fur and any other debris.
NOTE: The Fabric Shaver can be operated for up to 30 minutes when
fully charged.
NOTE: Do not leave the Fabric Shaver unattended when charging. Always switch o and unplug
when you are not charging the Fabric Shaver.
NOTE: When the Fabric Shaver requires cleaning, the motor will slow down, or sound laboured. If
you are working with a heavily pilled fabric, you may need to clean the Fabric Shaver more regularly.
Please see page 19 for instructions on how to clean the Fabric Shaver.
Fig. 9
Fig. 10

18
AFTER SALES SUPPORT
1300 777 137
MODEL: IA3744 PRODUCT CODE: 712159 07/2023
Cleaning and Maintenance
Cleaning the Garment Steamer
1. Always switch o, unplug from the power outlet, and allow the Garment Steamer to cool
completely before removing the water tank or cleaning the unit.
2. Wipe the exterior of the Garment Steamer with a soft, slightly damp cloth. Do not use abrasive
cleaners or detergents as this can damage the unit. Dry the exterior thoroughly with a soft dry
cloth.
3. Before packing the Garment Steamer away for storage, ensure it has completely cooled down
and is clean and dry.
WARNING: Allow the Garment Steamer to cool completely before cleaning or storing the unit.
WARNING: Do not immerse the Garment Steamer in water or any other liquids.
WARNING: Do not use harsh or abrasive cleaners, solvents, or metal scourers on the Garment
Steamer as these will damage the product.
WARNING: Do not attempt to remove excess unused water from the Garment Steamer until it has
cooled completely.
Descaling the Garment Steamer
In the event tap water is being used, we recommend you descale the Garment Steamer regularly. How
often you descale the Garment Steamer depends on the usage and performance of the unit. Generally,
if there is less steam being generated it may indicate the below steps should be undertaken.
1. Before descaling, check the Garment Steamer has completely cooled down, is switched o
and unplugged from the power outlet.
2. Prepare a solution consisting of 40ml of water and 40ml of vinegar.
3. Remove the water tank from the Garment Steamer and open the water tank plug. Please see
page 13 for instructions on how to remove the water tank. Empty any remaining water in the
tank into a sink.
4. Add the solution to the water tank. Replace the water tank plug and reattach the water tank to
the Garment Steamer. Please see page 13 for instructions on how to attach the water tank.
5. Plug the Garment Steamer into a power outlet and switch on at the outlet. Press and hold the
steam button ( button) for 3-4 minutes or until approximately half of the solution has been
used up.

19
AFTER SALES SUPPORT
1300 777 137
MODEL: IA3744 PRODUCT CODE: 712159 07/2023
Cleaning and Maintenance (cont.)
6. Release the steam button ( button). Switch o and unplug from the power outlet. Allow the
Garment Steamer to cool down completely. Remove the water tank, open the plug and empty
the remaining solution into a sink.
7. Fill the water tank with 85ml of clean water, then empty the water into a sink. This will help to
remove any leftover solution remaining in the water tank.
8. Fill the water tank again with 85ml of clean water, close the plug and reattach the water tank to
the Garment Steamer.
9. Plug the Garment Steamer into a power outlet and switch on at the outlet. With the Garment
Steamer facing downwards, press and hold the steam button ( button) for approximately 4
minutes. This will help to remove any leftover solution remaining inside the main unit.
10. Release the steam button ( button). Switch o and unplug from the power outlet. Allow the
Garment Steamer to cool down completely. Remove the water tank, open the plug and empty
the remaining water into a sink.
11. Replace the water tank plug and reattach the water tank to the Garment Steamer.
WARNING: Never leave the Garment Steamer unattended during the descaling process.
Cleaning the Fabric Shaver
It is recommended to clean the Fabric Shaver after each use to ensure
the motor and blade performance are maintained.
WARNING: Never use the Fabric Shaver when the motor power
becomes very weak. When this happens, turn o the Fabric Shaver and
check whether the lint catcher is full. Do not use the Fabric Shaver until
the lint has been removed and it operates normally again. If you cannot
solve the problem, please contact our After Sales Support line on
1300 777 137 for further advice.
1. Always turn the Fabric Shaver o and unplug the USB cable from
the charging port on the Fabric Shaver before cleaning.
2. First, remove the magnetic cover, then detach the lint catcher by
turning in an anticlockwise direction and set aside (Fig. 11).
3. Using the cleaning brush, remove the lint from the Fabric Shaver.
Wipe the inside of the Fabric Shaver with a soft dry cloth to
remove any remaining lint particles (Fig. 12).
Fig. 12
Fig. 11

20
AFTER SALES SUPPORT
1300 777 137
MODEL: IA3744 PRODUCT CODE: 712159 07/2023
Cleaning and Maintenance (cont.)
4. Detach the mesh blade cover by turning in an anticlockwise
direction, and set aside (Fig. 13).
WARNING: Take care when removing the mesh blade cover as the
razor blades on the blade attachment are extremely sharp!
NOTE: Only clean the lint catcher, mesh blade cover and blade
attachment with the cleaning brush provided. Never immerse these
parts in water or any other liquid.
NOTE: This Fabric Shaver has a safety mechanism which deactivates the unit when the mesh blade
cover is removed, or not correctly attached. This is a safety feature, so that the Fabric Shaver does not
accidentally turn on, while you are disassembling the unit for cleaning or reassembling the unit.
NOTE: The blade attachment can also been removed for cleaning. We recommend that this is
done sparingly, as the blades are extremely sharp. The blade attachment should only be removed
in those instances where the Fabric Shaver is extremely dirty inside and the lint cannot be removed
successfully with the brush. If the decision has been made to remove the blade attachment please
exercise extreme care.
WARNING: The blade attachment should only be removed by a capable adult; one with the
necessary skills needed to remove it (steady hand, strong eyesight etc.). Persons (including children)
with reduced physical, sensory or mental capabilities or lack of experience or knowledge should
NEVER attempt to remove it themselves and should always be supervised while using the Fabric
Shaver.
5. Holding the Fabric Shaver steady in one hand, use the end of the
cleaning brush to carefully pry the blade attachment away from the
main body and set aside (Fig. 14). Please do this over a benchtop
or table as the blade attachment will pop out of the Fabric Shaver.
6. Holding the blade attachment carefully by the sides, use the
cleaning brush to remove the lint from the blade attachment (Fig.
15).
CAUTION: Always unplug the USB cable from the Fabric Shaver when
cleaning or assembling.
WARNING: Exercise extreme caution when handling the blade
attachment for cleaning. Hold the blade attachment carefully by the
plastic sides avoiding contact with the extremely sharp razor blades.
Fig. 15
Fig. 14
Fig. 13
Other manuals for IA3744
1
Table of contents
Other Stirling Steam Cleaner manuals

Stirling
Stirling GS511 User manual

Stirling
Stirling SC-389 User manual

Stirling
Stirling GSTT1100 User manual

Stirling
Stirling SC-380 User manual

Stirling
Stirling GS511 User manual

Stirling
Stirling SM-102 User manual

Stirling
Stirling IA3744 User manual

Stirling
Stirling GS511 User manual

Stirling
Stirling SC-270S User manual

Stirling
Stirling GSTT1100 User manual


