Stirling GSTT1100 User manual
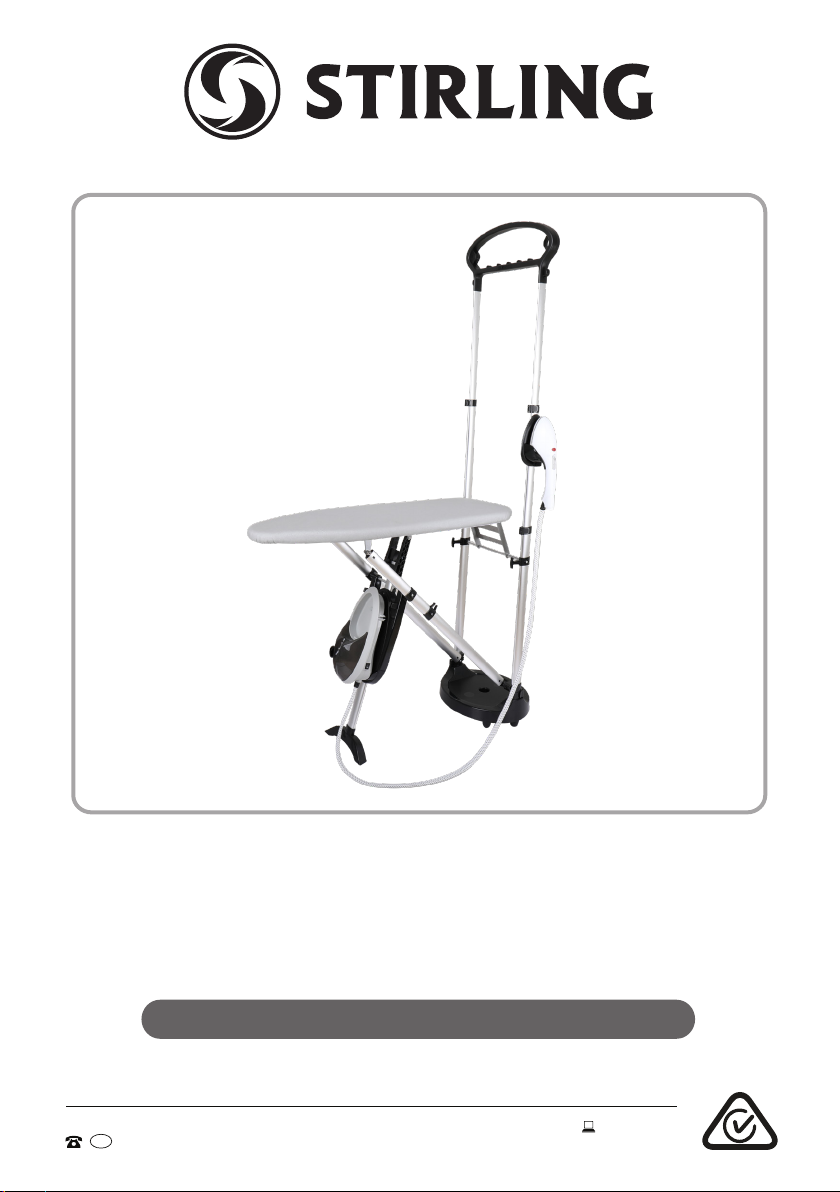
Garment Steamer with Ironing Board
Model Number GSTT1100
INSTRUCTION MANUAL
po.org
MODEL: GSTT1100 PRODUCT CODE: 705577 07/2021
AFTER SALES SUPPORT info@tem
AUS 1300 112 534

2AFTER SALES SUPPORT
1300 886 649
AUS MODEL: GSTT1100 PRODUCT CODE: 705577 07/2021
1300 112 534
Welcome
Congratulations on choosing to buy a STIRLING®product.
All products brought to you by STIRLING®are manufactured to the highest
standards of performance and safety and, as part of our philosophy of customer
service and satisfaction, are backed by our comprehensive 1 Year Warranty.
We hope you will enjoy using your purchase for many years to come.

3
AFTER SALES SUPPORT
1300 886 649
AUS MODEL: GSTT1100 PRODUCT CODE: 705577 07/2021
1300 112 534
Contents
02 Welcome
04 Warranty Details
05 General Safety Instructions
09 Product Overview
11 Getting Started
17 Instructions
23 FAQs & Troubleshooting Guide
24 Other Useful Information
27 Repair and Refurbished Goods or Parts Notice
4AFTER SALES SUPPORT
1300 886 649
AUS MODEL: GSTT1100 PRODUCT CODE: 705577 07/2021
1300 112 534
Garment Steamer with Ironing Board
Warranty Details
The product is guaranteed to be free from defects in workmanship and
parts for a period of 12 months from the date of purchase. Defects that
occur within this warranty period, under normal use and care, will be
repaired, replaced or refunded at our discretion. The benefits conferred by
this warranty are in addition to all rights and remedies in respect of the
product that the consumer has under the Competition and Consumer Act
2010 and similar state and territory laws.
Our goods come with guarantees that cannot be excluded under the
Australian Consumer Law. You are entitled to a replacement or refund for
a major failure and to compensation for any other reasonably foreseeable
loss or damage. You are also entitled to have the goods repaired or
replaced if the goods fail to be of acceptable quality and the failure does
not amount to a major failure.
REGISTER YOUR PURCHASE AT www.aldi.com.au/en/about-aldi/product-registration/ TO KEEP UP-TO-DATE WITH IMPORTANT PRODUCT INFORMATION

5
AFTER SALES SUPPORT
1300 886 649
AUS MODEL: GSTT1100 PRODUCT CODE: 705577 07/2021
1300 112 534
General Safety Instructions
IMPORTANT SAFETY INSTRUCTIONS
READ CAREFULLY AND KEEP FOR FUTURE REFERENCE
Read this manual thoroughly before first use, even if you are familiar with this type
of product. The safety precautions enclosed herein reduce the risk of fire, electric
shock and injury when correctly adhered to. Keep the manual in a safe place for
future reference, along with the completed warranty card, purchase receipt and
carton. If applicable, pass these instructions on to the next owner of the appliance.
Always follow basic safety precautions and accident prevention measures
when using an electrical appliance, including the following:
Electrical safety and cord handling
• Voltage: Make sure your local outlet voltage and circuit frequency correspond
to the voltage indicated on the appliance rating label and your outlet socket is
properly earthed. If this is not the case, do not use the appliance.
• Separate circuit: To reduce the likelihood of circuit overload, do not operate
another high wattage appliance on the same circuit.
• WARNING: Do not immerse! Never immerse the cord, plug or appliance in
water or other liquid, or expose the electrical connections to water or other
liquid. Should liquids enter the housing, unplug the appliance from the power
socket immediately and arrange for it to be repaired by a qualified technician.
• Protect from moisture: Do not use the appliance outdoors or expose it to
humidity. Never use the appliance adjacent to water contained in a bath,
shower, wash basin or other vessel. The proximity of moisture presents a
danger, even when the appliance is switched off. Do not operate the appliance
or touch the power cord or plug with wet hands.
• No extension cord: Always unwind the power cord fully before switching on
and do not use an extension cord. If an extension cord is absolutely necessary,
a 15A rated cord should be used. Cords rated for less amperage may overheat.
Take care when arranging the cord so that it cannot be pulled or tripped over.
• Protect the power cord: Do not damage, kink or squash the power cord and
protect it from sharp edges. Do not let the cord touch any hot surface, including
the ironing/steaming surface. Unwind and straighten the cord before use, then
arrange the cord in such a way that no one can step on it or trip over it.
• Damage: Do not use the appliance if it has been dropped, if there are visible
signs of damage or if it is leaking. A damaged cord or plug must be replaced by
the manufacturer or a qualified technician in order to avoid a hazard. In case of
damage, please contact our after sales support centre.
Other manuals for GSTT1100
1
This manual suits for next models
1
Table of contents
Other Stirling Steam Cleaner manuals

Stirling
Stirling GS511 User manual

Stirling
Stirling SC-389 User manual

Stirling
Stirling SC-380 User manual

Stirling
Stirling SC-389 Specification sheet

Stirling
Stirling GS511 User manual

Stirling
Stirling IA3744 User manual

Stirling
Stirling SC-270S User manual

Stirling
Stirling SM-102 User manual

Stirling
Stirling IA3744 User manual

Stirling
Stirling GSTT1100 User manual


