Stirling SC-389 User manual

INSTRUCTION MANUAL
N13275
AFTER SALES SUPPORT
AUS Hotline Costs
AUS
MODEL: SC-389 PRODUCT CODE:42556 09/2014
Model Number SC-389
Steam Cleaner with Wheels

AFTER SALES SUPPORT
AUS Hotline Costs
AUS
MODEL: SC-389 PRODUCT CODE:42556 09/2014
Contents
01 Warranty Details
02 Welcome
03 General Safety Instructions
06 Product Overview
08 Getting Started
10 Instructions
15 Other Useful Information
18 Repair and Refurbished Goods or Parts Notice
1
AFTER SALES SUPPORT
AUS Hotline Costs
AUS
MODEL: SC-389 PRODUCT CODE:42556 09/2014
Steam Cleaner with Wheels
Warranty Details
The product is guaranteed to be free from defects in workmanship and parts
for a period of 36 months from the date of purchase. Defects that occur
within this warranty period, under normal use and care, will be repaired,
replaced or refunded at our discretion, solely at our option with no charge for
parts and labour. The benefits conferred by this warranty are in addition
to all rights and remedies in respect of the product that the consumer
has under the Competition and Consumer Act 2010 and similar state and
territory laws.
Our goods come with guarantees that cannot be excluded under the
Australian Consumer Law. You are entitled to a replacement or refund for
a major failure and to compensation for any other reasonably foreseeable
loss or damage. You are also entitled to have the goods repaired or
replaced if the goods fail to be of acceptable quality and the failure does
not amount to a major failure.
YEAR WARRANTY
3

2
AFTER SALES SUPPORT
AUS Hotline Costs
AUS
MODEL: SC-389 PRODUCT CODE:42556 09/2014
Welcome
Congratulations on choosing to buy a Stirling®product.
All products brought to you by Stirling®are manufactured to the highest
standards of performance and safety and, as part of our philosophy of customer
service and satisfaction, are backed by our comprehensive 3 Year Warranty. We
hope you will enjoy using your purchase for many years to come.

3
AFTER SALES SUPPORT
AUS Hotline Costs
AUS
MODEL: SC-389 PRODUCT CODE:42556 09/2014
General Safety Instructions
Read this manual thoroughly before first use, even if you are familiar with this
type of product. The safety precautions enclosed herein reduce the risk of fire,
electric shock and injury when correctly adhered to.
Keep the manual in a safe place for future reference, along with the completed
warranty card, purchase receipt and carton. If applicable, pass these instructions
on to the next owner of the appliance.
Always follow basic safety precautions and accident prevention measures when
using an electrical appliance, including the following:
Electrical safety and cord handling
• Voltage: Make sure your outlet voltage and circuit frequency correspond
to the voltage stated on the appliance rating label and your outlet socket is
earthed.
• Do not immerse: To protect against fire and electric shock, do not immerse
the cord, plug or the appliance itself in water or other liquid, or expose the
electrical connections to water.
• Power cord: The cord as well as any extension cord required should be run
in such a way that there will be no risk of anyone pulling it inadvertently or
tripping over it.
• Protect the power cord: Do not kink, bend, squash, strain or damage the
power cord and protect it from sharp edges and heat. Do not let it touch hot
surfaces.
• Damage: Before using the appliance, check to make sure that it is in
undamaged and safe to operate. In particular, check the power cord.
• Do not use if damaged: Do not pick up or operate the appliance if the power
supply cord, plug or housing is damaged. Do not use the appliance after it
malfunctions or has been damaged in any manner.
• Damaged cord or plug: A damaged cord or plug must be replaced by the
manufacturer or a qualified person in order to avoid a hazard. In case of
damage, contact our after sales support line to arrange return or repair of the
damaged product.
• Disconnect: Before cleaning, maintenance or moving the appliance, or when
it is not in use, make sure to switch off the appliance and unplug the power
plug.
• Do not pull on the cord: Switch off the power at the outlet and then gently
pull on the plug only to unplug it. Do not pull on the cord.

4
AFTER SALES SUPPORT
AUS Hotline Costs
AUS
MODEL: SC-389 PRODUCT CODE:42556 09/2014
General Safety Instructions (Cont.)
Usage conditions and restrictions
• Household use only: This appliance is intended for household use only. Do
not use it for anything other than its intended purpose, and only use it as
described in these operating instructions.
• Accessories: Only use the appliance with the accessories provided by the
manufacturer. Improper installation and the use of accessory attachments not
recommended by the appliance manufacturer may result in fire, electric shock,
personal injury and/or damage to the unit.
• Adult use only: This appliance should only be operated by adults who have
been instructed in the use of the device or have proven their ability to use it.
• Usage restriction: This appliance is not intended for use by persons
(including children) with reduced physical, sensory or mental capabilities, or
lack of experience and knowledge, unless they have been given supervision
or instruction concerning use of the appliance by a person responsible for
their safety.
• Children: This appliance is not a toy. Young children should be supervised to
ensure they do not play with the appliance. Close supervision is necessary
when any appliance is used near children.
Safe usage
• Changing accessories: Always unplug the device from the power point
before changing accessories.
• Water use: Do not fill the water tank with anything else but tap water. Do
not use perfumed, aromatic or flammable substances, alcohol, cleaning
agents, petrol, paint thinner, acetone, acids, solvents or any other substances
because these can damage the device and create an explosion hazard.
• Hard water areas: In hard water areas we recommend using distilled water to
prevent the build-up of lime deposits.
• Do not block openings: Never stick any objects in the openings. Do not use
the device if the openings are blocked.
• Do not point at people: Never point the device at persons, pets or plants,
and only use it on surfaces or objects that can withstand high temperatures.
• Use with caution: When using the device, watch out for third parties,
especially children.
• Avoid skin contact: The high temperatures generated by the steam cleaner
can cause serious injuries and burns. Avoid skin contact with the appliance
during use.

5
AFTER SALES SUPPORT
AUS Hotline Costs
AUS
MODEL: SC-389 PRODUCT CODE:42556 09/2014
General Safety Instructions (Cont.)
• Do not incline: When operating the device, NEVER tip it in any direction by
more than 45° from its vertical axis.
• CAUTION: Do not open the valve during use.
• Dry after use: Before restarting the appliance, it must be completely dry.
• Stoves: When cleaning electric appliances such as stoves and the like, always
make sure that they are unplugged (circuit breaker switched off).
• Harmful substances: Do not steam any materials that contain asbestos or
any other harmful substances.
• Electrical equipment: Do not use the appliance for cleaning electrical
equipment (such as electric heaters, lamps, hair dryers and other electrical
equipment) if the steam comes into direct contact with wiring and switches.
After cooling, the steam could cause an electrical fault in such equipment.
• Unattended: Never leave the device unattended during operation, and always
keep it out of reach of children.
• Cool down after use: After switching the device off, steam can still be
released. It is therefore important to let the device cool down for at least five
minutes after unplugging and before storing it.
• Do not use faulty equipment: Never use the device if there are indications
that it is not working properly. Call the after sales support line for advice.
• Storage: Protect the device from rain; store it in a cool and dry place.
• Repairs and service: All repairs and service work, including replacing the
power cord, may only be conducted by an authorised electrician. Otherwise,
you may risk damaging the unit and voiding your warranty. In case of damage
or malfunction, contact our after sales support line for advice.
• RCD: Unless your home is already fitted with a residual current device (safety
switch), we recommend installing an RCD with a rated residual operating
current not exceeding 30mA to provide additional safety protection when
using electrical appliances. See your electrician for professional advice.
6
AFTER SALES SUPPORT
AUS Hotline Costs
AUS
MODEL: SC-389 PRODUCT CODE:42556 09/2014
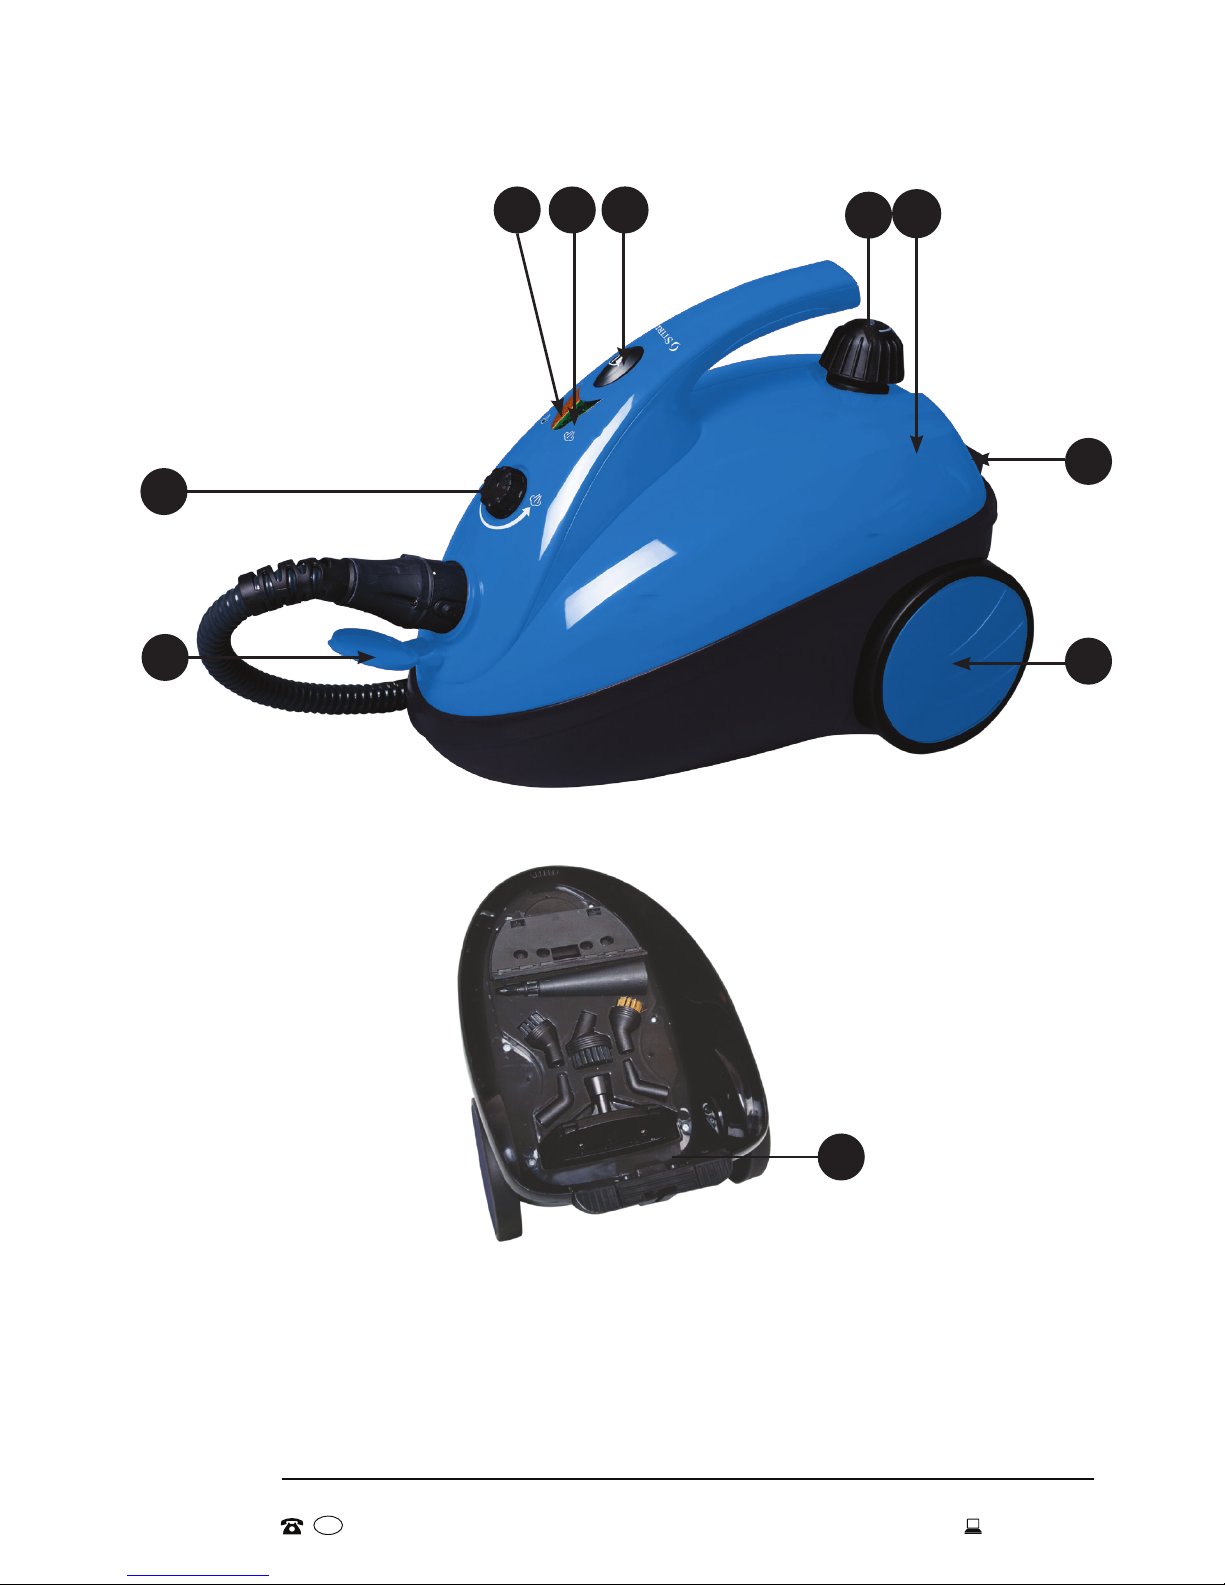
Product Overview
Components
1 Steam connection
2 Steam regulator
3 Red operating control light
4 Green control light (steam status)
5 On/off switch
6 Safety locking cap (tank cover)
7 Housing
8 Housing release flaps
9 Wheels
10 Attachment holder (for storage)
Internal accessory compartment [A]
7
6
1
2
43
8
9
10
5
The appliance

7
AFTER SALES SUPPORT
AUS Hotline Costs
AUS
MODEL: SC-389 PRODUCT CODE:42556 09/2014
Product Overview (Cont.)
13
11
12
23 25
24 24
26 27 28 29
22
21
20
19
18
17
16
15
14
Components (cont.)
11 Steam pressure knob
12 Steam pressure lock
13 Steam nozzle
14 Extension tubes
15 Steam gun
16 Funnel
17 Measuring beaker
18 Glass cleaning attachment
19 Textile brush
20 Accessory adaptor
21 Floor attachment connector
22 Concentrator nozzle
23 Connection/release knob
24 Holding clips
25 Floor attachment
26 Round brush cloth
27 Round brushes
28 45º nozzles
29 Cleaning cloth
Accessories

8
AFTER SALES SUPPORT
AUS Hotline Costs
AUS
MODEL: SC-389 PRODUCT CODE:42556 09/2014
Filling the water tank
• Ensure that the appliance is disconnected from the mains supply.
• Press the safety locking cap [6] downwards and turn it counterclockwise to
open the tank (see A1, below).
• Measure the volume of water in the measuring beaker [17] and pour it into
the appliance using the funnel [16] – the tank holds a maximum of 1.6 litres.
Then close the water tank by pressing the safety locking cap downwards and
turning it clockwise as far as it will go.
• See page 14 for instructions for filling the water tank during operation.
A1
Before first use
• Unpack the appliance but keep all packaging materials until you have made
sure your new steam cleaner is undamaged and in good working order. Plastic
wrapping can be a suffocation hazard for babies and young children, so
ensure all packaging materials are out of their reach.
• Unwind the cord to its full length and inspect it for damage. Do not use the
appliance if the appliance or its cord have been damaged or are not working
properly. In case of damage, contact our after sales support line for advice.
• Read this manual to familiarise yourself with all the parts and operating
principles of the steam cleaner. Pay particular attention to the safety
instructions on the previous pages. The numbers in square brackets
throughout the manual are the part numbers as indicated on pages 6-7.
• Before assembly, ensure the appliance is disconnected from the power supply.
Getting Started
9
AFTER SALES SUPPORT
AUS Hotline Costs
AUS
MODEL: SC-389 PRODUCT CODE:42556 09/2014
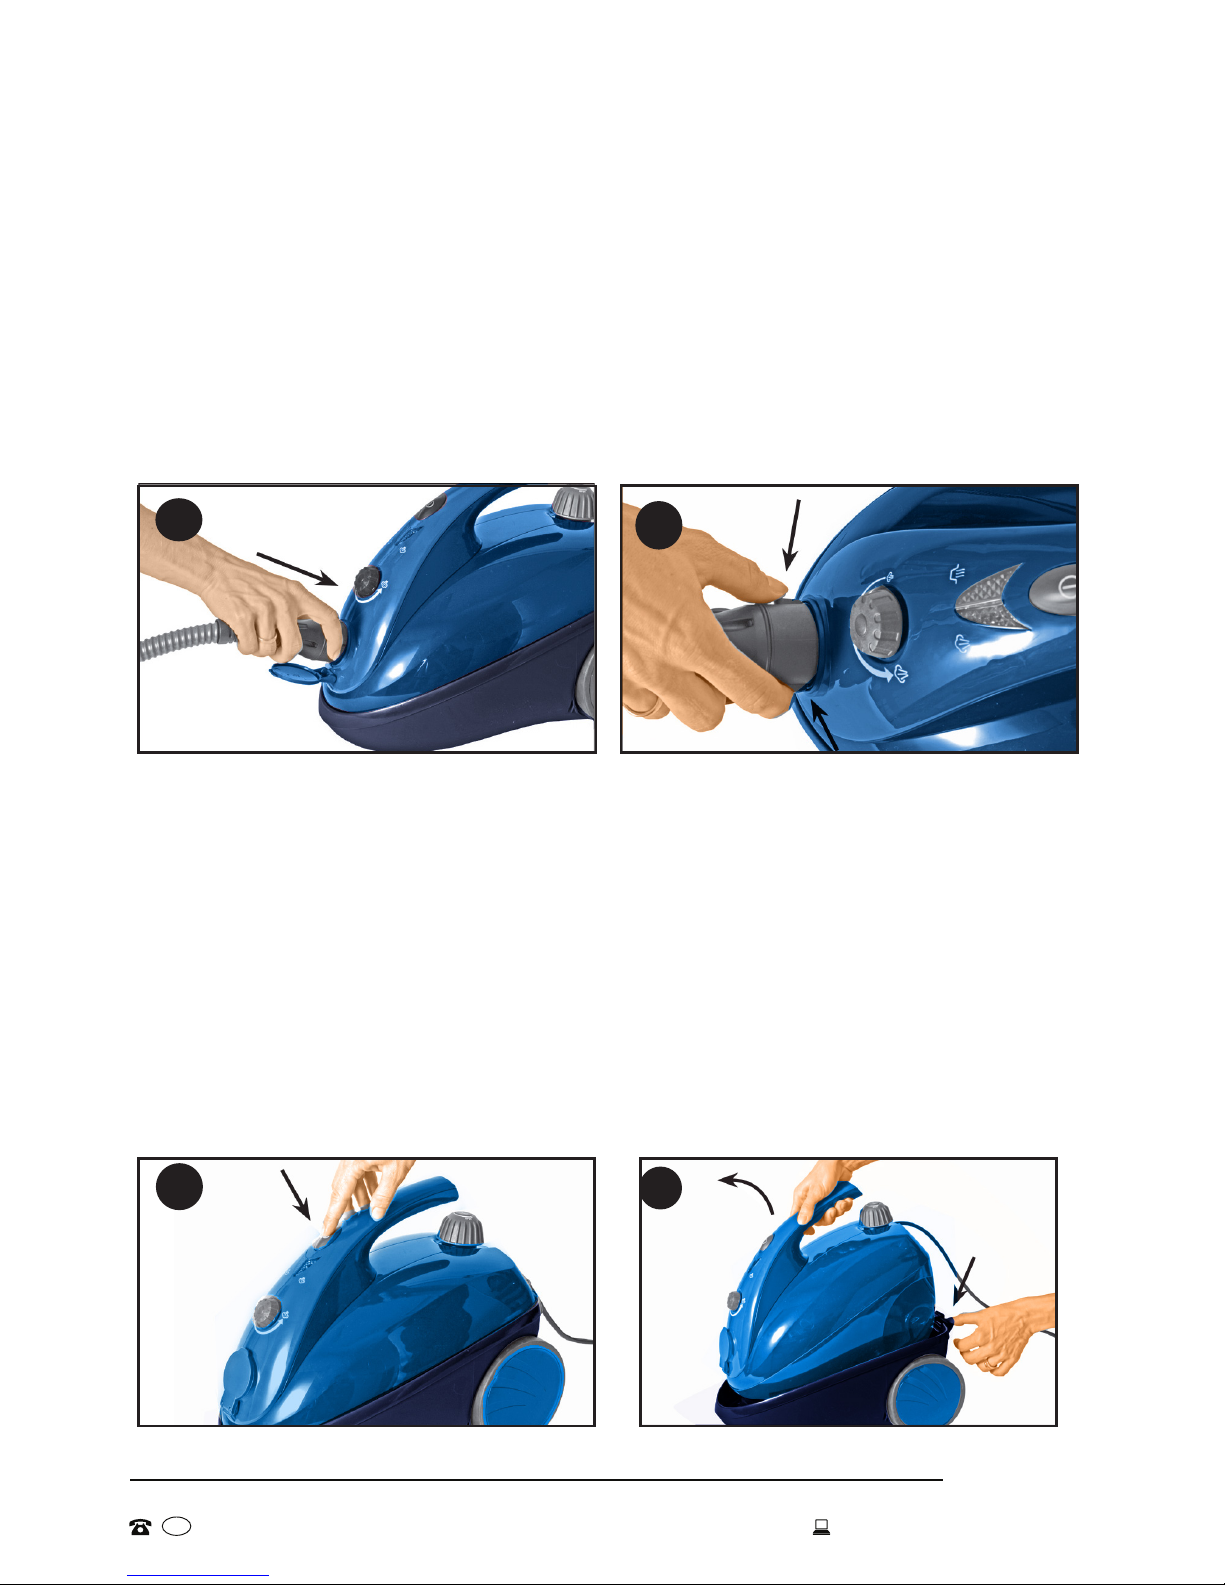
Getting Started (Cont.)
Setting up the steam cleaner
To use the steam cleaner, with or without any special attachment, the flexible
hose at the end of the steam gun must be securely connected to the steam
connection on the appliance housing.
• Connect the flexible hose end of the steam gun [15] to the steam connection
[1] on the appliance housing until it engages with an audible clicking noise
(see A2, below left). To remove the steam gun, press the two side snappers
and pull it out (see A3, below right).
• Connect the mains lead to the power supply and switch on the appliance by
pressing the on/off switch [5]. The red operating indicator [3] will light up (see
A4, below left).
• When the green steam control light comes on, the appliance is ready and you
can attach the accessories. How each accessory is fitted to the appliance,
and how to use it, is explained in the instructions section starting on the next
page.
• Some of the accessories are housed in the accessory compartment [A]. To
open this compartment, press down the housing release flaps [8] and lift up
the top section of the appliance by the handle (see A5, below right).
A3
A2
A4 A5

10
AFTER SALES SUPPORT
AUS Hotline Costs
AUS
MODEL: SC-389 PRODUCT CODE:42556 09/2014
Basic usage principles
Steam gun [15]
The appliance has a steam pressure lock [12] on the steam gun [15] to prevent it
being activated accidentally.
• Press the steam pressure lock and the steam pressure knob [11] will be
locked; press it again to release the lock and you can use the steam pressure
knob again (see A6, below).
• Press the steam pressure knob [11]. The steam pressure lock [12] must be
released as you do so.
• If you are using the appliance for the first time, or if you have not used it for a
long time, some drops of water may be emitted. This is only the water that has
condensed in the pipes. In this case, direct the steam jet at a cloth and press
and hold the steam pressure knob until no more water is emitted.
• To increase the steam volume being emitted, turn the steam regulator [2]
counterclockwise. To reduce the steam volume, turn it clockwise
(see A7, below).
A6
A7
Instructions
11
AFTER SALES SUPPORT
AUS Hotline Costs
AUS
MODEL: SC-389 PRODUCT CODE:42556 09/2014
Instructions (Cont.)
A9
A10
A8
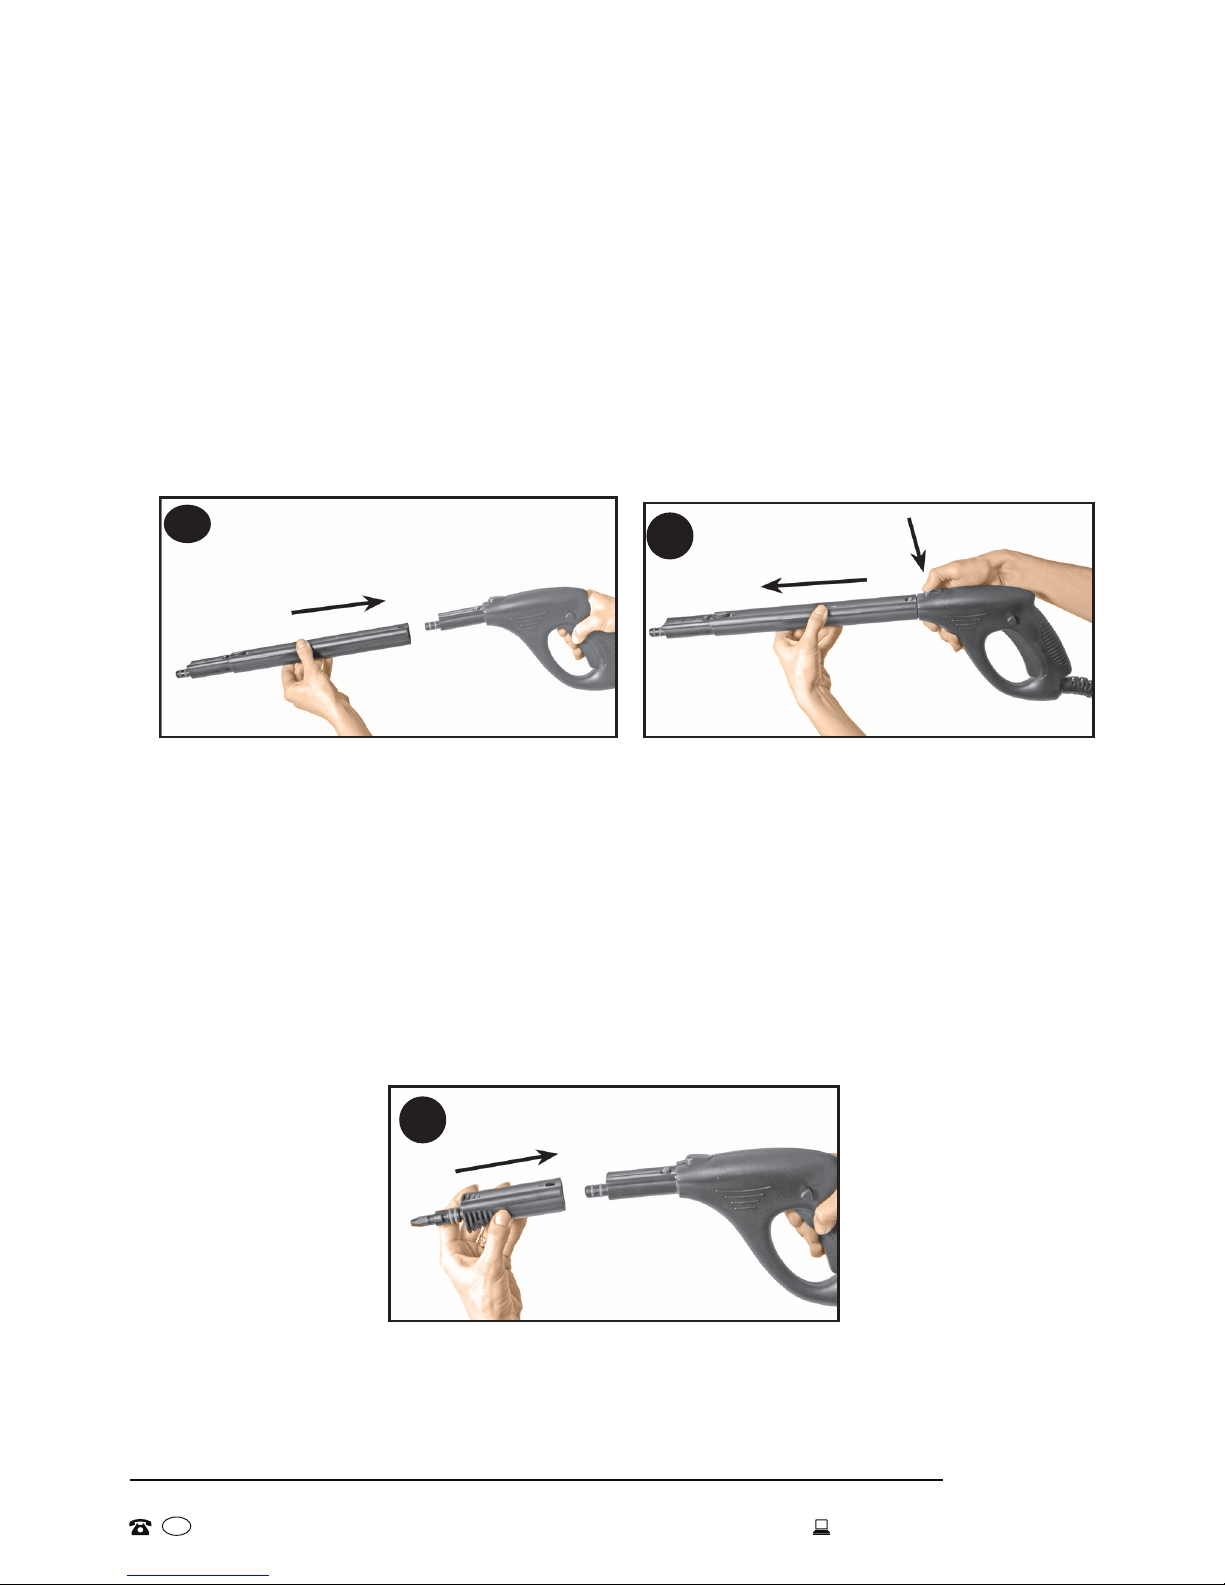
Using the attachments
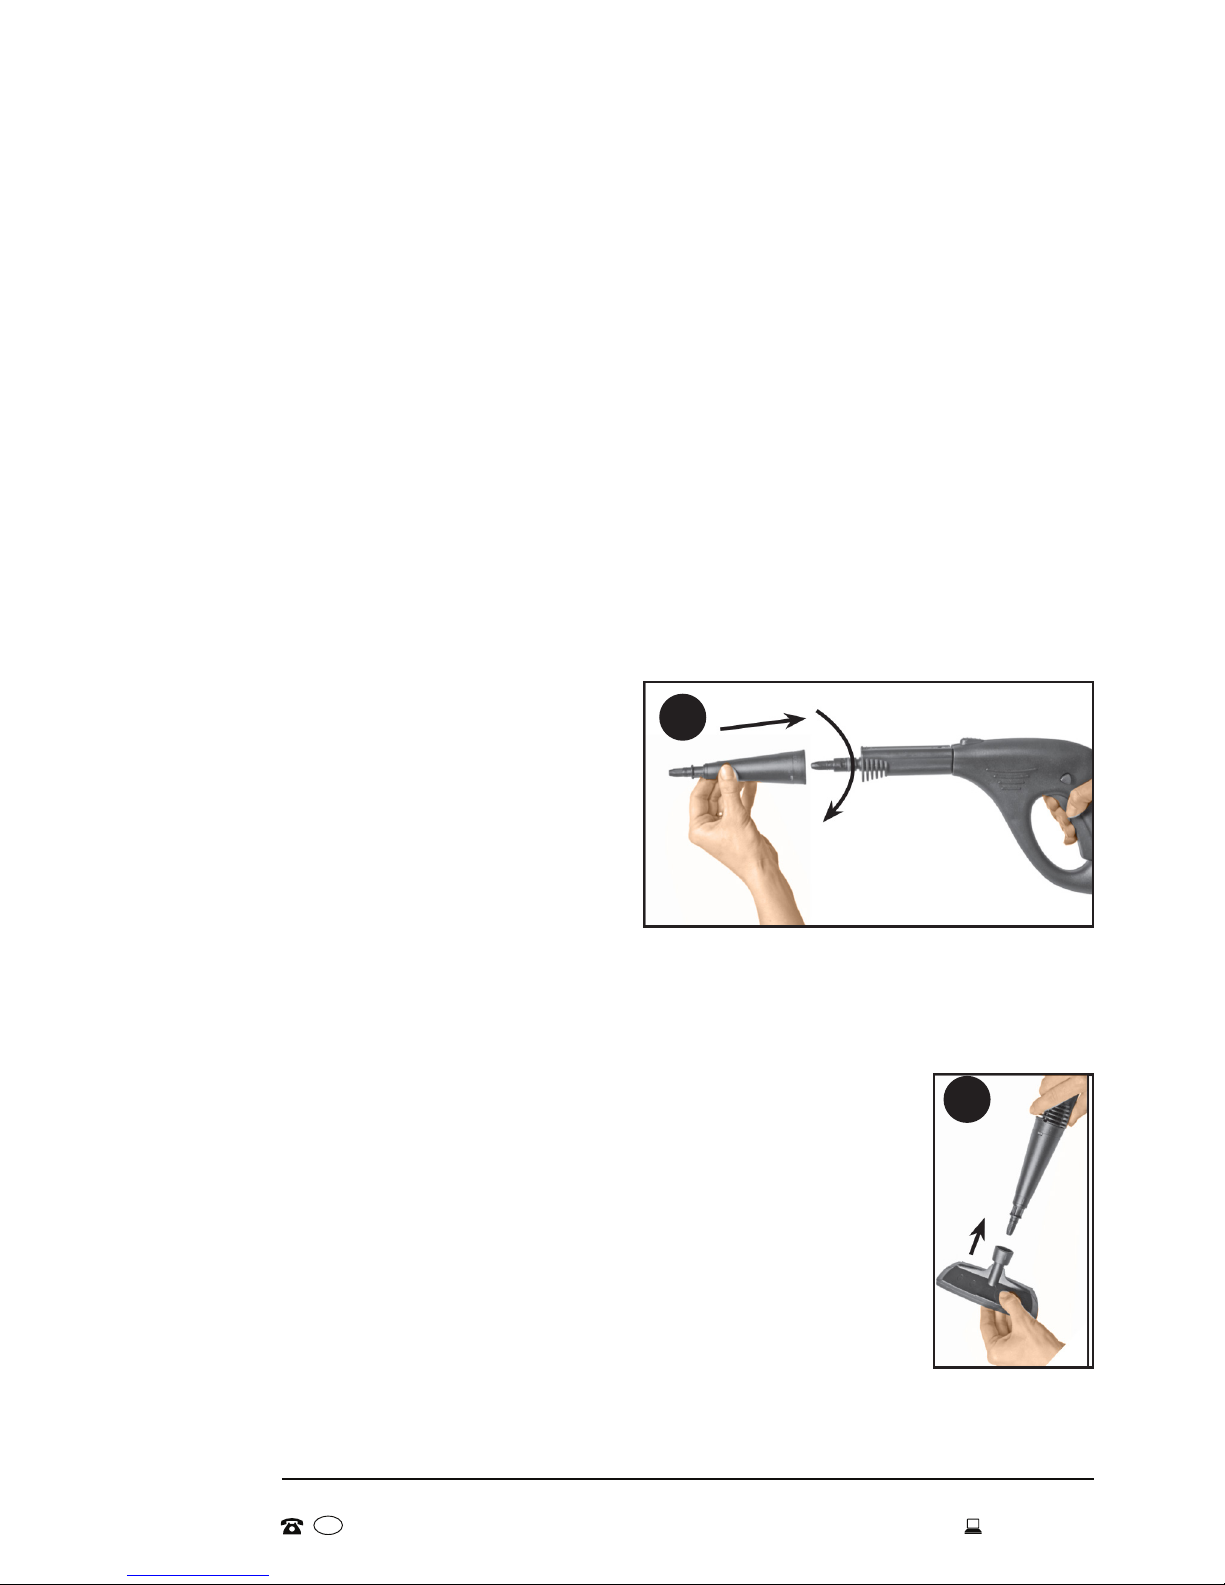
Accessory adaptor [20]
Some accessories do not fit directly onto the steam nozzle and must be
connected to the accessory adaptor [20], which can be attached straight to the
steam nozzle [13] or, if required, to the extension tubes [14].
• Attach the adaptor until it engages with an audible clicking noise (see A10,
below).
• The following attachments require use of the accessory adaptor: the round
brushes [27], concentrator nozzle [22] and the 45° nozzles [28].
Extension tubes [14]
Use any of the three extension tubes [14] to extend the steam gun [15] for
cleaning the floor, or cleaning surfaces high up.
• Attach the tube to the steam nozzle [13] until it engages with an audible
clicking noise. Then attach the next extension tube to the one that is
currently attached, if necessary (see A8, below left).
• To remove the extension tube, press the connection/release knob [23] to
release it and pull off the tube (see A9, below right).
12
AFTER SALES SUPPORT
AUS Hotline Costs
AUS
MODEL: SC-389 PRODUCT CODE:42556 09/2014
A11
Instructions (Cont.)
Round brushes [27] and 45° nozzles [28]
These small accessories are designed for cleaning areas with difficult access,
such as corners, edges, roller shutters etc.
The round brush with brass scouring bristles is for removing stubborn stains,
rust or coatings from floors and rough surfaces. It is not suitable for cleaning
sensitive surfaces!
Use a round brush with plastic bristles for cleaning sensitive surfaces, and with
the brush cloth [26] attached to dry surfaces that have been steam cleaned.
• Attach these accessories with pressure either to the accessory adaptor [20]
or to the concentrator nozzle [22].
Concentrator nozzle [22]
The textile brush [19], glass cleaning
attachment [18], round brushes [27], and
the 45° nozzles [28] can be connected to
the concentrator nozzle.
• Attach the concentrator nozzle [22]
using the mark on the accessory
adaptor [20] and turn it through 90°
clockwise (see A11, right).
Textile brush [19]
The textile brush [19] is designed for cleaning curtains, carpets, upholstery, etc.
A12
• Attach the textile brush [19] with pressure to the
concentrator nozzle [22], aligning the marked arrows
(see A12, right).

13
AFTER SALES SUPPORT
AUS Hotline Costs
AUS
MODEL: SC-389 PRODUCT CODE:42556 09/2014
Instructions (Cont.)
Cleaning floors and walls
Floor attachment connector [21]
The floor attachment connector [21] can be attached straight to the steam nozzle
[13] or, if required, to the extension tubes [14]. It is required for use with the floor
attachment [25], as described below.
• Attach the attachment connector until you hear it click into place.
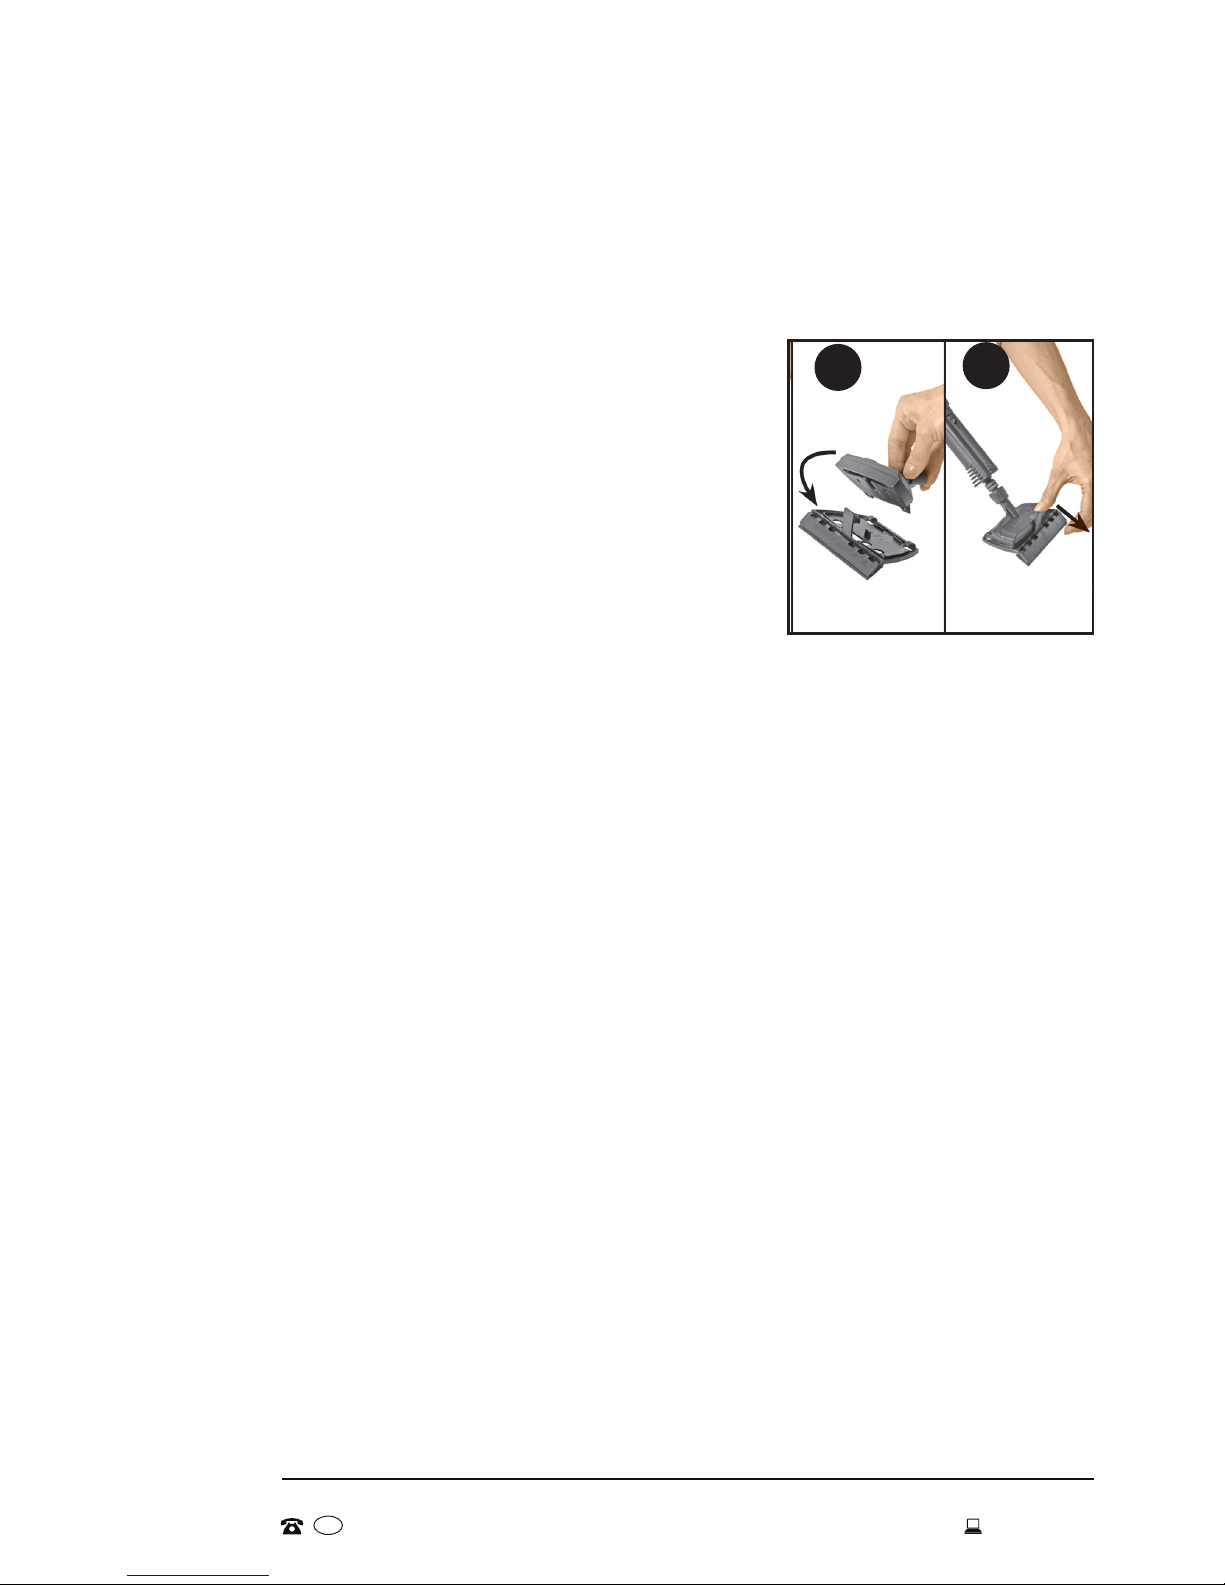
Floor attachment [25]
This floor accessory is designed for cleaning floors and washable walls. It can be
used with or without the cleaning cloth [29].
• Holding the round end of the attachment connector [21] upwards so that the
hose connector points downwards, place the round end of the attachment
connector in the opening in the floor attachment [25] until both parts engage.
• Turn the attachment connector through 180° upwards (see A13, below).
Cleaning cloth [29]
The cleaning cloth [29] must be clipped to the floor attachment. It is designed for
cleaning sensitive surfaces such as wood or parquet, or for drying cleaned surfaces.
• Place the cleaning cloth on a flat surface.
• Place the floor attachment [25] in the centre of the cleaning cloth [29]. Secure
the cloth to both sides of the floor attachment with the two holding clips [24]
(see A14, below right).
A13 A14
14
AFTER SALES SUPPORT
AUS Hotline Costs
AUS
MODEL: SC-389 PRODUCT CODE:42556 09/2014
Instructions (Cont.)
Cleaning windows, tiles and mirrors
Glass cleaning attachment [18]
The glass cleaning attachment is suitable for cleaning windows, tiles, mirrors and
ceramic surfaces.
• Place the lug on the textile brush [19] in the hooks
on the glass cleaning attachment [18] and press
the textile brush downwards until the lug engages
with an audible clicking noise (see A15, right).
• To remove the glass cleaning attachment, pull the
lug forwards and lift up the textile brush (see A16,
right).
Window cleaning
• Spray steam evenly onto the window from a distance of approximately 20cm.
• IMPORTANT! Glass surfaces can crack if they are exposed to excessive
heat. Therefore spray the steam onto the surface from a distance of 20-25cm
initially and reduce this distance later to 15cm, if necessary.
• Turn off the steam and wipe off the moisture using the rubber squeegee on
the glass cleaning attachment, moving it from top to bottom.
• Wipe off the rubber squeegee and dry the bottom frame of the window after
every cleaning operation.
Filling the water tank during operation
• Switch off the appliance by pressing the on/off switch [5].
• Ensure that the red operating control light [3] is no longer lit and disconnect
the mains lead from the power supply.
• Release the steam pressure by pressing the steam pressure knob [11].
• Slowly press the safety locking cap [6] downwards and turn it counterclock-
wise so that the remaining steam can escape from the water tank.
• Wait for a few minutes and then, using the funnel [16], top up the water to a
maximum of 1.6 litres.
• Close the water tank by pressing the safety locking cap [6] downwards and
turning it clockwise as far as it will go.
A15 A16
15
AFTER SALES SUPPORT
AUS Hotline Costs
AUS
MODEL: SC-389 PRODUCT CODE:42556 09/2014
Other Useful Information
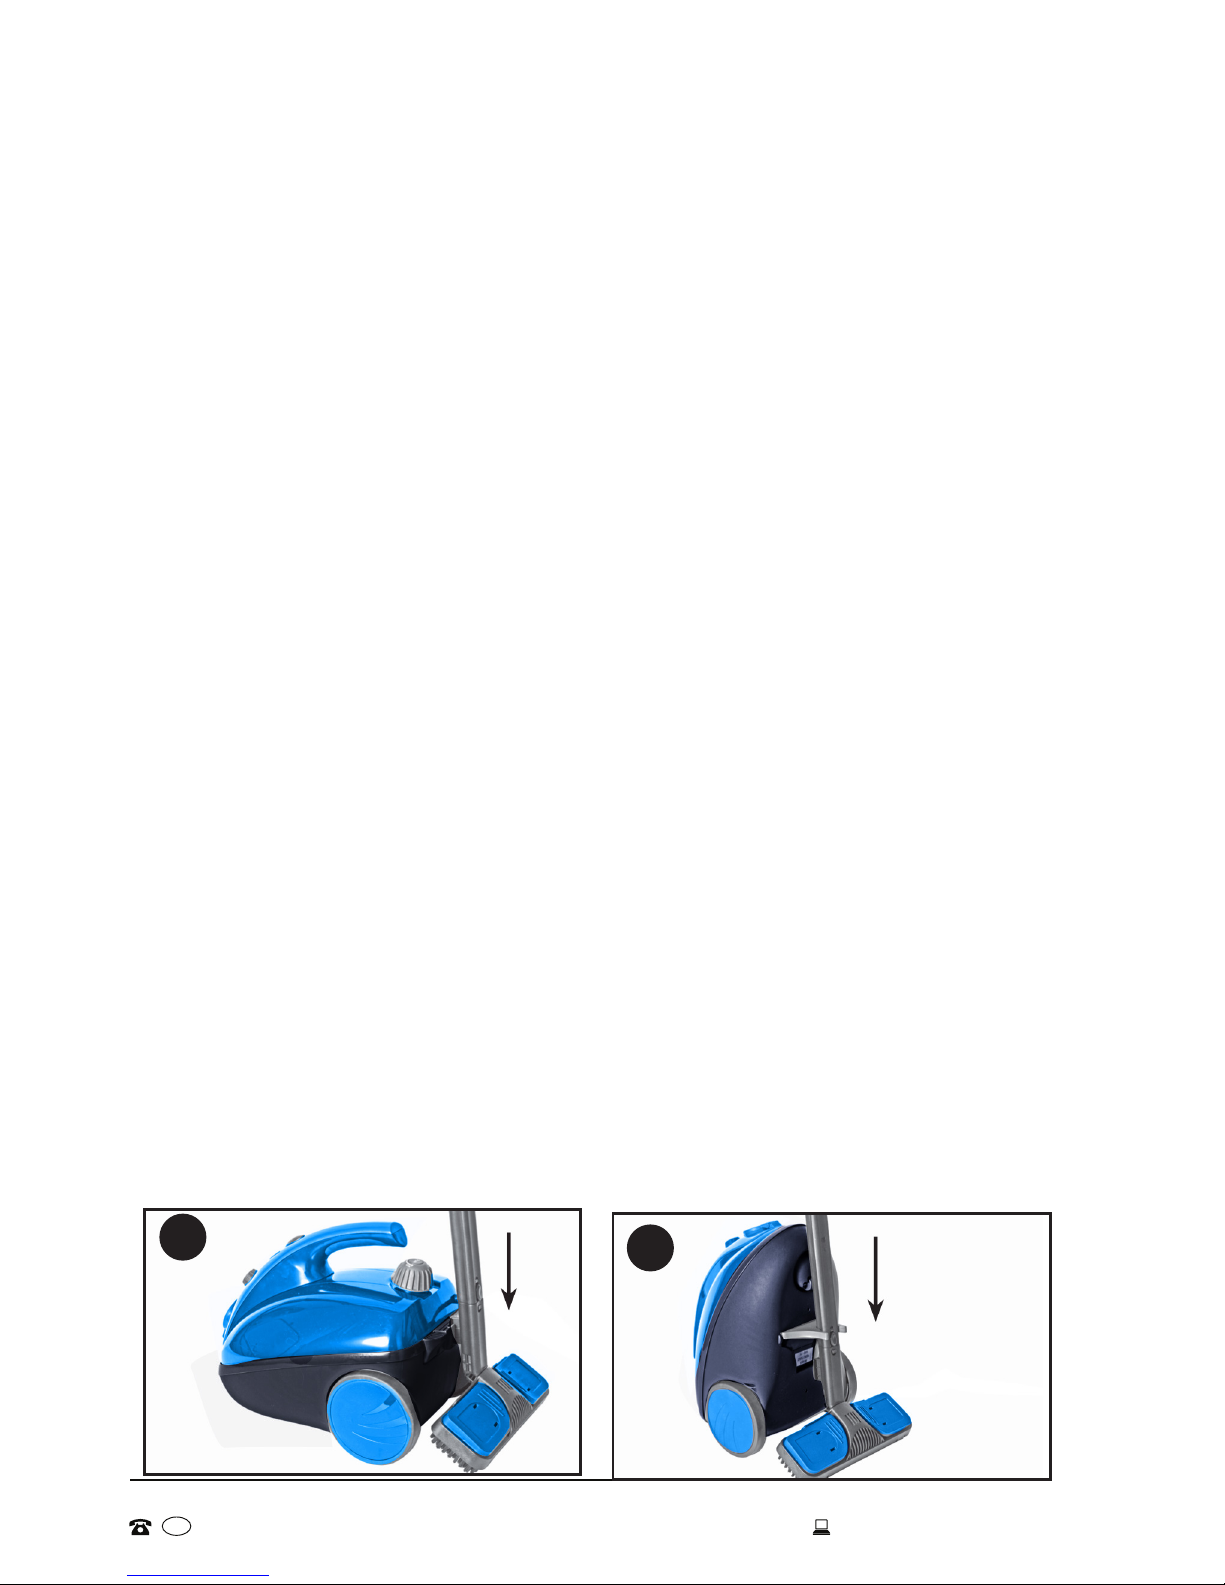
Storage
The appliance can be stored in two positions.
• Horizontal (with the floor attachment connector [21] only): Place the lug of
the connector in the attachment holder [10] at the back of the appliance (see
A17, below left).
• Vertical: Stand up the appliance and pull out the holder on the base. The
extension tubes [14] can now be attached (see A18, below right).
NOTE: Before storing the appliance, always empty the tank and leave the main
unit to dry completely with the water tank open.
Cleaning the steam cleaner
Before cleaning the steam cleaner in any way, disconnect the appliance from the
power supply, release the pressure and wait until the appliance has cooled down
completely. We recommend cleaning the water tank after it has been filled at
least five times. To do this:
1. Fill the tank with tap water using the measuring beaker and funnel.
2. Shake it up vigorously and empty it out.
3. Repeat the process two to three times.
4. Use a damp cloth to clean the plastic parts. Do not use cleaning products,
solvents or sharp objects for this purpose.
Descaling the appliance
If you live in a hard water area, you may also have to remove any lime deposits in
the water tank every six months or so. To do this:
1. Use the measuring beaker and funnel to fill the water tank with a solution of
25% vinegar and 75% water, or with a special descaling solution prepared
according to the packet instructions.
2. Leave the solution to work for approximately 30 minutes, or as specified.
Then shake the tank vigorously and empty it. Repeat, if necessary.
A17 A18

16
AFTER SALES SUPPORT
AUS Hotline Costs
AUS
MODEL: SC-389 PRODUCT CODE:42556 09/2014
Other Useful Information (Cont.)
Problem Cause Solution
Water is emitted
from the steam
gun or other
accessories.
The green control light is
not lit.
The pipes and connections
are cold and the steam is
condensing before being
emitted.
The appliance is at an angle.
Wait until the green control
light is lit.
Press and hold the steam
pressure knob and wait until
the pipes and connections
reach operating temperature.
Set the appliance straight.
When the steam
pressure knob
is pressed, no
steam is emitted
although the
appliance is
plugged in.
The on/off switch is
switched off (red operating
control light is not lit).
The water tank is empty.
Press the on/off switch (red
operating control light will be
lit). Wait until the green control
light is also lit.
Fill up the water tank.
Steam is
escaping through
the safety locking
cap.
The safety locking cap is
not locked correctly.
The safety valve has tripped.
Turn the safety locking cap to
fully lock it.
Contact the after sales
support line for advice.
The safety locking
cap is difficult to
open.
There is still steam in the
water tank.
Press the steam pressure knob
to allow the steam to escape.
There are strange
noises when the
on/off switch is
pressed.
There is still steam in the
appliance from the last time
it was used.
The appliance is cold.
Press the steam pressure
knob to allow the steam to
escape.
This is normal and will stop
after a few minutes.
Troubleshooting guide

17
AFTER SALES SUPPORT
AUS Hotline Costs
AUS
MODEL: SC-389 PRODUCT CODE:42556 09/2014
Other Useful Information (Cont.)
Responsible disposal
At the end of its working life, do not throw this appliance out with your household
rubbish. Electrical and electronic products contain substances that can have
a detrimental effect on the environment and human health if disposed of
inappropriately. Observe any local regulations regarding the disposal of electrical
consumer goods and dispose of it appropriately for recycling. Contact your local
authorities for advice on recycling facilities in your area.
Technical specifications
Voltage: 220V-240V ~ 50Hz
Wattage: 1800W max.
Tank capacity: 1600ml
Pressure: 3 bar
AFTER SALES SUPPORT
AUS Hotline Costs
AUS
MODEL: SC-389 PRODUCT CODE:42556 09/2014
Repair and Refurbished
Goods or Parts Notice
Unfortunately, from time to time, faulty products are manufactured which need to
be returned to the supplier for repair.
Please be aware that if your product is capable of retaining user-generated data
(such as files stored on a computer hard drive, telephone numbers stored on
a mobile telephone, songs stored on a portable media player, games saved on
a games console or files stored on a USB memory stick) during the process of
repair, some or all of your stored data may be lost. We recommend you save this
data elsewhere prior to sending the product for repair.
You should also be aware that rather than repairing goods, we may replace them with
refurbished goods of the same type or use refurbished parts in the repair process.
Please be assured though, refurbished parts or replacements are only used
where they meet ALDI’s stringent quality specifications.
If at any time you feel your repair is being handled unsatisfactorily, you may
escalate your complaint. Please telephone us on 1300 886 649 or write to us at:
Tempo (Aust) Pty Ltd ABN 70 106 100 252
PO BOX 6056 Frenchs Forest, Sydney, Australia NSW 2086
Telephone: 1300 886 649 (Aust) - Fax: (02) 9975 2688
Tempo Help Desk: 1300 886 649 (Aust)
(Operating Hours: Mon-Fri 08:30am to 06:00pm EST)
Email: [email protected]g
YEAR WARRANTY
3
Steam Cleaner with Wheels
Other manuals for SC-389
1
Table of contents
Other Stirling Steam Cleaner manuals

Stirling
Stirling IA3744 User manual

Stirling
Stirling GSTT1100 User manual

Stirling
Stirling GSTT1100 User manual

Stirling
Stirling GS511 User manual

Stirling
Stirling GS511 User manual

Stirling
Stirling SC-380 User manual

Stirling
Stirling GS511 User manual

Stirling
Stirling SC-270S User manual

Stirling
Stirling SC-270S User manual

Stirling
Stirling SM-102 User manual


