Strahman HYDRO-PRO 150 User manual

RENEWABLE COVER REPLACEMENT
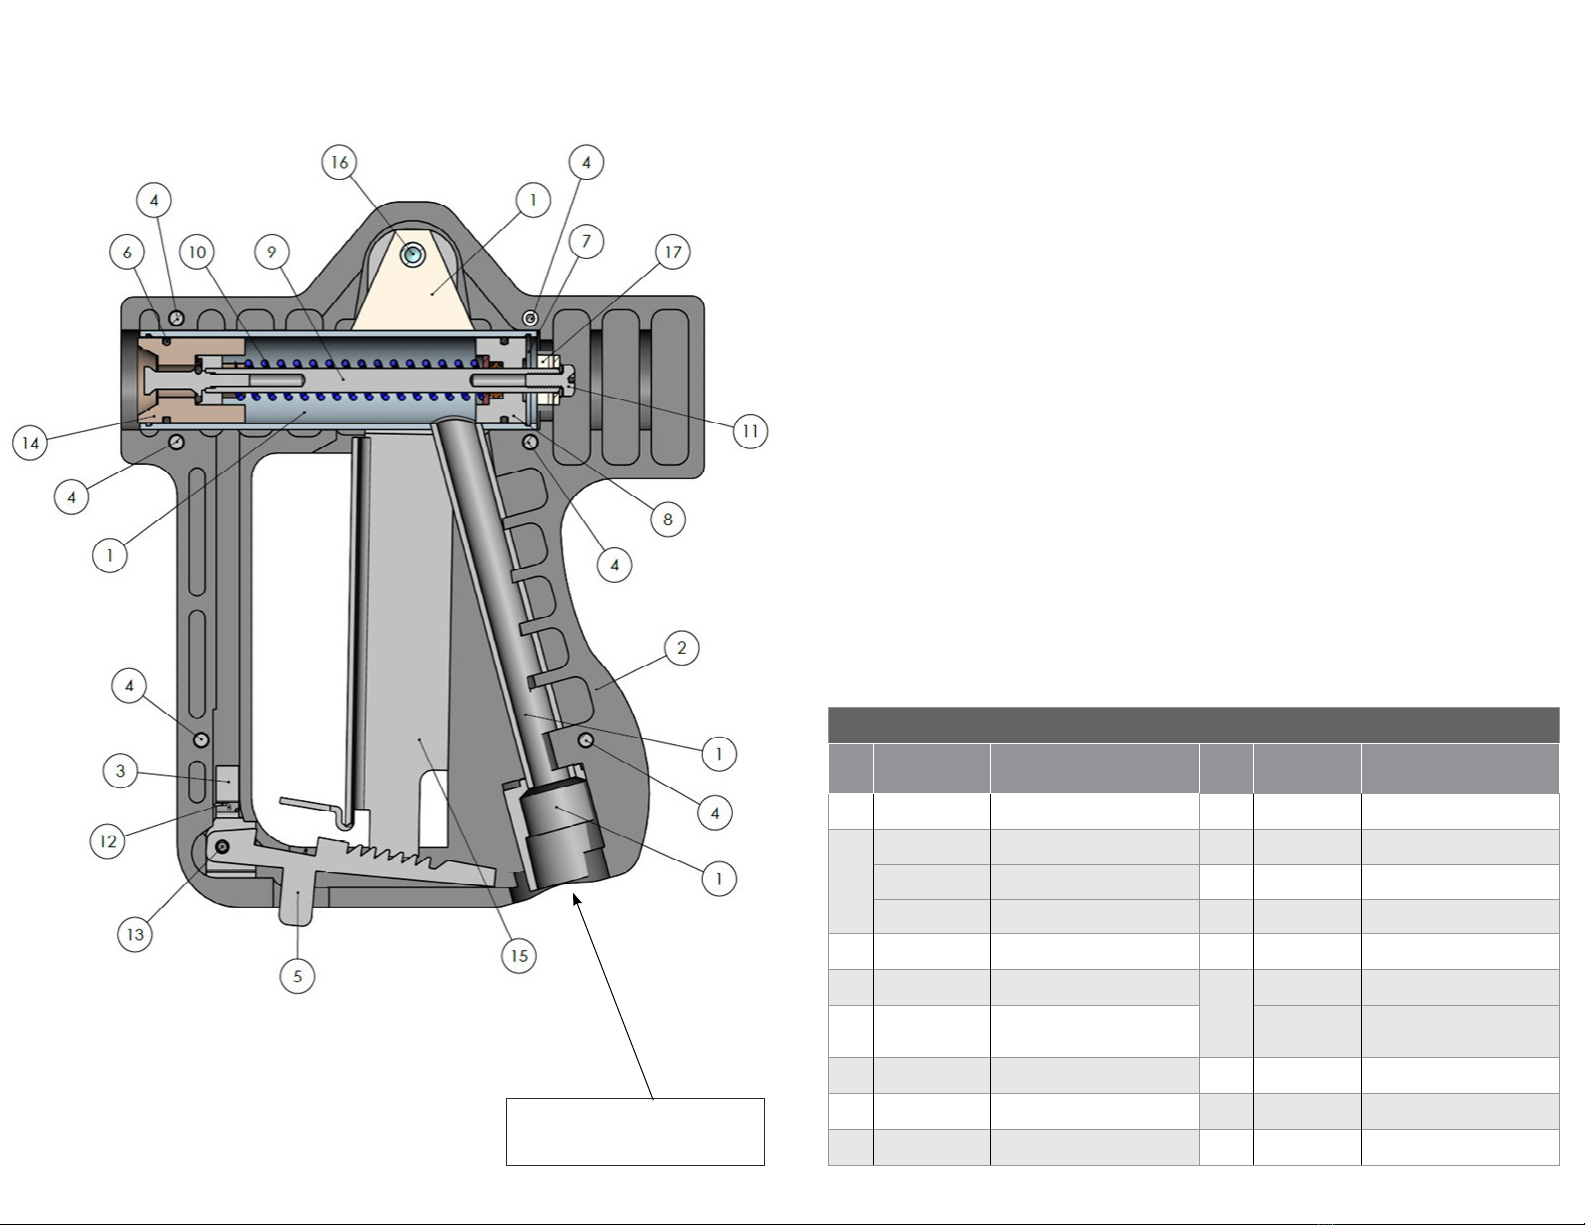
If the renewable cover (2) becomes worn or cracked, follow the steps
below to replace it.
1. Disassemble the renewable cover (2) by loosening and removing the six cover screws (4) (not shown).
2. Lift the body (1) free of the cover (2). Remove the ratchet assembly hinge (3), ratchet (5), and ratchet
spring pin (13).
3. lnstall the body (1) and ratchet assembly-hinge (3) ratchet (5), ratchet spring (13) and spring pin (14) in the
new renewable cover (2). Reinstall the six cover screws (4) (not shown).
Assembly Instructions
HYDRO-PRO 150®
WATER-SAVER SPRAY NOZZLE
A
C
E
R
T
I
F
I
E
D
Q
U
A
L
I
T
Y
P
R
O
D
U
C
T
•
A
C
E
R
T
I
F
I
E
D
Q
U
A
L
I
T
Y
P
R
O
D
U
C
T
•
A
C
E
R
T
I
F
I
E
D
Q
U
A
L
I
T
Y
P
R
O
D
U
C
T
•
1 YEAR
LIMITED
WARRANTY
STRAHMANGROUP.COM
WORLD HEADQUARTERS
2801 BAGLYOS CIRCLE
BETHLEHEM, PA 18020
P: +1 484.893.5080
© STRAHMAN GROUP PUBLISHED 07.24.23
RENEWABLE COVER - BLACK RENEWABLE COVER - WHITE RENEWABLE COVER -RED
HYDRO-PRO 150®WATER SAVER NOZZLE
INSTRUCTIONS FOR SERVICING SPRAY NOZZLE
If the Hydro-Pro 150 begins to leak from the seat (14) or rear of the body (1) follow
the steps below. For best results, order original Strahman parts.
1. Disassemble the renewable cover (2) by loosening and removing the six cover screws (4) (not shown).
2. Lift the body (1) free of the cover (2). Remove the ratchet assembly hinge (3), ratchet (5), and ratchet spring pin (13).
Place the body in boiling water for 2-3 minutes to release the Loc-Tite bond on stem screw (11). Remove the stem
screw (11) and swivel the U-bracket (17) down or up away from the stem (9).
3. Remove the snap rings (7) from the font and rear of the water saver body (1). Push on the rear of the stem (9) until
the seat stem (14) and stem spring (10) are free of the body.
4. Carefully press the housing (8) out of the rear of the water saver body (1). Precautions should be taken to avoid
damaging the inside of the water saver body.
5. lnstall a new “O-ring” (6) on the seat (14). Install a new “O-ring” (6) on the new housing (8).
6. lnstall seat (14) and snap-ring (7) in the front of the water saver body (1). Install the stem (9) and then stem spring
(10) from the rear of the water saver body.
7. Install the housing (8) in the rear of the body and compress the stem spring (10). Install a snap ring (7) in the rear of
the water saver body.
8. Swivel the U-bracket (17) back into place over the end of the stem (9). Apply Loc-Tite 271 to the stem screw (12) and
reinstall.
9. Re-install the body (1) and ratchet assembly-hinge (3) ratchet (5), and ratchet spring pin (13) in the new renewable
cover (2). Reinstall the six cover screws (4) (not shown).
PARTS LIST
ITEM
NO. ORDER NUMBER DESCRIPTION ITEM
NO. ORDER NUMBER DESCRIPTION
1 HPBODYASSM HYDRO-PRO 150® BODY 9 HP150STEMASSY STEM ASSEMBLY
2
WSHP1COVER0007 RENEWABLE COVER - BLACK 10 SPRG12339S3SS STEM SPRING (SET OF 6), SST
WSHP1COVER0008 RENEWABLE COVER - RED 11 MSN8320038LWOZ STEM SCREW & WASHER (SET OF 6)
WSHP1COVER0009 RENEWABLE COVER - WHITE 12* SPRG12410S5SS RATCHET SPRING, SST
3* HP1HINGESS RATCHET HINGE, SST 13* HP1SPINSS RATCHET SPRING PIN (SET OF 6) SST
4 HP1SCR COVER SCREWS (SET OF 6) (NOT SHOWN)
14
HP1SEAT HP 150 SEAT, SST
5 HP150RACHETASSY RATCHET ASSEMBLY (INCLUDES ITEMS
#3, 12, 13 HP1SEATLFSS HP 150 LOW FLOW SEAT, SST
6 ORNG18MM02MMEA O-RINGS (SET OF 6) 15 HP1LARM LEVER ARM
7 HP1SNAPRINGSS SNAP RETAINING RING, SST 16 WSHP1LPIV0000 LEVER ARM PIVOT ASSY
8 HP1HOUSASSY HOUSING, SST 17 HP1UBRKSS U-BRACKET, SST
* IS ALSO A PART OF A COMPLETE ASSEMBLY ITEM #5
HYDRO-PRO 150®WATER SAVER NOZZLE
Add pipe sealant at this connection;
tighten to ensure an adequate seal.
Other Strahman Paint Sprayer manuals


Popular Paint Sprayer manuals by other brands


Kobalt
Kobalt SGY-AIR160TZ operating instructions

Nordson
Nordson Sure Coat Series Customer product manual

Meec tools
Meec tools 011485 manual

Nordson
Nordson Tribomatic 2 Customer product manual

Air & Allied Sales
Air & Allied Sales UGC2005 operating instructions

Gloria
Gloria MULTIJET 230V instruction manual

Nordson
Nordson Versa-Spray manual

Task Force Tips
Task Force Tips Ultimatic INSTRUCTIONS FOR SAFE OPERATION AND MAINTENANCE

Smith
Smith SR-25 Sulky Driver Operation and repair manual

Unimac
Unimac HVLP user manual

MeiVac
MeiVac MAK Series Owner's operation and maintenance manual

DETE
DETE BM 250 operating manual