Strong srt rb-4k User manual

M
M
odel
Us
e
0
SRT
e
r Ma
RB-
4
nual
4
K

1

2
Warranty Information
This product comes with a 12-month manufacturer’s warranty from the date of purchase.
This unit has a 30 days’ replacement warranty for manufacturing faults.
Within this period please return the faulty product with all its supplied accessories to either the
place of purchase or
STRONG Australia
accompanied by the original purchase receipt. After
this 30 days period the unit must be returned to
STRONG Australia
for testing, and if deemed
faulty, will be repaired or replaced at the discretion of
STRONG Australia Pty
Ltd.
The faulty
product can either be sent to
STRONG Australia
directly or via your place of purchase for
evaluation.
STRONG Australia
will cover any reasonable costs incurred in returning the faulty
product for evaluation should the product be deemed as genuinely faulty. If the product is
found to have no fault, the costs incurred in delivering product to and from
STRONG
Australia
will be the responsibility of the customer.
Our goods come with guarantees that cannot be excluded under Australian Consumer
Law. You are entitled to a replacement or refund for major failure and for compensation for any
reasonably foreseeable loss or damage. You are also entitled to have goods repaired or
replaced if the goods fail to be of acceptable quality and the failure does not amount to a major
failure.
STRONG Australia
60 Wedgewood Rd, Hallam. VIC. 3803

3
Ph: +61 3 8795 7990 FAX: +61 3 8795 7991
CONTENTS
CONTENTS............................................................................................................................................3
1SAFETY ..........................................................................................................................................5
2UNPACKING AND SETUP HARDWARE..................................................................................7
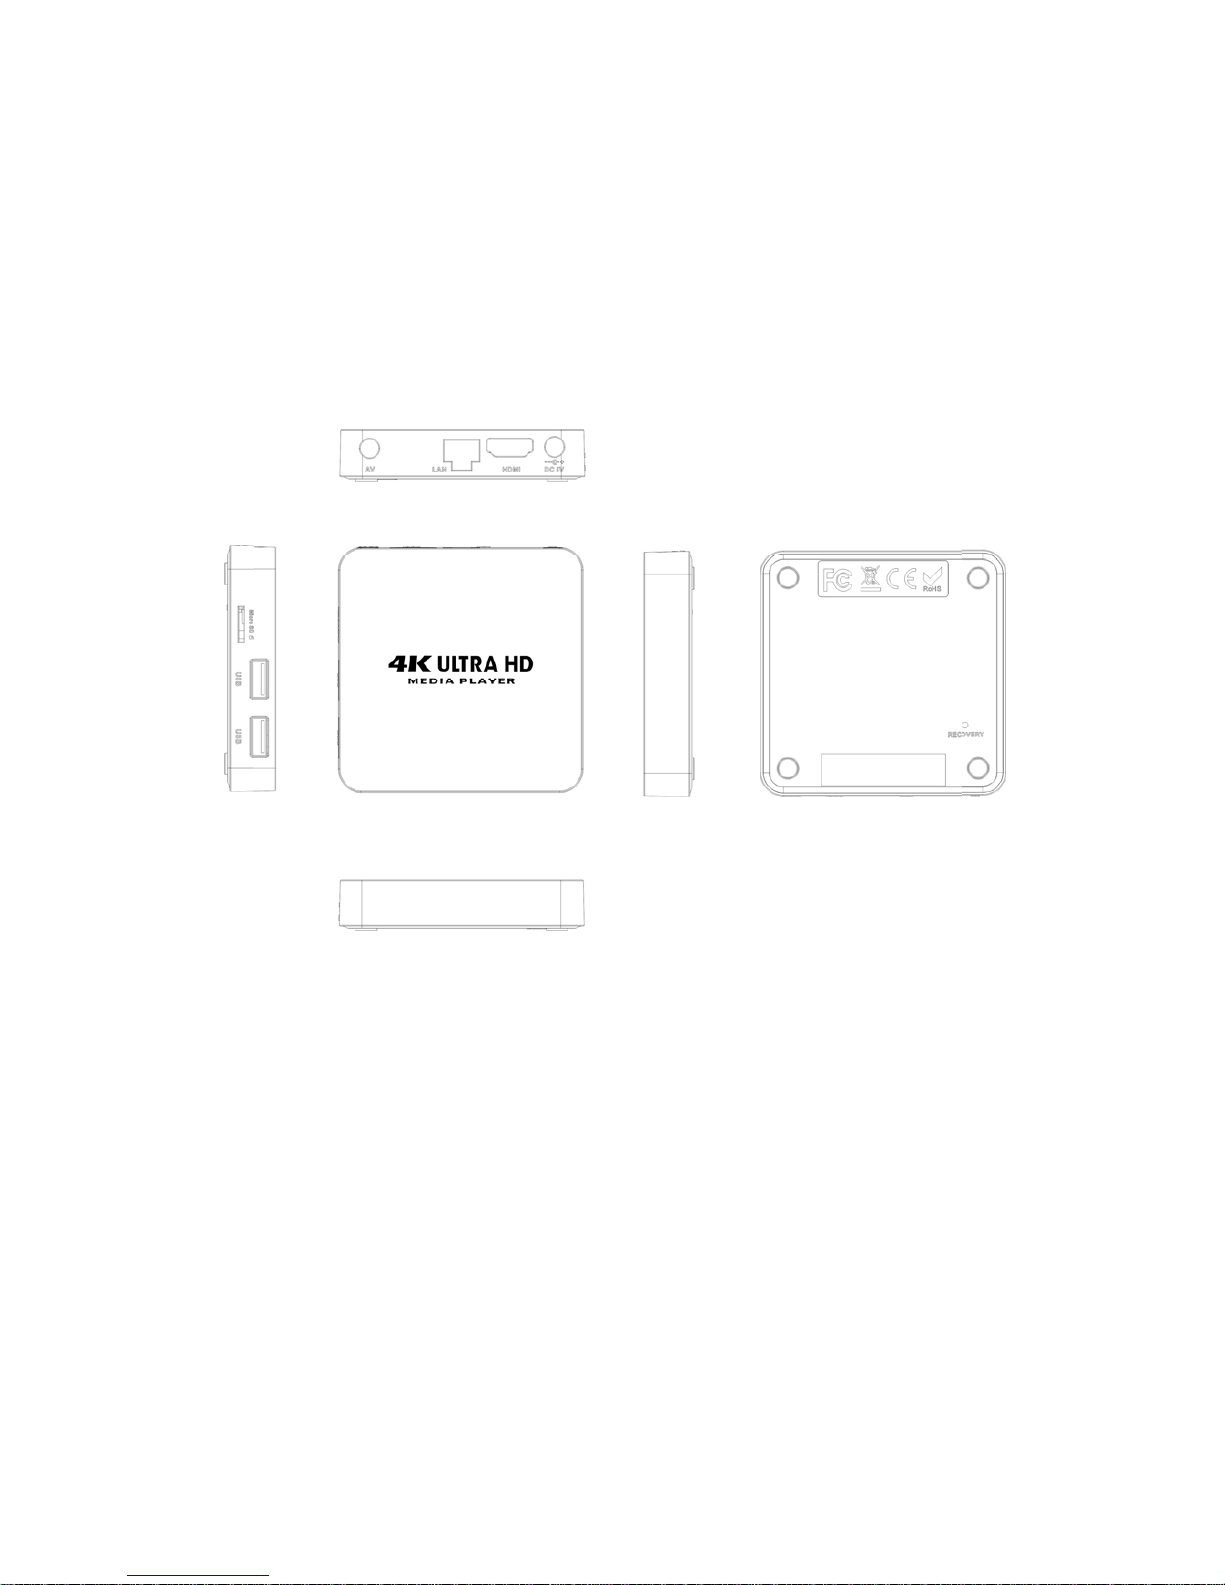
2.1 TOP/RIGHT/LEFT VIEW ..................................................................................................................7
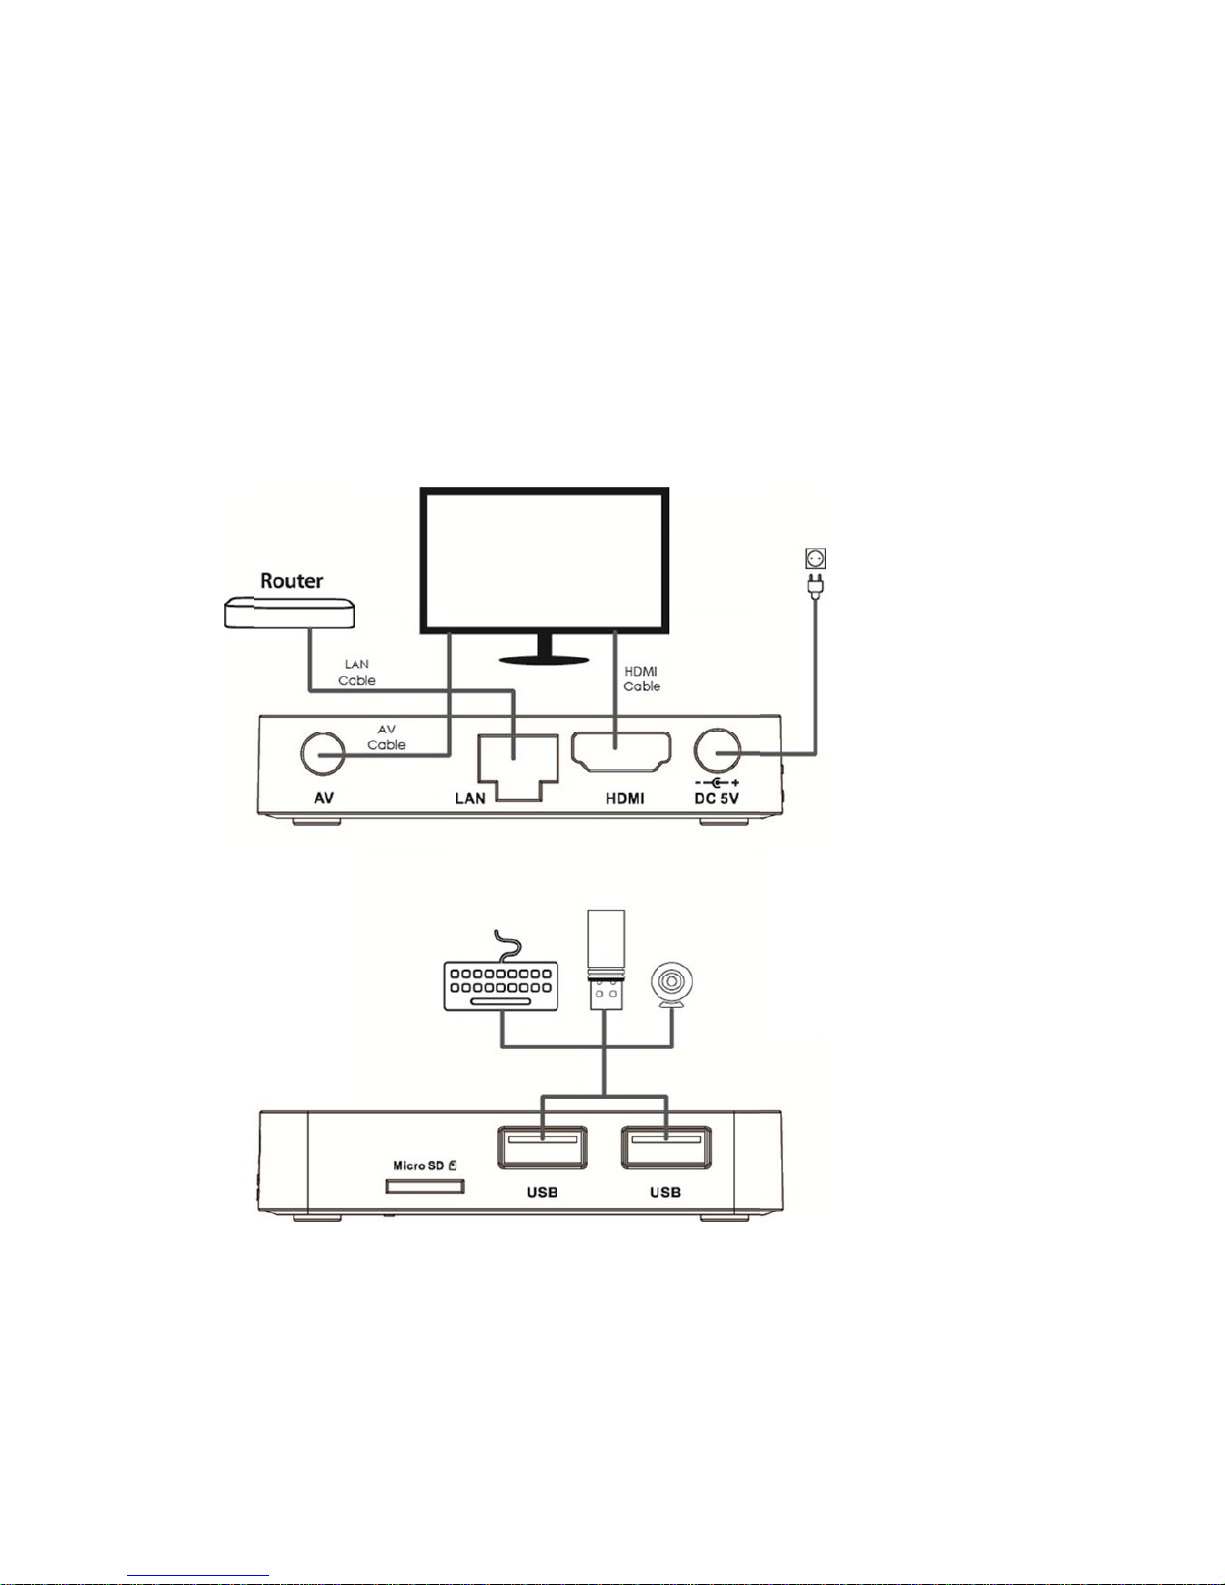
2.2 HARDWARE INSTALLATION.............................................................................................................8
3REMOTE CONTROL....................................................................................................................9
4ENTERTAINMENT ON ANDROID MEDIA BOX ....................................................................10
4.1 INSTALL APP FROM GOOGLE PLAY STORE ................................................................................10
4.2 INSTALL APP FROM EXTERNAL USB/SD CARD STORAGE.........................................................11
4.3 CUSTOMIZE YOUR LAUNCHER......................................................................................................12
4.4 MIRACAST/AIRPLAY/DLNA .........................................................................................................12
5SYSTEM SETTINGS AND UPGRADE....................................................................................14
5.1 SYSTEM SETTINGS ......................................................................................................................14
5.2 SYSTEM UPGRADE .......................................................................................................................15
6TROUBLESHOOTING................................................................................................................17
6.1 NO SIGNAL ON THE UHD TV .......................................................................................................17

4
6.2 CANNOT TURN ON YOUR MEDIA BOX...........................................................................................17
6.3 CANNOT CONNECT TO NETWORK ................................................................................................17
6.4 SOME UHD TV CAN NOT DISPLAY THE ENTIRE PICTURE............................................................17
6.5 THE REMOTE CONTROL DOES NOT WORK ...................................................................................17
6.6 NO PICTURE OR SOUND ...............................................................................................................18

5
1Safety
NOTICE: To prevent fire and electric shock, do not expose this receiver to
rain or moisture. In order to avoid any possible risk of electric shock, never
attempt to open the unit. In case of the unit breaking down, repair of the unit
should be carried out by qualified technicians. No part of this unit should be repaired by users.
WARNING!
Presence of live parts inside the unit! Do not open. Risk of electric shock! No part should
be repaired by users.
The maintenance of the receiver should be carried out exclusively by qualified persons.
If the power cord is damaged, it must be replaced or repaired by the manufacturer, its
after-sales service, qualified electrician or persons of similar qualification in order to avoid
possible danger.
The product must be installed in accordance with national regulations.
The used batteries must be disposed of safely an appropriately in order to protect the
environment.
Proper Installation
Place the receiver on a flat, firm and stable surface. Do not put it on a carpet or rug.
Do not place the receiver on top of another device, such as an amplifier. This may lead to
overheating.
Do not cover the unit or put anything above the unit (for example, CDs or magazines).
Sufficient Ventilation
Place the receiver in a well-ventilated location to prevent accumulation of internal heat.

6
Allow a gap of at least 10cm to the rear and the top of the unit, as well as a space of 5cm
to both sides to avoid overheating.
Do not obstruct any ventilation openings with items such as newspapers, tablecloths,
curtains, etc.
Protecting the Receiver from High Temperatures, Humidity, Water and Dust
The receiver should not be exposed to dripping water or splashing.
No objects filled with liquids, such as vases, should be placed on the unit.
Do not place any objects that might damage your unit near it (e.g. liquid filled objects or
candles).
Do not place any source of flames such as lit candles on the receiver.
Electricity Supply
Please unplug the receiver in case of prolonged non-use.
If the power cord is damaged, it must be replaced or repaired by the manufacturer, its
after-sales service, qualified electrician or similar qualifications to those to avoid possible
danger.
The plug must remain readily accessible after the installation of the product.

2
Th
e
2.1
NO
T
Unpac
k
e
pictures sh
Top/Righ
t
T
ICE: The
pi
k
ing and
ows what o
t
/Left view
i
ctures are f
o
setup ha
u
r product l
o
o
r reference
s
7
a
rdware
o
oks like.
s
only

2.2
A
s
s
the
the
Hardwar
e
s
hown, con
n
product (su
c
power is co
e
installati
o
n
ect the int
e
c
h as conn
e
nnected, tu
r
n
e
rfaces on
t
e
ct the prod
u
r
n on the s
w
8
t
he televisi
o
u
ct with TV
s
w
itch and yo
u
o
n with the
c
s
ets throug
h
u
can use t
h
c
orrespondi
n
the HDMI
c
h
e product.
n
g interfac
e
c
able), then
e
s on
after

3
P
B
Remot
e
ower button
B
ack button
e
control
Notes: Th
e
Directi
o
Context-
s
e
default pa
s
9
o
nal Pad/OK
b
s
pecific menu
ssword is 0
0
b
utton
button
0
00 for this
Volume + M
o
media box.
Home butto
n
ouse enable
d
n
d
isable button
s
s

4
Th
a
sm
a
vid
e
A
n
d
4.1
Pre
s
Pla
y
Log
ent
e
Entertain
m
a
nks to the
p
a
rter TV. Yo
u
e
o chat wit
h
d
roid compa
t
Install AP
s
s Home b
u
y
Store to la
in to the G
o
e
rtainment
a
m
ent on A
n
p
owerful
A
n
d
u
can enjoy
h
your frien
d
t
ible game-
p
P from G
o
u
tton to sho
w
unch it
o
ogle Play S
a
pplications.
n
droid Me
d
d
roid platfor
m
more enter
t
d
s, browsin
g
p
ads or air
m
ogle Play
S
w
home pag
e
t
ore with yo
10
d
ia Box
m, the med
i
t
ainment on
g
news, so
c
m
ouse (not
p
Store
e and go to
ur account
a
i
a box conv
e
your TV se
t
c
ial networ
k
p
rovided) to
My Apps m
a
nd then yo
u
e
rts your re
g
t
such as w
a
k
and playi
n
the media
b
enu then s
e
u
can install
g
ular TV se
t
a
tching You
T
n
g games
u
b
ox.
e
lect the Go
o
l
your prefe
r
t
to a
T
ube,
u
sing
o
gle
r
red

4.2
Se
a
and
itse
l
lau
n
Lau
Install AP
a
rch on the
i
copy it to
U
lf
. Plug US
B
n
cher. Go t
o
nch FileBro
w
P from ex
t
i
nternet for
t
U
SB/SD ca
r
B
/SD Card
s
o
the Applic
a
w
ser to sel
e
t
ernal US
B
t
he applicat
r
d storage
o
s
torage in t
o
a
tions page
o
e
ct USB/SD
11
B
/SD Card
t
ion install fi
o
r download
o the medi
a
o
n the hom
e
card storag
e
storage
le (*.apk) t
h
directly fro
a
box and
p
e
screen.
e
and brow
s
at you nee
d
m
the inter
n
p
ress Home
s
e APK file,
d
on a com
p
n
et onto th
e
e
button to
s
press OK b
u
p
uter
e
box
s
how
u
tton

to i
n
4.3
Yo
u
Pr
e
but
t
Yo
u
ap
p
4.4
Th
e
Ph
o
Ph
o
Mir
a
n
stall it.
Customiz
e
u
can add
e
ss Home
t
on.
u
can del
e
p
lication b
y
Miracast/
A
e
media box
o
ne/iPhone
o
ne/iPhone,
a
cast receiv
e
e
your lau
n
your pref
e
button to
s
e
te applic
a
y
pressing
A
irplay/DL
N
supports
M
screen to
t
Android Pa
d
e
r and mirr
o
n
che
r
er
red appl
s
how laun
c
a
tion shor
t
menu butt
N
A
M
iracast/Airp
t
he TV set
d
/iPad to th
e
o
ring your A
n
12
ication to
c
her and
c
r
tcuts fro
m
t
on after hi
p
lay/DLNA,
t
or share
v
e
TV set thr
n
droid Pho
n
home pa
g
c
hoose + i
m
the hom
ghlighting
t
his means
y
v
ideo/music
/
ough medi
a
n
e/Pad scre
e
g
e and lau
con by pr
e
e page o
r
the applic
a
y
ou can sh
a
/
picture fro
m
a
box. Laun
c
e
n to the TV
nch it qui
c
e
ssing the
r
uninstall
a
tion.
a
re your An
d
m
your An
d
c
h S Link to
set. Comp
a
c
kly.
OK
the
d
roid
d
roid
start
a
tible

Mir
a
sm
a
Do
w
iPh
o
a
cast smart
a
rt phone, S
w
nload and
i
o
ne/iPad Ai
r
phone are
G
ony Androi
d
i
nstall an Ai
r
play mirrori
n
G
oogle Ne
x
d
smart pho
n
rPlay app fr
n
g and DL
N
13
x
us Phone,
L
n
e etc...
r
om Google
N
A from all
D
L
G Android
Play Store
o
D
LNA comp
a
smart pho
n
o
n the medi
a
tible APP.
n
e, HTC An
d
i
a box to re
c
d
roid
c
eive

5
Sys
as
v
5.1
Yo
u
pre
s
etc.
Ch
o
me
d
sett
use
System
S
tem setting
s
v
ideo/audio
o
System S
u
can open
s
s the OK b
..
o
ose More
S
d
ia box sup
p
ings, we do
n
r
S
ettings a
n
s
and upgra
o
utput, net
w
ettings
system set
t
utton. You
c
S
ettings to o
p
p
lies the M
o
n
’t recomm
e
n
d upgrad
e
de helps y
o
w
ork conne
c
t
ings menu
c
ould setup
p
en Androi
d
o
re Settings
e
nd the use
r
14
e
o
u to setup
t
c
tion, Blueto
o
from Laun
c
Network, Bl
d
system se
t
application
r
selects the
s
he media b
o
o
th etc...
c
her by sel
e
uetooth, Vi
d
t
tings for ad
v
for configu
r
s
e options
u
o
x in advan
c
e
cting the S
e
d
eo/Audio o
u
v
ance settin
g
r
ation and d
u
nless they
a
ce settings
ettings icon
utput, Lang
u
gs. Althoug
h
isplays adv
a
a
re an adva
n
s
uch
and
u
age
h
the
a
nce
n
ced

5.2
Me
d
onli
n
inte
System u
p
d
ia box ca
n
n
e update n
rnet. Click
n
p
grade
n
be upgra
d
otifications
o
n
otification t
o
d
ed through
o
n the hom
e
o
download
15
USB/SD
c
e
page whe
n
new softwa
c
ard storag
e
n
new softw
a
r
e and upgr
a
e
and OTA.
a
re is made
a
de the me
d
You might
available o
n
d
ia box.
see
n
the

Wh
e
(w
w
car
d
Ch
o
e
n availabl
w
w.strong.c
o
d
storage.
G
o
ose the up
g
e, you ca
n
o
m.au) in th
e
G
o to Setting
g
rade pack
a
n
downloa
d
e
support s
e
s--->About-
-
a
ge from US
16
d
new ver
s
e
ction and u
-->Upgrade
-
S
B/SD card
s
s
ions of s
o
pgrade the
-
-->Local.
s
torage to u
p
o
ftware fro
m
edia box t
p
date the m
o
m our we
t
hrough US
B
m
edia box.
bsite
B
/SD

17
6 Troubleshooting
6.1 No signal on the UHD TV
Check if the HDMI cable is securely connected.(HDMI 2.0 Cable required)
Check if you have selected the correct HDMI input on your UHD TV.
Check the antenna cable, replace the cable, or connect the cable to the receiver securely.
Set the values of the tuner parameters correctly in the installation menu.
Check the antenna connections.
6.2 Cannot turn on your media box.
Check if the power connector is correctly connected into the DC socket of your TV and to
the media box.
Check if the power is turned on.
6.3 Cannot connect to network
Ensure the network cable is securely connected and the Ethernet is functioning
Ensure the Wi-Fi network is connected and the security key for the encrypted network is
entered correctly.
Make sure you select the correct IP address settings.
6.4 Some UHD TV cannot display the entire picture
Setup the screen ratio on your UHD TV as automatic.
On your UHD TV, go to Menu >Screen >Press arrow buttons to select the ratio type >
Select automatically to display the entire screen.
6.5 The remote control does not work
Make sure the batteries are in good condition and that they are correctly inserted.

18
Make sure no objects block the path between the remote control and the signal sensor
area on the product.
Make sure the distance between the remote control and the box is no more than 5 meters.
6.6 No picture or sound
Check if the Audio/ Video output connection from the product to TV correctly.
Turn TV on.
Press mute button to see if the TV was muted and also on the Android box remote.

19
7. Specification
Hardware
Chipset Amlogic S905X
RAM DDR3 2GB
Flash storage eMMC 16GB
Video
Video Decoding H.264/H.265 HEVC [email protected] up to 4K UHD@60fps
H.264/H.265 AVC [email protected] up to 4K UHD@60fps
H.264/H.265 MVC up to 4K UHD@60fps
MPEG-4 ASP@L5 up to 1080P@60fps
AVS Jizhun Profile up to 1080P@60fps
MPEG-2 MP@HL up to 1080P@60fps
MPEG-1 MP@HL up to 1080P@60fps
RealVideo 8/9/10 up to 1080P@60fps
WebM up to VGA
Video File Format Support
*.mkv,*.wmv,*.mpg,*.mpeg,*.dat,*avi,*.mov,*.iso,*.mp4,*.rm,*.jp
g, *.bmp, *gif etc…
HDMI Output HDMI 2.0 (video format default @ Auto), Support HDCP2.2
Aspect Ratio Auto, Full screen
Video resolution 4K@60Hz 4K@50Hz 1080p/i 720p
Audio
A
udio Decoding Dolby Digital, MPEG, AAC, HE-AAC, OGG, OGA, FLAC,
ALAC, Ape, M4A, RM, MPEG-1 layer1/2, MPEG-2 Layer II
(DTS, WMA, WMA Pro, WMV Optional via third party
applications/plugins and software decoding)
Table of contents
Other Strong Media Player manuals