STX Juicer Attachment User manual

INSTRUCTION MANUAL
JUICER
ATTACHMENT
For use with STX
MegaForce & Turboforce Meat Grinders

***IMPORTANT***
The STX Juicer Attachment ONLY works
with the STX MegaForce and STX
TurboForce.
***IMPORTANT***
The STX Juicer Attachment
does NOT work with the
STX TurboForce II or
any other STX Meat Grinders.

- 3 -
STX JUICER ATTACHMENT
The STX Juicer Attachment is designed to extract juice. It is not designed
for grinding nuts, herbs, coffee beans, making nut butter, etc.
BASIC COMPONENTS
1. Housing
2. Auger
3. Strainer
4. Yield Setting Cap*
5. Plunger Tool
*Yield Setting Cap can be broken down into the Setting Cap and Yield Control
Knob. These two components are separated during the cleaning process.
1
3
2
4
5

- 4 -
ASSEMBLY OF JUICER
1. Insert the Auger into the Housing.
2. Insert the Strainer over the Auger so that the tabs align with the
recessed portion of the Housing. The Strainer has tabs on the wide
end that align with recessed areas of the Housing.
3. Attach the Yield Setting Cap.
a. The Yield Setting Cap has numbers, “0”, “1”, “2”, and “3”
embossed on its face.
b. The Housing has the word OPEN with an arrow embossed at
approximately the 3 o’clock position.
c. On the opposite side of the opening of the Housing, the word
“CLOSE” and an arrow is also embossed on the Housing.
d. Align the Yield Setting Cap so that the number “1” aligns with the
Open Arrow.
e. Push the Yield Setting Cap snug against the opening of the
Housing.
f. Rotate the direction shown by the CLOSE arrow.
HOUSING
AUGERSTRAINER
YIELD
SETTING
CAP

- 5 -
CONNECT THE STX JUICER ATTACHMENT
TO THE STX MEAT GRINDER
The STX Juicer Attachment ONLY works with the
STX MegaForce and STX TurboForce.
It does NOT work with the STX TurboForce II or
any other STX Meat Grinders.
1. Ensure that the STX Meat Grinder is turned off and unplugged prior
to attaching the STX Juicer Attachment to the STX Meat Grinder.
2. The assembled STX Juicer can be fitted to the STX Meat Grinder
by removing the grinding head of the STX Meat Grinder (See the
Owner’s Manual for the STX Meat Grinder for instructions).
3. Insert the Juicer Housing into the STX Meat Grinder. The STX Juicer
Attachment has two male locking tabs that insert into 2 female slots
of the STX Meat Grinder. The Juicer Auger has a male gear that
also aligns with the female slot on the drive shaft of the STX Meat
Grinder. These components align quite easily but sometimes it may
be necessary to slightly rotate the STX Juicer Attachment clockwise
and counter clockwise to align all components. The Juicer housing
will fit flush with the front of the STX Meat Grinder when correctly
attached.
4. Now simply tighten the Grinding Head Knob hand tight, so that the
STX Juicer Attachment is firmly in place. Removal of the STX Juicer
Attachment is completed by simply loosening this same Grinding
Head Knob and removing the STX Juicer Attachment. Do NOT
overtighten.
- 6 -
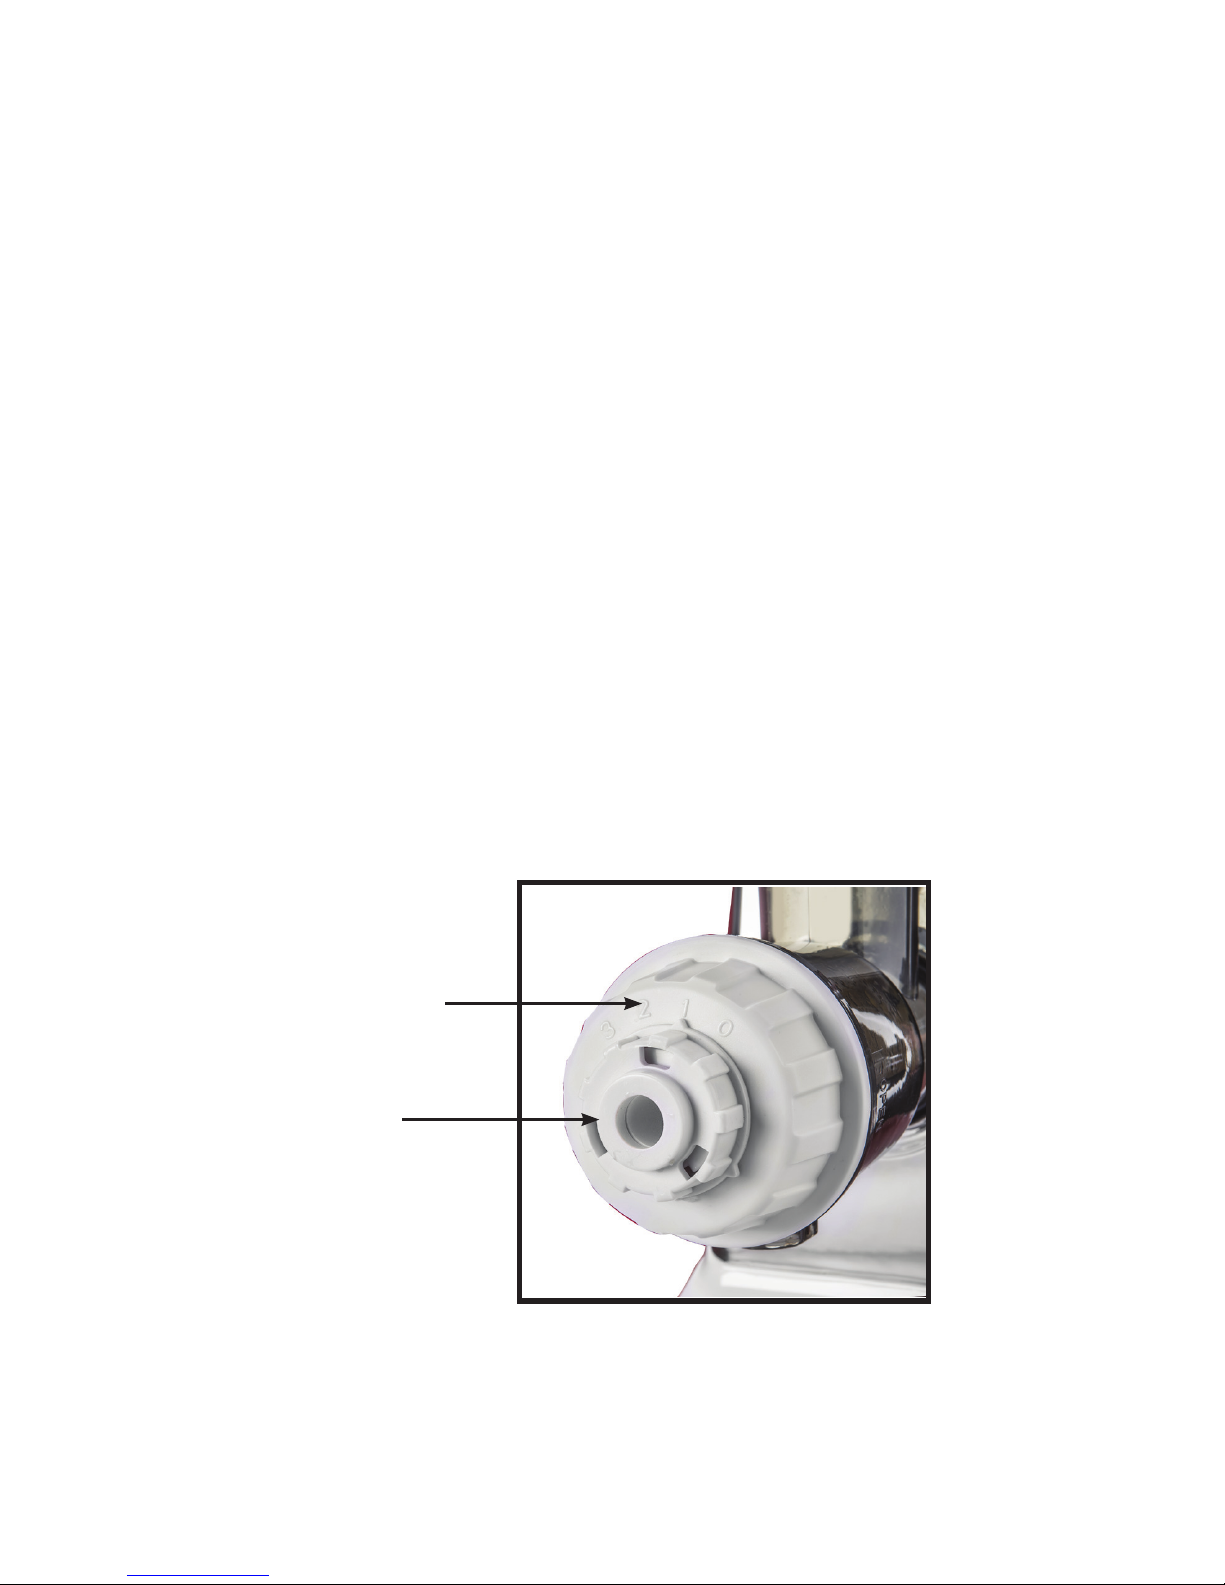
VARIABLE YIELD SETTINGS
The STX Juicer Attachment has 3 yield settings. These settings can be
achieved by rotating the Yield Control Knob to the desired setting.
• Setting #1 would be the moistest pulp setting and produces a little
less juice yield.
• Setting #2 would be an intermediate pulp setting, producing a
medium juice yield.
• Setting #3 is the driest pulp setting and produces the greatest
juice yield.
A wetter pulp setting may be desired when using the pulp for a paste.
The Yield Control Knob initially can be quite stiff. This is because the
Yield Control Cap is exposed to great pressure during use and the
control knob should not vary from a desired setting during use. This
stiffness becomes less noticeable after some usage.
Note: The number “0” is the setting for breaking down the Yield Setting Cap into
its two components for ease of cleaning. This setting should NOT be used
when juicing.
YIELD
CONTROL
CAP
YIELD
SETTING
KNOB

- 7 -
PREPARATION TIPS
The STX Juicer Attachment is designed for rugged usage. Following are
some suggestions to make juicing easier, with less mess and prolong the
life of your appliance.
• Ensure that the STX Meat Grinder is ready for use and located in a
safe environment. (Refer to the STX Meat Grinder Owner’s Manual
for details)
• Ensure that all foods are thoroughly washed prior to juicing.
• Fruits that you would normally peel because of the thicker
protective skin (i.e. oranges, grapefruits, pineapple, bananas,
lemons, etc.) should be peeled. Thinner skin fruit (i.e. apples,
pears, grapes, prunes, and most berries) do not need to be peeled.
• Care must be taken to remove any large pits, seeds, cores, etc,
that could damage the juicer and its components.
• Larger portions of fruits and leafy products should be cut to roughly
match the opening of the housing access chute.
• Two separate containers will be needed: one to capture the pulp
that will be ejected from the front of the juicer through the Yield
Setting Cap and another to collect the juice. The juice is ejected
from the bottom of the Housing so appropriate containers should
be placed under the openings (see picture on page 8) prior to
beginning the juicing process. Residual juice can drip from the
Housing even after the appliance has been stopped as final
straining takes place.
• Drier, leafier vegetables like spinach or kale may take considerable
quantities to produce amble juice.
• Naturally juicy fruit (oranges, grapefruit, berries, etc) may fill
the containers more quickly so it is helpful to have additional
containers available.
• If a wet pulp setting was selected and more juice is available and
desired, the pulp can be run a second time easily by spooning it
into the access chute with or without a change in yield settings.

- 8 -
OPERATING INSTRUCTIONS
1. Ensure all food preparation is complete before starting the juicing
process.
2. Ensure the Juicer Attachment is attached to the STX Meat Grinder.
(See Connect The STX Juicer Attachment to the STX Meat Grinder
section.)
3. Prior to juicing, ensure that the proper yield setting has been set on
the Yield Control Knob (See the YIELD SETTING Section of this
manual.)
4. Place the a container at the end of the Juicer Attachment (to catch
the pulp) and one directly under (to catch the juice) - See picture
below.
PULP
JUICE
5. Turn the STX Meat Grinder on the slowest speed. The STX Meat
Grinder produces tremendous torque so most, if not all, juicing can
be done on the slow speed setting.
6. Push the food to be juiced through the top hole of the Housing. Use
the Food Pusher provided with the STX Juicer Attachment to get the
food all the way down to the Auger.
Note: Never use cooking utensils or other objects to push food
toward the Auger. The Food Pusher is designed with the proper
working length so as not to damage the Food Pusher or Auger while
feeding foods to the Auger.

- 9 -
7. Continue pushing food down the Housing until you are finished
juicing.
Note: Make sure to watch the two containers (juice and pulp) to
ensure they do not overflow. If they are getting full, stop juicing and
switch them out. Then you can resume juicing.
8. Once the juicing process is completed, ensure that the STX Meat
Grinder is turned off and unplugged prior to removing the STX
Juicer Attachment from the STX Meat Grinder.
9. It is recommended to clean the Juicer Attachment and all of
its pieces inbetween juicing different food to ensure optimal
performance of the Juicer Attachment and to ensure optimal,
untainted flavor for your juice. (Refer to the Cleaning & Maintenance
Section of this manual.)

- 10 -
SEPARATING THE YIELD CONTROL KNOB
FROM THE YIELD SETTING CAP
Rotate the Yield Setting Cap in the opposite direction of the CLOSE
arrow. When the number “1” aligns with the OPEN arrow, the Yield
Setting Cap can be easily pulled away from the Housing.
Set the Yield Control Knob to “0” and pull the two components apart (or
push the Yield Control Knob with your finger from the inside of the cap
which will also separate the two components). These components have
a tight fit, so some effort may be needed initially to separate these two
components.
Now both can easily be cleaned.
To replace the Yield Control Knob simply align one of the three pointed
tabs on the rim of the Yield Control Knob with the “0” on the Yield Setting
Cap and push them back together. You can preset the Yield Control Knob
to either, 1, 2, or 3 for further juicing. Do not leave it set at “0” when
juicing.
CLEANING AND MAINTENANCE
Ensure that the STX Meat Grinder is turned off and unplugged.
Separate the STX Juicer Attachment from the STX Meat Grinder by
loosening the Grinding Head Knob.
Disassemble the STX Juicer Attachment in a sink. Remove the Yield
Setting Cap from the Housing. To accomplish this, rotate the Yield
Setting Cap in the opposite direction of the embossed “CLOSE” Arrow
on the Housing until the number “1” on the Yield Control Knob aligns
with the “OPEN” arrow. Once the Yield Setting Cap is removed, the
Auger and Strainer can be freed from the Housing. The Yield Setting Cap
can be further broken down into its components for maximum cleaning.
(See SEPARATING THE YIELD CONTROL KNOB FROM THE YIELD
SETTING CAP portion of this manual)
All components can easily be washed in a mild dishwashing detergent
and water and hand dried. Ensure that all components are clean and dry
prior to storing this appliance.


QUESTIONS, PROBLEMS
OR COMPLIMENTS?
Thank You for purchasing this
STX International Product!
We are grateful for your business!
All of our STX International Products are inspected then
sealed with our NEW Product Seal prior to shipment.
Our goal is to ensure Quality, Completeness, and
Satisfaction for your order.
For Any Questions, Problems, or
Compliments please call or email us.
If you would like to shop for other STX International Products
Please visit our website
www.STXInternational.com
Toll Free: 844-861-4762
Our Business Hours are:
Monday - Thursday: 8am - 4pm CST
Friday: 8am - Noon CST
Table of contents


