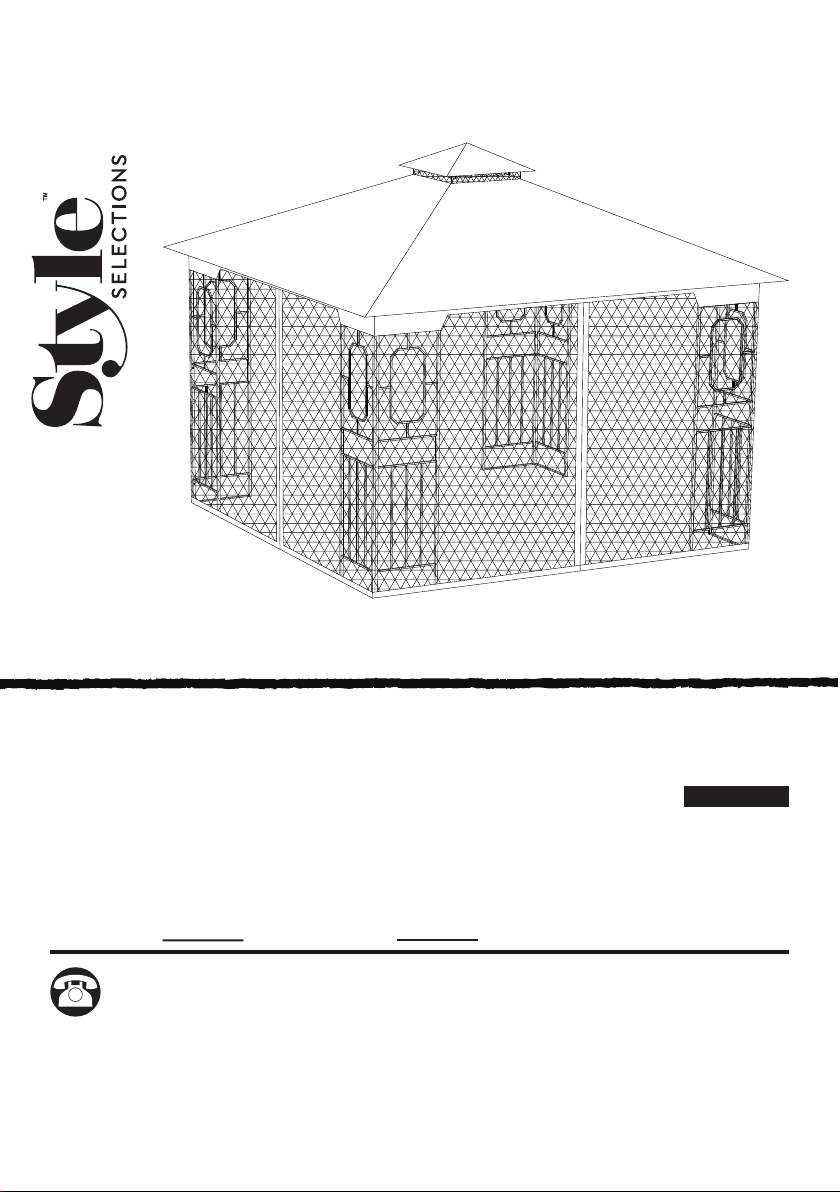
Style selections A101009400 User manual

ITEM #0884021/38115277
Serial Number Purchase Date
Questions, problems, missing parts? Before returning to your retailer, call our customer
service department at 1-877-888-8225, 8 a.m. - 8 p.m., EST, Monday - Sunday.
SM20446
ATTACH YOUR RECEIPT HERE
MODEL #
A101009400
Français p. 17
1
GAZEBO
STYLE SELECTIONS and logo design are
trademarks or registered trademarks of LF,
LLC. All rights reserved.
STYLE SELECTIONS et le logo sont des
marques de commerce ou des marques de
commerce déposées de LF, LLC. Tous droits
réservés.

2
PACKAGE CONTENTS
PART
A1
A2
B1
B2
C1
C2
4
4
8
4
4
4
4
DESCRIPTION QUANTITY
D1
D2
4
4
G
E
1
PART
1
Big Canopy
Mosquito Netting
DESCRIPTION QUANTITY
J
K1
1
F
H
Small Roof Sloped Beam
Small Roof Connector
1
ISmall Canopy 1
D2
Hook
Screen 1
Screen 2
Beam1
Beam2
Extension Big Roof Sloped Beam
Big Roof Sloped Beam
Extension Big Roof Middle Beam
Big Roof Middle Beam
D1
A1
A2
B2 B1
C1
C2
G
F
H
E
I
JK
Big Roof Connector

3
HARDWARE CONTENTS
M6
Flat Washer
M6 Nut
M6 x 30 mm
Bolt
Qty. 12 + 1 spare
M6
Allen Key
Qty. 2
Qty. 20 + 1 spare
AA CC DDBB
EE GG Z1
FF
M6 Spring Washer
Ring ¢6 x 230 mm
Stake
Qty. 4 + 1 spare Qty. 48 + 3 spare Qty. 16
Qty. 12 + 1 spare
M6 x 35 mm
Bolt
Qty. 4 + 1 spare
Z2
M6
Wrench
Qty. 2

SAFETY INFORMATION
Please read and understand this entire manual before attempting to assemble or
install the product.
•Keep all children and pets away from assembly area. Children and pets should
be supervised while gazebo is being assembled.
•The assembled gazebo should be located at least 6 feet from any obstruction
such as fence, garage, house, overhanging branches, laundry lines or electrical
wires.
•Some parts may contain sharp edges. Wear protective gloves if necessary,
during assembly.
•This unit is heavy. For safety, do not assemble this item alone. Three to four
people are recommended for safe assembly.
•Keep all flame and heat sources away from the tent fabric. This tent is made
with fabric that meets CPAI-84 specifications for flame resistance. It is not fire
proof. The fabric will burn if left in continuous contact with any flame source. The
application of any foreign substance to the tent fabric may render the flame-
resistant properties ineffective.
•Check all nuts and bolts periodically for tightness and, when required, tighten
them again.
•While this gazebo is manufactured to withstand winds through only the supplied
ground stakes, in areas subject to frequent severe weather, securing the
gazebo to a deck, concrete patio or footings should be considered.
•Do not use ladder leaning against the gazebo or climbing onto the roof.
•Do not use or enter the gazebo if there exists any of the following or of similar
conditions:
1. Visible movement of support members, roofing panels or sagging roofline.
2. Creaks or audible noise from the gazebo.
3. Cracks, fractures or malformation of support members or roof panels.
4. Damaged or missing fasteners.
WARNING
4

•Install the gazebo on level ground. Stakes are provided to secure the gazebo to
the ground. Do not assemble the gazebo on sandy, muddy or loose soil, as stakes
do not have enough anchorage in these types of soil. If you wish to secure the
gazebo to a wood deck or concrete surface, use anchors suited to these surfaces.
Snow must be cleared off regularly during snowy days. Remove all excess snow
from the roof. In order to avoid damage, use a plastic snow rake to remove
excessive snow and ice buildup from roof and keep away from falling debris. Any
assembly or maintenance of the product must be carried out by adults only.
Please check your state and local regulations prior to purchasing. Some
jurisdictions may require permits for installation and use. Some special procedures
may be valid in your area.
•For outdoor use only. Chandelier hook maximum weight: 26 lbs.
•If any scratch paint, please touch up to prevent rusting
PREPARATION
Before beginning assembly of product, make sure all parts are present. Compare
parts with package contents list and hardware contents list. If any part is missing
or damaged, do not attempt to assemble the product.
Estimated Assembly Time: 60-90 minutes
Tools Required for Assembly: Wrench (included) & Allen Key.
Tools Required for Assembly (not included): hammer, and 2 ladders (no less
than 8.2-feet tall).
5
CAUTION

1
6
ASSEMBLY INSTRUCTIONS
1. Attach the screen 1 (A1) to the screen
2 (A2) with bolts (AA), flat washer
(BB) and spring washer (DD).Tighten
with allen key (Z1). Cover with plastic
cap (HH).
Hardware Used
x 12
x 12
x 1
x 12
AA M6 x 30 mm Bolt
BB M6 Flat Washer
DD M6 Spring Washer
Z1 M6 Allen Key
A1
A2
B2B1B2
A2
A1
AA DD BB

7
ASSEMBLY INSTRUCTIONS
2. Insert the beam 2 (B2) to the beam 1 (B1)
3. Insert the assembled beam (B1/B2) to the
screen 1 (A1) and screen 2 (A2). 33
2
B1 B2
A1 A2
B2
J
C2
A1
A2
C1
D2
D1
E
F
G

8
ASSEMBLY INSTRUCTIONS
4.
C1
C2
5.G
C1
D1
G
E
F
Insert the big roof cant beam (C1) to
the extension big roof cant beam
(C2).
4
Insert the big roof cant beam (C1) to
the big roof connector (G). 5

9
ASSEMBLY INSTRUCTIONS
7.Insert the big roof middle beam (D1) to
the extension big roof middle beam (D2).
8.Insert the big roof middle beam (D1) to
the big roof connector (G). 8
6.Insert the extension big roof cant
beam (C2) to the screen 1 (A1)
and screen 2 (A2).
7
D1
D2
G
D1
6
A2
A1
C2

11.Insert the small roof cant beam (E) to
the small roof connector (F).
10
ASSEMBLY INSTRUCTIONS
11
9.Attach the hook (H) to the big roof
connector (G).
(CC), flat washer (BB) and nut (EE).
Hardware Used
x 4
x 8
Z M6 Wrench x 1
x 4
10
9
x 1
CC
BB
EE
Z2
M6 x35 mm Bolt
M6 Flat Washer
M6 Nut
G
H
D2
B1
CC BB
BB EE
F
E
Z1 ZM6 Allen Key
(D1/D2) to the beam 1 (B1) with bolts
10.Connect the assembled middle beam

11
ASSEMBLY INSTRUCTIONS
13.Place the big canopy (J) onto the
assembled big roof, then attach the
assembled small roof to the big roof
with inserting the small roof
cant beam (E) to the big roof cant
beam (C1).
12.
13
12
I
J
E
C1
Place the small canopy (I) onto the
assembled small roof and secure it to
the cant beam.

12
ASSEMBLY INSTRUCTIONS
14.Secure the big canopy (J) to the cant
beam.
14
J
K
J
J

13
ASSEMBLY INSTRUCTIONS
16.Secure the gazebo to the ground with
15.Fix the mosquito netting (K) with the
mosquito netting ring (FF) to the beam.
stakes (GG).
Hardware Used
15
16
Hardware Used
x 48
FF Ring
GG x 16
¢6 x 230 mm
Stake
K
GG

14
Steel components for this gazebo are treated with rust inhibiting paint that
protects it from rusting. However, due to the nature of steel, surface oxidation
(rusting) will occur if these protective coatings are scratched. This is not a defect
and thus not covered by the warranty. To minimize this condition, it is
recommended to use care when assembling and handling the product to prevent
scratching the paint. Should any scratching or damage occur, it is recommended
to cover the scratch immediately with rust inhibiting paint (not included). Surface
rust can also be easily removed with a very light application of regular cooking oil
or WD-40. If surface oxidation (rusting) occurs and if no measure is taken to
prevent this, the oxidation may start dripping onto deck or patio and caused
damaging stains, which may be difficult to remove. This can be prevented if the
above-mentioned measures are taken to keep the product from oxidizing.
1. Do not use bleach, acid, or other abrasive cleaners on the roof or frame parts.
2. Keep instruction manual for future reference.
3. Keep the original packaging to store the gazebo.
ONE-YEAR LIMITED WARRANTY
CARE AND MAINTENANCE
This limited warranty is extended to the original purchaser and applies to defects
in material and workmanship of your item provided the item is maintained with
care and used only for personal, residential purposes. Please note that this
warranty does not exceed 1 year. Parts, Canopies, Drapes, and Netting may be
available for purchase after 1 year but is available to a limited time frame for each
product. Your current exact color may not be available. This warranty does not
cover inclement weather due to high winds, excessive snow or rain, and other
extreme weather issues.
The manufacturer warranty for this item, is to be free of defects in material and
workmanship for a period of one year. If any defect is found, please call our
customer service department at 1-877-888-8225 for help. The manufacturer will
not cover transportation or delivery costs or compensate the individual or any
third party for assembling or disassembling the product. This warranty gives you
certain rights, and you may have other rights that vary from state to state.
Frames. Steel frame construction is warranted against defects in material and
workmanship for one year from purchase date. Damage to frames or welds
resulting from improper assembly or exposure to water and/or sub-freezing
temperatures is not covered.
Finishes. Paint finishes are warranted against peeling, cracking and blistering for
one year from purchase date provided the item has not been scratched or
abraded. Chips and scratches or fading resulting from normal wear and tear and
Lexposure to the elements are not covered.

15
For replacement parts, call our customer service department at
1-877-888-8225, 8 a.m. - 8 p.m., EST, Monday - Sunday.
REPLACEMENT PARTS LIST
D2
A1 A2
B1 B2 C2
C1 D1
GEFH
IJK
Fabrics. Canopies, Drapes, and Netting (if applicable) are warranted
against separation at the seams for one year from purchase date. Fading
and/or discoloration resulting from exposure to the elements, oils, spills,
fluids, chemicals, water damage or any other cause are not covered.

16
For replacement parts, call our customer service department at
1-877-888-8225, 8 a.m. - 8 p.m., EST, Monday - Sunday.
REPLACEMENT PARTS LIST
AA
BB CC DD
Z2FF GG
EE
Printed in China
Production number:
2021200002
PART
A1
A2
B1
B2
C2
C1
P006300058
P000400647
P000400648
P000600935
P000600934
P000600937
P000600936
Screen 1
Screen 2
Beam1
Beam2
DESCRIPTION PART#
D2
D1
P006300059
P000500759
P000600933
H090030002
H090010017
PART
P001100387
H010030034
H050030001
H070010005
Ring
M6 Wrench
DESCRIPTION
P001200142
P000500758
P005800001
P001100388
¢6 x 230 mm Stake
M6 Allen Key
PART#
H010030023
H050020017
H040010004
P005100264
AA
BB
CC
DD
EE
FF
GG
Small Roof Connector
Big Roof Connector
Hook
Small Canopy
Big Canopy
Mosquito Netting
M6 x 30 mm Bolt
M6 Flat Washer
M6 Nut
M6 x 35 mm Bolt
Z1
G
E
F
H
I
J
K
Z1
Z2
M6 Spring Washer
Small Roof Sloped Beam
Extension Big Roof Sloped Beam
Big Roof Sloped Beam
Extension Big Roof Middle Beam
Big Roof Middle Beam

ARTICLE #0884021/38115277
Date d’achat
Des questions, des problèmes, des pièces manquantes? Avant de retourner l’article au
détaillant, appelez notre service à la clientèle au 1 877 888-8225, entre 8 h et 20 h (HNE),
du lundi au dimanche.
JOIGNEZ VOTRE REÇU ICI
Numéro de série
MODÈLE #A101009400
17
PAVILLON DE JARDIN

18
A1
A2
B1
B2
C1
C2
4
4
8
4
4
4
4
DESCRIPTION QUANTITÉ
D1
D2
4
4
G
E
1
PIÈCE
1
Grand auvent
Moustiquaire
DESCRIPTION QUANTITÉ
J
K1
1
F
H
Traverse inclinée du petit toit
Raccord du petit toit
1
IPetit auvent 1
CONTENU DE L’EMBALLAGE
PIÈCE
D2
Crochet
Paravent 1
Paravent 2
Traverse 1
Traverse 2
Rallonge de traverse inclinée du grand toit
Traverse inclinée du grand toit
Rallonge de traverse centrale du grand toit
Traverse centrale du grand toit
D1
A1
A2
B2 B1
C1
C2
G
F
H
E
I
JK
Raccord du grand toit

19
QUINCAILLERIE INCLUSE
Rondelle plate M6
Écrou M6
Boulon M6 de 30 mm
Qté: 12 + 1
de rechange
Clé hexagonale M6
Qté: 2
Qté: 20 + 1
de rechange
AA CC DDBB
EE GG Z1
FF
Rondelle à ressort
M6
Anneau
Qté: 4 + 1
de rechange
Qté: 48 + 3
de rechange
Piquet de 6 mm
dia. x 230 mm
Qté: 16
Qté: 12 + 1
de rechange
Boulon M6 de
35 mm
Qté: 4 + 1
de rechange
Z2
Clé M6
Qté: 2

CONSIGNES DE SÉCURITÉ
Assurez-vous de lire et de comprendre l’intégralité de ce manuel avant de tenter
d’assembler, d’utiliser ou d’installer le produit.
•
•
Assurez-vous que les enfants et les animaux ne s’approchent pas de l’endroit
où vous assemblez l’article. Surveillez les enfants et les animaux pendant
l’assemblage du pavillon de jardin.
Le pavillon de jardin assemblé doit se situer à au moins 1,82 m de toute forme
d’obstacle, par exemple une clôture, un garage, une maison, des branches
saillantes, une corde à linge ou des fils électriques.
•Certaines pièces peuvent avoir des bords coupants. Au besoin, portez des gants
protecteurs pendant l’assemblage.
•Cet article est lourd. Pour des raisons de sécurité, n’assemblez pas cet article
seul. Pour plus de sécurité, il est recommandé d’assembler cet article en groupe
de trois à quatre personnes.
•Gardez les flammes et autres sources de chaleur à distance de la toile. Cette
toile est faite d’un tissu qui satisfait aux normes CPAI-84 pour une résistance
aux flammes. Elle n’est pas ignifugée. Cette toile brûlera si elle est laissée en
contact continu avec une flamme. L’application de toute substance étrangère sur
la toile pourrait nuire à l’efficacité de ses propriétés de résistance aux flammes.
•Vérifiez tous les boulons et les écrous périodiquement afin de vous assurer
qu’ils sont serrés. Au besoin, resserrez-les.
•Bien que ce pavillon de jardin soit fabriqué pour résister aux vents à l’aide des
piquets de sol seulement, vous devriez envisager de le fixer à une terrasse, à
une terrasse en béton ou à des semelles de fondation s’il est installé dans un
endroit fréquemment touché par du temps violent.
•N’utilisez pas une échelle qui s’appuie sur le pavillon de jardin et ne grimpez pas
sur le toit.
•N’utilisez pas le pavillon de jardin et n’y entrez pas en présence de l’une des
conditions suivantes ou d’une condition semblable :
1. Mouvement visible des éléments porteurs ou des pans de toiture, ou toit qui
s’affaisse.
2. Craquements ou bruit audible provenant du pavillon de jardin.
3. Fissures, bris ou défauts des éléments porteurs ou des panneaux de toit.
4. Fixations manquantes ou endommagées.
AVERTISSEMENT
20
This manual suits for next models
2
Table of contents
Languages:
Other Style selections Outdoor Furnishing manuals
Popular Outdoor Furnishing manuals by other brands

ISLAND RETREAT
ISLAND RETREAT EZ-CARE TEK-WOOD NU6796 Assembly instructions

Swing-N-Slide
Swing-N-Slide PB 8140 Assembly instructions

CASTLECREEK
CASTLECREEK 714648 instruction manual

Hanover
Hanover Monaco MONDN7PCSW-2-BLU manual

Whittier Wood Furniture
Whittier Wood Furniture John Greenleaf Rustic Lodge 373KFDC Assembly instructions

deVRIES
deVRIES TRENDY Blackpool 69266 Assembly instructions